
ScoutTrainer 100 - Remote control MOTOROLA - Free user manual and instructions
Find the device manual for free ScoutTrainer 100 MOTOROLA in PDF.


| Product Type | Remote Training System (Dog Collar and Remote Control) |
| Brand | Motorola |
| Model | ScoutTrainer 100 |
| Number of Pet Collars Supported | Up to 4 |
| Static Correction Levels | 15 (Level 0 to 15, Level 0 disables static correction) |
| Training Modes | Tone, Vibration, Static Correction, Push-to-Talk (voice) |
| Remote Control Power | 2 x 1.5V AAA alkaline batteries |
| Pet Collar Unit Power | 3.7V 277mAh Li-ion battery pack (rechargeable via included adapter) |
| Charging Time | Approximately 12 hours |
| Operating Range | Up to 460 feet (140 m) line-of-sight; indoors up to 100 feet (30 m) |
| RF Frequency | 902 MHz - 928 MHz (Direct Sequence Spread Spectrum) |
| Water Resistance | IP54 (Pet Collar Unit) |
| Operating Temperature | 5°C to 45°C (41°F to 113°F) |
| Included Accessories | 1 Pet Collar Unit, 1 Remote Control, 1 Power Adapter, 1 Collar Strap, 1 Test Light, 2 Pairs of Collar Contacts (long and short), plus medium contacts pre-installed |
| Collar Contacts Lengths | Short, Medium (pre-installed), Long; choose based on coat density |
| Maximum Continuous Correction | 60 seconds, then 30-second rest period required |
| Safety Features | Auto shut-off after 30 minutes of inactivity (Remote); low battery indicator; rest period after prolonged correction |
| Cleaning | Clean collar contacts weekly with alcohol; check neck area for irritation |
| Warranty | 1 year for product, 90 days for accessories |
| Compliance | FCC Part 15, ICES-003, Industry Canada RSS |
Frequently Asked Questions - ScoutTrainer 100 MOTOROLA
User questions about ScoutTrainer 100 MOTOROLA
0 question about this device. Answer the ones you know or ask your own.
Ask a new question about this device
Download the instructions for your Remote control in PDF format for free! Find your manual ScoutTrainer 100 - MOTOROLA and take your electronic device back in hand. On this page are published all the documents necessary for the use of your device. ScoutTrainer 100 by MOTOROLA.
USER MANUAL ScoutTrainer 100 MOTOROLA
motorola


User's Guide
The features described in this User's Guide are subject to modifications without prior notice.
Welcome...
to your new Motorola Deluxe Remote Training System!
Thank you for purchasing the Motorola Deluxe Remote Training System. Your new Training System will provide a quick and effective means of solving common problem behaviors and reinforcing basic obedience commands your pet already knows. You can choose from three different training modes - warning tone only, gentle vibration or 15 levels of static correction from gentle to firm, or give verbal commands through the Pet Collar Unit with the digital Push-To-Talk function.
Please retain your original dated sales receipt for your records.
For warranty service of your Motorola product, you will need to provide a copy of your dated sales receipt to confirm warranty status. Registration is not required for warranty coverage.
For product related questions, please call:
US and Canada 1-888-331-3383
Email: support@motorolamonitors.com
This User's Guide provides you with all the information you need to get the most from the product.
Please read and follow the instructions in this User's Guide along with the Safety Instructions on page 8 before you using this product.
Got everything?
- 1 x Pet Collar Unit
- 1 x Power Adapter (For Pet Collar Unit)
- 1 x Collar Strap
- 1 x Remote Control Unit
• 1 x Test Light for Collar Contacts
• 2 Pairs of Collar Contacts - Long & Short (For Pet Collar Unit)
In multi-collar packs, you will find one or more additional Pet Collar Units with power adapter units.
Overview of the Pet Collar Unit
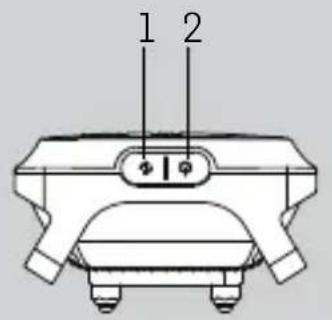


- Pair Key
- Power Key
Press and hold to power ON.
The Indicator LED lights up in green for 5 seconds when powered on.
Press and hold to power OFF.
- Collar Contacts
- Power Adapter Socket
- Indicator LED
Lights up in green for 5 seconds
when powered on and flashes slowly during standby.
Lights up in red when battery is low.
Flashes alternately in green and red when delivering static correction.
- Charging LED
Lights up in blue when charging.
- Speaker
Delivers tone or voice sent from the Remote Control Unit.
Overview of the Remote Control Unit

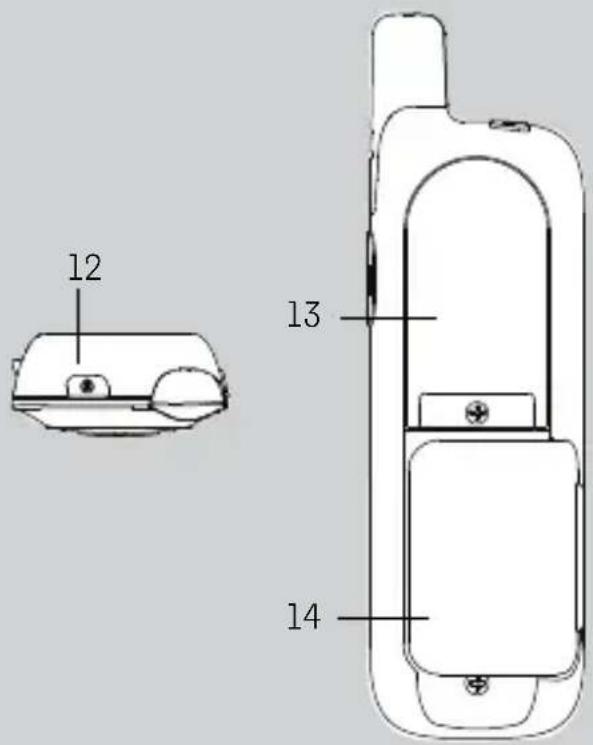
- Display (LCD screen)
- OK Key
Press to select the desired option and lock the setting.
- Menu Key
Press to pair or unpair with the Pet Collar Unit. You can pair it with up to 4 Pet Collar Units.
- Up Key
Correction Mode: Increase level Menu Mode: Move up
- Down Key
Correction Mode: Decrease level Menu Mode: Move down
- Tone Key
Press to send a tone to the Pet Collar Unit.
- Vibration Key
Press to vibrate the Pet Collar Unit. - Static Correction Key
Press and hold to deliver static correction to the Pet Collar Unit. - Microphone
- Antenna
- Push-To-Talk Key
Press and hold to give verbal commands through the Pet Collar Unit. - Power Key
Press and hold to power ON/OFF. - Battery Cover
- Leash Clip
Symbols on the Remote Control Unit

| RF signal strength of the Remote Control against the Pet Collar Unit. | |
| Displays when you enter Menu mode. | |
| Alert indication on Collar 3 (battery low, out of range, etc). | |
| Battery level on Remote Control Unit. | |
| Pet Collar Number. | |
| Select to REMOVE collar. | |
| Select to PAIR collar. | |
| Displays the selected STATIC CORRECTION LEVEL (Level 0 to 15). When 0 is displayed, only tone and vibration alerts are sent to the Pet Collar Unit. | |
| Displays when PUSH-TO-TALK KEY is pressed. | |
| Displays when VIBRATION KEY is pressed. | |
| Displays when TONE KEY is pressed. |
How the Deluxe Remote Training System works
The Training System comes with a Remote Control Unit that is paired with the Pet Collar Unit. At the push of the STATIC CORRECTION KEY (0) on the Remote Control Unit, a signal is sent to the Pet Collar Unit, which delivers static correction to your dog to assist you with shaping and modifying its behavior.
The Remote Control Unit is also designed with a TONE KEY and a VIBRATION KEY. At the push of any one of these keys, a tone or vibration signal is sent to the Pet Collar Unit, which delivers a tone or vibration to your dog. The tone function is good for giving your dog an opportunity to respond to your commands prior to pressing the STATIC CORRECTION KEY. The vibration function can be used in many ways. However, it is best suited as a secondary reinforcement for rewards.
Important guidelines when using the Deluxe Remote Training System
- Included in the Training System are Collar Contacts in three different lengths (short, medium and long) that deliver static correction to your dog. Choose the appropriate length for your dog's hair coat. The Pet Collar Unit was shipped with medium Collar Contacts that are suitable for dogs with medium hair coats. If your dog has dense coats or undercoats, use one of the longer Collar Contacts included with the product.
- Proper fit of the Pet Collar Unit is critical to the performance and effectiveness of the Training System. If the fit is too loose, the collar will not be able to get sufficient contact with the skin to deliver static correction. If the fit is too tight, it will irritate your dog's skin.
- Tighten the collar high on your dog's neck, tight enough that you can get two fingers between the collar strap and your dog. It should not be able to rotate around the neck.
- Do not make your dog wear the Pet Collar Unit for more than 12 hours continuously to avoid skin irritation.
- Do not connect a leash to the Pet Collar Unit as this might pull the Collar Contacts too tight against your dog's neck.
- When connecting a separate collar for the leash, make sure that it does not add pressure on the Pet Collar Unit.
- Check the contact area on your dog's neck for signs of irritation. If there is a rash or sore, discontinue use until the skin is completely healed. See a veterinarian if the condition persists.
Table of contents
1. Safety Instructions....8
2. Getting Started ...... 9
2.1 Remote Control Unit Battery Installation 9
2.2 Attach the Adjustable Strap to the Pet Collar Unit ....10
2.3 Charging the Pet Collar Unit 10
2.4 Fit the Pet Collar Unit on your Dog's Neck 11
2.5 Trim Away Excess Strap Length 12
2.6 Change Collar Contacts ....13
2.7 Using the Test Light 14
3. Using the Pet Collar Unit ....15
3.1 Powering On/Off the Pet Collar Unit 15
3.2 Pairing with the Remote Control Unit ....15
4. Training Your Dog with the Deluxe Remote Training System ...... 16
4.1 Powering On/Off the Remote Control Unit ....16
4.2 Select a Pet Collar Unit (if you have 2 or more Pet Collar Units) ...... 16
4.3 Deliver Static Correction 16
4.4 Determine the TRAINING LEVEL for your dog ....17
4.5 When to Increase Level of Static Correction 17
4.6 Push-To-Talk Function.... 18
4.7 Tone Key 18
4.8 The Vibration Key 18
5. Training Tips 19
- Disposal of the Device (Environment) 21
- Cleaning and Care ....22
- Frequently Asked Questions ....23
- Troubleshooting 25
- General Information ......26
1. Safety Instructions

WARNING:
DO NOT USE ON AGGRESSIVE DOGS - This product is not for use on aggressive dogs. If you are not sure if this product is suitable for your dog, please consult a certified trainer or your veterinarian.
RISK OF SKIN DAMAGE
- Determine a proper fit of the Pet Collar Unit on your dog's neck. If worn for too long or the fit is too tight, it may cause skin damage.
- Check your dog's neck area daily for signs of skin irritation.
- Discontinue use immediately if a rash or sore is found on the neck area.
- AVOID wearing for more than 12 continuous hours a day.
- Clean your dog's neck area and the Collar Contacts on the Pet Collar Unit with a soft damp cloth weekly.
WARNING
The Deluxe Remote Training System is suitable for use on healthy, non-aggressive dogs to correct their behavior when used as described in this User's Guide. Therefore, always read the instructions in this User's Guide carefully before using the product.
• This product is not a toy. Do not allow children to play with it.
• This product is not a substitute for responsible supervision of your dog.
- Test this product and all its functions so that you are familiar with it prior to actual use.
- Only use batteries of the same type. The Remote Control Unit uses 2x 1.5V AAA-sized alkaline batteries.
- Keep this User's Guide for future reference.
CAUTION
There is danger of explosion if the battery is replaced by an incorrect type. Dispose of used batteries according to their instructions.
2. Getting Started
2.1 Remote Control Unit Battery Installation
The Remote Control Unit uses 2x AAA-sized alkaline batteries.

- Use a small cross-head or flat end screwdriver to unscrew the battery compartment cover as shown above.
- Fit the batteries into the compartment in the correct polarity as shown below.

- Close the battery compartment cover and gently tighten the screw in a clockwise direction using a small cross-head or flat end screwdriver.
- Press and hold the POWER KEY ⏻ to power the Remote Control Unit on or off.
2.2 Attach the Adjustable Strap to the Pet Collar Unit
IMPORTANT
Power off the Pet Collar Unit before attaching the strap.
- Set the Pet Collar Unit facing down with the Collar Contacts facing up.
- With the front side of the buckle facing down, thread the strap through the first slot, moving it towards the second slot.
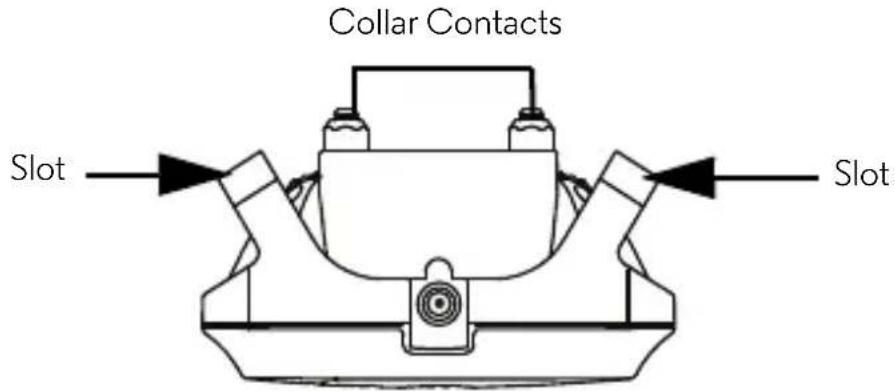
- Continue to thread through the second slot.
2.3 Charging the Pet Collar Unit
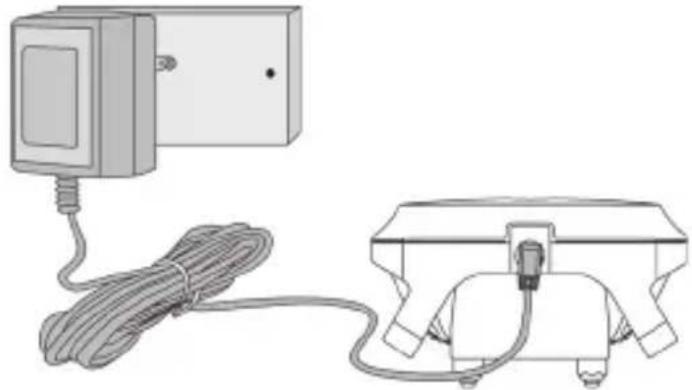
-
Connect the small plug of the power adapter to the Pet Collar Unit and the other end into the electrical outlet.
-
The Charging LED will light up in blue to indicate charging.
NOTE
Only use the enclosed power adapter (6V DC / 450mA).
The battery pack will take approximately 12 hours to charge. The Power LED will light up in red when battery is low. To conserve battery life, press and hold the POWER KEY ⏻ to power off the Pet Collar Unit when it is not in use.
2.4 Fit the Pet Collar Unit on your Dog's Neck
IMPORTANT
For effective and reliable operation of the Training System, the Pet Collar Unit must be properly placed and fitted on your dog's neck with suitable Collar Contacts that are long enough to touch the dog's skin on the underside of its neck (not its hair).
- Make sure that the Pet Collar Unit is powered off (see "Powering On/Off the Pet Collar Unit" on page 15).
- Have your dog stand in a balanced position on a flat, even surface.
- Put the strap over your dog's neck, centering the Pet Collar Unit underneath its neck and making sure that the Motorola logo is upright facing you.
- String the end of the strap through the strap buckle.
- Pull the end of the strap until the desired level of tightness is reached and push the retainer bar through the nearest strap hole.
- Check to ensure that the Pet Collar Unit is in the center underneath the neck of your dog.
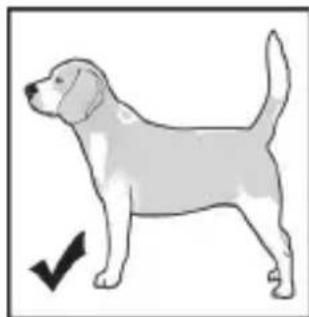


- Check the fit again after your dog has worn the collar for several minutes or as your dog gets more comfortable with it.
NOTE
The Pet Collar Unit should fit snugly on your dog's neck so that you can only fit two fingers underneath it. It should not be able to rotate around the neck.
If necessary, trim some of your dog's hair where the collar makes contact with the skin to allow for consistent performance.
2.5 Trim Away Excess Strap Length
After you are satisfied with the fit of the Pet Collar Unit, you may want to trim away some of the excess nylon strap.
- Mark the desired strap length with a pen. However, you may want to allow for growth especially when your dog is young or may grow a thicker winter coat.
- Remove the Pet Collar Unit from your dog and trim away excess strap length.
- To seal the end of the strap, hold it about 1/4 inch away from a candle flame or lighter until the edge melts away.
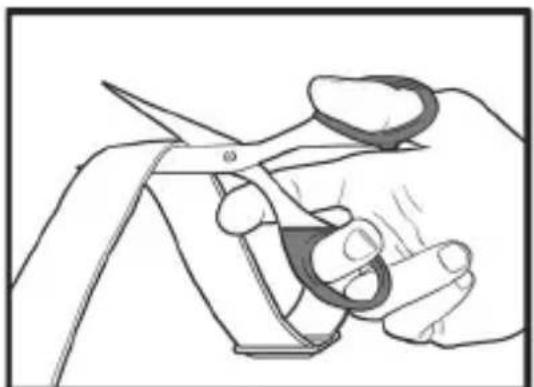

PLEASE USE CAUTION.
2.6 Change Collar Contacts
IMPORTANT
• Power off the Pet Collar Unit before changing collar contacts.
• Make sure that the collar contacts are securely fastened. Do not over tighten.
Included with the Training System are Collar Contacts in three different lengths (short, medium and long) that deliver static correction to your dog.
Choose the appropriate length for your dog's hair coat. If your dog has dense coats or undercoats, use one of the longer Collar Contacts included with your Training System.
- Using your fingers or with the help of the test light (supplied with your Training System), twist the Collar Contacts counter-clockwise to loosen and remove them.
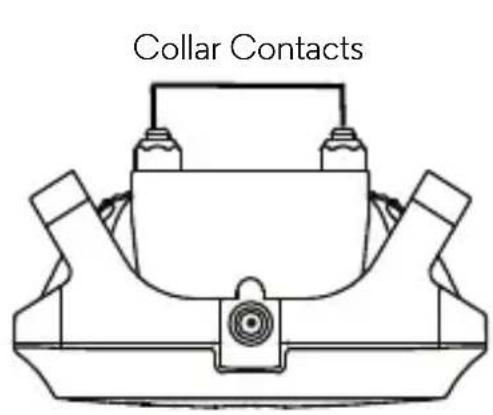
Fit the test light over the Collar Contact and twist counterclockwise to loosen it.
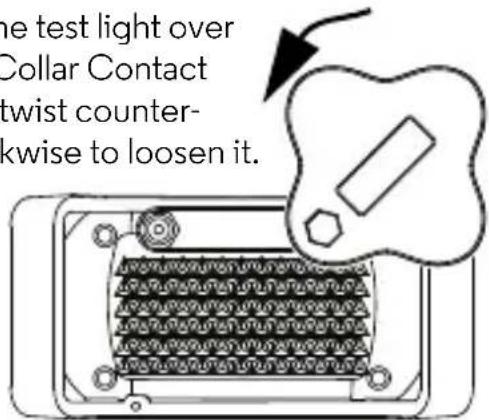
- Insert another pair of Collar Contacts of the appropriate length and gently twist clockwise with your fingers to tighten them.
- To ensure that the Collar Contacts are securely fastened, fit the test light over the Collar Contacts and twist clock-wise to tighten them securely as shown below.

Twist clockwise to tighten the Collar Contacts securely.
2.7 Using the Test Light
You can use the Test Light that is supplied with your Deluxe Remote Training System to test if the Remote Control Unit is sending static correction to the Pet Collar Unit.
-
Press and hold the POWER KEY ⏻ on the Pet Collar Unit to power it on. The Power LED will light up in green for 5 seconds.
-
Fit the Test Light Contacts over the Collar Contacts on the Pet Collar Unit.


- Press and hold the STATIC CORRECTION KEY ((o)) on the Remote Control Unit.
The Test Light will flash. The higher the level of static correction, the brighter the Test Light flashes.
NOTE
If the Test Light does not flash, charge the Pet Collar Unit and re-test.
If the Test Light still does not flash, contact Customer Service at 1-888-331-3383.
3. Using the Pet Collar Unit
3.1 Powering On/Off the Pet Collar Unit
To power on, press and hold the POWER KEY ⏻ on the Pet Collar Unit. The Power LED will light up in green for 5 seconds.
To power off, press and hold the POWER KEY ⏻ on the Pet Collar Unit until the green Power LED light goes off.
3.2 Pairing with the Remote Control Unit
Your Deluxe Remote Training System can pair with up to 4 Pet Collar Units. The Remote Control Unit and Pet Collar Unit provided are already paired. They will communicate with each other once they are powered on. You do not need to pair them again unless the Pet Collar Unit loses its link with the Remote Control Unit. To pair them again, or pair a new Pet Collar Unit, follow the procedures below:
- Power on both the Remote Control Unit and Pet Collar Unit (see “Powering On/Off the Remote Control Unit” on page 16 and “Powering On/Off the Pet Collar Unit” on page 15).
- Press the MENU KEY Monu on the Remote Control Unit. The screen displays a blinking symbol.
- Press the OK KEY OK on the Remote Control unit. The screen displays a blinking symbol.
- Press and hold the PAIR KEY 🎨 on the Pet Collar Unit to start pairing. The Power LED blinks in Green on the Pet Collar unit.
- If you only have one Pet Collar Unit, press OK KEY OK on the Remote Control Unit once to confirm. If you have more than one Pet Collar Unit, press ON to select a collar number (1, 2, 3 or 4) and press the OK KEY OK to confirm.
NOTE
To test if the units are linked, press and hold the TONE KEY 📋 on your Remote Control Unit. The Pet Collar Unit should emit a beep tone.
4. Training Your Dog with the Deluxe Remote Training System
Whether you're hoping to provide your dog more freedom at the park or trying to solve frustrating behavior problems, your new Training System provides a quick and easy training solution. To get the most from your Training System, carefully follow these instructions.
Your Training System provides 15 levels of static correction from none (LEVEL 0) to very strong (LEVEL 15). Every dog is different. You can't determine the right correction level for your dog by their size or breed. Dog temperaments, sensitivity and personalities are all different, so you will need to conduct a little experiment to see which level is right for your dog.
NOTE
LEVEL 0 does not deliver any static correction, only vibration and beep tone.
To conserve battery life, the Remote Control Unit will automatically shut down after 30 minutes of inactivity. Press and hold the POWER KEY ⏻ on the top of your Remote Control Unit to power it back on.
4.1 Powering On/Off the Remote Control Unit
To power on or off, press and hold the POWER KEY ⏻ on the Remote Control Unit.
4.2 Select a Pet Collar Unit (if you have 2 or more Pet Collar Units)
Press the OK KEY OK on the Remote Control Unit until the Pet Collar Unit (1 to 4) to which you wish to send remote commands is displayed. indicates that collar number 3 is selected.
4.3 Deliver Static Correction
- Press and hold the STATIC CORRECTION KEY ((o)) on the Remote Control Unit.
- Press to increase the level of correction or press to decrease. The number beside the ((0)) symbol on the screen indicates the current
level of correction.
8((o)) indicates that the current level of correction is 8.
- The Indicator LED on the Pet Collar Unit flashes alternately in green and red when delivering static correction.
NOTE
The maximum duration you can press the STATIC CORRECTION KEY (o) to deliver static correction to your dog continuously is 60 seconds. This is followed by a 30 seconds “rest” period. You can press the STATIC CORRECTION KEY again after the “rest” period.
4.4 Determine the TRAINING LEVEL for your dog
TRAINING LEVEL is the level you use to discourage your dog's behavior, such as getting on the couch, towards a more acceptable behavior, such as lying on the ground.
With the Pet Collar Unit properly fitted on your dog and powered on, start on level 1. This level is extremely low and most dogs will feel very little, if anything at all. The number beside on your Remote Control Unit indicates the current Static Correction Level.
- Press and hold the STATIC CORRECTION KEY ((o)) on the Remote Control Unit.
- Look for signs that your dog is feeling the static correction, such as ears twitching, looking up or down or a quick shake of the head.
- If nothing happens, press ▲ to go to level 2 and try again.
- When you see that your dog is feeling the static correction, this is your dog's TRAINING LEVEL.
4.5 When to Increase Level of Static Correction
When you are trying to change your dog's behavior around a heavy distraction where your dog is too excited to feel the TRAINING LEVEL described above, such as jumping on a visitor at the door, you will need to increase the correction level 2 or 3 levels higher than the TRAINING LEVEL. If the TRAINING LEVEL you established was level 3, then you will need to increase it to level 5 to have your
dog respond when it is really distracted or excited. If the TRAINING LEVEL you established was level 5, then you will need to increase it to level 7, so on and so forth.
4.6 Push-To-Talk Function
On the side of your Remote Control Unit is a Push-To-Talk key. You can press and hold down on the right-hand side of the Remote Control Unit to convey commands, praises or verbal reprimands to your dog through the Pet Collar Unit.
4.7 Tone Key
The TONE KEY 📋 on your Remote Control Unit delivers a beep tone to the Pet Collar Unit. You can press this key for a few seconds to give your dog an opportunity to respond to known commands before pressing the STATIC CORRECTION KEY (oo).
4.8 The Vibration Key
The VIBRATION KEY ≈ on your Remote Control Unit delivers vibration to the Pet Collar Unit. Although the vibration function can be used in many ways, it is best suited as a secondary reinforcement for rewards. Vibration of your dog's collar is meaningless to your dog on its own, but when used in conjunction with rewards such as treats, meals, walks, praise and play, you will soon find that your dog responds very happily to the collar's vibration. You can even use the vibration alone as a 'reward' when it is not possible or convenient to offer your dog an immediate food or praise reward.
5. Training Tips
Use only the static correction level necessary to get the desired response.
- In most circumstances, your dog should never yelp in discomfort or pain.
- Reserve the highest settings for critical, dangerous or life threatening behaviors such as running towards a traffic.
After stopping an inappropriate behavior, immediately direct your dog to an appropriate behavior followed by a reward.
- After you have pressed the STATIC CORRECTION KEY ((o)) to stop an inappropriate behavior, such as jumping on a visitor, immediately direct your dog to a more appropriate behavior such as “Get your ball!”
- Or, if you have taught your dog basic commands, you can command your dog to sit and then provide a treat or verbal praise.
- The rationale behind this is to direct your dog to an acceptable behavior and provide a reward for your dog after being corrected for an inappropriate behavior.
Teaching your dog the "Come" command.
- Put a separate collar on your dog's neck above the Pet Collar Unit, without adding pressure to the Collar Contacts on the Pet Collar Unit.
- Attach a long leash to the separate collar.
- Press and hold the POWER KEY ⏻ to power on the Pet Collar Unit.
-
When your dog is distracted and looking away from you, press and hold the STATIC CORRECTION KEY ((o)) on your Remote Control Unit (at your dog's TRAINING LEVEL). The number beside (on) your Remote Control Unit indicates the current Static Correction Level. See “Determine the TRAINING LEVEL for your dog” on page 17.
-
Jog backwards.
-
As soon as your dog turns to follow you, release the STATIC CORRECTION KEY (a) and bring the dog to you.
-
Provide a treat reward and praise. Repeat these steps until your dog is returning to you unprompted with the leash pull.
-
Now, your dog will know how to respond to the collar's static correction.
Teaching your dog the "Sit" command.
-
Put a separate collar on your dog's neck above the Pet Collar Unit, without adding pressure to the Collar Contacts on the Pet Collar Unit.
-
Attach a long leash to the separate collar.
-
Press and hold the POWER KEY ⏻ to power on the Pet Collar Unit.
-
When your dog is facing you, press and hold the STATIC CORRECTION KEY (on your Remote Control Unit (at your dog's TRAINING LEVEL). The number beside on your Remote Control Unit indicates the current Static Correction Level. See "Determine the TRAINING LEVEL for your dog" on page 17.
-
Use your free hand to guide your dog to a sitting position and give the "Sit" command.
-
As soon as your dog is in the sitting position, release the STATIC CORRECTION KEY (on your Remote Control Unit.
-
Provide a treat reward and praise. Repeat these steps until your dog sits without your hand gestures when you give a "Sit" command.
-
Now, your dog will know how to respond to the collar's static correction.
6. Disposal of the Device (Environment)
At the end of the product lifecycle, you should not dispose of this product with normal household waste. Take this product to a collection point for the recycling of electrical and electronic equipment. The symbol on the product, user's guide and/or box indicates this.
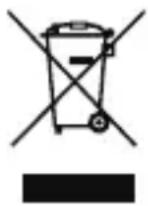
Some of the product materials can be reused if you take them to a recycling point. By reusing some parts or raw materials from used products you make an important contribution to the protection of the environment.
Please contact your local authorities in case you need more information on the collection points in your area.
Dispose of the battery pack in an environmentally-friendly manner according to your local regulations.
7. Cleaning and Care
IMPORTANT
Power off the Pet Collar Unit before touching the Collar Contacts.
Cleaning and care
- Check Collar Contacts for tightness weekly.
- Clean Collar Contacts with alcohol weekly.
- Check your dog's neck area for irritation and wash neck weekly.
- Every effort has been made to ensure high standards of reliability of your Training System. However, if something does go wrong, please do not try to repair it yourself – contact Customer Service for assistance.
8. Frequently Asked Questions
Will the Deluxe Remote Training System be effective on my dog?
- The Training System is designed to be a convenient and effective training device on all healthy breeds and sizes. However, it should not be used on aggressive dogs.
Is the Deluxe Remote Training System appropriate and humane?
- Yes. The Training System is designed to get your dog's attention, not to punish it. However, the initial correction may startle your dog.
What is meant by static correction?
• We have all received a static shock at some point in our lives, such as when we walk barefoot across a carpeted floor and feel a small shock after touching a doorknob. Static shock does not hurt, but it does startle us.
How long does my dog need to continue wearing the Pet Collar Unit?
Once your dog is trained and has been obeying your commands, it does not have to continue to wear the Pet Collar Unit. However, you can consider reinforcing the training with the Pet Collar Unit from time to time.
Can the Deluxe Remote Training System be used on all dogs regardless of age?
- Ideally, your dog should at least be 6 months old and should be able to recognize basic obedience commands such as “Sit” or “Stay” before using the Training System.
What is the range of operation of the Deluxe Remote Training System?
- The range of operation is up to 460 feet* line of sight. It varies according to the position you are holding the Remote Control Unit, the weather, terrain, transmission from other radio devices, etc.
* When there is a clear line of sight between the trainer and pet collar unit. Any obstruction between the trainer and pet collar unit will reduce the range significantly. When you are indoors with the trainer unit, the typical range is up to 100 feet.
How long can I continue to deliver static correction to my dog?
- The maximum duration is 60 seconds followed by a 30 seconds “rest” period. You can press the STATIC CORRECTION KEY ((o)) again after the 30 seconds “rest” period.
9. Troubleshooting
When your dog does not seem to respond to the Static Correction
- Make sure that the Pet Collar Unit is properly fitted on your dog. Loosely fitted collar will affect performance. For proper fit, the collar should be snug, yet loose enough to allow two fingers to fit between the strap and your dog's neck.
- Make sure that there is good skin contact where the Collar Contacts touch the neck area. If necessary, trim your dog's hair to ensure good contact.
- If you are certain that your dog is feeling the static correction, however is still not responding, try the next level higher (see “Determine the TRAINING LEVEL for your dog” on page 17).
- Check if the battery has drained out.
- Test the response of the Pet Collar Unit using the Test Light supplied with your Training System (see “Using the Test Light” on page 14).
- If your dog still does not respond, contact Customer Service at 1-888-331-3383.
When the Pet Collar Unit does not seem to respond to the Remote Control Unit
- Make sure that the Pet Collar Unit is powered on (see “Powering On/Off the Pet Collar Unit” on page 15).
- Make sure that the batteries are inserted properly (see “Remote Control Unit Battery Installation” on page 9).
- The maximum duration you can press the STATIC CORRECTION KEY ((o)) to deliver static correction to your dog continuously is 60 seconds. This is followed by a 30 seconds “rest” period. The Remote Control Unit will only send static correction to the Pet Collar Unit again after the 30 seconds “rest” period.
- If the Pet Collar Unit still does not respond, contact Customer Service at 1-888-331-3383.
10. General Information
If your product is not working properly....
- Read this User's Guide.
- Contact Customer Service:
US and Canada 1-888-331-3383
Email: support@motorolamonitors.com
Consumer Products and Accessories Limited Warranty
Thank you for purchasing this Motorola branded product manufactured under license by Binatone Electronics International LTD (“BINATONE”).
What Does this Warranty Cover?
Subject to the exclusions contained below, BINATONE warrants that this Motorola branded product (“Product”) or certified accessory (“Accessory”) sold for use with this product that it manufactured to be free from defects in materials and workmanship under normal consumer usage for the period outlined below. This Warranty is your exclusive warranty and is not transferable.
Who is covered?
This Warranty extends only to the first consumer purchaser, and is not transferable.
What will BINATONE do?
BINATONE or its authorized distributor at its option and within a commercially reasonable time, will at no charge repair or replace any Products or Accessories that does not conform to this Warranty. We may use functionally equivalent reconditioned/ refurbished/ pre-owned or new Products, Accessories or parts.
What Other Limitations Are There?
ANY IMPLIED WARRANTIES, INCLUDING WITHOUT LIMITATION THE IMPLIED WARRANTIES OF MERCHANTABILITY AND FITNESS FOR A PARTICULAR PURPOSE, SHALL BE LIMITED TO THE DURATION OF THIS LIMITED WARRANTY, OTHERWISE THE REPAIR OR REPLACEMENT PROVIDED UNDER THIS EXPRESS LIMITED WARRANTY IS THE EXCLUSIVE REMEDY OF THE CONSUMER, AND IS PROVIDED IN LIEU OF ALL OTHER WARRANTIES, EXPRESS OR IMPLIED. IN NO EVENT SHALL MOTOROLA OR BINATONE BE LIABLE, WHETHER IN CONTRACT OR TORT (INCLUDING NEGLIGENCE) FOR DAMAGES IN EXCESS OF THE PURCHASE PRICE OF THE PRODUCT OR ACCESSORY, OR FOR ANY INDIRECT, INCIDENTAL, SPECIAL OR CONSEQUENTIAL DAMAGES OF ANY KIND, OR LOSS OF REVENUE OR PROFITS, LOSS OF BUSINESS, LOSS OF INFORMATION OR OTHER FINANCIAL LOSS ARISING OUT OF OR IN CONNECTION WITH THE ABILITY OR INABILITY TO USE THE PRODUCTS OR ACCESSORIES TO THE FULL EXTENT THESE DAMAGES MAY BE DISCLAIMED BY LAW.
Some jurisdictions do not allow the limitation or exclusion of incidental or consequential damages, or limitation on the length of an implied warranty, so the above limitations or exclusions may not apply to you. This Warranty gives you specific legal rights, and you may also have other rights that vary from one jurisdiction to another.
| Products Covered Length of Coverage | |
| Consumer Products One (1) year from the date of the products original purchase by the first consumer purchaser of the product. | |
| Consumer Accessories | Ninety (90) days from the date of the accessories original purchase by the first consumer purchaser of the product. |
| Consumer Products and Accessories that are Repaired or Replaced | The balance of the original warranty or for Ninety (90) days from the date returned to the consumer, whichever is longer. |
Exclusions
Normal Wear and Tear. Periodic maintenance, repair and replacement of parts due to normal wear and tear are excluded from coverage.
Batteries. Only batteries whose fully charged capacity falls below 80% of their rated capacity and batteries that leak are covered by this Warranty.
Abuse & Misuse. Defects or damage that result from: (a) improper operation, storage, misuse or abuse, accident or neglect, such as physical damage (cracks, scratches, etc.) to the surface of the product resulting from misuse; (b) contact with liquid, water, rain, extreme humidity or heavy perspiration, sand, dirt or the like, extreme heat, or food; (c) use of the Products or Accessories for commercial purposes or subjecting the Product or Accessory to abnormal usage or conditions; or (d) other acts which are not the fault of MOTOROLA or BINATONE, are excluded from coverage.
Use of Non-Motorola branded Products and Accessories. Defects or damage that result from the use of Non-Motorola branded or certified Products or Accessories or other peripheral equipment are excluded from coverage.
Unauthorised Service or Modification. Defects or damages resulting from service, testing, adjustment, installation, maintenance, alteration, or modification in any way by someone other than MOTOROLA, BINATONE or its authorised service centres, are excluded from coverage.
Altered Products. Products or Accessories with (a) serial numbers or date tags that have been removed, altered or obliterated; (b) broken seals or that show evidence of tampering; (c) mismatched board serial numbers; or (d) nonconforming or non-Motorola branded housings, or parts, are excluded from coverage.
Communication Services. Defects, damages, or the failure of Products or Accessories due to any communication service or signal you may subscribe to or use with the Products or Accessories is excluded from coverage.
How to Obtain Warranty Service or Other Information?
To obtain service or information, please call:
US and Canada 1-888-331-3383
Email: support@motorolamonitors.com
You will receive instructions on how to ship the Products or Accessories at your expense and risk, to a BINATONE Authorized Repair Center.
To obtain service, you must include: (a) the Product or Accessory; (b) the original proof of purchase (receipt) which includes the date, place and seller of the Product; (c) if a warranty card was included in your box, a completed warranty card showing the serial number of the Product; (d) a written description of the problem; and, most importantly; (e) your address and telephone number.
These terms and conditions constitute the complete warranty agreement between you and BINATONE regarding the Products or Accessories purchased by you, and supersede any prior agreement or representations, including representations made in any literature publications or promotional materials issued by BINATONE or representations made by any agent employee or staff of BINATONE, that may have been made in connection with the said purchase.
Manufacture Date: as the serial number (please open the battery cover, it is shown on the inside of the device.)
FCC, ACTA and Industry Canada (IC) regulations
WARNING
Changes or modifications to this equipment not expressly approved by the party responsible for compliance could void the user's authority to operate the equipment.
NOTE
This equipment has been tested and found to comply with the limits for a Class B digital device, pursuant to Part 15 of the Federal Communications Commission (FCC) rules. These limits are designed to provide reasonable protection against harmful interference in a residential installation. This equipment generates, uses and can radiate radio frequency energy and, if not installed and used in accordance with the instructions, may cause harmful interference to radio communications. However, there is no guarantee that interference will not occur in a particular installation. If this equipment does cause harmful interference to radio or television reception, which can be determined by turning the equipment off and on, the user is encouraged to try to correct the interference by one or more of the following measures:
- Reorient or relocate the receiving antenna.
- Increase the separation between the equipment and receiver.
- Connect the equipment into an outlet on a circuit different from that to which the receiver is connected.
- Consult the dealer or an experienced radio/TV technician for help.
This device complies with part 15 of the FCC Rules. Operation is subject to the following two conditions: (1) This device may not cause harmful interference, and (2) this device must accept any interference received, including interference that may cause undesired operation. This device complies with Industry Canada licence-exempt RSS standard(s). Operation is subject to the following two conditions: (1) this device may not cause interference, and (2) this device must accept any interference, including interference that may cause undesired operation of the device. This Class B digital apparatus complies with Canadian ICES-003.
Technical Specifications
RF Frequency Band 902MHz - 928MHz
Modulation Direct Sequence Spread Spectrum
Operating Temperature 5°C to 45°C
Remote Control Unit 2x1.5V AAA Alkaline Cells
Voltage
Collar Unit Voltage 3.7V 277mAh Li-battery pack
100 - 120 V (AC voltage, 60Hz)
6V DC, 500mA (Adapter output)
Water Resistance IP54
Compliance FCC Part 15, ICES-003

motorola
Manufactured, distributed or sold by Binatone Electronics International LTD., official licensee for this product. MOTOROLA and the Stylized M Logo, are trademarks or registered trademarks of Motorola Trademark Holdings, LLC. and are used under license. All other trademarks are the property of their respective owners.
© 2014 Motorola Mobility LLC.
All rights reserved.

US_EN Version 13.0
Printed in China
- USER'S GUIDE
- WELCOME
- TO YOUR NEW MOTOROLA DELUXE REMOTE TRAINING SYSTEM
- GOT EVERYTHING
- OVERVIEW OF THE PET COLLAR UNIT
- OVERVIEW OF THE REMOTE CONTROL UNIT
- HOW THE DELUXE REMOTE TRAINING SYSTEM WORKS
- IMPORTANT GUIDELINES WHEN USING THE DELUXE REMOTE TRAINING SYSTEM
- TABLE OF CONTENTS
- SAFETY INSTRUCTIONS....8
- GETTING STARTED ...... 9
- USING THE PET COLLAR UNIT ....15
- TRAINING YOUR DOG WITH THE DELUXE REMOTE TRAINING SYSTEM ...... 16
- TRAINING TIPS 19
- SAFETY INSTRUCTIONS
- WARNING
- RISK OF SKIN DAMAGE
- CAUTION
- GETTING STARTED
- 2.1 REMOTE CONTROL UNIT BATTERY INSTALLATION
- 2.2 ATTACH THE ADJUSTABLE STRAP TO THE PET COLLAR UNIT
- IMPORTANT
- 2.3 CHARGING THE PET COLLAR UNIT
- NOTE
- 2.4 FIT THE PET COLLAR UNIT ON YOUR DOG'S NECK
- 2.5 TRIM AWAY EXCESS STRAP LENGTH
- 2.6 CHANGE COLLAR CONTACTS
- 2.7 USING THE TEST LIGHT
- USING THE PET COLLAR UNIT
- 3.1 POWERING ON/OFF THE PET COLLAR UNIT
- 3.2 PAIRING WITH THE REMOTE CONTROL UNIT
- TRAINING YOUR DOG WITH THE DELUXE REMOTE TRAINING SYSTEM
- 4.1 POWERING ON/OFF THE REMOTE CONTROL UNIT
- 4.2 SELECT A PET COLLAR UNIT (IF YOU HAVE 2 OR MORE PET COLLAR UNITS)
- 4.3 DELIVER STATIC CORRECTION
- 4.4 DETERMINE THE TRAINING LEVEL FOR YOUR DOG
- 4.5 WHEN TO INCREASE LEVEL OF STATIC CORRECTION
- 4.6 PUSH-TO-TALK FUNCTION
- 4.7 TONE KEY
- 4.8 THE VIBRATION KEY
- TRAINING TIPS
- TEACHING YOUR DOG THE "COME" COMMAND
- TEACHING YOUR DOG THE "SIT" COMMAND
- DISPOSAL OF THE DEVICE (ENVIRONMENT)
- CLEANING AND CARE
- FREQUENTLY ASKED QUESTIONS
- WILL THE DELUXE REMOTE TRAINING SYSTEM BE EFFECTIVE ON MY DOG
- IS THE DELUXE REMOTE TRAINING SYSTEM APPROPRIATE AND HUMANE
- WHAT IS MEANT BY STATIC CORRECTION
- HOW LONG DOES MY DOG NEED TO CONTINUE WEARING THE PET COLLAR UNIT
- CAN THE DELUXE REMOTE TRAINING SYSTEM BE USED ON ALL DOGS REGARDLESS OF AGE
- WHAT IS THE RANGE OF OPERATION OF THE DELUXE REMOTE TRAINING SYSTEM
- HOW LONG CAN I CONTINUE TO DELIVER STATIC CORRECTION TO MY DOG
- TROUBLESHOOTING
- WHEN YOUR DOG DOES NOT SEEM TO RESPOND TO THE STATIC CORRECTION
- WHEN THE PET COLLAR UNIT DOES NOT SEEM TO RESPOND TO THE REMOTE CONTROL UNIT
- GENERAL INFORMATION
- CONSUMER PRODUCTS AND ACCESSORIES LIMITED WARRANTY
- WHAT DOES THIS WARRANTY COVER
- WHO IS COVERED
- WHAT WILL BINATONE DO
- WHAT OTHER LIMITATIONS ARE THERE
- EXCLUSIONS
- HOW TO OBTAIN WARRANTY SERVICE OR OTHER INFORMATION
- FCC, ACTA AND INDUSTRY CANADA (IC) REGULATIONS
- TECHNICAL SPECIFICATIONS
- MOTOROLA
Brand : MOTOROLA
Model : ScoutTrainer 100
Category : Remote control