
RCT6272W23 - Tablet RCA - Free user manual and instructions
Find the device manual for free RCT6272W23 RCA in PDF.


| Product Type | Tablet |
| Brand | RCA |
| Model | RCT6272W23 |
| Operating System | Android |
| Front Camera | 0.3 Megapixels |
| Rear Camera | 2.0 Megapixels |
| Battery Type | Built-in rechargeable battery |
| Charging Port | Micro-USB (DC IN 5V) |
| Headphone Jack | 3.5mm |
| Micro SD Card Slot | Supports microSD/microSDHC up to 32GB |
| Wi-Fi | IEEE 802.11 b/g/n |
| VPN | Supported |
| Power Input | DC 5V via included AC adapter |
| Touchscreen | Capacitive multi-touch |
| Voice Control | Google Now, Voice Search, Voice Actions |
| Google Play Store | Preinstalled |
| Safety Compliance | FCC Part 15, IC RSS-102, SAR limit 1.6 W/kg |
| Warranty | 1 year parts and labor |
| Included Accessories | AC adapter |
| Cleaning Instructions | Clean with dry cloth only |
Frequently Asked Questions - RCT6272W23 RCA
User questions about RCT6272W23 RCA
0 question about this device. Answer the ones you know or ask your own.
Ask a new question about this device
Download the instructions for your Tablet in PDF format for free! Find your manual RCT6272W23 - RCA and take your electronic device back in hand. On this page are published all the documents necessary for the use of your device. RCT6272W23 by RCA.
USER MANUAL RCT6272W23 RCA
natural_image
Front view of a rectangular tablet device with blank screen (no text or symbols)
Scan for more user manual details or visit www.RCAtablets.com
It's important to read these instructions prior to using your new product for the first time.
Safety Precautions

RCA
RCT6272W23
Equipment tested for
compliance as a
complete unit
This device complies with Part 15 of the FCC Rules. Operation is subject to the following two conditions: (1) This device may not cause harmful interference, and (2) this device must accept any interference received, including interference that may cause undesired operation. This equipment has been tested and found to comply with the limits for a Class B digital device, pursuant to Part 15 of FCC Rules. These limits are designed to provide reasonable protection against harmful interference in a residential installation. This equipment generates, uses, and can radiate radio frequency energy and, if not installed and used in accordance with the instructions, may cause harmful interference to radio communications.
However, there is no guarantee that interference will not occur in a particular installation. If this equipment does cause harmful interference to radio or television reception, which can be determined by turning the equipment off and on, the user is encouraged to try to correct the interference by one or more of the following measures:
- Reorient or relocate the receiving antenna.
- Increase the separation between the equipment and receiver.
- Connect the equipment into an outlet on a circuit different from that to which the receiver is connected.
- Consult the dealer or an experienced radio/TV technician for help.
Warning: Changes or modifications not expressly approved by the party responsible for compliance could void the user's authority to operate the equipment.
This equipment complies with FCC radiation exposure limits set forth for an uncontrolled environment. End user must follow the specific operating instructions for satisfying RF exposure compliance. This transmitter must not be co-located or operating in conjunction with any other antenna or transmitter.
The portable device is designed to meet the requirements for exposure to radio waves established by the Federal Communications Commission (USA). These requirements set a SAR limit of 1.6 W/kg averaged over one gram of tissue. The highest SAR value reported under this standard during product certification for use when properly worn on the body.
CAN ICES-3(B) / NMB-3(B)
This device complies with Industry Canada license-exempt RSS standard(s). Operation is subject to the following two conditions: (1) this device may not cause interference, and (2) this device must accept any interference, including interference that may cause undesired operation of the device.
This EUT is in compliance with SAR for general population/ uncontrolled exposure limits in IC RSS-102 and had been tested in accordance with the measurement methods and procedures specified in IEEE 1528.
Caution: Use of controls or adjustments or performance of procedures other than those specified may result in hazardous radiation exposure.
Warning: the AC adapter is used as disconnect device and it should remain re operable during intended use.
In order to disconnect the mains plug from mains completely, the AC adapter should be disconnected from the mains socket outlet completely.
Service Information
This product should be serviced only by those specially trained in appropriate servicing techniques. For instructions on how to obtain service, refer to the warranty included in this guide.
IMPORTANT SAFETY INSTRUCTIONS
PLEASE READ AND SAVE THIS FOR FUTURE REFERENCE
Some of the following information may not apply to your particular product; however, as with any electronic product, precautions should be observed during handling and use.
- Read these instructions.
- Keep these instructions.
- Heed all warnings.
- Follow all instructions.
- Do not use this apparatus near water.
- Clean only with dry cloth.
- Do not block any ventilation openings. Install in accordance with the manufacturer's instructions.
- Do not install near any heat sources such as radiators, heat registers, stoves, or other apparatus (including amplifiers) that produce heat.
- Protect the power cord from being walked on or pinched particularly at plugs, convenience receptacles, and the point where they exit from the apparatus.
- Only use attachments / accessories specified by the manufacturer.
- Unplug this apparatus during lightning storms or when unused for long periods of time.
- Refer all servicing to qualified service personnel. Servicing is required when the apparatus has been damaged in any way, such as power-supply cord or plug is damaged, liquid has been spilled or objects have fallen into the apparatus, the apparatus has been exposed to rain or moisture, does not operate normally, or has been dropped.
ADDITIONAL SAFETY INFORMATION
- The AC adapter and apparatus shall not be exposed to dripping or splashing and no objects filled with liquids, such as vases, shall be placed on the apparatus.
- Always leave sufficient space around the product for ventilation. Do not place product in or on a bed, rug, in a bookcase or cabinet that may prevent air flow through vent openings.
- Do not place lighted candles, cigarettes, cigars, etc. on the product.
- Care should be taken so that objects do not fall into the product.
- Do not attempt to disassemble the cabinet. This product does not contain customer serviceable components.
• To prevent the risk of fire or electric shock, do not expose this apparatus to rain or moisture. - Do not play your headset at high volume. Hearing experts warn against extended high-volume play.
Contents
Safety Precautions ....1
Important Safety Instructions 2
Startup 4
Overview of Controls 4
Buttons 5
Accessory 5
Navigating the Home Screen 6
Connections 8
Battery Management and Charging 8
Micro-USB 9
Headphone 9
Micro SD 9
Wi-Fi....10
VPN....10
Basic Operation 11
First Time Operation 11
Basic Operation 11
Google Now™ 12
Voice Search & Voice Actions 12
Google Play™ 13
Settings 13
GoogleTM 14
Preinstalled Apps ....14
Additional Information 15
Trouble Shooting 15
Specifications 15
Copyright and Trademark Notices 15
Limited Warranty 16
Startup
Overview of Controls
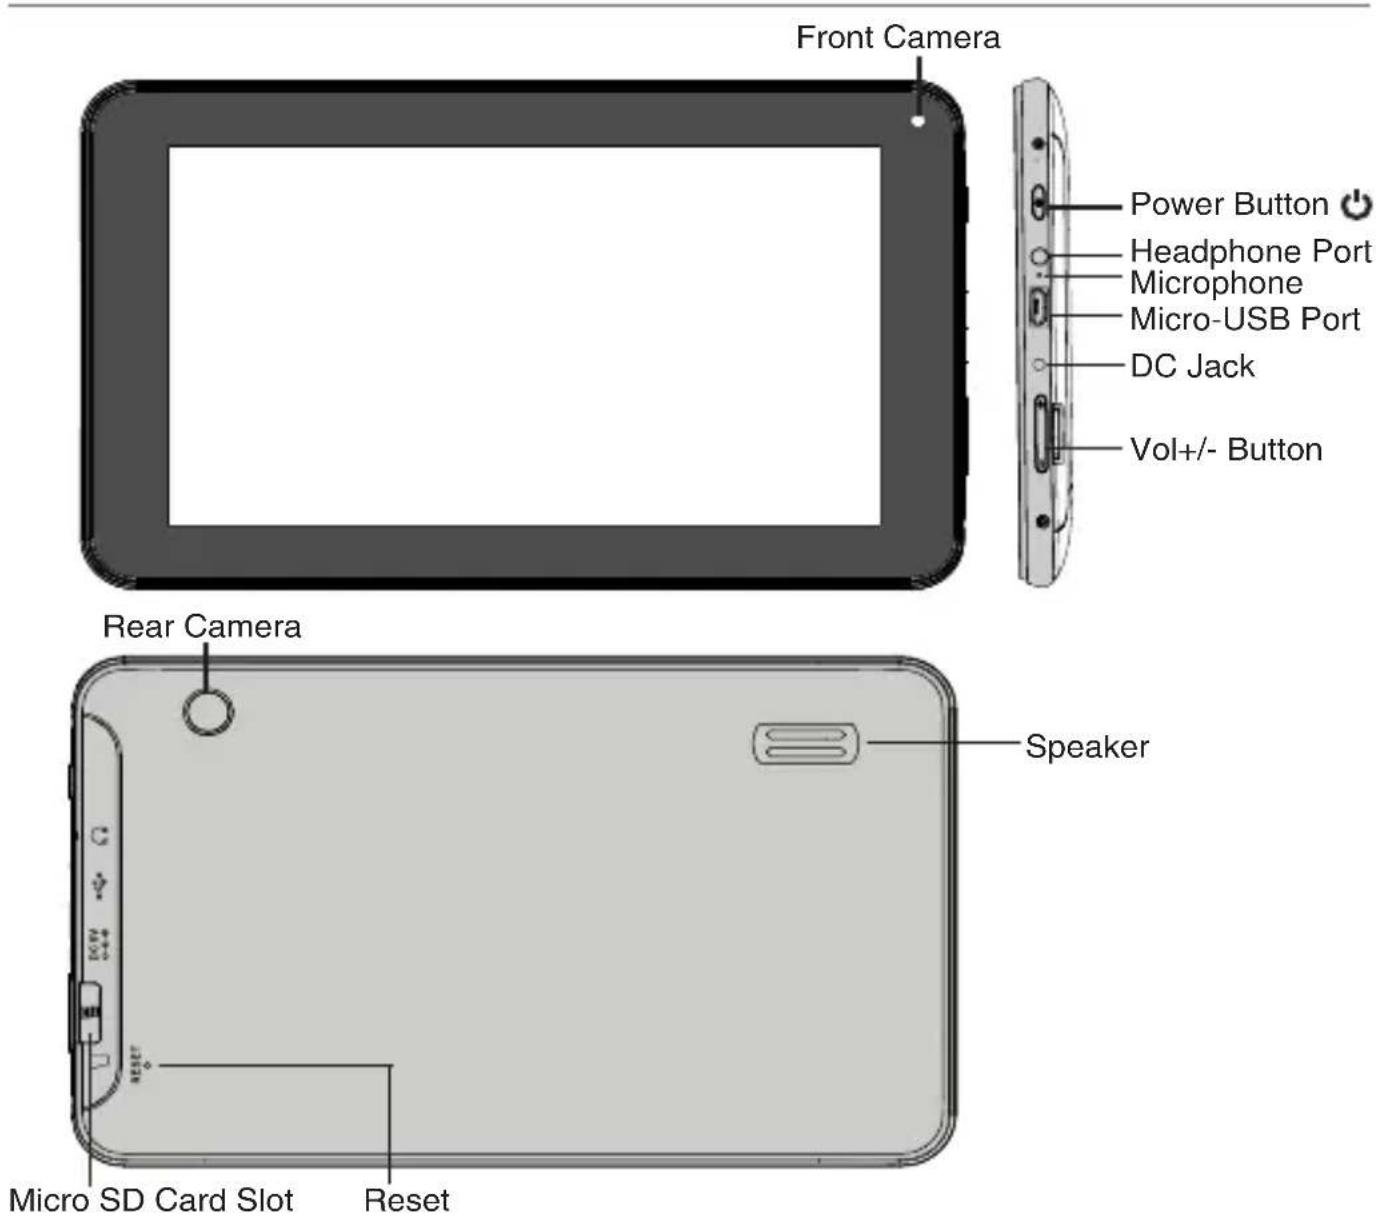
Item
Description
Power Button 🔊
Press to enter standby/wake up mode, press and hold to switch On/Off the unit.
Headphone Port
Headphone connection for personal listening.
Microphone
For voice input.
Micro-USB Port
MINI USB Port, connect to a PC or USB storage device; for charging.
DC Jack
Connect with 5V DC charger.
Vol+/- Key
Press to increase/decrease the volume.
Micro SD Card Slot
Accepts micro SD card (up to 32G).
Reset
Reset the tablet.
Buttons
Power Button
Power the Tablet On
Press & hold the Power ⏻ button until the RCA logo appears.
Power the Tablet Off
Press & hold the Power ⏻ button until a message box displays. Select "Power off". Tap "OK" and the tablet will be powered off.
Sleep Mode
Briefly press the Power button to put the tablet in sleep mode.
If you don't operate for some time, the tablet will enter sleep mode automatically.
Tip: You can go to Settings > DEVICE > Display > Sleep to set the screen timeout.
Wake the Tablet from Sleep Mode
Press the Power button to wake the tablet from sleep mode.
Vol +/- Button
Press the Vol +/- button to increase or decrease the volume.
Tip: You can go to Settings > DEVICE > Sound > Volumes to adjust volume settings for Notifi cations and Alarms
Accessory
The following accessory is included.
AC Adapter ...... x 1
Navigating the Home Screen
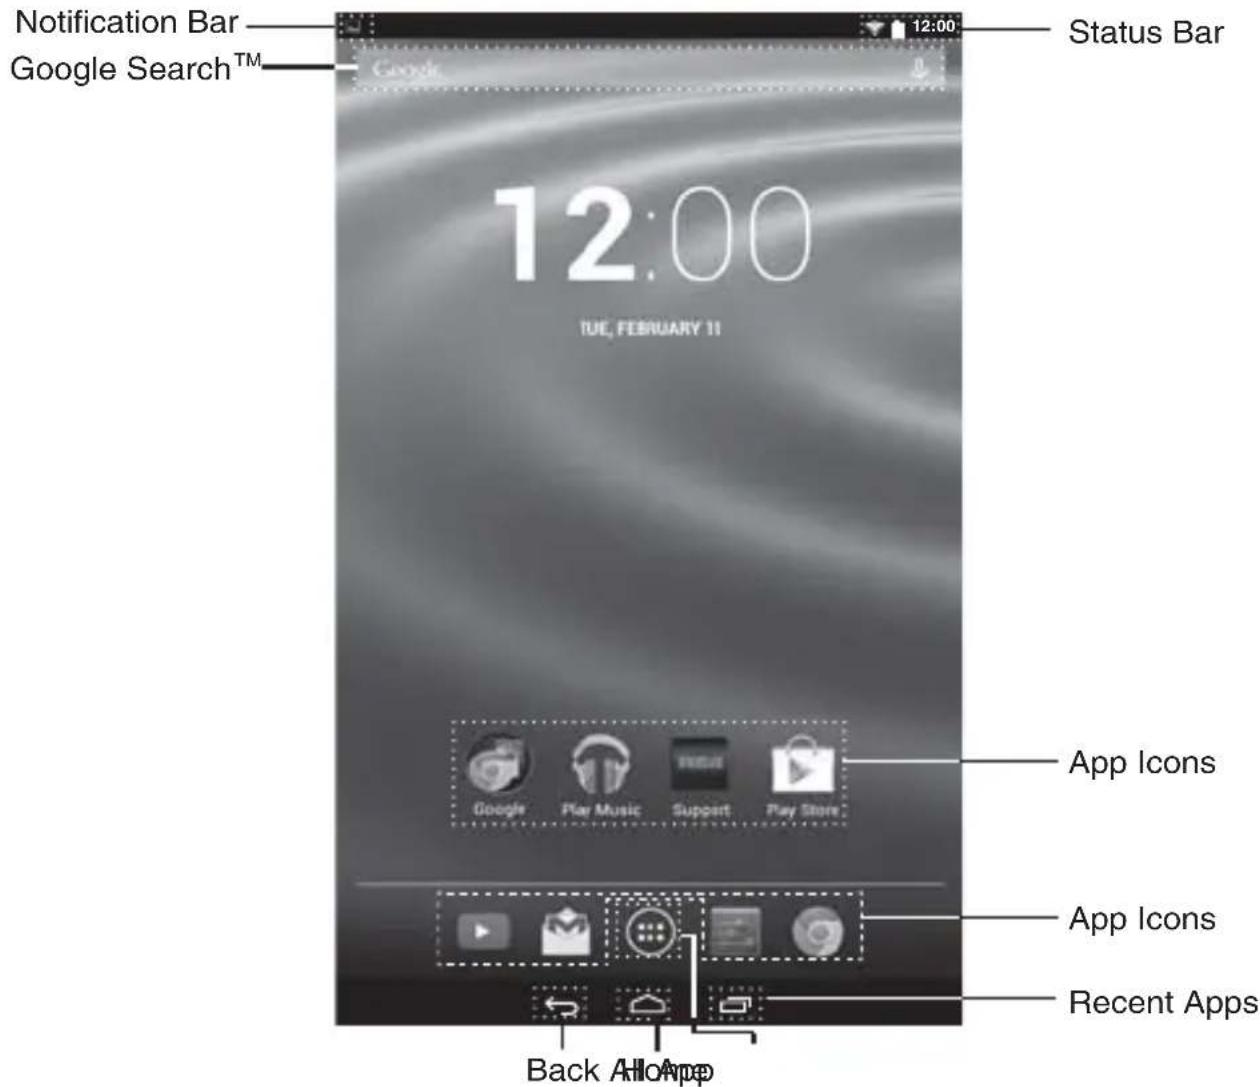
Notification & Status Bar
Some indicators that inform you about the status of your tablet are shown at the top of the screen.
Notifi cation Shade
Notifi cations may come from the system, a game, an application such as E-mail, or the music player.
When Notifications are available, related icons will appear in the top left corner of the screen. To open the Notification Shade, touch the Notification icon and swipe your finger down. Some notifications allow you to take specific actions by tapping icons within the notification.
After you are fi nished with a notifi cation, just slide it away to the left or right. If you want to dismiss all notifi cations, tap the Dismiss icon_ at the top of the notifi cation.
Status Bar & Quick Settings
The Status Bar in the top right corner shows various indicators, including Wi-Fi connection and battery status. To access "Quick Settings", touch the status bar and swipe down. You can then adjust various settings on the tablet by touching the corresponding square.
Notification & Status Icons
The below table lists some of the frequently used icons in the Notification & Status bar:
Item
Description

Message Received new message.

Music The Google Play Music app is running.

Screenshots Screenshot captured.

USB tethering Has connected to a PC and the USB tethering is turned on.

Wi-Fi Has a Wi-Fi Internet connection.

Play Store An update for an app is available.
Home Screen Icons
All Apps

Tap the All Apps icon 📄 to enter the All Apps screen.
In All Apps screen, you can:
- Move between screens: Slide left or right.
- Open an App: Tap its icon.
- Copy an App icon to the Home screen: Press & hold the icon or widget icon and slowly to drag it to the Home screen.
- View widgets: Tap the widgets tab at the top of a All Apps screen. Widgets are app information displays that can be placed on your Home screen.
- Get more apps: Tap the Google Play Store icon
- View info about an App: Press & hold it, and drag it to the top of the screen, then drop the app over the App Info icon ⓘ.
Tip: Most apps include a Menu icon: near the top or bottom of the screen that lets you control the app's settings.
Back
Tap Back icon ← to return to the previous screen.
- The Back icon remains on the bottom of the screen at all times, allowing you to navigate back to the previous screen.
- Once you go back to the Home screen, you can't go back any further in your history.
Home
Tap Home icon △ from anywhere on your tablet to return to the Home screen.
Recent Apps
Tap Recent Apps icon 📄 to view recently used apps. Tap an app to use it again.
You can slide down to see more apps. You can also slide it away to the left or right.
Connections
Battery Management and Charging
The tablet has a built-in rechargeable battery.
Battery Icon
The battery icon in the upper-right corner shows the battery level or charging status.

Full battery

Low battery

Need to be charged

Charging
Charging the Battery
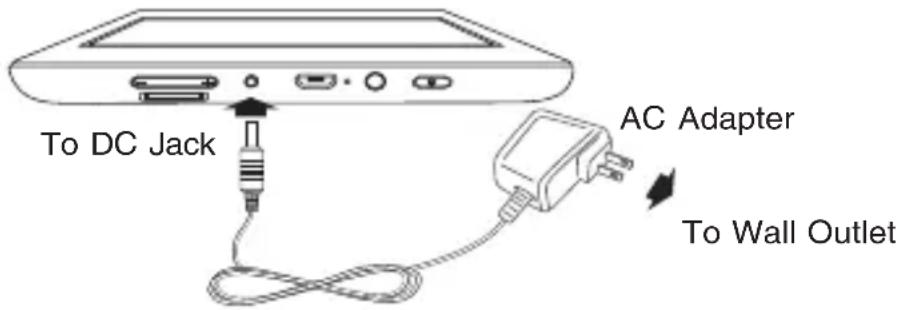
Note: In order to keep the battery working in best condition, please pay attention to the following:
- The included AC adapter is for use with this unit only. Do not use it with other equipment.
- Please do not charge the battery in high temperatures.
- Do not wait for the battery to be fully depleted before charging again. Keep the battery charged as needed.
- If tablet has not been used for a long period of time, the battery might be in over discharge protection mode and may take longer to charge.
Prolong the Battery Life
Here are some tips for how to prolong the life of the battery:
- If you aren't using Wi-Fi, go to Settings > WIRELESS & NETWORKS > Wi-Fi, turn it off.
- Don't leave the Maps or Navigation apps open on the screen when you're not using them.
- Turn down screen brightness and set a shorter screen timeout: Settings > DEVICE >Display.
- If you don't need it, turn off automatic syncing for all apps: Settings > ACCOUNTS >[Google account-name]. This means you need to sync manually to collect messages, email, and other recent information, and won't receive notifications when updates occur.
Micro-USB
Connect your tablet to a PC or a USB storage device with a USB cable (not included), to transfer music, pictures and other files in both directions.
Note: To change your tablet's USB connection options, you should go to Settings >DEVICE > Storage, and tap Menu icon : at the upper right corner. Then tap USB computer connection to enter to setup.
The tablet can be connected to a keyboard, a mouse or other input devices via USB cable and use it just as you would with a PC.
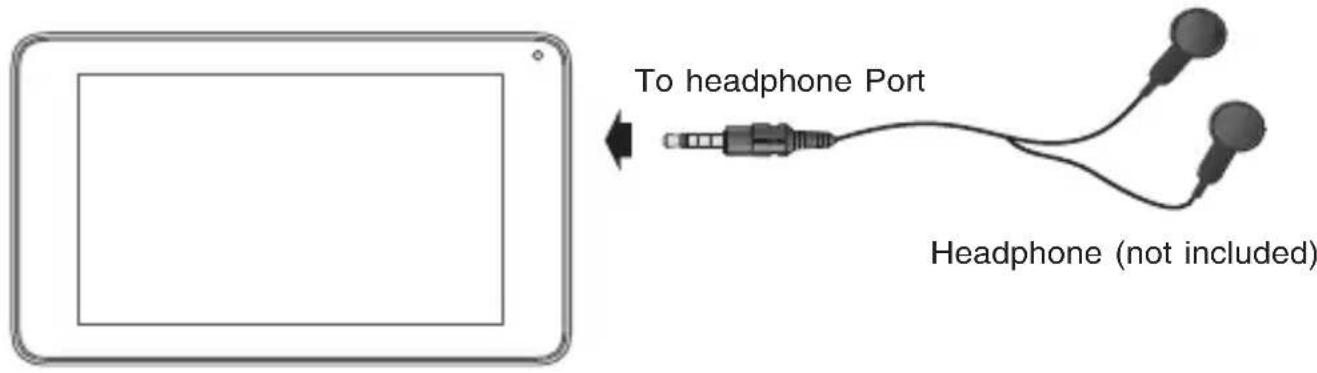
Headphone
Headphone can be connected to the tablet's Headphone port.
Micro SD
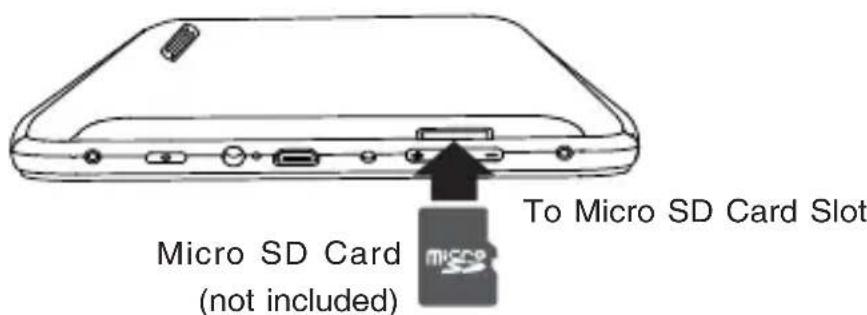
Insert the micro SD card, with contacts facing the screen, into the tablet's Micro SD slot until it clicks.
To check the storage of the micro SD card, go to Settings > DEVICE > Storage.
Remove the micro SD card by pushing in on the card's edge. The card will pop out and can be removed.
Notes:
- You can use microSD™ card and microSDHC™ card (up to 32GB, SD card not included).
- Never remove or insert micro SD card in On mode.
Connect to a Wi-Fi Network
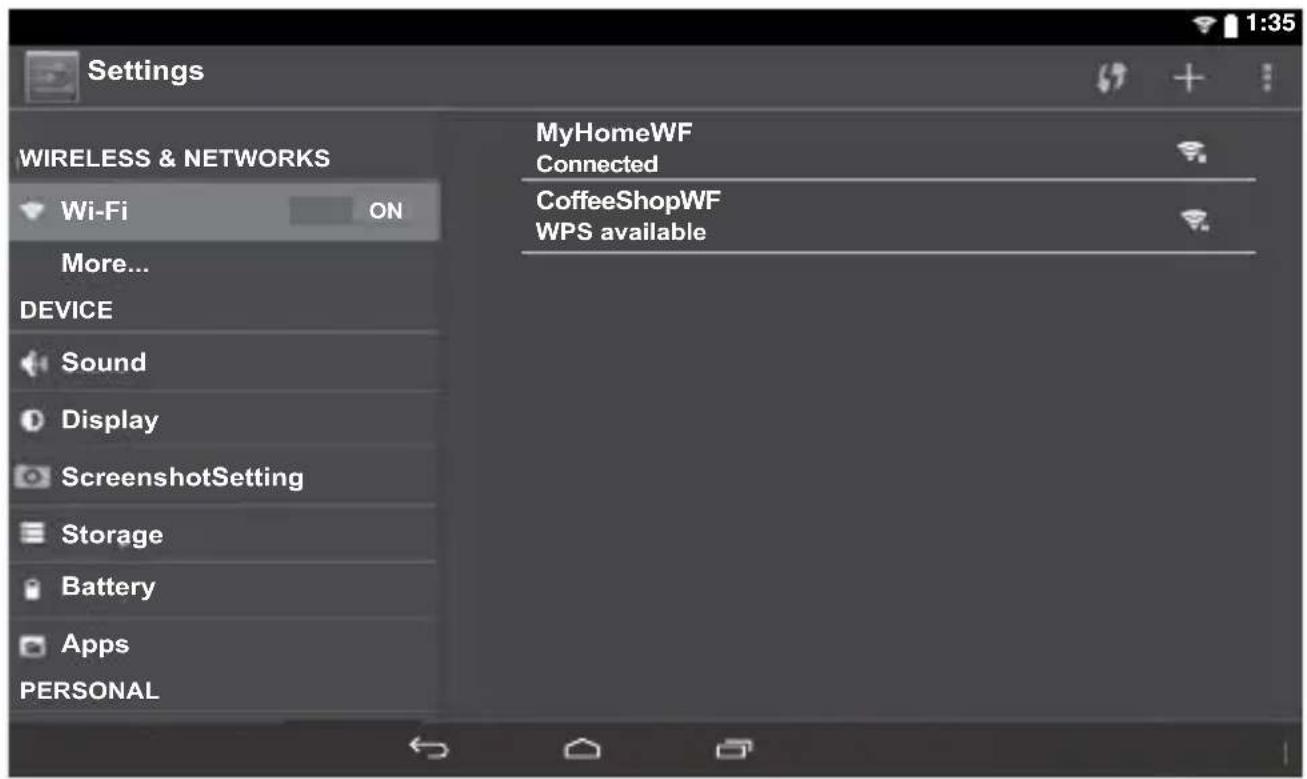
- Go to Settings > WIRELESS & NETWORKS > Wi-Fi, and slide the Wi-Fi switch to the ON position.
-
The device will scan Wi-Fi networks automatically and display the available names.
-
If the device finds a network that you connected to previously, it will connect to it automatically.
- Tap a network name to connect to it, and enter a password if necessary.
- Alternatively, if your Wi-Fi router supports Wi-Fi Protected Setup, tap the WPS icon at the top of the screen, and then press the WPS button on your router.
- If your network does not broadcast its SSID, tap the Plus icon + at the top of the screen, and enter the Network SSID (name) of the network. If necessary, enter security or other network configuration details.
Note: you can tap Menu icon : at the upper right corner in the Settings screen for advanced settings.
VPN (Virtual Private Network)
You can create virtual private network (VPN) and connect to your private network securely through a public network, such as the internet. You must set a lock screen PIN or password before you can use credential storage.
Add VPN network and follow the instructions on the screen.
Basic Operation
First Time Operation
Turning Your Tablet On for the First Time
When using the tablet for the first time, you will be required to setup the following:
- Select the language, then tapStart.
- If you have a Google Account, select "Yes". Then tap a network name to see more details or connect to it, and enter a password if necessary.
When prompted, sign in using the email address and password for your Google Account. If you don't have one yet, go ahead and create one. - Follow the onscreen instructions to setup the tablet.
Basic Operation
Using the Touchscreen
Here are some basic procedures for interacting with the touchscreen.
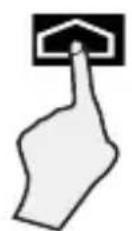
Tap
To select an item on the touchscreen, lightly tap it.
Press & Hold
In some instances, touching the item and holding your finger on it will present other options or menus.
natural_image
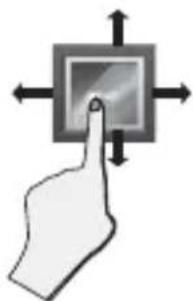
Hand icon pointing at a square button with directional arrows (no text or symbols)Drag or Swipe
While holding an item such as an icon, it can sometimes be moved by dragging it to another area or screen. You may also be able to swipe your finger across a screen or item to navigate or move it.
natural_image
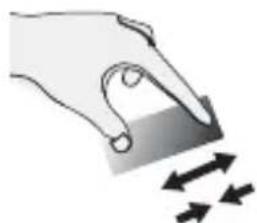
Illustration of a hand holding a tablet with directional arrows indicating movement (no text or symbols)Zoom
By placing two fingers on the screen, you can slide them apart to "Zoom In", or pinch them together to "Zoom Out".
Customizing the Home Screen
- From All Apps screen to Home screen: Tap All Apps icon 🎯 to open All Apps screen, press & hold an icon or widget and slowly to drag it to the location of your choice. This makes it much easier to change your Home screen layout.
- Move apps or widgets: Press & hold an icon or widget, slowly to drag it to the screen edge, the screen will switch.
- Delete apps or widgets: Press & hold an icon or widget, when the "X" icon appears at the left of the screen, drag the icon or widget into it.
- Press & hold the wallpaper on your Home screen, and choose your wallpaper from Gallery, Live Wallpapers or Wallpapers.
Google Now
To create a truly personalized experience, using your location and personal Google account information, use Google Now. Touch and Hold the Home icon, and slide up to the Google Now icon. Follow the instructions to setup your Google Now experience.
Voice Search & Voice Actions
Turn Voice Search or Voice Action On
You can initiate a Voice Search or Voice Action by tapping the Microphone icon in the top left corner of the Home screen.
When you're viewing the Google Now screen, you don't have to touch anything. Just say "Google."
Note: To detect when you say "Google" to launch Voice Search or Voice Actions, your tablet analyzes sound picked up by your tablet's microphone in intervals of a few seconds or less.
Using Voice Search
After tapping the microphone icon, just say whatever it is you want Google to search for.
Using Voice Actions
There are many actions that the tablet can perform using "Voice Actions". For example, you can send emails, set alarms, play a song, or navigate to a website. Just tap the Microphone icon, and say what you want the tablet to do. As you speak, Voice Search analyzes your speech and initiates the action.
If Voice Search doesn't understand you, it lists a set of possible meanings. Just tap the one you want.
Google Play
In addition to the apps that come preinstalled on your tablet, you can download Android™ apps and games, music, movies, TV shows, and magazines on Google Play.
- On the App menu, touch the Google Play Store icon.
- To search for an item from the Google Play Store app, touch the search icon in the upper right corner, and then type a keyword to search.
- Touch an available item to go to its details page. From there you can install or download the item.
Settings
Settings lets you configure the tablet, set app options, add accounts, and change other preferences.
WIRELESS & NETWORKS
Wi-Fi—Enable or disable Wi-Fi, and connect to a wireless network so that you can check email, search the Web, or access social media websites.
More... —Enable or disable Airplane mode or VPN.
DEVICE
Sound—Set Volumes, Default notification sound, and enable or disable Touch sounds and Screen lock sound.
Display—Set Brightness, Wallpaper, Sleep, Daydream, Font size and Wireless display.
ScreenshotSetting—Set Select delay time to capture the screen, Set the location of screenshot storage and enable or disable Show the screenshot button in the statusbar.
Storage—View available space in FLASH, INTERNAL STORAGE, SD CARD and USB STORAGE /set the related items.
Battery—View battery status.
Apps—View downloaded apps and running apps. To view information or uninstall an app, tap the relevant app.
PERSONAL
Location access—Enable or disable Access to my location and LOCATION SOURCES.
Security—Set preferences for SCREEN SECURITY, PASSWORDS, DEVICE ADMINISTRATION, and CREDENTIAL STORAGE.
Language & input—Set preferences for Language, KEYBOARD & INPUT METHODS, SPEECH and MOUSE/TRACKPAD.
Backup & reset—Set preferences for BACKUP & RESTORE, and PERSONAL DATA.
ACCOUNTS
You can add an email account or another type of account.
SYSTEM
Date & time—Enable or disable Automatic date & time, and select preferences for date, time, time zone, time format, and date format etc..
Accessibility—Select preferences for SERVICES and SYSTEM.
Developer options—Enable or disable various Developer options.
WARNING: It is highly recommended that the Developer options remain turned OFF. Adjusting these settings can cause the device and applications on it to break or misbehave.
About tablet
Check System updates, Status, Legal information etc.
A Google Account lets you organize and access your personal information from any computer or mobile device.
Add an Account
You can use multiple Google Accounts and Microsoft Exchange ActiveSync accounts on your tablet.
You may also be able to add other kinds of accounts, depending on your apps. To add some accounts, you may need to obtain details from your system administrator about the service to which the account connects. For example, you may need to know the account's domain or server address.
- Go to Settings > ACCOUNTS > Add account.
- Tap the kind of account to add. And then follow the on-screen instructions.
Remove an Account
To remove a Google account, go to Settings > ACCOUNTS > Google > [account-name] Menu icon □> Remove account.
Preinstalled Apps
Your tablet comes with many apps preinstalled to allow you to browse the web, send and receive email, and access entertainment. Spend some time exploring these apps to learn how your tablet can be most useful for you.
Additional Information
Trouble Shooting
Tablet displays network or service error message
- When you are located in places with poor signals, your tablet may lose its Wi-Fi connection. Try moving closer to the Wi-Fi router.
Touch screen response is slow or incorrect
If the tablet's touch screen response is incorrect, please try the following:
- Remove any protective film of the touch screen. The protective film may prevent the device recognition input.
- Make sure that your fingers dry and clean before you tap the touch screen.
- Restart the tablet to clear any temporary software bugs.
- Make sure that the tablet's software has been upgraded to the latest version.
Tablet is frozen or a serious error appears
- If the tablet is frozen or suspended, you may need to close the app program or reset the tablet.
- If the tablet is frozen or slow to respond, press & hold the power button for 8 seconds to reset the tablet.
- If that doesn't work, insert a paper clip into the RESET hole on the back of the tablet.
Tablet gets warm
- When using for a long time, the tablet may be warm. This is normal and will not affect the life or performance of the unit.
Tablet can not show video of opposite side during skype call
- The Wi-Fi signal is poor. Please move close to your wireless router, or disconnect other devices from your wireless router, or increase bandwidth of internet connection.
- Please check the Wi-Fi setting. It's recommended to use an IEEE 802.11 b/g/n certified Wi-Fi network.
Specifications
Power: DC IN 5V (operate with AC adapter)
Front camera: 0.3 Megapixe, rear camera: 2.0 Megapixe
Copyright and Trademark Notices
Android, Google, Google Play and other marks are trademarks of Google Inc.
The Wi-Fi CERTIFIED Logo is a certification mark of the Wi-Fi Alliance. The Wi-Fi Protected Setup Mark is a mark of the Wi-Fi Alliance.
Specifications subject to change without notice.
Limited Warranty
AVC MULTIMEDIA (“AVC”) makes the following limited warranty. This limited warranty extend to the original consumer purchaser and is limited to non-commercial use of the product.
One Year Parts & Labor Warranty
AVC products purchased in the United States or Canada are warranted to be free from defects in materials or workmanship for a period of one year from the date of their original retail purchase. If the unit fails to conform to this warranty, we will service the product using new or refurbished parts and products, at AVC's sole discretion.
During a period of one year from the effective warranty date, AVC will provide, when needed, service labor to repair a manufacturing defect at its designated Service Center. To obtain warranty service in the United States or Canada, you must first call our Customer Support Center at 1-877-252-6873 or 1-855-475-9646, during the hours listed in the box below. The determination of service will be made by AVC Customer Support. PLEASE DO NOT RETURN YOUR UNIT TO AVC WITHOUT PRIOR AUTHORIZATION. New or remanufactured replacements for defective parts or products will be used for repairs by AVC at its designated Service Center for one year from the effective warranty date. Such replacement parts or products are warranted for an additional one year from the date of repair or replacement. The Customer will be required to ship the unit to the Service Center indicated at the time Customer Support is contacted to make the necessary repairs. The customer is responsible for all transportation charges to the service facility.
Packaging and Shipping Instruction
When you send the product to the AVC service facility you must use the original carton box and packing material or an equivalent as designated by AVC.
Your Responsibility
(1) You must retain the original sale receipt to provide proof of purchase.
(2) These warranties are effective only if the product is purchased and operated in the United States or Canada.
(3) Warranties extend only to defects in material or workmanship, and do not extend to any product or parts which have been lost or discarded, or damage to product or parts caused by misuse, accident, improper operation or maintenance, or use in violation of instructions provided with the product, or to product which has been altered or modified without authorization of AVC, or to products or parts thereof which have had the serial number removed or changed.
Out of Warranty
In the event your product requires repair after the limited warranty period has expired, please contact our Customer Support Center at 1-877-252-6873 or 1-855-475-9646 or www.RCAtablets.com
Hours: Monday–Thursday: 9am–7pm, Friday: 9am–5pm, Saturday: 9am–NOON Eastern time.
Important: You are responsible for any transportation, shipping or insurance relative to the return of product to our Product Returns Center.
All warranties implied by state law, including the implied warranties of merchantability and fitness for a particular purpose, are expressly limited to the duration of the limited warranties set forth above. With the exception of any warranties implied by state law as hereby limited, the foregoing warranty is exclusive and in lieu of all other warranties, guarantees, agreements and similar obligations of manufacturer or seller with respect to the repair or replacement of any parts. In no event shall AVC be liable for consequential or incidental damages.
No person, agent, distributor, dealer or company is authorized to change, modify or extend the terms of these warranties in any manner whatsoever. The time within action must be commenced to enforce any obligation of AVC arising under the warranty or under any statute, or law of the United States or Canada or any state thereof, is hereby limited to one year from the date of purchase. This limitation does not apply to implied warranties arising under state law.
This warranty gives you specific legal rights and you may also have other rights, which may vary, from state to state. Some states do not allow limitation on how long an implied warranty lasts, when an action may be brought, or the exclusion or limitation of incidental or consequential damages, so the above provisions may not apply to you.
For more information on other products and services, please visit our web site at :
www.RCAtablets.com
Important: Also keep your "Bill of Sale" as proof of purchase.
Model no....
Product name....
Type of set....
Serial no....
Invoice no....
Date purchased....
Dealer name....
FOR SUPPORT, SERVICE AND REPAIR, PLEASE VISIT www.RCAtablets.com
Specifications and external appearance are subject to change without notice.
© 2014 AVC MULTIMEDIA
- Safety Precautions
- CAN ICES-3(B) / NMB-3(B)
- Service Information
- IMPORTANT SAFETY INSTRUCTIONS
- PLEASE READ AND SAVE THIS FOR FUTURE REFERENCE
- ADDITIONAL SAFETY INFORMATION
- Contents
- Safety Precautions ....1
- Important Safety Instructions 2
- Startup 4
- Connections 8
- Basic Operation 11
- Preinstalled Apps ....14
- Additional Information 15
- Limited Warranty 16
- Startup
- Overview of Controls
- Item
- Description
- Power Button 🔊
- Headphone Port
- Microphone
- Micro-USB Port
- DC Jack
- Vol+/- Key
- Micro SD Card Slot
- Reset
- Buttons
- Power Button
- Power the Tablet On
- Power the Tablet Off
- Sleep Mode
- Wake the Tablet from Sleep Mode
- Vol +/- Button
- Accessory
- Navigating the Home Screen
- Notification & Status Bar
- Notifi cation Shade
- Status Bar & Quick Settings
- Notification & Status Icons
- Home Screen Icons
- All Apps
- Back
- Home
- Recent Apps
- Connections
- Battery Management and Charging
- Battery Icon
- Charging the Battery
- Prolong the Battery Life
- Micro-USB
- Headphone
- Micro SD
- Notes:
- Connect to a Wi-Fi Network
- VPN (Virtual Private Network)
- Basic Operation
- First Time Operation
- Turning Your Tablet On for the First Time
- Using the Touchscreen
- Tap
- Press & Hold
- Drag or Swipe
- Zoom
- Customizing the Home Screen
- Google Now
- Voice Search & Voice Actions
- Turn Voice Search or Voice Action On
- Using Voice Search
- Using Voice Actions
- Google Play
- Settings
- WIRELESS & NETWORKS
- DEVICE
- PERSONAL
- ACCOUNTS
- SYSTEM
- About tablet
- Add an Account
- Remove an Account
- Preinstalled Apps
- Additional Information
- Trouble Shooting
- Tablet displays network or service error message
- Touch screen response is slow or incorrect
- Tablet is frozen or a serious error appears
- Tablet gets warm
- Tablet can not show video of opposite side during skype call
- Specifications
- Copyright and Trademark Notices
- Limited Warranty
- One Year Parts & Labor Warranty
- Packaging and Shipping Instruction
- Your Responsibility
- Out of Warranty
- www.RCAtablets.com
Brand : RCA
Model : RCT6272W23
Category : Tablet