
P2 - Video projector ASUS - Free user manual and instructions
Find the device manual for free P2 ASUS in PDF.


| Product Type | LED Video Projector |
| Display Technology | 0.45" DLP |
| Light Source | RGB LED |
| Light Source Life | 30,000 hours (max) |
| True Resolution | WXGA 1280x800 |
| Brightness | 350 Lumens |
| Contrast Ratio | 3500:1 DCR |
| Throw Ratio | 1.1 (42" @1m) |
| Projection Distance | 0.5 - 3 m |
| Screen Size | 20 - 120 inches |
| Keystone Correction | Digital, ±40° |
| Aspect Ratios | 16:10, 16:9, 4:3 |
| Inputs | HDMI/MHL, Mini VGA, USB 2.0, Micro SD, Audio Out |
| Built-in Speaker | 1.5W mono |
| Power Consumption | 27 - 50 W (on mode) |
| Standby Power | < 0.5 W |
| Dimensions (W x D x H) | 142.4 x 130 x 34.6 mm |
| Weight (approx) | 502 - 532 g (model dependent) |
| Noise Level | 25 - 34 dB (mode dependent) |
| Security | Kensington lock slot |
| Accessories | Remote control, power adapter, cables, carrying bag |
| Media Support | Photo (JPG, BMP), Video (various codecs), Audio (MP3, WMA, etc.), Document (PDF, Word, Excel, PowerPoint) |
Frequently Asked Questions - P2 ASUS
User questions about P2 ASUS
0 question about this device. Answer the ones you know or ask your own.
Ask a new question about this device
Download the instructions for your Video projector in PDF format for free! Find your manual P2 - ASUS and take your electronic device back in hand. On this page are published all the documents necessary for the use of your device. P2 by ASUS.
USER MANUAL P2 ASUS
natural_image
Illustration of a black projector with grid-patterned lens and control panel (no text or symbols)E9719
September 2014
Revised Edition V3
COPYRIGHT AND WARRANTY INFORMATION
No part of this manual, including the products and software described in it, may be reproduced, transmitted, transcribed, stored in a retrieval system, or translated into any language in any form or by any means, except documentation kept by the purchaser for backup purposes, without the express written permission of ASUSTeK COMPUTER INC. ("ASUS").
Product warranty or service will not be extended if: (1) the product is repaired, modified or altered, unless such repair, modification of alteration is authorized in writing by ASUS; or (2) the serial number of the is defaced or missing.
ASUS PROVIDES THIS MANUAL "AS IS" WITHOUT WARRANTY OF ANY KIND, EITHER EXPRESS OR IMPLIED, INCLUDING BUT NOT LIMITED TO THE IMPLIED WARRANTIES OR CONDITIONS OF MERCHANTABILITY OR FITNESS FOR A PARTICULAR PURPOSE. IN NO EVENT SHALL ASUS, ITS DIRECTORS, OFFICERS, EMPLOYEES OR AGENTS BE LIABLE FOR ANY INDIRECT, SPECIAL, INCIDENTAL, OR CONSEQUENTIAL DAMAGES (INCLUDING DAMAGES FOR LOSS OF PROFITS, LOSS OF BUSINESS, LOSS OF USE OR DATA, INTERRUPTION OF BUSINESS AND THE LIKE), EVEN IF ASUS HAS BEEN ADVISED OF THE POSSIBILITY OF SUCH DAMAGES ARISING FROM ANY DEFECT OR ERROR IN THIS MANUAL OR PRODUCT.
Products and corporate names appearing in this manual may or may not be registered trademarks or copyrights of their respective companies, and are used only for identification or explanation and to the owners' benefit, without intent to infringe.
SPECIFICATIONS AND INFORMATION CONTAINED IN THIS MANUAL ARE FURNISHED FOR INFORMATIONAL USE ONLY, AND ARE SUBJECT TO CHANGE AT ANY TIME WITHOUT NOTICE, AND SHOULD NOT BE CONSTRUED AS A COMMITMENT BY ASUS. ASUS ASSUMES NO RESPONSIBILITY OR LIABILITY FOR ANY ERRORS OR INACCURACIES THAT MAY APPEAR IN THIS MANUAL, INCLUDING THE PRODUCTS AND SOFTWARE DESCRIBED IN IT.
Copyright © 2014 ASUSTeK COMPUTER INC. All Rights Reserved.
LIMITATION OF LIABILITY
Circumstances may arise where because of a default on ASUS' part or other liability, you are entitled to recover damages from ASUS. In each such instance, regardless of the basis on which you are entitled to claim damages from ASUS, ASUS is liable for no more than damages for bodily injury (including death) and damage to real property and tangible personal property; or any other actual and direct damages resulted from omission or failure of performing legal duties under this Warranty Statement, up to the listed contract price of each product.
ASUS will only be responsible for or indemnify you for loss, damages or claims based in contract, tort or infringement under this Warranty Statement.
This limit also applies to ASUS' suppliers and its reseller. It is the maximum for which ASUS, its suppliers, and your reseller are collectively responsible.
UNDER NO CIRCUMSTANCES IS ASUS LIABLE FOR ANY OF THE FOLLOWING: (1) THIRD-PARTY CLAIMS AGAINST YOU FOR DAMAGES; (2) LOSS OF, OR DAMAGE TO, YOUR RECORDS OR DATA; OR (3) SPECIAL, INCIDENTAL, OR INDIRECT DAMAGES OR FOR ANY ECONOMIC CONSEQUENTIAL DAMAGES (INCLUDING LOST PROFITS OR SAVINGS), EVEN IF ASUS, ITS SUPPLIERS OR YOUR RESELLER IS INFORMED OF THEIR POSSIBILITY.
SERVICE AND SUPPORT
Visit our multi-language web site at http://support.asus.com
Table of Contents
About this manual 5
Conventions used in this manual 6
Typography....6
Multi-language versions 6
Safety precautions....7
Using your LED projector....7
Servicing and replacement of parts 7
Caring for your LED projector 8
Proper disposal....8
Chapter 1: Knowing your LED projector
Features 10
Top view 10
Front view....12
Rear view 13
Left side 16
Right side....17
Bottom view....18
LED projector remote control....19
Replacing the battery 21
Chapter 2: Setting up
Operating your LED projector 24
-
Connect the LED projector to the power adapter.....24
-
Connect the LED projector to your device....27
-
Adjust the height of the LED projector. 28
-
Press the power button. 30
-
Adjust the image focus....31
Chapter 3: Using the onscreen display menu
Launching programs from the onscreen display menu....34
Control panel grid ....35
Using your LED projector for the first time....36
Accessing your LED projector's settings....38
Using Demo Mode....46
Enabling Demo Mode......46
Creating and playing your own demo video....47
Using the Media Center 48
Launching the Media Center....48
Opening files from the SD Card or USB Drive....49
Multi-language versions 56
Appendices
Federal Communications Commission Statement....58
Regional notice for California....58
Canadian Department of Communications Statement....59
Global Environmental Regulation Compliance and Declaration .59
ASUS Recycling/Takeback Services....59
Support PC Timings....60
Specifications for P2 LED projector series ....61
About this manual
This manual provides information about the hardware and software features of your LED projector through the following chapters:
Chapter 1: Knowing your LED Projector
This chapter details the parts of your LED projector and its accompanying remote control.
Chapter 2: Setting up
This chapter shows you how to set up your LED projector and use its parts for input device connection.
Chapter 3: Using the onscreen display menu
This chapter talks about the features of your LED projector's onscreen display menu and how to navigate it using the control panel.
Appendices
This section includes safety notices for your LED projector.
Conventions used in this manual
To highlight key information in this manual, some text are presented as follows:
IMPORTANT! This message contains vital information that must be followed to complete a task.
NOTE: This message contains additional information and tips that can help complete tasks.
WARNING! This message contains important information that must be followed to keep you safe while performing tasks and prevent damage to your LED projector's data and components.
Typography
Bold = This indicates a menu or an item that must be selected.
Italic = This indicates sections that you can refer to in this manual.
Multi-language versions
Download other language versions of this E-Manual via this website:http://support.asus.com
Safety precautions
Using your LED projector
• Refer to the manual and take note of the safety instructions before operating your LED projector.
• Follow the notes and warnings stated in the user manual.
- Do not place your LED projector on uneven or unstable surfaces.
- Do not use your LED projector in smoky environments. Smoke residue may cause build-up on critical parts and damage the LED projector or decrease its performance.
- Keep the LED projector's plastic packages out of the reach of children.
- Do not block or place anything near the LED projector's ventilation holes. Doing so may cause internal heat build-up that can degrade picture quality and damage the projector.
- Ensure that the operating voltage of your LED projector matches the voltage of your power source.
Servicing and replacement of parts
- Do not disassemble or attempt to service this LED projector by yourself. Contact your local ASUS service center for assistance.
- Risk of explosion if battery is replaced by an incorrect type. Dispose used batteries according to safety instructions and contact your local ASUS service center for assistance.
- When replacing parts of your LED projector, purchase items as specified by ASUS and contact your local service center for assistance.
Caring for your LED projector
- Switch off then unplug the LED projector from the power outlet before cleaning it.
- When cleaning the LED projector's housing, use a clean soft cloth dampened with water or a mix of water and neutral detergent. Wipe it dry using a soft dry cloth.
- Ensure that the lens is cool before cleaning it. Gently wipe the lens using a lens cleaning paper. Do not touch the lens with your hands.
- Do not use liquid or aerosole cleaners, benzene, or thinners on your LED projector.
- Never operate this LED projector immediately after moving it from a cold location. When the LED projector is exposed to a drastic change in temperature, moisture may condense on the lens and its other internal parts. To prevent this, use the unit two (2) hours after an extreme or sudden change in temperature occurs.
Proper disposal

Do not throw your LED projector in municipal waste. This product has been designed to enable proper reuse of parts and recycling. The symbol of the crossed out wheeled bin indicates that the product (electrical, electronic equipment and mercury-containing button cell battery) should not be placed in municipal waste. Check local regulations for disposal of electronic products.

Do not throw the battery in municipal waste. The symbol of the crossed out wheeled bin indicates that the battery should not be placed in municipal waste.
Chapter 1:
Knowing your LED projector
natural_image
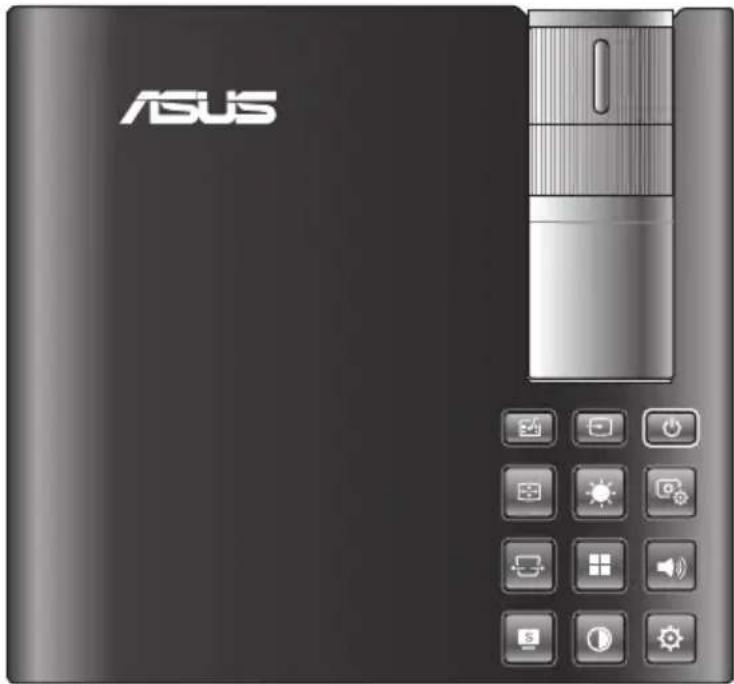
Exterior view of a Asus VR headset with control panel and display buttons (no readable text or symbols)Features
Top view
NOTE: Actual appearance may vary depending on model.
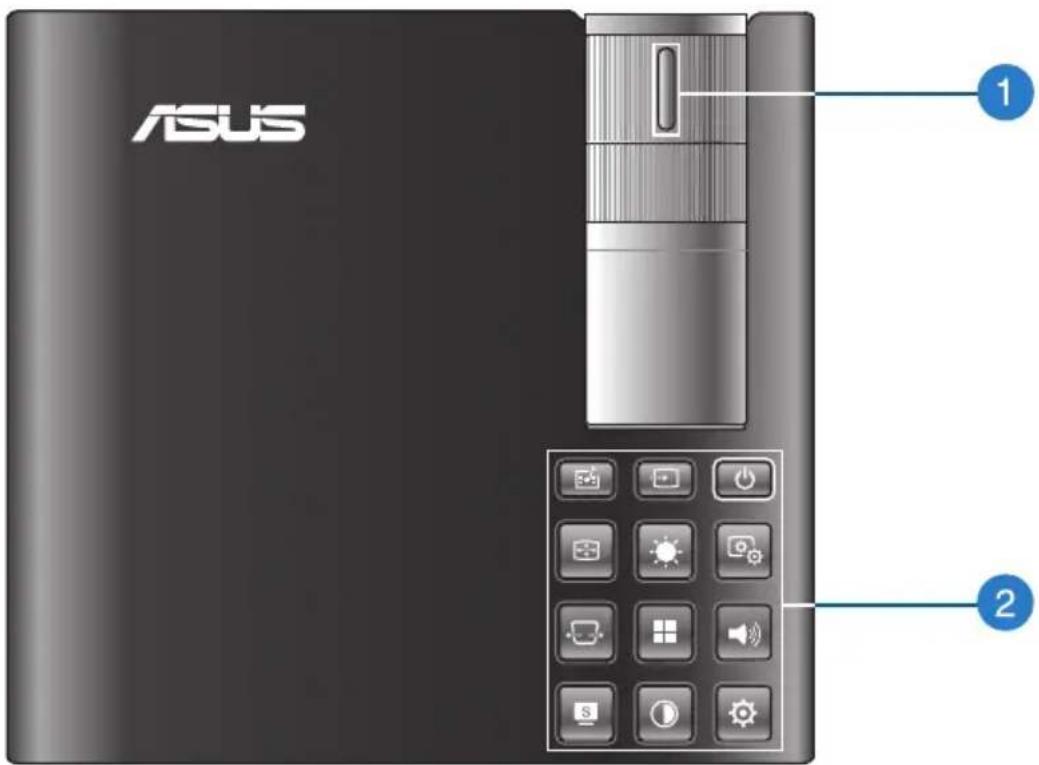
1 Focus ring
The focus ring allows you to adjust the image focus of your LED projector.

Control panel buttons
The control panel buttons allow you to navigate the onscreen display menu. Individually, these buttons also correspond to a specific LED projector setting as indicated below.

Media Center Input Power

natural_image
Three gray rounded squares with icons: camera, sun, and gear (no text or symbols)Image Position Brightness Image Setting

natural_image
Three gray square buttons with white icons: a folder, a grid, and a speaker symbol (no text or labels)Keystone Main menu/OK Volume

natural_image
Three gray square buttons with icons: a monitor, a pie chart, and a gear (no text or symbols)Splendid Contrast Setup

VGA HDMI
NOTE: For more information on using the control panel buttons to access your LED projector's settings, refer to the Accessing your LED projector's settings section in this manual.
* on selected models only
Front view
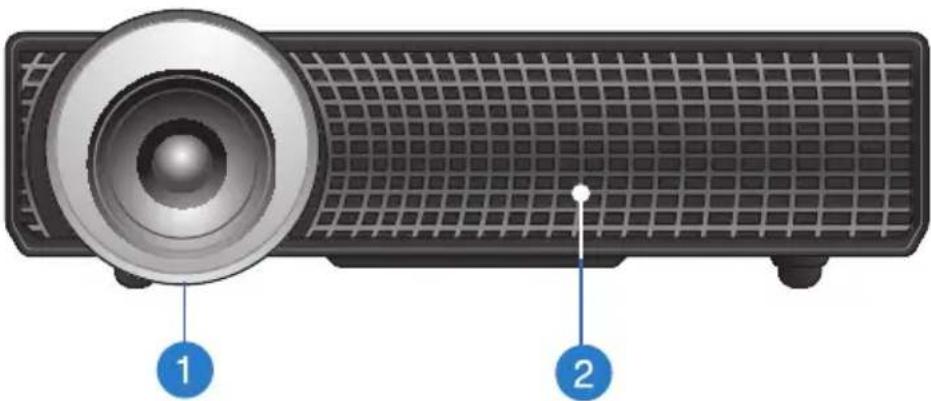
1 Lens
The lens projects video or image files onscreen from your input device.
WARNING! Do not touch the lens using your hands or any sharp object.
2 Air vents
The air vents allow cool air to enter and warm air to exit the LED projector.
WARNING! Ensure that paper, books, clothing, cables, or other objects do not block any of the air vents or else overheating may occur.
Rear view
P2B/P2M
P2E
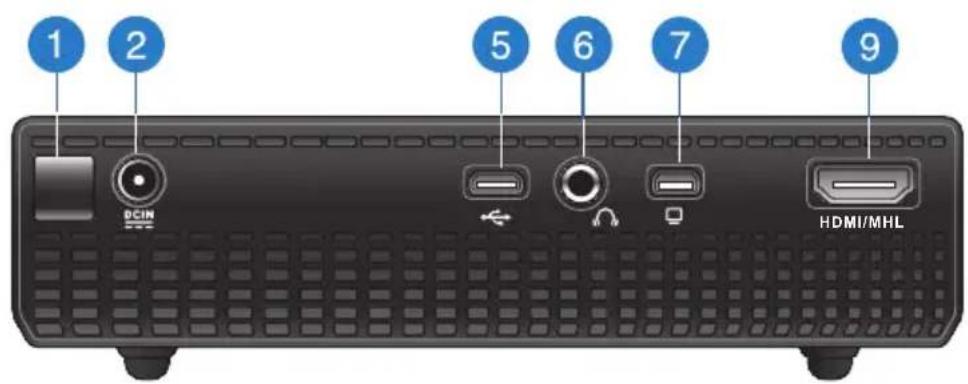
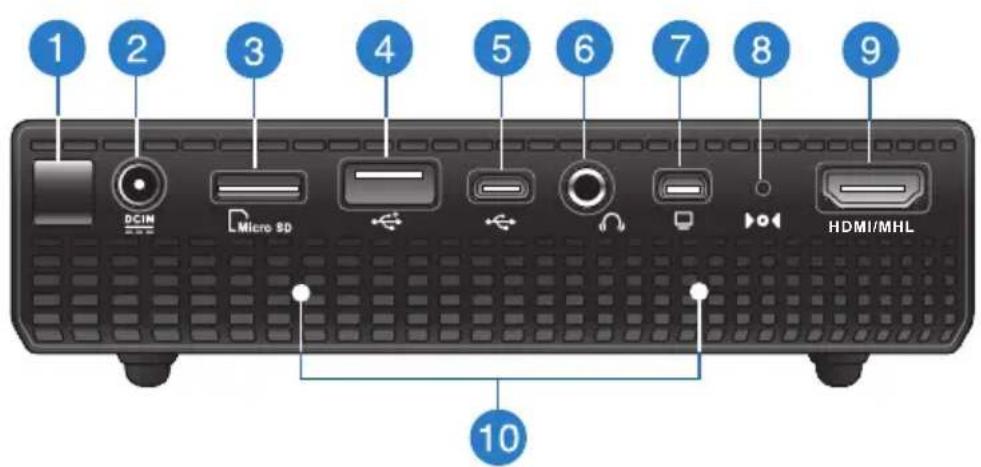
1 Infrared (IR) sensor
The IR sensor detects signal from your LED projector's remote control, allowing you to access the LED projector's control panel from a distance of up to ten (10) meters and a receiving angle of 15^ .
2 Power (DC) input port
Insert the bundled power adapter into this port to charge the battery pack and supply power to your LED projector.
WARNING! The adapter may become warm to hot while in use. Do not cover the adapter and keep it away from your body while it is connected to a power source.
3 Micro SD card reader
This built-in memory card reader supports microSD and microSDHC card formats.
4 USB 2.0 port
The USB 2.0 (Universal Serial Bus 2.0) port is compatible with USB 2.0 or USB 1.1 devices.
5 Micro USB 2.0 port\*
This port also allows you to transfer data from your input device to your LED projector.
6 Audio output jack port
The audio output jack port allows you to connect your LED projector to amplified speakers or headphones.
7 Mini VGA port
The mini VGA port allows you to connect your LED projector to a standard VGA-compatible device.
8 Manual reset hole\*
Insert a straightened paperclip in this hole to restore your LED projector to its default settings.
*on selected models only

HDMI/MHL port
This port is for the HDMI (High-Definition Multimedia Interface) connector and also supports MHL (Mobile HI-Definition Link) compatible devices. This port is HDCP compliant for HD DVD, Blu-ray, and other protected content playback.

Air vents
The air vents allow cool air to enter and warm air to exit the LED projector.
WARNING! Ensure that paper, books, clothing, cables, or other objects do not block any of the air vents or else overheating may occur.
*on selected models only
Left side
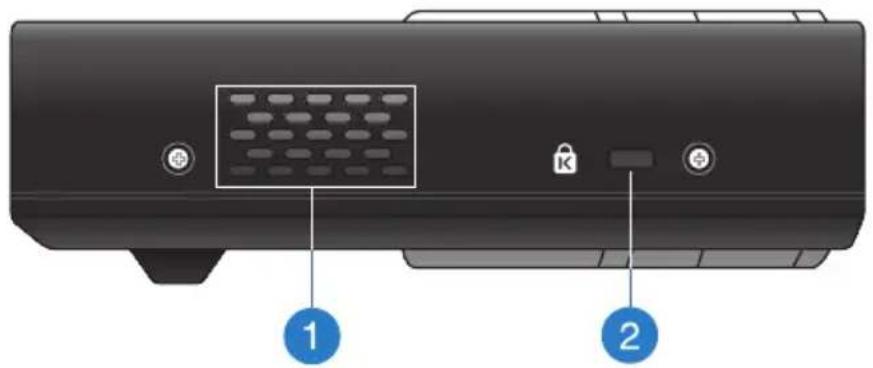
1 Air vents
The air vents allow cool air to enter and warm air to exit the LED projector.
WARNING! Ensure that paper, books, clothing, cables, or other objects do not block any of the air vents or else overheating may occur.
2 Kensington® security slot
The Kensington ^® security slot allows you to secure your LED projector using Kensington ^® compatible LED projector security products.
Right side
natural_image
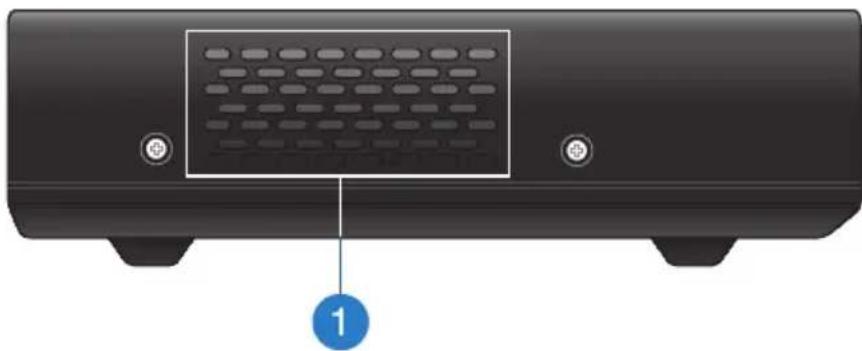
Front view of a black electronic device with ventilation grilles and buttons, labeled with number 1 (no text or symbols on the device itself)1 Air vents
The air vents allow cool air to enter and warm air to exit the LED projector.
WARNING! Ensure that paper, books, clothing, cables, or other objects do not block any of the air vents or else overheating may occur.
Bottom view
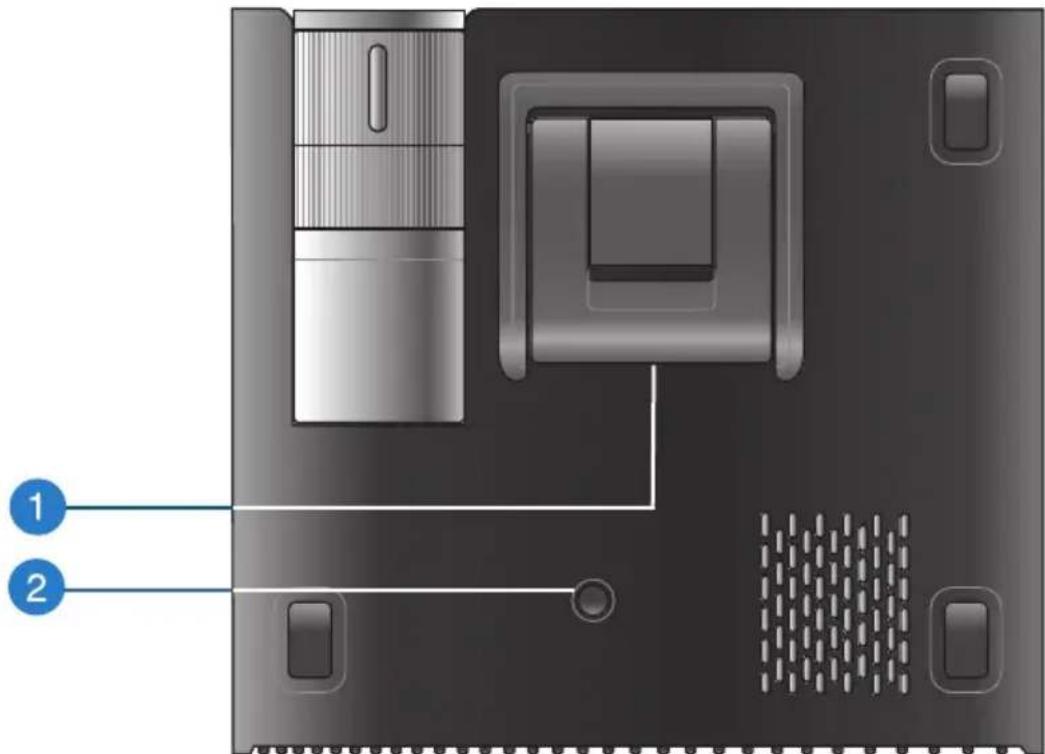
1 Built-in stand
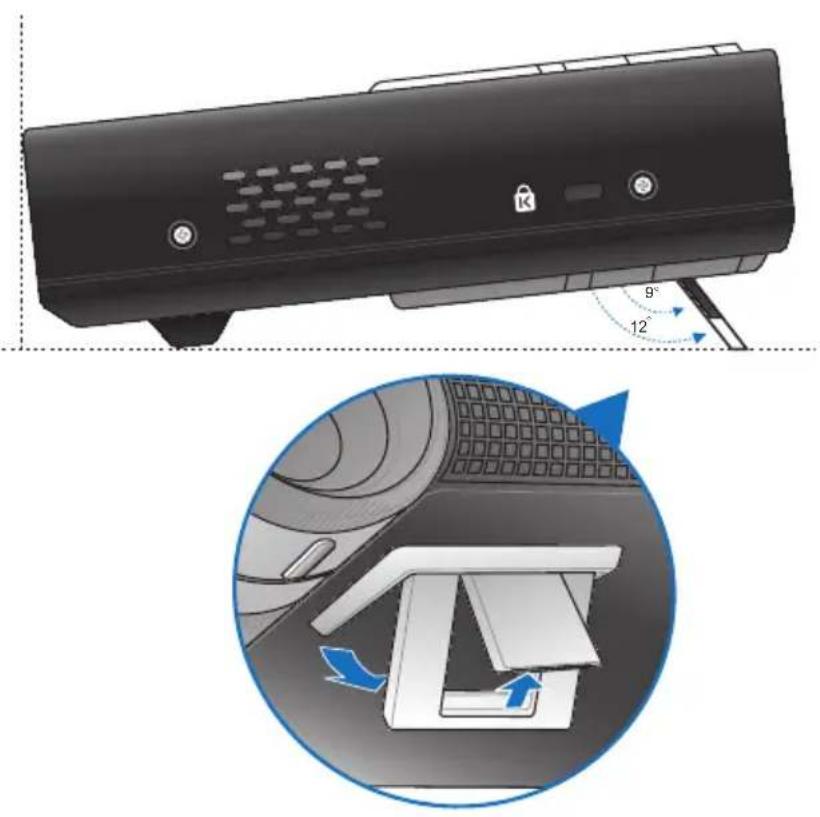
This LED projector comes with a built-in stand that allows you to adjust the height of the projector by either 9^ or 12^ .
2 Tripod socket
Connect the LED projector to a tripod using this socket.
LED projector remote control
NOTE: Actual appearance may vary depending on model.
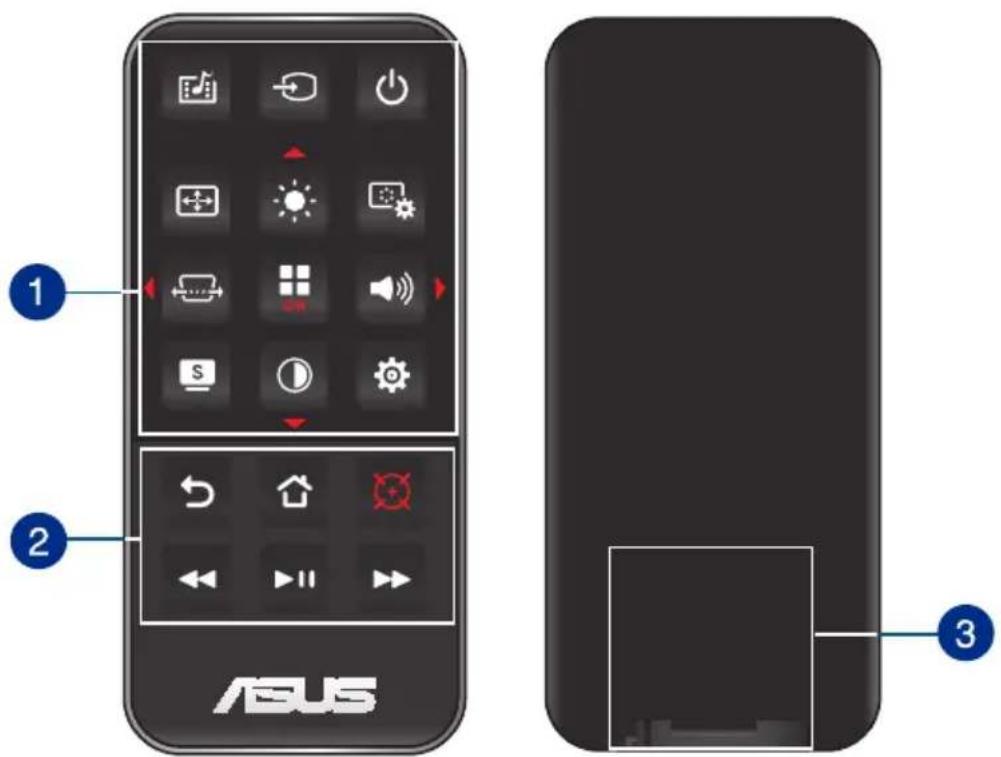
1 Control panel buttons
The control panel buttons allow you to navigate the onscreen display menu. Individually, these buttons also correspond to a specific LED projector setting.
NOTE: For more details on using the control panel buttons, refer to the Using the onscreen display menu section in this manual.
2 Remote control buttons
These additional buttons allow you to use the LED projector from a distance of up to 10 meters.
Back - Press this button to go back to the previous screen.
Home - Press this button to go back to the home screen.
Laser pointer - Press this button to activate the laser pointer of the remote control.
Rewind - Press this button to rewind your audio or video file.
Play/Pause - Press this button to play or stop your audio or video file.
Fast-forward - Press this button to fast-forward your audio or video file.
3 Battery compartment
The battery compartment allows you to use a CR2025 or CR2032 lithium coin battery to power your LED projector's remote control.
NOTE: For more details on using the battery compartment, refer to the Replacing the battery section in this manual.
Replacing the battery
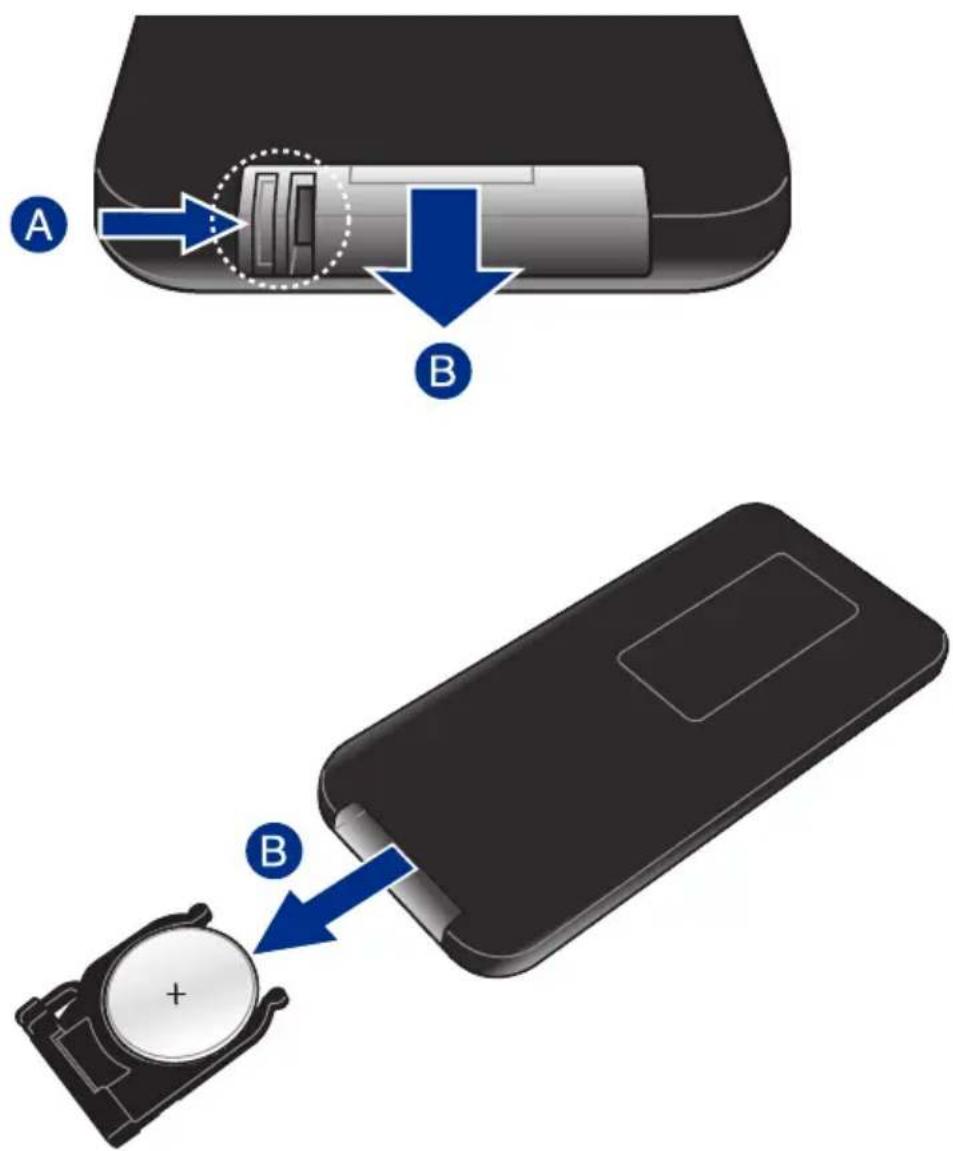
A. Move the battery compartment's latch to the right to unlock the battery holder.
B. Pull down the battery holder and remove it completely out of the battery compartment.
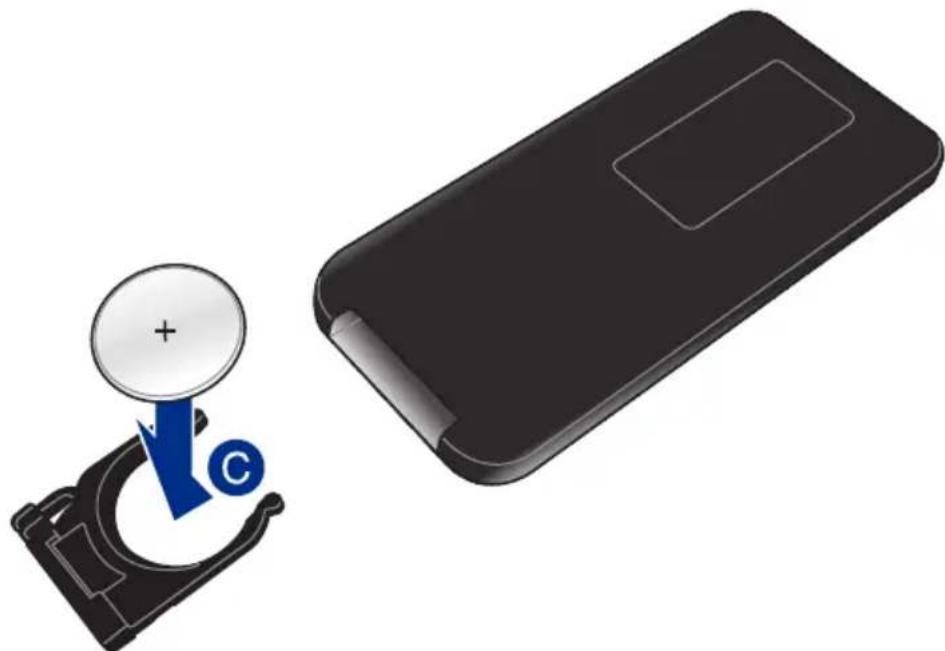
C. Remove the old battery then insert the new lithium coin battery into the battery holder with the positive side (+) facing up.
natural_image
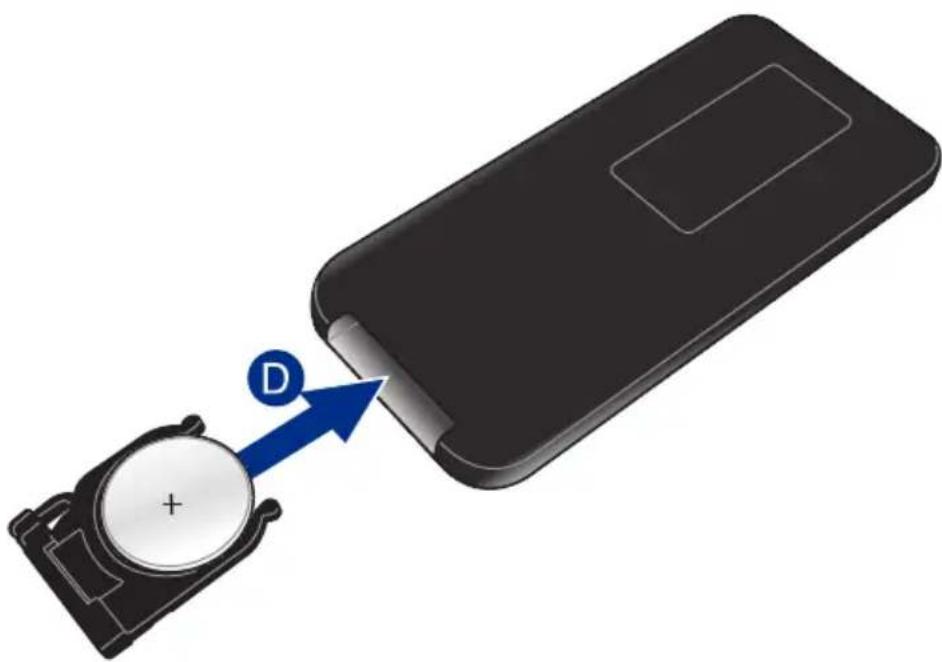
Illustration of a black remote control device with a magnifying glass and a blue circular button labeled 'C' (no text or symbols on the device itself)D. Slide the battery holder back into the battery compartment. Push it all the way in until you hear a soft click, indicating that the battery compartment is locked back in place.
natural_image
Diagram showing a device being inserted into a remote control case, with a magnifying glass and blue arrow indicating direction (no text or symbols present)Chapter 2:
Setting up
natural_image
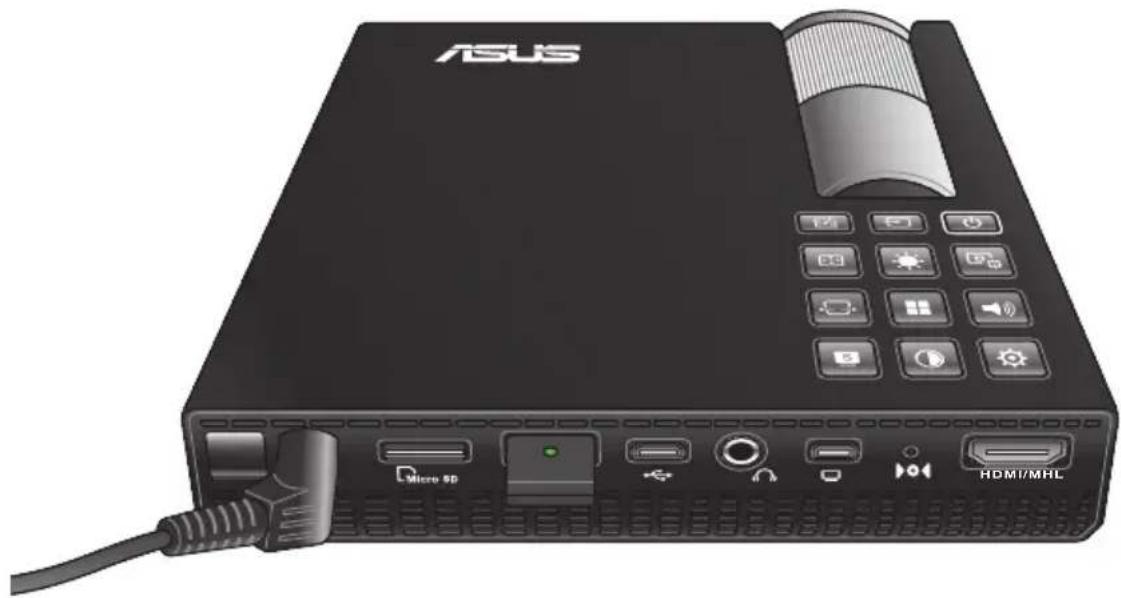
Black ASUS remote control console with labeled ports and a cable, no visible text or symbols beyond brandingOperating your LED projector
This portable LED projector allows you to plug and play your devices so you can easily open multimedia files.
For your safety and to maintain the quality of this unit, refer to the following steps when operating your LED projector.
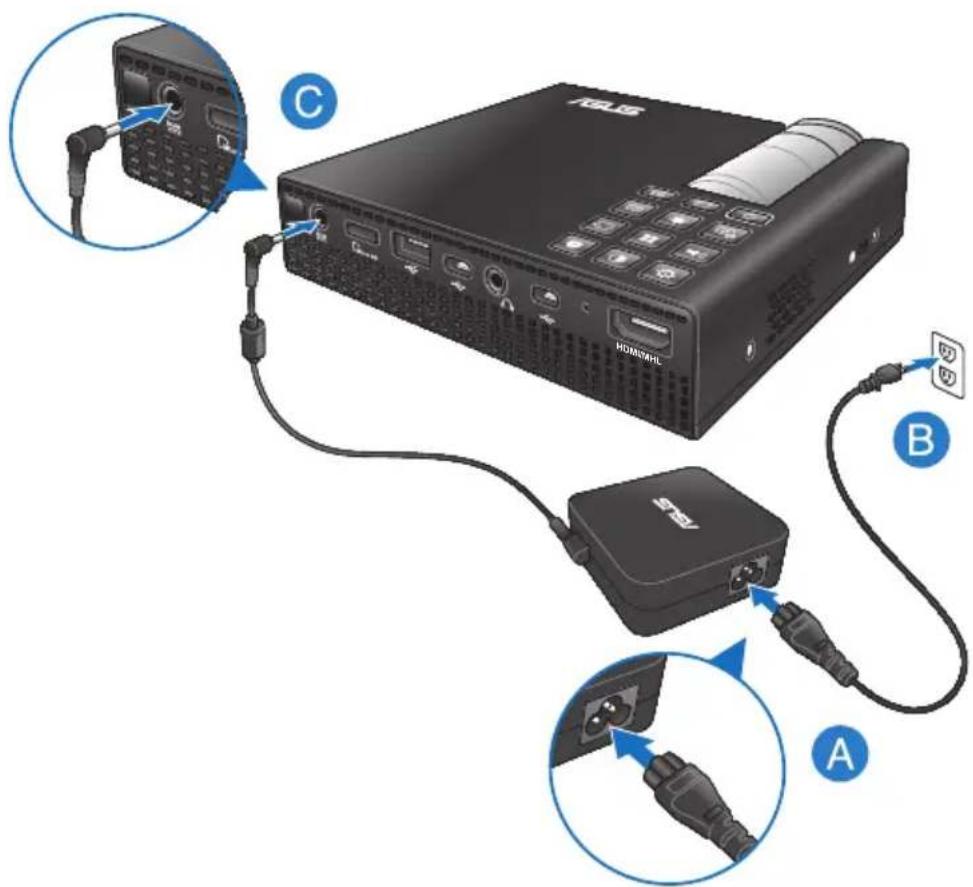
1. Connect the LED projector to the power adapter.
A. Connect the AC/DC power cord to the power adapter.
B. Connect the AC power cord to a power source.
C. Connect the DC power connector to your LED projector.
NOTE: This LED projector is also compatible with ASUS power adapters within the 65W to 90W range.
WARNING!
Read the following precautions for your LED projector's battery pack.
- Only ASUS-authorized technicians should remove the battery inside the device.
- The battery used in this device may present a risk of fire or chemical burn if removed or disassembled.
• Follow the warning labels for your personal safety. - Risk of explosion if battery is replaced by an incorrect type.
• Do not dispose of in fire. - Never attempt to short-circuit your LED projector's battery.
• Never attempt to dissamble and reassemble the battery.
• Discontinue usage if leakage is found. - The battery and its components must be recycled or disposed of properly.
- Keep the battery and other small components away from children.
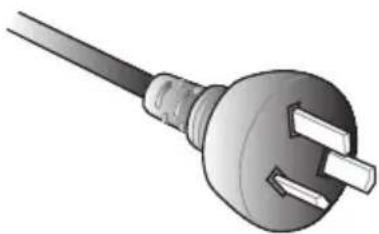
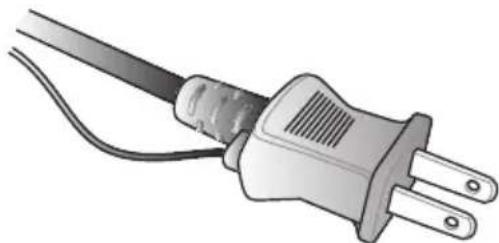
AC power cord requirements
Use the correct AC plug type according to your current location.
IMPORTANT! Contact your sales dealer if the AC power cord bundled with your LED projector does not match your local power source.
NOTE: We highly recommend that you use a video source device that also uses a grounding type plug to prevent signal interference due to voltage fluctuations.
natural_image
Illustration of a black and white electrical outlet plug with two leads (no text or symbols)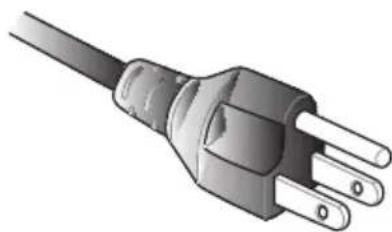
natural_image
Illustration of a black electrical outlet plug with three leads (no text or symbols)for Australia and Mainland China for U.S.A., Canada, and Taiwan
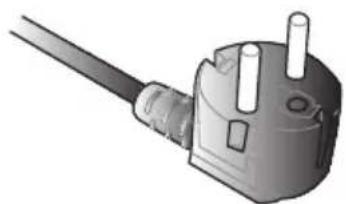
natural_image
Close-up of a black electrical outlet plug with three wires (no text or symbols visible)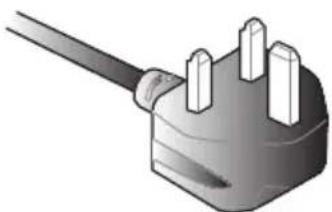
natural_image
Illustration of a plug with three pins (no text or symbols)for Continental Europe for U.K.
natural_image
Illustration of an electric plug with two terminal leads and a black plastic housing (no text or symbols)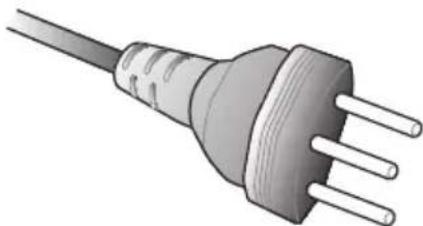
natural_image
Illustration of a three-pin electrical outlet plug (no text or symbols)for Japan for Sweden
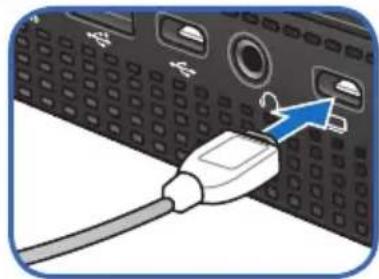
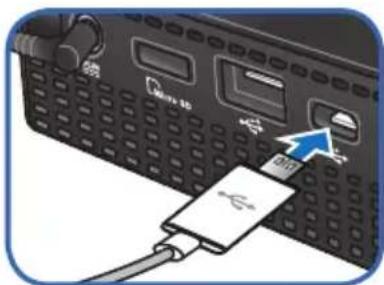
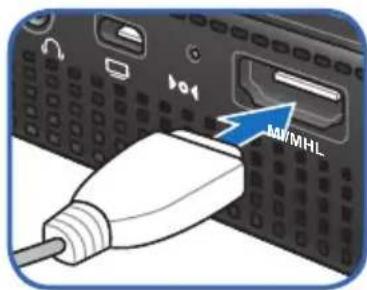
2. Connect the LED projector to your device.
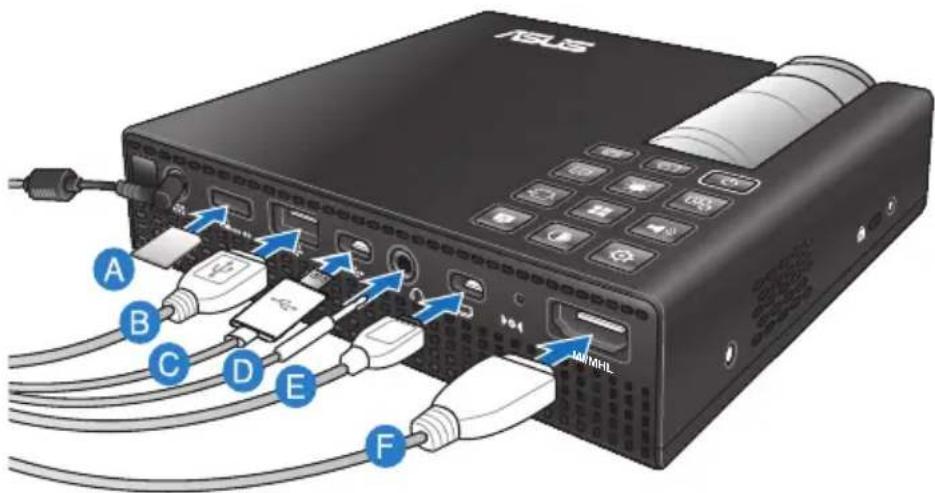
A Micro SD card
natural_image
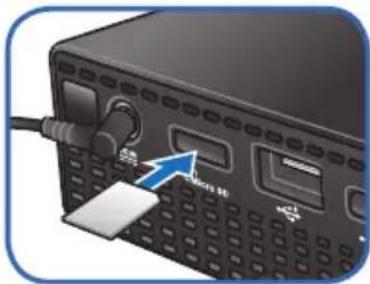
Close-up of a black electronic device with ports and a blue arrow pointing to a labeled component (no readable text or symbols)D Audio output jack
natural_image
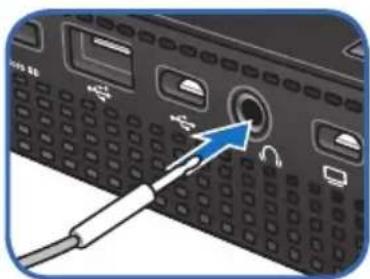
Close-up of a computer keyboard with a blue arrow pointing to the button (no text or symbols visible)B USB 2.0
natural_image
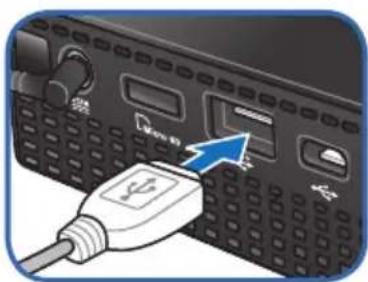
Illustration of a USB port connected to a computer interface (no text or symbols visible)E Mini VGA
natural_image
Close-up of a computer interface with a cable inserted, showing ports and buttons (no text or symbols visible)C Micro USB
F HDMI/MHL
3. Adjust the height of the LED projector.
Your LED projector comes with a built-in stand that helps adjust the image height onscreen.
WARNING!
- Possibly hazardous optical radiation emitted from this product. Do not stare at operating lamp. May be harmful to the eyes.
- Ensure that the built-in stand is fully retracted before placing the LED projector inside the projector bag.
NOTES:
- Place the LED projector on a stable flat surface.
- Keep a space of 30 cm or more between the sides of the LED projector.
- Consult your dealer for special installation procedures like suspending the LED projector from the ceiling.
Screen size and projection distance table
Adjust the LED projector's distance from the screen using the table below.
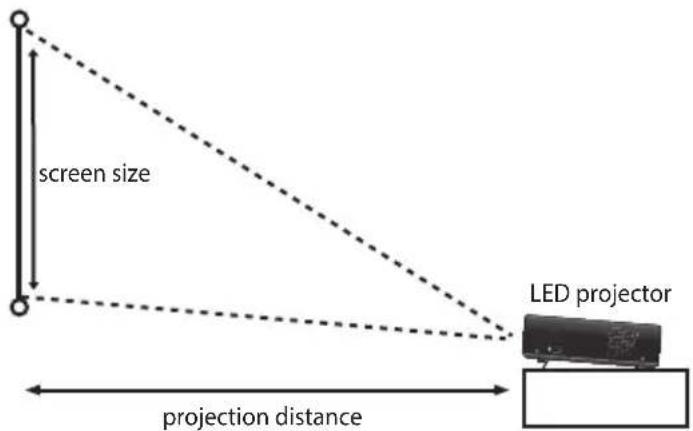
| Screen size - 16:10 Projection distance (inches) (millimeters) (meters) | |
| 30 762 0.71 | |
| 40 1016 0.95 | |
| 60 1524 1.42 | |
| 80 2032 1.90 | |
| 100 2540 2.37 | |
| 120 3048 2.84 | |
| 140 3556 3.32 | |
| 160 4064 3.79 | |
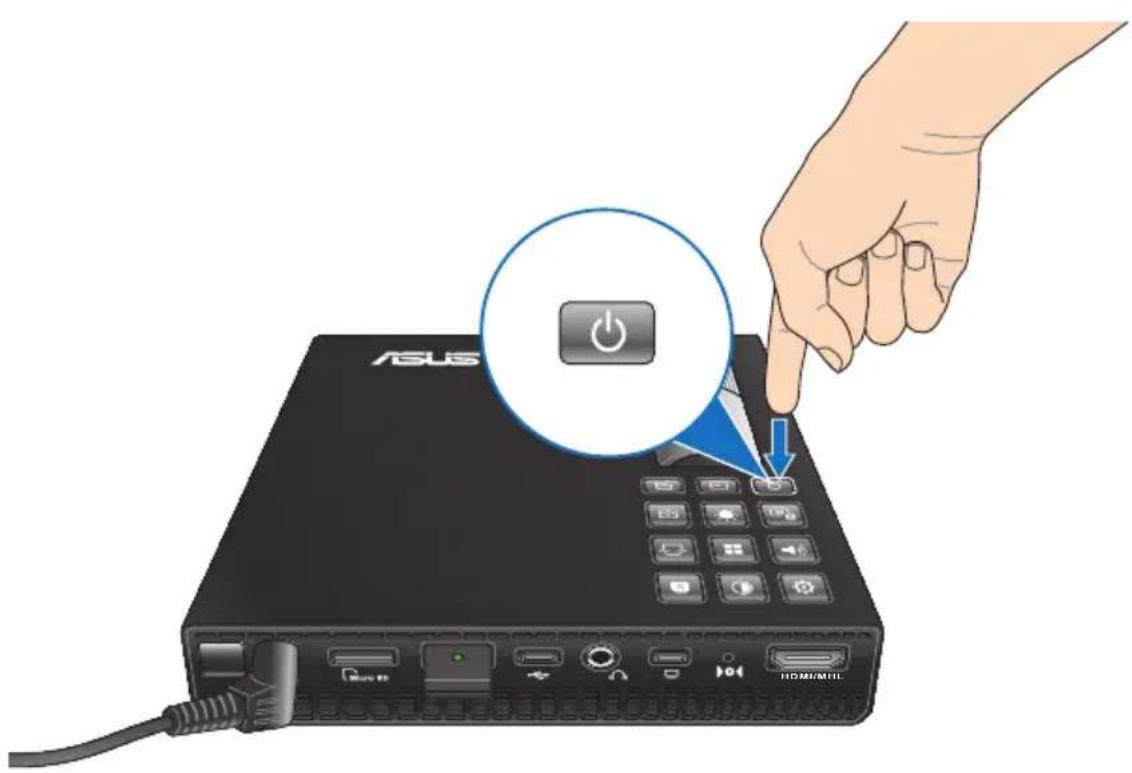
4. Press the power button.
NOTE: For safety reasons, some models require you to press the power button for about 2 seconds to turn on your LED projector.
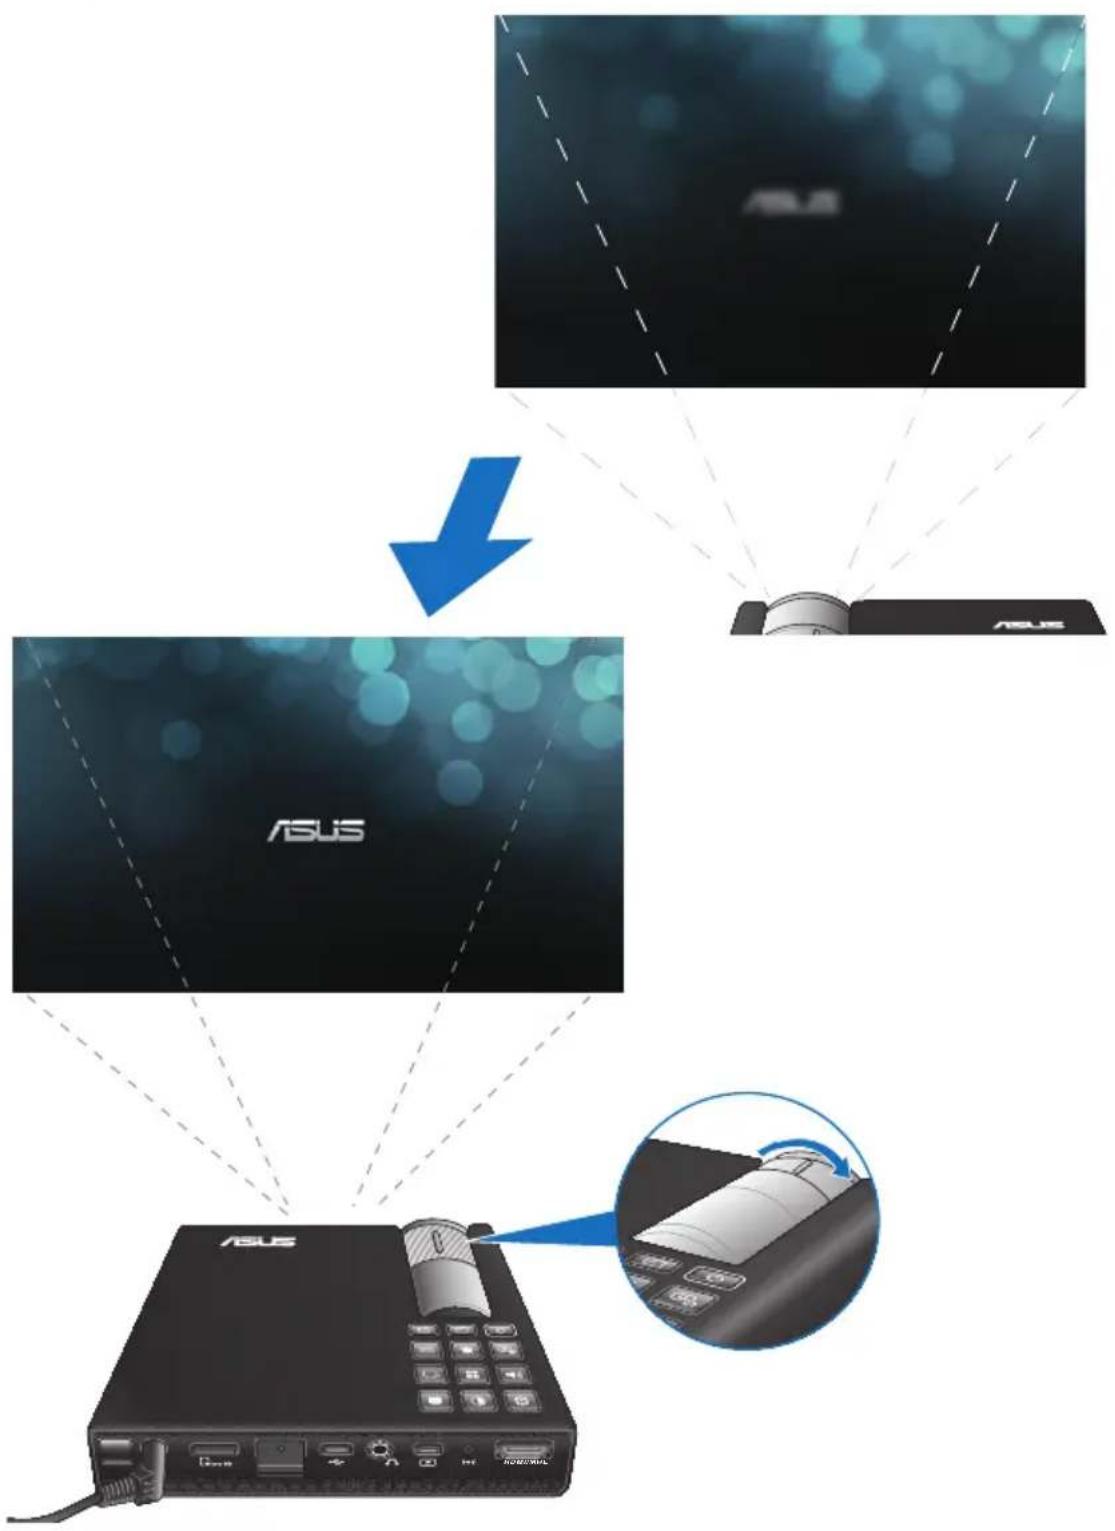
5. Adjust the image focus.
Move the focus ring to the left or to the right to adjust the image focus.
NOTE: Use a still image when adjusting the onscreen display.
flowchart
graph TD
    A["Device 1"] --> B["Device 2"]
    B --> C["Device 3"]
    C --> D["Device 4"]
    D --> E["Device 5"]
    E --> F["Device 6"]
    F --> G["Device 7"]
    G --> H["Device 8"]
    H --> I["Device 9"]
    I --> J["Device 10"]
    J --> K["Device 11"]
    K --> L["Device 12"]
    L --> M["Device 13"]
    M --> N["Device 14"]
    N --> O["Device 15"]
    O --> P["Device 16"]
    P --> Q["Device 17"]
    Q --> R["Device 18"]
    R --> S["Device 19"]
    S --> T["Device 20"]
    T --> U["Device 21"]
    U --> V["Device 22"]
    V --> W["Device 23"]
    W --> X["Device 24"]
    X --> Y["Device 25"]
    Y --> Z["Device 26"]
    Z --> AA["Device 27"]
    AA --> AB["Device 28"]
    AB --> AC["Device 29"]
    AC --> AD["Device 30"]
    AD --> AE["Device 31"]
    AE --> AF["Device 32"]
    AF --> AG["Device 33"]
    AG --> AH["Device 34"]
    AH --> AI["Device 35"]
    AI --> AJ["Device 36"]
    AJ --> AK["Device 37"]
    AK --> AL["Device 38"]
    AL --> AM["Device 39"]
    AM --> AN["Device 40"]
    AN --> AO["Device 41"]
    AO --> AP["Device 42"]
    AP --> AQ["Device 43"]
    AQ --> AR["Device 44"]
    AR --> AS["Device 45"]
    AS --> AT["Device 46"]
    AT --> AU["Device 47"]
    AU --> AV["Device 48"]
    AV --> AW["Device 49"]
    AW --> AX["Device 50"]
Chapter 3:
Using the onscreen display menu
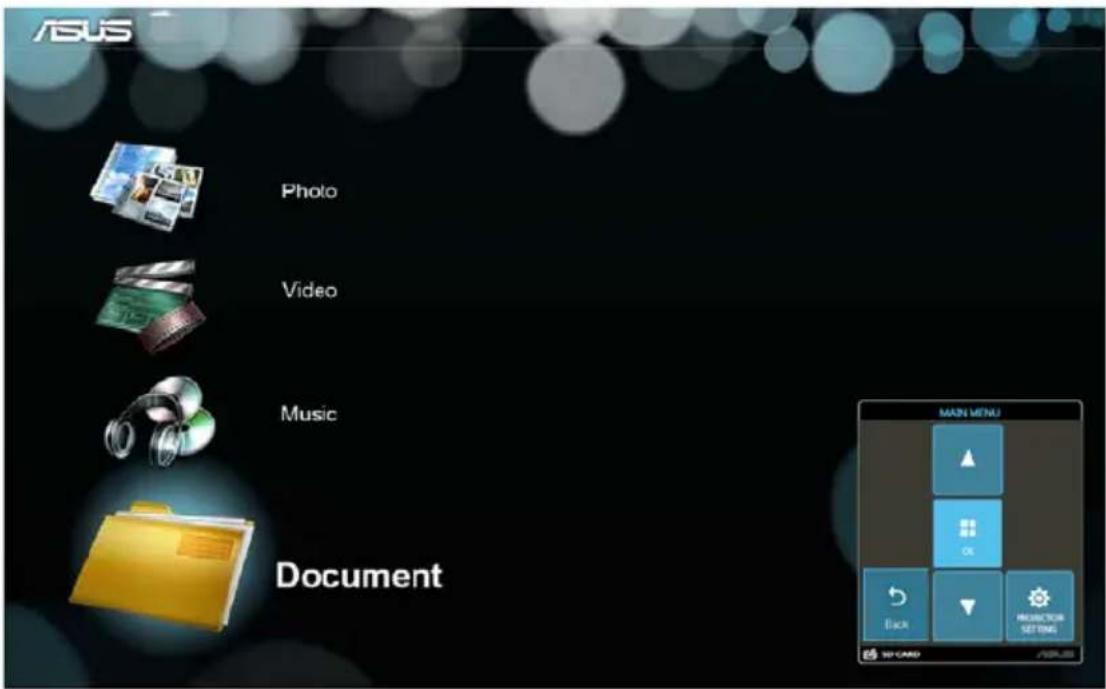
Launching programs from the onscreen display menu
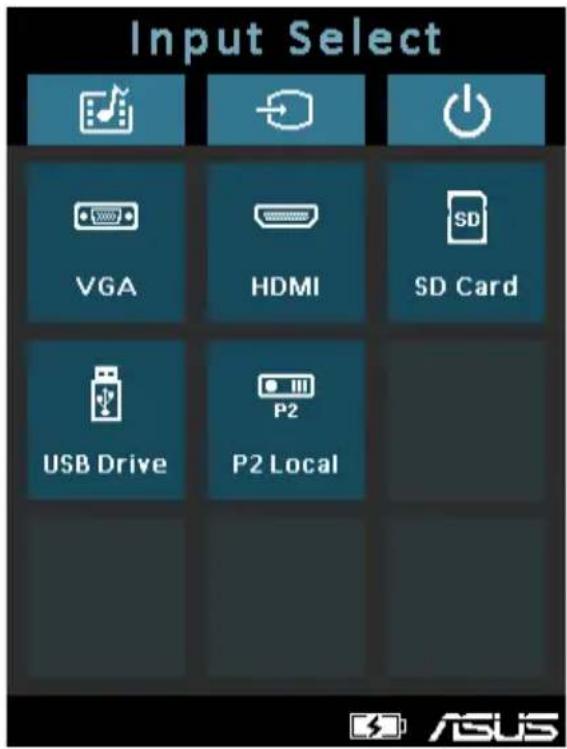
NOTE: The following screenshots are for reference only and may be updated without prior notice. Screenshots may also vary depending on the LED projector model.
The onscreen display menu contains a set of programs and settings designed to maximize your use of the LED projector. You can navigate inside the onscreen display menu using the control panel buttons on your LED projector or its accompanying remote control.
To launch options or programs shown on the onscreen display menu, refer to the control panel grid shown as below.
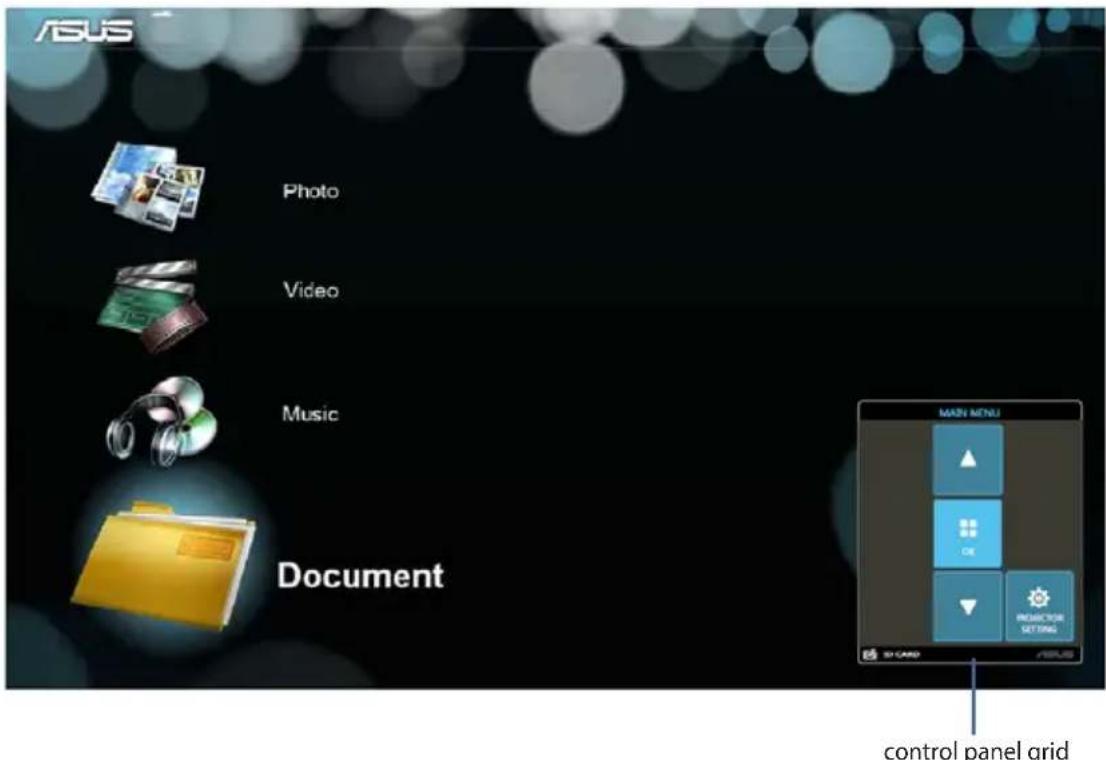
Control panel grid
The control panel grid guides you through the process of using the control panel buttons to launch active options inside your onscreen display menu.
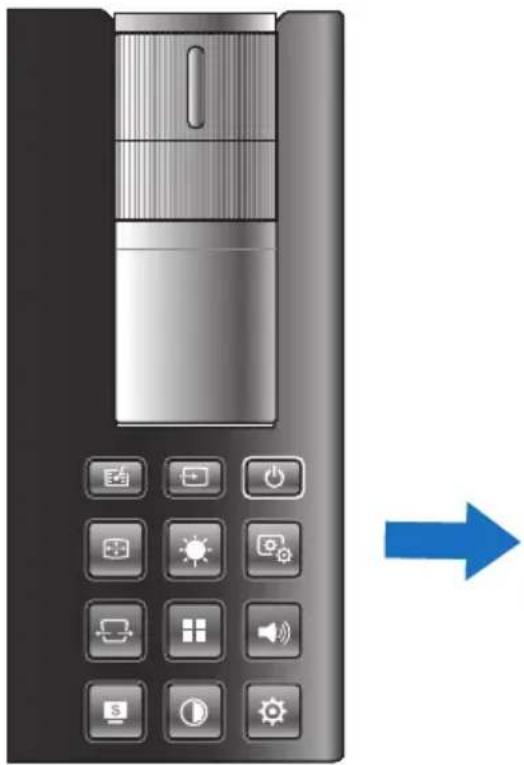
The control panel grid represents the 8 buttons surrounding the button on the control panel.

control panel buttons
natural_image
Close-up of a mobile phone keypad with control buttons and a blue arrow pointing right (no text or symbols on the device itself)control panel grid sample
Using your LED projector for the first time
Refer to the following steps when using your LED projector for the first time.
- Set up your LED projector then press the power button. The ASUS welcome screen appears to indicate that the LED projector is now turned on.
- Using the control panel buttons, select the language you want to use in your LED projector.
- In the Demo Mode control panel grid, select either of the following options:
On - This option launches the demo video of your LED projector. If you choose this, proceed to step 4.
IMPORTANT!
- This option automatically launches the Demo Mode control panel grid whenever you turn on your LED projector.
- When this option is enabled, your LED projector automatically launches the demo video.
NOTE: To know more about the functions of Demo Mode, refer to the Using Demo Mode section in this manual.
Off - This option disables viewing demo videos on your LED projector and proceeds to scan for connected input devices.
IMPORTANT! This option deactivates the Demo Mode control panel grid and instead launches the Input control panel grid whenever you turn on your LED projector.
NOTE: To know more about the functions of Demo Mode, refer to the Using Demo Mode section in this manual.
- After watching the demo video or while watching the demo video, you can press 📋 to proceed to scanning for connected input devices.
Accessing your LED projector's settings
Aside from using the control panel buttons to navigate the onscreen display menu, you can also use each of these buttons to launch the following LED projector settings:
IMPORTANT! Press Projector Setting on the control panel grid to use these functions in the Media Center.

Power
Press this button to turn the LED projector on or off.
Brightness
Press this button to adjust the brightness of your projection onscreen.
Keystone
Press this button to correct distorted images resulting from an angled projection.
Main Menu/OK
Press this button to launch the main menu of your LED projector settings, to activate a selected item, or exit the current control panel grid.

Volume
Press this button to adjust the volume of the audio file played on your LED projector.

Contrast
Press this button to set the difference between lighten or darken your projection onscreen.
Media Center\*
Press this button to launch the Media Center.
NOTE: For more details, refer to the Using the Media Center section in this manual.
VGA\*
Press this button to start the connection with your input device via the mini VGA port.
HDMI\*
Press this button to start the connection with your input device via the HDMI port.
* on selected models only
Input\*
Press this button to scan the connected devices to your LED projector.
* on selected models only
Splendid
Press this button to activate either of the following display modes: Standard, Black Board, White Board, Dynamic, Game, Theater, Scenery.
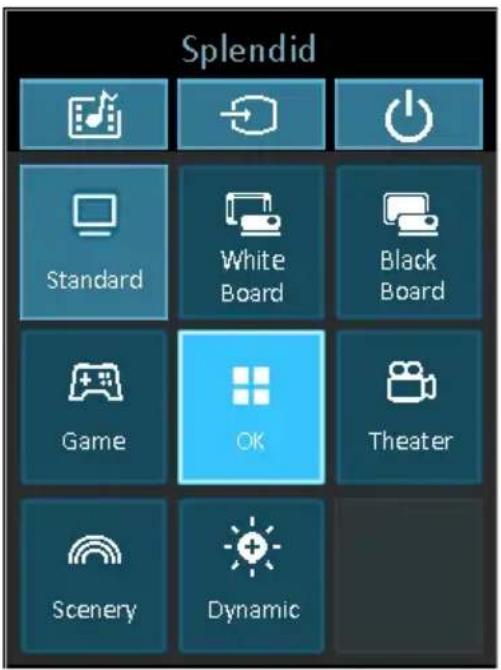
Image Setting
Press this button to access the following image settings:
NOTE: This function only works when using the HDMI port.
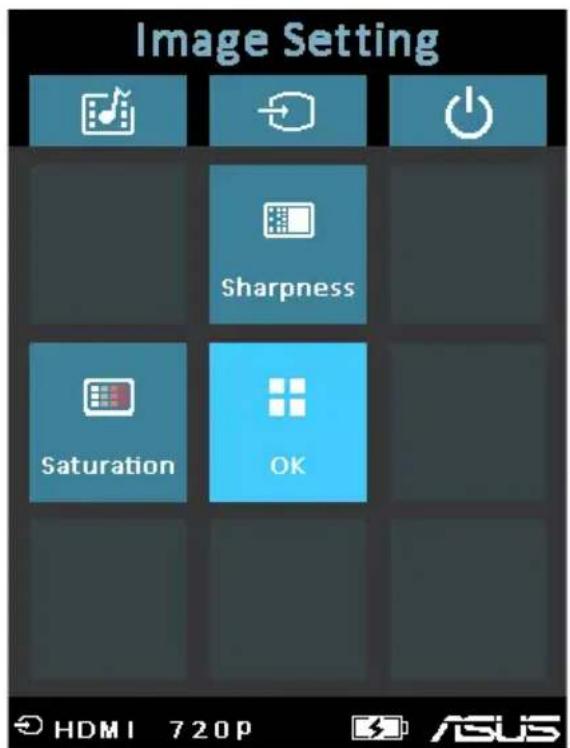
- Sharpness - This option allows you to sharpen or soften the appearance of the projected image.
- Saturation - This option allows you to adjust the hue of the projected image.
Image Position
Press this button to access the following image position settings:
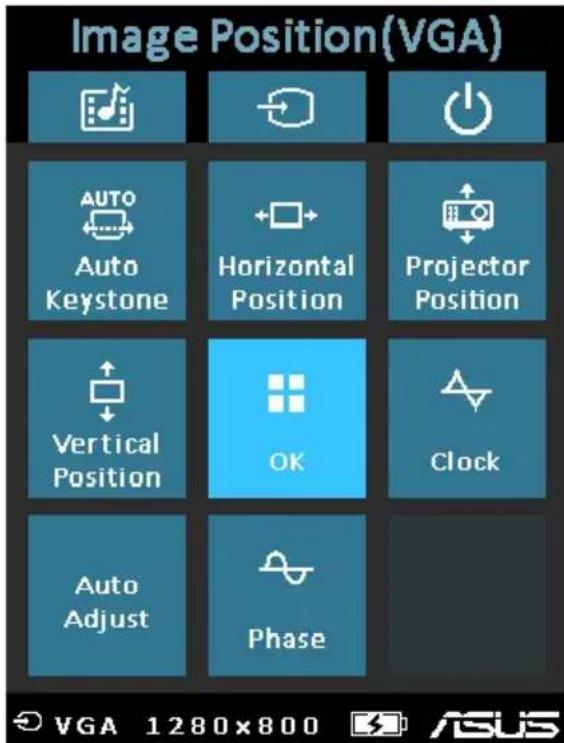
• Auto Keystone - This option allows you to automatically adjust the alignment of your image.
- Horizontal Positioning - This option allows you to shift the image's position horizontally.
- Projector Position - This option allows you to adjust the position of the projected image based from the location of your LED projector.
• Vertical Position - This option allows you to vertically shift the image position.
- Auto Adjust- This option allows you to automatically adjust the projection of image onscreen.
- Phase - This option allows you to adjust the number of lines emitted by the computer's signal so that the LED projector relative to the computer's signal.
- Clock - This option allows you to adjust the frequency of the LED projector relative to the computer.

Setup
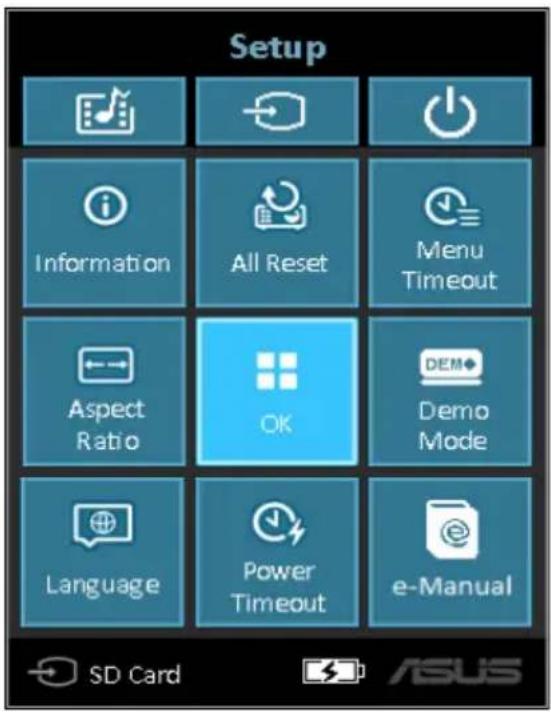
Press this button to access the following LED projector settings:
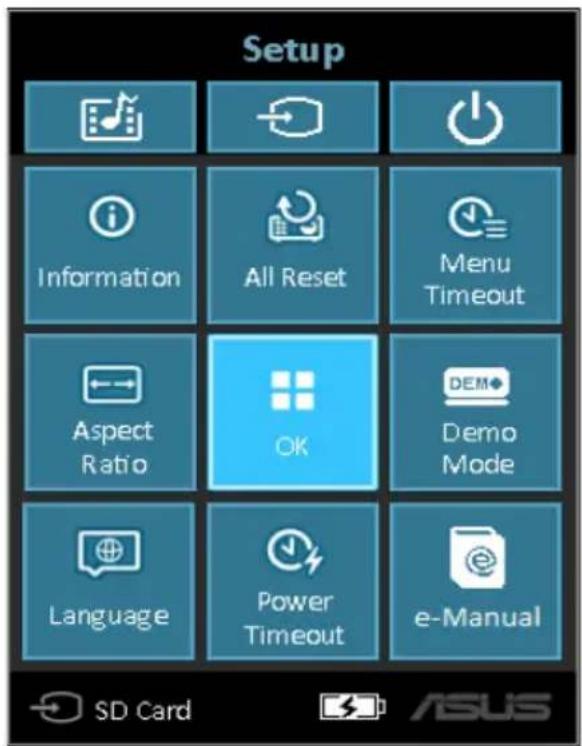
- Information - This option shows you the following information about your LED projector: currently used input port, LED projector's model name, and currently use Splendid mode.
- All Reset - This option allows you to reset all the settings you have currently set up for your LED projector.
- Menu Timeout - This option allows you to set the timeout rate, according to seconds, before the onscreen display menu disappears from your projection screen.
-
Aspect Ratio - This option allows you to change the projection of your display according to the following aspect ratios: AUTO, 4:3, 16:9, and 16:10.
-
Language - This option allows you to select the language to use on your LED projector's onscreen display menu.
• Power Timeout - This option allows you to set the number of seconds before your LED projector automatically shuts down when not in use. - Demo Mode - This option turns the demo video features of your LED projector on or off.
NOTE: For more details, refer to the Using Demo Mode section in this manual.
• E-Manual - This option launches the LED projector's E-Manual.
Using Demo Mode
View the internal demo video that comes with your LED projector or your own demo videos using Demo Mode.
Demo Mode is automatically enabled in your LED projector if you chose On when you turn on the device for the first time.
However, choosing Off disables this feature. In this case, you can enable this feature using the following steps.
Enabling Demo Mode
- Launch the Setup control panel grid.
- Choose Demo Mode > On.
IMPORTANT!
- This option automatically launches the Demo Mode control panel grid whenever you turn on your LED projector.
- When this option is enabled, your LED projector automatically launches the demo video from its internal memory or from your SD card or USB drive as the LED projector goes into stand-by mode.
Creating and playing your own demo video
Your LED projector allows you to create simple demo videos using a series of photos presented as a slideshow. You may also add a background music to go with the slideshow as it plays onscreen.
Create your own demo video and play this on your LED projector using the following steps:
- Create a folder named ASUS in your SD Card or USB drive.
- Select the photos you want to include in your demo video and one music file (optional).
IMPORTANT! You may only choose one music file as your demo video's background music.
NOTE: Refer to the Specifications for P2 LED projector series section in this manual to see the list of compatible photo and music file formats.
- Copy the selected files inside the ASUS folder you created.
- Connect the SD card or USB drive to your LED projector.
- Turn on the LED projector. If Demo Mode is enabled, press On to play the demo video stored in the ASUS folder of your SD card or USB drive.
Using the Media Center
Show photos, play videos, listen to audio music, and view documents using your LED projector's Media Center. Through the Media Center, you can also connect to USB-enabled input devices and micro SD cards.
Launching the Media Center
The Media Center automatically launches after the LED projector detects a micro SD card or external drive.
You can also manually launch the Media Center by pressing from the control panel.

Opening files from the SD Card or USB Drive
Photo
Supported image file formats:
- JPG
- JPEG
- BMP (bitmap)
To open an image file:
- Connect your input device to the LED projector.
- Turn on the LED projector to launch the Media Center's onscreen display menu.
- Select Photo.
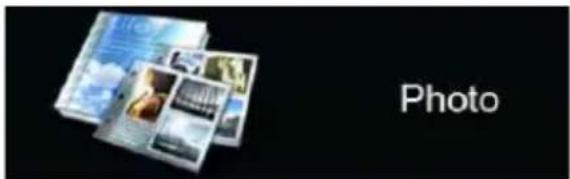
- Refer to the control panel grid to help you browse and select the file from your input device.
- Press ☐ to open the selected folder or file.
- After opening the file, press 📋 on the control panel to launch the Photo Slideshow control panel grid.
Video
| File Type | Video Codec Resolution Frame Rate Audio Codec | |||
| AVI H.264 BP, | MP, HP @ L4.1MPEG-4 ASP @ L5MPEG-4 SPDivx High DefinitionXvidH.263 Profile 3 Level 70MPEG-1MPEG-2 MP@HLMJPEG Baseline 4:4:4 | 1080P 30 fps | MPEG-1 L1-3 | HE-AACv1PCM / G.711 |
| MOV H.264 BP, | MP, HP @ L4.1MPEG-4 ASP @ L5MPEG-4 SPDivx High DefinitionXvidH.263 Profile 3 Level 70MPEG-1MPEG-2 MP@HLMJPEG Baseline 4:4:4 | 1080P 30 fps | MPEG-1 L1-3 | HE-AACv1AMR-NBAMR-WBPCM / G.711 |
| MP4 H.264 BP, | MP, HP @ L4.1MPEG-4 ASP @ L5MPEG-4 SPDivx High DefinitionXvidH.263 Profile 3 Level 70MPEG-1MPEG-2 MP@HL | 1080P 30 fps | MPEG-1 L1-3 | HE-AACv1AMR-NBAMR-WB |
| MPG MPEG-1 | MPEG-2 MP@HL | 1080P 30 fps | MPEG-1 L1-3 | |
| 3GP3G2 | H.264 BP, MP, HP @ L4.1MPEG-4 ASP @ L5MPEG-4 SPDivx High DefinitionXvidH.263 Profile 3 Level 70MPEG-1MPEG-2 MP@HL | 1080P 30 fps | HE-AACv1 | AMR-NBAMR-WB |
(continued on the next page)
| File Type | Video Codec Resolution Frame Rate Audio Codec | |||
| WMVASF | MPEG-4 SPDivx High DefinitionXvidVC-1/WMV9 | 1080P 30 fps | WMA8/9 | |
| MKV H.264 BP, MP, HP @ L4.1 1080P 30 fps | MPEG-1 L1-3 | HE-AACv1PCM / G.711AC3 | ||
| VOB MPEG-2 | MP@HL 1080P 30 fps MPEG-1 | L1-3 | AC3DTS | |
| DAT MPEG-1 | 1080P 30 fps MPEG-1 L1-3 | |||
| TS MPEG-2 MP@HL 1080P 30 fps MPEG-1 L1-3 | ||||
| M4V MPEG-4 | ASP @ L5MPEG-4 SP | 1080P 30 fps N/A | ||
| FLV Sorenson | Spark 1080P 30 fps MPEG-1 L1-3 | PCM / G.711 | ||
To open a video file:
- Connect your input device to the LED projector.
- Turn on the LED projector to launch the Media Center's onscreen display menu.
- Select the input device you wish to access.
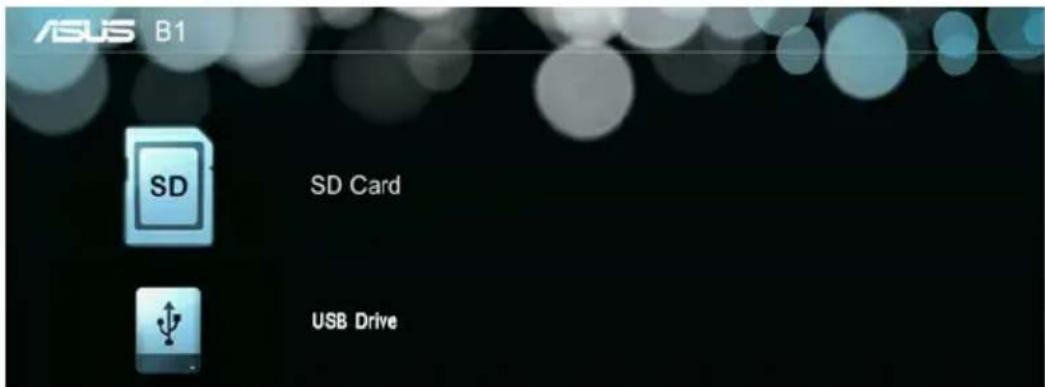
- Select Video.
- Refer to the control panel grid to help you browse and select the file from your input device.
- Press to open the selected folder or file.
- After opening the file, press 📋 on the control panel to launch the video file's control panel grid.
Audio
| File Type Sample Rate (KHz) Bit Rate (Kbps) | ||
| MP1/ MP2/ MP3 8-48 8—320 | ||
| WMA 22-48 5—320 | ||
| OGG 8-48 64—320 | ||
| ADPCM-WAV 8-48 32—384 | ||
| PCM-WAV 8-48 128—1536 | ||
| AAC | 8-48 8—256 | |
To play audio files, refer to the following steps:
- Connect your device to the LED projector.
- Turn on the LED projector to launch the Media Center's onscreen display menu.
- Select Music.

-
Refer to the control panel grid to help you browse and select the file from your input device.
-
Press ☐ to open the selected folder or file.
-
After opening the file, press 📋 on the control panel to launch the audio file's control panel grid.
Document
| File Type Support Version Pages /Lines | Limitation | Size Limitation | Comment | |
| Adobe PDF PDF 1.0PDF 1.1PDF 1.2PDF 1.3PDF 1.4 | Up to 100 pages (One File) | Up to 75 MB - | ||
| Microsoft® Office Word | Microsoft® Office Word 1995, Microsoft® Office Word 1997, Microsoft® Office Word 2000, Microsoft® Office Word 2002, Microsoft® Office Word 2003 | Because the office viewer does not load all pages of a Microsoft® Word file at the same time, there are no obvious page or line limitations. | Up to 100 MB Does not support bold text in Simple Chinese font | |
| Microsoft® Office Excel | Microsoft® Office Excel 1995Microsoft® Office Excel 1997, Microsoft® Office Excel 2000, Microsoft® Office Excel 2002, Microsoft® Office Excel 2003,Microsoft® Office Excel 2007 (.xlsx), Microsoft® Office Excel 2010 (.xlsx)Microsoft® Office Excel XP | Row Limit: up to 595Column Limit: up to 256Sheet: up to 100Note: These 3 listed limitations do not appear altogether in just one file. | Up to 15 MB Does not support password-protected sheets | |
| Microsoft® Office PowerPoint | Microsoft® Office PowerPoint 1997, Microsoft® Office PowerPoint 2000, Microsoft® Office PowerPoint 2002, Microsoft® Office PowerPoint 2003, Microsoft® Office PowerPoint 2007 (.pptx), Microsoft® Office PowerPoint 2010 (.pptx), Microsoft® Office PowerPoint XP, .ppx, .ppsx | Up to 1000 pages (one file) | Up to 19 MB Does not support slideshow order | |
To view documents, refer to the following steps:
- Connect your device to the LED projector.
- Turn on the LED projector to launch the Media Center's onscreen display menu.
-
Select the input device you wish to access.
-
Select Document.

-
Refer to the control panel grid to help you browse and select the file from your input device. Press
-
Press ☐ to open the selected folder or file.
-
After opening the file, press 📄 on the control panel to launch the Document control panel grid.
Multi-language versions
Download other language versions of this E-Manual via this
website:http://support.asus.com
Appendices
Federal Communications Commission Statement
This equipment has been tested and found to comply with the limits for a class B digital device, pursuant to Part 15 of the Federal Communications Commission (FCC) rules. These limits are designed to provide reasonable protection against harmful interference in a residential installation. This equipment generates, uses, and can radiate radio frequency energy and, if not installed and used in accordance with the instructions, may cause harmful interference to radio communications. However, there is no guarantee that interference will not occur in a particular installation. If this equipment does cause harmful interference to radio or television reception, which can be determined by turning the equipment off and on, the user is encouraged to try to correct the interference by one or more of the following measures:
• Reorient or relocate the receiving antenna.
- Increase the distance between the equipment and receiver.
- Connect the equipment to an outlet on a different circuit than that which the receiver is connected to.
- Consult the dealer or an experienced radio/TV technician for help.
This device complies with Part 15 of the FCC Rules. Operation is subject to the following two conditions:
- This device may not cause harmful interference, and
- This device must accept any interference that may cause undesired operation.
Regional notice for California
This product contains chemicals, including lead, known to the State of California to cause birth defects or other reproductive harm. Wash hands after handling.
Canadian Department of Communications Statement
This digital apparatus does not exceed the Class B limits for radio noise emissions from digital apparatus set out in the Radio Interference Regulations of the Canadian Department of Communications.
This class B digital apparatus complies with Canadian ICES-003.
Global Environmental Regulation Compliance and Declaration
ASUS follows the green design concept to design and manufacture our products, and makes sure that each stage of the product life cycle of ASUS product is in line with global environmental regulations. In addition, ASUS disclose the relevant information based on regulation requirements.
Please refer to http://csr.asus.com/english/Compliance.htm for information disclosure based on regulation requirements ASUS is complied with:
Japan JIS-C-0950 Material Declarations
EU REACH SVHC
Korea RoHS
Swiss Energy Laws
ASUS Recycling/Takeback Services
ASUS recycling and takeback programs come from our commitment to the highest standards for protecting our environment. We believe in providing solutions for you to be able to responsibly recycle our products, batteries, other components as well as the packaging materials. Please go to http://csr.asus.com/english/Takeback.htm for detailed recycling information in different regions.
Support PC Timings
HDMI (PC)
| Resolution Mode Refresh rate (Hz) H-frequency (kHz) Clock (MHz) | ||||
| 640 x 480 VGA_60 | 59.940 | 31.469 | 25.175 | |
| 800 x 600 SVGA_60 | 60.317 | 37.879 | 40.000 | |
| 1024 x 768 XGA_60 | 60.004 | 48.363 | 65.000 | |
| 1280 x 800 WXGA_60 | 59.810 | 49.702 | 83.500 | |
| 1280 x 960 1280 x | 960_60 | 60.000 | 60.000 | 108 |
| 1360 x 768 1360 x | 768_60 | 60.015 | 47.712 | 85.500 |
| 1440 x 900 WXGA+_60 | 59.887 | 55.935 | 106.500 | |
HDMI (Video)
| Timing | Resolution | Vertical frequency (Hz) | H-frequency (kHz) | Dot Clock Frequency (MHz) |
| 480p | 720 x 480 | 59.94 | 31.47 | 27 |
| 576p | 720 x 576 | 50 | 31.25 | 27 |
| 720/50p | 1280 x 720 50 | 37.5 | 74.25 | |
| 720/60p | 1280 x 720 60 | 45.00 | 74.25 | |
| 1080/50i 1920 x | 1080 50 | 28.13 | 74.25 | |
| 1080/60i 1920 x | 1080 60 | 33.75 | 74.25 |
Mini VGA
| Resolution | Mode | Refresh rate (Hz) | H-frequency (kHz) | Clock (MHz) |
| 640 x 480 | VGA_60 | 59.940 | 31.469 | 25.175 |
| 800 x 600 | SVGA_60 | 60.317 | 37.879 | 40.000 |
| 1024 x 768 | XGA_60 | 60.004 | 48.363 | 65.000 |
| 1280 x 800 | WXGA_60 | 59.810 | 49.702 | 83.500 |
| 1280 x 1024 | SXGA_60 | 60.020 | 63.981 | 108.000 |
| 1280 x 960 | 1280 x 960_60 | 60.000 | 60.000 | 108 |
| 1366 x 768 | 1366 x 768_60 | 60.015 | 47.7 | 85.86 |
| 1440 x 900 | WXGA+_60 | 59.887 | 55.935 | 106.500 |
Specifications for P2 LED projector series
| P2B P2M P2E | |||
| Display | Display Technology 0.45" DLP® | ||
| Light Source R/G/B LED | |||
| Light Source Life 30,000 hours (max) | |||
| True Resolution (native) WXGA 1280x800 | |||
| Light Output 350 | Lumens | 350 Lumens | |
| Contrast Ratio 3500:1 DCR | |||
| Color Saturation (NTSC) 100% | |||
| Display Colors 16.7 M | |||
| Projection Lens | Throw Ratio 1.1 (42" @1m) | ||
| Projection Distance 0.5 ~ 3m | |||
| Projection/Screen Size 20 ~ 120 inches | |||
| Projection Offset 100 ± 5 % | |||
| Zoom Ratio Fixed | |||
| Video Features | Picture Modes | 7 Modes (Standard Mode, Black board, White board, Dynamic Mode, Game, Scenary Mode, Theater Mode) | |
| Keystone adjustment | Digital (Up to +/- 40 degree) | ||
| Auto Keystone | Yes | ||
| Aspect Ratio | 16:10/ 16:9 / 4:3 | ||
| Projector Placement | Front Table, Rear Table, Front Ceiling, Rear Ceiling | ||
| Audio Features | Built-in speakers | Yes, 1 speaker (1.5W) | |
| Signal Frequency | Analog Signal Frequency | 31.5~55.9 KHz(H)/60 Hz(V) | |
(continued on the next page)
| P2B P2M P2E | ||||
| Power Noise | Power On Mode | 30W 50W 27W | ||
| Standby Mode | <0.5 W | |||
| Acoustic Noise | 32dB (Standby mode) | 34dB (Standby mode) | 32dB (Standby mode) | |
| 25dB (Theater mode) | 30dB (Theater mode) | 25dB (Theater mode) | ||
| Input / Output | Audio Out Earphone out | |||
| Card Reader | 1 x Micro SD card slot for multimedia playback | 1 x Micro SD card slot for multimedia playback | N/A | |
| USB port Yes N/A | ||||
| Multimedia Formats Supported | Video Yes N/A | |||
| Audio Yes N/A | ||||
| Picture Yes N/A | ||||
| Document Viewer | Yes N/A | |||
| Mechanical Design | Chassis Colors | White Black | ||
| Tripod Socket | Yes | |||
| Supporting Stand | Yes | |||
| Mechanical Design | On-machine Buttons | Media Center, Input, Power Image position, Brightness, Image Quality, Image Setting, Keystone Enter, Volume, Splendid, Contrast, Setup | VGA, HDMI, Power, Image Position, Brightness, Image Quality, Image Setting, Keystone, Enter, Volume, Splendid, Contrast, Setup | |
| Security | Kensington lock Yes | |||
| Dimension | Physical Dimension | 142.4mm x 130mm x 34.6mm | ||
| Box Dimension 235 | mm x 179mm x 113mm | |||
| Weight | Net Weight (Esti.) | 66g 532g | 502g | |
| Gross Weight (Esti,) | 1.4kg 1.2kg | 1.2kg | ||
| Operating Temperature | 0°C ~ 40°C | |||
| Operating Humidity | 20 ~ 90% | |||
| Accessories | carrying bag, power adapter, power cord, D-Sub cable, quick start guide, remote control, warranty card | |||
| Regulation Approvals | FCC/UL/CE/CB/CCC/C-tick/VCCI/PSE/CU | |||
(continued on the next page)
* Specifications are subject to change without prior notice.
** Product availability may vary by region.
** All brand and product names mentioned are trademarks of their respective companies.
- E9719
- September 2014
- Revised Edition V3
- COPYRIGHT AND WARRANTY INFORMATION
- LIMITATION OF LIABILITY
- SERVICE AND SUPPORT
- Table of Contents
- Chapter 1: Knowing your LED projector
- Chapter 2: Setting up
- Chapter 3: Using the onscreen display menu
- Appendices
- About this manual
- Conventions used in this manual
- Typography
- Multi-language versions
- Safety precautions
- Using your LED projector
- Servicing and replacement of parts
- Caring for your LED projector
- Proper disposal
- Chapter 1:
- Knowing your LED projector
- Features
- Top view
- Focus ring
- Control panel buttons
- Front view
- Lens
- Air vents
- Rear view
- P2B/P2M
- P2E
- Infrared (IR) sensor
- Power (DC) input port
- Micro SD card reader
- USB 2.0 port
- Micro USB 2.0 port\*
- Audio output jack port
- Mini VGA port
- Manual reset hole\*
- HDMI/MHL port
- Air vents
- Left side
- Air vents
- Kensington® security slot
- Right side
- Bottom view
- Built-in stand
- Tripod socket
- LED projector remote control
- Control panel buttons
- Remote control buttons
- Battery compartment
- Replacing the battery
- Chapter 2:
- Setting up
- Operating your LED projector
- Connect the LED projector to the power adapter.
- WARNING!
- AC power cord requirements
- Connect the LED projector to your device.
- Adjust the height of the LED projector.
- NOTES:
- Screen size and projection distance table
- Press the power button.
- Adjust the image focus.
- Chapter 3:
- Using the onscreen display menu
- Launching programs from the onscreen display menu
- Control panel grid
- Using your LED projector for the first time
- IMPORTANT!
- Accessing your LED projector's settings
- Power
- Brightness
- Keystone
- Main Menu/OK
- Volume
- Contrast
- Media Center\*
- VGA\*
- HDMI\*
- Input\*
- Splendid
- Image Setting
- Image Position
- Setup
- Using Demo Mode
- Enabling Demo Mode
- Creating and playing your own demo video
- Using the Media Center
- Launching the Media Center
- Opening files from the SD Card or USB Drive
- Photo
- Supported image file formats:
- To open an image file:
- Video
- To open a video file:
- Audio
- To play audio files, refer to the following steps:
- To view documents, refer to the following steps:
- Federal Communications Commission Statement
- Regional notice for California
- Canadian Department of Communications Statement
- Global Environmental Regulation Compliance and Declaration
- ASUS Recycling/Takeback Services
- Support PC Timings
Brand : ASUS
Model : P2
Category : Video projector