31HF - Dishwasher MOFFAT - Free user manual and instructions
Find the device manual for free 31HF MOFFAT in PDF.


User questions about 31HF MOFFAT
0 question about this device. Answer the ones you know or ask your own.
Ask a new question about this device
Download the instructions for your Dishwasher in PDF format for free! Find your manual 31HF - MOFFAT and take your electronic device back in hand. On this page are published all the documents necessary for the use of your device. 31HF by MOFFAT.
USER MANUAL 31HF MOFFAT
G.C. No 64-546-01
TABLE OF CONTENTS
| Introduction | Programmes |
| Installation | Useful Information |
| Fitting a Decor Panel | After the wash |
| Specification | Care and Cleaning |
| Getting to know your Dishwasher | Washing Query Guide |
| Preparing your Dishwasher | What to do and When |
| Using your Dishwasher | Service |
| Short Spares List |
You and Your new Dishwasher
— A great team.
Now your new dishwasher's here, you probably can't wait to use it, but before you do, take time out to read through this booklet which is designed to help you make the most of all the features of your new dishwasher. In particular it is important that you read and understand the advice highlighted in bold italics. This has been included for you and your family's safety.
Whilst your dishwasher has been designed and manufactured to the relevant standards care should be taken when either using or cleaning it.
The dishwasher has been designed for use by adults for the washing and drying of crockery, cutlery and cooking implements and should not be used for any other purpose. Items that are contaminated by petrol, paint, steal or
iron debris, corrosive acidic or alkaline chemicals should not be washed in the dishwasher. Children should not be allowed to tamper with the controls or play with the product.
Please ensure that you retain this instruction book for future reference and make it available to guests etc who may want to use the dishwasher. Also pass it on with the dishwasher if you give or sell it to another user.
The installation instructions given in this book give details on how and where your dishwasher may be fitted. If already installed you should satisfy yourself that all requirements have been met, if in doubt check with a competent person. More details on installation are given in the next section.
In order that your new dishwasher will operate correctly and give you the best possible results it must be installed in accordance with the following instructions. Any local regulations concerning connections to the electricity and water supplies and drainage must also be complied with.
Any plumbing work required to install this appliance should be carried out by a qualified plumber.
Any electrical work required to install this appliance should be carried out by a qualified electrician.
Some of the internal fittings are secured by tape or wire ties, these should be removed before operating the machine.
If this appliance is replacing an old dishwasher which is to be scrapped, we would ask your assistance in preventing young children becoming trapped inside your old machine by ensuring the door is removed before disposal.
Location
The dishwasher can be placed in any suitable position providing the water, drain and electrical connections are accessible. The machine can be free standing or placed in a recess providing 5 mm ( ^1/_4 ) clearance is left at the sides and top to allow easy withdrawal when required. It can be levelled by adjusting the four feet. Wherever it is placed it must be possible to disconnect and remove the machine easily should servicing be required.
Connecting to the electrical supply
Before you use your dishwasher check that the voltage shown on the data plate conforms with your mains supply. The mains lead of the dishwasher is fitted with a non-rewireable moulded on 13 amp plug containing a 13 amp fuse. In the event of the fuse requiring replacement the fuse cover/carrier should be removed using a small screwdriver to lever it out. The old fuse should be replaced by a 13 amp approved BS1362 fuse and the fuse cover/carrier must be refitted before the plug is used again. If the fuse cover/carrier is lost, a replacement can be obtained from an electrical shop. The fuse cover/carrier must be of the same colour as that of the coloured insert in the base of the plug. In no circumstances must be plug be used without a correct fuse cover/carrier fitted.
If the plug supplied on the mains lead is not suitable for the socket outlet in your home it should be cut off and disposed of safely or destroyed to avoid any possible shock hazard resulting from the plug being inserted into a 13 amp socket elsewhere in the house. A suitable replacement plug should be fitted (as in Fig. 1). If a 13 amp plug and socket are not used the circuit supplying the dishwasher should contain a 15 amp fuse.
Warning — this appliance must be earthed and protected by a 13 amp fuse.
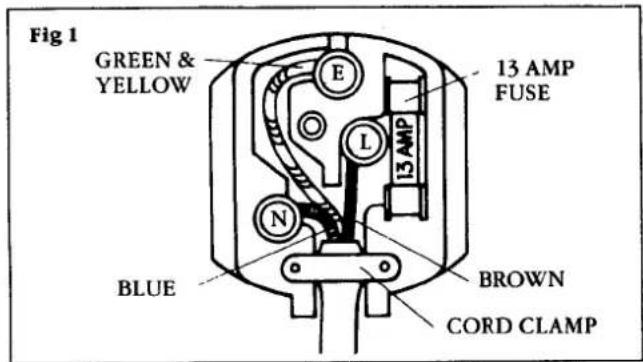
IMPORTANT! The wires in the mains lead of this appliance are coloured in accordance with the following code:
GREEN-and-YELLOW: EARTH.
BLUE: NEUTRAL. BROWN: LIVE.
As the colours of the wires in the mains lead may not correspond with the coloured markings identifying the terminals in your plug proceed as follows.
Connect the GREEN-and-YELLOW coloured wire to the plug terminal marked letter E or earth symbol or coloured Green or Green-and-Yellow.
Connect the BROWN coloured wire to the plug terminal marked letter L or coloured Red.
Connect the BLUE coloured wire to the plug terminal marked letter N or coloured Black.
Care should be taken to ensure the machine does not stand on the electrical supply cable.
Recommended Drainage Connections
You must abide by any Local Authority Byelaws regarding drainage and if you live in a Multi Storey building we strongly recommend that you seek expert advice as special arrangements may be required.
Water and drain connections Outlet Hose and Drain
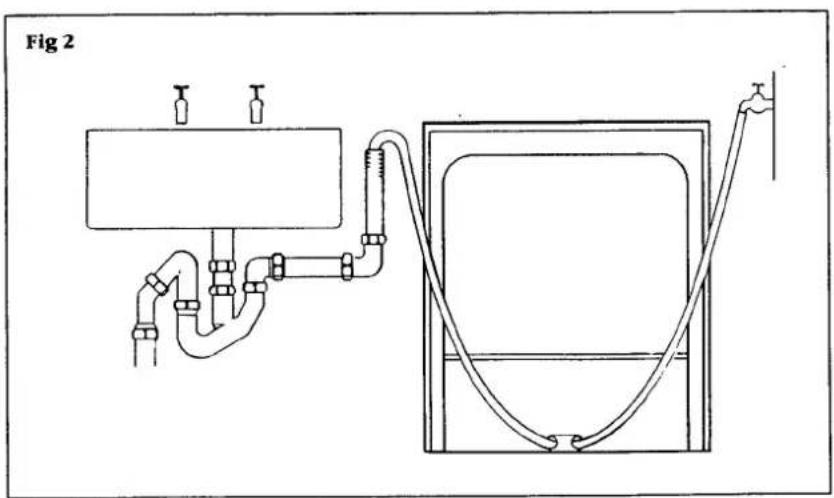
Alternative methods of discharging to the drains are as follows:
- Directly into a sink — by hanging the end of the hose through the horseshoe bracket and over the edge of the sink, making sure that the sink plug has first been removed. The top of the hook should not be higher than 1000 mm (40 in.) above the floor.
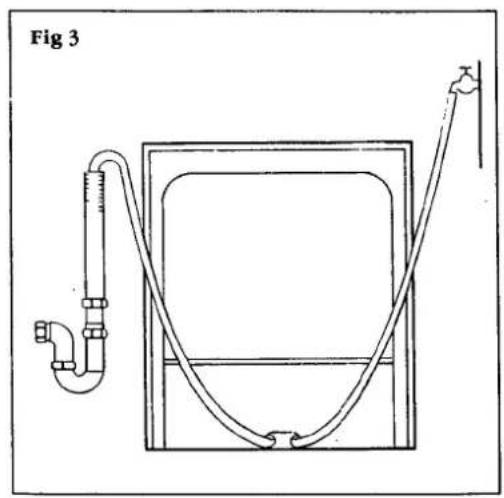
- Via a water-break to a fixed drain outlet. The water-break is essential and should be positioned at least 500 mm (20 in.) above floor level to prevent water draining away from the machine at times other than intended. The maximum permissible height from the floor to the top of the drain hose is 1000 mm (40 in.). The drain stand pipe should have a minimum internal diameter of 38 mm ( 1^1/2 in.). A trap should be provided between the standpipe and the drain to prevent odours rising into the working area (Fig. 3).
- Into a Universal waste trap which replaces the sink trap (Fig. 2).
Inlet water connection
This dishwasher has been especially designed for use with water supplied by a stored hot water system, or by an instantaneous gas water heater.
Whilst the dishwasher has been designed for use with hot water it will continue to function even if the hot water starts to run cold. The only effect will be that the washing programme takes longer to complete and that more electricity will be used.
The water inlet hose has a 34 " B.S.P. female connector at the free end which is fitted at the factory. No attempt should be made to remove it or replace it with an alternative fitting. The hose should be connected to the hot water supply via a tap or stopcock which should be positioned so as to give easy access. The water connection should be arranged so that when in use it does not interfere with the normal domestic supply.
The hose must never be connected to a mixer tap
A positive head of water is required to operate this machine.
Accessories
Inside your machine you will find a horseshoe bracket. The horseshoe bracket is used to hook over the outlet hose before placing over the sink edge.
natural_image
Simple line drawing of a mechanical setup with pipes and a container, labeled 'Fig 3' (no text or symbols on the diagram itself)Model No 31HF is supplied in white with a decor frame around the main door and lower panel.
To fit the panels proceed as follows:
- Remove the screws from the lower panel, and remove the panel.
- Remove the 3 screws on each side and lower edge of the door. Remove the decor frames.
- Remove the old decor panel if fitted. If the new panel is 4 mm thick, remove all four pasteboard fillers; if 2 mm thick, remove only 2 fillers.
- Place the decor panel in position. Replace the frames.
● The bottom panel is repositioned using 2 screws. Use washers between the spacers and the plinth.
Adjusting the height of the bottom panel
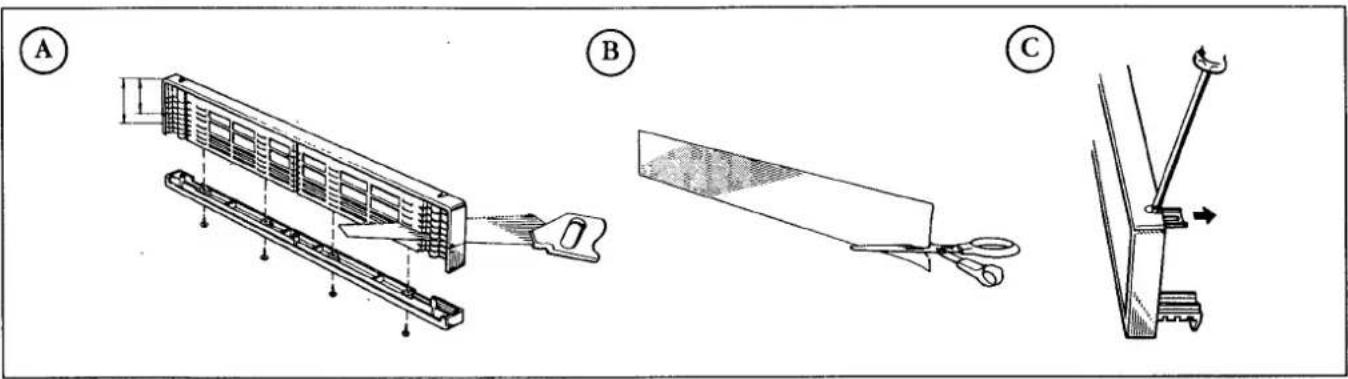
The height of the bottom panel can be adjusted, to align with the kitchen cabinets. When the lower panel has been removed, as described above, use a saw to cut off as many steps as necessary. (Fig A.) Cut off an equal amount from the trim and cardboard panels (Fig B), fit the decor panel and assemble.
The depth of the lower front panel may also be adjusted by means of the two screws. (Fig C.)
The dimensions of the decor panels are as follows:
| Height | Width | |
| Main door | 479 mm | 591 mm |
| Lower Panel | 102 mm | 591 mm |
natural_image
Technical line drawings of three mechanical components labeled A, B, and C, showing different assembly or assembly states (no text or symbols beyond labels)Specification
Type
Freestanding with worktop or built-in with worktop removed.
Dimensions
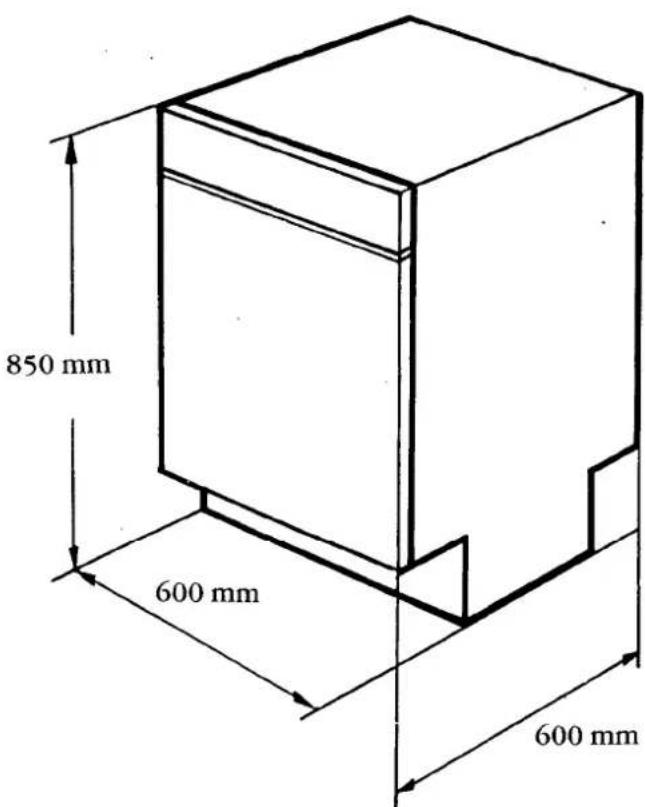
Height 850 mm
Height built-in without worktop ____ 820 mm
Adjustment in Height ____ +50 mm
Depth 600 mm
Width 600 mm
Weight empty ____ 54 kg
Capacity
14 International place settings.
Operation features
Programme selector dial. ____ √
No. of programmes 6
Programme progress indicator ____ V,
Built-in water softener ____ V
Salt refill indicator ____ V.
Rinse aid indicator ____ V
Sound power level when built-in ____ 54 dB(A)
Water connection
Hot fill ____ √
Cold fill if necessary ____ V
Temperature selection ____ 55°C/65°C
Maximum hot water fill ____ 70°C
Pex long life with hose connection ____ ^3/_4 " BSP
Water Consumption (normal) ____ 21 litres
Removal of worktop
If you want to use your machine as built-in, you must remove the worktop. Do as follows:
● Unscrew the two screws positioned in front.
● Pull the worktop forewards and lift it off.
Special features
Stainless steel interior ____ √
White Cabinet with brown plinth ____ V.
Decor panels retaining trims ____ V.
Multi level cutlery basket with handle ____ √
Easy clean double filter system ____ V
High intensity cutlery spray ____ V
Removable upper tray ____ V
Electrical input
Voltage 240
Fuse rating ____ 13 amp
Getting to know your Dishwasher
This section is designed to help you become familiar with the various features of your new dishwasher.
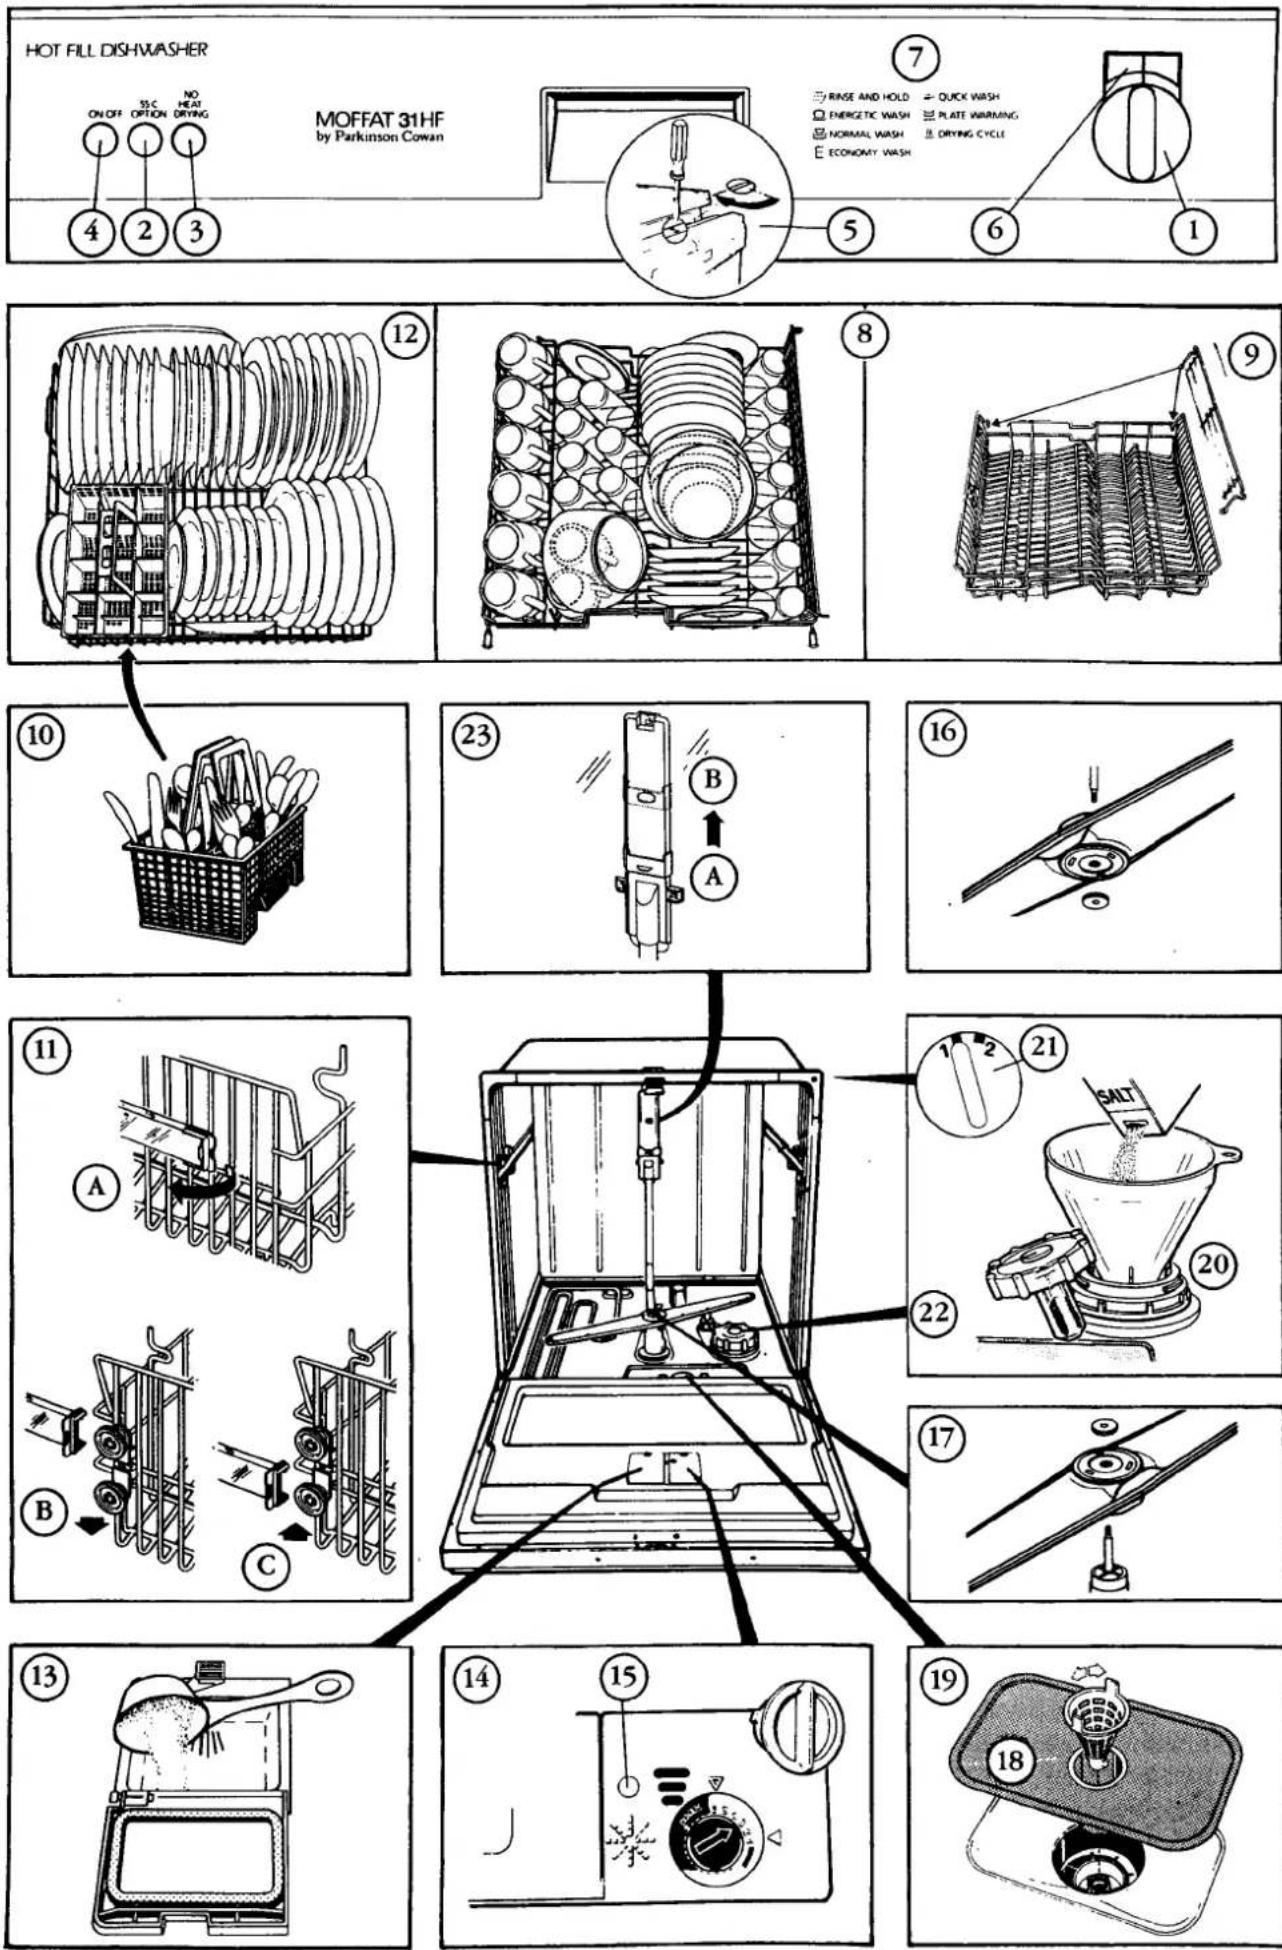
1. Programme selector
Turn the programme selector dial (1) to the required programme, as indicated on the control panel. These programmes are explained in more detail on page 12 'Programmes'.
2. Temperature selector
There is a temperature selector button (2) for reduced temperature. This button enables the main wash and final rinse to be reduced from 65°C to 55°C. The 55°C option is selected when the button is pushed in.
3. Economy Drying selector
Normally the heater is used to accelerate the drying process. However, if you wish, the heater can be excluded and the dishes are then dried from the residual heat after the final hot rinse. This is done by simply pressing in the economy drying button (3).
4. Mains on/off button
Push the on/off button (4) in to operate the machine. The mains on indicator lamp (6) will illuminate when the machine is working. To stop the machine, push the button in and release it.
The on/off switch should always be in the "ON" position to ensure operation of the overflow and leakage monitors, unless the water is turned off at the stopcock and the machine at the electrical supply.
The door can be made more difficult for children to open by setting the childproof door catch. When set this necessitates a 2 stage action to open the door ie slide the catch on the door handle to the right and then push the handle upwards. To set the door lock, simply turn the red screw in the door panel as shown on diagram (5) and the childproof catch will operate every time the door is closed.
6. Mains on indicator lamp
This illuminates when the machine is working.
7. Programme chart
The programmes are listed on the control panel of your dishwasher (7). They correspond with the programme selector dial and are explained in more detail on page 12 under 'Programme'.
8. Upper dish rack
The upper dish rack (8) is for cups, glassware, small plates, bowls and the like. To remove the upper rack, turn back the stops (11) on the racks and pull the rack out. The upper dish rack may be raised or lowered (11B, 11C) to accommodate taller items. When replacing the rack do not forget to relocate the stops, and ensure that the rubber stops are at the front of the basket. If you remove the rack altogether (to make room for exceptionally tall items) you must shut off water supply to the upper spray arm by sliding up the water outlet cover (23) on the spray tube so that it covers the hole. The rack has one hinged flap (9) that can be fitted either side of the rack. When lowered these serve as extra racks for cups.
10. Cutlery Basket
The removable cutlery basket (10) can be positioned anywhere along the front of the dish rack or it can be completely removed to make room for large items such as saucepans. When placing cutlery in the cutlery basket, do not mix silver and stainless steel items in the same section as they must not touch. Always place items of cutlery with the handles pointing downwards. See that spoons do not rest together, and that slender items cannot protrude through the openings in the bottom and sides of the basket to foul the spray arms. The basket has various depth compartments to allow for the easy accomodation of teaspoons and different size items of cutlery.
12. Lower dish rack
The lower dish rack (12) is for heavier items such as large plates and dishes.
13. Detergent dispenser
The detergent dispenser (13) has a spring loaded flap which can be opened by gently pushing the release button away from you. Once it is released, the flap will spring completely open. To reset, simply close the flap. The flap will now be held in the closed position. At the appropriate time during the wash cycle, the flap will be automatically released to uncover the detergent. This detergent is then washed into the machine.
The dispenser has a capacity of 60cc (4 tablespoons) of detergent. For dosage see 'Using your Dishwasher' (page 11). Liquid or powder dishwasher detergent may be used. Powder is generally more suitable for stubborn stains.
Detergent for the pre-wash programme should be placed in the recess of the closed detergent dispenser flap.
14. Rinse-aid dispenser
Rinse-aid is a liquid which reduces the surface tension of the water so that it readily runs off the articles being washed instead of forming droplets which could leave white spots or streaks after drying. The rinse-aid dispenser automatically injets the rinse-aid into the machine during the final rinse. The amount of rinse-aid dispensed can be adjusted (15B). See "Preparing your Dishwasher".
If rinse-aid is accidentally spilt onto the door when filling the dispenser wipe clean before using the dishwasher. Failure to do so could cause excessive foaming, and damage the machine.
15. Rinse-aid level indicator
This shows when the reservoir requires filling. The indicator is a small window (15A) which will appear dark all over when the container is full. However as the container empties the dark area will gradually diminish.
16. and 17. Spray arms
Water is pumped at high pressure through the holes in these arms to spray over the dirty dishes. It is this spraying that is the mechanical action in the washing process. The spray also causes the arms to rotate so that all parts of the wash chamber are covered. It is important therefore that the holes are kept clear by regularly removing the arms from the wash chamber and rinsing them under a tap.
The upper spray arm (16) can be removed simply by undoing the plastic retaining nut. To remove the lower spray arm (17), pull out the lower dish rack, remove the plastic nut and lift off the spray arm.
When replacing the spray arms ensure they are positioned correctly, with the spray boles facing upwards, and that they rotate freely.
Ensure the correct retaining nut is used. (Grey = Lower, Beige/Brown = Upper.
18.19. Filters
Particles of food washed off the plates and dishes etc. are trapped by the filters. Blocked filters reduce the wash efficiency of the machine. The coarse filter (18) can be removed by grasping the 2 plastic lugs and rotating in an anti-clockwise direction. This should be checked after every wash.
Removing the coarse filter additionally allows removal of the fine filter (19). Although this is a self cleaning filter it should be checked occasionally and rinsed under the tap, paying particular attention to the underside.
Do not forget to put both filters back after cleaning and make sure they are in the correct positions.
20. Water softener
To prevent a build up of white deposits on dishes and glasses which could occur where hardness is present in the water, your dishwasher incorporates its own water softener. This softener uses special resins to remove the hardness and these are automatically regenerated during the last part of each wash cycle using regeneration salt. Thus the water softener is ready to do its job again during the next wash.
21. Water Softener Adjuster
As the hardness of water varies throughout the country the amount of regeneration the softener requires will also vary. This can be adjusted to suit water conditions found in Britain.
This adjuster is situated at the top right hand corner, and is visible when the door is open. It has 2 settings (see page 7 for diagram).
The hardness of your water can be measured using the special test pack provided with the dishwasher. See "Preparing your Dishwasher".
22. Salt container
This container should be regularly filled with salt. For type and quantity of salt see "Preparing your dishwasher". A free "Sun" funnel is provided with your dishwasher to help fill the container.
Preparing your Dishwasher
Before using your new dishwasher for the first time you must: (A) fill the rinse-aid container and adjust the dispenser: (B) fill the salt container for the water softener and adjust the softener.
Filling the rinse-aid container
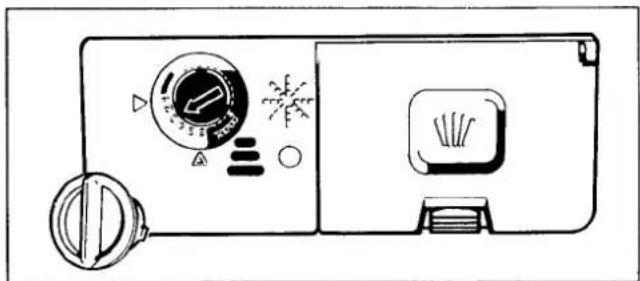
It is preferable to use rinse-aid and detergent of the same make so that they are compatible with one another. Moffat have tested and recommend 'Sun' rinse-aid and detergent, free samples of which are supplied with every machine. To fill the rinse-aid container unscrew the cap on the rinse-aid dispenser and inside the container, at the bottom, will be seen the slots of the adjuster. Pour in a quantity of rinse-aid just sufficient to show up in the window.
Adjusting the dispenser
The amount of rinse-aid dispensed can be varied to suit the differing water supplies. Start with the adjuster set to the left hand side. The results achieved with the first few washes will show you whether adjustment is necessary. If white spots are evident after the wash has been completed and the articles have dried, the dispenser will need to be altered. To do this: using a suitably sized screwdriver move the adjuster to the right, to a higher setting, one notch at a time. Continue in this way until satisfactory results are obtained.
natural_image
Line drawing of a washing machine front panel with control knobs and buttons (no text or symbols)Remember the rinse-aid container should always be refilled before it is completely empty.
Filling the salt container for the water softener
The hardness of your water can be measured using the special test pack provided with the dishwasher.
Before you first use your dishwasher, you should proceed as follows:
- Remove the salt container filler cap.
- Fill the container with ordinary water using a jug.
- Fill the container with coarse salt (obtainable from any High Street store but make sure it is suitable for dishwashers). Use the funnel so that you do not spill the salt. Water will come out of the container as you fill with salt. This is normal. You will need about 1^1/2 kg. of salt to start with, you should see the level of salt near the top of the container.
- Remove the funnel and replace the cap. When the machine is in operation, the salt container should be topped up after approximately 20–30 washes, or when the green indicator disappears.
- Clean the filler cap thoroughly inside and out every time you fill the salt container with salt and wipe off any surplus salt around the filler opening so that the cap can be screwed down securely. This will ensure proper operation of the water softener.
Run the dishwasher through the Rinse and Hold programme or a complete dishwashing cycle after replenising the water softener with salt in order to rinse out any salt that might have been spilt inside it. It is therefore advisable to fill up with salt immediately before washing dishes.
If your house is fitted with a water softener unit it is not necessary to add salt to the dishwasher.
Adjusting the softener
The test pack provided with your dishwasher allows you to measure the hardness of your water.
Dip the test strip briefly into some water drawn from the water supply. Shake it dry and leave for approximately one minute. If four red squares appear set the softener to setting 2. Otherwise use setting 1.
Generally setting 1 will be adequate. If there is any doubt about the water hardness the softener should initially be set with the arrow on 1. If a white film forms on the wash chamber walls or dishes etc, turn to a higher setting. The white film may be removed by using approximately 4 tablespoons (60 cc) of citric acid instead of detergent and running the dishwasher, empty, through the NORMAL wash programme at 65°C.
Using your Dishwasher
1. Preparations
Scrape plates clean of large pieces of waste food, bones, etc. just as you would before hand washing dishes.
2. Loading
The dish racks should be pulled forward gently on their wheels to make the racks more accessible for loading. Typical loadings for each of the racks are shown in the illustrations on page 7. The upper dish rack is for cups, saucers, glassware, small plates and bowls, etc. Cups, glasses and bowls should be placed upside down. The rack has 1 hinged flap which acts as an extra rack, enabling a double-deck of cups to be accommodated.
The lower dish rack is for large plates, dishes, saucepans, etc. The cutlery basket can be placed anywhere at the front of the rack. For clarity in the illustration of the lower dish rack, the cutlery basket has been shown lifted out.
Cutlery basket. When putting cutlery into the basket, the items should be placed with their handles pointing downwards. Make sure that spoons and forks do not nestle together and thus prevent the water jets from reaching all the soiled surfaces. Also, make sure that slender items cannot protrude through the openings in the bottom of the basket and stop the spray arms rotating. Also, never mix silver and stainless steel items in the same section of the basket, as a chemical reaction can occur, between the two if they touch during the washing process.
3. Detergent - What Type?
You should only use a detergent specially designed for dishwashers. Never use ordinary washing up liquids or powders as they do not contain the correct ingredients for machine washing and the considerable lather which would be produced would prevent the pumps and spray arms from operating properly. For best results, we recommend 'SUN' which has been specially formulated for use in domestic dishwashers. 'SUN' is available in powder or liquid form.
How much?
At first you should follow the instructions given on the packet and as you gain experience you can vary the amount to suit your need in terms of the type of load and degree of soiling at any one time.
4. Filling the Detergent Dispenser
Open the flap of the detergent dispenser and put the required amount into the dispenser, it will hold a maximum of 60 cc (4 tablespoons). Close flap after filling dispenser.
If detergent is needed for the pre-wash measure the required amount out into the inner door panel.
5. Check rinse-aid
Check that there is sufficient quantity of rinse-aid. Do not forget after examining articles from the first few washes to adjust the rinse-aid dispenser if necessary.
Remember too that it should be filled once the correct settings has been found.
Always keep a spare quantity of detergent, rinse-aid and regeneration salt to hand.
6. Check salt
Make sure that the salt container has been filled (see page 10).
7. Final preparations
Close the door and check that the drain outlet hose is either hooked over the sink or into the drain standpipe and that the water is turned on at the stopcock. Select the programme required, and push in the mains on/off button. (See "Programmes", page 13).
8. After the wash
When the washing programme has finished, the machine will stop. You should then turn off the water supply stopcock. Do not turn off the water before the programme has finished, as water is needed for the regeneration of the water softener which takes place during the drying cycle. Finally, remember to inspect the filters occasionally and, if necessary, rinse them under a tap. Note that there may be a small amount of water left in the filter recess.
9. Leakage and Flood Protectors
You may not always be able to switch the machine off at the mains and stopcock immediately after it has finished the washing and the drying cycle (for example if the dishwasher is running overnight).
In this event, the machine is protected from leakage of flooding by a safety device which comes into operation as soon as the dishwasher stops and the light goes out. You can therefore rest assured that the machine can be left unattended until you are able to switch it off completely.
The leakage protector will operate if water leaks onto the base plate of the dishwasher when the main switch is in "ON" position. The switch will stop the wash cycle and switch on the discharge pump which will remain running until the machine is swithed off and the protector reset. This should be carried out by a Parkinson Cowan service engineer.
Programmes
| PROGRAMMES | SYMBOLS | DRYING | PRE-WASH ALT. PRE-RINSE C° | WASH C° | RINSES HOT C° | kWh | HOT FILL 60 ° | |
| TIME MINUTES | WATER LITRES | |||||||
| RINSE & HOLD WASH | [SKYY] | RESIDUAL HEAT | INLET WATER TEMPERATURE | — | — | 0,02 | 7 | 5 |
| ENERGETIC WASH |  | HEATED | 55° | 65° | 65° | 1,2 | 73 | 21 |
| RESIDUAL HEAT | 55° | 65° | 55° | 0,9 | 55 | 21 | ||
| NORMAL WASH |  | HEATED | INLET WATER TEMPERATURE | 65° | 65° | 1,0 | 68 | 21 |
| RESIDUAL HEAT | INLET WATER TEMPERATURE | 65° | 55° | 0,7 | 50 | 21 | ||
| ECONOMY WASH | [AHK6] | RESIDUAL HEAT | — | 55° | 55° | 0,5 | 36 | 16 |
| QUICK WASH | [SC32] | RESIDUAL HEAT | — | 55° | 55° | 0,48 | 30 | 15 |
| PLATE WARMING |  | HEATED | — | — | 65° | 0,9 | 44 | 7 |
Total time could vary due to variation in inlet water temperature.
For best results the machine should not be loaded to its full capacity if items are heavily soiled.
NOTE. Dishwasher detergent can be harmful. Keep out of reach of children. In the event of an accident refer to the detergent container which carries instruction on what action to take.
Programmes
Rinse and Hold Programmes
The 'rinse and hold' programme can be used when you do not have enough articles to justify a complete wash, especially useful when the soil on the plates has a strong odour such as sea food.
After rinsing, the dishes can remain in the machine until after the next meal, or until there is a full load.
No detergent is required for this programme.
Plate warming
The drying cycle can be utilized to warm dinner plates prior to serving a meal. When using this facility remember the heater button should be released (in the out position).
Energetic Wash. Generally used for heavily soiled items or when the machine is loaded to capacity.
Normal Wash. Is the most commonly used programme.
Economy Wash/Quick Wash. May be used for lightly soiled items.
Care and Cleaning
Before carrying out any cleaning of your machine always make sure that the power supply is turned off at the wall socket and the stopcock is closed.
Your machine will be kept in good condition if you carry out the following recommendations:
- Check the detergent dispenser, wipe away any powder deposits and dry the compartments thoroughly.
- Wipe over the outside of your machine with a damp cloth only. Do not use any other form of cleaning such as metal polish, otherwise you may damage the surface.
● Clean the front edge, particularly around the hinges and the door gasket with a damp cloth periodically.
● Wipe around the outer edges of the inner door panel occasionally with a damp cloth.
Generally speaking, crockery and cutlery which can normally be washed by hand can also be washed in the machine, although pans, casserole dishes, etc., which have food burnt on, cannot always be expected to be completely clean. These should be soaked prior to dishwashing in the same way as when handwashing.
Some materials are not suitable for machine washing, or require special treatment, therefore, to avoid any disappointment, we suggest the following information is carefully studied.
Plastic-ware
Some plastics are suitable for washing in the high water temperatures obtained in the machine but others may warp or discolour. If there is any doubt, we suggest that one small item from the set is washed initially to check the results.
Antique and handpainted china or porcelain
Because these delicate materials can be bleached or discoloured, we do not recommend that these articles are machine washed.
Aluminium
Can discolour in contact with very hot water. To prevent this remove bright aluminium articles before the final rinse cycle. Simply stop the machine. Remove the articles and then restart the machine.
To remove tarnish from an aluminium pan, boil water with a little vinegar added in the pan. The exterior can be cleared using a mild abrasive such as "Jif". If the pan is washed in the dishwasher after this it will discolour once again. Do not wash coloured aluminium articles in your machine.
Ceramic glazes
Some glazes will not withstand machine washing temperatures and a trial wash is recommended on a less important piece.
Glass
Wash glasses on gentle wash programme at 55°C. Cut glass, glasses with coloured decorations and lead crystal are not suitable for machine dish-washing.
Stainless Steel
Although cutlery manufactured from stainless steel is generally considered stain-proof, it is possible, if washed in contact with silverware, for an action to be set up resulting in corrosion of the stainless steel. This is why we recommend that stainless steel cutlery and silver cutlery be placed in different sections of the cutlery basket so that they do not come into contact with each other.
As stainless steel can show rust marks if left too long in contact with moisture, when the dishwasher has completed its cycle, cutlery should be removed and wiped dry as soon as possible.
Any stains that are produced, for example by hard water, can usually be removed by rubbing the articles with a non-abrasive metal cleaning paste.
Acidic foods such as vinegar, mayonnaise etc can cause discolouration. The Rinse and Hold programme should be used if the cutlery is not to be washed straight away.
Other items
Cutlery with wooden or horn handles or glued parts, bronze cutlery and sauce pans with wooden handles (unless sold as dishwasher proof) should not be put in your dishwasher. If in doubt, check with your manufacturer of the item.
Washing Query Guide
Symptom
ONE. White spots, streaks or film.
Possible Cause
a) Insufficient detergent.
b) Insufficient rinse aid.
c) Water softener requires salt.
d) Incorrect loading of baskets.
TWO. Specks.
a) Food particles.
b) Detergent.
THREE. Poor results/stains left behind.
a) Filter/Spray arms blocked.
b) Water softener requires salt.
c) Unsuitable, high lathering detergent being used.
d) Insufficient powder used.
c) A lot of protein soiling present. (Protein is found in such foods as milk, eggs and cheese).
f) Powder effectiveness reduced by poor storage conditions.
FOUR. Excessive Foaming.
a) A lot of protein soiling present.
b) Excessive use of rinse aid.
c) Incorrect detergent being used.
a) Rinse aid dispenser not working/empty.
b) Poor stacking.
FIVE. Inadequate drying, poor drying results.
Solution
Check dispenser. Increase dosage.
Check dispenser. Increase dosage.
Add dishwasher (coarse) salt.
See instructions for advice on loading.
Check filters, use pre-rinse, do not overload machine, increase detergent.
Check detergent for caking, discard old detergent. Store detergent in cool, dry conditions.
Check and clean.
Check and add dishwasher (coarse) salt.
Use 'SUN' dishwasher detergent which contains a foam suppressant.
Increase dosage.
Pre-rinse, increase powder dosage.
Keep powder air-tight when not in use. Store in dry place.
Pre-rinse, increase powder dosage.
Check dispenser and alter dosage.
Use 'SUN' dishwasher detergent.
Check and top up if necessary.
Check instructions for guidance.
If the event of your machine developing a fault, you should quickly run through this check list before calling the Parkinson Cowan Service Department.
If your wash is not satisfactory:
- Check the "Washing Query Guide" page 15.
- Check that the crockery or cutlery has been properly loaded and is suitable for dishwashing.
- Check that the spray arms, or holes in the arms, have not become obstructed or blocked.
- Check that the filter is clean.
- Check that the programme selected was the correct one.
- Check that the correct amount of detergent was used.
- Check that the programme has been completed.
What to do when a fault occurs Machine does not start
(Note: the machine does not start immediately therefore wait 1–2 minutes before going through the following procedure.) Check that:
● The mains switch is on and the programme selector is in start position. If the indicator lights do not illuminate check your plug and fuse.
● Electricity is reaching your wall socket by plugging in another appliance.
● The water supply is turned on.
● The door is properly closed.
If all the above points are in order there is a fault in the machine and you should switch off both the wall socket and the machine. The door may be opened and the dishes removed.
Noise
The dishwasher is one of the quietest dishwashers on the market. If excessive noise occurs check that the dishes inside are not knocking against each other or that the spray arms are not knocking against incorrectly loaded items — large plates, cutlery protruding through the bottom rack.
Water enters the machine and continues to flow out resulting in the machine failing to start.
Check that your discharge hose is raised to the correct height — no less than 500 mm (20 in.) above the floor.
Machine will not empty
Check that the drain hose is not trapped or kinked.
If the fault is not cured by the above then either contact your retailer or contact:
Parkinson Cowan Ltd
(Service Department)
Flaxley Road
Stechford
Birmingham B33 9AD
Tel. 021-783-4000
Service
Under no circumstances should you attempt to repair the appliance yourself. Repairs carried out by inexperienced persons may cause injury or further malfunction. It is dangerous to alter the specification or modify the product in any way.
This product should be serviced by Parkinson Cowan or their authorized agents. Only genuine Parkinson Cowan spare parts should be used.
Short Spares List
The following are a list of replacement parts that may be obtained & fitted by the user.
| Description | Part No |
| Cutlery basket | 150 13 19 006 |
| Upper dish rack | 150 25 07 153 |
| Lower dish rack | 150 13 18 081 |
| Cup rack | 150 20 99 029 |
| Upper spray arm | 150 23 61 023 |
| Lower spray arm | 150 23 61 007 |
| Control knob | 150 29 13 013 |

GIVE YOUR KITCHEN THE MOFFAT TOUCH.
Parkinson Cowan Limited, Flaxley Road, Stechford, Birmingham B33 9AD.
- You and Your new Dishwasher
- — A great team.
- Location
- Connecting to the electrical supply
- Recommended Drainage Connections
- Water and drain connections Outlet Hose and Drain
- Inlet water connection
- The hose must never be connected to a mixer tap
- Accessories
- Adjusting the height of the bottom panel
- Specification
- Type
- Dimensions
- Capacity
- Operation features
- Water connection
- Removal of worktop
- Special features
- Electrical input
- Getting to know your Dishwasher
- Programme selector
- Temperature selector
- Economy Drying selector
- Mains on/off button
- Mains on indicator lamp
- Programme chart
- Upper dish rack
- Cutlery Basket
- Lower dish rack
- Detergent dispenser
- Rinse-aid dispenser
- Rinse-aid level indicator
- and 17. Spray arms
- Filters
- Water softener
- Water Softener Adjuster
- Salt container
- Preparing your Dishwasher
- Filling the rinse-aid container
- Adjusting the dispenser
- Filling the salt container for the water softener
- Adjusting the softener
- Using your Dishwasher
- Preparations
- Loading
- Detergent - What Type?
- How much?
- Filling the Detergent Dispenser
- Check rinse-aid
- Check salt
- Final preparations
- After the wash
- Leakage and Flood Protectors
- Programmes
- Rinse and Hold Programmes
- Plate warming
- Care and Cleaning
- Plastic-ware
- Antique and handpainted china or porcelain
- Aluminium
- Ceramic glazes
- Glass
- Stainless Steel
- Other items
- Washing Query Guide
- What to do when a fault occurs Machine does not start
- Noise
- Water enters the machine and continues to flow out resulting in the machine failing to start.
- Machine will not empty
- Service
- Short Spares List
Brand : MOFFAT
Model : 31HF
Category : Dishwasher