
DM1635 - Blender NUMARK - Free user manual and instructions
Find the device manual for free DM1635 NUMARK in PDF.


| Product Type | Professional DJ Stereo Mixer |
| Model | DM1635 |
| Brand | Numark |
| Rack Size | 19-inch, 5U rackspace |
| Power Consumption | 20 W typical, 28 W max (with full headphone output) |
| Power Supply | AC mains, internal voltage selector (see manual) |
| Inputs | 4 line/stereo (RCA), 3 phono (RCA), 2 mic (1x Neutrik Combo, 1x 1/4"), 5-8 switchable line (via line/phono switch) |
| Outputs | Master (RCA), Zone (RCA), Tape (RCA), Send (RCA), Headphone (1/4" stereo) |
| Crossfader | User-replaceable ALPs™, assignable left/right |
| Equalizer | 6-band stereo graphic EQ (42 Hz, 152 Hz, 480 Hz, 1.5 kHz, 4.8 kHz, 15.4 kHz), ±15 dB, with In/Out switch |
| Beatkeeper | Automatic BPM tracking for up to 8 sources (4 simultaneous), Sync Lock, Beat Assist, Tempo Difference & Beat Offset bar graphs, BPM range 50-199 |
| Microphone EQ | 2-band (Treble/Bass) on Mic 1 and Mic 2, Talkover with variable attenuation |
| Headphone Output | Stereo, 0.5 W into 47 Ω, with Program Mix control |
| Signal-to-Noise Ratio | Line > 85 dB, Mic > 72 dB, Phono > 83 dB |
| Frequency Response | Line: 20 Hz - 20 kHz ±0.5 dB; Mic: 20 Hz - 15 kHz ±0.5 dB; Phono: ±1 dB (with -3 dB @ 20 Hz rumble filter) |
| Distortion | < 0.01% |
| Dimensions (approx.) | 19" x 8.75" x 5.25" (rack width x height front panel x depth; estimated based on 5U) |
| Weight (approx.) | 12 lbs (estimated) |
| Accessories | 12V BNC gooseneck lamp connector |
| Maintenance | Do not use spray cleaners on faders; use quality shielded cables; keep away from moisture |
| Safety | Read manual before use; do not expose to rain/moisture; refer servicing to qualified personnel |
| Warranty | 360 days (parts & labor) from authorized dealer purchase, up to 2 years from shipment |
Frequently Asked Questions - DM1635 NUMARK
User questions about DM1635 NUMARK
0 question about this device. Answer the ones you know or ask your own.
Ask a new question about this device
Download the instructions for your Blender in PDF format for free! Find your manual DM1635 - NUMARK and take your electronic device back in hand. On this page are published all the documents necessary for the use of your device. DM1635 by NUMARK.
USER MANUAL DM1635 NUMARK
Professional Disc Jockey Products
DM1635 STEREO MIXER with the BEATKEEPER
OWNER'S MANUAL

Safety Information and Product Registration

CAUTION
RISK OF ELECTRIC SHOCK DO NOT OPEN

CAUTION: TO REDUCE THE RISK OF ELECTRIC SHOCK DO NOT REMOVE ANY COVER. NO USER- SERVICEABLE PARTS INSIDE. REFER SERVICING TO QUALIFIED SERVICE PERSONNEL ONLY.
The lightning flash with arrowhead symbol within the equilateral triangle is intended to alert the user to the presence of un-insulated “dangerous voltage” within the product’s enclosure that may be of sufficient magnitude to constitute a risk of electric shock to persons.
The exclamation point within the equilateral triangle is intended to alert the user to the presence of important operating and maintenance (servicing) instructions in the literature accompanying this appliance.
CAUTION
FOR USA & CANADIAN MODELS ONLY
TO PREVENT ELECTRIC SHOCK DO NOT USE THIS (POLARIZED) PLUG WITH AN EXTENSION CORD, RECEPTACLE OR OTHER OUTLET UNLESS THE BLADES CAN BE FULLY INSERTED TO PREVENT BLADE EXPOSURE.
SAFETY INSTRUCTIONS
- Read Instructions - All the safety and operating instructions should be read before this product is connected and used.
- Retain Instructions - The safety and operating instructions should be kept for future reference.
- Heed Warnings - All warnings on this product and in these operating instructions should be followed.
- Follow Instructions - All operating and other instructions should be followed.
-
Water and Moisture - This product should be kept away from direct contact with liquids.
-
Heat - Avoid placing this product too close to any high heat sources such as radiators.
- Power Sources - This product should be connected to a power supply only of the type described in these operating instructions, or as marked on the unit.
- Power Cord Protection - Power supply cords should be routed so that they are not likely to be walked upon or pinched by items placed on or against them. When removing the cord from a power outlet be sure to remove it by holding the plug attachment and not by pulling on the cord.
- Object and Liquid Entry - Take care that objects do not fall into and that liquids are not spilled into the inside of the mixer.
- Damage Requiring Service - This product should be serviced only by qualified personnel. If you have any questions about service please contact Numark at the number(s) shown on the back cover of this manual.
- Grounding or Polarization - Precautions should be taken so that the grounding or polarization means built into the mixer is not defeated.
- Internal/External Voltage Selectors - Internal or external voltage selector switches, if any, should only be reset and re-equipped with a proper plug for alternative voltage by a qualified service technician. Do not attempt to alter this yourself.
NOTE: This apparatus does not exceed the Class A/Class B (whichever is applicable) limits for radio noise emissions from digital apparatus as set out in the radio interference regulations of the Canadian Department of Communications.
WARNING: To reduce the risk of fire or electric shock, do not expose this appliance to rain or moisture. Electrical equipment should NEVER be kept or stored in damp environments.
Please record the serial number of your unit as shown on the back of the chassis as well as the name of the dealer from whom you purchased the unit. Retain this information for your records. Please return the warranty card enclosed to register your mixer with us.
MODEL: DM1635 PURCHASED FROM:
| SERIAL NUMBER: DATE OF PURCHASE:
NUMARK DM1635 STEREO MIXER
INDEX
Safety Information Page 2 Product Registration
Introduction Page 4 Features
Precautions Page 5
Front Panel Diagram Page 6
Guided Tour of Features Page 7 Operating Instructions
Beatkeeper Diagram Page 10
Beatkeeper Operating Instructions Page 12
Beatkeeper Troubleshooting Page 14
Rear Panel Diagram Page 16
Connection Diagram Page 17
Specifications Page 18
Block Diagram Page 19
Warranty and Service Page 20
CONGRATULATIONS!
You have purchased the DM 1635 Stereo Mixer by Numark. This equipment features all new multi-source Beatkeeper technology. With the latest in manufacturing and design technology you get greater quality and better reliability than ever before. The DM 1635 brings to you the finest quality of DJ mixing equipment available today.
Thank you for buying Numark DJ products!
DM1635 FEATURES...
Mixer features include:
- User replaceable assignable ALPs TM crossfader.
- Dual 6-band graphic equalizer with In/Out switch.
• Master and Zone level controls - Neutrik™ "Combo" connector allows 1/4" or XLR plug to be used for DJ Mic.
- 5-8 switchable line inputs
- Three phono inputs.
• Dedicated DJ Mic and Second Mic Channel with 2 Band EQ and Talk-over dual control - Split cue headphone monitoring with cross-fader
• Master and Zone level controls - Stereo/Mono switch on the Master and Zone
- Tape Out for direct recording.
• Powerful stereo headphone output - Push button cueing
• High-end performance audio signal
• 12V BNC light connector
theBEATKEEPER Features:
• Automatic BPM tracking of up to 8 input sources (4 simultaneously)
- Accurate digital BPM displays
- Visual live tracking of your mix progress, using Tempo Difference and Beat Offset Bar Graphs
- All visual displays update on every beat
- Sync Lock Button for accurate BPM tracking
- Beat Assist for locking to the correct beat
- Simple user interface
Once you've synced your Beatkeeper you've opened a whole new dimension in mixing. The Beatkeeper has two bar graphs - one showing the tempo difference, and the other showing the beat offset. Now you can see when your mix is on track. If the beats start to drift, you'll be able to easily adjust the music before your audience can hear it. No other beat counter or automatic mixer can give you the power to make a more accurate mix.
Numark - The Proven Leader in DJ Technology
IMPORTANT INFORMATION...
Please read this entire manual before connecting the DM1635 to your system. For optimum performance:
• Always make sure that AC power is OFF while making any connections.
- Do not use excessively long cables (i.e. over 50ft/14m) Be sure plugs and jacks are tightly mated. Loose connections can cause hum, noise or intermittents that could easily damage your speakers.
- Never use spray cleaners on the slide controls. Residues cause excessive dirt build-up and this will void your warranty. In normal use slide controls can last for many years. If they malfunction (usually because of a dirty or dusty environment) consult a professional technician.
- Never attempt to make any adjustments or repairs other than those described in this manual. Take the DM1635 to your dealer or to an authorized Numark Service Center.
A NOTE ON CABLES:
Make the input and output connections with readily available low-capacitance stereo cables. Quality cable makes a big difference in audio fidelity and punch. See your Numark dealer or an electronics or audio specialist store if you are not sure which cables to get.
SYSTEM PRECAUTIONS
- Use appropriate cables throughout your system: Quality shielded audio cables and terminated shielded video cables, low-capacitance preferred. Speaker cables must be 14-gauge minimum; 12- or 10-gauge is better.
- Reliability will be enhanced through the use of banana connectors on the speaker wires. Observe correct speaker wire polarity. If in doubt, consult your Numark dealer or a qualified technician.
- Take care to connect only one cable at a time. Pay attention to the color-coded, labelled Input and Output jacks.
- ALWAYS remember: "TURN AMPS ON LAST AND OFF FIRST". Begin with master faders or volume controls on minimum and the amplifier gain/input control(s) down. Wait 8 to 10 seconds before turning up the volume. This prevents transients which may cause severe speaker damage.
- Use restraint when operating controls. Try to move them slowly. Rapid adjustments could damage speakers due to amplifier clipping.
- Avoid amplifier “clipping” at all costs: this occurs when the red LEDs (usually on the front panel of most professional power amplifiers) start flashing. “Clipping” is when the power amplifier is distorting and working beyond its limits. Amplifier distortion is THE major cause of speaker failure.
• To prevent fire or shock hazard, do not expose the unit to rain or moisture. Never place cans of beer, soda, glasses of water or anything wet on top of the mixer!
DM 1635 FRONT PANEL DIAGRAM...

GUIDED TOUR OF FEATURES AND OPERATING INSTRUCTIONS...
If the DM1635 is your first mixer, please read this entire manual before you begin operation.
If you are an experienced DJ simply replace your old mixer. The DM1635 can be rack-mounted or used as a free-standing unit (five 19" rack unit spaces).
INSTALLATION AND OPERATION
Study the Connections Diagram on page 13. First, connect all stereo input sources. Next connect your microphone(s) and monitor headphones. Make sure all faders are at "zero" and the unit is off. Finally, connect the stereo outputs to the power amplifier(s) and/or audio sources. Plug the DM1635 into AC power. Now you are ready to switch it on.
The DM1635 is divided into six functional blocks: Input, Crossfader, DJ Mic, Master/Booth Output, Equalizer, and BEATKEEPER. It is important to learn how each of these work.
CHANNEL INPUTS/CONTROLS SECTION
- Channels 1, 2, 3 & 4 Input Toggle Switches select which source will be live to that channel based on what you have connected to the rear panel input section.
- The Input Faders are low-noise, low-impedance, high-quality, smooth Alps™ faders. These control individual source levels in the mix.
-
Channel Cue Assign. The Cue pushbuttons are used to route channel audio to the Monitor Section. The channel faders do not control the Cue send volume.
-
Effect Send (Channels 1-4). Depress these buttons when you want the signal from any input channel to be routed to the Send Out Jacks. The channel faders do not affect the signal levels which are routed to the send output.
CROSSFADER SECTION
- The Crossfader Assign knob to the left of the crossfader lets you choose which input channel will be heard when the crossfader is in the far left position.

- The Replaceable Crossfader achieves clean segues between the two selected input channels.
"Hard left" selects the channel set up of the Assign Left knob. In this example it is Channel 1. "Hard right" selects the channel set up on the Assign Right knob. In this example it is Channel 4. With the crossfader centered both assigned channels are live. Use the crossfader for fast and seamless segues from one selected channel to the other. To turn off the crossfader simply turn both knobs all the way to the left.
Note: The crossfader is user replaceable in case of failure. Simply unscrew the two large screws which hold it in place, lift it out and disconnect it's cable. Re-attach the new crossfader and screw the mounting plate back onto the unit - you're back in business!
- The Crossfader Assign knob to the right of the crossfader lets you choose which input channel will be heard when the crossfader is in the far right position.
DJ MIC SECTION
The DM1635 has an extremely flexible DJ Mic channel. The Talkover function reduces the level of the music while leaving the DJ Mic at normal volume.
- Neutrik™ "Combo" connector allows connection of either a 1/4" jack or an XLR jack. This is ideal for connecting an XLR gooseneck directly into the mixer.
- Treble and Bass Controls fine tune the tone of your voice on both mics through the sound system. The controls are detented for setting tone "flat". For best results, use a dynamic cardioid microphone.
- The DJ Mic 1 Fader controls the DJ Mic volume for the Neutrik™ "Combo" connector.
- The Mic 2 Fader controls the Mic volume for the 1/4" connector on the rear of the mixer.
12.Mic Off/On/Talkover Switch.
Off turns off Mic 1
On turns on Mic 1
Talkover turns down the input level of your music sources from Channels 1-4.
Talkover is very useful for making announcements without adjusting any levels.
Try using this feature for audience participation when you want the music to temporarily cease and the audience to be heard - "YEAH!"
MASTER/BOOTH OUTPUT SECTION
- The Stereo Master Fader controls the overall output level.
- Stereo/Mono toggle adjusts the Master output for the operation selected.
- The Zone Level controls speaker volume for a remote zone or booth monitors. If you do not use booth monitors the output can feed a tape deck, another amplifier, another mixer or a satellite speaker system. Note: This can also be used to supply line level audio to a lighting controller or to lights that are sound activated.
CONTRACTOR'S NOTE: Booth Level provides zone control in installations where there are two separate rooms, or a bar and dance floor, for example. Remote zone volume should be controlled from the DM1635.
- Stereo Auto Peak Hold Level Indicator. This fast, accurate stereo meter tracks the output level. The red LEDs for +3dB, +5dB and +8dB hold program peaks for a second or two. With peak metering, it's OK to be "in the red" as long as +5dB or +8dB aren't constantly lit. Set the crossover, equalizer and power amp inputs to avoid distortion at each step in the audio chain. Proper attention to the peak meter results in the punchiest possible sound without audible distortion.
EQUALIZER SECTION
- 6-Band Stereo Graphic Equalizer (EQ). EQ compensates for differences in source material sound quality. In ultra-compact mobile systems this EQ can be used to tailor the sound to the acoustical requirements of the room. Center frequencies are 42Hz, 152Hz, 480Hz, 1.5kHz, 4.8kHz and 15.4kHz. Faders have a center detent for an accurate "flat" response.
Below is a typical "house" EQ curve. Notice how the knobs above "0" balance out the knobs below. Start with this setting if you've never used a graphic EQ before:

Below is an example of a poor EQ curve because it cuts the output volume down by 6-10dB. You have to compensate by running the Master output higher:

Below is the worst sort of curve to use because you are using EQ to add volume. With exaggerated boost you can easily run your power amplifiers into “clipping” (see page 5) and damage your speakers.

GENERAL EQ HINTS
- Boost the 42Hz band for deep bass tones and solid kick drum sound. Use sparingly because this dramatically increases demand on power amplifiers and could drive them into “clipping” (see page 6).
- Cut slightly at 152Hz and more at 460Hz for extra clarity. Note: Cutting is preferable to boosting.
- Boost 15kHz for a little "sizzle".
-
As a general rule, less equalization is better!
-
Equalizer On/Off. This controls whether your final output will be routed through the EQ or not.
MONITOR SECTION
- The Monitor section includes the Program Mix control, the Headphone Volume control and the Headphone Jack. Connect headphones with a standard 1/4" stereo plug. The Cue audio is sent to the headphone amp using the Cue Assign Pushbutton and the Pgm Mix control. The Program Mix controls the amount of program audio in the headphones so that beats can be matched exactly and segues are smooth when a song is cued.
- 12V BNC Connector allows a 12 volt gooseneck lamp to be connected directly to the mixer. This light is readily available from your Numark dealer.
- Power Switch and Power-On LED.
the BEATKEEPER
Panel Diagram
A. CHANNEL SELECT-
Tap this button to select desired pre-fader input channel. The respective input channel LED will light up 1,2,3, or 4
When an input is not yet set and scanning for the tempo tapping the Sync Lock button once will lock in the music as long as there is a BPM number displayed for the input. When an input is locked in tapping the Sync Lock button tells the Beatkeeper to start scanning for a new tempo again.
C. SYNC LOCK LED
OFF- the respective input is not locked or set to track the music
ON- the respective input is synced and ready to track the music
D. BEAT ASSIST BUTTON-
Tapping the Beat Assist button once automatically realigns the downbeat to exactly when you tapped the button. Tapping the beat assist button two or more times also sets the tempo and sync locks the music.
E. BPM DISPLAY-
(--)- No audio signal is being processed for this input or the Beatkeeper has not completed tracking the BPM for this input (NUMBER)- The respective input is currently playing music with this number of Beats Per Minute (as determined by the Beatkeeper)
F. DOWN BEAT LED (red)
OFF- the Beatkeeper has not yet matched the beat of the respective audio input
BLINKING- the Beatkeeper has matched this LED to the beat of the respective audio input
ON- the Beatkeeper is waiting for the music to start on the respective input
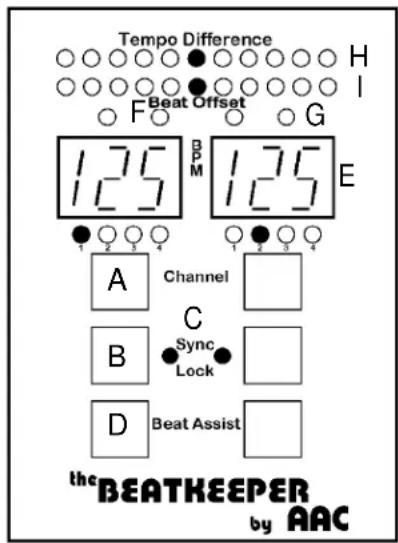
G. PEAK SOUND LED (green)
OFF- the Beatkeeper is not detecting sound from the respective audio input
BLINKING- the Beatkeeper is detecting 'rhythm setting' sounds from the respective audio input
H. TEMPO DIFFERENCE GRAPH
OFF- One or Both of the audio inputs are not yet sync locked in
RED LED ON- The audio inputs tempos are not aligned YELLOW LED ON- The audio inputs tempos are close to aligned
GREEN LED ON- The audio inputs tempos are perfectly aligned
I. BEAT OFFSET GRAPH
OFF- one or both of the audio inputs are not yet sync locked or are not sending an audio signal
RED LED ON- the audio inputs beats are not aligned YELLOW LED ON- the audio inputs beats are close to aligned
GREEN LED ON- the audio inputs beats are perfectly aligned
When your mixer is first turned on the channels selected will be 1 & 2 respectively. If you wish to track the beat of another channel, tap on the channel select button until the desired input is reached.
NOTE: The Beatkeeper will track the source that is selected with the channel toggle switch.
Syncing Your Beatkeeper
When learning how to use the Beatkeeper, choose some dance music with a hard, steady beat.
Start the music for left channel of your Beatkeeper. When the Beatkeeper has located the beat, the BPM display will illuminate with the music's Beats Per Minute.
You'll notice a flashing green LED every time the Beatkeeper detects a rhythm defining instrument. The Beatkeeper will soon flash a red LED on every beat, the same way you would tap your foot to the beat of the music. The Beatkeeper will display a BPM which will update every five-seconds while scanning. As long as the beat is well-defined the BPM number will equal the beats per minute of the song being played. Once you see the red beat LED flashing with the beat of the music, press the respective Sync Lock button, and the Sync Lock LED will illuminate.
Activating the Sync Lock tells the Beatkeeper to stop scanning the music for a different BPM and to start tracking the beat changes of the current BPM as you adjust the pitch of the music. This function is manual to ensure that the Beatkeeper is right on the beat. Once the Sync Lock LED is on, the Beatkeeper tracks the beats of the music and updates the BPM display on every beat.
To unlock, simply tap the Sync Lock button once and the Beatkeeper is back in BPM scanning mode.
After syncing an audio input, try speeding up and slowing down the music. You'll notice that the red beat LED will continue to flash on the downbeat, and the BPM number will adjust itself to match the tempo of the music. This indicates that the Beatkeeper is successfully tracking the beat and will continue to do so throughout your mix. If you stop the music you will notice the Beat LED will go solid and the BPM number will remain in memory. Once the music is restarted the Beatkeeper will remember the last tracked rhythm pattern and pick up on the beat right away.
PLAY the music, OBSERVE the beat match, and PRESS the Sync Lock Button. That's it. If you can do that twice, you can mix with the Beatkeeper.
Beat Assist
The Beatkeeper is foolproof. The Beatkeeper can track any music up to 199 beats per minute. The unit, however, is set to automatically track tempos between 80-150BPM. Of course not all music is within this range, you may need to track the high tempos of Meringue or Salsa, or the low tempos of R&B slow jams or Reggae. Let's face it, not all music has hard steady beats either and sometimes you just need the music set up yesterday. For these occasions we have the Beat Assist Button.
If the Beatkeeper is having trouble matching the beat to the flashing red Beat LED, or if you need to sync up Immediately, tap the Beat Assist button 2-8 times as you hear the beat, the same way you would tap your feet to the music. Pressing the Beat Assist Button more than once aligns the Beatkeeper to your taps. Notice that the Sync Lock LED automatically illuminates, signifying that the Beatkeeper is now locked in with the beat. Simply put, if the Beatkeeper isn't on track, or you're in a real hurry, you need to press a button twice instead of once.
If the Beatkeeper is synced to the correct BPM but is aligned to the music's offbeat, tap the Beat Assist button with the beat of the music just once and you will have brought the Beatkeeper back in sync.
2 Channel Mixing
After you feel comfortable syncing up the Beatkeeper, you're ready to mix. Mixing with the Beatkeeper has three parts: syncing to the music (which you've done), aligning the tempos, and aligning the beats. Once these three things are done, you will have a perfect mix. No more guessing, tapping, or embarrassing fades.
Choose another music selection and start it on your right channel. Sync up the first song as described in the last section. With the first selection synced (Sync Lock LED illuminated), sync up the right channel the same way you set up the left.
As the second Sync Lock LED illuminates, a new dimension of DJing begins: VISUAL MIXING.
The bar graphs on the top of the Beatkeeper have now been activated and are updating automatically.
NOTE: In order to perform a mix which is tracked by the Beatkeeper, both channels MUST be synced. This is indicated by the yellow Sync Lock LED being lit for both inputs.
In order to create the perfect mix, your goal is to keep both bar graphs as close to centered (green or yellow) as possible.
First, align the top graph, the Tempo Difference Graph. This graph indicates how close the two BPMs are to each other. If they are exactly the same tempo, the green LED in the middle will light up. If one song is faster than the other, the bar graph will shift towards the faster song. If the Tempo Difference graph is not centered, adjust the speed of one of the inputs using the pitch control. For example, if the Tempo Difference graph has a red LED illuminated closer to the right channel of the Beatkeeper, the right channel is faster than the left channel, either slow down the right channel, or speed up the left channel.
If the opposite is true, the Tempo Difference Graph has a red LED illuminated on the left channel, indicating the song on the left channel is faster than that the right channel, either slow down the left channel, or speed up the right channel. The second step involves the bottom graph, the Beat Offset Graph. This graph indicates how close the individual beats are. Both BPMs may be the same but the beats may not be in sync. This is often described as the "ping-pong" effect. If the beats are matched, the green LED in the middle lights up. If the beats of one input are earlier than beats of the other input, the Beat Offset Graph will shift toward the song with the earlier beats.
To align the Beat Offset Graph when using CD Players, adjust the appropriate pitch bend. If you are using turntables, hold or apply pressure to the record/turntable and then release to "shift" the beat.
If the Beat Offset graph is shifted toward the right channel either use the minus (“-”) pitch bend for the right channel CD player (with vinyl, apply pressure to slow the turntable) or use the plus (“+”) pitch bend for the left channel CD player (with vinyl push the turntable ahead).
Intuitively, if either bar graph is shifted towards a channel, this indicates that the song on that channel is “ahead” of the other one. Either the tempo is faster (top graph), or the beats come sooner (bottom graph).
When both bar graphs are in the green you are ready to perform your mix!
Don't forget you can always resync to the beat, if it ever shifts off, by tapping the Beat Assist button.
If the beats start to drift, you'll be able to easily adjust the music before your audience can hear it. No other beat counter or automatic mixer can give you the power to make a more accurate mix!
NOTE: The Beat Offset bar graph either indicates beat-to-beat offset, or beat-to-halfbeat offset, whichever is closer. This allows the DJ the option of mixing on the beat or on the half beat.
Multiple Channel Mixing
One exciting feature of your Beatkeeper built into your mixer is the option to visually beat mix more than 2 sources at the same time. Once you have synced a channel of the Beatkeeper the unit will continue to track it even if you should decide to change channels. Up to all four channels can be in sync simultaneously. By selecting different channels you can cross-compare the mix of any 2 channels instantly.
In order do perform a 3-way mix you first will need to set up a 2-way mix as described in the previous section.
NOTE: Multiple source or "layer" mixes should be performed with a minimum of vocals otherwise the music will clash when mixed for a long period of time.
The next step will be to decide which input channel you would like to use as a reference for beat mixing. While your 2-way mix is ongoing change the channel, on the side you have not chosen as a reference, to the next song you plan to mix into. Now sync and mix this song like you did for the 2-way mix. After you have synced up the new song you should continue to check your original mix by switching between channels. When you have properly aligned the new song you are ready to perform a 3-way mix.
To perform a 4-way mix just do the same thing again.
Prepping For A Mix
You may also choose to prep the Beatkeeper for an actual mix. To prep the Beatkeeper, first match the two song's tempos by adjusting the pitch so that the Tempo Difference LED graph displays yellow or green LEDs. Next hit the Cue button of your CD player, or lift your record needle. The red "beat" LED will remain solid alerting you to which input is ready to start. When the music starts again, the Beatkeeper begins right on the beat and indicates how well the two songs are synced within seconds.
Syncing To Off Beats
Now if you really want to be fancy, you can actually use the Beatkeeper to sync to the off-beats. You can have two songs going "Boom - Cha - Boom - Cha". Normally, you would sync the "Booms" of both songs (beat-to-beat mixing). But you can also sync the "Boom" of one song to the "Cha" of the other (beat-to-half beat mixing). The Beatkeeper's Beat Offset graph will display whichever offset is smaller. This allows the DJ the flexibility to mix with the beat or the off-beat.
Beat mixing is a skill that must be practiced in order to be proficient at it. 3 and 4-way mixing can be a very difficult skill to master. Visual mixing with the Beatkeeper gives you the tools to help you do this, but nothing replaces practice.
BEATKEEPER TROUBLESHOOTING
T1 The BPM goes way off when using the search button on my high tech CD mixer.
Some high tech CD mixers have a cueing feature which allows you to cue precisely to an exact spot in the music so you can slam mix. The only problem is that this mode repeats the first beat of the music at a rate which is unrelated to the actual BPM of the music. As a result, the BPM goes off track. The best way to avoid this is to restart the music after a search, make sure the Beatkeeper is resynced to the music and then press the Cue button on the CD player. The Beatkeeper will remember the BPM and track the music once it starts.
T2 The Beatkeeper doesn't resync to the downbeat of the music when the music restarts.
Either the downbeat isn't strong enough to be detected, or the music was started well before a strong downbeat. You can easily resync to the downbeat by tapping the Beat Assist button once with the beat. Alternatively you can cue the music to a strong downbeat so that the Beatkeeper starts on this downbeat.
T4 Either the BPM display is blank, or it is noticeably off.
This is common at the beginnings of songs where the beat is not well defined. To sync simply tap the Beat Assist button two or more consecutive times on the downbeat. The Sync Lock LED turns on automatically, indicating that the Beatkeeper is now tracking the beat of the music.
T5 The BPM display is correct, but the beat LED isn't flashing on the downbeats of the music.
If this happens tap the Sync Lock button (turning the Syr Lock LED on) and tap the Beat Assist button once to make the Beatkeeper track the downbeat. You can also use this force the Beatkeeper to track an offbeat for more advanced mixing.
Alternatively you may sync manually by tapping the Beat Assist button 2 or more times on the beat.
T6 The Beats per minute number seems to jump all over the place.
The Beatkeeper is analyzing different sections of the music to find the BPM. If there is a temporary suspension of a distinct beat or if the rhythm is too complex, this number may not follow the actual BPM.
a) You can wait for a passage of music with a steady beat for a more accurate BPM indication.
b) Hit the Sync Lock button once the red beat LED starts following the beat
or c) Tap the Beat Assist button at least twice along with the music beat.
Either method (b or c) will cause the Sync Lock LED to tu and lock on, indicating that the Beatkeeper is now tracking the music.
T7 It takes too long for the Beatkeeper to find the beat on its own.
To speed up the BPM detection process, tap the Beat Assist button at least twice. At this point, the Beatkeeper w turn on the Sync Lock LED, immediately providing a BPM estimate, while resynchronizing to the beat you tapped.
T8 I hit the Sync Lock button, but the flashing red beat LED doesn't seem to follow the beat.
This means you hit the Sync Lock button before the red beat LED actually started tracking the tempo. You can easily fix this by tapping the Beat Assist buttons as many times as necessary to resync to the beat of the music.
T9 The beat tracking suddenly gets off track.
This may happen if the music has several beats missing, or the rhythm suddenly becomes extremely complex or variable. You can either resync the beat using the Beat Assist button or wait a few seconds for the Beatkeeper to automatically recover.
T10 The Beatkeeper seems to track the music for a little bit right after using the Beat Assist, and then drifts off.
This could be one of two things:
a) The Beatkeeper is averaging the time between each of your Beat Assist button taps. If the first tap is way off, the tempo will be way off.
b) The Beatkeeper was synced during a section of the music without a well defined beat.
In either case, the problem can be overcome by waiting a few seconds before preceding to tap the Beat Assist button two or more times with the beat of the music.
T11 Either the BPM number or red beat LED doesn't track the music fast enough while using the pitch bend on my CD player (or speed control on my record player).
You may have exceeded the tracking capability of the Beatkeeper. The Beatkeeper can normally handle speed changes of +/- 5% per beat if the music's rhythm is steady. If the rhythm is complex (or some of the beats are missing) the Beatkeeper will require more gradual changes to track properly.
* If you are using a record player or a wide range pitch bend on a CD player, note that the Beatkeeper only tracks +/- 11.5% from the tempo at which it was synced. You may need to resync the Beatkeeper if you exceed this range while attempting to align tempos.
* You can also manually resync the beat using the Beat Assist button.
T12 Neither the Tempo Difference graph or the Beat Offset graph seem to work.
The bar graphs are only operational when both Sync Lock LEDs are illuminated. This ensures that you don't inadvertently try to mix two songs without their tempos being synced.
To make the bar graphs operational, either:
a) Wait for the red beat LED's to follow the music and ta the respective Sync Lock button
or b) Tap the Beat Assist button twice with the beat of th music.
Either method will cause the Sync Lock LED to illuminate
T13 The Beat Offset graph is not illuminated, but the Tempo Difference graph is.
This indicates that one or both of the inputs are not playing. The Beat Offset graph turns off when there are no beats available for tracking on either or both inputs. The graph automatically restarts once both inputs become active again.
T14 The Beat Offset graph has the green LED illuminated when the red beat LEDs are a half beat off from each other.
This indicates that the songs are synced at their half beat. With rap music and some house, mixing is often done on the half beats rather than the down beats themselves. The Beatkeeper intentionally syncs this way to give the DJ the option of beat-to-beat mixing or beat-to-halfbeat mixing.
DM1635 REAR PANEL DIAGRAM
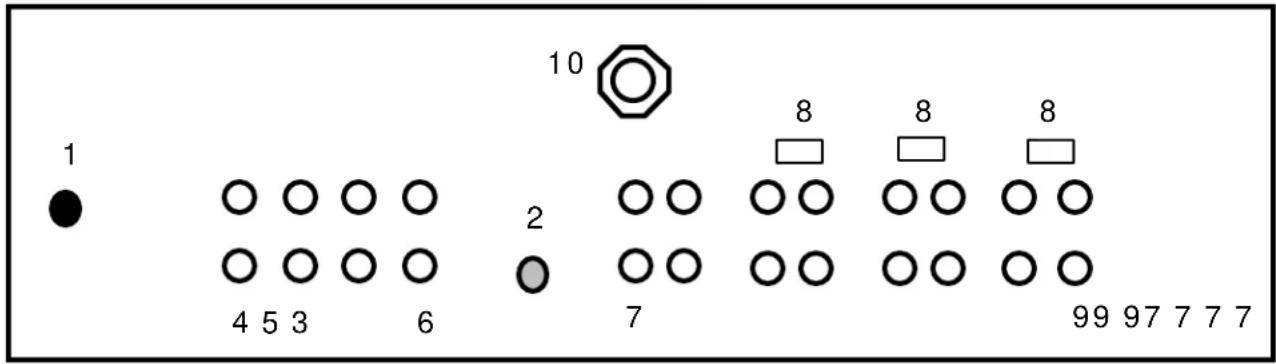
REAR PANEL: INPUTS AND OUTPUTS
- AC Cord. See safety precautions on page 2 for proper treatment of the power cord.
- GND is the grounding lug for turntables 1, 2 and 3 (phono inputs on Channels 1, 2 and 3). Always use this connection (your turntable cable should have a grounding wire).
- The Stereo Main Outputs are low-impedance RCA connectors controlled by the Master fader.
- The Stereo Zone Outputs are low-impedance unbalanced RCA jacks controlled by the Zone Level control.
- The Tape Outputs are low-impedance unbalanced RCA jacks which output the program mix and allow you to connect any recording device.
-
The Send output is for send to an external signal processor such as an external sampler or effects box. You direct sound to the send by pressing the send button on the main panel.
-
Channels 1-5 Line Inputs are unbalanced RCA jacks. The Line Input is selected with the toggle switch of the front panel.
You can connect stereo audio from HiFi VCRs, cassette an reel-to-reel tape decks, DAT machines, CD players, laser discs, tuners, even synthesizers or other mixing consoles.
NOTE: Plug mono audio sources into both Left and Right inputs using a "Y" cable connector. - Line/Phono Input switch. Use this to allow line level equipment to be plugged into your phono inputs giving you a total of 8 line input options.
- Phono Inputs on Channels 1, 2 and 3 use unbalanced RCA jacks. Your input signal is fed directly to the DM1635's high-quality RIAA phono pre-amplifiers so use this position only for moving magnet cartridges. Line level sources will overload the sensitive phono pre-amps and will sound very bad, so always be sure to toggle the line/phone switch over to line before connection of line sources.
- Mic 2 is the mic input for mic 2.
DM1635 CONNECTION DIAGRAM...
![graph TD A["Microphone 2"] --> B["Tape Deck"] C["Digital Sampler"] --> D["AC Outlet"] E["Keyboard"] --> F["Turntable 1"] G["CD Player"] --> H["Turntable 2"] I["Turntable 3"] --> J["Turntable 3"] K["Main"] --> L["Sound System w/ Amplifier"] M["Sound System w/ Amplifier"] --> N["Zone"] O["Main"] --> P…](/content/2026/05/945479/images/7c37abdee04abebca5af90f97f12dadf5f3f1f8ab3c5f3001751d2dee495611a.jpg)
SPECIFICATIONS...
INPUTS:
Line:10kΩ input impedance
80 mV rms sensitivity (for 1.22 V output)
Mic: 10kΩ input impedance balanced/unbalanced
2.5 mV rms sensitivity (for 1.22 V output)
500 mV rms max input
Phono:47kΩ input impedance
1.5 mV rms sensitivity @ 1 KHz (for 1.22 V output)
OUTPUTS:
Line: 9V rms max (+20 dBm)
Headphone Amp: .5 watt into 47Ω
Distortion less than .01%
EQUALIZER:
6-Band Stereo Graphic EQ
Band centers 42 Hz, 152 Hz, 480 Hz, 1.52 KHz, 4.8 KHz, 15.36 KHz +/- 15 dB
SIGNAL TO NOISE RATIOS (vs. maximum output):
Line: Better than 85 dB
Mic: Better than 72 dB
Phono: Better than 83 dB
FREQUENCY RESPONSE:
Mic: 20 Hz-15k Hz + _.5 dB
Line: 20 Hz- 20k Hz + _ .5 dB
Phono: +_ 1 dB except for controlled attenuation of -3 dB
@ 20 Hz to reduce rumble and feedback
TALKOVER ATTENUATION:
variable from no cut to -16 dB
BEATKEEPER
Sync Lock Mode
BPM update rate
Every beat
BPM accuracy
+/- 1 BPM
BPM tracking range
50-199BPM
Bar graph update rate
Every beat
Tempo difference graph resolution +/-1 BPM per LED, green is +/-2 BPM
Beat offset graph resolution +/-7.5msec per LED, green is +/-15msec
Beat Assist Button
Minimum time between consecutive taps 0.3 seconds
Maximum time between consecutive taps
1.2 seconds
Consecutive taps averaging for BPM
Last 2 to 8 taps
POWER CONSUMPTION:
20 Watt typical, 28 watt with full headphone output
Numark - The Proven Leader in DJ Technology
BLOCK DIAGRAM...
Numark
Professional Disc Jockey Products
Warranty and Service Information
Numark Industries, LLC and Numark International, Inc. (hereafter "Numark") warrants each new product manufactured and/or supplied by it to be free from defects in material or workmanship under conditions of normal use and service for 360 days, beginning on the date of purchase from an authorized Numark Dealer, but not to exceed 2 years from date of shipment by Numark.
The Numark obligation under this warranty is limited to repairing or replacing, at its option, the product or part(s) therein; which upon examination by Numark shall appear to be defective or not up to factory specifications; providing the Numark product is returned (transportation prepaid) to Numark.
Numark shall not be liable for any damages, consequential or otherwise, resulting from the use and operation of this product and makes no other warranty(s) either express or implied on this product, including any warranty of merchantability.
This warranty does not extend to any of our products which have been subjected to misuse, neglect, accident, incorrect wiring not our own, improper installation, or use in violation of instructions furnished by us, nor extended to units which have been repaired or altered outside of our factory, nor to cases where the serial number thereof has been removed, defaced, or changed, nor to accessories used therewith not of our own manufacture. Numark reserves the right to make changes or improvements in its products, during subsequent production, without incurring the obligation to install such changes or improvements on previously manufactured equipment.
To place this warranty into effect, the enclosed WARRANTY REGISTRATION CARD must be returned to Numark Industries, LLC within thirty (30) days after date of purchase.
This warranty gives you specific legal rights, and you may also have other rights which vary from state to state.
Some states do not allow the exclusion or limitation of incidental or consequential damages so the above limitation or exclusion may not apply to you.
EQUIPMENT TRANSPORT
A Return Authorization number should be obtained from Numark through the addresses or phone numbers below.
It is the customer's obligation, when returning faulty equipment, to properly pack the Numark equipment in its original packaging. Failure to do so may inadequately protect the equipment in transit and, therefore, jeopardize the customer's warranty. The defective Numark equipment should be sent, FREIGHT PREPAID with Return Authorization number to:
NUMARK INDUSTRIES
11 Helmsman Road
North Kingstown, RI 02852 USA
Attention: Service Department
Telephone: +1 (401) 295-9000


- PROFESSIONAL DISC JOCKEY PRODUCTS
- DM1635 STEREO MIXER WITH THE BEATKEEPER
- OWNER'S MANUAL
- SAFETY INFORMATION AND PRODUCT REGISTRATION
- CAUTION
- SAFETY INSTRUCTIONS
- NUMARK DM1635 STEREO MIXER
- INDEX
- CONGRATULATIONS
- DM1635 FEATURES
- MIXER FEATURES INCLUDE
- THEBEATKEEPER FEATURES
- IMPORTANT INFORMATION
- A NOTE ON CABLES
- SYSTEM PRECAUTIONS
- DM 1635 FRONT PANEL DIAGRAM
- GUIDED TOUR OF FEATURES AND OPERATING INSTRUCTIONS
- INSTALLATION AND OPERATION
- CHANNEL INPUTS/CONTROLS SECTION
- CROSSFADER SECTION
- DJ MIC SECTION
- MASTER/BOOTH OUTPUT SECTION
- EQUALIZER SECTION
- GENERAL EQ HINTS
- MONITOR SECTION
- THE BEATKEEPER
- PANEL DIAGRAM
- CHANNEL SELECT
- SYNC LOCK LED
- BEAT ASSIST BUTTON
- BPM DISPLAY
- DOWN BEAT LED (RED)
- PEAK SOUND LED (GREEN)
- TEMPO DIFFERENCE GRAPH
- BEAT OFFSET GRAPH
- SYNCING YOUR BEATKEEPER
- BEAT ASSIST
- CHANNEL MIXING
- MULTIPLE CHANNEL MIXING
- PREPPING FOR A MIX
- SYNCING TO OFF BEATS
- BEATKEEPER TROUBLESHOOTING
- T1 THE BPM GOES WAY OFF WHEN USING THE SEARCH BUTTON ON MY HIGH TECH CD MIXER
- T2 THE BEATKEEPER DOESN'T RESYNC TO THE DOWNBEAT OF THE MUSIC WHEN THE MUSIC RESTARTS
- T4 EITHER THE BPM DISPLAY IS BLANK, OR IT IS NOTICEABLY OFF
- T5 THE BPM DISPLAY IS CORRECT, BUT THE BEAT LED ISN'T FLASHING ON THE DOWNBEATS OF THE MUSIC
- T6 THE BEATS PER MINUTE NUMBER SEEMS TO JUMP ALL OVER THE PLACE
- T7 IT TAKES TOO LONG FOR THE BEATKEEPER TO FIND THE BEAT ON ITS OWN
- T8 I HIT THE SYNC LOCK BUTTON, BUT THE FLASHING RED BEAT LED DOESN'T SEEM TO FOLLOW THE BEAT
- T9 THE BEAT TRACKING SUDDENLY GETS OFF TRACK
- T10 THE BEATKEEPER SEEMS TO TRACK THE MUSIC FOR A LITTLE BIT RIGHT AFTER USING THE BEAT ASSIST, AND THEN DRIFTS OFF
- T11 EITHER THE BPM NUMBER OR RED BEAT LED DOESN'T TRACK THE MUSIC FAST ENOUGH WHILE USING THE PITCH BEND ON MY CD PLAYER (OR SPEED CONTROL ON MY RECORD PLAYER)
- T12 NEITHER THE TEMPO DIFFERENCE GRAPH OR THE BEAT OFFSET GRAPH SEEM TO WORK
- T13 THE BEAT OFFSET GRAPH IS NOT ILLUMINATED, BUT THE TEMPO DIFFERENCE GRAPH IS
- T14 THE BEAT OFFSET GRAPH HAS THE GREEN LED ILLUMINATED WHEN THE RED BEAT LEDS ARE A HALF BEAT OFF FROM EACH OTHER
- REAR PANEL: INPUTS AND OUTPUTS
- DM1635 CONNECTION DIAGRAM
- SPECIFICATIONS
- INPUTS
- OUTPUTS
- EQUALIZER
- SIGNAL TO NOISE RATIOS (VS. MAXIMUM OUTPUT)
- FREQUENCY RESPONSE
- TALKOVER ATTENUATION
- BEATKEEPER
- SYNC LOCK MODE
- POWER CONSUMPTION
- NUMARK
- WARRANTY AND SERVICE INFORMATION
- EQUIPMENT TRANSPORT
Brand : NUMARK
Model : DM1635
Category : Blender