
CAXM - External hard drive Cavalry - Free user manual and instructions
Find the device manual for free CAXM Cavalry in PDF.


| Product type | External hard drive |
| Brand | Cavalry |
| Model | CAXM |
| Compatible drive | 3.5-inch SATA hard disk drive (not included) |
| Interface | USB 3.0 |
| Enclosure material | ABS plastic |
| Shock protection | Yes, shock-absorbing design |
| Assembly required | Yes (screwdriver needed) |
| Power supply | External AC adapter (included) |
| Data transfer speed | Up to 5 Gbps (USB 3.0) |
| Plug and play | Yes |
| Operating system compatibility | Windows, macOS, Linux |
| Cooling | Passive (no fan) |
| LED indicator | Yes (power/activity) |
| Cable included | USB cable |
| Dimensions (approx) | 180 x 120 x 30 mm |
| Weight (approx) | 800 g |
| Warranty | 1 year |
| Packaging content | Enclosure, USB cable, power adapter, manual |
| Color | Black |
| Maintenance | Clean with dry cloth; avoid static discharge during assembly |
| Safety | Assemble on non-carpeted surface to reduce static; handle drive by sides only |
Frequently Asked Questions - CAXM Cavalry
User questions about CAXM Cavalry
0 question about this device. Answer the ones you know or ask your own.
Ask a new question about this device
Download the instructions for your External hard drive in PDF format for free! Find your manual CAXM - Cavalry and take your electronic device back in hand. On this page are published all the documents necessary for the use of your device. CAXM by Cavalry.
USER MANUAL CAXM Cavalry
cavalry™ Assembly Guide
EN-CAXH-B Enclosure
Thank you for purchasing the CAXH user-configured enclosure! The CAXH enclosure is elegant, cost-effective, and primarily designed to protect your Hard Disk from shock. The sleek ABS plastic enclosure tightly conforms to the shape of your Hard Disk in order to divert the shock of accidental collisions and direct it towards the enclosure itself; safely away from the delicate Hard Disk. This requires a careful assembly process in order to provide maximum protection to your data. Please read the entire guide before beginning the assembly!

Note:
To reduce static discharge, do not assemble while on a carpeted surface.
Handle hard drives on the sides only. Do not touch any pins or connectors.
You will need (not included):
Screwdriver with Philips head
1 SATA hard drive
1 STEP ONE
Remove the box contents. Put the two panels off to the side. The panel with the circuit board will be referred to as Panel A. The lid will be referred to as Panel B. Take this moment to count all of the channels on Panel A. Notice that half of them face inwards. Now count the tabs on Panel B. These are the main mechanisms that hold your CAXH together. They must be aligned precisely!


2 STEP TWO
Once you have tested your internal hard drive, then we can prepare to insert it into the enclosure. Turn your 3.5" SATA Hard Disk upside down, so that it's circuit board is facing up. Slide it into Panel A slowly, at a 45° angle, until the data port mates with the connector on Panel A.

B

EN-CAXH-B
3 STEP THREE
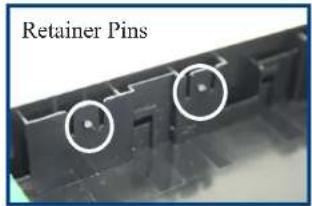
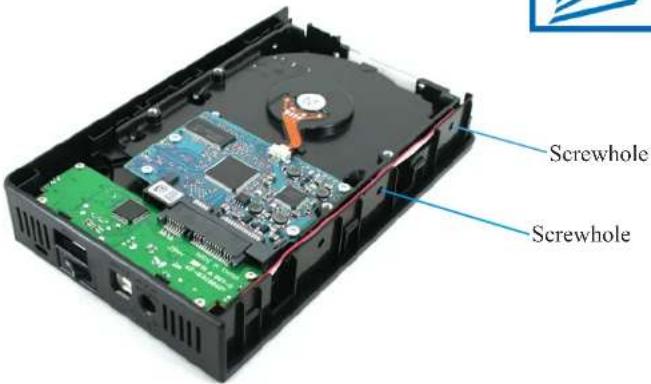
As you place the hard drive into the enclosure, watch the retainer pins on the right side of panel A. Once they have lined-up with the screw-holes on the side of your HDD, push the back end of the drive downwards, into the floor of Panel A. Do this slowly and firmly, making sure that all of the retainer pins on Panel A line up with the screw-holes on the HDD.
4 STEP FOUR
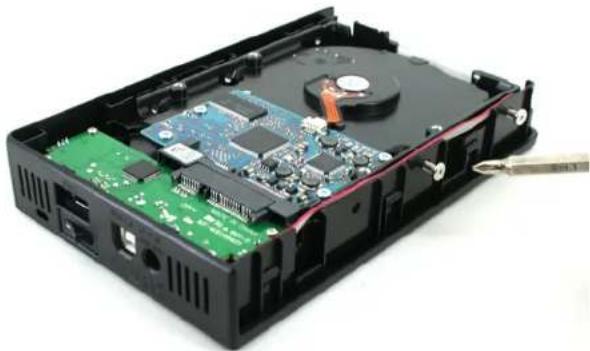
Use your thumbs to push around the edge of the drive until you feel that the drive is well-mated with Panel A. Then, insert the two HDD screws into Panel A, and beyond until they meet with the screw-holes of the HDD. You may have to push the drive inwards, towards the board on Panel A, in order to line the holes up. Tighten the screws slowly, but make sure not to indent the plastic. Finger-tight will do.
5 STEP FIVE
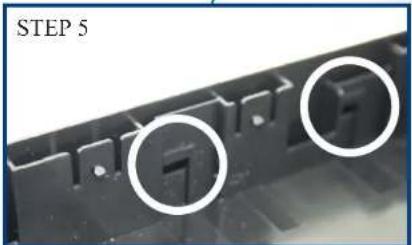
Now bring Panel B down slowly on top of Panel A. Take this time to make sure all of the tabs are lined up with the channels that you counted before. Push the longest tabs in halfway first. Make sure they are inside of the channels.
Warning! This is a one-time assembly! Before closing the case, check that all tabs are correctly seated inside their channels. Once aligned, the case will snap together smoothly and predictably.

B

6 STEP SIX
Now push the short tabs in just far enough to enter into the channels.
7 STEP SEVEN
Rotate the drive slowly and look down every edge. Check for any bump adjacent to a nearby tab. This means you will need to carefully remove Panel B and try again!


STEP EIGHT
Once all the tabs are lined-up, push down on the entire surface of Panel B until you here the snapping noises of the tabs engaging. Use your thumbs to go around the edges of the enclosure and engage every tab. Don't be afraid to squeeze the case a little. There should be an equal-space around the edge of Panel B.


STEP NINE
Plug-in your power supply and your USB cable. Make sure that you turn on your unit and enjoy!


*If you need any assistance initializing your drive within your OS, checkout CavalryStorage.com for detailed instructions. Or, just email us at customersupport@cavalrystorage.com!
EN-CAXH-B
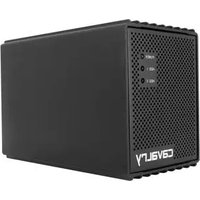


Brand : Cavalry
Model : CAXM
Category : External hard drive