
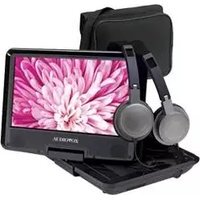
D7021 - Portable DVD Player AUDIOVOX - Free user manual and instructions
Find the device manual for free D7021 AUDIOVOX in PDF.


| Product Type | Portable DVD Player |
| Screen Size | 7 inches (16:9 aspect ratio) |
| Battery Type | Rechargeable Li-Polymer |
| Battery Life | Approximately 2 hours |
| Charging Time (Unit Off) | 3 to 4 hours |
| Charging Time (Unit On) | Approximately 10 hours |
| Power Input | 9-12 VDC via AC/DC adapter or vehicle DC adapter |
| Disc Compatibility | DVD, VCD, CD, CD-R, DVD-RW, JPEG, Kodak Picture CD |
| File Formats | MPEG, MPEG2, JPEG |
| Video Output | AV Out (1 Vp-p 75 Ohm unbalanced) |
| Audio Output | 1.2 V (±0.2 V) RMS/10 kOhm |
| Headphone Jack | 3.5 mm |
| Remote Control | Included (CR2025 battery) |
| Region Code | Region 1 (USA, Canada) – preset at factory |
| Parental Control | Yes, with password (default 3308) |
| Screen Saver | Yes (movable DVD logo) |
| Last Memory | Yes (resume playback from last point) |
| OSD Languages | English, French, Spanish |
| TV Display Modes | 16:9, 4:3 Pan&Scan, 4:3 Letterbox |
| Audio Downmix | LT/RT or Stereo for 5.1-channel discs |
| Panel Adjustments | Sharpness, Brightness, Contrast, Hue, Saturation, Backlight |
| Cleaning | Use a cloth lightly dampened with water |
Frequently Asked Questions - D7021 AUDIOVOX
User questions about D7021 AUDIOVOX
0 question about this device. Answer the ones you know or ask your own.
Ask a new question about this device
Download the instructions for your Portable DVD Player in PDF format for free! Find your manual D7021 - AUDIOVOX and take your electronic device back in hand. On this page are published all the documents necessary for the use of your device. D7021 by AUDIOVOX.
USER MANUAL D7021 AUDIOVOX
AUDIOVOX® CORPORATION
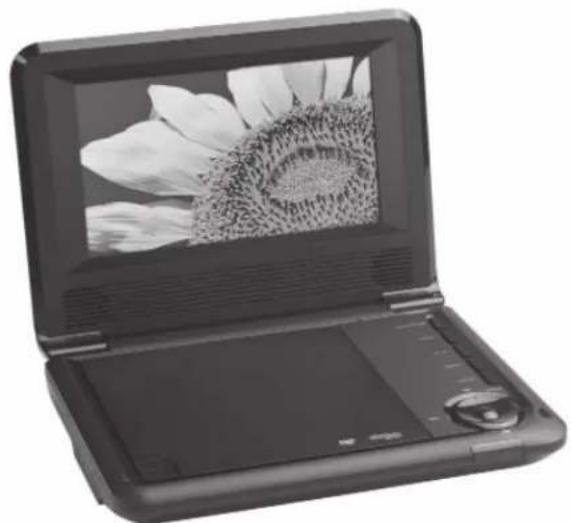
D7021
Portable DVD Player
Owner's Manual
natural_image
Black-and-white photo of a flat-screen open laptop displaying a sunflower image (no visible text or symbols)WARNINGS AND CAUTIONS
Notice
This Product incorporates copyright protection technology that is protected by method claims of certain U.S. Patents and other intellectual property rights owned by Macrovision Corporation and other rights owners. Use of this copyright protection technology must be authorized by Macrovision Corporation, and is intended for home and other limited viewing uses only unless otherwise authorized by Macrovision Corporation. Reverse engineering or disassembly is prohibited.
Notice
An LCD panel and/or video monitor may be installed in a motor vehicle and visible to the driver if the LCD panel or video monitor is used for vehicle information, system control, rear or side observation or navigation. If the LCD panel or video monitor is used for television reception, video or DVD play, the LCD panel or video monitor must be installed so that these features will only function when the vehicle is in "park" or when the vehicle's parking brake is applied.
An LCD panel or video monitor used for television reception, video or DVD play that operates when the vehicle is in gear or when the parking brake is not applied must be installed to the rear of the driver's seat where it will not be visible, directly or indirectly, to the operator of the motor vehicle.
Licensed under one or more of the following patents:
Patent Numbers: 5,583,936; 6,381,747; 6,516,132; 6,836,549; and 7,050,698.
Placement
• To prevent fire or electric shock, do not expose this appliance to rain or moisture.
- Do not place the set on an unstable cart, stand, tripod, bracket or table to prevent it from falling.
- Keep the unit away from strong magnets, heat sources, direct sunlight, or excessive dust.
- If the unit is brought directly from a cold to a warm location, moisture may condense inside the unit.
- When you move it from a cold to a warm location, wait for about one hour before operating the unit, or remove the disc and leave the unit turned on until the moisture evaporates.
Installation
- Ensure that the unit is installed and used in accordance with the instructions and illustrations provided in this manual.
Objects and Liquids
- Do not push objects of any kind into the unit through openings.
- Do not spill, splash or spray liquid of any kind on or in the system (this may result in a fire or electric shock).
- Do not place anything heavy on the unit.
- Do not place any open flame sources, such as lighted candles, on the unit.
Ventilation
- To ensure proper ventilation and proper operation, never cover or block the slots and openings with a cloth or other material.
Disassembly
- Do not attempt to disassemble the case or replace the battery. There is a risk of electric shock and/or exposure to Laser Radiation. Contact qualified service personnel if your system is in need of repair.
Cleaning the Unit
- When cleaning, make sure the system is unplugged from the power source.
- Do not use liquid cleaners or aerosol cleaners.
- Use a cloth lightly dampened with water for cleaning the exterior of the DVD Player system only.
WARNINGS AND CAUTIONS
Headphones
- Excessive sound pressure from headphones can cause hearing loss.
- Connect earphones or headphones to the headphone jack with the volume set low and increase it if required. When earphones or headphones are connected, no sound will be emitted from the built-in speaker system.
Disc
- Do not use irregularly shaped discs such as heart or star-shaped discs as they may cause the unit to malfunction.
- Do not stick paper, tape or glue on the disc.
- Do not expose the disc to direct sunlight or heat sources such as hot air ducts.
- Do not touch the surface of the disc.
- Handle the disc by its edge.
- Clean the disc by wiping the disc from the center out with a cleaning cloth.
- Remove the disc from the unit and store it in its case after playing.

natural_image
Illustration of four hands performing a circular tool manipulation (no text or symbols)Cleaning and handling the disc.
CONTENTS
Warnings and Cautions 2
Contents 5
Introduction....6
Charging the Battery....7
Controls and Indicators....8
Remote Control Operation....10
Connecting to a TV....14
System Setup....15
Playback....24
Specifications 29
Troubleshooting....28
Owner's Notes......30
INTRODUCTION
Thank you for selecting the D7021 Portable DVD Player. The player features include a 7" Screen (16:9 Aspect Ratio) Liquid Crystal Display (LCD) monitor and a DVD Player.
The player incorporates the latest state-of-the-art electronics and is designed for use in hotels, offices, homes or vehicles. The player is constructed to provide years of reliable, trouble-free service, is compact so that you can take it with you anywhere, and is designed for quick and easy set up.
Please read the entire instruction manual supplied with this product prior to operation. The documentation will assist you in setting up the system properly to obtain the best equipment performance. Please save this manual for later use.
Features
- 7" LCD Screen
• Two Optional Aspect Ratios 16:9 and 4:3 - Remote Control
• 3.5 mm Headphone Jack
• Audio/Video Output Jack - Compatible with DVD, VCD, CD, CD-R, DVD-RW, JPEG, Kodak Picture CD, etc.
- Support Playback Control: Play, Pause, Stop, Fast Forward Playback, Fast Reverse Playback, etc.
• 2 Hour Playback - Internal Rechargeable Li-Polymer Battery
• Operated with 9-12 VDC Power Supply
Package Contents
- 1 X Instruction Manual
- 1 X Remote Control
- 1 X CR2025 Lithium Battery
- 1 X AC/DC Power Adapter
- 1 X Vehicle DC Power Adapter
CHARGING THE BATTERY
The DVD player is powered by a lithium-polymer battery. It has no memory effect and thus it can be recharged at any time regardless of whether it is fully or partially discharged.
The player can be recharged when it is powered on or off. When the power is off, it takes about 3 to 4 hours to fully charge the battery. When the power is on, it takes approximately ten hours to charge the battery. When fully charged, the battery can be used for about two hours.
While the player is charging, the battery charge indicator will be illuminated red. When the battery is fully charged, the battery charge indicator will be illuminated green.
To Charge the Battery
The player can be charged using the AC/DC Power Adapter or the Vehicle DC Power Adapter.
By AC/DC Power Adapter:
Connect the AC/DC Power Adapter to the DC IN 9-12V jack on the player, then plug the adapter into a 120 VAC outlet.
By Vehicle DC Power Adapter:
Plug one end of the Vehicle DC Power Adapter into the DC IN 9-12V jack on the player, then plug the other end into the vehicle DC accessory socket of a car.
Do not charge the DVD player in the vehicle when the vehicle is not running.
Use and Maintenance of the Rechargeable Battery
- The working temperature of the rechargeable battery is 32 °F (0 °C) to 95 °F (35 °C) .
- Always unplug the player when it is not being used or charged.
- If you do not plan to use the battery for an extended period of time (one week or longer), we recommend that you fully charge the battery. For longer periods of storage, please recharge the battery at least once every two months to maintain the battery in optimum condition.
- Once the battery is fully discharged, immediately recharge the battery (regardless of whether you plan to use the DVD player or not) in order to maximize battery life.
- Recharge efficiency will degrade when temperatures drop below 50 °F ( 10 °C ) or exceed 95 °F ( 35 °C ).
- The battery compartment contains a temperature sensor. If the temperature exceeds 104 °F (40 °C) when charging the unit, the power will turn off automatically and the red charge indicator on the side of the unit will flash. In this case, disconnect the power adapter, wait for the unit to cool down, then reconnect the power adapter.
- Heat is produced during charging. This is normal.
- Do not subject the battery to strong impacts.
- Keep the battery away from humidity and excessive heat.
- The battery is not user serviceable. Please contact Audiovox in the event the battery will not charge.
CONTROLS AND INDICATORS
Front View

Top View

-
SPEAKER OUTPUT
-
7" LCD DISPLAY SCREEN
-
BATTERY CHARGE INDICATOR
Steadily lit red when the battery is charging. Steadily lit green when the battery is charged.
-
INFRARED REMOTE CONTROL SENSOR Point the remote control to the infrared remote control sensor.
-
ON/OFF INDICATOR
Steadily lit green when the player is on.
- PLAY/PAUSE BUTTON
Press once to pause playback, then press again to continue playback.
- STOP BUTTON
Press once to pause a playback, then press the PLAY/PAUSE button to continue playback. Press twice to stop playback.
- MUTE BUTTON
Press to temporarily switch the sound off. Press again to switch the sound on.
- MENU BUTTON
Press to return to the root menu when playing a DVD.
- SETUP BUTTON
Press to enter/exit the Setup Menu.
- PREVIOUS (◀) BUTTON
Press to skip to the previous chapter/track
- VOL+ BUTTON
Press to increase the volume.
- NEXT (▶)BUTTON
Press to skip to the next chapter/track.
- OK BUTTON
Press to confirm and execute a selection.
- VOL- BUTTON
Press to decrease the volume.
-
DISC TRAY COVER
-
OPEN BUTTON
Press to open the disc tray cover.
CONTROLS AND INDICATORS
Side View

- 3.5mm HEADPHONE JACK
Note: When headphones are connected, no sound will be emitted from the speakers.
- AV OUT JACK
Connect the AV Cable to the AV OUT jack on the main unit and to the AV IN jack on the external unit.
- ON/OFF SWITCH
Slide the switch to ON position to turn on the unit. Slide the switch to OFF position to switch off the unit.
- DC IN 9-12V JACK
Battery Installation/Replacement
Remove the battery compartment cover according to the diagram below.
- Press the ridged area to the left.
- At the same time, pull the battery tray out.
- Remove the old CR2025 battery. Replace it with a new CR2025 lithium battery on the tray with the positive side facing upward.
- Replace the cover.

Note: Do not expose the battery to excessive heat.
Remote Control Functions

- ANGLE
Press to switch the viewing angles.
Note: This function only works with discs encoded with multiple camera angles. - FUNCTION
Press to switch between the 16:9 and 4:3 aspect ratios. - SETUP
Press to enter/exit the Setup Menu. - REPEAT
Press to switch the repeat modes.
Note: For VCD 2.0 discs, this function is invalid when the PBC function is activated. - TITLE
Press to return to the title menu of a DVD disc. - PREVIOUS/UP
Press to skip to the previous chapter/track. Press to navigate in the up direction when a menu is displayed on the screen. - FAST REWIND◀/LEFT
Press repeatedly for fast reverse playback. The available speeds are 2X, 4X, 8X, 16X, and 32X.
Press to navigate in the left direction when a menu is displayed on the screen.
Press repeatedly to switch/show the subtitle(s) or turn off the subtitle function.
Note: This function only works with discs encoded with subtitles.
9. PLAY★)
Press to start a playback or resume normal playback from fast forward, fast reverse, slow-motion, frame-by-frame playback, etc.
10. DIGIT KEYS
The digit keys can be used to input numbers or make selection of a track, a chapter, etc.
11. GOTO
During playback, press to enter the GOTO menu. In the menu, use the UP/DOWN direction buttons to select a menu item. Press ENTER to edit.
Use the digit keys to input a specific track, disc time, track time, chapter, title, chapter time or title time to go to directly. Press it again to exit the GOTO menu.
12. MUTE
Press this button to temporarily switch the sound off. Press it again to switch the sound on.
13. AUDIO
Press repeatedly to select the audio languages available on the disc (for DVD). Press repeatedly to switch the audio channels available on the disc (for VCD).
Note: This function only works with discs encoded with different audio languages.
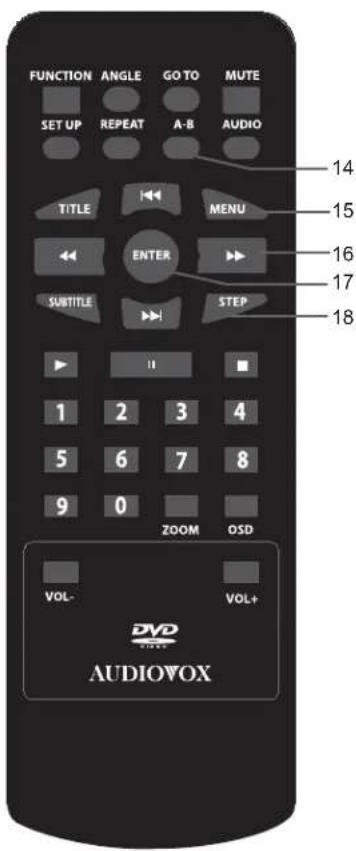
14. A-B REPEAT
Press to repeat a specific section of a disc. Press this button to mark down the starting point (A) and press it again to mark down the ending point (B). The unit will play back this section over and over again. Press this button a third time to cancel A-B repeat and resume normal playback.
Note: Points A and B must be in the same title/ track.
15. MENU
Press to return to the root menu when playing a DVD.
When playing a disc encoded with the PBC function, press to display the PBC menu. Press it again to disable the PBC function.
Note: A VCD2.0 disc has a PBC function while DVD, VCD1.1, CD-DA, and MP3 discs have no PBC functions.
16. FAST FORWARD (▶) / RIGHT
Press repeatedly for fast forward playback. The available speeds are 2X, 4X, 8X, 16X, and 32X.
Press to navigate in the right direction when menu is displayed on the screen.
17. ENTER
Press to enter a highlighted item in a menu or to confirm and execute a selection.
18. STEP
Press repeatedly to advance the video frame by frame. Press Play (▶) to resume the normal playback.
Note: Applies to DVD, VCD, etc.
Press to skip to the next chapter/track. Press to navigate in the down direction when menu is displayed on the screen.
- STOP (■)
Press once to pause a playback, then press Play (▶) to continue playback. Press twice to stop playback.
- PAUSE (II)
Press to temporarily pause playback; press it again or press Play (▶) to resume playback.
- ZOOM
Press to zoom in/out of a scene. The available zoom ratios are 2X, 3X, 4X, 1/2, 1/3, and 1/4. In zoomed-in mode, the direction keys can be used to move the zooming center.
Note: Applies to DVD, VCD, etc.
- OSD
Press repeatedly to display title elapsed time, title remaining time, chapter elapsed time or chapter remaining time, or hide the display.
- VOL+/VOL-
Press VOL+ to increase the volume. Press VOL- to decrease the volume.
CONNECTING TO A TV
The player has an AV OUT jack. You can connect it to a TV for viewing.
-
Use an AV output cable (not supplied) to connect the AV OUT jack on the main unit to the video input terminal and L/R channel audio input terminals of a TV.
-
After the connection has been correctly made, turn on the connected TV and set it to AV mode. You can then view the video with the connected TV.

The System Setup menu allows you to personalize the DVD Player settings to your preference. Once the initial settings are set, they are retained in the DVD player until modified.
Menu Operation
- Press the SETUP button on the remote control to show the Setup Menu.
- Press the LEFT (◀) or RIGHT (▶) button to select the GENERAL, AUDIO, DOLBY, VIDEO or PREFERENCE setup page. The selected page is highlighted in green. Note: PREFERENCE is available if the disc tray is empty, the disc tray cover is open or the disc in the disc tray is stopped.
- Press the ENTER button to access the setup page. The submenu of the selected page appears.
- Press the UPI◀◀ or DOWN (▶◀) button to select an item. The item is highlighted in green.
- Press the ENTER or RIGHT (▶) button to enter the option list.
- Press the UPI◀◀ or DOWN (▶◀) button to select an option. The option is highlighted in green.
- Press the ENTER button to confirm, or press the LEFT (◀◀) button to cancel.
- Press the UP (I) DOWN ( ) button to continue to select other items in the submenu.
- Press the LEFT ( *button to return to the Setup Menu.
- Press the SETUP button to exit the Setup Menu.
General Setup Page
There are six items in the GENERAL SETUP PAGE. They are TV DISPLAY, ANGLE MARK, OSD LANGUAGE, CLOSE CAPTIONS, SCREEN SAVER, and LAST MEMORY.
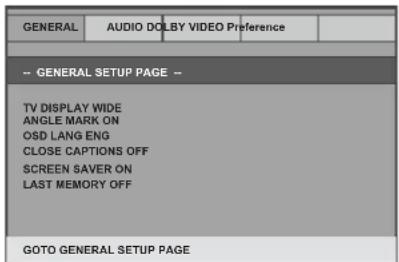
TV DISPLAY
If the player is connected to a conventional TV set, select 4:3 PANSCAN or 4:3 LETTERBOX. The 4:3 image will be displayed in full screen in its native aspect ratio. If the player is connected to a wide-screen TV set, select 16:9.
Options:
4:3 PANSCAN: The wide-screen image will be displayed on the screen in its native aspect ratio with some part on the left and right cut off.
4:3 LETTERBOX: The wide-screen image will be displayed in its native aspect ratio with black bands on the upper and lower sections of the screen.
16:9: The wide-screen image will be displayed in full screen in its native aspect ratio. The 4:3 image will be stretched out horizontally to fit in the screen.
SYSTEM SETUP
ANGLE MARK
This item is available when a disc is encoded with multiple camera angles.
Options:
ON: Enables the Angle Mark function. When a disc with multiple camera angles is playing, an angle mark will display on the screen. You can then view the video of different camera angles by pressing the ANGLE button on the remote control.
OFF: Set this item to OFF to hide the angle mark.
OSD LANGUAGE (On-Screen Display Language)
This item allows you to select a language for the on-screen display.
Options: English, French, Spanish
CLOSED CAPTIONS
This item is available when a disc is encoded with closed captions.
Options:
ON: Enables the Closed Caption function. When a disc encoded with closed captions, the closed captions will be shown on the screen.
OFF: Set this item to OFF to hide closed captions.
You can also press the SUBTITLE button on the remote control to show or hide the closed captions.
SCREEN SAVER
When the player is not in use for several minutes (for example the disc is paused, stopped etc.) a running DVD logo will move across the LCD screen to protect the LCD screen.
Options:
ON: Enables the Screen Saver function. If the image remains motionless on the screen for several minutes, a screen saver will appear on the screen. You can press any key or button to wake the screen up.
OFF: Disables the Screen Saver function.
LAST MEMORY
During playback or in a paused status, the Last Memory function will memorize the last playback time each time you open the disc tray. The next time you insert the same disc and close the disc tray cover to load the disc, the unit will play from the memorized point.
Options:
ON: Enables the Last Memory function.
OFF: Disables the Last Memory function.
SYSTEM SETUP
Audio Setup Page
There is one item in the AUDIO SETUP PAGE - ANALOG AUDIO.

ANALOG AUDIO
DOWNMIX
This item only applies to Dolby AC-3 encoded 5.1-channel discs.
Options:
LT/RT: The 5.1-channel audio is mixed into the left channel and right channel.
STEREO: The 5.1-channel audio is mixed into a stereo signal.
SYSTEM SETUP
Dolby Setup Page
There are two items in the DOLBY SETUP PAGE - DUAL MONO and DYNAMIC.
| GENERAL | AUDIO DOLBY VIDEO Preference | |
| -- DOLBY DIGITAL SETUP – | ||
| DUAL MONO DYNAMIC | ||
| GOTO DOLBY DIGITAL SETUP | ||
DOLBY DIGITAL
DUAL MONO
This item only applies to the Dolby AC-3 encoded 2-channel discs.
Options:
STEREO: The player outputs the left-channel audio and right-channel audio via the left and right speaker respectively.
L-MONO: The player outputs the left-channel audio only via both the left and right speaker.
R-MONO: The player outputs the right-channel audio only via both the left and right speaker.
MIX-MONO: The player outputs the average signal of the left-channel and right-channel audio via the left speaker and the right speaker.
DYNAMIC
When you watch a movie with a large dynamic range at a low volume, you can adjust the dynamic value up to avoid losing sound details resulting from the low volume.
Options:
Off to Full: Adjust the slider bar to the desired level. To adjust the slider bar press ENTER, then press the UP (◀◀) or DOWN (▶▶) button to move the slider bar. Press ENTER again to set the level.
SYSTEM SETUP
Video Setup Page
There are two items in the VIDEO SETUP PAGE. They are COLOR SETTING and PANEL QUALITY.
| GENERAL | AUDIO | DOLBY | VIDEO Preference |
| -- VIDEO SETUP PAGE -- | |||
| COLOR SETTING PANEL QUALITY | |||
| GOTO VIDEO SETUP PAGE | |||
COLOR SETTING
The COLOR SETTING menu is used to adjust the picture quality when the player is connected to an external TV set.
Options:
SHARPNESS: Adjusts the edge enhancement of the picture. There are three options: HIGH, MEDIUM, and LOW.
BRIGHTNESS: Adjusts the black level in the picture. Press LEFT() or RIGHT (▶) adjust the value, then press ENTER to confirm it.
CONTRAST: Adjusts the level of the brightest highlights in the picture. Press LEFT (◀◀) or RIGHT (▶▶) to adjust the value, then press ENTER to confirm it.
GAMMA: Adjusts the balance between bright and dark areas in the picture. There are four options: HIGH, MEDIUM, LOW, and NONE.
HUE: Adjusts the level of tint balance. Press LEFT (◀◀) or RIGHT (▶▶) to adjust the value, then press ENTER to confirm it.
SATURATION: Adjusts the level of color intensity. Press LEFT (◀◀) or RIGHT (▶▶) to adjust the value, then press ENTER to confirm it.
PANEL QUALITY
The PANEL QUALITY menu is used to adjust the picture quality of the player's LCD screen.
Options:
SHARPNESS: Adjusts the edge enhancement of the picture. There are three options: HIGH, MEDIUM, and LOW.
BRIGHTNESS: Adjusts the black level in the picture. Press LEFT (◀◀) or RIGHT (▶▶) adjust the value, then press ENTER to confirm it.
CONTRAST: Adjusts the level of the brightest highlights in the picture. Press LEFT (▶) or RIGHT (▶) to adjust the value, then press ENTER to confirm it.
HUE: Adjusts the level of tint balance. Press LEFT (◀◀) or RIGHT (▶▶) to adjust the value, then press ENTER to confirm it.
SATURATION: Adjusts the level of color intensity. Press LEFT (◀◀) or RIGHT (▶▶) to adjust the value, then press ENTER to confirm it.
BACKLIGHT: Adjusts the level of illumination of the LCD screen. Press LEFT (◀◀) or RIGHT (▶▶to adjust the value, then press ENTER to confirm it.
SYSTEM SETUP
Preference Page
There are eight items in the PREFERENCE PAGE. They are TV TYPE, PBC, AUDIO, SUBTITLE, DISC MENU, PARENTAL, PASSWORD, and DEFAULT.
This page is available if the disc tray is empty, the disc tray is open or the disc in the disc tray is stopped.
| GENERAL | AUDIO | DOLBY | VIDEO Preference |
| -- PREFERENCE PAGE -- | |||
| TV TYPE | PAL | ||
| PBC | ON | ||
| AUDIO | ENG | ||
| SUBTITLE | ENG | ||
| DISC MENU | ENG | ||
| PARENTAL | |||
| PASSWORD | |||
| DEFAULT | |||
| GOTO PREFERENCE PAGE | |||
TV TYPE
This item matches video output of the player to the broadcast system of a connected TV. The player supports both National Television System Committee (NTSC) and Phase Alternating Line (PAL) television broadcasting standards.
Options:
PAL: Select this mode if the connected TV is a PAL system. The video signal of a NTSC disc will be output in PAL format.
AUTO: Select this mode if the connected TV is multi-system. The output format of video signal will be in accordance with the video signal of the disc.
NTSC: Select this mode if the connected TV is a NTSC system. The video signal of a PAL disc will be output in NTSC format.
Note: For best performance, this setting should remain at NTSC.
PBC (Play Back Control)
This item only works with discs encoded with PBC function such as VCD 2.0 discs. DVD, VCD 1.1, CD-DA, and MP3 discs do not have a PBC menu.
Options:
ON: Activates the PBC function.
OFF: Disables the PBC function.
AUDIO MENU
This item allows you to select a preferred audio language. This function only applies to discs encoded with different audio languages.
Options: English, French, Spanish, Chinese, Japanese, Korean, Russian, and Thai.
You can also change the audio language by pressing AUDIO on the remote control.
Note: If the selected language is not available for the currently playing disc, the disc's default setting is applied.
SYSTEM SETUP
SUBTITLE MENU
This item allows you to select a preferred subtitle language. This function only applies to discs encoded with subtitles.
Options: English, French, Spanish, Chinese, Japanese, Korean, Russian, Thai, and Off.
You can also change the subtitle language by pressing SUBTITLE on the remote control.
Note: If the selected language is not available for the currently playing disc, the disc's default setting is applied.
DISC MENU
This item allows you to select a preferred disc menu language.
Options: English, French, Spanish, Chinese, Japanese, Korean, Russian, and Thai.
Note: If the selected language is not available for the currently playing disc, the disc's default setting is applied.
PARENTAL
This item allows you to limit the content of movie playback from Kid Safe to Adult. The lower the value, the more strict the control. Movies rated higher than the level set for the parental lock can only be viewed when the correct password is entered.
Options:
| 1 | KID | SAFE |
| 2 | G | |
| 3 | PG | |
| 4 | PG-13 | |
| 5 | PGR | |
| 6 | R | |
| 7 | NC17 | |
| 8 | Adult |
Note: The rating level can be changed only when the correct password is provided.
Note: This function only works with those discs with parental function.
SYSTEM SETUP
PASSWORD
This item allows you to access the Password Setup Page. Press ENTER to access the Password Setup Page.
DEFAULT
This item allows you to restore all the default settings, except the settings in the Password Setup Page and the PARENTAL setting.
Options:
RESET: Restores the default settings.
SYSTEM SETUP
Password Setup Page
There are two items in the PASSWORD PAGE. They are PASSWORD MODE and PASSWORD.

PASSWORD MODE
You can activate or disable the password function by setting it to ON or OFF. You must key in the correct password and press ENTER to confirm before you can turn the password mode on or off. The default password is 3308.
PASSWORD
This item allows you to change the password.
To change the password:
- Enter the old password in the OLD PASSWORD row.
- Enter the new password in the NEW PASSWORD row.
- Enter the new password again in the CONFIRM PWD row.
- Press ENTER.
Note: You may reset the password if you forget the old password by using the default password: 3308.
Note: The default password is 3308. This password is always active even after you have selected your own password and changed it. To avoid the possibility of others using the default password to set the parental level and change the password, record the default password in another area and delete it from this manual.
DVD Playback
To get the optimum use out of the DVD Player, make sure you read this section completely.
DVD Region Code
The DVD player is preset to a region code at the factory depending on where the DVD player is sold. A DVD from a different region cannot be played in this unit and the unit will display "WRONG REGION".

Region 1 - USA, Canada
Region 2 - Japan, Europe, South Africa, Middle East, Greenland
Region 3 - S. Korea, Taiwan, Hong Kong, Parts of South East Asia
Region 4 - Australia, New Zealand, Latin America (including Mexico)
Region 5 - Eastern Europe, Russia, India, Africa
Region 6 - China
Types of Discs Your DVD Player Will Play
Your system will play the following types of discs:
- DVD* disc - DVD discs which contain video.
• VCD disc - VCD discs which contain video. - Audio disc - Audio CDs contain musical or sound content only.
*Note: This system is capable of playing most recordable DVD formats. However, due to the variety of disc manufacturers and software, playback cannot be guaranteed.
Types of Files Your DVD Player Will Play
Your system will play the following types of files: MPEG, MPEG2, and JPEG.
Loading and Playing a Disc
Before you load a disc, make sure that it is compatible with the player. Insert the disc with the label facing up.
Note: The following discs CANNOT be used with this player:
- MiniDisc
- Laserdisc
• Super Audio CD (SACD) - Blu-ray Disc (BD)
- DVD digital copy
Some playback operations may be intentionally disabled by the disc's manufacturer, or the disc's software does not support a feature (for example, angle mark). In this case, the icon appears on the screen. The icon also appears if a feature is not available at the moment. Also, refer to the instructions supplied with the disc.
To Load and Play a Disc:
- Slide the power switch to the ON position.
- Press the OPEN button to open the disc tray cover.
- Place a disc in the disc tray with the label side facing up. Make sure the disc is snapped onto the hub.
- Close the disc tray cover. The unit will load and play the disc.

natural_image
Line drawing of a microwave oven with control panel and door (no text or symbols)Press
Kodak Picture CD or JPEG Image CD Playback
- Place a Kodak Picture CD or JPEG image CD in the disc tray. The player will load the disc automatically.
- Press STOP ( ■ ) on the remote control to enter the thumbnail mode to preview the pictures.
- In the thumbnail mode, press the direction keys to select a picture, then press the ENTER or PLAY (▶) buttons to start the playback from the selected picture.
Viewing Files
Play Modes:
Press STOP (■) to enter the thumbnail mode to preview the pictures.
Press PAUSE (II) to pause a playback. Press it again or press PLAY (▶) to resume the playback.
Press PLAY (▶) to start a playback or resume to the normal playback.
Skip to the Previous/Next Picture:
Press PREVIOUS (◀) to skip to the previous picture during playback.
Press NEXT (▶) to skip to the next picture during playback.
Picture Rotation:
Press LEFT (◀) to rotate the picture counterclockwise during playback.
Press RIGHT (▶) to rotate the picture clockwise during playback.
Zoom In / Out:
During playback, press ZOOM repeatedly to zoom in by 125%, 150% or 200%, or zoom out by 75% or 50%. When the picture is a 50%, press ZOOM to return the picture to its original size.
When the picture is zoomed in, use the direction keys to move the picture.
SPECIFICATIONS
| Compatible DISC DVD/VCD/CD | |
| Signal System PAL/NTSC | |
| Panel Size 7 inch | |
| Frequency Response 20 Hz to | 20 kHz |
| Video Output 1 Vp-p 75 Ohm unbalanced | |
| Audio Output 1.2 V (±0.2 V) RMS/10 kOhm | |
| Dynamic Range ≥ 85 dB | |
| Laser Semiconductor laser, wavelength: 650 nm/795 nm | |
| Power Source 9-12 VDC | |
| Power Consumption 10 W | |
| Operating Temperature 0~35°C | |
| Battery Type Li-Polymer | |
TROUBLESHOOTING
If your DVD player does not appear to be functioning correctly, check the items below before contacting Audiovox technical support.
| Symptom Cause(s) Remedy | |
| No Power • The adapter is not connected to the unit securely or is not connected to the power supply.• The battery needs to be charged.• The unit is turned off. | • Connect the adapter to the DC input jack securely and then plug the adapter into an AC outlet (for the AC/DC power adapter) or the vehicle DC accessory socket of a car (for vehicle DC power adapter).• Charge the battery.• Make sure the unit is turned on. |
| PictureThere is no picture displayed on the connected TV. | • The AV cable is not connected to the unit securely or is not connected to the TV. |
| SoundThere is no sound from the speakers. | • The volume is set to the lowest level.• The sound is switched off.• The disc is in fast forward/reverse playback.• The speakers are cut off when a headphone is plugged in. |
| Unable to play a disc • This disc is placed in the disc tray in the wrong way.• The disc isn’t compatible with the unit.• The disc is dirty. | • Turn up the volume.• Press MUTE to switch on the sound.• Press PLAY to resume the normal playback.• Unplug the headphone and the sound will output through the built-in speakers. |
TROUBLESHOOTING
| Symptom Cause(s) Remedy | |
| The remote control does not function. | There is no battery in the remote control.The battery is discharged.The remote control is not pointed to the remote control sensor.The remote control is too far from the unit.The unit is shut off. |
| The icon (∅) appears on the screen. | The feature or action cannot be completed at this time. |
OWNER'S NOTES

AUDIOVOX
90 DAY LIMITED WARRANTY
Applies to Audiovox Video Products
AUDIOVOX ELECTRONICS CORP. (the Company) warrants to the original retail purchaser of this product that should this product or any part thereof, under normal use and conditions, be proven defective in material or workmanship within ninety (90) days from the date of original purchase, such defect(s) will be repaired or replaced with reconditioned product (at the Company's option) without charge for parts and repair labor. A game controller, if supplied, is similarly warranted for ninety (90) days.
To obtain repair or replacement within the terms of this Warranty, the product is to be delivered with proof of warranty coverage (e.g. dated bill of sale), specification of defect(s), transportation prepaid, to the Company at the address shown below.
This Warranty does not extend to the elimination of externally generated static or noise, to correction of antenna problems, to costs incurred for installation, removal or reinstallation of the product, or to damage to digital memory/media devices, gaming devices, discs, speakers, accessories, or electrical systems.
This Warranty does not apply to any product or part thereof which, in the opinion of the Company, has suffered or been damaged through alteration, improper installation, mishandling, misuse, neglect, accident, or by removal or defacement of the factory serial number/bar code label(s). THE EXTENT OF THE COMPANY'S LIABILITY UNDER THIS WARRANTY IS LIMITED TO THE REPAIR OR REPLACEMENT PROVIDED ABOVE AND, IN NO EVENT, SHALL THE COMPANY'S LIABILITY EXCEED THE PURCHASE PRICE PAID BY PURCHASER FOR THE PRODUCT.
This Warranty is in lieu of all other express warranties or liabilities. ANY IMPLIED WARRANTIES, INCLUDING ANY IMPLIED WARRANTY OF MERCHANTABILITY, SHALL BE LIMITED TO THE DURATION OF THIS WRITTEN WARRANTY. ANY ACTION FOR BREACH OF ANY WARRANTY HEREUNDER INCLUDING ANY IMPLIED WARRANTY OF MERCHANTABILITY MUST BE BROUGHT WITHIN A PERIOD OF 12 MONTHS FROM DATE OF ORIGINAL PURCHASE. IN NO CASE SHALL THE COMPANY BE LIABLE FOR ANY CONSEQUENTIAL OR INCIDENTAL DAMAGES FOR BREACH OF THIS OR ANY OTHER WARRANTY. No person or representative is authorized to assume for the Company any liability other than expressed herein in connection with the sale of this product.
Some states do not allow limitations on how long an implied warranty lasts or the exclusion or limitation of incidental or consequential damage so the above limitations or exclusions may not apply to you. This Warranty gives you specific legal rights and you may also have other rights which vary from state to state.
Audiovox Electronics Corporation, 150 Marcus Blvd., Hauppauge, New York 11788 ● 1-800-645-4994
128-5556G

For Customer Service Visit Our Website At
www.audiovoxproducts.com
Product Information, Photos, FAQ's Owner's Manuals
- AUDIOVOX® CORPORATION
- WARNINGS AND CAUTIONS
- Notice
- Placement
- Installation
- Objects and Liquids
- Ventilation
- Disassembly
- Cleaning the Unit
- Headphones
- Disc
- CONTENTS
- INTRODUCTION
- Features
- Package Contents
- CHARGING THE BATTERY
- To Charge the Battery
- By AC/DC Power Adapter:
- By Vehicle DC Power Adapter:
- Use and Maintenance of the Rechargeable Battery
- CONTROLS AND INDICATORS
- Battery Installation/Replacement
- Remote Control Functions
- PLAY★)
- DIGIT KEYS
- GOTO
- MUTE
- AUDIO
- A-B REPEAT
- MENU
- FAST FORWARD (▶) / RIGHT
- ENTER
- STEP
- CONNECTING TO A TV
- Menu Operation
- General Setup Page
- TV DISPLAY
- Options:
- SYSTEM SETUP
- ANGLE MARK
- OSD LANGUAGE (On-Screen Display Language)
- CLOSED CAPTIONS
- SCREEN SAVER
- LAST MEMORY
- Audio Setup Page
- ANALOG AUDIO
- DOWNMIX
- Dolby Setup Page
- DUAL MONO
- DYNAMIC
- Video Setup Page
- COLOR SETTING
- PANEL QUALITY
- Preference Page
- TV TYPE
- PBC (Play Back Control)
- AUDIO MENU
- SUBTITLE MENU
- DISC MENU
- PARENTAL
- PASSWORD
- DEFAULT
- Password Setup Page
- PASSWORD MODE
- DVD Playback
- DVD Region Code
- Types of Discs Your DVD Player Will Play
- Types of Files Your DVD Player Will Play
- Loading and Playing a Disc
- To Load and Play a Disc:
- Kodak Picture CD or JPEG Image CD Playback
- Viewing Files
- Play Modes:
- Skip to the Previous/Next Picture:
- Picture Rotation:
- Zoom In / Out:
- TROUBLESHOOTING
- OWNER'S NOTES
- AUDIOVOX
- DAY LIMITED WARRANTY
Brand : AUDIOVOX
Model : D7021
Category : Portable DVD Player