HS-3245 - Mp3 player Hip Street - Free user manual and instructions
Find the device manual for free HS-3245 Hip Street in PDF.


| Product Type | MP3 Player |
| Brand | Hip Street |
| Model | HS-3245 |
| Display | 2.8-inch 320x240 dot matrix color TFT |
| Touch Screen | Yes |
| Audio Formats | MP3, WMA |
| Video Formats | MPEG-4 (AVI) |
| Picture Formats | JPEG |
| FM Tuner | Yes, with FM recording |
| Recording | Voice via built-in microphone, FM radio |
| Games | Yes |
| Memory Expansion | microSD/T-Flash card slot |
| Built-in Speaker | Yes |
| Equalizer Modes | Normal, 3D, Rock, Pop, Classic, Jazz, User EQ |
| Languages | Multiple (selectable) |
| Firmware Upgrade | Yes (via included software) |
| PC Connection | USB 2.0, no driver needed for Windows 2000/XP/ME/Vista |
| Power Supply | Internal rechargeable battery, USB charging |
| Charging Time | Approximately 2-3 hours (typical) |
| Battery Life | Up to 10 hours audio playback (estimated) |
| Dimensions | Approximately 4.5 x 2.4 x 0.5 inches |
| Weight | Approximately 3.5 ounces |
Frequently Asked Questions - HS-3245 Hip Street
User questions about HS-3245 Hip Street
0 question about this device. Answer the ones you know or ask your own.
Ask a new question about this device
Download the instructions for your Mp3 player in PDF format for free! Find your manual HS-3245 - Hip Street and take your electronic device back in hand. On this page are published all the documents necessary for the use of your device. HS-3245 by Hip Street.
USER MANUAL HS-3245 Hip Street
Thank you for purchasing a Hip Street product and we hope you enjoy using it
Please visit our website at www.hipstreetonline.com. We have a Frequently Asked Questions FAQ section where you will find answers to most of your questions. If you do not find an answer there, please use the option to contact our technical support department and kindly send us an email detailing your question and we will get back to you promptly.
Note:
The display screen pictures contained in this Guide are used only for indication purpose. Real display pictures may be different.
Preface
Kindly read and retain all the operating instructions before operating the unit. We cannot assume any liability that may arise out of improper operation or incidental/accidental damages. The contents of this user manual are subject to change based on newer developments.
I. Features:
2.8-inch 320x240 dot matrix color TFT display
Touch screen interface
Supports MP3 /WMA playback.
Supports MPEG-4(AV1) video formats
Supports JPEG picture viewing
FM tuner. FM Recording
Game function
Supports T-Flash Memory upgrade card
◄uilt-in microphone, high quality voice recording
Several EQ modes
◄uilt-in Loud Speaker
Supports several languages
Firmware upgradeable (not recommended if product functioning normally)
No driver needed under Windows 2000/XP/ME/Vista
II. Note:
- Do not use the unit in places that are extremely hot, cold, dusty, or humid.
- The battery life will differ with different usage conditions and modes.
- Please charge the unit when any of the following cases occur:
A. The battery indicator informs of a low battery
◀. The player turns off automatically, and turns off again after rebooting.
▶. The keys become inactive
- Do not disconnect the player while it is formatting or uploading/downloading. This may lead to errors
- The player is charged while connected with P▶ via US◀ / A▶ adaptor, regardless if it is powered on or not.
- Do not disassemble. Please contact our support center if you need service.
- Specifications are subject to change and improvement without notice
- Avoid water or foreign objects falling on this player.
IMPORTANT:
If you need basic help with this product to load songs/photos onto this player, please visit our website at www.hipstreetonline.com or please review the Interactive Product Tutorial that comes with this product and that is stored on the CD that accompanied this product.
You must have songs in .mp3 or .wma file format on your computer to be able to load them onto this player.
You must have photos in .jpg file format on your computer to be able to load them onto this player.
For Video files, please read through this manual and it itemizes a step by step process on how this is done. Again for all help please refer to either the Interactive Product Tutorial or contact us at support@hipstreetonline.com
III. Introduction of main buttons and functional parts:

1、Pen 2、Earphone jack 3、Touch screen
4、Power on/off 5、power switch 6、USB jack
7、T-Flash card slot
IV. Main Interface

In the main interface, click “◀/▶” in the main interface to select the menu.
V. Audio playback
Select "Music" in the main menu, and click the music icon to enter. The player starts playback automatically.
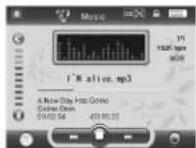
Operation on buttons:
Click "/* do to select files. Keep on clicking the "/" icon to RDW/FF.
Click "▶" icon to start playback. Click the icon again, it pauses, and the icon turns to

Click the 📄 icon to A-◀ repeat. Click 🔍 once to set the start point of the repeat section "A"; Click 🔍 again, the end point ◀ is set, and the player starts to repeat the section. Press "Button the third time to cancel A-◀ repeat.
Functions:
- Adjust Volume

Click the top of the Icon to increase the volume. Click the bottom of it to decrease the volume.
2. Play list
Click the icon to enter the audio file play list, the music will not stop.

- lick the top or bottom of the icon to select the folder you want. - lick Enter icon to enter the sub-folder; click Return icon to return to the previous folder.
3. Delete files
Select the file you want to delete and click icon to delete it.
4. FF/REW
Keep on clicking the "F" to REW/FF.

5. Lyrics Display
While playing music files, if there is a lyric file which has the same name with the music file, and is placed in the folder of the playing music file, the player will display the lyrics directly.
VI. Video playback

Select "Video" by clicking the "◀/▶" icon in the main menu, and click it to enter. The player enters the video file list first. (If the T-flash card is inserted, the player will display two folders "Card" and "Flash memory". Select one and enter to operate".)
Operation on buttons:
- lick the top or bottom of the icon to select the file you want, and click the icon. - lick " " to return to the main menu.

While playing video files, click the ▶ icon to pause. ▶ lick it again to resume playback.
- FF/REW
Keep on clicking the "I" look to REW/FF.
- Return
Under video playback interface, click icon to return to the play list.
- Adjust Volume
Under video playback interface, click "+" icon to increase the volume; click "-" to
decrease the volume.
- Delete files
Select the file you want to delete and click from to delete it.
VII. FM tuner | Your earphones MUST be plugged in for FM to work|
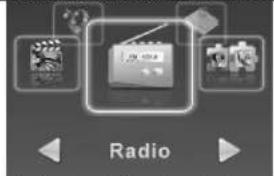
Select "Radio" in the main interface, and click it to enter.

▶ lick icon to enter the FM sub-menu:
1. Searching for stations
Select "Manual", and keep on clicking it for 2 seconds, it enters the manual searching interface to search for the station manually. Keep on clicking "/1#comb" searching for stations from low or high frequency. There will be no voice while searching for stations. It will stop searching until it searched for the next station. ▶lick "1#dommomentarily, the frequency will be decreased or increased 0.1MHz every time.
2. Preset stations
Enter the "Preset" menu, click "F" icon to select the preset stations.
3. Store stations
Select "mem", and keep on clicking it for 2 seconds, it enters the saving interface. and then select the position of saving the station: ▶H1, ▶H2....▶lick "Yes" and then select "Yes" or "No" to save or cancel.
4. Delete stations
Select "Del", and keep on clicking it for 2 seconds, it enters the deleting interface. Select the station you want to delete: ▶II1, ▶II2... and click "Yes" to delete it.
5. Auto searching:
Select "Auto", and keep on clicking it for 2 seconds, it enters the auto-searching interface and starts to searching for stations automatically.
6. Adjust volume

▶ lick the top of the 📄con to increase the volume. ▶ lick the bottom of it to decrease the volume.
7. FM recording
- lick icon to enter the FM recording interface. - lick it again it starts to recording.
8. Return to the main menu
▶ lick ⬆ to return to the main menu.
VIII. Picture viewing
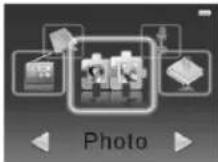
Select "Photo" in the main menu, and click it to enter. The player enters the file list first.
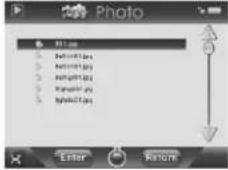
Operation on buttons:
Click the top or the bottom of the icon to select files. Click Enter icon to open the
file; click icon to return to the main menu.
Click Icon to delete the file you selected.

natural_image
Black-and-white photo of a person holding a bird, no visible text or symbolsClick the ▶ icon to browse the pictures automatically. Click "F" to select the picture you want and press the POWER ON/OFF button to display the picture in full screen. Click to return.
IX. E-book |Reading TEXT|

Select "TEXT" in the main menu, and click it to enter. The player enters the file list first.
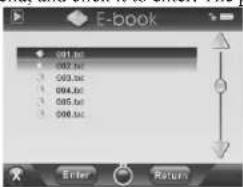
Operation on buttons:
- lick the top or the bottom of the icon to select files. - lick Enter icon to open the file; click Icon to return to the main menu.
While reading the e-book, click the top or the bottom of the icon to turn to the previous page or next page.
▶ lick 📄 on to delete the file you selected.

▶ lick Icon to return.
▶ lick icon to load bookmark.
Keep on clicking icon to save bookmark.
X. Recording

Select "Record" in the main menu, and click it to enter.
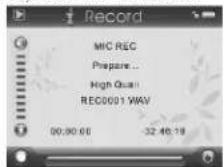
Operation
▶lick icon to start recording, the icon turns to □.
▶lick □ icon to pause, keep on clicking □ to stop and save the recorded file.
▶ lick Icon to return to Main menu.
XI. Explorer

Select "Explorer" in the main menu, and click it to enter. (If the T-flash card is inserted, the player will display two folders "▶ard" and "Flash memory". Select one and enter to operate".) There list all of the files in the player.


- lick the top or the bottom of the ↓ icon to select files. - lick Enter to playback.
▶ lick icon to return.
▶ lick to delete the selected file.
Press and hold "M" button to return to the main interface.
XIII. Settings

Select "Settings" in the main menu, and click it to enter the setting interface.
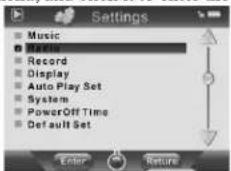
After selecting the corresponding setting, click Enter icon to enter. ▶lick Return icon to return to the previous menu.
1. Music Playback setting
In this setting interface, there are four options to be selected: repeat mode, play mode, EQ select and user EQ set.
① Repeat mode
In this menu, there are seven options to be selected: once, repeat one, folder once, folder repeat, All once, All repeat and Intro.
② Play mode
In this menu, there are two options to be selected: order and shuffle.
③ EQ selection
In this menu, there are eight options to be selected: Normal/3D/Rock/Pop/lassic/Jazz/User EQ.
④ User EQ set:
In this menu, there are five kinds of frequency, and there are 6 levels in every frequency for user to adjust.
2. Radio setting
In this menu there are two options: Stereo Switch, FM region.
① Stereo Switch. In this menu, there are two options: On and Off.
② Listening ZONES
In this menu there are four options: ▶hina, Europe, Japan, and the U.S.A. For Canada,
please choose U.S.A.
3. Record setting
In this setting there are two options: record quality, record volume.
① Record quality
In this menu, there are two options: High quality, General quality.
② Record volume
In this menu, there are five options to be selected: +1, +2, +3, +4, +5. The higher the
level is, the bigger the record volume will be.
4. Display setting
In this menu there are three options: ◀acklight time, Lum, and ◀acklight mode.
① ◀ acklight time
In this menu there are 6 options to be selected: 5 seconds, 10 seconds, 15 seconds,
20seconds, 30 seconds, always on.
② Lum
In this menu, there are five options: 1, 2, 3, 4 and 5. The higher the level is, the darker the brightness will be.
③ ◀ acklight mode
In this menu, there are two options: Normal and Power save.
5. Auto Play Set
To set the time of autoplaying while viewing pictures or texts.
①Text
In this menu, there are five options: 1 second, 2 seconds, 3 seconds, 4 seconds and 5 seconds.
②Jpeg
In this menu, there are five options: 1 second, 2 seconds, 3 seconds, 4 seconds and 5 seconds.
6. System setting
In this menu, there are three options to be selected: Language, about and upgrade.
1). Language selection
Select the language you want, and click icon to confirm.
2). About
The following information is displayed: this machine storage capability, remaining capability, system software version, which is read only. ▶lick icon to exit.
3). Firmware upgrade
In this menu pop up dialog box, click "Yes" or "No" icon to confirm upgrade firmware.
7. Power off time
In this menu, there are many options to be selected as follows: OFF, 10 minutes, 15 minutes, 30 minutes, 60 minutes and 120 minutes.
8. Default set
In this mane, a dialog box pops up, click "Yes" or "No" icon to confirm whether to restore the system default or not.
XIV Converting a Video File
AVI is one of the most popular video formats being used today for portable media players. It is also very commonly used for video available on the internet. It adopts
XviD/DivX format to code the video file. The quality of this type of video file is good and the size of the video file is small.
This AVI converter supports converting AVI, MPG, MPEG, RM, RMV◀, WMV, DAT, MP4, ASF, MKV, VO◀ formats to AVI format in high speed and high quality. System requirements:
- The ▶onverter software needs the basic configuration as follows:
▶PU : Intel or AMD processor, Intel Pentium 3 or above, including Intel ▶cleron series
Operation steps:
-
Insert the ▶D that came with this player into your ▶D Drive and look for a file or folder called "AVIConverter Vista Compatible Setup Package.exe"
-
Double click on the file and follow steps to install this AVI converter software on your computer's hard drive. Press 'FINISH' to complete the installation.
-
Once the AVI ▶onverter has been installed, please locate this program on your computer and start the program. This is the 1 ^st step in starting to convert files to be played on your player.

- The above image shows the starting screen.
▶onversion Steps:
① ▶ lick on 'Add' to add a file to convert. Then select source file path, as shown in the picture below. This indicates the file that you want converted to play on this player.

② You now have to select where this converted file is to be saved. Select the target file

③ Select the convert quality and aspect ratio. Make sure resolution is set at 320x240.

④ Once this is done, press 'Save' key. You may continue to add another file, or press '▶ lose' key to return previous interface.
5 Press '▶ onvert Now' to start converting:

After the conversion progress shows 100%, it means that the file is converted successfully. You may now use your US ◀ cable to transfer the file to the player. You are now ready to watch the video file on your player
XV. System / Firmware Upgrade [NOT to be DONE if the player is working fine] The firmware of player can be upgraded by the upgrade tool in the enclosed ▶D. Operations:
-
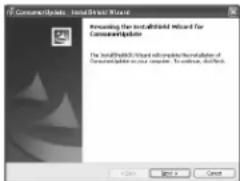
Run the ▶ onsumerSetup2.4.0.exe in the enclosed ▶ D.
-
▶lick "Next" as per the promotion on the dialog box. In the "browsing" option of the fourth dialog box, select the "upgrade fool" folder of the enclosed ▶D, and click "OK" to confirm.
-
Push the power switch to the OFF position, press and hold the POWER ON/OFF button, and then connect the player to the P▶ via US◀ cable.
-
The P▶ displays "rock US◀ Device", and asks to install the driver. (If the driver is installed, this progress is skipped.)
-
Run the "Firmware Update" program that you just installed in the START menu.

- ▶lick "Open" and select the firmware.
![Refresh Files\0.1 File Edit View Help [ ] [ ] [ ] [ ] [ ] [ ] [ ] [ ] [ ] [ ] [ ] [ ] [ ] [ ] [ ] [ ] [ ] [ ] [ ] [ ] [ ] [ ] [ ] [ ] [ ] [ ] [ ] [ ] [ ] [ ] [ ] [ ] [ ] [ ] [ ] [ ] [ ] [ ] [ ] [ ] [ ] [ ] [ ] [ ] [ ] [ ] [ ] [ ] [ ] [ ] [ ] ( )](/content/2026/05/944250/images/1120a5ee3a4219a460d1ac54e6731e9a040111ed273afbd92b01e9a688e7b4f5.jpg)
- ▶lick "Start" to upgrade.

- Disconnect the player and the P▶ after upgrading.
XVI. Troubleshooting
1. Failure to start/No response on buttons/ player freezes
- check if the POWER SWITCH▶H is on the position of "ON", and check the power of battery;
- ▶onnect the unit with your P▶ or the A▶ adaptor and check again;
- Push the power switch to the direction of OFF and push it to ON again. Press OK button to turn on the player.
- If it still fails to start after charge, please contact our customer service center.
2 No voice in the earphone
- Please check the volume is 0.
- Please check the connection of the earphone.
3. Serious noise
- Please check whether the pin of the earphone is dirty, as if this is the case, it could be the cause of noise.
Please check whether the music file is corrupted in some way. Please try playing another music file. If the file is corrupted, it could cause serious noise or not play at all.
4. No sound from the loud speaker
- ▶heck if the setting on the loudspeaker is set as ▶LOSE. Please check for this in
"Settings-Speaker" menu.
5. Display clobber on the screen
Please check whether the language is properly selected or not, and please enter
6. Download file failure
- e sure the connection between computer and player is secure.
- heck whether the memory is used up or not;
- ▶heck whether the US ◀ cable is broken or not.
7. Does not support WMA format music
The player does not support WMA format music files which are lower than 64kbps bit rate.
Need assistance? Please call us!
If you encounter any difficulties with this product, please visit our website at www.hipstreetonline.com and review our support section or call us. Our representatives are ready to help you with any questions about your product. We can guide you through connections, first-time use, or any of the features. Just give us a call or send us an email.
Customer & Technical Support: 1-888-4KOBIAN or 1-888-456-2426
Monday through Friday: 8:30am – 5:00pm EST
Email: support@hipstreetonline.com
We want you to start enjoying your product right away!
- Preface
- Features:
- Note:
- IMPORTANT:
- Main Interface
- Audio playback
- Operation on buttons:
- Functions:
- Play list
- Delete files
- FF/REW
- Lyrics Display
- Video playback
- Searching for stations
- Preset stations
- Store stations
- Delete stations
- Auto searching:
- Adjust volume
- FM recording
- Return to the main menu
- Picture viewing
- Recording
- Operation
- Explorer
- Music Playback setting
- Radio setting
- Record setting
- Display setting
- Auto Play Set
- System setting
- 2). About
- 3). Firmware upgrade
- Power off time
- Default set
- XIV Converting a Video File
- Operation steps:
- Troubleshooting
- Failure to start/No response on buttons/ player freezes
- No voice in the earphone
- Serious noise
- No sound from the loud speaker
- Display clobber on the screen
- Download file failure
- Does not support WMA format music
- Need assistance? Please call us!
Brand : Hip Street
Model : HS-3245
Category : Mp3 player