
LT4706 - Electrical relay SCHNEIDER - Free user manual and instructions
Find the device manual for free LT4706 SCHNEIDER in PDF.


User questions about LT4706 SCHNEIDER
0 question about this device. Answer the ones you know or ask your own.
Ask a new question about this device
Download the instructions for your Electrical relay in PDF format for free! Find your manual LT4706 - SCHNEIDER and take your electronic device back in hand. On this page are published all the documents necessary for the use of your device. LT4706 by SCHNEIDER.
USER MANUAL LT4706 SCHNEIDER
HAZARD OF ELECTRIC SHOCK, EXPLOSION, OR ARC FLASH
Disconnect all power before servicing equipment.
Failure to follow these instructions will result in death or serious injury.
PLEASE NOTE:
■ Electrical equipment should be installed, operated, serviced, and maintained only by qualified personnel.
■ No responsibility is assumed by Schneider Electric for any consequences arising out of the use of this material.
■ This document is also available in French, Spanish, Italian, German, and Chinese for download on our website at www.schneider-electric.com.

Operating and Function
■ LT47, solid state overload relay, compares motor current with preset load current threshold (LOAD).
■ Motor currents are monitored through two internal current transformers.
■ CT hole size is 12 mm in diameter. Please don't allow excessive force on CTs.
■ D-Time counts down and is only available for motor starting. During steady state, if motor current is greater than current setting(overloaded), LT47 switches its contacts after O-Time.
■ For shear-pin (mechanical shock) protection, set O-Time knob to its minimum in order to trip in 0.2-0.3 s.
| Type | Relay setting range |
| LT 4706 | 0.5 - 6 A |
| LT 4730 | 3 - 30 A |
| LT 4760 | 5 - 60 A |

Standard type (Manual / Electrical reset)

Combined signals from red and green LEDs indicate motor status including trip cause.
| Condition | LED Signal | |
| Green LED Red LED | ||
| Power on | On | Off |
| Starting | ||
| Steady state | On | |
| Overloading | On | |
| Trip | Off | On |
| Off On Flickering | ||


mm
in.


L1 L2 L3

When motor current is less than minimum current setting (< 0.5A), looping conductors through CT holes can be used. The following table explains number of looping for low current setting.
| No. of Loops | Time of Passing | Current Set. Range (A) | |
| LT4706 | 0 | 1 | 0.50 - 6.0 A |
| Looping Option | 1 | 2 | 0.25 - 3.0 A |
| 2 | 3 | 0.17 - 2.0 A | |
| 3 | 4 | 0.12 - 1.5 A | |
| 4 | 5 | 0.10 - 1.2 A |
Note:
■ LT47 may be influenced by the harmonics on the control power.
■ The control power should be supplied via the isolated transformer.
■ Output: Normally energized.
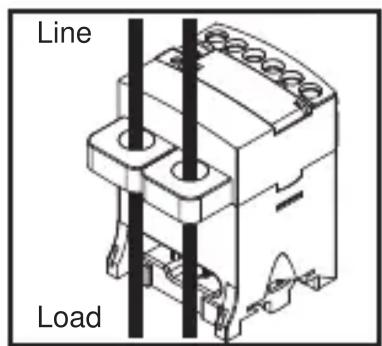
Straight-through-Wiring

Looping Option (1-Loop)

When putting 2 ring lug in the same terminal, plug one after the other as shown in figure.

Setting Guide - Manual reset type
■ Machine which can be loaded to its full load during the setting
- Adjust Load, D-Time and O-Time knobs to their maximum value. Then start motor.
- Adjust D-Time knob to the known motor start-up time. If start-up time is unknown, use clamp current meter to find its value.
- When motor reaches steady state, adjust Load knob counterclockwise until the red LED start to flicker. Then slowly adjust the Load knob clockwise until red LED stops flickering.
-
Adjust O-Time knob to the desired trip delay time.
■ Machine's load is unknown or load with high fluctuation. -
Adjust Load knob to motor's nominal current or just upper value.
- Adjust D-Time to the calculated time which take into account the machine feature (Torque, Inertia).
- Adjust O-Time to desired trip relay time.
Setting Guide - Auto reset type
■ Machine which can be loaded to its full load during the setting
1. Adjust Load and O-Time knobs to their maximum value.
Then start motor.
2. Adjust O-Time knob to a few seconds more than motor start-up time. If start-up time is unknown, use clamp current meter to find its value.
3. When motor reaches steady state, adjust Load knob counterclockwise until the red LED start to flicker.
Then slowly adjust the Load knob clockwise until red LED stops flickering.
4. Adjust R-Time knob to the desired auto-reset delay time(1...120 s).
■ Machine's Load is unknown or load with high fluctuation.
1. Adjust Load knob to motor's nominal current or just upper value.
2. Adjust O-Time to the calculated time which take into account the machine feature (Torque, Inertia).
3. Adjust R-Time to desired auto-reset delay time.
Adjustable

Output Relay
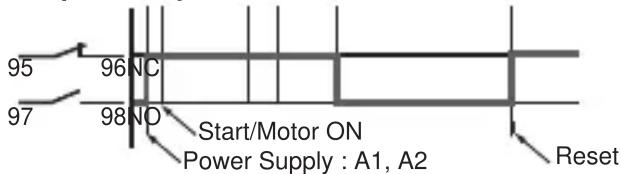
Note:
As shock relay utilisation, set O-Time at the minimum scale (tripping time: 0.2-0.3 s).

Reset
■ Manual: Immediate reset by RESET button
■ Electrical: Immediate reset by interrupting control power (minimum 0.1s).
■ Auto: reset by preset R-Time, 1...120 s adjustable, Auto Reset type only.

TEST function available at no load.
■ When LT47 is powered, keep Test button pushed for D-Time plus O-Time (Manual reset type) or O-Time (Auto reset type), till the internal relay switches its contact.
■ Periodic test is recommended.

Stop function while motor is running.
■ Must be associated with 3-wire control circuit.
■ The motor will be stopped immediately by pressing the TEST/STOP button. In this case, LT47 is automatically reset.
Brand : SCHNEIDER
Model : LT4706
Category : Electrical relay