
RDZ6046SS - Wine cellar RANGEMASTER - Free user manual and instructions
Find the device manual for free RDZ6046SS RANGEMASTER in PDF.


| Product Type | Wine Cellar |
| Brand | Rangemaster |
| Model | RDZ6046SS |
| Bottle Capacity | 46 bottles (0.75L Bordeaux style) |
| Net Volume | 128 L |
| Dual Zone | Yes (upper and lower zones) |
| Temperature Range | Upper preset 8°C, lower preset 12°C (adjustable) |
| Climate Class | N (16-32°C ambient) |
| Voltage / Frequency | 220-240V AC / 50Hz |
| Current | 0.9 A |
| Energy Consumption | 0.438 kWh/24h |
| Protection Class | II |
| Refrigerant | R600a (Isobutane) |
| Dimensions (W x D x H) | 595 x 575 x 820-880 mm (adjustable feet) |
| Door Reversibility | Yes (left or right) |
| Control Panel | Touch sensitive with display |
| Interior Light | LED, auto or always-on mode |
| Automatic Defrost | Yes (every 4 hours, 20 min) |
| Door Alarm | Sounds if door open > 60 seconds |
| Child Lock | Panel lock function |
| Charcoal Filter | Replaceable (see manual) |
| Installation | Undercounter, requires ventilation (14000 mm² free area) |
| Finish | Stainless steel |
| Accessories Included | Bottle shelves, handle, stability bracket |
Frequently Asked Questions - RDZ6046SS RANGEMASTER
User questions about RDZ6046SS RANGEMASTER
0 question about this device. Answer the ones you know or ask your own.
Ask a new question about this device
Download the instructions for your Wine cellar in PDF format for free! Find your manual RDZ6046SS - RANGEMASTER and take your electronic device back in hand. On this page are published all the documents necessary for the use of your device. RDZ6046SS by RANGEMASTER.
USER MANUAL RDZ6046SS RANGEMASTER
Single Door, Dual Zone
Wine Cabinets
User Guide
&
Installation Instructions
RANGEmaster
U111319-01a
1. Before You Start 1
Safety Information 1
Before Using Your Appliance 2
2. Overview 4
Getting to Know Your Wine Cabinet 4
Using Your Wine Cabinet 4
3. Care & Maintenance 7
4. Installation 9
Installation Requirements 9
Unpacking 9
Accessories Included 9
Installing your Wine Cabinet 10
Installing the appliance 10
Reversible door (single door only) 12
Electrical Connection 13
5. Product Support 14
Warranty / After Sales Service 14
6. Troubleshooting 15
7. Circuit Diagrams 16
8. Technical Specification 17
1. Before You Start
Safety Information
IMPORTANT: Please read these instructions fully before installing or operating.
WARNING: Keep ventilation openings, in the appliance enclosure or to the inside unit, clear of obstruction.
WARNING: Do not use electrical appliances inside the storage compartments of the appliance unless they are of the type recommended by the manufacturer.
WARNING: Do not damage the refrigerant circuit.
WARNING: Due to the instability of the appliance, it must be fixed in accordance with the instructions to avoid a hazard.
WARNING: If the supply cord is damaged, it must be replaced by the manufacturer, its service agent or similarly qualified persons in order to avoid a hazard.
WARNING: Do not use mechanical devices or other means to accelerate the defrosting process, other than those recommended by the manufacturer.
WARNING: This appliance is intended for domestic use only.
WARNING: This product is not suitable for food storage and must not be used to store food inside.
- This appliance contains the coolant Isobutane (R600a), a natural gas which is environmentally friendly. Although it is flammable, it does not damage the ozone layer and does not increase the greenhouse effect. The use of this coolant has, however, led to a slight increase in the noise level of the appliance. In addition to the noise of the compressor, you might be able to hear the coolant flowing around the system. This is unavoidable, but does not have any adverse effect on the performance of the appliance.
- Care must be taken during the transportation and installation of the appliance that no parts of the cooling system are damaged. Leaking coolant can damage the eyes.
• In the event of any damage:
- Avoid open flames and anything which creates a spark.
- Disconnect from the mains.
- Air the room in which the appliance is located for at least an hour.
- Contact Service Department for advice.
- Whilst carrying and positioning the appliance care must be taken not to damage the cabinet gas circuit at the rear of the appliance.
- The lamp must be replaced by the manufacturer, its service agent or similarly qualified persons
- Do not store explosive substances such as aerosol cans with a flammable propellant in this appliance. Do not use the appliance for industrial and commercial use, or any other purpose.
- The appliance is design for indoor use only and must be protected from rain, moisture and extreme temperature variations.
- This appliance is not intended for outdoor use.
- If the socket and refrigerator plug are not compatible please contact after sales service provider.
- This appliance can be used by children aged from 8 years and above and persons with reduced physical, sensory or mental capabilities or lack of experience and knowledge if they have been given supervision or instruction concerning use of the appliance in a safe way and
understand the hazards involved. Children shall not play with the appliance. Cleaning and user maintenance shall not be made by children without supervision. Children aged from 3 to 8 years are allowed to load and unload refrigerating appliances.
- Before connecting the appliance, make sure that the connection data on the data plate (voltage and frequency), matches the mains electricity supply. This data must correspond in order to avoid the risk of damage to the appliance. Consult a qualified electrician if in any doubt.
- Ensure the accessories are secured during transportation to prevent damage.
- Do not splash water on the appliance. It may cause electrical parts to fail and result in an electric shock.
- Do not sit, stand or place any other heavy objects on top of the appliance. This could result in injury or damage to the appliance.
- To prevent possible harm to the environment or human health from uncontrolled waste disposal, recycle it responsibly to promote the sustainable reuse of material resources.
- Young children should be supervised to ensure that they do not play with the appliance.
- In case there is a flammable gas leak, open the window for air circulation and disconnect from the mains. Do not turn the temperature knob. Otherwise, sparks may happen.
- Please dispose of this appliance in accordance with local regulations as this appliance contains Isobutane (R600a) gas.
Before Using Your Appliance
Before switching on your appliance for the first time, ensure it is positioned in it's desired final location and is in it's upright position for at least 24 hours before plugging in and switching on the power, otherwise you may damage the compressor.
You may experience an odour from the appliance when it is operated for the first time. This is normal and will fade when your appliance starts to cool.
It is recommended that you remove all the internal and external packaging and clean the interior of the appliance prior to first use. We recommend you wipe all parts with warm water, then rise and dry. Place all parts back into the appliance after cleaning.
Cleaning and user maintenance shall not be made by children without supervision.
- WARNING: Risk of fire / flammable materials.
- When positioning the appliance, ensure the supply cord is not trapped or damaged.
- Do not locate multiple portable socket-outlets or portable power supplies at the rear of the appliance.
• To avoid contamination of drinks, pay attention to the following:
- Opening the door for long periods of time can cause a significant increase in the temperature in the compartments of the appliance.
- Only store wine in sealed containers.
- Do not overload the cabinet.
- Only open the door when necessary.
- This is a self-defrosting appliance. The compressor will not run during the twenty minutes defrost cycle.
- Do not pull the shelves beyond the anti-stop position when fully loaded.
- This appliance is intended to be used exclusively for the storage of wine.
- In the event of a power failure, leave the door closed as much as possible to maintain the internal working temperature. Should the power failure continue for a prolonged period, you should take steps to protect the contents of the wine cabinet against a rise in temperature. The wine cabinet will remember the selected temperature setting and revert to these setting once the power is restored.
2. Overview
Getting to Know Your Wine Cabinet
Fig. 2.1 Fig. 2.2
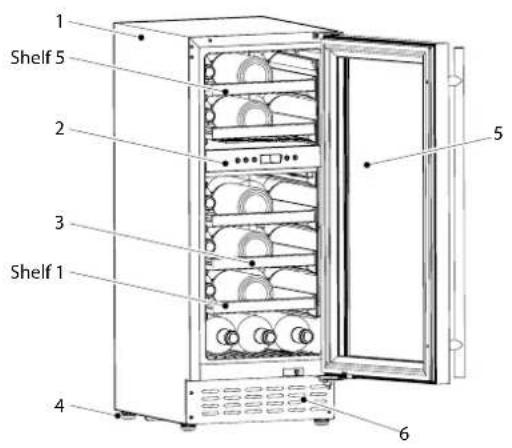
RWC 3018 RDZ 6046
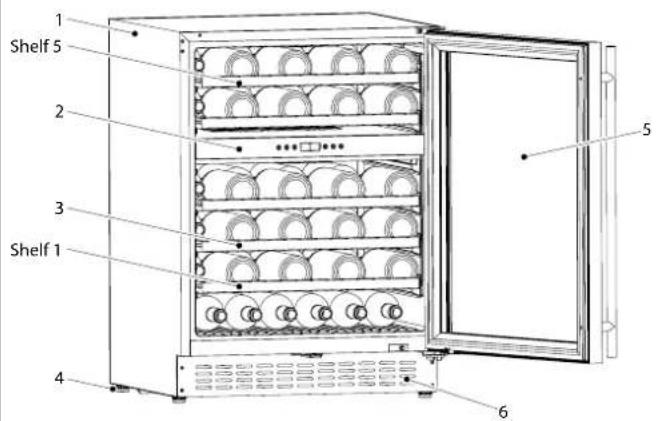
Fig. 2.3
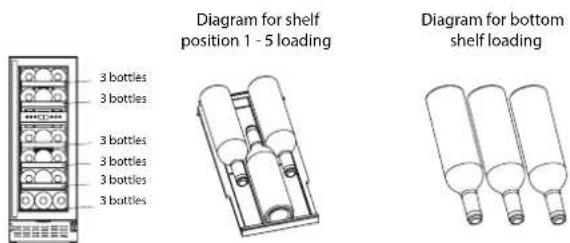
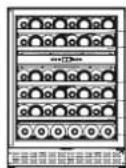
8 bottles
8 bottles
8 bottles
8 bottles
8 bottles
6 bottles
Diagram for shelf position 1 - 5 loading
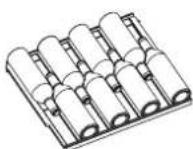
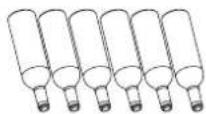
Diagram for bottom shelf loading
The RWC 3018 (Fig. 2.1) and RDZ 6046 (Fig. 2.2) share the following features:
1 Cabinet
2 Touch control panel
3 Wine shelves
4 Levelling feet
5 Glass door
6 Ventilation slots
Using Your Wine Cabinet
Arranging Wine
Before putting wine into the wine cabinet please ensure the shelves are correctly in place.
Adjust the temperature of the wine cabinet.
Allow several hours to let bottles reach the desired temperature.
Fill the wine cabinet with your choice of wine bottle. Lay the wine bottles in a horizontal position and ensure they sit on the shelf securely. Do not exceed the capacity that the appliance is able to handle. Follow the loading diagram in Fig. 2.3.
Note: Please be aware that this wine cabinet is designed to fit 0.75 litre Bordeaux style wine bottles.
If you wish to store other style bottles i.e. champagne, the maximum storage capacity will be less than as shown above. Shelves may also need to be removed to allow bottles to be stored.
| Rangemaster Code Finish | |
| RWC 3018 BL /RWC 3018 SS / | BlackST-ST |
| RDZ 6046 BL /RDZ 6046 SS / | BlackST-ST |
Caution: Condensation may form on the glass door during summer time or in humid temperatures. This is normal, remove with a dry cloth or paper towel.
Remove the Shelves
To remove a shelf from the wine cabinet, first remove all bottles from the shelf.
Fully extend the shelf you wish to remove.
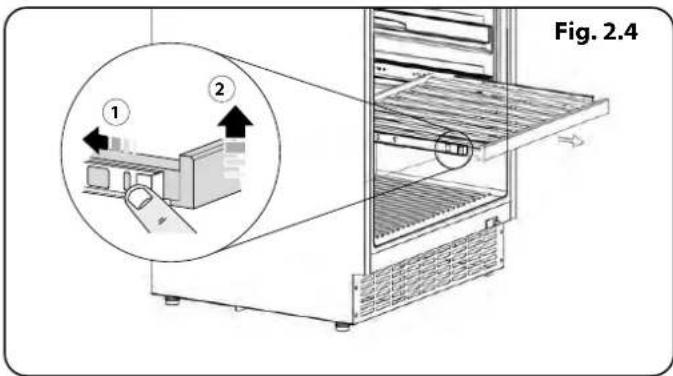
Whilst holding the shelf runner with your finger, push the shelf in (1) and then lift (2), to release from the clips (Fig. 2.4).
Note: To avoid damaging the door gasket make sure the door is fully opened when removing the shelves.
To replace the shelf follow the procedure in reverse order.
Defrosting
The wine cabinet is designed to defrost automatically every 4 hours. The defrost process will last for 20 minutes. During defrost the compressor stops working and the fan will run for 20 minutes.
Door Alarm
The wine cabinet is equipped with an alarm that will sound if the door is left open for more than 60 seconds. Close the door or press any key once to switch off the alarm.
Controls (Fig. 2.5)
It is recommended that the appliance is installed in a place where the ambient temperature is between 16^ C - 32^ C. If the ambient temperature is above or below this recommended temperature, the performance of the unit may be affected.
For example, placing your unit in extremely cold or hot conditions, may cause the interior temperature to fluctuate. The operation temperature range may not be reached.
Note: Controls are touch sensitive and only need a light press / touch to register a key press.
To switch the power on / off
Press and hold the power button [A] for 6 seconds to switch the wine cabinet on.
Press and hold the power button [A] for 6 seconds, again, to switch the wine cabinet off.
To change the temperature of each zone
Press the '+' or '-' buttons, for the appropriate zone, until the required temperature is shown on the display.
The preset temperature is 8^ C / 46^ F for the upper zone and 12^ C / 54^ F for the lower zone.
To change the temperature display from Fahrenheit to Celsius, or Celsius to Fahrenheit, press the lower zone '+' and '-' buttons at the same time for 2 seconds.
Tip: Please see the °C/°F' symbol on the control panel.
The display shows the current internal temperature when the wine cabinet is on.
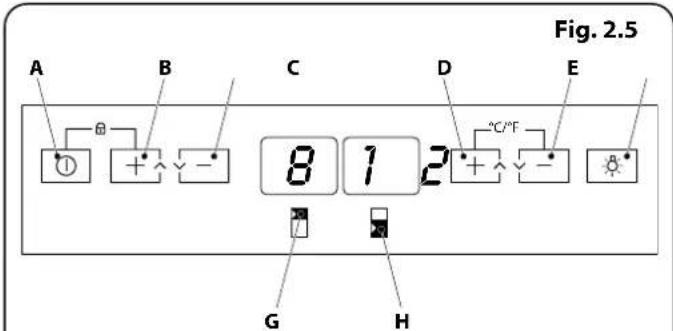
A Power Button
G Upper zone display
B Upper zone '+' button
H Lower zone display
C Upperzone'-button
D Lower zone '+' button
E Lower zone'-button
F Light button
Optimal temperature selection
Wine is best stored at temperatures between 13 and 15°C, your wine can also be stored at drinking temperature. As a guide for red wine this is between 15 and 17°C, and for white wine between 12 and 13°C.
To change how your internal light functions
Your product is set to turn the light on when the door opens and turn off when the door closes.
Your product allows you to change the light function so that the light always remains on.

Your product will consume more energy when the light is always on.
Open the door, press and hold the light button for 6 seconds, until the display shows 'CL'. The interior light is now set to be always on.
To return your product to its factory set condition. Open the door, press and hold the light button for 6 seconds, until 'OP' is displayed. Your product will now turn on / off the light when the door is open / closed.
To lock the whole panel
Press the power button and '+' button at the same time for 1 second, all buttons on the panel will be locked.
Press the power button and '+' button once again, all buttons will be unlocked.
Tip: Please see the [☐] symbol on the control panel.
3. Care & Maintenance
Cleaning your Appliance
- Make sure you unplug the wine cabinet before cleaning.
- Do not pour water directly over your appliance.
- Wipe the inner and outer sides with a soft cloth.
- Remove parts individually and clean by hand with soapy water. Do not place them in a dishwasher.
- Never use flammable, explosive or corrosive material for cleaning your appliance.
- Occasionally dust behind the cabinet and on the ground to improve the cooling effect and energy saving.
- The interior of the cabinet should be cleaned regularly to avoid odour.
- Check the door gasket regularly to make sure there is no debris.
- Please turn off the power and remove all of the shelves before cleaning.
- Clean the door gasket with mild soap and water.
- Use a soft cloth or sponge to clean the inside of the cabinet. Use two tablespoons of baking soda and a litre of warm water. Then rinse with water and wipe clean. Open the door and allow the cabinet to dry naturally before turning the power back on.
- Do not use soap, detergent, spray cleaner, etc. as these may cause odours in the interior of the cabinet.
- Clean the bottle frame and shelves with a mild detergent and dry with a soft cloth.
- Wipe the outer surface of the cabinet with a soft cloth dampened with soapy water or detergent and then wipe dry.
- Do not use hard brushes, steel wool, wire brushes, abrasives or solvents; like alcohol or acetone, boiling water, acids or alkaline to clean the appliance as it may damage the surface or interior.
- Do not rinse with water so as not to affect the electrical insulation properties.
Power Failure
If the power failure lasts for up to 24 hours, keep the door closed. This will allow stored bottles to stay cold as long as possible.
If the power failure lasts longer than 24 hours, it is advised to empty the wine cabinet compartment and temporarily store the bottles in a portable wine chiller.
Fig. 3.1
natural_image
Simple circular diagram with concentric rings and an arrow indicating rotation (no text or symbols)A Locked
natural_image
Diagram of a circular device with directional arrows indicating rotation or movement (no text or symbols)B Unlocked
Short Holiday
There is no need to disconnect the appliance from the mains if you are away for two to three weeks.
Longer Holiday
Remove all the wine if you are away for three weeks or more. Unplug the appliance and leave the door(s) open to provide air circulation to prevent odour and mould.
If the refrigerating appliance is left empty for long periods; switch off, defrost, clean, dry and leave the door open to prevent mould developing within the appliance.
How To Replace The Charcoal Filter
Open the door and remove the shelves.
Note: For wine cabinets with telescopic shelves; follow the correct shelf removal procedure.
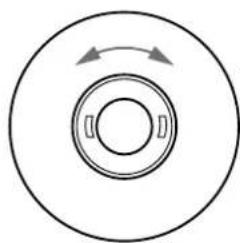
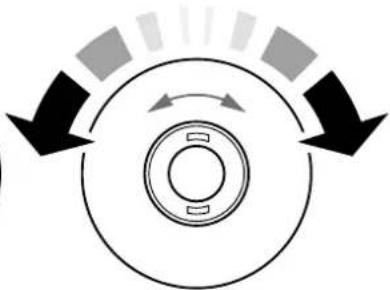
Turn the filter from the locked position (A) to the unlocked position (B) (Fig. 3.1).
Remove the filter by pulling it out.
Replace with the new filter and twist to lock it back into position (Fig. 3.1).
Re-install the shelves.
Note: For wine cabinets with telescopic shelves; follow the correct procedure to replace the shelves.
4. Installation
Installation Requirements
Before starting to use your wine cabinet, you should pay attention to the following:
- Operating voltage for your wine cabinet is 220-240V at 50Hz.
- We do not take the responsibility of the damages that occur due to ungrounded usage. Please refer to "Electrical Connection" on page 13.
- Do not place your appliance in direct sunlight.
- Your appliance should be at least 50 cm away from stoves, gas ovens and heaters, and should be at least 5 cm away from electrical ovens.
- Your wine cabinet should never be left outdoors.
- When your wine cabinet is placed next to a deep freezer, there should be at least 2 cm between them to prevent humidity on the outer surface.
- Before using your wine cabinet, wipe all parts with warm water then rinse and dry. Place all parts back in the appliance after cleaning.
- The installation of this appliance is best carried out by 2 people.
- Dispose of all packaging carefully and responsibly.
- The appliance is designed for indoor use only and must be protected from rain, moisture and extreme temperature variations.
- This appliance is designed for household use. Do not use the appliance for industrial and commercial use.
- The appliance MUST be positioned on a firm level base.
Unpacking
Please make sure that when unpacking your appliance that it is carried out in a safe manner. Ensure the packaging is disposed of in accordance to local regulation.

Do not allow children to play with the packaging material, e.g. plastic bags and wrappings. Danger of suffocation
Accessories Included
natural_image
Simple line drawing of a diagonal pipe with two circular ends (no text or symbols)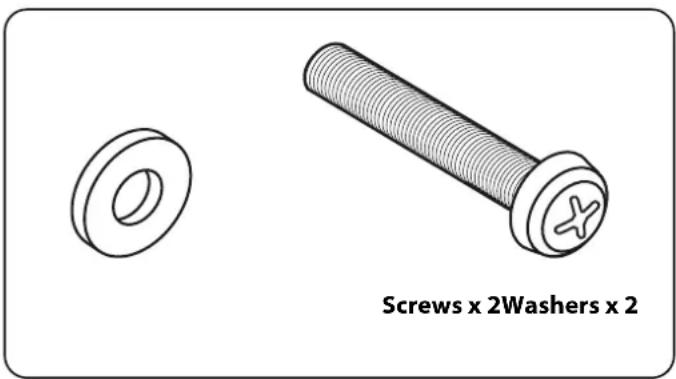
natural_image
Technical illustration of a screw and washer assembly (no text or symbols on the diagram itself)Fig. 4.1
Installing your Wine Cabinet
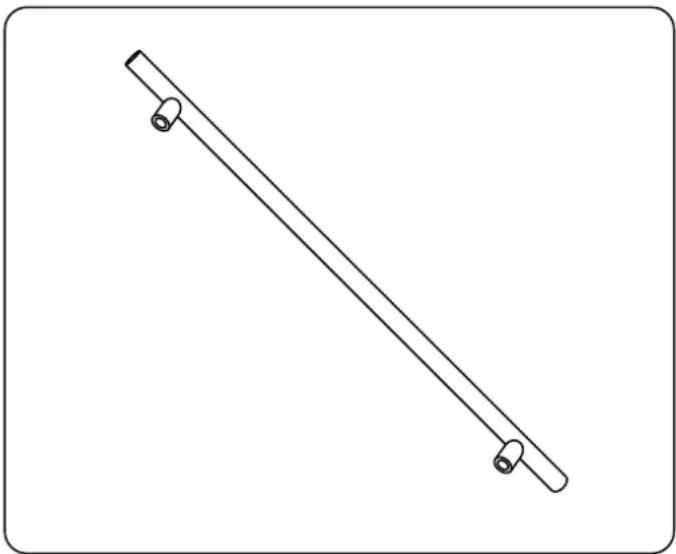
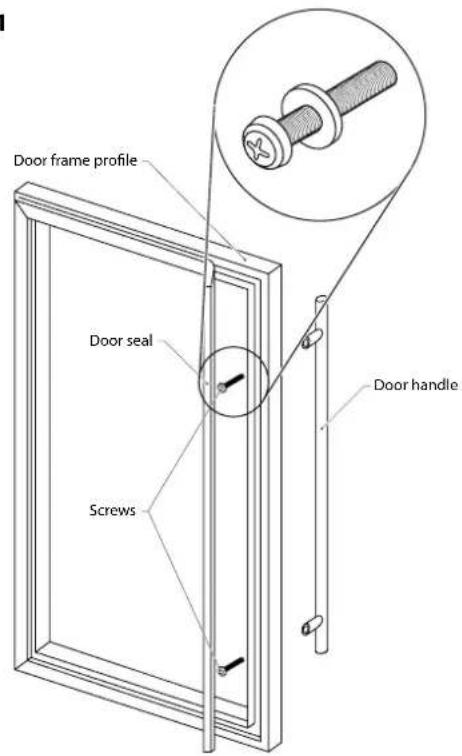
Installing the stainless steel handle
(Fig. 4.1)
- Peel back door seal along the right hand side of door. You will find a screw hole at the top and lower of the door where you have peeled the seal back. (please refer to Fig. 4.1).
• Take out the screws and washers from the bag at the back of the cabinet. Place the washers onto the screws and then put the screws in the hole where the handle is to be installed. Please make sure the washer is correctly in place before you put the screws in the hole. - Align the handle with screws, tighten the screws using a screw driver until the handle is both push and secured tightly against the door side. (DO NOT over-tighten as this may cause damage to the door surface)
• After handle fixed well, put the door seal back to the door to cover the hole.
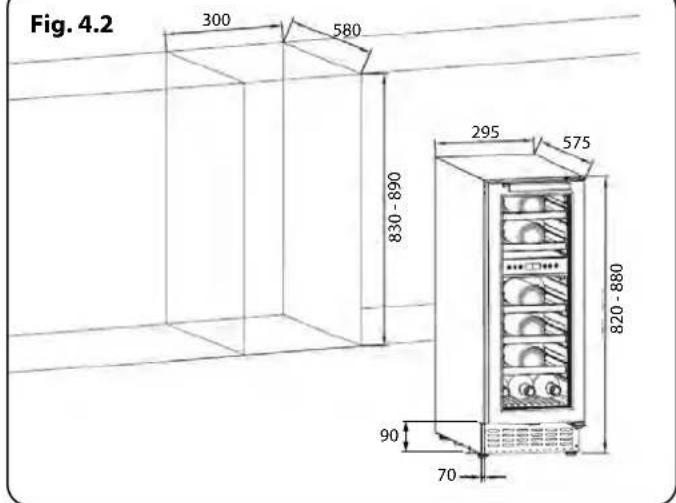
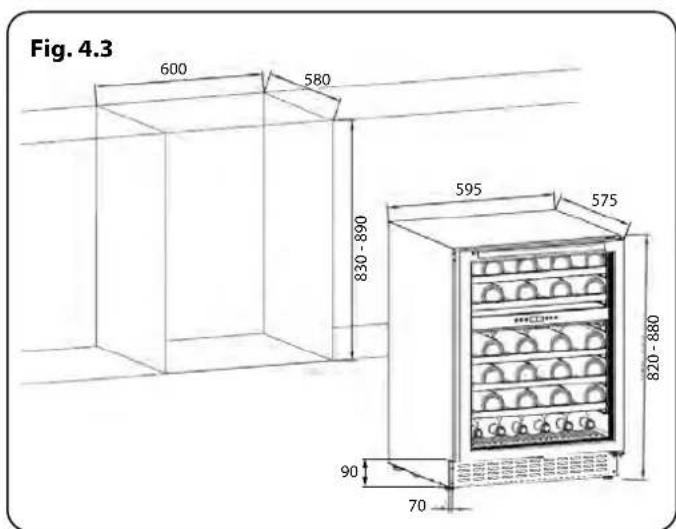
Installing the appliance (Fig. 4.2 & Fig. 4.3)
• Make sure your mains connection is accessible.
- Align the appliance to the height of the recess by adjusting the adjustable feet.
- Connect the power cord to a conventional socket.
- Slide the appliance into the recess. Make sure the power cord does not get wedged. The appliance should not be in direct contact with the floor when sliding into place, since, this could damage the floor.
Stability fixing
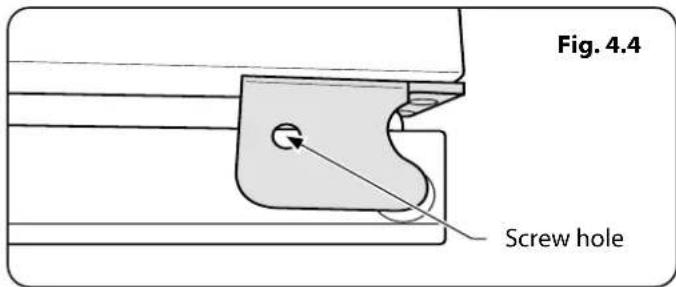
Your appliance is provided with a stability bracket.
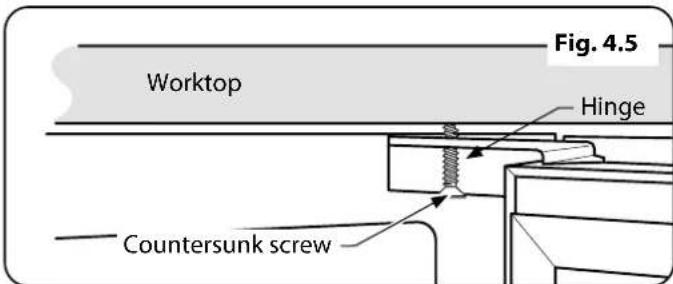
The top hinge has a hole, into which a low profile countersunk wood screw should be fitted (Fig. 4.4), to secure your appliance to the underside of a worktop (Fig. 4.5). This is the security bracket.
Before using for the first time
Clean the inside of the cabinet (see "Care & Maintenance" on page 7).
Wait for 1 to 1.5 hours after placing the appliance in its final position to allow the refrigerant to settle before connecting it to the mains power supply.
Levelling feet
The appliance must be installed level to work properly.
If the unit is not level, the doors and magnetic seal alignments, will not function correctly.
To level the unit, adjust one or both levelling feet, at the base of the unit. Use a spirit level on a fixed surface to check your product is level.
Adjustable feet
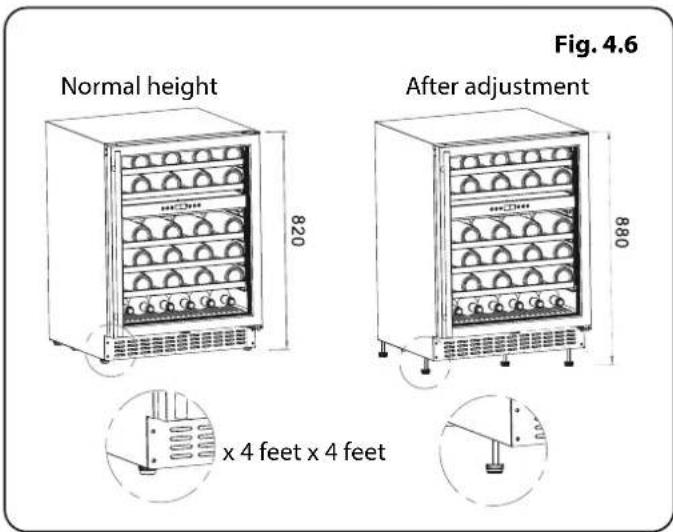
The appliance comes with height adjustment feet which allow the appliance to be installed under bench and ensures the appliance is stable and level.
Rotate the bottom feet anti-clockwise to raise the height up to 880 mm. Or clockwise to lower the height to 820 mm (Fig. 4.6).
Climate Class
Your wine cabinet is Climate Class N.
Each item has a climate class (shown on the rating label) where it indicates the temperature range of the appliance. The appliance may not work properly if it is left for a long period at a temperature outside the specified range (Table 4.1).
Details on how to set the internal temperature can be found on page 5 of this manual.
Fitting an external plinth (ventilation)
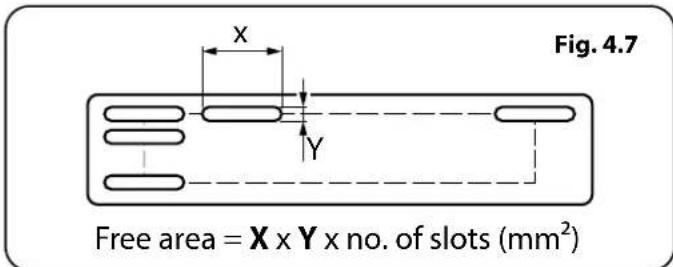
You may wish to fit an external plinth across the front of your appliance. This is allowed, however, you must provide a suitable vent in the external plinth. Failure to provide adequate ventilation will impair the function of your appliance.
See Table 4.2 as a guide.
An example of an external vent is shown in Fig. 4.7.
| Climate Class Amb. T. (°C) Amb. T. (°F) | |
| SN 10-3250-90 | |
| N 16-3251-90 | |
| ST 16-3861-100 | |
| T 16-4361-110 | |
Table 4.1
| Model Free Area (mm ^2 ) | |
| RWC 3018 BL/RWC 3018 SS/ | 6000 |
| RDZ 6046 BL/RDZ 6046 SS/ | 14000 |
Table 4.2
flowchart
graph TD
    A["Step 1"] --> B["Step 2"]
    B --> C["Step 3"]
    C --> D["Step 4"]
    D --> E["Step 5"]
    style A fill:#f9f,stroke:#333
    style B fill:#f9f,stroke:#333
    style C fill:#f9f,stroke:#333
    style D fill:#f9f,stroke:#333
    style E fill:#f9f,stroke:#333
Reversible door (single door only)
The door of the wine cabinet can be hung on the right hand or left hand side.
This procedure is best performed with the wine cabinet free from undercounter position, empty of wine bottles and shelves and disconnected from the mains power supply.
Access to the bottom hinge plate may need the appliance to be tilted backwards, please take care to adequately support your appliance.
If you have to lie the appliance down, please make sure any flooring is adequately protected and when you finish the procedure allow 12/24 hours for the refrigerant to settle back into the compressor before turning your appliance back on.
Refit as required in the under counter position.
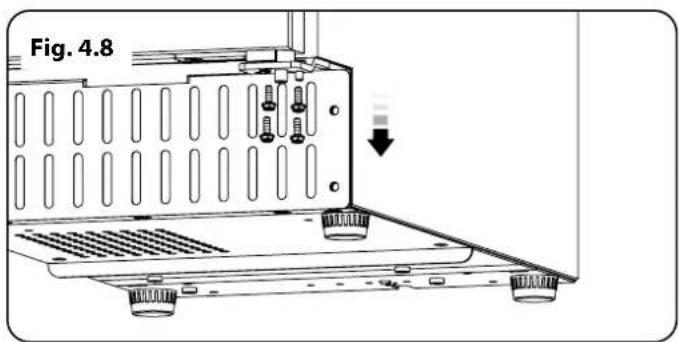
Step 1 Remove and retain the four fixings screws from the bottom hinge bracket of the appliance (Fig. 4.8).
Note: Take care to support the door as it will now drop away from the top hinge bracket.
Retain the bottom hinge bracket and the door for use.
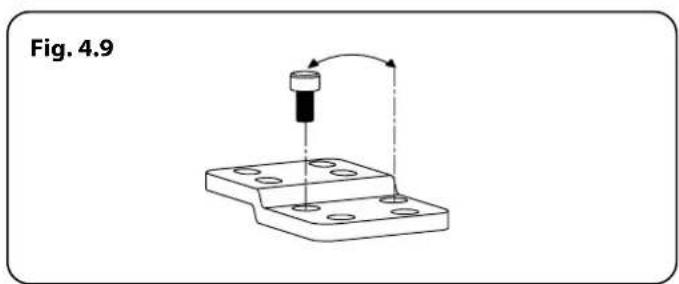
Step 2 Move the screw and replace in the hole shown (Fig. 4.9).
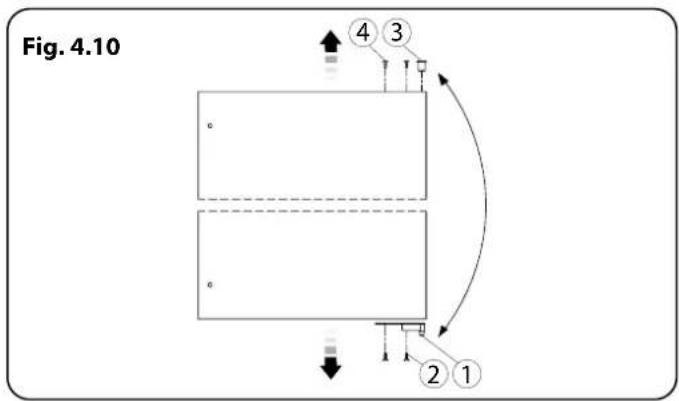
Step 3 (Fig. 4.10) Remove the door hinge bracket (1) by removing the two screws (2) – Retain the parts for use.
Remove the hinge bush (3) and the two blanking plugs (4) and retain for use.
Fit the door hinge bracket (1) to the top of the door with two screws (2).
Fit the two blanking plugs (4) to the bottom edge of the door.
Fit the hinge bush (3) to the bottom edge of the door.
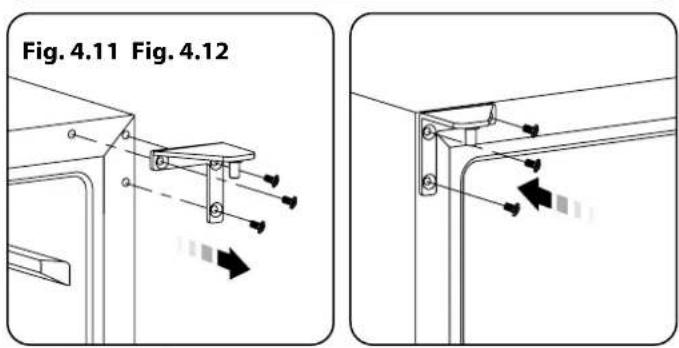
Step 4 Remove the RH upper hinge bracket, retaining the screws for use (Fig. 4.11).
Remove the three blanking plugs from the LH hinge position and refit into the screw holes of the RH upper hinge bracket.
Fix the new LH hinge bracket as shown using the 3 screws from the RH upper hinge bracket (Fig. 4.12).
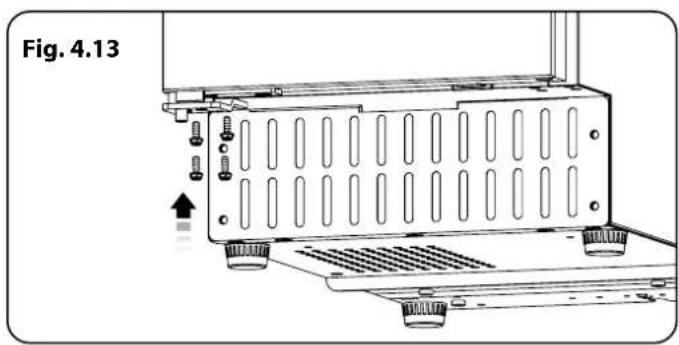
Step 5 Rotate the door and fit to the LH side of your appliance. Ensure the top hinge pin is correctly located in the hinge bush (3)
Support the door and fit the bottom hinge (Fig. 4.13).
Adjusting your door
After reversing the opening direction of your appliance door, it may need adjusting, to ensure alignment with the outer carcass of the appliance.
Adjustment can be made by loosening the two screws (2) and aligning the door. Retighten the screws once door is aligned.
Electrical Connection
Any electrical work that is required to install this appliance MUST be carried out by a qualified electrician.
WARNING: This appliance must be earthed.
Before making any electrical connections, ensure that:
- Electrical safety is only guaranteed when the earth system of your house in accordance with the related local regulations.
- Do not bend, stretch or pull the supply cable to avoid electric shock.
- Ensure the power socket is suitable for the Maximum power of the machine (fuses in the power circuit must be 13 amp).
- The supply voltage should be the same as that indicated in the technical specifications and the appliance rating plate.
- The appliance should be earthed and in compliance with the applicable law.
- When installed, the power socket must be within easy reach.
- If the socket outlets in your home are not suitable for the plug supplied with this unit check with a qualified electrician for replacement.
- To avoid the risk of overloading your plug socket, the use of adapters, multiple connectors or extension cables are not recommended. The appliance must be connected to a 220-240 volt SOHz AC supply by mean of a three pin socket, suitably earthed and protected by a 13 amp fuse. Should the fuse need to be replaced, a 13 amp fuse approved to BS1362/A must be used.
- The plug contains a removable fuse cover that must be refitted when the fuse is replaced. If the fuse cover is lost or damaged, the plug must not be used until a replacement cover has been fitted or the plug is replaced.
- A damaged plug should be cut off as close to the plug body as possible, the fuse should be removed and the plug disposed of safely.
- When positioning the appliance, ensure the supply cord is not trapped or damaged.
- Do not locate multiple portable socket-outlets or portable power supplies at the rear of the appliance.
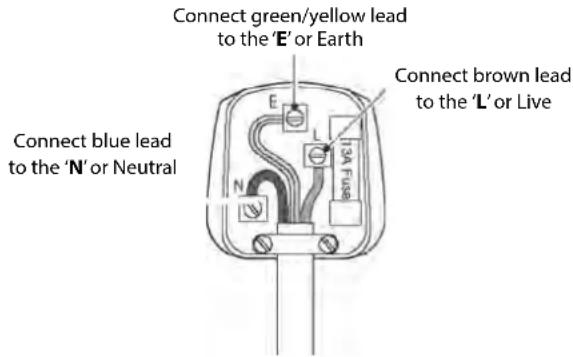
Plug replacement (UK & Ireland only)
Should you need to replace the plug; the wires in the power cable are coloured in the following way:
Blue - Neutral 'N'
Brown - Live 'L'
Green & Yellow - Earth 'E'
The green & yellow wire must be connected to the terminal in the plug that is marked with the letter E or by the earth symbol.
The blue wire must be connected to the terminal that is marked with the letter N.
The blue wire must be connected to the terminal that is marked with the letter L.
If power supply cord is damaged, it must replaced by the manufacturer or its service agent or a similar qualified person in order to avoid a hazard.
5. Product Support
Declaration of conformance to product standards
This appliance conforms to all relevant standards applicable to domestic appliances sold in the UK.

This appliance/fitting is marked according to the European directive 2012/19/EU on Waste Electrical and Electronic Equipment (WEEE).
By ensuring this product is disposed of correctly, you will help prevent potential negative consequences for the environment and human health, which could otherwise be caused by inappropriate waste handling of this product.
The symbol on the product, or on the documents accompanying the product, the crossed out wheelie bin symbol, indicates that this appliance/fitting may not be treated as household waste. Instead it shall be handed over to the applicable collection point for the recycling of electrical and electronic equipment.
Disposal must be carried out in accordance with local environmental regulations for waste disposal.
For more detailed information about treatment, recovery and recycling of this product, please contact your local authority, your household waste disposal service or the retailer where you purchased the product.
Old fridges and freezers contain isolation material and refrigerant with CFC. Therefore, take care not to harm the environment when you are disregarding your old fridges.
Warranty / After Sales Service
If consultation or technical assistance is needed, please provide the local authorised service agent with the purchase invoice and the product code/serial number.
The 2 years free maintenance for the operation of the appliance started from the date of purchase of this product.
Any cosmetic damage to the appliance must be reported within 90 days of delivery.
Please note that AGA Rangemaster Limited have appointed UK Warranty Solutions to administer in warranty repairs on our behalf. If you make a request for an in warranty repair, your details will be held by Warranty Solutions.
Warranty Solutions: 01759 48 78 25
6. Troubleshooting
| Problem Solution | |
| The doors do not close properly • Ensure there are no obstructions preventing door closure.• Check the door compartments and shelves are correctly in place.• Check the door seal is not warped or torn.• Check the appliance is level. | |
| Unusual noises • Check that the appliance is on a flat, level surface and is stable.• Check the spacing around the appliance and ensure it is not touching other items.• Bubbling and gurgling sound: This noise is emitted as the coolant fluid flows through the pipes within the system. This is normal.• Contraction and expansion of the inside walls may cause popping and cracking noises. | |
| The cabinet door will not open • If the door has just been opened, leave it for a few minutes to allow the air pressure to equalise before trying again. | |
| Compressor runs constantly • The temperature is set too cold: Select a lower (warmer) setting.• The door is open, or something is obstructing proper door closure.• The room temperature is hotter than usual. | |
| The external fridge surface is warm • The exterior walls can be warmer than room temperature. This is normal while the compressor works to transfer heat from inside the bottle cabinet. | |
| Smells / odours • Check all the drinks that are in the cabinet are in date and correctly packaged. Please remove anything that may be spoiled and repack if necessary.• Check for spillages throughout the cabinet. Spillages may cause odours if left unwashed. Wash accordingly to the manufacturer's advice. | |
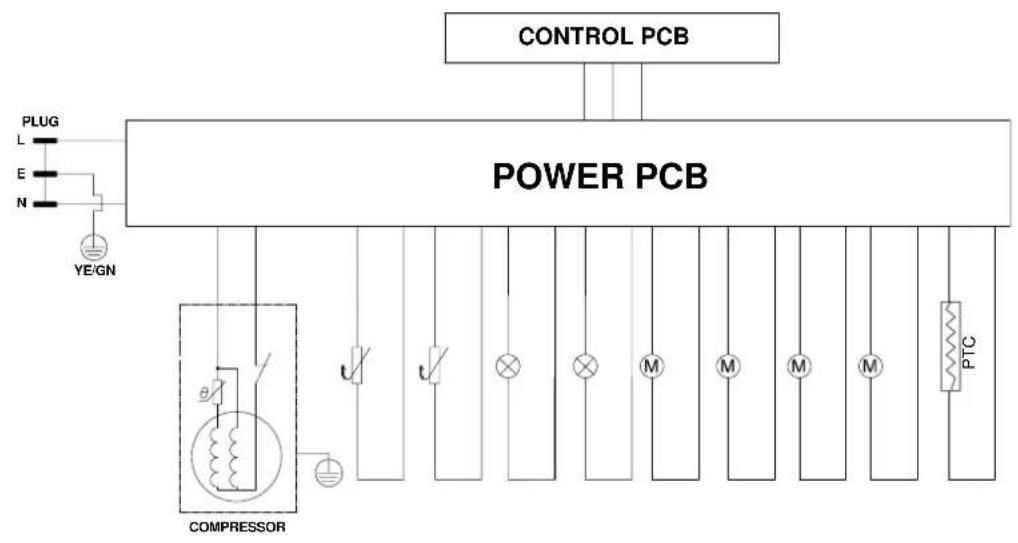
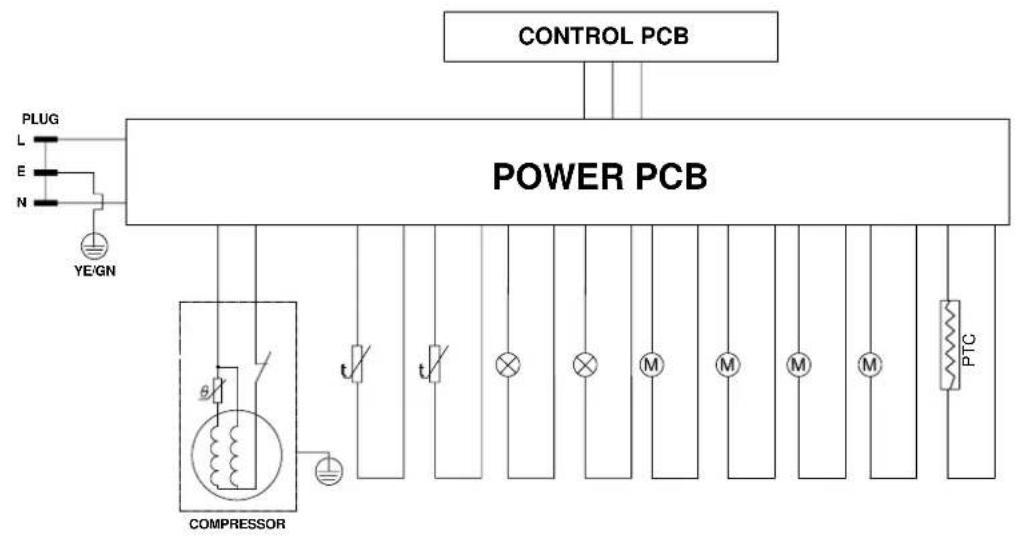
7. Circuit Diagrams
RWC 3018
flowchart
graph TD
    A["CONTROL PCB"] --> B["POWER PCB"]
    B --> C["COMPRESSOR"]
    C --> D["PLUG L E N YE/GN"]
    C --> E["t/ t/"]
    C --> F["×"]
    C --> G["M"]
    C --> H["M"]
    C --> I["M"]
    C --> J["PTC"]
RD Z6046
flowchart
graph TD
    A["CONTROL PCB"] --> B["POWER PCB"]
    B --> C["COMPRESSOR"]
    C --> D["t/"]
    C --> E["t/"]
    C --> F["×"]
    C --> G["×"]
    C --> H["M"]
    C --> I["M"]
    C --> J["M"]
    C --> K["PTC"]
8. Technical Specification
| Model | RWC 3018 BL / RWC 3018 SS / | RD Z6046 BL/ RD Z6046 SS/ |
| Fridge Capacity (net litres) 55 L 128 L | ||
| Bottle Capacity 18 bottles 46 bottles | ||
| Voltage & Frequency 220 - 240V AC/50Hz | ||
| Protection Class II | ||
| Climate Class N (25 | °C AmB) N (25 | °C AmB) |
| Energy Consumption 0.41 Wh/240.438 Wh/24 | ||
| Rated Current 0.5 A 0.9 A | ||
| Rated Lamp Power 1+1 W | 1+1 W | |
| Refrigerant | R600a/15g | R600a/25g |
| Energy Rating | A | A |
| Energy Rating 2021 new ERP | G | G |
| Size W x D x H (mm) | 295 x 575 x 820 (880 mm*) | 595 x 575 x 820 (880 mm*) |
* Adjustment height (maximum)
We apologise for any inconvenience caused by minor inconsistencies within these instructions that may occur due to product improvements and development. All images and drawings are for illustration purposes only.
AGA RANGEMaster
Clarence Street, Royal Leamington Spa,
Warwickshire, CV31 2AD, England.
Tel: +44 (0) 1926 457400 Fax: +44 (0) 1926 450526
E-mail: consumers@rangemaster.co.uk
- Single Door, Dual Zone
- Wine Cabinets
- User Guide
- Before You Start 1
- Overview 4
- Care & Maintenance 7
- Installation 9
- Product Support 14
- Troubleshooting 15
- Circuit Diagrams 16
- Technical Specification 17
- Before You Start
- Safety Information
- Before Using Your Appliance
- Overview
- Getting to Know Your Wine Cabinet
- Using Your Wine Cabinet
- Arranging Wine
- Remove the Shelves
- Defrosting
- Door Alarm
- Controls (Fig. 2.5)
- Note: Controls are touch sensitive and only need a light press / touch to register a key press.
- To switch the power on / off
- To change the temperature of each zone
- Optimal temperature selection
- To change how your internal light functions
- Your product will consume more energy when the light is always on.
- To lock the whole panel
- Care & Maintenance
- Cleaning your Appliance
- Power Failure
- Short Holiday
- Longer Holiday
- How To Replace The Charcoal Filter
- Installation
- Installation Requirements
- Unpacking
- Installing your Wine Cabinet
- Installing the stainless steel handle
- Installing the appliance (Fig. 4.2 & Fig. 4.3)
- Stability fixing
- Before using for the first time
- Levelling feet
- Adjustable feet
- Climate Class
- Fitting an external plinth (ventilation)
- Reversible door (single door only)
- Adjusting your door
- Electrical Connection
- Before making any electrical connections, ensure that:
- Plug replacement (UK & Ireland only)
- Green & Yellow - Earth 'E'
- Product Support
- Declaration of conformance to product standards
- Warranty / After Sales Service
- Troubleshooting
- Circuit Diagrams
- Technical Specification
- AGA RANGEMaster
Brand : RANGEMASTER
Model : RDZ6046SS
Category : Wine cellar