
JT1645T - Water purifier MIDEA - Free user manual and instructions
Find the device manual for free JT1645T MIDEA in PDF.


User questions about JT1645T MIDEA
0 question about this device. Answer the ones you know or ask your own.
Ask a new question about this device
Download the instructions for your Water purifier in PDF format for free! Find your manual JT1645T - MIDEA and take your electronic device back in hand. On this page are published all the documents necessary for the use of your device. JT1645T by MIDEA.
USER MANUAL JT1645T MIDEA

Please read the Manual carefully before use.
The Manual shall be kept in good custody for later reference
1. Precaution
1-1. Safety Issues
Please note the following brief icons and rules for safe use of this product
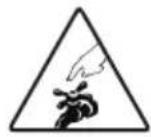
Troubleshooting
When the machine fails, please disconnect the power and water source immediately

Maintenance
Never remove the parts on the machine to avoid leakage or damage
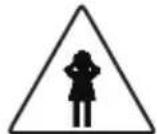
Avoid contact with children
Never have the machine operated by a child
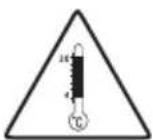
Temperature
Please use the product in a dry place with the temperature of 4-38°C
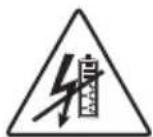
Electricity prevention
To avoid leakage of electricity.

Accessories and filters
To maintain the normal operation of the machine, be sure to use accessories and filters supplied by original company
Emergency call
For any help, please call the local sale service center or the national service hotline
Correct repair service
This machine can only be repaired by qualified personnel designated by this company
Avoid direct sunshine
Do not install the machine in a place exposed to direct sunshine
Anti-freeze
Never store or expose the product in an environment less than 0°C
- This appliance is not intended for use by persons (including children) with reduced physical, sensory or mental capabilities, or lack of experience and knowledge, unless they have been given supervision or instruction concerning use of the appliance by a person responsible for their safety.
- Children should be supervised to ensure that they do not play with the appliance.
- If the power cord is damaged, it must be replaced by the manufacturer, its service agent or similarly qualified persons in order to avoid a hazard.
- Do not store explosive substances such as aerosol cans with a flammable propellant in this appliance.
- This appliance is intended to be used in household and similar applications such as staff kitchen areas in shops, offices and other working environments; farm houses and by clients in hotels, motels and other residential type environments; bed and breakfast type environments; catering and similar non-retail applications.
- WARNING: To avoid a hazard due to instability of the appliance, it must be fixed in accordance with the instructions.
• The appliance must not be immersed. - This machine is applicable to the water environment with TDS value less than 250 in case of the high water hardness lead to incrustation even breakdown of the hot tank.
1. Precaution
- WARNING: To avoid a hazard due to instability of the appliance, it must be fixed in accordance with the instructions.
• The appliance must not be immersed
• The appliance must not be cleaned by a water jet. - WARNING: Do not operate the UV Electric ballast when it is removed from the appliance enclosure.
• This appliance contains a UV Electric ballast. - Unintended use of the appliance or damage to the housing may result in the escape of dangerous UV-C radiation. UV-C radiation may, even in little doses, cause harm to the eyes and skin.
- Appliances that are obviously damaged must not be operated. the replacement of the UV Electric ballast by the user is not allowed, the appliance is to be supplied through a residual current device (RCD) having a rated residual operating current not exceeding 30 mA.
38°C ±1°C on appliances of subtropical (ST) class.
43^ C ±1°C on appliances of tropical (T) class.
1-2. Packing List
| Packing box | Water Purifier (1 set) 1/4"PE pipe (3m) |
| Materials bag | User's Manual (1copy) |
| Materials bag | 6/8 " -2/8 " connector " (1pc) |
2. Your Direct Drinking Water Purifier
2-1. Part Name of Water Purifier
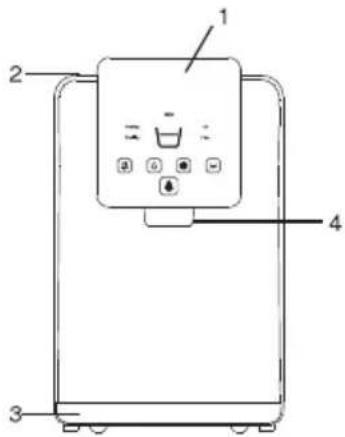
(FRONT)
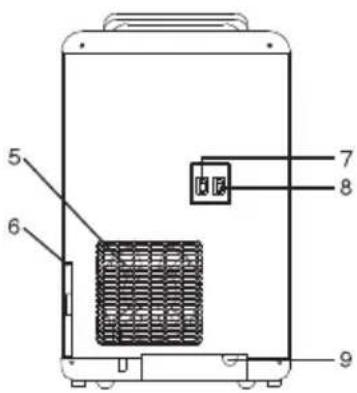
( REAR)
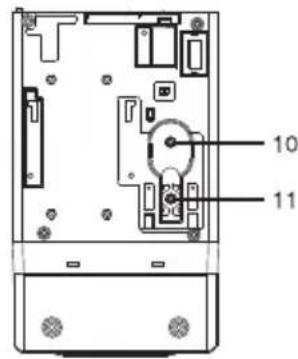
(BOTTOM)
| No. | PART NAME | No. | PART NAME |
| 1 | Display screen | 7 | Cooling switch |
| 2 | Top cover | 8 | Heating switch |
| 3 | Drip tray | 9 | Water inlet |
| 4 | Water outlet | 10 | Cold water drainpipe lid |
| 5 | Fan | 11 | Hot water drainpipe lid |
| 6 | Dust gauze |
Note: Please use the product in a place with temperature of 4-38°C and relative humidity less than 90%.
* To enhance product performance, product parts may be changed without notice. The object shall prevail.
2. Your Direct Drinking Water Purifier
2-2. Model and Major Parameters
| Model | 780165 |
| Rated Power | 555W |
| heating Power | 420W |
| Cooling Current | 1.0A |
| Rated pure water flow | 1.2L/min(0.3MPa) |
| Hot water capacity | 4 L/h(≥85°C) |
| Cold water capacity | 3 L/h(≤10°C) |
| Applicable environment | 4-38°C humidity ≤90% |
| Applicable water pressure | 0.18-0.4MPa |
| Applicable water | Tap water |
| TDS≤350ppm | |
| Stage 1 | Carbon block & UF membrane Filter |
| Product size | 260(W)x435(D)x425(H)mm |
| Packing size | 322(W)x514(D)x510(H)mm |
| Net weight | 13.5 kg |
| Gross weight | 14.8 kg |
2-3. Product Features
1.3 Temperature Selection.
2. Replace filter indicator.
3. Fixed water volume function. Hands free dispensing.
4. Carbon block & UF membrane Filter reduces odor, chlorine, smell, organism, bacteria.
5. Sediment filter eliminates rust and dirt particles.
6. High-efficiency and low noise compressor for cooling.
2. Your Direct Drinking Water Purifier
2-5. Working Principle
- Flowchart of water generation
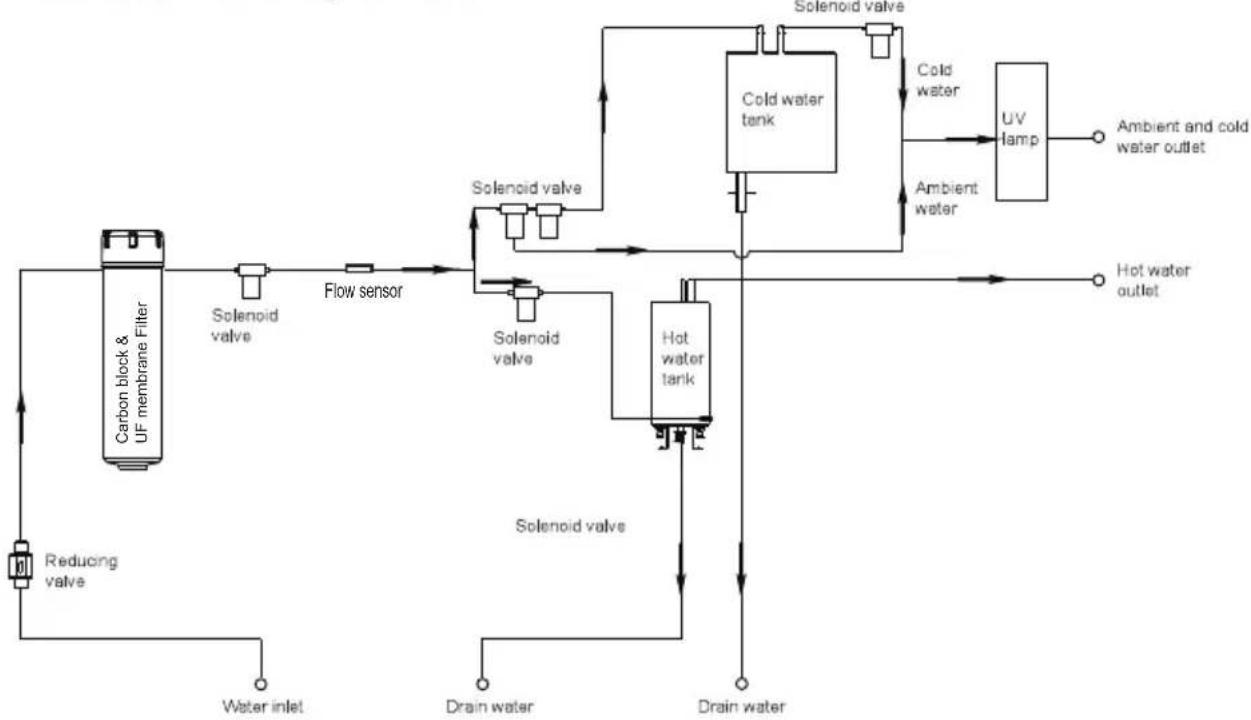
flowchart
graph TD
    A["Carbon block & UF membrane Filter"] --> B["Solenoid valve"]
    B --> C["Flow sensor"]
    C --> D["Solenoid valve"]
    D --> E["Solenoid valve"]
    E --> F["Solenoid valve"]
    F --> G["Solenoid valve"]
    G --> H["Solenoid valve"]
    H --> I["Solenoid valve"]
    I --> J["Solenoid valve"]
    J --> K["Cold water tank"]
    K --> L["Cold water"]
    K --> M["Ambient water"]
    M --> N["UV lamp"]
    N --> O["Ambient and cold water outlet"]
    K --> P["Hot water outlet"]
    P --> Q["Drain water"]
    Q --> R["Water inlet"]
    R --> S["Reducing valve"]
    S --> T["Reducing valve"]
- Circuit diagram
CIRCUIT DIAGRAM
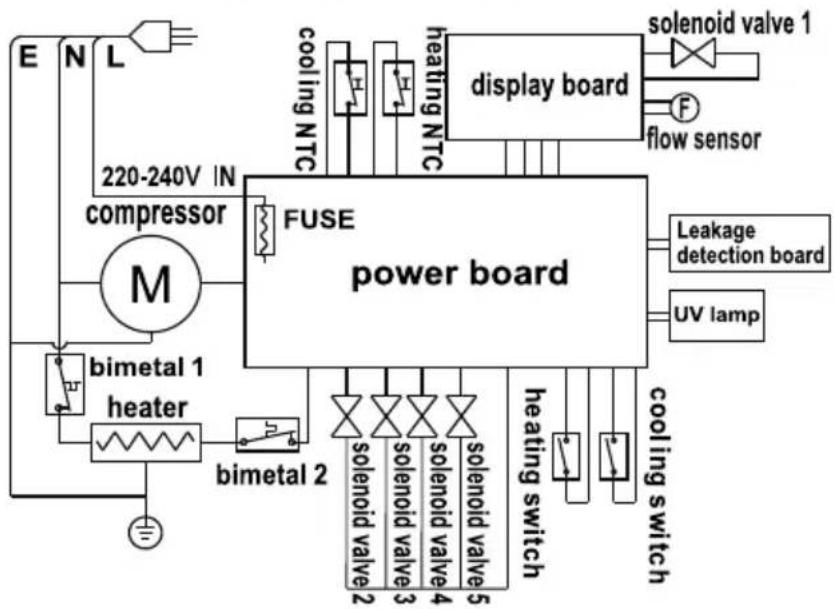
flowchart
graph TD
    A["220-240V IN compressor"] --> B["FUSE power board"]
    C["bimetal 1 heater"] --> B
    D["bimetal 2"] --> B
    E["displays board"] --> F["solenoid valve 1"]
    F --> G["flow sensor"]
    H["UV lamp"] --> I["Leakage detection board"]
    I --> J["cooling switch"]
    K["heating NTC"] --> L["coiling NTC"]
    M["solenoid valve 2"] --> N["solenoid valve 3"]
    O["solenoid valve 4"] --> P["solenoid valve 5"]
    Q["heating switch"] --> R["solenoid valve 2"]
    S["cooling NTC"] --> T["solenoid valve 3"]
    U["cooling NTC"] --> V["solenoid valve 4"]
    W["solenoid valve 5"] --> X["solenoid valve 3"]
2. Your Direct Drinking Water Purifier
Filter Function Introduction
| Stage | Filter | Function |
| Stage 1 | Carbon block & UF membrane Filter | Absorb unusual colors and odors, Remove residual chlorine and organic substances in water.Remove bacteria, iron rust, colloids and impurities in water. |
3. Use Guide and Maintenance
Please cut off water source before replacing filters. Never plug filters in water running state.
3-1. Guidance on Unpacking and Installation
- Open the top of the packing case, take out the top foam and its accessories.
- Put the accessories aside.
- Unpack the product, install the water collector.
- Before installation, To study the use of the quick connector.
Connect the tubing
The system includes push-in fittings for quick tubing connection. Review the following instructions before connecting the tubes in the next step.
Cut tube to length:
1). Use a sharp cutter or knife to cut the end of tubing. Tube should be cut flat.
2). Inspect the end (about 30 mm) of the tubing to be sure there are no nicks, scratches or other rough spots. If needed, cut the pe tube again.
Connect tubes:
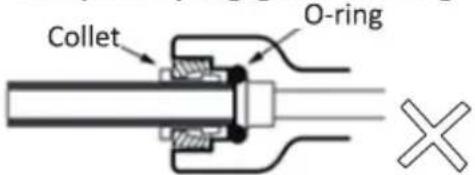
1). Push tube through collet until it engages the o-ring. Continue pushing the tube into the O-ring to the end of the fitting. A common mistake is that the tube is not pushed to the end. This will lead to future leaks. When a 3/8" tubing is fully engaged, 20 mm of the tube has entered the fitting (Figure 4).
2). We recommend you to use the tube from the manufacturer, its agency or equal qualified personnel, be sure it is of high quality, exact size and roundness with a smooth surface.
Tube partially engaged with fitting
Tube fully engaged with fitting
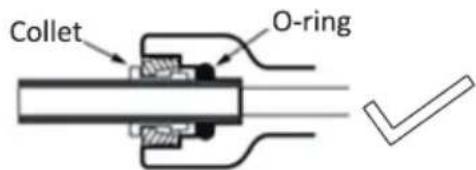
Figure 4
Disconnect tube:
1). Push the collet inward with finger tips and hold it.
2). Pull the tube out.
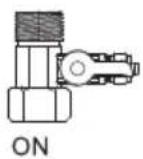
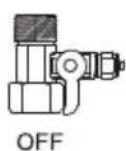
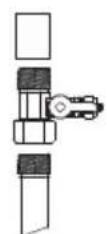
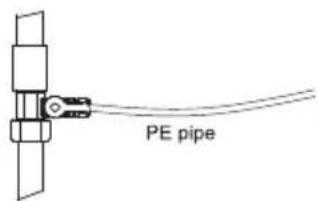
- Take out the quick joint, and install it on the water pipe.
(1)
(2)
3. Use Guide and Maintenance
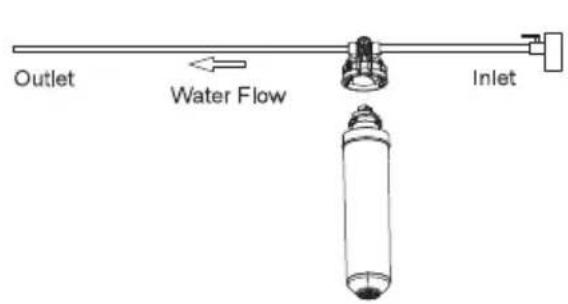
- Filter should be cleaned for the first use. Remove the top cover, take out the filter and then connect to PE tube(Follow the indication on the filter head and insert the inlet and outlet). Turn on the faucet to flush the filter for 10 minutes, and then install it back to the machine.
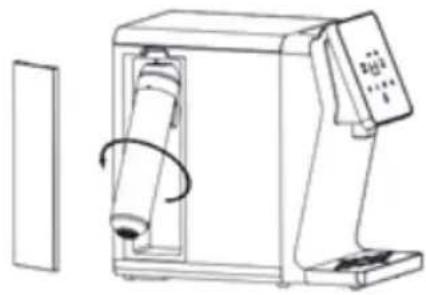
natural_image
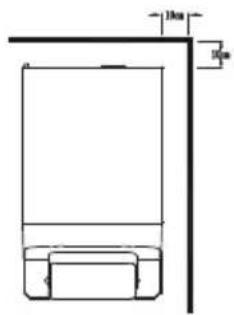
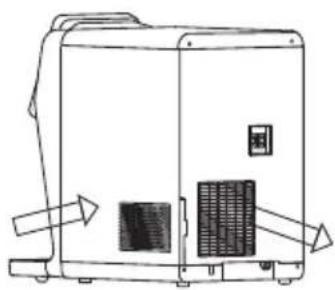
Technical line drawing of a mechanical device with a rotating shaft and control panel (no text or symbols)- When installing the machine, please pay attention to the installation dimension in case of the blocking of air inlet and outlet.
natural_image
Line drawing of a portable electronic device with ventilation slots and control panel (no text or symbols)- Drip tray cover must be properly placed inside the machine. No suspending in midair in case of falling off.
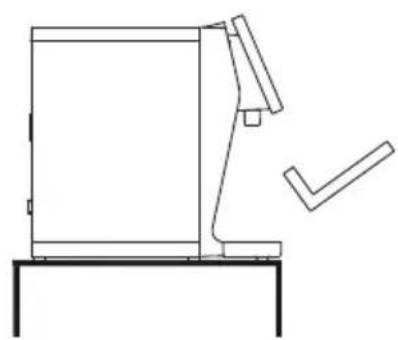
natural_image
Line drawing of a mechanical device with a bracket and handle, showing a checkmark (no text or symbols)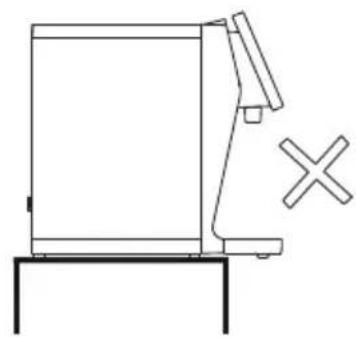
natural_image
Simple line drawing of a mechanical device with a cross mark indicating no text or symbols on the device itself.3. Use Guide and Maintenance
- Take out the pin of the quick joint at the rear of the product's base plate, and then take out the blue plug.
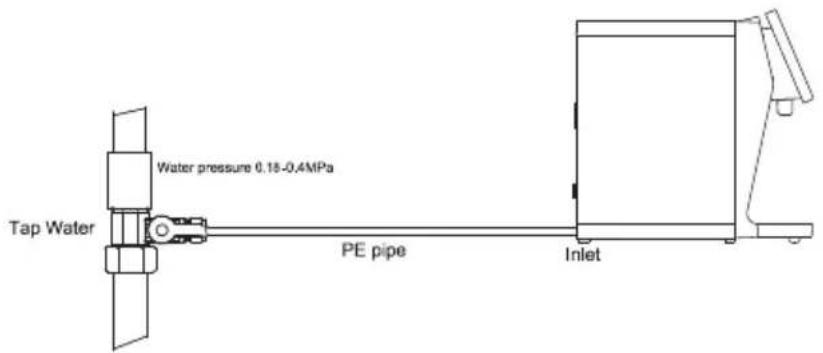
-
Insert the water inlet PE pipe in the quick joint, and tighten the pin.
-
The power cord of water dispenser should be plugged into the switch socket with safety grounding
-
When installing filter and replace filter please turn off the water and power supply before installation and replacement.
-
After installation, plug on the machine, and it can be used normally.
3-2. Using The Product
Start up
-
Power on, start to use the product.
-
When using it for the first time, press the cold water output and hot water output buttons till discharging cold water and hot water from the faucet, ensure to remove the air from the hot tank and cold tank, to prevent dry heating and dry cooling.
-
After step 2, then turn on the heating and cooling switches on the rear side according to the actual requirement, start the heating and cooling functions, the green one is the cooling switch and the red one is the heating switch.
3. Use Guide and Maintenance
Control Panel
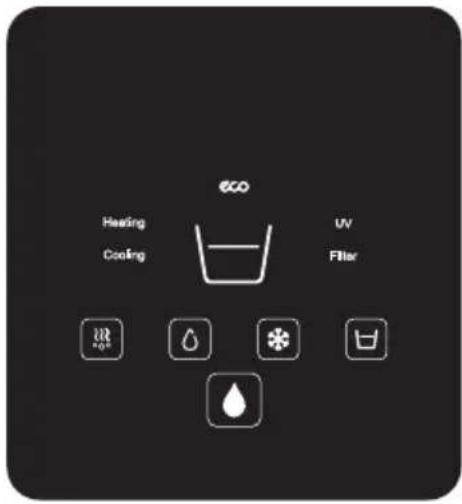
| Icon | Decription | Icon | Decription |
 | Hot Water Button.Touch the Hot Water Button, this icon lights up, It means you Select the hot water. | Heating | Heating IndicatorWhen heating, the heating icon is on, after heating or when the product is not heating, it is off. |
| [XYZD] | Ambient Water Button.Touch the Ambient Water Button, this icon lights up, It means you Select the ambient water . | Cooling | Cooling IndicatorWhen cooling, the cooling icon is on, after cooling or when the product is not cooling, it is off. |
| [WC4V] | Cold Water Button.Touch the Cold Water Button.,this icon lights up, It means you Select the cold water. | UV | UV Working IndicatorWhen the UV sterilizing is enabled, UV icon turns on. |
| [X45Y] | Quantitative Water Output Button.Touch the Quantitative Water Output Button, this icon lights up, It means you Select the the quantitative water output function. | Filter | Filter Life IndicatorWhen the filter life is not expired, the indicator is on; after the filter life expires, the indicator flashes. |
 | Taking Water ButtonPress this button to get water. | After power on, the Cup icon keeps on. | |
 | ECO Button.Touch to turn on / off Eco Mode in which the heating and cooling function is disabled and energy is being saved. |
Operation Requirements Instructions
1 taking water function
1.1 Water output after selecting water temperature
Press the water temperature button, corresponding indicator turns on, within 5s, press the "Taking Water button" to output water, during the water output process, press the "Taking Water" button again, the indicator turns off, and the product stops outputting water. After stopping water, the water temperature selection automatically switches to "Ambient Water" 5s later. During the water output process, the Water Temperature Selection button and the Quantitative Water Output button are not workable.
3. Use Guide and Maintenance
1.2 Quantitative water output after selecting water temperature
Select the Water Temperature button, corresponding indicator turns on, then select the Quantitative Water Output button, Quantitative Water Output indicator turns on, within 5s, press the "Taking Water" button to output water, after outputting water for 10S, the water output is automatically stopped, the Quantitative Water Output indicator turns off. During the water outputting process, press the "Taking Water" button again to stop outputting water, the Quantitative Water Output indicator turns off. After stopping water, the water temperature selection automatically switches to "Ambient Water" 5s later. During the water output process, the Water Temperature Selection button and the Quantitative Water Output button are unavailable.
2 ECO Function
Under the state that ECO function is enabled, if it detects that the light diminished, it will turn off the heating and cooling function. If it detects that the light turned bright, the heating and cooling function will be recovered automatically.
3-3. Filter Replacement Cycle
Carbon block & UF membrane Filter
6-12 month
Special hints:
The data above are for references only. It is based on 10 L per daily drinking water.
The specific cycle for replacement of filters varies with local water quality and water amount consumed.
while the "Filter" is twinkling, it indicates the filter should be changed as the schedule. After you replace new cartridges, please long press "ECO" button until "Filter" stops twinkling to reset the filter indicator.
3-4. Maintenance
- Keep this machine in a dry and cool place and avoid direct sunshine.
Never put the machine on paper or foam, which may store water and then cause electricity leakage.
Never put anything flammable beside this machine. Do not use the machine outdoors or in a Place that can be splashed by water. - For the water purifier, the installation and replacement of filters must be carried out by qualified personnel.
- In case the machine is not in use for a long time, turn off the heating switch or the cooling switch to save power.
- In case the machine is not needed for a long time, please turn off the Cooling switch and the Heating switch and taking out hot water form water outlet. Then please take off the plug, turn off the water inlet. After that, please Pull the plug and then drain off the remaining water.
3. Use Guide and Maintenance
- In case the water supply is cut off, please close the inlet water ball valve and cut off the power. After water re-supply, please open the other faucets to discharge the sediments remained in the water net and then turn on the inlet water ball valve.
- The machine must use an earthed three-pin socket and a reliable creepage protection switch.
- Never use organic solvents such as gasoline to clean the machine; strictly prohibit washing the machine with water or splashing water to the machine.
- Never turn on (off) the machine by inserting the plug into (pulling the plug out from) the socket. Never increase the length of the supply cord to avoid fire.
- If the supply cord is damaged, it must be replaced by the manufacturer or qualified person so as to avoid a hazard.
- The water source for the water purifier is civil tap water.
- Never dismantle spare parts of the machine to avoid water leakage or damage.
- Never turn the machine upside down or lean it more than 45^ when moving it so as to avoid any damage to it or any accident.
- NOTE To clean the thimerosal in the machine, take cold / hot /ambient 2.0L each 3 times before use this machine first time.
- NOTE Inactivation Cycle
- Never drink the first cup of water overnight or after a pause of more than 10 hours, drink any kind of water after discharging the first cup of water.
For the inactivation cycle of the water dispenser, although the water dispenser is running, it does not supply water - If the connection between water dispenser and water network keeps inactive for 48 hours, at least 2L of cold water should be discharging before drinking.
- If the water dispenser keeps inactive for 15-20 days, safe disinfection shall be carried out at least before drinking.
- If the water dispenser keeps inactive for more than 20-25 days, it is necessary to re-sterilize and replace the filter at least before drinking.
3. Use Guide and Maintenance
3-5. Troubleshooting
In case of failure, please carry out inspection according to the requirements below. If unresolved, please contact the local service agency.
| Failure | Cause | Solution |
| Small water flow/No hot water Heating and lights flashing | Low water pressure | Check the tap water,If water pressure is very low, please wait for the pressure return to normal and then take cold or ambient water to restart heating function. |
| Filter is blocked | Please replace the filter and then take cold or ambient water to restart heating function. | |
| Abnormal Water temperature | Over consumption of water in a short time | Just wait a moment, and water is available again |
| Power supply not put through | Switch on power supply | |
| Corresponding functions not started | Press a corresponding function key to start the function | |
| Water leakage | Pipe not connected properly | Inspect the connector to connect the pipe properly |
| Water pipe and PE pipe bursting | Replace the water pipe and PE pipe | |
| “♂” light flashing | there should be leakage. | check the PCB on the base plate.Repair the machine and dry the PCB, and then power on again. |
| Electric leakage | The earth connection is not well connected | Use a three-pin socket with earth wire, making the machine grounded properly |
| Noisy operation | Not installed steadily | Place the machine on a steady & solid surface |
| Machine fails to run | Power supply not put through | Switch on power supply |
It is a normal state that the following circumstances occur when the water purifier is used.
1. During the heating, the heating tube may generate slight noises. This is a normal state.
2. When the heating tank is being heated without water, the anti dry-burning device will disconnect automatically and can not reset by its own. The reset must be completed by a professional technician. The design is in accordance with the national safety requirements.
3. When an ambient temperature is higher, the cooling capacity may be slower, which is a normal state.
- Precaution
- 1-1. Safety Issues
- Troubleshooting
- Maintenance
- Avoid contact with children
- Temperature
- Electricity prevention
- Accessories and filters
- Emergency call
- Correct repair service
- Avoid direct sunshine
- Anti-freeze
- 1-2. Packing List
- Your Direct Drinking Water Purifier
- 2-1. Part Name of Water Purifier
- 2-3. Product Features
- 2-5. Working Principle
- Use Guide and Maintenance
- Please cut off water source before replacing filters. Never plug filters in water running state.
- 3-1. Guidance on Unpacking and Installation
- Connect the tubing
- Connect tubes:
- Disconnect tube:
- 3-2. Using The Product
- Start up
- taking water function
- Water output after selecting water temperature
- Quantitative water output after selecting water temperature
- ECO Function
- 3-3. Filter Replacement Cycle
- Special hints:
- 3-4. Maintenance
- 3-5. Troubleshooting
Brand : MIDEA
Model : JT1645T
Category : Water purifier