Fobbles F8 Pro - Effects machine Froggy's Fog - Free user manual and instructions
Find the device manual for free Fobbles F8 Pro Froggy's Fog in PDF.


| Product Type | Fog Bubble Machine |
| Brand | Froggy's Fog |
| Model | Fobbles F8 Pro |
| Machine Dimensions | 21 x 18.5 x 22 in (53.3 x 47.0 x 55.9 cm) |
| Flight Case Dimensions | 25.2 x 23.2 x 28.5 in (64.0 x 58.9 x 72.4 cm) |
| Net Weight | 88.2 lb (40.0 kg) |
| Gross Weight | 133.3 lb (60.5 kg) |
| Power Input | AC 110-120V, 50/60 Hz |
| Power Consumption | 1600 W |
| Heat-Up Time | Approx. 3.5 min |
| Max Fog Output Volume | Approx. 6000 ft³/min (170 m³/min) |
| Max Output Height / Distance | 30 ft (9.1 m) |
| Bubble Fluid Tank Capacity | 2.4 gal (9 L) |
| Fog Fluid Tank Capacity | 1.3 gal (5 L) |
| Output Control Methods | On-device LCD control (menu, volume, timer), DMX (4 channels via 3/5-pin) |
| Mounting Options | Floor (horizontal) or rigged with safety cables |
| Recommended Fluids | Froggy's Fog Fobbles Bubble Liquid and Fog Liquid |
| Safety Features | Resettable breaker (15A, 250V), grounded circuit required, thermal protection |
| Maintenance Interval | Bubble system rinse after each use; fog heater core every 40 h of use |
| Warranty | 2-year limited (US only, manufacturing defects) |
| Included Accessories | Power cord, user manual, flight case |
Frequently Asked Questions - Fobbles F8 Pro Froggy's Fog
User questions about Fobbles F8 Pro Froggy's Fog
0 question about this device. Answer the ones you know or ask your own.
Ask a new question about this device
Download the instructions for your Effects machine in PDF format for free! Find your manual Fobbles F8 Pro - Froggy's Fog and take your electronic device back in hand. On this page are published all the documents necessary for the use of your device. Fobbles F8 Pro by Froggy's Fog.
USER MANUAL Fobbles F8 Pro Froggy's Fog

F8 Pro Fog Bubble Machine
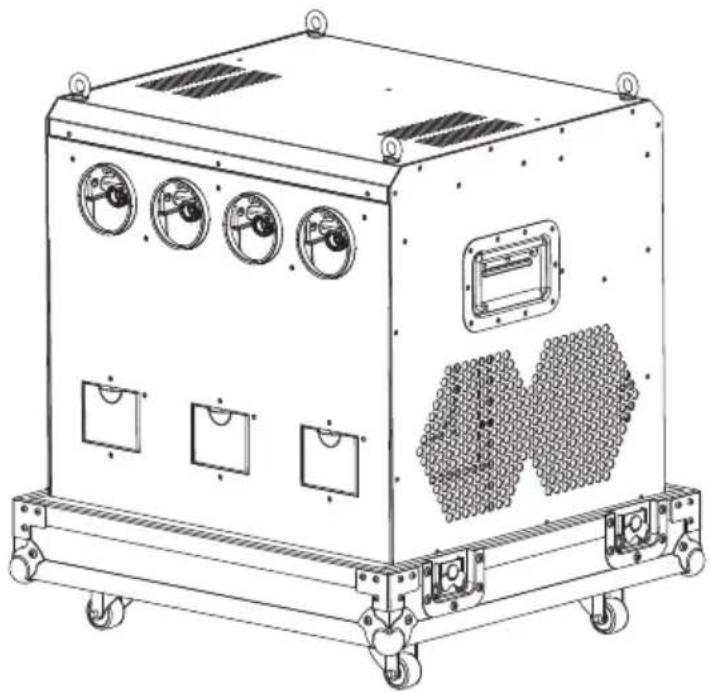
Table of Contents
1 BEFORE YOU BEGIN....3
1.1 What Is Included ....3
1.2 Unpacking Instructions....3
1.3 Symbols 3
1.4 Disclaimer....3
1.5 Safety Notes....3
1.5.1 Personal Safety 3
1.5.2 Mounting and Rigging 4
1.5.3 Power and Wiring 4
1.5.4 Installation Instructions 4
2 INTRODUCTION....5
2.1 Description....5
2.2 Features....5
2.3 Product Overview ....5
3 TECHNICAL SPECIFICATIONS ....6
4 SETUP....6
4.1 AC Power 6
4.2 AC Plug....7
4.3 Reset Breaker....7
4.4 DMX Linking....7
4.5 Mounting....7
4.5.1 Orientation....7
4.5.2 Rigging....8
5 OPERATION....8
5.1 Preparing for Operation 8
5.2 On-device Control Mode & Operation 8
5.2.1 Menu Map....9
5.3 DMX Mode & Operation 10
5.3.1 DMX Working Page 10
5.3.2 DMX Channel Assignments and Values.... 10
6 TECHNICAL INFORMATION ....11
6.1 Maintenance....11
6.2 Storage 12
7 WARRANTY....12
1 BEFORE YOU BEGIN
1.1 What Is Included
• FOBBLES F8 PRO Fog Bubble Machine × 1
- Power Cord × 1
- User Manual × 1
- Flight Case x 1
1.2 Unpacking Instructions
Carefully unpack the product immediately and check the container to make sure all the parts are in good condition. If the box or the contents (the product and included accessories) appear damaged from shipping, or show signs of mishandling, notify the carrier or dealer/seller immediately. In addition, keep the box and contents for inspection.
1.3 Symbols
| Symbol | Meaning |
 | CautionCritical installation, configuration, or operation information. Not following these instructions may make the product not work, cause damage to the product, or cause harm to the operator. |
 | ImportantImportant installation or configuration information. Failure to comply with this information may keep the product from working correctly. |
 | InformationUseful information. |
1.4 Disclaimer
The information and specifications contained in this User Manual are subject to change without notice. FROGGY'S FOG assumes no responsibility or liability for any errors or omissions and reserves the right to revise or to create this manual at any time.
Copyright © 2021 Froggys Fog. All rights reserved.
1.5 Safety Notes
Please read the following safety notes carefully before working with the product. The notes include important safety information about installation, usage, and maintenance.
1.5.1 Personal Safety
• Always connect the product to a grounded circuit to avoid the risk of electrocution.
• During heating up and operation, the housing will be hot. Avoid contact.
- The product is very hot during operation, and it remains hot for a long time after operation has stopped. Do not touch the products nozzle.
- Never drink fog or bubble liquid. If it is ingested, call a doctor immediately for any discomfort. If liquid comes in contact with skin or eyes, rinse thoroughly with water.
1.5.2 Mounting and Rigging
• To prevent risk of fire or shock, do not expose the product to rain or moisture.
- CAUTION: When transferring product from extreme temperature environments, (e.g., cold truck to warm humid ballroom) condensation may form on the internal electronics of the product. To avoid causing a failure, allow product to fully acclimate to the surrounding environment before connecting it to power.
- Do not mount the product on a flammable surface (linoleum, carpet, wood, paper, carton, plastic, etc.).
- Do not use in a confined space. Always install the product in a location with adequate ventilation, at least 20 in (50 cm) from adjacent surfaces.
- Be sure that no ventilation slots on the product's housing are blocked.
- when hanging, please use the safety cables to fix four safety loops on the top cover and two handles on side cover.
1.5.3 Power and Wiring
- Always make sure that the voltage of the outlet to which you are connecting the product is within the range stated on the decal or rear panel of the product.
- Make sure the power cord is not crimped or damaged.
- Do not connect the machine to a dimming controller or rheostat.
- Never disconnect the product from power cord by pulling or tugging on the cord.
- To eliminate unnecessary wear and improve its lifespan, during periods of non-use completely disconnect the product from power via breaker or by unplugging it.
1.5.4 Installation Instructions
- Do not operate this product if you see damage to the housing or cables. Have the damaged parts replaced by an authorized technician before resuming operation.
• Make sure there are no flammable materials close to this product while it is operating. - Do not cover or plug the output nozzle during operation.
- Do not cover the ventilation slots when operating to avoid internal overheating.
- Wipe up unspent fluid immediately. Moisture – also fluid – can destroy the electronic components.
- Never carry the product by the power cord or any moving part. Always use the handles.
• The maximum ambient temperature is 104\ °F ( 40\ °C ). Do not operate the product at higher temperatures. - Drain the tank before transporting the product to ensure spill free transportation. Bubble and fog fluid tanks shall be used for their respective fluid only.
• Always disconnect the product from the power source before cleaning. - This product contains no user-serviceable parts. Any reference to servicing in this User Manual will only apply to properly trained, certified technicians. Do not open the housing or attempt any repairs which can lead to damage or malfunction.
• In the event of a serious operating problem, stop using the product immediately.
• Use only FROGGY'S FOG brand fluid. Fobbles premium bubble fluid and Fobbles quick dissipating fog fluid are recommended. - Only specifically designed water-based scent additives may be added to the fog fluid. Never add flammable liquids of any kind (oil, gas, non-application specific perfumes). Pay attention to all warning labels and instructions printed on the exterior of your machine.
2 INTRODUCTION
2.1 Description
FROGGY'S FOG FOBBLES F8 PRO is a newly launched professional bubble fog machine for big stages and event halls. The 4-nozzle design can help produce a huge number of bubbles filled with fog. The innovative and patented Jet-design ensures fog is encapsulated inside the bubbles, while avoiding ambient fog dispersing in the air. The height and distance of the fog bubble can be adjusted by adjusting the air outlet angles. Bubble fluid is stored and sealed in the tank minimizing contamination and ensuring a high quality show.
2.2 Features
• Innovative Jet design, create massive amount of fog filled bubbles with low amounts of unencapsulated fog.
• Application designed heating system releases the fog evenly and consistently.
• Three fans with adjustable deflectors make the fog bubble fly higher and further.
• Built-in backlit LCD control, 3-pin and 5-pin DMX control and timer control.
• Large fluid tanks offer a long running time at full output.
Note: The actual effect may be affected by the ambient environment.
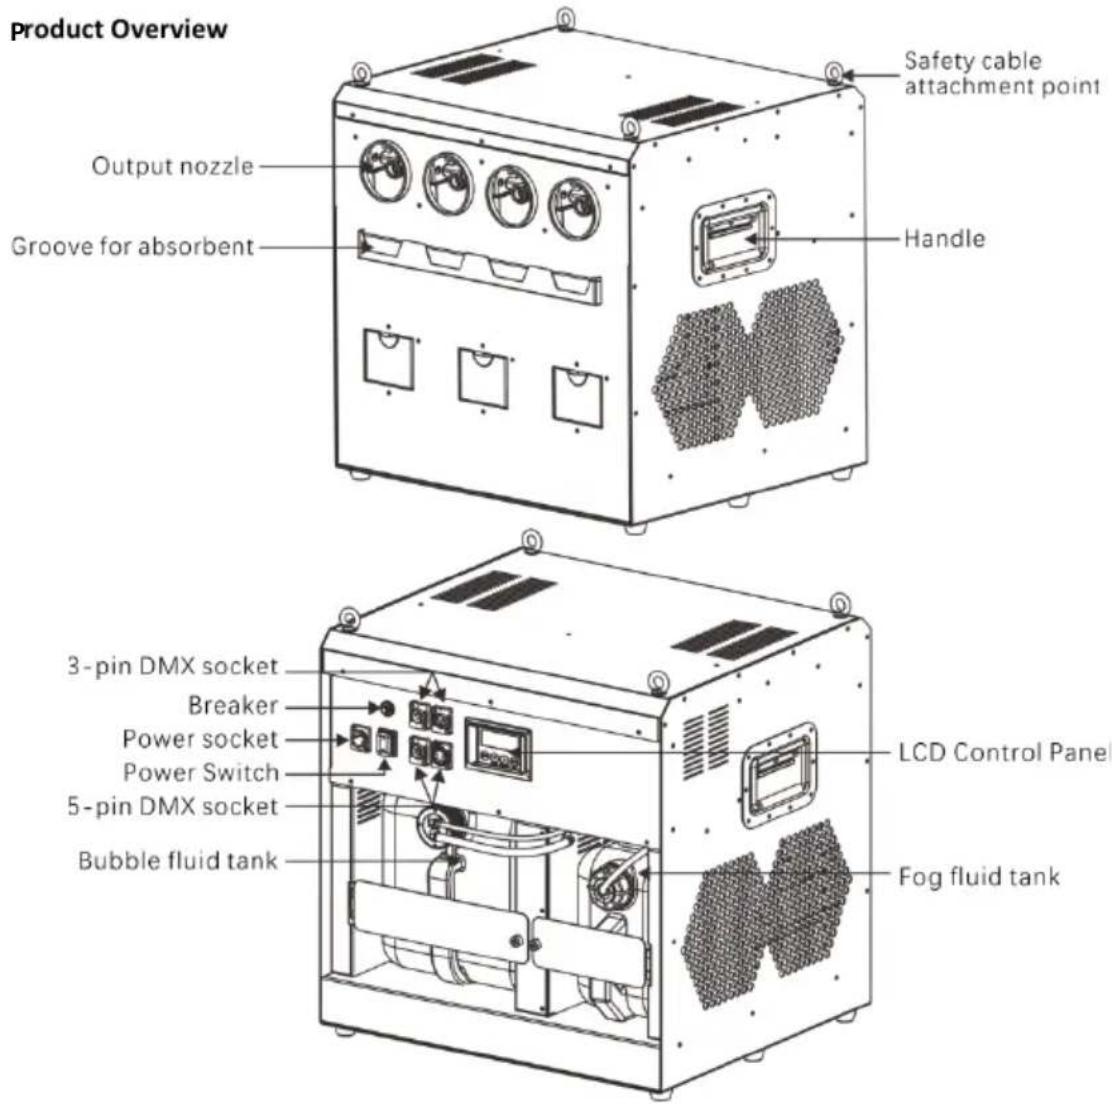
2.3 Product Overview
3 TECHNICAL SPECIFICATIONS
| AC Power | Input Voltage & Rate | AC 110-120 V, 50/60 Hz |
| Current Limiter Type | Breaker | |
| Current Limiter Specifications | 15A, 250 V | |
| Total Power Consumption | 1,600 W | |
| Heating | Heat Up Time | Appr. 3.5 min |
| Capacity | Bubble Fluid Tank Capacity | 2.4 Gal / 9 L |
| Fog Fluid Tank Capacity | 1.3 Gal / 5 L | |
| Output | Adjustable Output | √ |
| Max Fog Output Volume | Appr. 6,000 CFM | |
| Max Output Height | Appr. 30 ft. | |
| Max Output Distance | Appr. 30 ft. | |
| Fog Fluid Consumption (100% Output) | Appr. 350 min/gal | |
| Bubble Fluid consumption (100% Output) | Appr. 48.1 min/gal | |
| Placement & Mounting | Horizontal | √ |
| Inclined | × | |
| Sidelong | × | |
| Hang Upside Down | × | |
| Rigging & Trussing | √ | |
| Control | On-device Manual Control | LCD control board |
| Wireless Control | × | |
| Wired Control | DMX | |
| Control Protocol | DMX512 | |
| DMX Channel Range | 4 | |
| Fluid | Fluid | Fobbles Bubble Liquid and Fobbles Fog Liquid |
| Weight & Dimensions | Net Weight | 88.2 lbs. |
| Gross Weight | 133.3 lbs. | |
| Machine Dimensions | 21 / 18.5 / 22 in. | |
| Flight Case Dimensions | 25.2 / 23.2 / 28.5 in |
4 SETUP
4.1 AC Power
The Fobbles F8 Pro machine has an input voltage of AC 110 V-120 V, 50/60 Hz.
To determine the product's power requirements (circuit breaker, power outlet, and wiring), use the current value listed on the label affixed to the product's back panel, or refer to the product's specifications chart. The listed current rating indicates the product's average current draw under normal conditions.

Always connect the product to a protected circuit (circuit breaker or fuse). Make sure the product has an appropriate electrical ground to avoid the risk of electrocution or fire.

Never connect the product to a rheostat (variable resistor) or dimmer circuit, even if the rheostat or dimmer channel serves only as a 0 to 100% switch.
4.2 AC Plug
The FOBLES F8 PRO Supper Bubble Fogger comes with a power input cord terminated with a lockable power connector on one end.
If the power input cord that came with your product has no plug, or if you need the change the plug, use the table below to wire the new plug:
| Connection | Wire (U.S.) | Wire (Europe) |
| AC Live | Black | Brown |
| AC Neutral | White | Blue |
| AC Ground | Green/Yellow | Green/Yellow |
4.3 Reset Breaker
- The unit is equipped with a resettable breaker. If the breaker trips, the unit will be disconnected from the power.
To Reset:
- Disconnect the machine from the power.
- Wait for about 15 minutes till the unit cools down.
• After that, manually press the button of the breaker to reset it.
- Reconnect the machine to the power outlet and continue to use it as recommended.
4.4 DMX Linking
You can link the machine to a DMX controller using a 3- or 5-pin DMX connection. If using other DMX-compatible products with this product, you can control each individually with a single DMX controller. Instructions for connecting and configuring this product for DMX operation are listed further in the manual.
4.5 Mounting
Before mounting the product, read and follow the safety recommendations indicated in the Safety Notes.
4.5.1 Orientation
For safety reasons, make sure the unit is well mounted through bracket and with safety cable. Also make sure there is adequate room for ventilation, configuration, and maintenance.

Do not mix bubble fluid and fog fluid.

4.5.2 Rigging
Using the following general guidelines when mounting this product:
- Before deciding on a location for the product, make sure there is easy access to the product for maintenance and programming purposes.
- Make sure that the structure or surface onto which you are mounting the product can support the product's weight (see the Technical Specifications).
- When mounting the product on the floor, make sure that the product and cables are away from people and vehicles.
5 OPERATION
5.1 Preparing for Operation
• After checking that all the parts are intact and complete, position the machine on flat surface.
• Withdraw the fluid tanks from their compartments and remove the caps. Add bubble fluid and fog fluid to their respective tanks.
- Verify that the plastic hoses attached to the cap are in place and in good condition without crimps.
• Always connect the product to a grounded circuit. Before powering on, make sure it is supplied with the rated voltage.
- Turn on the machine, and "Warming up" shows on the display during the heating-up process. After approx. 3 minutes, the display changes to "Ready to work" when the machine finishes heating.
5.2 On-device Control Mode & Operation
To access the control panel functions, use the four buttons located underneath the LCD display.
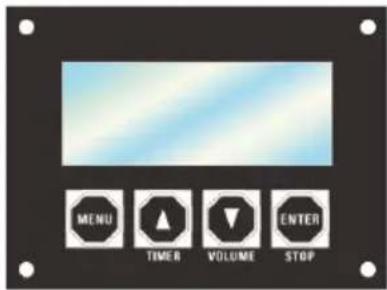
| Button | Function |
| MENU | Switch menu pages to select a function |
| ▲TIMER | Increases the numeric value of current functionTrigger TMER output mode |
| ▼ VOLUME | Decreases the numeric value of current functionTrigger manual VOLUME output mode |
| ENTER | Save settingsSTOP turns the fog output off |
5.2.1 Menu Map
| Display | Description | Parameter Range | |
| Standby page | Fobbles F8 Pro Version XX | Firmware Information | |
| Fobbles F8 Pro AC-120V 60Hz | Voltage Information | ||
| Heating Up >>>>>>>>> | The unit is heating. | ||
| Ready FOBBLES F8 PRO | After about 3 minutes heating, the unit is ready to emit fog. | ||
| Setting Pages | Fog Output 100% | Press ▲ and ▼ button to set fog level in VOLUME mode. | 1-100% |
| Bubble Output ON | Press ▲ and ▼ button to set bubble function in VOLUME mode. | ON/OFF | |
| Fan Speed 100% | Press ▲ and ▼ button to set fan speed in VOLUME mode. | 1-100% | |
| Timer Interval 600s | Press ▲ and ▼ button to set interval under TIMER mode. | 5-600s | |
| Timer Duration 300s | Press ▲ and ▼ button to set duration under TIMER mode. | 5-300s | |
| DMX Address 512 | Press ▲ and ▼ button to set DMX starting address. | 1 - 512 | |
| Bubble Clean Mode OFF | Press UP or DOWN to set Bubble cleaning mode ON/OFF. (When cleaning mode is ON, it will override all the other functions. Default cleaning time is 1 minute without turning of the mode manually.) | ON/OFF | |
| Working Status Page | Interval 600S FOBBLES F8 PRO | This page shows remaining interval when the unit is working in TIMER mode. | |
| Duration 300S FOBBLES F8 PRO | This page shows remaining duration when the unit is working in TIMER mode | ||
| Fog Output 100% Bubble ON | This is the page shows when the unit is working in VOLUME mode. Press ▲ and ▼ button to set fog level in VOLUME mode. | ||
| Error Status Page | Heater Failure Contact Service | The fog fluid heater will require service. |
5.3 DMX Mode & Operation
FOBBLES F8 PRO Super Bubble Fogger works with a DMX controller.
- Connect the product to a suitable power outlet.
- Turn the product on.
- Connect a DMX cable from the DMX output of the DMX controller to the DMX input socket on the product.
5.3.1 DMX Working Page
 | Pressing ▲ or ▼ to set the DMX starting address | 1 - 512 | |
| Standby and setup page |  | When setting the DMX starting address, the number of channels (4) occupied by the DMX mode must be considered. If the starting address is too high, some channels may not be controlled.In DMX mode, each machine responds to the control of the DMX controller through its own unique starting address. Machines with the same starting address will be synchronized accordingly. | |
 | When connected with DMX controller and receiving DMX signal, the LCD display will always show current DMX starting address which can be adjusted by pressing ▲ or ▼. | ||
5.3.2 DMX Channel Assignments and Values
FOBBLES F8 PRO Bubble Fogger has 4 DMX channels and can be connected by 3-pin or 5-pin DMX sockets. Set the DMX start address within the range of 001-512.
| Channel | Function | Value | Description |
| 1 | Bubble Output | 0-10 | OFF |
| 11-255 | ON | ||
| 2 | Fog Output | 0-10 | OFF |
| 11-255 | Fog volume, low to high | ||
| 3 | Fan Output | 0-10 | OFF |
| 11-255 | Fan speed, low to high | ||
| 4 | Bubble Cleaning Mode | 0-10 | OFF |
| 11-255 | When Bubble cleaning mode is ON, overriding other functions |
6 TECHNICAL INFORMATION
6.1 Maintenance
Do not allow the FOBBLES F8 PRO to become clogged due to residue buildup of bubble and fog fluid. Cleaning and preventative maintenance are necessary to keep your machine running issue free. Please follow these instructions for safely cleaning of your Fobbles machine if output become noticeably decreased. The bubble mechanism should be rinsed ideally after ever use to minimize residue build up. Typical service intervals for the fog heater core are every 40 hrs. of machine use. High quality fluid is recommended by the manufacturer to lengthen the amount of time between periods of maintenance as described below.
Tools: Clean lint free cloth, coffee filter or similar fine mesh filter cloth, several plastic or glass containers (do not use metal), distilled water and Froggys Fog fluid.
The recommended cleaning procedures are as follows.
General Maintenance
- Unplug the product from power.
- Remove dust from air vents with air compressor, vacuum, or soft brush. Excessive dust, fluid residue and dirt will degrade performance and cause overheating.
- Wipe machine body clean with clean lint free cloth.
- Store the machine in a cool, dry place when not in use. Avoid freezing temperatures, high heat above 120 degrees and humid/damp locations which could cause control board electrical issues.
Fog System
- Remove the cap assembly from the fog fluid reservoir.
- Dip the fog fluid intake tube into a container with distilled water.
- Connect the product to power and allow it to warm up.
- Operate the machine on 100% fog for 10 minutes in a well ventilated area. fog will come out in the first moments, followed by steam. Do not allow the pump to run dry.
- After 10 minutes of operation, swap the fog intake tube into a container of fresh fog fluid and briefly run the machine for 2 additional minutes.
- The fog fluid in the internal plumbing of the machine acts as lubricant for the fog pump's plastic and rubber components during storage.
- Turn off the machine and empty any residual fog fluid from the fog reservoir. The fluid may be filtered into a container for reuse.
- Restore the hoses and caps. Store the unit for next use once the machine is cool to the touch.
Bubble System
-
Remove the cap assembly from the bubble fluid reservoir.
-
Dip the bubble fluid intake tube into a vessel with hot tap water and the unspent fluid return tube into a 2nd empty vessel for drainage.
- Run the Bubble Cleaning Mode through the Menu or DMX to rinse/drain the bubble system. The flush cycle is 1 minute.
- If the bubble unit will not be used within a week, drain the bubble fluid from the reservoir and rinse the tank with hot tap water.
- Restore the hoses and caps. Store the unit for next use once the machine is cool to the touch.

Test-run your FROGGY'S FOG® FOBBLES F8 PRO monthly to achieve the best performance.
6.2 Storage
Before storing the machine, clean it and empty the fluid tank.
7 WARRANTY
Save these instructions. 2 Year Limited Warranty: Valid from the date of purchase. Warranty covers manufacturing defects only and does not cover misuse or abuse of the machine. Serial number, place of purchase with dated valid receipt must be submitted at time of service. Warranty is only valid with-in the United States (Lower 48). Buyer may be responsible for shipping fees associated with repairs.

- TABLE OF CONTENTS
- 1 BEFORE YOU BEGIN....3
- 2 INTRODUCTION....5
- 3 TECHNICAL SPECIFICATIONS ....6
- 4 SETUP....6
- 5 OPERATION....8
- 6 TECHNICAL INFORMATION ....11
- 7 WARRANTY....12
- 1 BEFORE YOU BEGIN
- 1.1 WHAT IS INCLUDED
- 1.2 UNPACKING INSTRUCTIONS
- 1.3 SYMBOLS
- 1.4 DISCLAIMER
- 1.5 SAFETY NOTES
- 1.5.1 PERSONAL SAFETY
- 1.5.2 MOUNTING AND RIGGING
- 1.5.3 POWER AND WIRING
- 1.5.4 INSTALLATION INSTRUCTIONS
- 2 INTRODUCTION
- 2.1 DESCRIPTION
- 2.2 FEATURES
- 3 TECHNICAL SPECIFICATIONS
- 4 SETUP
- 4.1 AC POWER
- 4.2 AC PLUG
- 4.3 RESET BREAKER
- 4.4 DMX LINKING
- 4.5 MOUNTING
- 4.5.1 ORIENTATION
- 4.5.2 RIGGING
- 5 OPERATION
- 5.1 PREPARING FOR OPERATION
- 5.2 ON-DEVICE CONTROL MODE & OPERATION
- 5.2.1 MENU MAP
- 5.3 DMX MODE & OPERATION
- 5.3.1 DMX WORKING PAGE
- 5.3.2 DMX CHANNEL ASSIGNMENTS AND VALUES
- 6 TECHNICAL INFORMATION
- 6.1 MAINTENANCE
- GENERAL MAINTENANCE
- FOG SYSTEM
- BUBBLE SYSTEM
- 6.2 STORAGE
- 7 WARRANTY
Brand : Froggy's Fog
Model : Fobbles F8 Pro
Category : Effects machine