
Titan H4 - Effects machine Froggy's Fog - Free user manual and instructions
Find the device manual for free Titan H4 Froggy's Fog in PDF.


User questions about Titan H4 Froggy's Fog
0 question about this device. Answer the ones you know or ask your own.
Ask a new question about this device
Download the instructions for your Effects machine in PDF format for free! Find your manual Titan H4 - Froggy's Fog and take your electronic device back in hand. On this page are published all the documents necessary for the use of your device. Titan H4 by Froggy's Fog.
USER MANUAL Titan H4 Froggy's Fog
| Model | Heater Core | CFM | Warm up time |
| Titan H4 Haze Machine | 1200 Watts | 6,000 | 1 Min |
Fluid Consumption Rate @ 100%: 10.7 hrs / gal
Tank Capacity: 1 Gal
N.W.: 24 lbs
G.W.: 29 lbs
DMX Channel: 2
Empty Fluid Circuitry and Pump Protection Technology
Compatible Fluids – Froggys Fog Faze Haze™ Professional Haze Fluid Froggys Fog Beam Splitter™ Premium Haze Fluid
Important
• Always use a grounded electrical outlet. Turn off or unplug the machine when not using it.
- This Machine can be used indoors and outdoors, but it is not water-proof. Please keep it away from moisture and water. If moisture, water or fluid gets inside the housing, stop using it.
- No user serviceable and modifiable parts inside. Do not disassemble the housing and do any modification, otherwise it might cause damage to the unit or danger of burning.
- For adult use only. Fixture must be installed out of the reach of children. Never leave the unit running unattended. Keep it away from fire as well as combustible and flammable materials.
- Position the machine in well-ventilated area. Please leave about 50cm spaces surrounding the unit.
- Please do not use the fixture under high temperatures.
- Only specifically designed water based scent additives may be added to the haze fluid. Never add flammable liquids of any kind (oil, gas, non-application specific perfumes). Pay attention to all warning labels and instructions printed on the exterior of your machine.
- Use only Froggys Fog Haze Liquids. The fluid's optimal vaporization temperature coincides with the machine's heater core to give you efficient haze production and minimize incomplete vaporization.
- Never drink Haze liquid. If it is ingested, call a doctor immediately for any discomfort. If liquid comes in contact with skin or eyes, rinse thoroughly with water.
Unpacking and inspection
Immediately upon receiving the machine, carefully unpack the carton, check all content to ensure that all parts are present and have been received in good condition. If any parts appear damaged or mishandled from shipping, please do not power on the machine. Contact the manufacturer for further instruction.
What is included:
- 1 x H4 Haze machine and Hanging Bracket
- 1×W-4 Wireless Remote
3.1 x Power Cord - 1 x User Manual
Installation
- After ensuring all the accessories are intact, position the machine on a flat surface.
- Press the fluid tank's quick connector by thumb and forefinger, and take it out quickly to disconnect the tube and the fluid tank. Take out the tank and uncover the cap. Pour water based haze machine liquid into the tank carefully, then tighten the cap. Put the tank into the machine and push the connector lightly to connect the tube and fluid tank.
- Connect the Neutrik power cord to the machine. Please make sure the required and provided electricity voltage and the electricity outlet is grounded.
- Upon activating the power switch, the unit will immediately start heating up in the standby mode, during this time, the LCD panel will display "WARMING UP"
- It requires about 50S for heating up. When the process of heating up finishes, the LCD display will show "Ready To Haze"
OPERATION
Wireless remote function
Without interference, the remote can control the unit in the distance of 50m. Under DMX control, wireless control will not work.
There are two buttons on the remote: ON/OFF.
One unit can remember five different remotes. This enables each unit to be controlled separately when being used together.
Register wireless remote
When the unit is powered on, and the wireless status is ON, the LCD display will show “wireless setup”. In such case, user can register the wireless remote by pressing any button for 1s on the remote. If the LCD display flickers twice, then it is matched with the unit successfully. One unit can match with 5 different programming remotes at most. If user register the sixth one, then the memory for the first one will be erased.
If the unit has matched with 5 remotes, when powered off. It will remember those remotes, while if user tries to register another one, then the memory for the five remotes will be erased.
For example:
① If one unit needs to be registered with three remotes, during 15s after the machine is powered on, press buttons on the three remotes to register them. Make sure the LCD display flickers twice.
②If two units need to be controlled by one remoter. Power on both machine, and press button on the remote. Make sure both units' LCD display flicker twice.
2. Wireless remote control

natural_image
Close-up of a black remote control device with two 'ON' and 'OFF' buttons, attached to a metallic keychain (no text or symbols visible)Press ON button to run the unit or OFF button to stop it.
When the machine is under wireless remote control, the haze output is the one set by VOLUME OUT. For example, if the VOLUME OUT is 1%, then it will be 1% when controlled by wireless remote.
Note:
- When register the wireless remote, please make sure the LCD display flicker twice. Then release the ON button. Otherwise, it might fail.
- If the wireless remote is under OFF status, when the machine is powered on again. The LCD display will not show "wireless setup".
- Wireless remote control will inoperable if the unit is connected to DMX.
Silent Mode Function
When the unit finishes heating, keep pressing "MENU" button for 5s to enter into silent mode setting. There are three settings: Mode 1, Mode 2, Mode 3. Under this setting page, press "MENU" button to choose the ideal one. After choosing, press "VOLUME" button to activate it. To exit this function, press "STOP" button.
LCD Control
Please take note LCD Display and control is inoperable when the unit is connected to DMX.
LCD display has 4 buttons., see below:
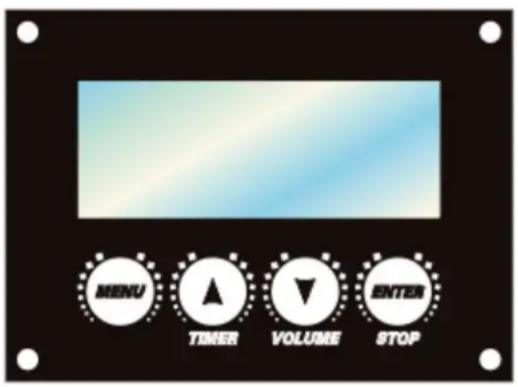
MENU: Enters/changes setting mode
UP/TIMER: Increase value; Timer mode
DOWN/VOLUME: Decrease value; haze output
ENTER/STOP: Enter or exit setting mode; STOP
Press ENTER button, there are ten pages in total, as following:
- "READY to Haze" Machine finishes heating.
- Interval Set: 5\~200s
3.Duration Set: 5\~200s - Timer out: 1%\~100% haze output under "TIMER" mode
- Volume out: 1%\~100% haze output under Volume mode (Rotary Knob Function)
- Fan speed: 1%\~100% (Rotary Knob Function)
7.DMX 512 ADD: 1\~512 - Wireless set: Wireless remote on/off
- Direct timer: Direct timer on/off after power on
Under any setting pages, press "STOP" to exit or return to the page one.
When the unit is working, press "STOP" to stop running and return to the page one.
After enter into different setting pages, press "UP" and "DOWN" to change the value.
When it is in the page one, press "TIMER" button to enter into timer mode.
DMX Control
When the unit is connected to DMX, LCD display will show the address value. In such case, press "UP" and "DOWN" button to change the address.
There are two DMX channels.
Channel 1: Fan output. 0\~5 OFF; 6\~255 increase
Channel 2: Haze output. 0\~5 OFF; 6\~255 increase
Product Overview
- Hanging Bracket
- Safety Cable Attachment
- Nozzle
- Quick connector
- fluid tank
- Fluid tank baffle
- Air vent
- Antenna
- LCD display
- 3-pin DMX
- 5-pin DMX
- Power socket
- Power switch
Not Pictured Below the LCD Display: Haze Volume and Fan Control Knobs

MAINTENANCE
Cleaning your Haze machine regularly will help reduce costly parts replacement and repair charges.
Please follow these instructions for safely cleaning your haze machine if output become noticeably decreased. High Quality fluid recommended by the manufacturer lengthens the amount of time between periods of maintenance as described below.
Tools: Clean lint free cloth, coffee filter or similar fine mesh filter cloth, plastic or glass container larger than the reservoir size (do not use metal), distilled water and Froggys Haze fluid.
- Allow the machine to cool down before handling.
- Drain any Haze solution that remains in the tank into a container through the filter mesh for reuse.
- Add distilled water to fill the Haze fluid reservoir approximately 1/3.
- Run machine for 10 minutes. Haze will come out the first few cycles, followed by distilled water vapor.
- Turn off the machine and allow to cool down, then drain the distilled water from the reservoir.
- Refill the reservoir approximately 1/3 with good quality haze solution.
- Turn the machine on, run for 10-15 minutes. Water vapor steam will come out the first few cycles, followed by Haze. Continue steaming the machine for 5-10 cycles.
- Turn off the machine and allow to cool, then wipe machine clean with clean lint free cloth.
- Leave the haze solution in the reservoir. The solution acts a lubricant and conditioner for the plastic and rubber parts in the fluid pump.
- Store the machine in a cool, dry place when not in use. Avoid freezing temperatures, high heat above 120 degrees and humid/damp locations which may cause control board failure.
- If possible, remove from storage after 6 months and operate the machine for 15 minutes or more, then repeat step 8 – 10.
Save these instructions. 2 Year Limited Warranty: Valid from the date of purchase. Warranty covers manufacturing defects only and does not cover misuse or abuse of the machine. Serial number, place of purchase with dated valid receipt must be submitted at time of service. Warranty is only valid with-in the United States. Buyer may be responsible for shipping fees associated with repairs.
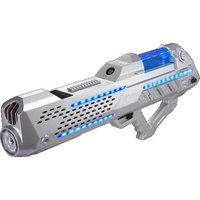

Brand : Froggy's Fog
Model : Titan H4
Category : Effects machine