
Headload - Audio Amplifier Radial Engineering - Free user manual and instructions
Find the device manual for free Headload Radial Engineering in PDF.


| Product Type | Guitar Amp Load Box and Power Attenuator with integrated JDX Direct Box and Phazer |
| Maximum Amplifier Power | 120 Watts RMS (180 Watts peak) |
| Impedance Options (Model Dependent) | 4 Ω, 8 Ω, 16 Ω |
| Attenuation Control | 6-position LOAD switch: OFF, 1% (via RANGE), 20%, 40%, 60%, 80%, 100% |
| Resonance EQ | LO (60Hz, +12dB max) and HI (6.5kHz, +12dB max) shelving filters with ON/OFF switches; boost varies with load setting |
| JDX Balanced Outputs | Two XLR outputs: Pre-EQ (transformer isolated, with ground lift and 180° polarity reverse) and Post-EQ (active balanced, with ground lift) |
| JDX EQ and Voicing | Two-band EQ (LOW ±9dB @80Hz, HIGH ±9dB @6kHz) and 6-position SPEAKER CAB VOICING switch (A through F) |
| Unbalanced Outputs | Two 1/4" TS: Post-EQ (Post-JDX) and Direct (Pre-JDX) with shared LEVEL control |
| Phazer Phase Shifter | Continuous 0°–360° analog phase adjustment with ON/OFF switch and 180° range selector |
| Headphone Output | 1/4" stereo jack with dedicated LEVEL control; recommended impedance ≥32 Ω; output power 400mW into 32 Ω |
| Cooling | Variable speed fan (controlled by amp power output); do not block vents; allow 2.5cm (1") clearance |
| Power Supply | External +/-15V 400mA with locking 4-pin XLR connector; universal AC cable included |
| Construction | 14-gauge steel chassis and outer shell with durable powder coat finish |
| Dimensions (L x W x D) | 6.05" x 12" x 3.45" (154mm x 305mm x 87.6mm) |
| Weight | 8 lbs (3.63 kg) |
| Warranty | Radial 3-year transferable limited warranty (see manual for details) |
Frequently Asked Questions - Headload Radial Engineering
User questions about Headload Radial Engineering
0 question about this device. Answer the ones you know or ask your own.
Ask a new question about this device
Download the instructions for your Audio Amplifier in PDF format for free! Find your manual Headload - Radial Engineering and take your electronic device back in hand. On this page are published all the documents necessary for the use of your device. Headload by Radial Engineering.
USER MANUAL Headload Radial Engineering
Radial Engineering Ltd.
1588 Kebet Way, Port Coquitlam
British Columbia, Canada, V3C 5M5
tel: 604-942-1001 • fax: 604-942-1010
email: info@radialeng.com

IMPORTANT SAFETY & USER NOTICE PLEASE READ BEFORE CONNECTING YOUR RADIAL HEADLOAD

ALWAYS TURN YOUR AMPLIFIER OFF BEFORE CONNECTING OR DISCONNECTING
It is your responsibility to confirm the Headload is connected properly before operating your amplifier. If you are unsure about connecting or operating the Headload consult a qualified technician or see your dealer. Damage caused by improper operation is not covered under the warranty. See the back cover for warranty details.
ALWAYS USE THE HEADLOAD WITH A SPEAKER CABINET
A speaker cabinet must be connected to the Headload at all times. It is possible to use the Headload as a dedicated load box without a speaker connected but this is not a recommended practice as you may damage the Headload or your amp if the LOAD SWITCH is not in the proper setting. Damage due to misuse is not covered under the Radial 3-year warranty.
CAUTION - USE OF THE HEADLOAD WITH AMPLIFIERS WITH BRIDGED OR BALANCED SPEAKER OUTPUTS IS STRICTLY PROHIBITED.
Although these types of circuits are rarely employed on instrument amps, using the Headload with them can cause an electrical shock. Please consult the amplifier manufacturer to ensure the power output section of your amp is not bridged or balanced. As we have no control over the use of these amps, for legal liability reasons, Radial Engineering Ltd. strictly prohibits use of the Headload with such amplifiers.
DO NOT BLOCK THE AIR VENTS
It is normal for your Headload to get warm during operation. The Headload fan draws cool air in through the front, top and sides and exhaust hot air out through the rear. Do not block the air vents and always provide a minimum of 2.5cm (1") of open air space around the Headload when in use.
HEADPHONE SAFETY WARNING
As with all products capable of producing high sound pressure levels (SPL), users must be very careful to avoid hearing damage that may occur from prolonged exposure. This is particularly important as it applies to headphones. Prolonged listening at high SPLs will eventually cause Tinnitus and can lead to partial or complete loss of hearing. Please be aware of the recommended exposure limits within your legal jurisdiction and follow them very closely. The user agrees that Radial Engineering Ltd. remains harmless from any health effects resulting from the use of this product and the user clearly understands that he or she is entirely responsible for the safe and proper use of this product. Please consult the Radial Limited Warranty for further details.
Radial® Headload™
Guitar Amp Load Box
User Guide
Table of Contents ...... Page
Overview....1
Features and Functions ....3
Unpacking and Optional Rackmount Kit ....5
Getting Started 6
Connecting the Amp and Speaker 7
Using the Attenuator/Loadbox 8
Connecting the JDX Balanced Outputs 9
Using the JDX....10
Using the Phazer 11
Specifications 12
Radial Limited Warranty .... Back Cover
Congratulations and thank you for purchasing the Radial Headload, an innovative speaker power attenuator, loadbox and guitar amp direct box. The Headload is a unique tool that lets you drive your amp hard for great tone while keeping speaker volume low. This lets you optimize the tone from your guitar amplifier without having to perform at ear-blistening levels.
The Headload features a built-in JDX amp DI that captures the natural tone of your amplifier/speaker and interfaces it with professional PA and recording systems. The Headload has also been equipped with a Radial Phazer. This phase adjustment tool lets you time-align the JDX direct output with a microphone to deliver incredibly natural tones, or when pushed to extreme, create over the top effects.
The Headload is easy to use, however it differs significantly from standard attenuators. We recommend you take a few minutes to read this manual before operating your Headload. Should you have any questions, check the Headload FAQ page at www.radialeng.com. This is where we post questions from users and informational updates. If you would like to share your experience with Radial products we invite you to contact us at info@radialeng.com or on Facebook at www.facebook.com/radialeng.
OVERVIEW
The Headload is a combination load box and attenuator that is capable of handling up to 120 watts RMS of continuous power and peaks of 180 watts. Inserted between the head and cabinet, it allows the guitar amp to be driven hard while reducing the output level to reduce the sound pressure on stage or provide the means for quiet recording in the studio. This enables the artist to optimize the tone from the guitar amplifier without having to perform at ear-blistening levels.

flowchart
graph TD
    A["HEADPHONES"] --> B["AMPS"]
    B --> C["AMP"]
    C --> D["SPK CAB"]
    B -->|FROM AMP| C
    B -->|TO SPK| D
JDX Section
In order to ensure greater consistency from gig to gig, the Headload is equipped with a Radial JDX Reactor direct box. This captures both the signal from the head plus the reactive load from the speaker cabinet for a more natural feel. The JDX has two balanced line outputs. This first is Pre-EQ and intended to feed the standard JDX tone to the FOH mixing console. The Post-EQ output is intended to feed the monitor system allowing the player to modify the tone using the JDX EQ and cabinet emulation filters.

flowchart
graph TD
    A["HEADLAD"] -->|FROM AMP| B["AMP"]
    A -->|TO SPK| C["SPK CAB"]
    D["HEADLAD"] --> E["F.O.H"]
    D --> F["MONITORS"]
    G["HEADLAD"] --> H["FED/AMPS/AVOC"]
    G --> I["ACI-SPK/AMPS/AVOC"]
    G --> J["Headphones"]
    G --> K["Headphones"]
    G --> L["Headphones"]
    G --> M["Headphones"]
    G --> N["Headphones"]
    G --> O["Headphones"]
Phazer Section
For engineers that prefer to combine a direct feed with a microphone, the Headload has also been equipped with a Radial Phazer. This phase adjustment tool lets you time-align the JDX direct outputs with the microphone to deliver incredibly natural tones, or when pushed to extreme, create over the top effects.

flowchart
graph TD
    A["HEADLORD"] -->|FROM AMP| B["AMP"]
    A -->|TO SPK| C["SPK CAB"]
    C --> D["MIC"]
    D --> E["MONITORS"]
    E --> F["F.O.H"]
    F --> G["HEADLORD"]
    G --> H["HEADPHONES"]
    G --> I["AMPS"]
    I --> J["SPK CAB"]
Its purpose is to shape the sound by shifting the phase of the JDX signal from the Headload in relation to a microphone signal allowing you to tune the overall phase-response of the combined signals. The diagrams below show the phase offset created by the JDX and microphone signals. The Phazer is used to shift the JDX signal and align the fundamental waveforms.

line
| Time Segment | JDX Signal | Mic Signal | | ------------ | ---------- | ---------- | | Start | 0 | 0 | | Peak | High | High | | Mid | Low | Medium | | End | Low | Low |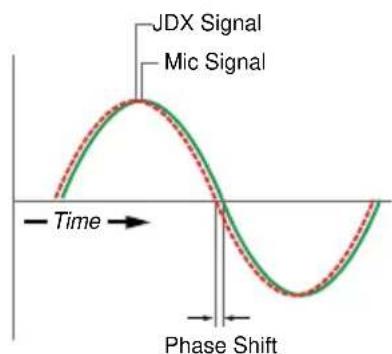
The Radial Phazer is capable of shifting the phase continuously over the complete 360^ range. You simply dial in the amount of phase shift that sounds best to your ears.
FRONT PANEL FEATURE SET
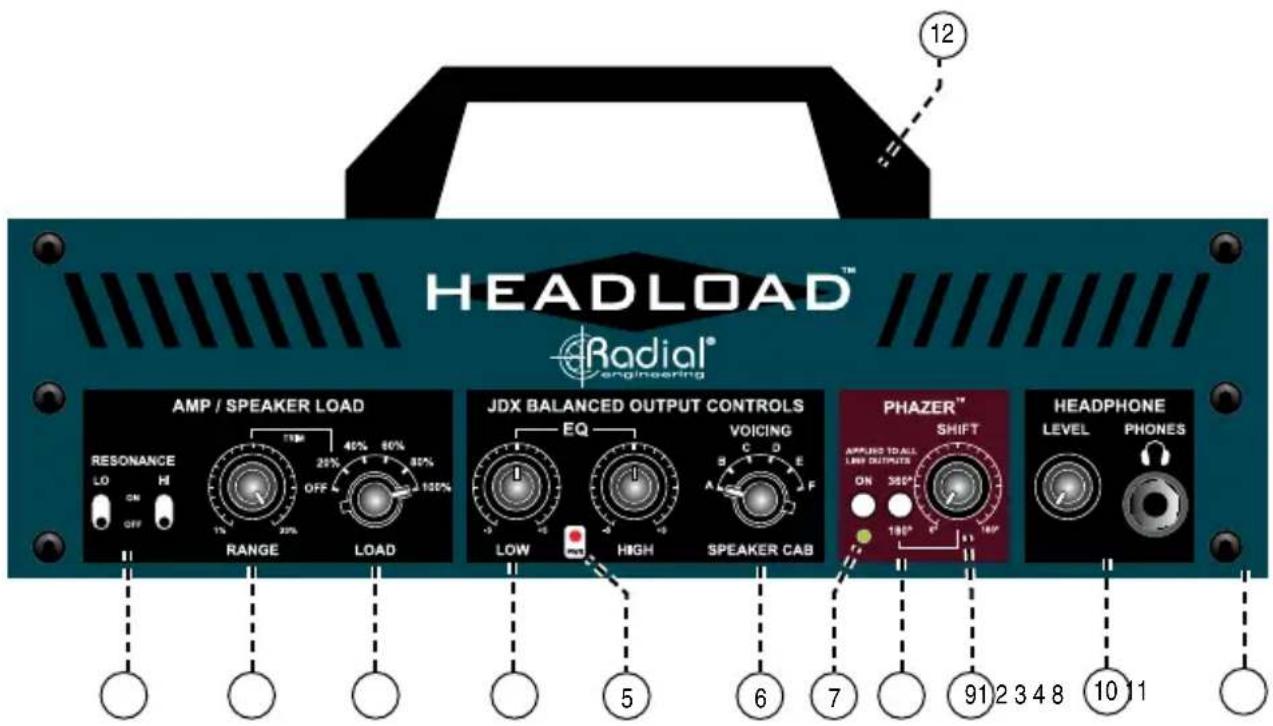
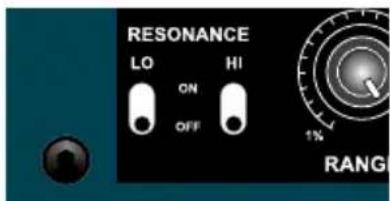
- RESONANCE: Increases the high and low frequency resonance. Used to compensate for weak bass and/or treble response when listening at low volume levels.
- RANGE: Works with the 20% LOAD setting to attenuate the speaker power to 1%.
- LOAD: Six position rotary switch adjusts the amount of speaker attenuation. The OFF setting mutes the speaker for silent listening or recording.
- HIGH LOW EQ: Two band equalizer lets you fi ne tune the Post-EQ JDX output.
- PWR LED: Indicator illuminates when the external power supply is connected.
-
SPEAKER CAB VOICING: Six position rotary switch offers six speaker voicing choices.
-
PHAZER ON: This switch is used to turn the Phazer on/off. An LED illuminates when Phazer is active.
- 180°: Sets the range of the SHIFT control; from 0°-180° with switch out; from 181°-360° with switch pushed in. A total of 360° of phase rotation is available between the two settings.
- SHIFT: Controls the amount of phase shift applied to all the JDX outputs.
- HEADPHONE: Output for 14 " standard headphones or earbuds. Level control adjusts the headphone volume.
- CONSTRUCTION: 'Road ready' 14-gauge steel enclosure for durability and improved shielding against stray magnetic fi elds.
- HANDLE: Makes transporting the Headload more convenient. Can be mounted on the top or side.
REAR PANEL FEATURE SET

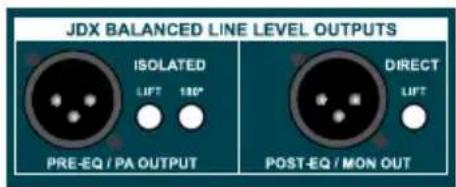
- JDX PRE-EQ: Outputs the JDX signal before the two band EQ and speaker voicing. Used to feed the FOH system. Balanced output for driving long cables. Transformer isolated to eliminate noise caused by ground loops. Equipped with ground lift and polarity 180^ reverse.
- JDX POST-EQ: Outputs the JDX signal after the EQ and voicing controls. Used to feed the on-stage monitor system. Balanced output for driving long cables. Equipped with ground lift.
-
FAN: Cooling fan is powered by your amp. The harder you drive your amp, the faster the fan moves.
16: POST-JDX (POST-EQ): Outputs an unbalanced ( 14 " line) JDX signal. Used for feeding additional effects, monitors or amps. -
PRE-JDX (DIRECT): Outputs the direct amp signal before the JDX signal processing.
- LEVEL: Ganged control sets the output level for both unbalanced 14 " outputs.
- POWER SUPPLY: The external power supply uses a locking 4-pin XLR connector to prevent accidental disconnection.
- FROM AMP: Connects your amplifier speaker output. Depending on which Headload you have, one of the jacks will be plugged.
- TO SPEAKERS: Connects to your speaker cabinet. Total speaker impedance (Ohms) must match your amp and the Headload.
UNPACKING THE HEADLOAD
We recommend that you save all packaging for storage and safe transport. Inside you will find the power supply, power cable suitable for your region and a handle. The handle may be attached to the top or side using the two included screws as shown below.

RACK MOUNT KIT
An optional 19" rackmount kit is available (order no. R800 9424 00) for the Headload. The Headload uses two rack spaces (2RU). The rackmount kit is constructed with the same powder-coated 14 gauge steel for durability and attaches using eight screws as shown below.

natural_image
Technical line drawing of an electronic device chassis with ports and connectors (no text or symbols)FAN COOLING
The Headload is cooled by a fan that draws cool air in through the front, top and sides and pushes hot air out the back. Do not block the vents when in use and always allow a minimum of 2.5cm (1") of open air space around the Headload. When rackmounting, provide an open rack space above the Headload for fresh air.
The fan speed is controlled by the power output of your amplifi er and the amount of attenuation you apply. With a small amount of attenuation (60-80%) the fan may move slowly or not at all. Appling a lot of attenuation, especially to a high wattage amp (100W), will cause the fan to turn faster and provide more cooling.

GETTING STARTED
Before making any connections, always ensure levels are turned down and your amp is turned off. This will help avoid loud turn-on transients ('pops') from harming the loudspeakers and alarming your audience. It is also a good practice to test your system at a low volume at first before turning up the power.
The Headload uses a universal power supply that comes with a detachable AC cable for your region. The Headload can be used in another region simply by changing the AC cable.

natural_image
Black electronic device with coiled cable and connector (no visible text or symbols)The power supply connects to the Headload using a locking 4-pin XLR. This provides a secure connection that helps prevent accidental disconnection. There is no power switch, as soon as you plug in the power supply the Headload will turn on. The power LED indicator on the front panel will illuminate when the power supply is connected and the Headload is ready to use.
STARTING POSITION
Set the front panel controls as shown below. This will start you off with a neutral setting from which to explore the functions and features.

AMP/SPEAKER LOAD SECTION
• LO and HI Resonance switches set to off
- Range rotated fully clockwise
- LOAD switch set to 100% (no attenuation)
JDX SECTION
- LOW and HIGH EQ set to center position (12 o'clock)
• VOICING switch set to position A
PHAZER SECTION
• ON switch set to the outward position (off or bypass)
- 360/180° switch set to the outward position
- SHIFT control rotated fully counter-clockwise
CONNECTING THE AMPLIFIER AND SPEAKER
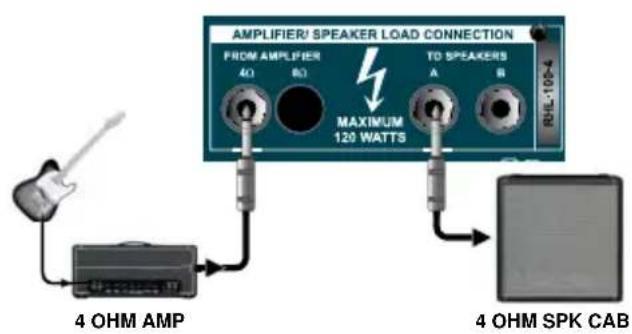
You can connect amplifiers up to 120 Watts RMS (180W peak) to the Headload and drive them at full power. We recommend using speaker cables eight feet or less in length with a minimum gauge of 1.5mm^2 (14 awg). Longer speaker cables should use heavier gauges to maintain the best power transfer. Use the chart below as a guide when selecting speaker cables to use with your Headload.
| Cable Length 100 | Watt Amp8 Ohms | 100 Watt Amp4 Ohms | 50 Watt Amp8 Ohms | 50 Watt Amp4 Ohms |
| 1.2 meters (4') 1.0mm | ^2 (16 awg) 1.0mm | ^3 (16 awg) 1.0mm | ^2 (16 awg) 1.0mm | ^2 (16 awg) |
| 2.4 meters (8') 1.5mm | ^2 (14 awg) 1.5mm | ^3 (14 awg) 1.0mm | ^2 (16 awg) 1.5mm | ^2 (14 awg) |
| 3 meters (10') 1.5mm | ^2 (14 awg) 2.5mm | ^3 (12 awg) 1.5mm | ^2 (14 awg) 1.5mm | ^2 (14 awg) |
| 3.7 meters (12') 2.5mm | ^2 (12 awg) 2.5mm | ^3 (12 awg) 1.5mm | ^2 (14 awg) 2.5mm | ^2 (12 awg) |
| 4.9 meters (16') 2.5mm | ^2 (12 awg) 4.0mm | ^3 (10 awg) 1.5mm | ^2 (14 awg) 2.5mm | ^2 (12 awg) |
| 5.5 meters (18') 4.0mm | ^2 (10 awg) Do not use 2.5mm | ^2 (12 awg) 2.5mm | ^2 (12 awg) | |
| 6.0 meters (20') Do not use Do not use 2.5mm | ^2 (12 awg) 2.5mm | ^2 (12 awg) | ||
It is important to match the impedance of the amplifier and speaker cabinet with the Headload's impedance. The Headload is available in 4, 8 and 16 Ohm versions. Depending on which one you purchased, one of the FROM AMP jacks will be plugged.

CONNECTING TWO CABINETS
The Headload is equipped with two 14 " TO parallel SPEAKER jacks that make connecting more than one cabinet easy. However it is important that the combined impedance of both cabinets match the impedance of the Headload. For instance, two 8 Ohm cabinets equal a 4 Ohm load. Therefore you would need the 4 Ohm version of the Headload to connect two 8 Ohm cabs.
| Cab A Cab | B Total | |
| 16 Ohms 16 | Ohms | 8 Ohms |
| 8 Ohms | 8 Ohms | 4 Ohms |
| 4 Ohms | 4 Ohms | 2 Ohms (do not use) |

USING THE AMP/SPEAKER LOAD
After confi rming your connections, power on your amp and slowly bring up the volume until you are at a comfortable level. Try attenuating the speaker volume by adjusting the LOAD control counter-clockwise from 100% (no attenuation) to 80% or 60%.
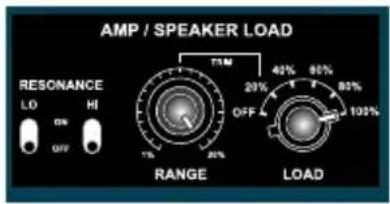
Increase the output level on your amp and toggle back and forth between the LOAD setting and your amp's volume control until you get comfortable with the way the Headload attenuator works. You can apply a little attenuation to take the edge off a screaming double stack or a lot of attenuation to signifi cantly reduce overall stage volume.
Range 20-1%
When the LOAD is set to 20%, you can use the RANGE control to continuously adjust the output from 20% down to 1% of full power. The RANGE control is particularly beneficial in the studio or on very quiet stages as it lets you dial in the ideal amount of attenuation.
Loadbox
You can mute the Headload's speaker outputs by selecting the OFF position. This enables silent performance, recording, or practicing via the built-in headphone amp. The safest way to use the Headload is to always have a speaker cab connected. However, it is possible to use the Headload without a speaker when the LOAD switch is set to OFF. Please observe the following user warning before operating the Headload without a speaker cabinet:

The danger is the LOAD switch could be bumped or moved and potentially put the Headload and/or amplifier at risk of damage. For this reason we recommend the Headload be connected to a speaker at all times. If you choose to ignore this warning, you should check the position of the LOAD switch before each use to minimize the risk.
Resonance EQ
After you have adjusted the attenuation, try testing the RESONANCE switches to hear their effect on the tone. These are used to boost low or high frequencies to your speaker cabinet and compensate for the way the human ear responds to music when listening at low volume levels.
CONNECTING THE JDX OUTPUTS
The Headload is equipped with a built-in Radial JDX direct box. The JDX is designed to capture the sound of your amp/speaker and feed a balanced line to a mixing console or recorder without having to necessarily use a microphone. The benefits of using the JDX are lower sound pressure levels on stage, a consistent guitar tone night after night and of course, quiet recording for those late night sessions.
The JDX features two balanced XLR outputs. The Pre-EQ output produces the classic JDX signal based on our proprietary reactive loading and active band-pass circuit that captures the sound of the amp and outputs a signal emulating a 4x12 speaker cab mic'd with a popular dynamic microphone. The original JDX has gained tremendous popularity with users as diverse as Megadeth, Aerosmith, Rascal Flatts, Sting and Radiohead. The Pre-EQ output is intended to feed a clean stable signal to the FOH PA system.

flowchart
graph TD
    A["AMP"] --> B["JDX"]
    B --> C["LOW / HIGH EQ"]
    C --> D["Speaker Cab Voicing"]
    D --> E["HEADPHONES"]
    B --> F["JDX BALANCED LINE LEVEL OUTPUTS"]
    F --> G["ISOLATED"]
    F --> H["POST-EQ / MON OUT"]
    G --> I["F.O.H MONITORS"]
    H --> J["F.O.H MONITORS"]
    style A fill:#f9f,stroke:#333
    style E fill:#ccf,stroke:#333
The Post-EQ output offers more control over the tone by adding a two-band EQ and five additional speaker emulation voicings to the JDX. The POST-EQ output is intended to feed the monitor system. Connected this way, you are able to hear the effects of the JDX equalizer and VOICING switch in your monitors or in-ear system and fine tune to your liking.
For the purpose of becoming familiar with the Headload features, you can connect both JDX outputs to the first and second channels of your mixing console. This will help you understand the differences between the Pre and Post-EQ outputs.
NOTE: You can also audition the JDX equalizer by connecting a set of headphones to the Headload. This way, you can mute the speakers by setting the LOAD switch to OFF and quietly go about testing the JDX EQ and VOICING controls.
USING THE JDX
Keep in mind that the JDX output level will follow changes to the amplifier's volume so it's best to set your amp up the way you like it before setting levels at the mixing console. Understand also that changing the LOAD switch setting or using the RESONANCE controls will not affect the sound of the JDX outputs. When your amp is setup and working to your liking, adjust the gain at the mixing console.
Low/High EQ and Speaker Voicing
The JDX features a two-band EQ and six speaker emulation filters. While listening to the Post-EQ output (or headphones), test the SPEAKER CAB VOICING switch. Setting-A is the classic JDX sound and the other five settings emulate the character of different types of speaker cabinets. Choose a setting that works best with your system.
The two-band EQ boosts or cuts the low and high frequencies and is used to make fine adjustments to the tone. You can use the HIGH EQ to add presence to a dull sounding amp or tame an overtly bright one. The LOW EQ can boost a weak bass response or clean up a muddy sounding amp by rolling off bass.

Ground Lift and Polarity reverse
The Pre-EQ output is transformer isolated to block hum and buzz caused by ground loops and equipped with a ground LIFT switch to further help eliminate noise. The Post-EQ output is active balanced or direct and also features a ground LIFT switch to help eliminate noise. If you notice hum or buzz caused by ground loops, try pushing the LIFT switch inward. This will float the pin-1 at the XLR output and isolate the signal ground between your amp and the mixing console to help eliminate the noise.
The polarity of the Pre-EQ output can be inverted with the 180^ switch. Depressing the switch will reverse pins-2 and 3 at the XLR output. The polarity reverse may be used to interface older ‘pin-3 hot’ equipment that does not follow the AES standard for XLR pin-out, or to correct a polarity reversal upstream in the signal chain.
Using The Unbalanced Outputs
The Headload is equipped with two 14 " unbalanced outputs with a dedicated level control. The first output is an unbalanced version of the Post-EQ JDX signal that can be patched to any line-level device like a backstage amp or effects. The second output is labelled direct and reproduces the dry, original signal from the amp at line level. This unfi itered signal can be used to patch in addition speaker emulation devices for even more creative opportunities.

USING THE PHAZER
In order to get the most natural tone from a guitar or bass amp, many engineers will opt to combine the sound of the direct JDX feed with a mic'd speaker cabinet. Because the microphone is distanced away from the loudspeaker, a slight time delay is introduced when compared to the direct JDX signal. To compensate, the Headload is equipped with a Radial Phazer that essentially delays the JDX output. However, the Phazer is not a digital delay that can create echo. The Phazer is completely analog and is capable of shifting the signal up to 360° so that a fundamental frequency from the JDX signal can be phase aligned with the microphone.
Place a mic in front of your speaker cabinet and patch it into the third channel of your mixer next to the JDX channels. Turn up the mic channel to make sure it is working. Set both the JDX and the mic channels to the same volume level and panned to the center.

flowchart
graph TD
    A["MIXING CONSOLE"] -->|JDX PRE-EQ| B["Radial engineering"]
    A -->|JDX POST-EQ| B
    B -->|JDX BALANCED LMS LEVEL OUTPUTS| C["SPK CAB"]
    C -->|FROM AMP| D["AMP"]
    C -->|AMPLI# SPEAKER LOAD CONNECTION| E["To SPK"]
    E -->|MAXIM 120 WATTS| F["SPK CAB"]
    B --> G["JDX BALANCED LMS LEVEL OUTPUTS"]
    B --> H["LIME OUTPUT"]
    B --> I["POST"]
    B --> J["OUT"]
    B --> K["MINIC"]
    B --> L["MINIC"]
    B --> M["MINIC"]
Activate the Phazer by pressing the ON switch, the LED indicator will illuminate. Slowly rotate the SHIFT control clockwise while listening to the result through the mixing console. The signal will be shifted from 1^ to 180^ . Now depress the 180 / 360^ switch to continue shifting the signal phase from 181^ to 360^ .

The Phazer can reinforce the fundamental frequency making the combination of the JDX and mic sound thicker and richer than either do on their own. You can also experiment with the Phazer and create special effects. Use your ear while adjusting the SHIFT control and choose the setting that sounds best.
SPECIFICATIONS
Audio Circuit Type: ....Reactive attenuation circuit with active equalization
Frequency Response: 90Hz at -3dB to 4KHz at -6dB
Low EQ: +/- 9dB @ 80Hz
High EQ: +/- 9dB @ 6Khz
Low & High Resonance:....60Hz & 6.5KHz, shelving filter 6dB/octave slope
+12dB at 20% load setting
+9dB at 40% load setting
+6dB at 60% load setting
+3dB at 80% load setting
None at 100% load setting
Headphones Impedance: 32 Ω or higher recommended
Headphone Output Power: 400mW into 32 Ω
Gain: -40dB typical
Intermodulation Distortion: ....<0.05%
Noise: -104dbu Unweighted
Input Impedance: 16/8/4 Ω depending on model
Maximum Amplifier Power:....120 Watts RMS (180 Watts peak)
JDX Output Impedance: 250 Ω
Total Harmonic Distortion: ....<0.05%
Impedance Load: ......Available in 4 Ω, 8 Ω, 16 Ω
Power: Radial +/-15V 400mA power supply
Construction: 14 gauge steel chassis & outer shell
Finish: ......Durable powder coat
Size (L x W x D): 6.05" x 12" x 3.45" (154mm x 305mm x 87.6mm)
Weight: 8lbs. (3.63kg)
Shipping Size (L x W x D): 8" x 14" x 5" (203mm x 365mm x 127mm)
Shipping Weight: 10lbs. (4.5kg)
Conditions:......For use in dry locations only between 5°C and 40°C
Warranty: Radial 3-year, transferable
Specifications are subject to change without notice.
BLOCK DIAGRAM

flowchart
graph TD
    A["SPK CAB"] --> B["ATTENUATION PHAZOR/VOX"]
    B --> C["Square Block"]
    C --> D["LOW / HIGH EQ"]
    D --> E["SPEAKER VOICING"]
    E --> F["HEADPHONE AMP"]
    F --> G["HEADPHONES POST-EQ"]
    B --> H["UNBAL. OUT DIRECT"]
    B --> I["JDX BAL. OUT PRE-EQ"]
    E --> J["JDX BAL. OUT POST-EQ"]
    E --> K["JDX UNBAL. OUT POST-EQ"]
THREE YEAR TRANSFERABLE LIMITED WARRANTY
RADIAL ENGINEERING LTD. ("Radial") warrants this product to be free from defects in material and workmanship and will remedy any such defects free of charge according to the terms of this warranty. Radial will repair or replace (at its option) any defective component(s) of this product (excluding finish and wear and tear on components under normal use) for a period of three (3) years from the original date of purchase. In the event that a particular product is no longer available, Radial reserves the right to replace the product with a similar product of equal or greater value. In the unlikely event that a defect is uncovered, please call 604-942-1001 or email service@radialeng.com to obtain an RA number (Return Authorization number) before the 3 year warranty period expires. The product must be returned prepaid in the original shipping container (or equivalent) to Radial or to an authorized Radial repair center and you must assume the risk of loss or damage. A copy of the original invoice showing date of purchase and the dealer name must accompany any request for work to be performed under this limited and transferable warranty. This warranty shall not apply if the product has been damaged due to abuse, misuse, misapplication, accident or as a result of service or modification by any other than an authorized Radial repair center.
THERE ARE NO EXPRESSED WARRANTIES OTHER THAN THOSE ON THE FACE HEREOF AND DESCRIBED ABOVE. NO WARRANTIES WHETHER EXPRESSED OR IMPLIED, INCLUDING BUT NOT LIMITED TO, ANY IMPLIED WARRANTIES OF MERCHANTABILITY OR FITNESS FOR A PARTICULAR PURPOSE SHALL EXTEND BEYOND THE RESPECTIVE WARRANTY PERIOD DESCRIBED ABOVE OF THREE YEARS. RADIAL SHALL NOT BE RESPONSIBLE OR LIABLE FOR ANY SPECIAL, INCIDENTAL OR CONSEQUENTIAL DAMAGES OR LOSS ARISING FROM THE USE OF THIS PRODUCT. THIS WARRANTY GIVES YOU SPECIFIC LEGAL RIGHTS, AND YOU MAY ALSO HAVE OTHER RIGHTS, WHICH MAY VARY DEPENDING ON WHERE YOU LIVE AND WHERE THE PRODUCT WAS PURCHASED.
To meet the requirements of California Proposition 65, it is our responsibility to inform you of the following:
WARNING: This product contains chemicals known to the State of California to cause cancer, birth defects or other reproductive harm.
Please take proper care when handling and consult local government regulations before discarding.

*◆▼□▼★◆▲
[Non-Text]
Radial Engineering Ltd.
1588 Kebet Way, Port Coquitlam BC V3C 5M5
tel: 604-942-1001 • fax: 604-942-1010
info@radialeng.com • www.radialeng.com


- IMPORTANT SAFETY & USER NOTICE PLEASE READ BEFORE CONNECTING YOUR RADIAL HEADLOAD
- ALWAYS TURN YOUR AMPLIFIER OFF BEFORE CONNECTING OR DISCONNECTING
- ALWAYS USE THE HEADLOAD WITH A SPEAKER CABINET
- CAUTION - USE OF THE HEADLOAD WITH AMPLIFIERS WITH BRIDGED OR BALANCED SPEAKER OUTPUTS IS STRICTLY PROHIBITED.
- DO NOT BLOCK THE AIR VENTS
- HEADPHONE SAFETY WARNING
- Radial® Headload™
- Guitar Amp Load Box
- User Guide
- Table of Contents ...... Page
- OVERVIEW
- JDX Section
- Phazer Section
- FRONT PANEL FEATURE SET
- REAR PANEL FEATURE SET
- UNPACKING THE HEADLOAD
- RACK MOUNT KIT
- FAN COOLING
- GETTING STARTED
- STARTING POSITION
- AMP/SPEAKER LOAD SECTION
- CONNECTING THE AMPLIFIER AND SPEAKER
- CONNECTING TWO CABINETS
- USING THE AMP/SPEAKER LOAD
- Range 20-1%
- Loadbox
- Resonance EQ
- CONNECTING THE JDX OUTPUTS
- USING THE JDX
- Low/High EQ and Speaker Voicing
- Ground Lift and Polarity reverse
- Using The Unbalanced Outputs
- USING THE PHAZER
- SPECIFICATIONS
- THREE YEAR TRANSFERABLE LIMITED WARRANTY
Brand : Radial Engineering
Model : Headload
Category : Audio Amplifier