KABISS590DA - Oven Kogan - Free user manual and instructions
Find the device manual for free KABISS590DA Kogan in PDF.


| Product Type | Built-in Electric Oven |
| Brand | Kogan |
| Model | KABISS590DA |
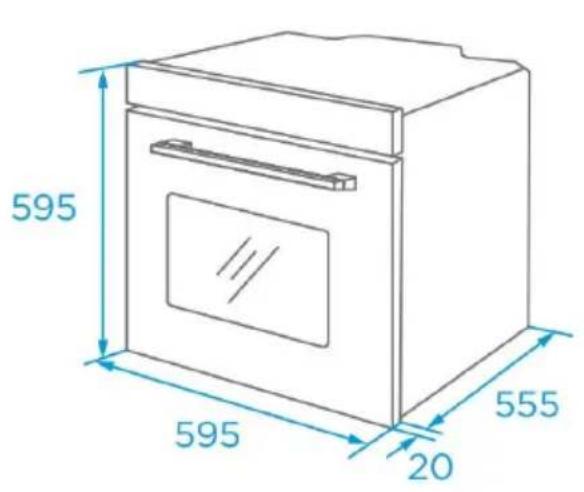
| Dimensions (H x W x D) | 595 x 595 x 550 mm |
| Weight | 30 kg |
| Power Supply | 220-240V ~ 50Hz |
| Rated Power | 3000 W |
| Oven Capacity | 70 Liters |
| Temperature Range | 50°C - 250°C |
| Heating Functions | Conventional, Grill, Fan Forced, Bottom Heat, Defrost |
| Cleaning Method | Enamel interior, easy clean |
| Safety Features | Child lock, auto shut-off, overheating protection |
| Spare Parts Availability | Replacement parts available via Kogan support |
| Repairability | Modular design, serviceable by qualified technician |
| Installation Type | Built-in under counter or in column |
| Energy Efficiency Class | A |
| Door Type | Drop-down, triple glazed |
| Interior Light | Yes |
| Includes | Oven, rack, baking tray, user manual |
Frequently Asked Questions - KABISS590DA Kogan
User questions about KABISS590DA Kogan
0 question about this device. Answer the ones you know or ask your own.
Ask a new question about this device
Download the instructions for your Oven in PDF format for free! Find your manual KABISS590DA - Kogan and take your electronic device back in hand. On this page are published all the documents necessary for the use of your device. KABISS590DA by Kogan.
USER MANUAL KABISS590DA Kogan
natural_image
Exterior view of a stainless steel oven with digital display and control knobs (no visible text or symbols)60cm Electric Built-in Oven
with Digital Timer (5 Functions)
KABISS590DA
Safety & Warnings 3
Overview 5
Installation 6
Before First Use 11
Operation 12
Cleaning & Care 16
Specifications 17
Troubleshooting 17
Notes 18
Safety & Warnings
These warnings are provided to ensure your safety. Read them carefully before installing or using the appliance.
• Always use spare parts provided by Kogan.com.
- When the oven is first switched on, it may emit an unpleasant smell caused by the bonding agent used for the insulating panels. Run the oven empty using the conventional cooking function at 250^ C for 90 minutes to eliminate any residues inside the cavity.
- Slight smoke or odours during the first use are normal. Allow them to dissipate before placing food in the oven.
- Operate the oven in a well-ventilated environment.
- The appliance and accessible parts become hot during use. Avoid touching heating elements. Children under 8 years should be kept away unless continuously supervised.
- If the surface is cracked, switch off the appliance immediately to prevent electric shock.
- This appliance can be used by children aged 8 years and older, or individuals with reduced physical, sensory, or mental capabilities, provided they are supervised or instructed on safe use and understand the hazards.
• Children must not play with the appliance.
• Cleaning and maintenance should not be performed by unsupervised children.
- Avoid opening the oven door frequently during cooking to maintain optimal performance.
- Ensure the appliance is switched off before replacing the lamp to prevent electric shock.
- The appliance must be installed with a disconnection mechanism incorporated into the fixed wiring as per local wiring specifications.
- If the power cord or plug is damaged, cease use immediately and contact help.Kogan.com for support to avoid fire or electric shock.
- Do not use abrasive cleaners or metal scrapers on the oven glass as they may scratch the surface and cause the glass to shatter.
- Do not use steam cleaners to clean the oven.
- The appliance is not designed to be operated via an external timer or remote control system.
- Follow instructions for proper installation of oven shelves.
- Avoid touching the oven with wet or damp hands or feet. Always wear proper footwear when using the oven.
- The oven door or drawer should not be used as a resting surface as it may cause unbalance or damage.
- Some parts of the appliance retain heat after use. Allow them to cool before touching.
- Unplug the appliance if it will not be used for an extended period.
- After unpacking the oven, ensure it has not been damaged during transit. If it has been damaged, cease use immediately and contact help.Kogan.com for support.
- Keep packaging materials, such as plastic bags and nails, out of children's reach to avoid accidents.
- Use heat-insulating gloves when removing food to prevent burns.
- Be cautious of steam when opening the oven door.
- Open the door slightly at first to allow steam to escape safely and avoid it reaching your face.
Installation
- Safe operation is guaranteed only if installed to professional standards per these instructions.
- Installation requires two professionals wearing protective gloves to prevent injuries or electric shock.
- Fitted units must withstand temperatures up to 90^ C, and adjacent unit fronts must tolerate up to 70^ C.
• Use a 16A electrical outlet. - Do not install the appliance behind a decorative door or cabinet door as this may cause overheating.
- Check the appliance for damage before installation. Do not connect if damaged.
- Do not block vents or gaps between the appliance and surrounding cupboards.
- Exercise caution when moving the appliance; it is heavy. Never lift it by the door handle.
- Handle the appliance with care during installation to prevent damage.
- Remove all packaging materials and accessories from the cavity before use.
- Ensure the electrical outlet is accessible for easy disconnection.
- Confirm the electrical outlet is firmly inserted into the outlet after installation.
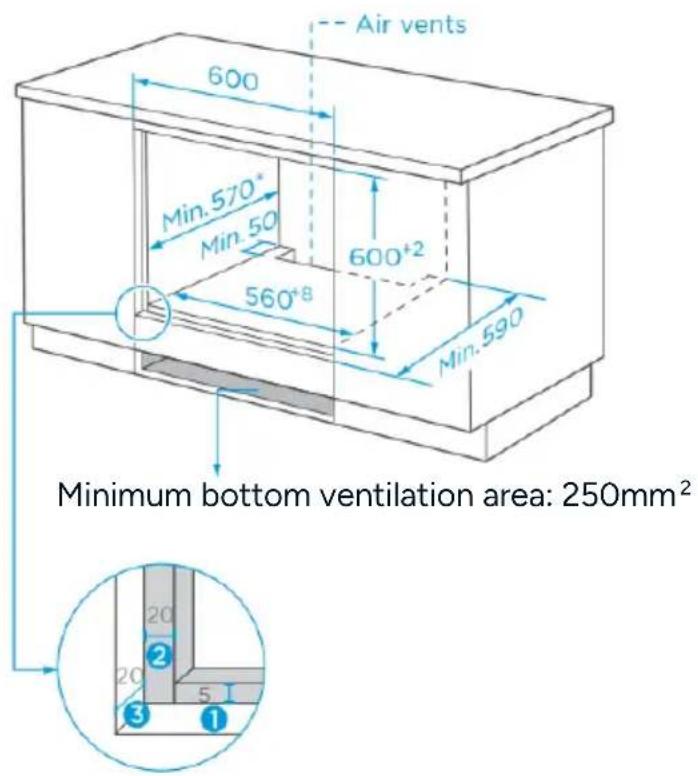
- Refer to the space requirements for dimensions, ensuring at least a 50mm clearance between the cupboard bottom board and rear board or wall.
Overview
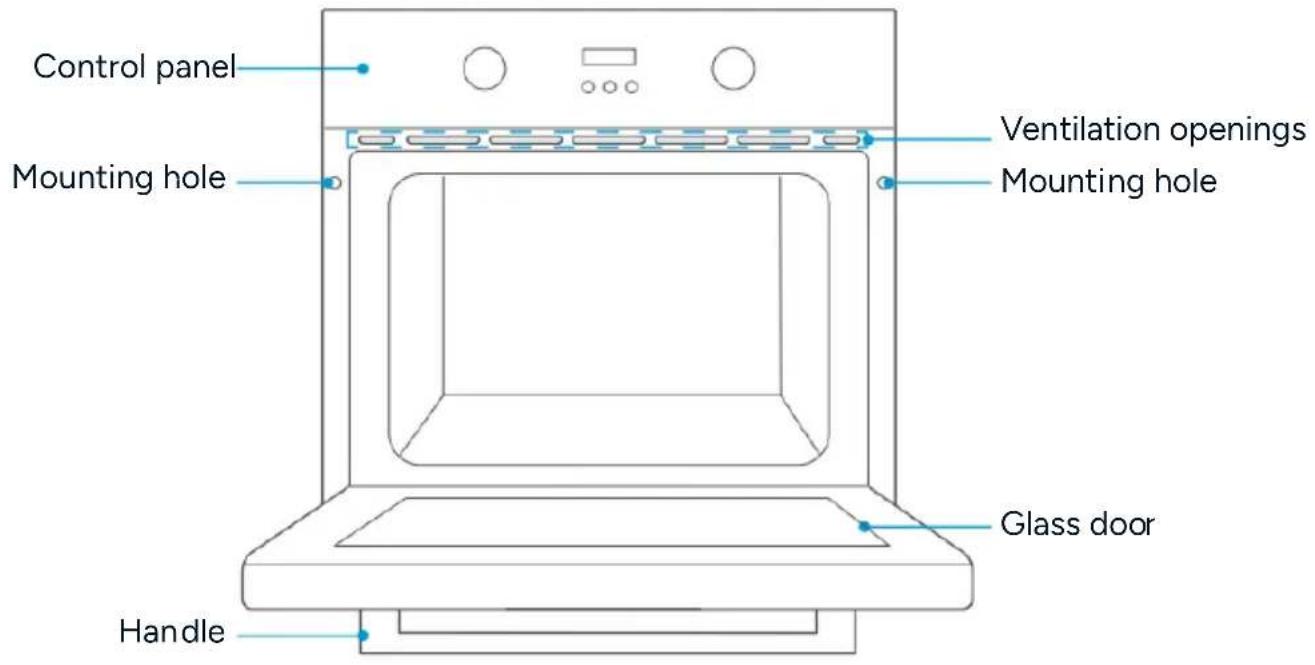
Installation
Standing Cupboard Space Requirements
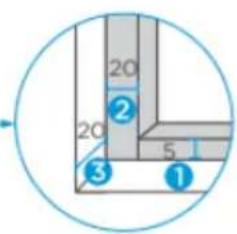
- Reserve 5mm for the door panel at the top and bottom respectively.
- Reserve 20mm for the door panel on the left and right respectively.
- Reserve 20mm for the door panel in thickness.
• The thickness of the cupboard is 20mm. - If the electrical outlet is installed on the back of the appliance, the depth of the cupboard opening shall be increased from a minimum of 590mm to 620mm.
• The dimensions in the figures are in mm.
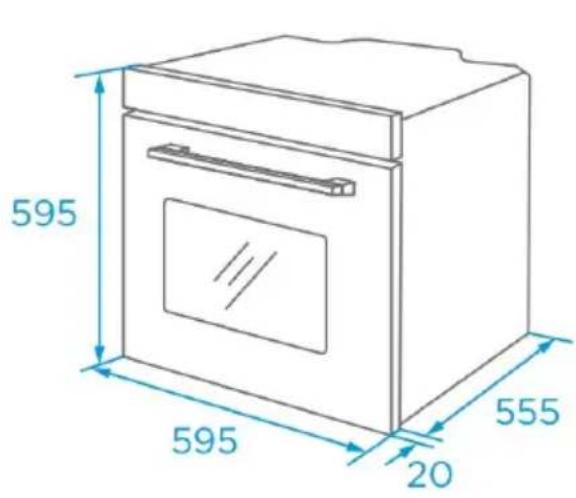
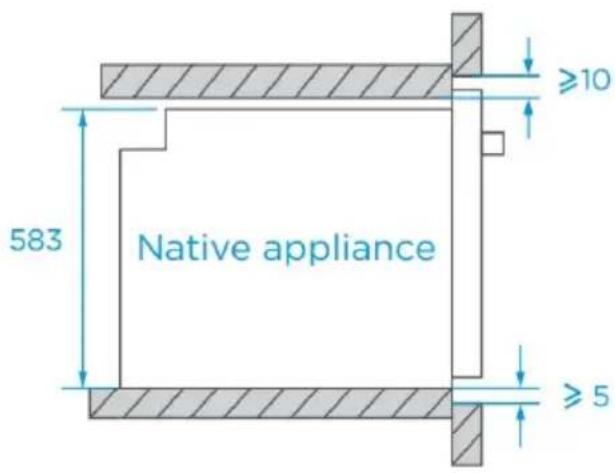
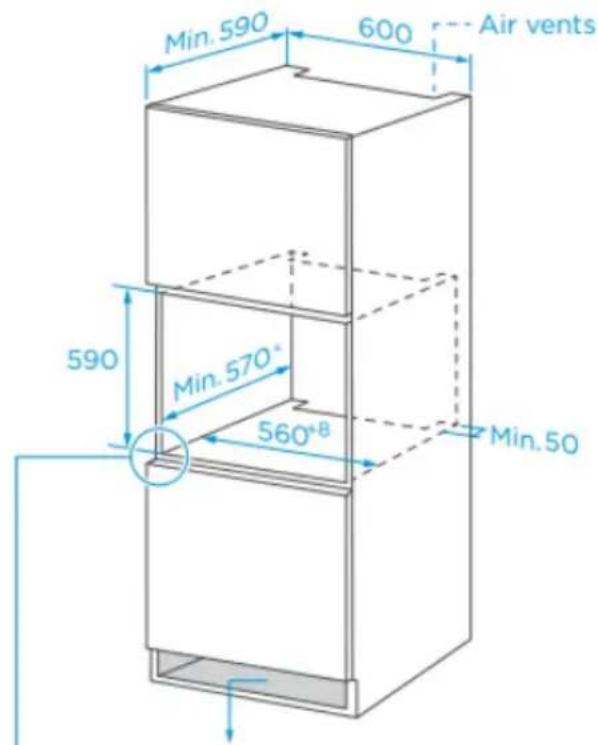
Ground Cupboard Space Requirements
- Reserve 5mm for the door panel at the top and bottom respectively.
- Reserve 20mm for the door panel on the left and right respectively.
- Reserve 20mm for the door panel in thickness.
If the appliance is installed under a cooktop, the minimum thickness of worktop A is shown below:
| Cooktop Type | Worktop A |
| Induction cooktop 37mm | |
| Full-surface induction cooktop | 47mm |
| Gas cooktop 30mm | |
| Electric cooktop 27mm |
• The thickness of the cupboard is 20mm.
- If the electrical outlet is installed on the back of the appliance, the depth of the cupboard opening shall be increased from a minimum of 590mm to 620mm.
• The dimensions in the figures are in mm.
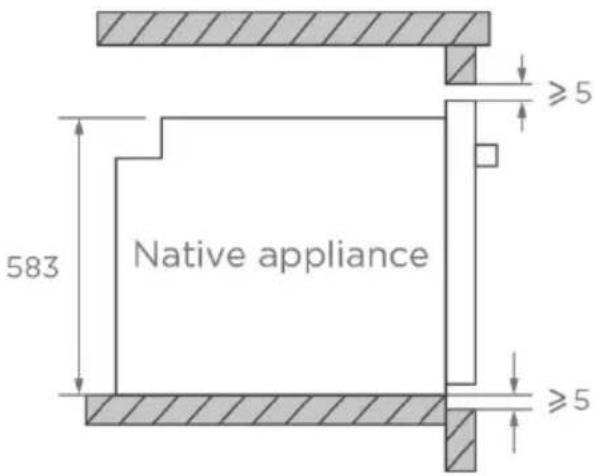
Without Cooktop
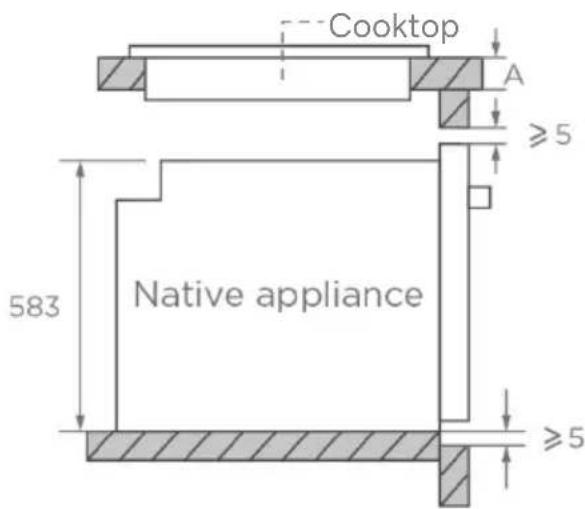
With Cooktop
Installation
- Customise the cupboard according to the space requirements.
- Before installation, ensure the electrical outlet is functional, properly grounded, and that the cupboard dimensions meet the installation requirements.
- Position the appliance in its designated location in the kitchen, install it in the cupboard, and connect it to the power supply.
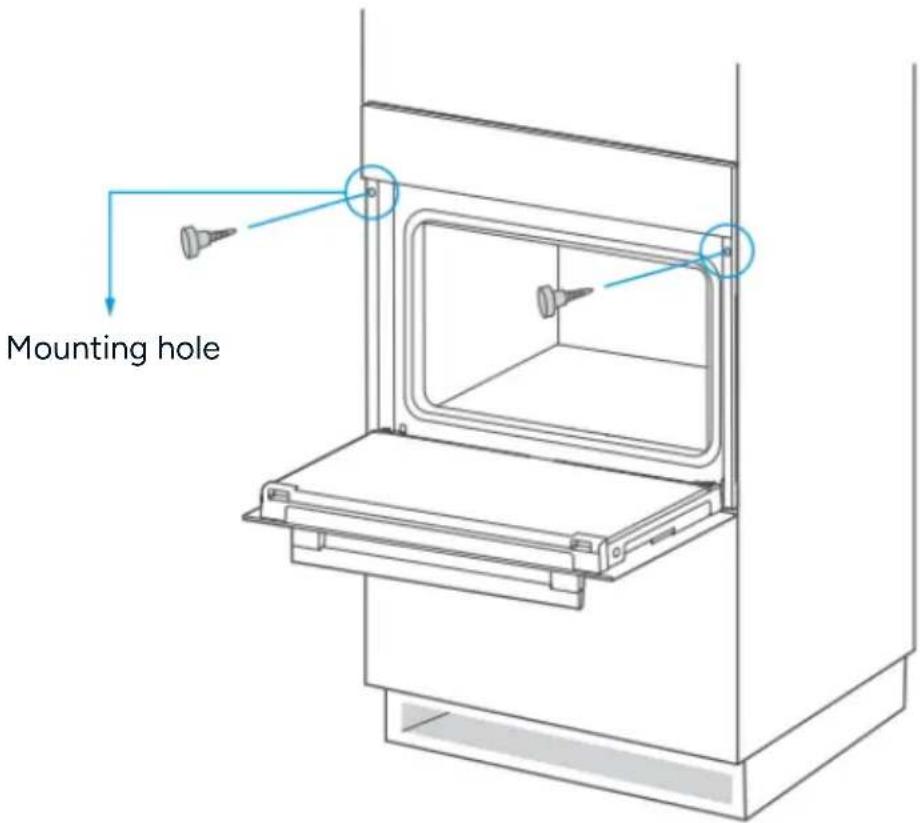
- Open the appliance door to locate the mounting holes on the side frame (refer to the position shown in the diagram).
- Secure the appliance to the cupboard using the provided rubber plugs and screws.
Accessories
natural_image
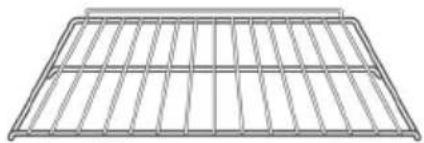
Pure wire mesh diagram without any text, numbers, or symbolsGrill Rack
Grill food or place heat-resistant cooking containers.
natural_image
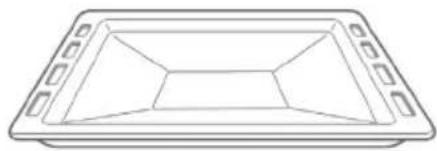
Line drawing of a rectangular tray with internal compartments (no text or symbols)Grill Tray
Cook large portions of food or catch food scraps.
Using the accessories:
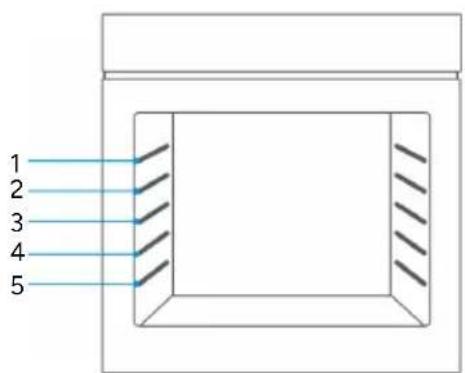
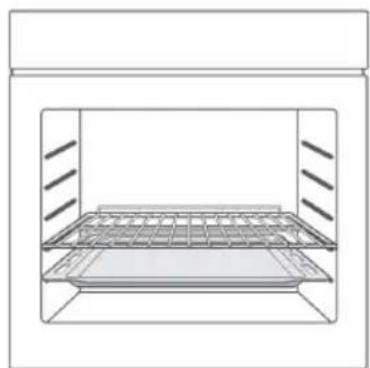
To ensure proper oven operation, the grill rack and grill tray should only be positioned between the first and fifth levels. When used together, always place the grill tray beneath the grill rack.
natural_image
Line drawing of a simple kitchen appliance with a rack and ventilation slots (no text or symbols)Before First Use
- Ensure the oven has been properly installed before operation.
- Remove all transport protection materials, packaging items, and accessories (e.g., foam, cardboard, grill tray, grill rack) to prevent fire hazards.
- Clean the oven cavity and accessories with soapy water and a soft cloth.
- Maintain good ventilation by opening kitchen windows or using cooker hoods.
- Keep children and pets out of the kitchen and close the doors of adjacent rooms.
- After connecting the power, activate the oven using the mode, time, and temperature listed below to eliminate odours from the cavity.
• After first use, open the oven door slightly and allow it to cool completely.
| Function Temperature Time | ||
| Grill with Fan | 250°C | 0.5-1 Hour |
Operation
Control Panel
| Symbol Function Description | ||
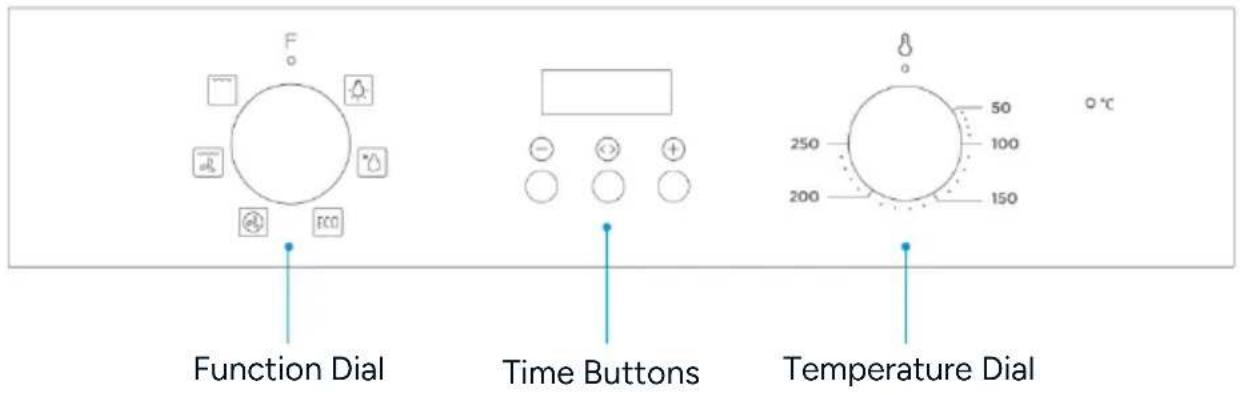
 | Lamp | Observe the progress of cooking without opening the door. The lamp will light for all cooking functions, except ECO. |
 | Defrost | The circulation of air at room temperature (without the use of any heat) enables quicker thawing of frozen food. It's a gentle but quick way to speed up the defrosting time and thawing of ready-made dishes and cream filled produce, etc. |
 | Convection | Warm air heated by the rear element is quickly and evenly distributed throughout the oven by the fan. This results in a faster and more economical cooking process. Convection allows food to be cooked simultaneously on different shelves. |
 | Grill with Fan | This function uses the radiant heating element combined with the fan to evenly distribute heat. It ensures thorough and efficient grilling, making it ideal for cooking larger or thicker items that require even heat penetration. |
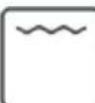 | Grill | Grilling utilises only the inner part of the top heating element, which directs heat downwards onto the food. |
 | ECO | For energy saving cooking. Cooking the selected ingredients in a gentle manner, with the heat coming from the top and bottom. |
Setting the Clock
When connecting the oven to the power supply for the first time, set the clock.
- Press the '+' or '-' buttons to adjust the hour.
- Press the 'Arrow' button to confirm the hour setting.
- Press the '+' or '-' buttons to adjust the minutes.
- Press the 'Arrow' button to complete the clock setting.
Notes:
The clock operates on a 24-hour format.
Regular Operation
- Turn the 'Function' knob to select the desired oven function.
- Turn the 'Temperature' knob to adjust the temperature.
- Set the desired mode (refer to Mode Setting instructions).
• After cooking, return both knobs to the 'O' position.
Mode Setting
- In standby mode, press and hold the 'Arrow' button for 3 seconds to enter manual mode. The 'Icon will illuminate.
- In manual mode, press the 'Arrow' button to cycle through the time mode selections: manual → timer → duration → end time → manual.
• Automatic cooking modes include: - Semi-automatic: 'dur' (duration) or 'end' (end time).
- The oven will not operate or heat unless the '💡' icon is displayed.
Mode Descriptions:
- Manual: The user controls the cooking time.
- Timer: Set a reminder for a specific time.
• Duration: Set the oven to cook for a specific duration.
• End Time: Set the oven to stop cooking at a specific end time.
Manual Mode
- In manual mode, only the current time and the ' 🔊' symbol is displayed. Cooking time is controlled by the user.
- If there is no operation for 5 hours, the displayed time will flash. After 10 hours, the oven will return to standby mode.
- If the time is flashing, press the '+' or '-' buttons to resume manual mode.
Timer
This function serves as a reminder and does not control oven operation.
- Press the 'Arrow' button to select the minute minder function. The '☐' and '-' symbols will flash.
- Adjust the time using the '+' or '-' button.
- Press the 'Arrow' button to confirm. The '☐' icon will remain illuminated.
- When the time is up, the buzzer will sound, and the '☐' symbol will flash. Press any button to cancel the reminder.
Cooking Duration (Dur)
Set the oven to cook for a specific time.
- Press the 'Arrow' button until 'dur' appears on the display.
- Adjust the duration using the '+' or '-' button (maximum: 10 hours).
- Press the 'Arrow' button to confirm and start cooking. The '◀' and 'A' icons will remain illuminated.
- When the time is up, the buzzer will sound, and the 'A' icon will flash.
- Press any button to stop the alert and return to standby mode.
Cooking End Time
Set the oven to finish cooking at a specific clock time.
- Press the 'Arrow' button until 'End' appears on the display.
- Adjust the end time using the '+' or '-' button.
- Press the 'Arrow' button to confirm and start cooking. The '◀' and 'A' icons will remain illuminated.
- When the end time matches the system clock, the buzzer will sound, and the '!' icon will disappear while the 'A' icon flashes.
- Press any button to stop the alert and return to standby mode.
Precautions for Timer Use
- Press and hold the '+' or '-' button for 3 seconds to continuously adjust time settings.
- In alarm or automatic cooking mode, press and hold both '+' and 'Arrow' buttons to cancel all settings and return to standby mode.
- If no action is taken within 5 minutes while setting a timer, the oven will revert to manual mode.
- Press and hold the 'Arrow' button for 3 seconds to cancel the current setting and return to manual mode.
- Only one mode (alarm clock or automatic cooking) can be selected at a time.
Cleaning & Care
Always disconnect the power supply before cleaning or maintenance. Regular and thorough cleaning ensures the longevity of your oven. Follow these steps:
- Allow the oven to cool completely after cooking.
- Remove all accessories, rinse them with warm water, and dry thoroughly.
- Clean any food debris from the oven chamber.
- Wipe the interior with a soft cloth dampened with mild detergent, then dry with a clean, soft cloth.
Notes:
- Avoid using sharp cleaning tools, hard brushes, or corrosive cleaning products, as these may damage the oven and its accessories.
- Do not use abrasive cleaners or sharp metal spatulas on the door glass, as these can scratch or damage the surface.
Lamp Replacement
WARNING: To prevent electric shock, ensure the appliance is completely cool and disconnected from the power supply before removing the lamp cover or replacing the bulb. If unsure how to replace the lamp, consult a qualified electrician for assistance.
- Switch off the oven and disconnect it from the power supply. Ensure all internal parts are cool before proceeding.
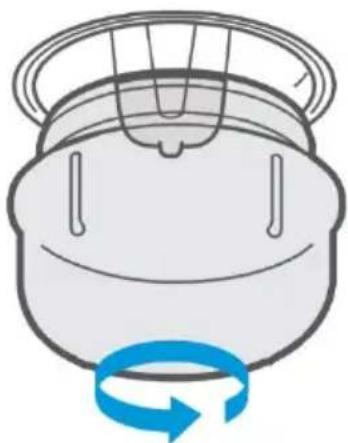
- Remove the lamp cover by turning it anticlockwise (note: it may be stiff).
- Replace the bulb with a new one of the same type, ensuring it is resistant to temperatures up to 300^ C. For replacement bulbs, contact help.Kogan.com for support.
- Insert the new bulb, replace the lamp cover, and ensure it is securely in place.
natural_image
Simple line drawing of a container with a mesh top and blue circular arrow below (no text or symbols)Specifications
Usable volume 65L
Rated voltage 220-240V\~
Rated frequency 50Hz-60Hz
Electric power 2.1 kW
Troubleshooting
| Problem | Possible Cause | Solution |
| Unable to start. | Power is not connected. | Connect the power supply. |
| Main power switch is not turned on. | Connect the power supply. | |
| Oven door is not closed. | Close the oven door. | |
| Lamp does not come on. | Lamp is faulty. | Contact help.Kogan.com for support. |
| Pungent odour or smoke. | First use. | No action required; this is normal. |
| Food is not cooked. | Temperature is set too low. | Increase the temperature. |
| Food portion is too large. | Cook food in smaller portions or extend the cooking time. | |
| Burnt or uneven food. | Temperature is too high, or heating time is too long. | Adjust the temperature or cooking time. |
| Food is placed too close to the heating element. | Adjust the accessory placement. | |
| Fan does not stop working after heating stops. | Fan delay for heat dissipation. | No action required; this is normal. |
Disposal
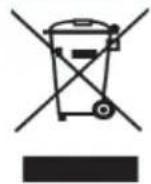
This marking indicates that this appliance should not be disposed with other household wastes. To prevent possible harm to the environment or human health from uncontrolled waste disposal, recycle it responsibly to promote the sustainable reuse of material resources.
Notes
Need more information?
We hope that this user guide has given you the assistance needed for a simple set-up.
For the most up-to-date guide for your product, as well as any additional assistance you may require, head online to help.Kogan.com.
kogan.com
- 60cm Electric Built-in Oven
- Safety & Warnings
- Installation
- Overview
- Standing Cupboard Space Requirements
- Ground Cupboard Space Requirements
- Accessories
- Using the accessories:
- Before First Use
- Operation
- Control Panel
- Setting the Clock
- Notes:
- Regular Operation
- Mode Setting
- Mode Descriptions:
- Manual Mode
- Timer
- Cooking Duration (Dur)
- Cooking End Time
- Precautions for Timer Use
- Cleaning & Care
- Lamp Replacement
- Specifications
- Disposal
- Notes
- Need more information?
Brand : Kogan
Model : KABISS590DA
Category : Oven