SWITCHER-41SS-MV - Router DVDO - Free user manual and instructions
Find the device manual for free SWITCHER-41SS-MV DVDO in PDF.


| Product Type | 4K60 4x1 Seamless HDMI Switcher with Multiview & Audio Output |
| Dimensions (W x D x H) | 220 mm x 100 mm x 30 mm |
| Weight | 620 g |
| Power Supply | DC 12V/2.5A (AC 100-240V 50/60Hz input) |
| Video Inputs | 4 x HDMI (Type A, 19-pin female) |
| Video Output | 1 x HDMI (Type A, 19-pin female) |
| Audio Output | 1 x L/R RCA (PCM2.0), 1 x Optical S/PDIF |
| Control Methods | Front panel buttons, IR remote, OSD menu, RS-232, Controller software |
| Supported Resolutions | Up to 4K@60Hz (4096x2160p60, 3840x2160p60, etc.) |
| Multiview Modes | 8 modes: SINGLE, PIP, PBP (1), PBP (2), Triple (1), Triple (2), Quad (1), Quad (2) |
| HDMI Compliance | HDMI 2.0b |
| HDCP Compliance | HDCP 2.2 / 1.x |
| Video Bandwidth | 18 Gbps |
| Color Depth | 8-bit |
| Audio Formats | LPCM 2.0/5.1/7.1, Dolby Digital/Plus, DTS, DTS-HD (up to 7.1 channels via HDMI) |
| ESD Protection | ±8kV (Air-gap discharge), ±4kV (Contact discharge) |
| Operating Temperature | 32 - 104°F (0 - 40°C) |
| Storage Temperature | -4 - 140°F (-20 - 60°C) |
| Relative Humidity | 20 - 90% RH (no-condensing) |
| Housing Material | Metal Enclosure |
| Color | Black |
| Maintenance | Clean with a soft dry cloth. Do not use liquids or solvents. |
| Safety | Use a surge protection device. Keep away from moisture and heat sources. |
| Spare Parts & Repairability | Contact DVDO support for replacement parts. No user-serviceable components inside. |
| General Information | Professional-grade 4x1 HDMI switcher with seamless switching and multiview capabilities. Suitable for presentations, video walls, and multi-source monitoring. |
Frequently Asked Questions - SWITCHER-41SS-MV DVDO
User questions about SWITCHER-41SS-MV DVDO
0 question about this device. Answer the ones you know or ask your own.
Ask a new question about this device
Download the instructions for your Router in PDF format for free! Find your manual SWITCHER-41SS-MV - DVDO and take your electronic device back in hand. On this page are published all the documents necessary for the use of your device. SWITCHER-41SS-MV by DVDO.
USER MANUAL SWITCHER-41SS-MV DVDO
4K 4x1 Seamless HDMI Switcher with Multiview & Audio Output
User Manual
Version v1.0
Thank you for purchasing DVDO-Switcher-41SS-MV
For optimum performance and safety, please read these instructions carefully before connecting, operating or adjusting this product. Please keep this manual for future reference.
Surge protection device recommended
This product contains sensitive electrical components that may be damaged by electrical spikes, surges, electric shock, lighting strikes, etc. Use of surge protection systems is highly recommended in order to protect and extend the life of your equipment.
Table of Contents
- Introduction...... 1
- Features.... 1
- Package Contents.... 2
- Specifications. 2
- Operation Controls and Functions. 3
5.1 Front Panel....3
5.2 Rear Panel....5
5.3 IR Pin Definition.... 5 - IR Remote....6
- EDID Settings....7
- Video & Audio....7
- Multiview....8
- OSD Menu Navigation....8
- Controller Software Operation Guide .... 11
11.1 Installation & Connection.... 11
11.2 Controller Main Interface.... 13 - RS-232 Command.... 16
- Application Example.... 23
1. Introduction
This 4K60 4x1 Multiviewer Seamless UHD Video Switcher was developed for the purpose of supporting higher output resolution (4K@60) for multiple sources on a single screen. It can combine up to four video signals onto a single UHD or HD displayer. The user can manage each input, and create combinations of the four inputs on a single display, as well as adjust the position of any input.
This product supports 8 display modes, within the mode range, users can freely switch 4-channel HD input signals. It can realize single screen display and multiview display on a single screen.
This device supports full range of input video resolutions up to 4K@60 (RB) and audio RCA /Optical de-embedding supported for external audio distribution systems.
This device can be controlled via front panel buttons, IR remote, OSD menu navigation, Controller software, RS-232 commands.
2. Features
☆ HDMI 2.0b, HDCP 2.2 and HDCP 1.x compliant
☆ Support 18Gbps video bandwidth
☆ Input and output resolutions support up to 4K@60Hz
☆ Support LPCM, AC3, DD+, DTS, DTS-HD, up to 7.1 audio channel
☆ Seamless switching between input channels and combined multiple images on single UHD monitor
☆ Up to 8 display modes: SINGLE, PIP, PBP (1), PBP (2), Triple (1), Triple (2), Quad (1), Quad (2)
☆ Seamless switching in single screen display mode
☆ Fast switching in multiview display mode
☆ Audio de-embedding via analog and optical fiber audio ports
☆ Support volume control and independent audio selection
☆ Support OSD navigation for advanced setting
☆ EDID management
☆ Control via front panel buttons, IR remote, OSD menu navigation, Controller software, RS-232 commands
☆ Compact design for easy and flexible installation
3. Package Contents
① 1 x 4K60 4x1 Multiviewer Seamless UHD Video Switcher
② 1 x IR Remote
③ 1 x 3pin-3.81mm Phoenix Connector (male)
④ 1 x 38KHz IR Wideband Receiver Cable (1.5 meters)
⑤ 2 x Mounting Ears
⑥ 4 x Machine Screws (KM3*4)
⑦ 4 x Rubber Feet
⑧ 1 x 12V/2.5A Locking Power Adapter
⑨ 1 x User Manual
4. Specifications
| Technical | |
| HDMI Compliance | HDMI 2.0b |
| HDCP Compliance | HDCP 2.2 / 1.x |
| Video Bandwidth | 18Gbps |
| Video Resolution | Up to 4K@60Hz |
| IR Level | 5Vp-p |
| IR Frequency | 38KHz |
| Color Space | RGB, YCbCr 4:4:4, YCbCr 4:2:2, YCbCr 4:2:0 |
| Color Depth | 8bit |
| Audio Formats | HDMI: PCM2.0/5.1/7.1CH, Dolby Digital/Plus, DTS, DTS High ResAnalog audio [3.5mm L/R]: PCM2.0SPDIF (OPTICAL): Dolby Digital, DTS 5.1, PCM2.0Note: It does not support HBR audio. |
| ESD Protection | Human body model — ±8kV (Air-gap discharge) & ±4kV (Contact discharge) |
| Connection | |
| Input ports | 4 x HDMI IN [Type A, 19-pin female] |
| Output ports | 1 x HDMI OUT [Type A, 19-pin female]1 x L/R OUTPUT [RCA]1 x OPTICAL OUTPUT [S/PDIF] |
| Control ports | 1 x RS-232 [3pin-3.81mm phoenix connector]1 x IR EXT [3.5mm Stereo Mini-jack] |
| Mechanical | |
| Housing | Metal Enclosure |
| Color | Black |
| Dimensions | 220mm [W] x 100mm [D] x 30mm [H] |
| Weight | 620g |
| Power Supply | Input: AC 100 - 240V 50/60HzOutput: DC 12V/2.5A (US/EU standard, CE/FCC/UL certified) |
| Power Consumption | 10W (Max) |
| Operating Temperature | 32 - 104°F / 0 - 40°C |
| Storage Temperature | -4 - 140°F / -20 - 60°C |
| Relative Humidity | 20 - 90% RH (no-condensing) |
5. Operation Controls and Functions
5.1 Front Panel
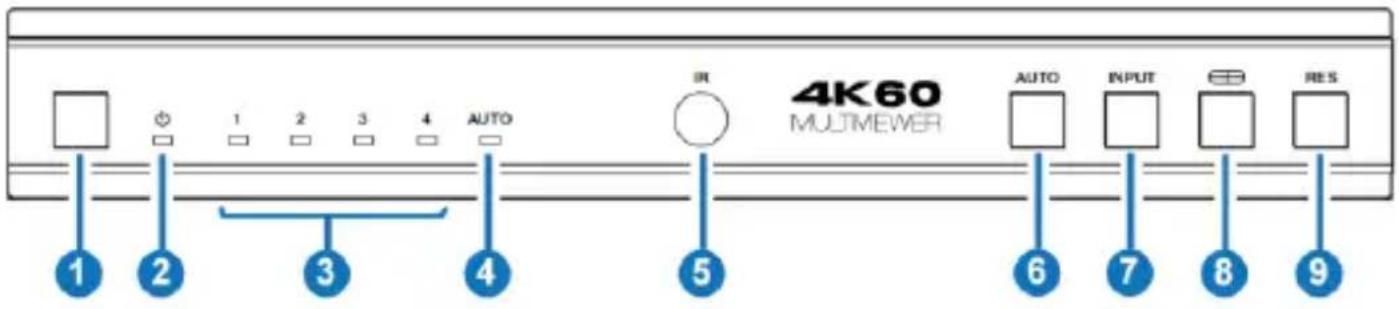
| No. | Name | Function Description |
| 1 | Power button | · Short press this button to power on the device.· Long press this button for 1 seconds to enter the standby mode. |
| 2 | Power LED | The Power LED will light in green when the product is powered on, and red when the product is on standby. |
| 3 | Input 1-4 LEDs | Input signal indicator lights.In single screen display mode, when the HDMI OUTPUT port outputs the signal from the HD 1/2/3/4 port, the corresponding green LED will be on.In multiview mode, all input signal LEDs will light in green. |
| 4 | AUTO LED | When the device is in the AUTO mode, the AUTO LED will light in green, and HDMI is automatically identified, that is, when the currently displayed source signal is disconnected, the switcher will automatically identify the next connected HDMI input port. |
| 5 | IR Window | IR signal receiving window. |
| 6 | AUTO button | Automatic switching button, only available in single screen display mode. |
| 7 | INPUT button | Input source switching button, only available in single screen display mode. |
| 8 | Multiview button | Multiview display mode switching button.· Short press this button to circularly select: SINGLE - PIP - PBP (1) - PBP (2) - Triple (1) - Triple (2) - Quad (1) - Quad (2).· Long press this button for 3 seconds to select the aspect ratio for PBP (1) / PBP (2) / Triple (1) / Triple (2) / Quad (1) / Quad (2). |
| 9 | RES button | Output resolution switching button.· Short press the RES button, the OSD will display the current output resolution of the HDMI OUTPUT port. Short press the RES button again before the OSD disappears to circularly switch the output resolution (Please refer to the output resolution list of “8. Video & Audio”).· Long press the RES button for 3 seconds to switch the output resolution to 720P60. |
5.2 Rear Panel
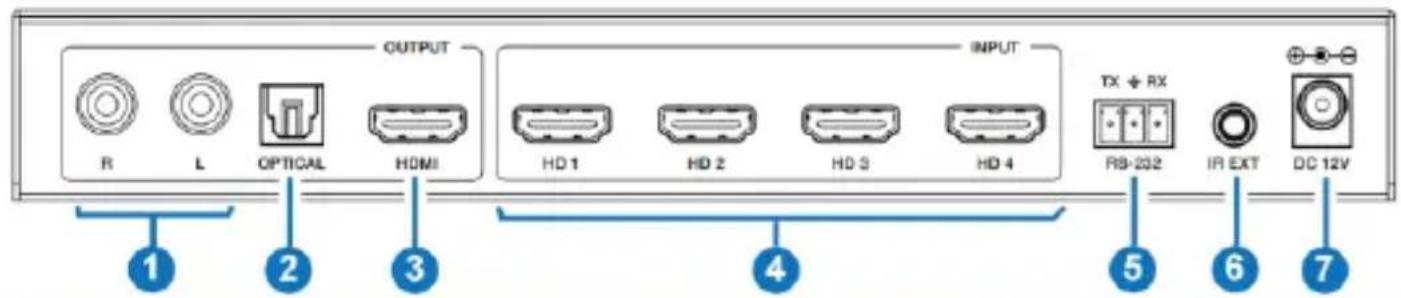
| No. | Name | Function Description |
| 1 | L/R port | PCM2.0 Analog audio output port. |
| 2 | OPTICAL port | Optical fiber digital audio output port. |
| 3 | HDMI OUTPUT port | HDMI signal output port, connected to HDMI display device such as TV or Monitor with HDMI cable. |
| 4 | HD 1-4 INPUT ports | HDMI signal input ports, connected to HDMI source device such as DVD or Set-top box with HDMI cable. |
| 5 | RS-232 port | 3-pin phoenix connector, connected to a PC or control system for serial port upgrade or RS-232 command control. |
| 6 | IR EXT port | IR signal receiving port, connected with 38KHz IR Receiver cable.If the IR signal receiving window of the unit is blocked or the unit is installed in a closed area out of infrared line of sight, the IR receiver cable can be inserted to the “IR EXT” port to receive the IR remote signal. |
| 7 | DC 12V | DC 12V/2.5A power input port. |
5.3 IR Pin Definition
IR Receiver pin's definition is as below:
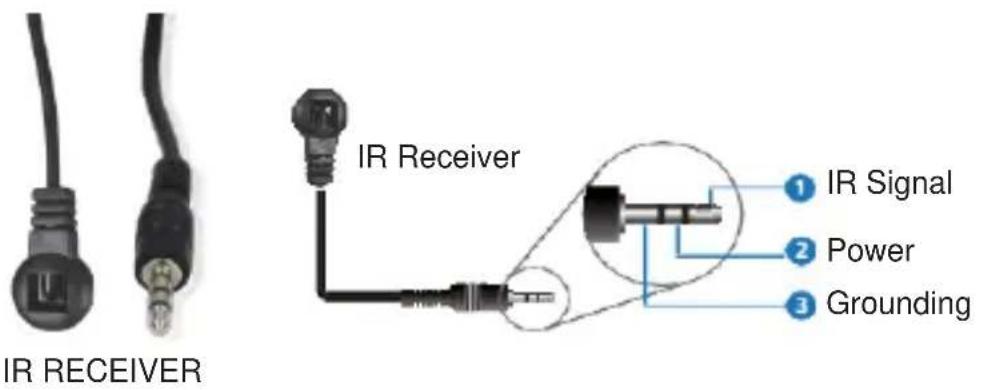
6. IR Remote
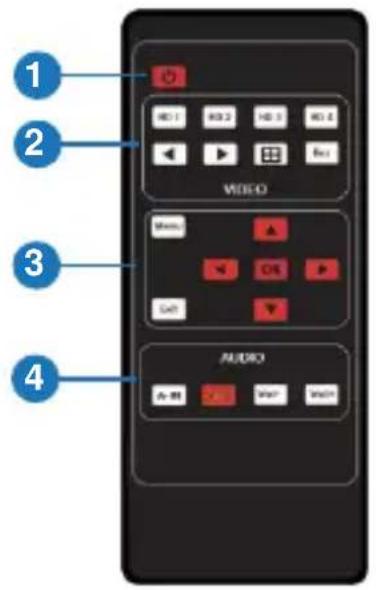
① Power on or Standby: Press this button to power on the switcher or set it to standby mode.
② HD 1/2/3/4: Press these buttons to select input source in single screen display mode, and the corresponding input LED on the front panel will light in green.
◀▶ : Press these buttons to circularly select the last or next input source in single screen display mode.
田 : Multiview display mode switching button.
- Short press this button to circularly select: SINGLE - PIP - PBP (1) - PBP (2) - Triple (1) - Triple (2) - Quad (1) - Quad (2).
- Long press this button for 3 seconds to select the aspect ratio for PBP (1) / PBP (2) / Triple (1) / Triple (2) / Quad (1) / Quad (2).
Res : Output resolution switching button.
- Short press the RES button to circularly switch the output resolution of the HDMI OUTPUT port (Please refer to the output resolution list of "8. Video & Audio").
- Long press the RES button for 3 seconds to switch the output resolution to 720P60.
③ MENU, EXIT, LEFT, RIGHT, UP, DOWN, OK: OSD Menu navigation buttons.
④ A-IN: Press this button to pop up the audio channel selection OSD, then press the UP / DOWN button to select the audio output channel. (The output audio follows the video source by default.)
Mute: Press this button to mute / unmute the audio.
VOL-, VOL+: Press these buttons to increase / decrease the audio output volume.
7. EDID Settings
User can select following EDID modes via RS-232 commands, OSD menu navigation or Controller software.
| No. | EDID Mode | No. | EDID Mode |
| 1 | 4K60-2.0CH | 11 | 1680x1050-2.0CH |
| 2 | 4K60-5.1CH | 12 | 1600x1200-2.0CH |
| 3 | 4K60-7.1CH | 13 | 1440x900-2.0CH |
| 4 | 4K30-2.0CH | 14 | 1360x768-2.0CH |
| 5 | 4K30-5.1CH | 15 | 1280x1024-2.0CH |
| 6 | 4K30-7.1CH | 16 | 1024x768-2.0CH |
| 7 | 1080P-2.0CH | 17 | 720P-2.0CH |
| 8 | 1080P-5.1CH | 18 | AUTO |
| 9 | 1080P-7.1CH | 19 | USER1 |
| 10 | 1920x1200-2.0CH |
8. Video & Audio
The switcher supports multiple resolution video input up to 3840x2160@60, and supports multiple audio formats such as LPCM, AC3, DD+, DTS, DTS-HD, up to 7.1 channel pass through function via HDMI cable.
User can control the volume of audio in LPCM format.
The switcher supports following video output resolutions via a powerful scaling engine.
| No. | Output Resolution | No. | Output Resolution |
| 1 | 4096x2160p 60Hz | 8 | 1920x1080p 60Hz |
| 2 | 4096x2160p 50Hz | 9 | 1920x1080p 50Hz |
| 3 | 3840x2160p 60Hz | 10 | 1360x768p 60Hz |
| 4 | 3840x2160p 50Hz | 11 | 1280x800p 60Hz |
| 5 | 3840x2160p 30Hz | 12 | 1280x720p 60Hz |
| 6 | 3840x2160p 25Hz | 13 | 1280x720p 50Hz |
| 7 | 1920x1200p 60Hz RB | 14 | 1024x768 60Hz |
9. Multiview
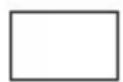
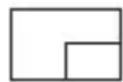
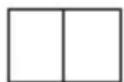
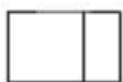
The switcher supports 8 categories of multiview display modes:
SINGLE, PIP, PBP (1), PBP (2), Triple (1), Triple (2), Quad (1), Quad (2)
Users can select different operations for different multiview modes as following:
SINGLE: Inputs selection
PIP: Inputs selection, Sub window size and position selection
PBP (1), PBP (2), Triple (1), Triple (2), Quad (1), Quad (2): Inputs selection,
Display mode selection, Display aspect selection
Multiview window distributions are as following:
SINGLE PIP PBP (1)
PBP (2)
Triple (1)
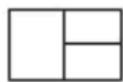
Triple (2)
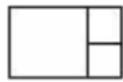
Quad (1)
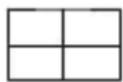
Quad (2)
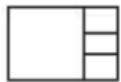
User can select multiview display modes via RS-232 commands, OSD menu navigation or Controller software.
10. OSD Menu Navigation
(1) A total of seven buttons on the IR Remote are used for OSD menu navigation, including Menu, Exit, UP, DOWN, LEFT, RIGHT, OK. Menu contents are as follows:
| Output | Resolution | 3840x2160p60 | 4096x2160p 60Hz/4096x2160p 50Hz/3840x2160p 60Hz/3840x2160p 50Hz/3840x2160p 30Hz/3840x2160p 25Hz/1920x1200p60Hz RB/1920x1080p 60Hz/1920x1080p 50Hz/1360x768p 60Hz/1280x800p 60Hz/1280x720p 60Hz/1280x720p 50Hz/1024x768 60Hz |
| Output | VKA | BLACKSCREEN | BLACKSCREEN, BLUESCREEN |
| ITC | OFF | ON, OFF | |
| Multiview | Single | Input select | HDMI1, HDMI2, HDMI3, HDMI4 |
| PIP | Win1 Select | HDMI1, HDMI2, HDMI3, HDMI4 | |
| Win2 Select | HDMI1, HDMI2, HDMI3, HDMI4 | ||
| PIP Position | Right Bottom, Right Top, Left Bottom, Left Top | ||
| PIP Size | Small, Middle, Large | ||
| PBP | Win1 Select | HDMI1, HDMI2, HDMI3, HDMI4 | |
| Win2 Select | HDMI1, HDMI2, HDMI3, HDMI4 | ||
| MODE | 1, 2 | ||
| Aspect | Full, 16:9 | ||
| 3 x WIN | Win1 Select | HDMI1, HDMI2, HDMI3, HDMI4 | |
| Win2 Select | HDMI1, HDMI2, HDMI3, HDMI4 | ||
| Win3 Select | HDMI1, HDMI2, HDMI3, HDMI4 | ||
| MODE | 1, 2 | ||
| Aspect | Full, 16:9 | ||
| 4 x WIN | Win1 Select | HDMI1, HDMI2, HDMI3, HDMI4 | |
| Win2 Select | HDMI1, HDMI2, HDMI3, HDMI4 | ||
| Win3 Select | HDMI1, HDMI2, HDMI3, HDMI4 | ||
| Win4 Select | HDMI1, HDMI2, HDMI3, HDMI4 | ||
| MODE | 1, 2 | ||
| Aspect | Full, 16:9 | ||
| AUDIO | Audio Select | WIN1 | WIN1, HDMI1, HDMI2, HDMI3, HDMI4 |
| Volume | 100 | 0..100 | |
| AUDIO-MUTE | OFF | ON, OFF | |
| System | Language/语言 | English | English, 中文 |
| EDID | 4K60-2.0 | 4K60-2.0, 4K60-5.1CH, 4K60-7.1CH, 4K30-2.0CH, 4K30-5.1CH, 4K30-7.1CH, 1080P-2.0CH, 1080P-5.1CH, 1080P-7.1CH, 1920x1200-2.0CH, 1680x1050-2.0CH, 1600x1200-2.0CH, 1440x900-2.0CH, 1360x768-2.0CH, 1280x1024-2.0CH, 1024x768-2.0CH, 720P-2.0CH, AUTO, USER1 | |
| Baud rate | 115200 | 115200, 57600, 38400, 19200, 9600 | |
| Reset | Reset | Reset | |
| FW Version | Read only |
(2) A total of four buttons on the IR Remote are used for audio setting on OSD menu navigation, including A-IN, Mute, VOL-, VOL+. Menu contents are as follows:
| A-IN | Audio Input | WIN1 | WIN1, HDMI1, HDMI2, HDMI3, HDMI4 |
| Mute | Audio Mute | OFF | ON, OFF |
| VOL-/VOL+ | Audio Volume | 100 | 0..100 |
11. Controller Software Operation Guide
11.1 Installation & Connection
Follow the steps below to install the Controller software.
Step 1. Double-click the following driver to install the Controller software.

4K60 Multi-Viewer Controller 1.0.5.exe
2022/12/28 11:12
应用程序
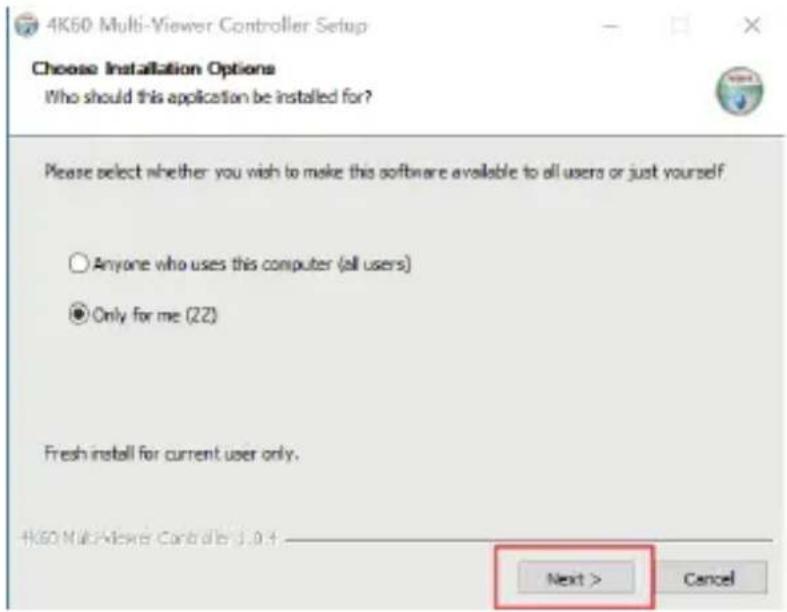
Step 2. Select "Anyone who uses this computer (all users)", and then click "Next".
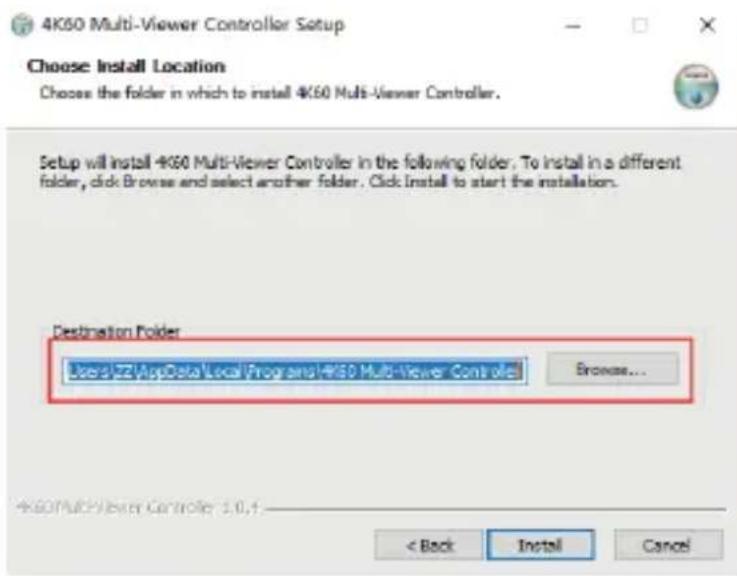
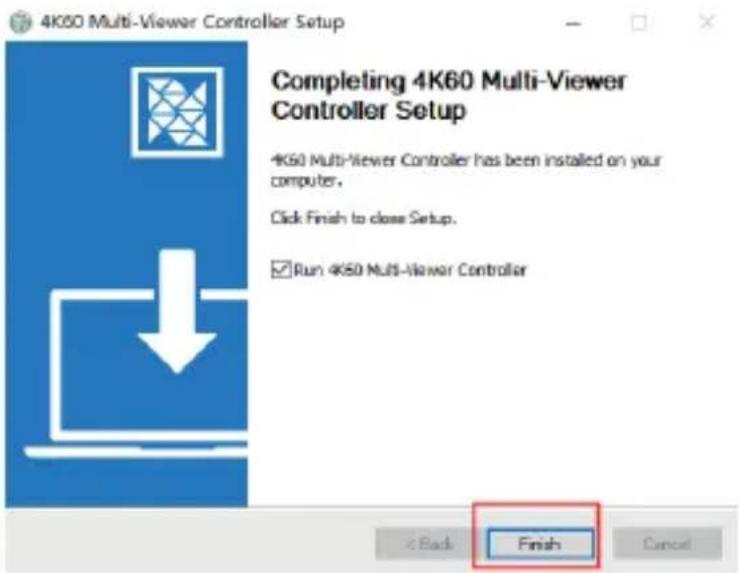
Step 3. Select the installation path and click "Install". After the installation is completed, click "Finish" to start using the Controller software.
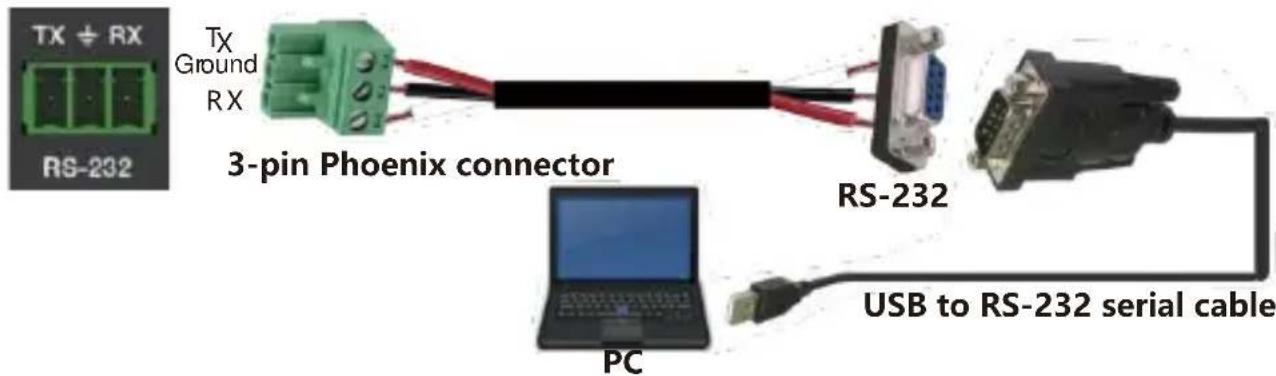
Follow the steps below to connect the Controller software and the device. Step 1. Connect the RS-232 port of the switcher to a PC with an RS-232 serial cable and an USB to RS-232 serial cable, as shown in the figure below.
Step 2. Launch the installed Controller software. (The default language is English, and you can set the language on the upper right corner of the main page.) Select “COM Control Mode” on the “General” page, then select the Port number and Baud Rate (default: 115200), and finally click “Connect”.
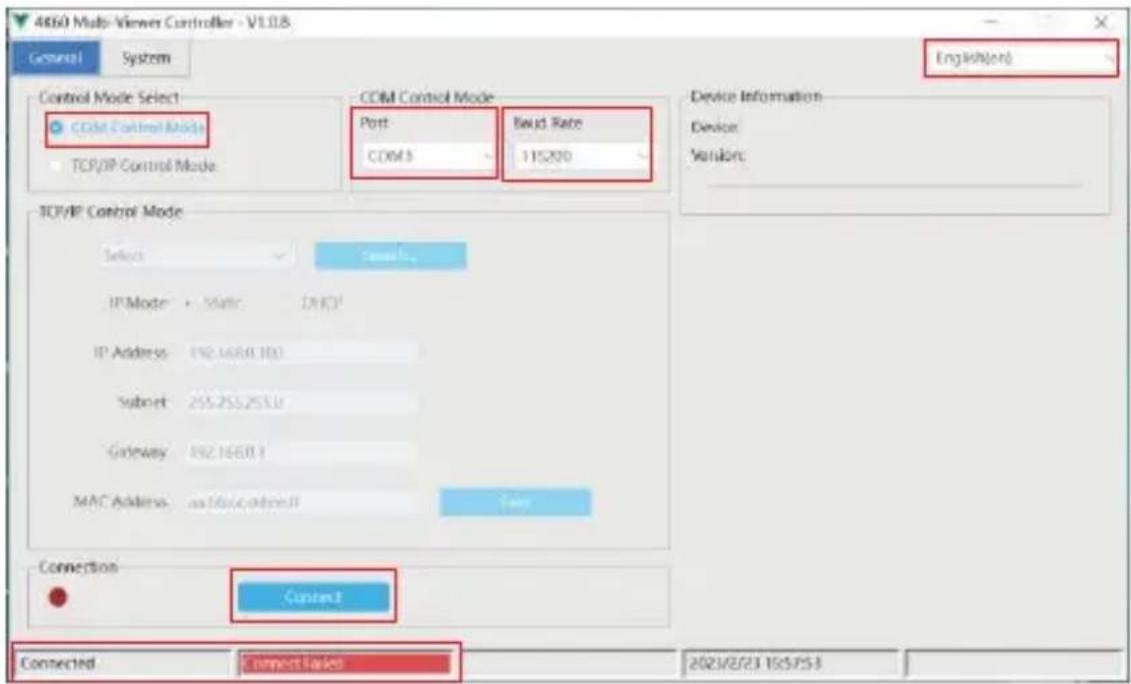
After successful connection, the “General” page will display the relevant information of the connected device, and the status bar at the bottom will display “Connected”.
11.2 Controller Main Interface
■ General Page
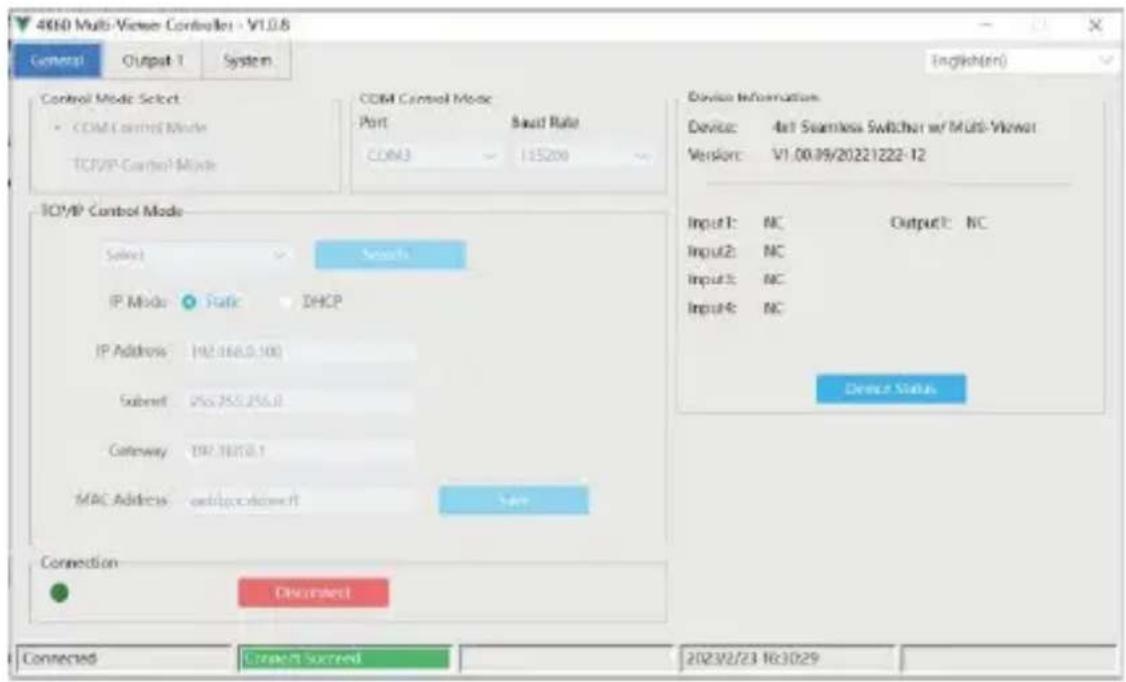
You can do the following operations on the General page:
① Control Mode Select: Select the “COM Control Mode”. (TCP/IP control is not supported temporarily, so the TCP/IP Control Mode is disabled.)
② COM Control Mode: Select the Port number and Baud Rate of the device.
③ Device Information: Display the device name, version and input/output connection status. Click “Device Status” to refresh the device status.
④ Connection: Click to set the connection status.
⑤ Connected: Display the connection status.
■ Output Page
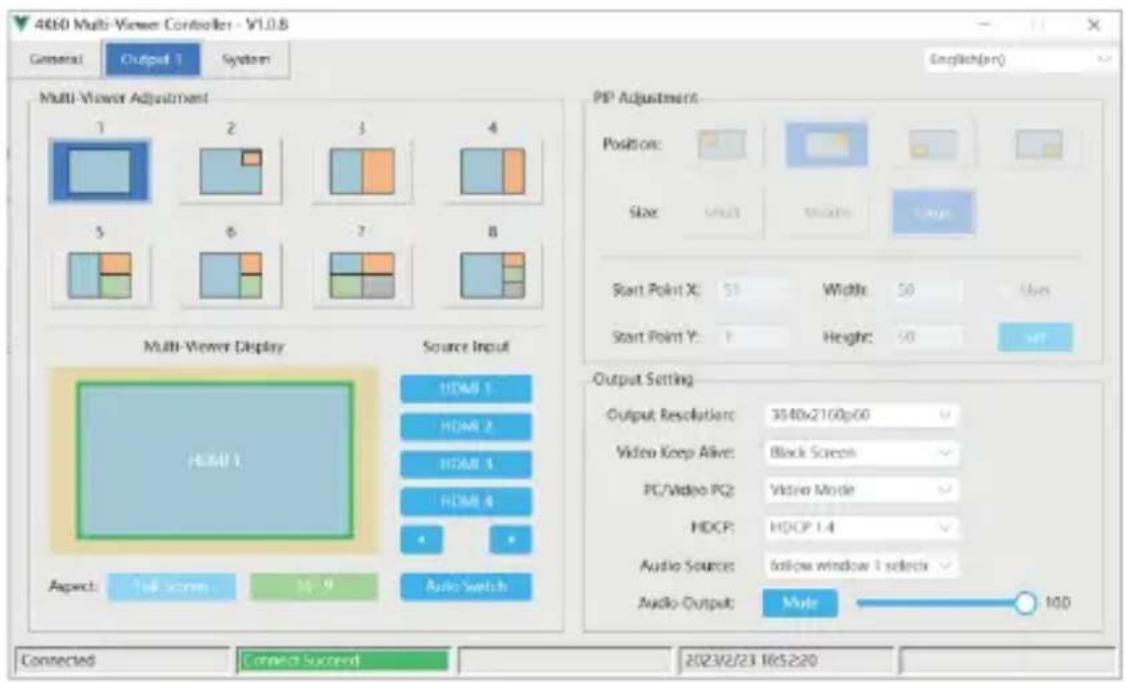
You can do the following operations on the Output page:
① Multi-View Adjustment: Click to select the desired screen display mode. There are eight modes available: SINGLE-PIP-PBP(1)-PBP(2)-Triple(1)-Triple(2)-Quad(1)-Quad(2).
② PIP Adjustment: In the PIP mode, you can switch the location and size of the PIP and set the user-defined PIP, as shown in the following table.
| Size | Relative Position(Starting Position) | Height and Width of theInner Frame |
| Small | Start Point X: 71Start Point Y: 71 | Width: 30Height: 30 |
| Middle | Start Point X: 61Start Point Y: 61 | Width: 40Height: 40 |
| Large | Start Point X: 51Start Point Y: 51 | Width: 50Height: 50 |
| User | Start Point X: 1-100Start Point Y: 1-100 | Width: 1-100Height: 1-100 |
③ Multi-Viewer Display: Display the input and output.
④ Source Input: Select the input signal source. You should select the window in "Multi-Viewer Display" firstly, and then click "HDMI 1/2/3/4" in "Source Input" to select a signal source, or click ◀/▶to select the last/ next signal source.
⑤ Aspect: Click “Full Screen” or “16:9” to switch the display aspect.
Only the following modes are available: PBP(1)-PBP(2)-Triple(1)-Triple(2)-Quad(2).
⑥ Auto Switch: Enable or disable the function of automatically switching input signal source, available only in SINGLE mode.
⑦ Output Setting: Set the output resolution, video keep alive, PC/Video PQ, HDCP, audio source and audio output.
■ System Page
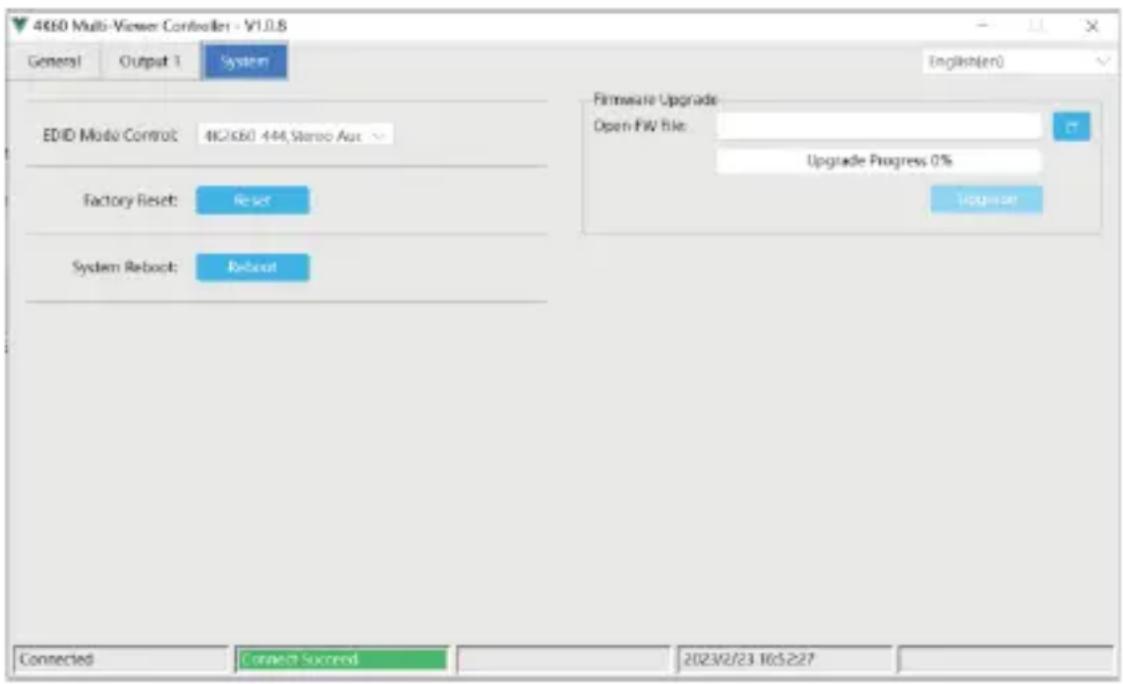
You can do the following operations on the System page:
① EDID Mode Control: Click the drop-down list on the right to select EDID mode.
② Firmware Upgrade: Click the folder icon on the right to import the firmware upgrade file, then click “Upgrade” to start upgrade. There will be a progress bar prompt during the upgrade process. When the progress bar reaches 100%, it indicates the upgrade is successful, and the device will be restarted automatically.
③ Factory Reset: Click "Reset" to reset the device to factory default settings.
④ System Reboot: Click “Reboot” to reboot the device.
12. RS-232 Command
The product also supports RS-232 command control. Connect the RS-232 port of the product to a PC with an RS-232 to USB serial cable. Then open a Serial Command tool on PC to send ASCII commands to control the product. The ASCII command list about the product is shown as below.
| ASCII Commands | ||||
| Serial port protocol. Baud rate: 115200 (default), 57600, 38400, 19200, 9600; Data bits: 8bit; Stop bits:1; Check bit: 0 | ||||
| x - Parameter 1; y - Parameter 2; ! - Delimiter | ||||
| Command Code | Function Description | Example | Feedback | Default |
| System Setting | ||||
| help! | List all commands | help! | ||
| r type! | Get device model | r type! | 4x1 HDMI Multiviewer | |
| r fw version! | Get Firmware version | r fw version! | MCU FW version x.xx.xx SCALER FW version x.xx.xx | |
| power z! | Power on/off the device,z=0~1 (z=0 power off, z=1 power on) | power 1! | Power on System Initializing... Initialization Finished! MCU FW version x.xx.xx SCALER FW version x.xx.xx | |
| r power! | Get current power state | r power! | power on/power off | |
| reboot! | Reboot the device | reboot! | Reboot... System Initializing... Initialization Finished! MCU FW version x.xx.xx SCALER FW version x.xx.xx | |
| reset! | Reset to factory defaults | reset! | Reset to factory defaults System Initializing... Initialization Finished! MCU FW version x.xx.xx SCALER FW version x.xx.xx | |
| Command Code | Function Description | Example | Feedback | Default |
| Output Setting | ||||
| s output res x! | Set Output Resolution (x=1~14)1. 4096x2160p60,2. 4096x2160p50,3. 3840x2160p60,4. 3840x2160p50,5. 3840x2160p30,6. 3840x2160p25,7. 1920x1200p60RB,8. 1920x1080p60,9. 1920x1080p50,10.1360x768p60,11.1280x800p60,12.1280x720p60,13.1280x720p50,14. 1024x768p60, | s output res 3! | out resolution:3840x2160p60 | 3840x2160p60 |
| r output res! | Get output resolution | r output res! | out resolution:3840x2160p60 | |
| s output hdcp x! | set output hdcp (x=1~3)1. HDCP 1.42. HDCP 2.23. HDCP OFF | s output hdcp 2! | output HDCP:HDCP 1.4 | HDCP 1.4 |
| r output hdcp! | Get output hdcp status. | r output hdcp! | output HDCP:HDCP 1.4 | |
| s output vka x! | Set output video keep active pattern. (x=1~2)1. black screen2. blue screen | s output vka 1! | output VKA pattern:black screen | black screen |
| r output vka! | Get output video keep active pattern. | r output vka! | output VKA pattern:black screen | |
| s output itc x! | Set output video mode (x=1~2)1: video mode2: pc mode | s output itc 1! | output ITC:video mode | video mode |
| r output itc! | Get output video mode | r output itc! | output ITC:video mode | |
| EDID Setting | ||||
| s input EDID x! | Set HDMI input EDID mode(x=1~19)1. 4K2K60_444,Stereo Audio 2.02. 4K2K60_444,Dolby/DTS 5.13. 4K2K60_444,HD Audio 7.14. 4K2K30_444,Stereo Audio 2.05. 4K2K30_444,Dolby/DTS 5.16. 4K2K30_444,HD Audio 7.17. 1080P,Stereo Audio 2.08. 1080P,Dolby/DTS 5.19. 1080P,HD Audio 7.110.1920x1200,Stereo Audio 2.011.1680x1050,Stereo Audio 2.012.1600x1200,Stereo Audio 2.013.1440x900,Stereo Audio 2.014.1360x768, Stereo Audio 2.015.1280x1024,Stereo Audio 2.016.1024x768, Stereo Audio 2.017.720p,Stereo Audio 2.018.copy from HDMI out19.USER1 | s input EDID 1! | input EDID:4K2K60_444, StereoAudio 2.0 | 4K2K60_444,StereoAudio 2.0 |
| r input EDID! | Get input EDID mode | r input EDID! | input EDID:4K2K60_444, Stereo Audio2.0 | |
| s edid user1 00FF FF ...! | Set user1 EDID data | s edid user1 00FF FF FF FF ...! | user1 EDID data:00 FF FF FF FF FFFF 00 ...... | |
| r edid user1! | Get user1 EDID data | r edid user1! | user1 EDID data:00 FF FF FF FF FFFF 00 ...... | |
| Audio Setting | ||||
| s output audio x! | Set output audio source (x=0~4)0. follow window 1 selectedsource1. HDMI 1 input audio2. HDMI 2 input audio3. HDMI 3 input audio4. HDMI 4 input audio | s output audio 0! | output audio: followwindow 1selected source | output audio:followwindow 1selectedsource |
| r output audio! | Get output audio source | r output audio! | output audio: followwindow 1 video | |
| s output audiovol+! | Increase output audio volume | s output audiovol+! | output audiovolume: 50 | |
| s output audiovol-! | Decrease output audio volume | s output audiovol-! | output audiovolume: 50 | |
| s output audiovol x! | Set output audio volume value(x=0~100) | s output audiovol 30! | output audiovolume: 30 | 100 |
| r output audio vol! | Get output audio volume | r output audio vol! | output audio volume: 30 | |
| s output audio mute x! | Set output audio mute on/off (x=0~1)0. mute off1. mute on | s output audio mute 0! | output audio mute: off | off |
| r output audio mute! | Get output audio mute on/off | r output audio mute! | output audio mute: off | |
| Single Screen Mode Setting | ||||
| s auto switch x! | Enable/disable auto switch feature(x=0~1)0. Disable auto switch1. Enable auto switch | s auto switch 0! | auto switch off | auto switch off |
| r auto switch! | Get auto switch feature | r auto switch! | auto switch off | |
| s in source x! | Route input source to output (1~4)1. HDMI 12. HDMI 23. HDMI 34. HDMI 4 | s in source 1! | HDMI 1 | HDMI 1 |
| r in source! | Get output selected input source | r in source! | HDMI 1 | |
| Multi-viewer Mode Setting | ||||
| s multiview x! | Set multi-viewer display mode (x=1~5)1. single screen2. PIP3. PBP4. triple screen5. quad screen | s multiview 1! | single screen | single screen |
| r multiview! | Get multi-viewer display mode | r multiview! | single screen | |
| s window x in y! | Select one input for one display window for the current multiview mode.(x=1~4)1. window 12. window 23. window 34. window 4(y=1~4)1. HDMI 12. HDMI 23. HDMI 34. HDMI 4 | s window 1 in 1! | window 1 select HDMI 1 | |
| r window x in! | Get windows selected input source (x=0~4)0. ALL1. window 12. window 23. window 34. window 4 | r window 1 in! | window 1 select HDMI 1 | |
| s window x border y! | Set the border mode of the specified window.(x=1~4)1. window 12. window 23. window 34. window 4(y=0~1)0. off1. on | s window 1 border 1! | window 1 border on | off |
| r window x border! | Get the border mode of windows (x=0~4)0. ALL1. window 12. window 23. window 34. window 4 | r window 1 border! | window 1 border on | |
| s window x border color y! | Set the border color of the specified window.(x=1~4)1. window 12. window 23. window 34. window 4(y=1~9)1. BLACK2. RED3. GREEN4. BLUE5. YELLOW6. MEGENTA7. CYNA8. WHITE9. GRAY | s window 1 border color 1! | window 1 border color:BLACK | YELLOW |
| r window x border color! | Get the border color of windows (x=0~4)0. ALL1. window 12. window 23. window 34. window 4 | r window 1 border color! | window 1 border color:BLACK | |
| s PIP HstartVstart HsizeVsize! | Set PIP window to user define modeHstart=(1~100)Vstart=(1~100)Hsize=(1~100)Vsize=(1~100)NOTE:Hstart+Hsize<=101,Vstart+Vsize<=101 | s PIP 10 10 20 20! | PIP 10 10 20 20 | |
| s PIP position x! | Set PIP window position (x=1~5)1. Left Top2. Left Bottom3. Right Top4. Right Bottom5. user | s PIP position 3! | PIP on right top | PIP on right top |
| r PIP position! | Get PIP window position | r PIP position! | PIP on right top | |
| s PIP size x! | Get PIP window size (x=1~4)1. small2. middle3. large4. user | s PIP size 3! | PIP size: large | PIP size: large |
| r PIP size! | Get PIP window size | r PIP size! | PIP size: large | |
| s PBP mode x! | Set PBP windows display mode (x=1~2)1. PBP mode 12. PBP mode 2 | s PBP mode 1! | PBP mode 1 | PBP mode 1 |
| r PBP mode! | Get PBP windows display mode | r PBP mode! | PBP mode 1 | |
| s PBP aspect x! | Set PBP windows display aspect ratio (x=1~2)1. Full screen2. 16:9 | s PBP aspect 1! | PBP aspect: full screen | PBP aspect: full screen |
| r PBP aspect! | Get PBP windows display aspect ratio | r PBP aspect! | PBP aspect: full screen | |
| s triple mode x! | Set triple windows display mode (x=1~2)1. triple mode 12. triple mode 2 | s triple mode 1! | triple mode 1 | triple mode 1 |
| r triple mode! | Get triple windows display mode | r triple mode! | triple mode 1 | |
| s triple aspect x! | Set triple windows display aspect ratio (x=1~2)1. Full screen2. 16:9 | s triple aspect 1! | triple aspect: full screen | triple aspect: full screen |
| r triple aspect! | Get triple windows display aspect ratio | r triple aspect! | triple aspect: full screen | |
| s quad mode x! | Set quad windows display mode (x=1~2)1. quad mode 12. quad mode 2 | s quad mode 1! | quad mode 1 | quad mode 1 |
| r quad mode! | Get quad windows display mode | r quad mode! | quad mode 1 | |
| s quad aspect x! | Set quad windows display aspect ratio (x=1~2)1. Full screen2. 16:9 | s quad aspect 1! | quad aspect: full screen | quad aspect: full screen |
| r quad aspect! | Get quad windows display aspect ratio | r quad aspect! | quad aspect: full screen | |
- Application Example
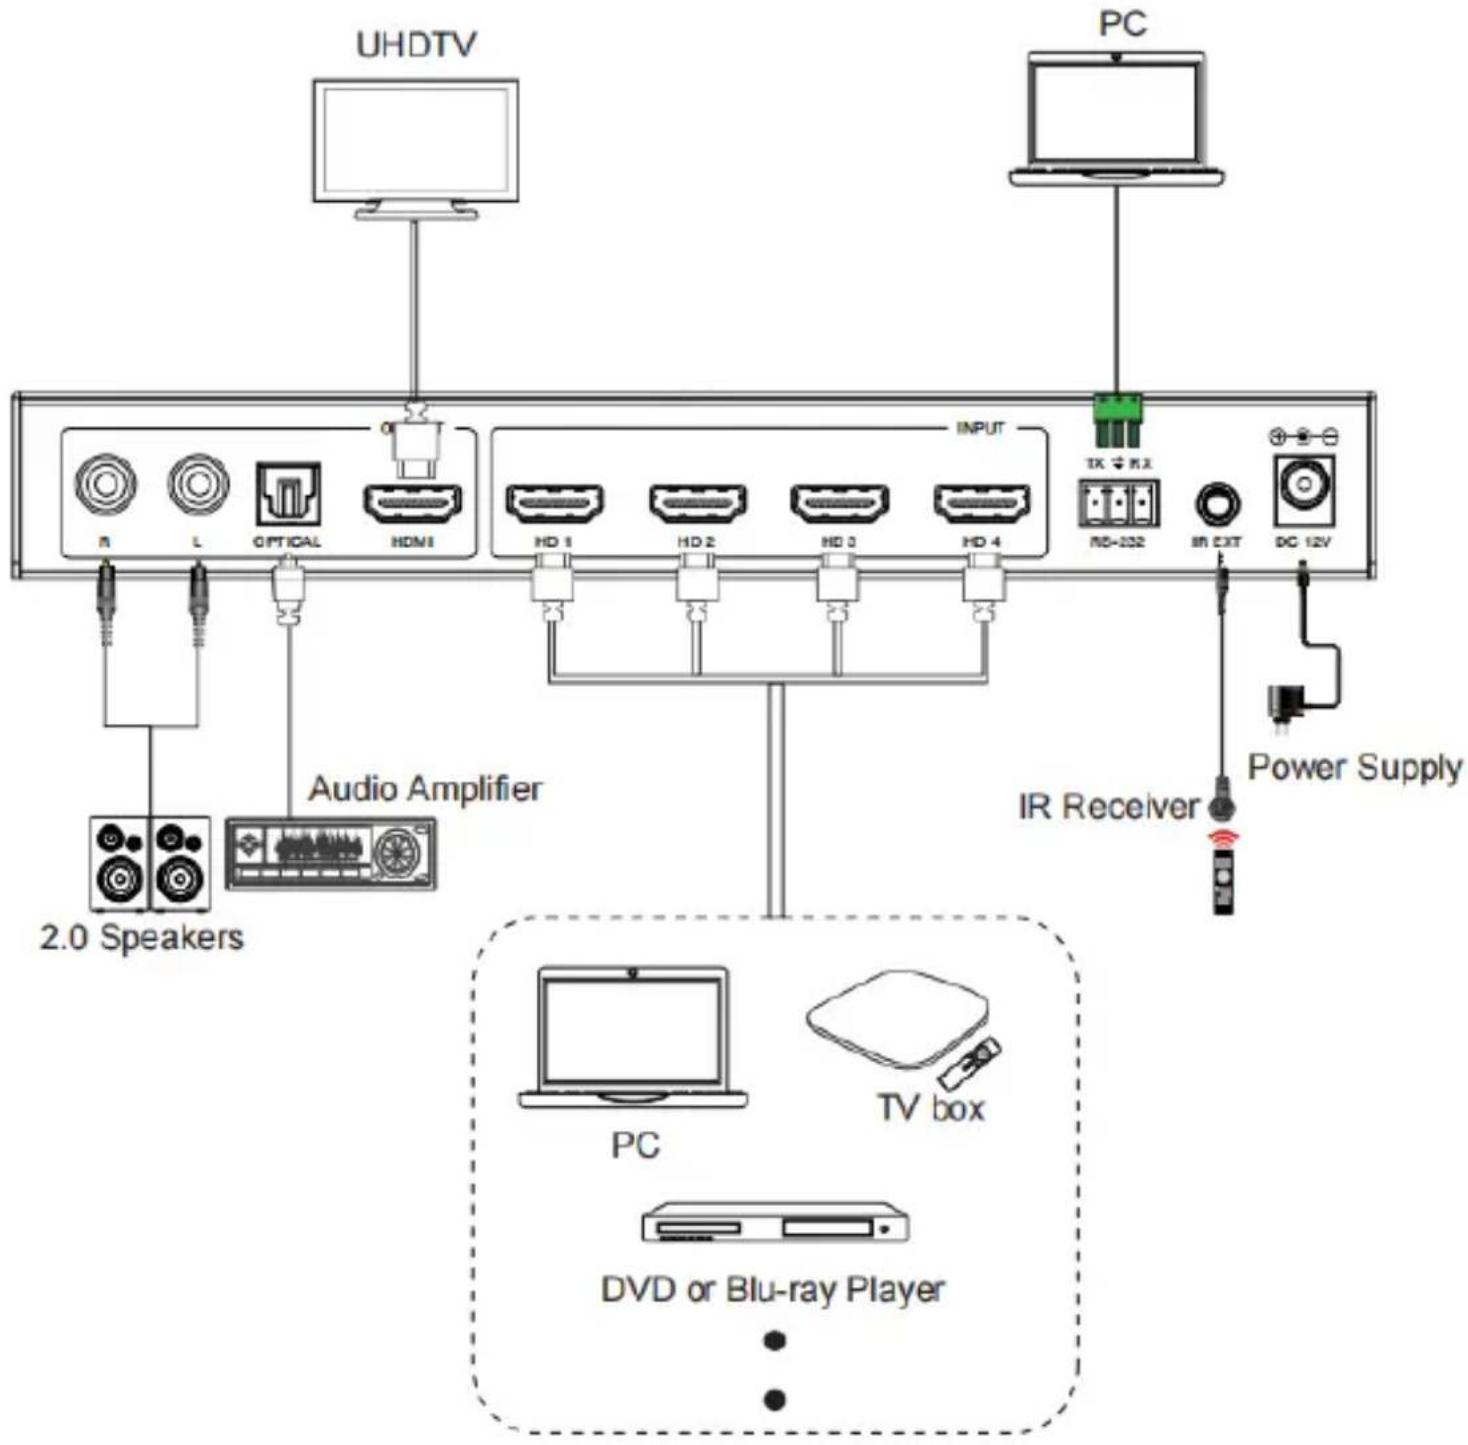
flowchart
graph TD
    A["UHDTV"] --> B["PC"]
    B --> C["IR EXT"]
    C --> D["DC 12V"]
    D --> E["Power Supply"]
    F["Audio Amplifier"] --> G["2.0 Speakers"]
    G --> H["PC"]
    H --> I["TV box"]
    I --> J["DVD or Blu-ray Player"]
    K["IR Receiver"] --> L["PC"]
    M["Input"] --> N["HD 1 HD 2 HD 3 HD 4"]
    style A fill:#f9f,stroke:#333
    style B fill:#ccf,stroke:#333
    style C fill:#cfc,stroke:#333
    style D fill:#fcc,stroke:#333
    style E fill:#ffc,stroke:#333
    style F fill:#cfc,stroke:#333
    style G fill:#ffc,stroke:#333
    style H fill:#cfc,stroke:#333
    style I fill:#fcc,stroke:#333
    style J fill:#ffc,stroke:#333
    style K fill:#cfc,stroke:#333
    style L fill:#fcc,stroke:#333
R L OPTICAL
DVDO
Follow us


- User Manual
- Thank you for purchasing DVDO-Switcher-41SS-MV
- Surge protection device recommended
- Table of Contents
- Introduction
- Features
- Package Contents
- Specifications
- Operation Controls and Functions
- Front Panel
- Rear Panel
- IR Pin Definition
- IR Remote
- EDID Settings
- Video & Audio
- Multiview
- OSD Menu Navigation
- Controller Software Operation Guide
- Installation & Connection
- Controller Main Interface
- ■ General Page
- ■ Output Page
- ■ System Page
- RS-232 Command
- DVDO
Brand : DVDO
Model : SWITCHER-41SS-MV
Category : Router