
Pro Espresso Machine EM0112-0SL - Coffee maker Emeril Lagasse - Free user manual and instructions
Find the device manual for free Pro Espresso Machine EM0112-0SL Emeril Lagasse in PDF.


| Product Type | Espresso machine |
| Model | EM0112-0SL |
| Brand | Emeril Lagasse |
| Power Supply | 120V~ 60Hz |
| Rated Power | 1350 Watts |
| Auto Shutoff | After 25 minutes of inactivity |
| Brewing Modes | Automatic single/double shot, Manual |
| Steam Function | Manual steam wand for frothing and heating |
| Hot Water Function | Manual hot water dispense (up to 90 seconds) |
| Water Tank | Removable, 40 oz (approx.) |
| Portafilter | Includes 1-shot and 2-shot sieves |
| Tamper | Integrated measuring spoon/tamper |
| Cleaning Tool | Included for unblocking portafilter openings |
| Drip Tray | Removable with full indicator |
| Cup Warming Plate | Top surface for pre-warming cups |
| Descaling Reminder | After approx. 500 cycles |
| Safety Features | Polarized plug, tamper-resistant screw, auto shutoff |
| Warranty | 2-year limited (US and Canada) |
| Certifications | ETL, UL listed (implied) |
| Dimensions (approx.) | 12 x 10 x 13 inches |
| Weight (approx.) | 10 lbs |
Frequently Asked Questions - Pro Espresso Machine EM0112-0SL Emeril Lagasse
User questions about Pro Espresso Machine EM0112-0SL Emeril Lagasse
0 question about this device. Answer the ones you know or ask your own.
Ask a new question about this device
Download the instructions for your Coffee maker in PDF format for free! Find your manual Pro Espresso Machine EM0112-0SL - Emeril Lagasse and take your electronic device back in hand. On this page are published all the documents necessary for the use of your device. Pro Espresso Machine EM0112-0SL by Emeril Lagasse.
USER MANUAL Pro Espresso Machine EM0112-0SL Emeril Lagasse
natural_image
Exterior view of a modern espresso machine (EMERIL LAGASSE) with control panel and glass cup, no visible text or symbols on the device itself.OWNER'S MANUAL
MODEL: EM0112-0SL
SAVE THESE INSTRUCTIONS - FOR HOUSEHOLD USE ONLY
When using electrical appliances, basic safety precautions should always be followed.
Do not use this appliance until you have read this manual thoroughly.
PRO ESPRESSO MACHINE
Before You Begin
The Emeril Lagasse™ Pro Espresso Machine will provide you many years of reliable service. Before you begin, it's very important that you read this entire manual, making certain that you are totally familiar with this appliance's operation and precautions.
Unit Specifications
Model Number
Power Supply
Rated Power
EM0112-0SL 120V\~ 60Hz 1350 Watts
Table of Contents
Unit Specifications 2
IMPORTANT SAFEGUARDS 4
Parts & Accessories 6
Instructions for Use 7
Before First Use 7
Auto Shutoff 7
Filling 7
Making Espresso 8
Steam/Hot Water Functions 10
Tips 11
Care & Maintenance 12
Troubleshooting 13
Warranty 14
IMPORTANT SAFEGUARDS
Please Read and Save this Use and Care Book.
When using electrical appliances, basic safety precautions should be followed, including the following:
- Read all instructions before using.
- To protect against fire, electric shock, and injury to people, do not immerse the cord, plugs, or appliance in water or other liquids.
- Avoid contact with moving parts.
- Do not operate any appliance with a damaged cord or plug or after the appliance malfunctions or has been damaged in any manner. Return the appliance to the nearest authorized service facility for examination, repair, or adjustment.
- The use of attachments not recommended or sold by the manufacturer may cause fire, injury, or electric shock.
- Do not use outdoors.
- Do not let the power cord hang over the edge of the table or counter or touch hot surfaces, including the stove.
- Clean the product and all other accessories after each use.
- Do not immerse in any liquid.
- The coffee-maker shall not be placed in a cabinet during use.
- The surfaces of the appliance will get hot. Residual heat will keep the surfaces hot after use.
- The surface of the heating element is subject to residual heat after use.
- Do not touch hot surfaces. Use handles or knobs.
- Use the appliance according to these instructions. Any misuse may cause potential injury, electric shock or other hazards. Do not use the appliance for anything other than its intended use.
- This appliance is not intended for use by children or by people with reduced physical, sensory, or mental capabilities or lack of experience and knowledge. Children should be supervised to ensure that they do not play with the appliance.
- Close supervision is necessary when any appliance is used near children.
- Do not place on or near a hot gas or electric burner, or in a heated oven.
- WARNING: To avoid the risk of injury, do not open the brew chamber during the brew process.
- Unplug from outlet when not in use and before cleaning. Allow to cool before putting on or taking off parts, and before cleaning the appliance.
- To disconnect, turn any control to "OFF", then remove plug from wall outlet.
SAVE THESE INSTRUCTIONS.
IMPORTANT SAFEGUARDS
Safety Features
POLARIZED PLUG (120V models only)
This appliance has a polarized plug (one blade is wider than the other). To reduce the risk of electric shock, this plug is intended to fit into a polarized outlet only one way. If the plug does not fit fully into the outlet, reverse the plug. If it still does not fit, contact a qualified electrician. Do not attempt to modify the plug in any way.
TAMPER-RESISTANT SCREW
Warning: This appliance is equipped with a tamper-resistant screw to prevent removal of the outer cover. To reduce the risk of fire or electric shock, do not attempt to remove the outer cover. There are no user-serviceable parts inside. Repair should be done only by authorized service personnel.
ELECTRICAL CORD
- A short power-supply cord is provided to reduce the risk resulting from becoming entangled in or tripping over a longer cord.
- Extension cords may be used if care is exercised in their use.
- If a long detachable extension cord is used:
a) The marked electrical rating of the power cord or extension cord should be at least as great as the electrical rating of the appliance.
b) If the appliance is of the grounded type, the extension cord should be a grounding-type 3-wire cord.
c) The cord should be arranged so that it will not drape over the countertop or tabletop where it can be pulled on by children or tripped over.
Note: This appliance has important markings on the plug blade. The attachment plug
or entire cord set (if plug is molded onto cord) is not suitable for replacement.
If damaged, the appliance shall be replaced.
SAVE THIS
INSTRUCTION MANUAL.
9

10

11
12
11

13
2
6
natural_image
Circular diagram with concentric rings and dots, no visible text or symbols- Cup warming plate
- Control panel
- Drip tray cover
- Drip tray full indicator
- Removable drip tray
- Steam/hot water control knob
- Steam wand
- Removable panarello (steam nozzle)
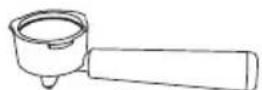
- Portafilter
-
2 shot sieve
-
1 shot sieve
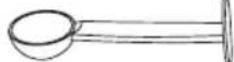
- Measuring spoon/Tamper
- Cleaning tool
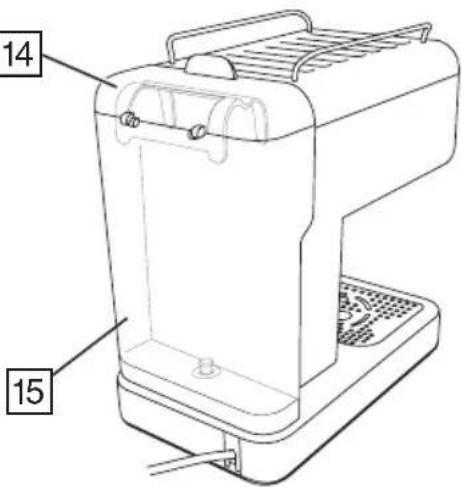
- Water tank lid
- Removable water tank
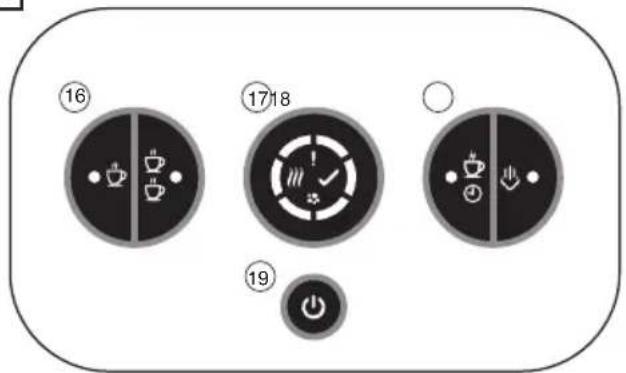
- Serving size selection buttons
- Status/Mode/Warning inidicator
- Manual/Steam buttons
- Power button
Instructions for Use
Before First Use
- Unpack all listed contents from the packaging.
- Read all material, warning stickers, and labels.
- Remove all packing materials, stickers, and labels from the appliance. Remove any clear or blue protective film on the components before use.
- Wash the portafilter, sieves and the measure/tamper in warm soapy water. Rinse and dry.
- Before using for the first time, or if the appliance has not been used for a long time, clean it by filling and running the appliance without coffee. Follow the instructions under FILLING and MAKING ESPRESSO but without adding any coffee.
- Clean the steam system by following the instructions under CARE AND MAINTENANCE.
Auto Shutoff
After 25 minutes of inactivity, your espresso maker will shut off. To turn it back on, press ⏻.
Filling
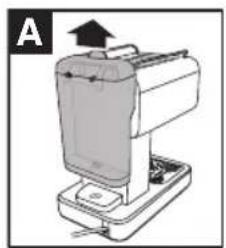
- Remove the water tank by lifting it upwards (Fig A).
- Fill the water tank with cold, fresh water to the max marking (Fig. B).
- Refit the water tank (Fig. C). Ensure it is correctly fitted and fully seated.
natural_image
Diagram of a printer or scanner device with an arrow indicating upward motion (no text or symbols present)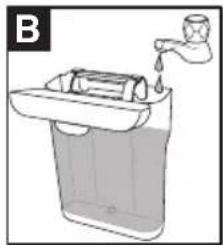
natural_image
Illustration of a hand washing a water bottle into a trash bin (no text or symbols)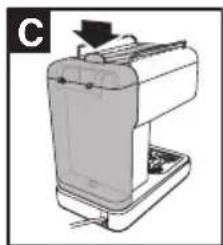
natural_image
Diagram of a portable printer with a paper feeding into a base, showing internal components and a downward arrow (no text or symbols)Instructions for Use
Making Espresso
Espresso can be enjoyed on it's own or used for many popular espresso based variations such as Latte, Cappuccino, Americano, etc. Your espresso maker can make a single shot (approx. 30ml), or a double shot (60ml) of espresso.
Your Espresso maker can make drinks automatically or under manual control.
Filling the portafilter
- Decide whether you are making a single shot or double shot.
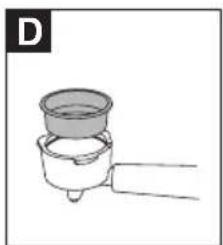
- For a single shot fit the 1 shot (smaller) sieve into the portafilter; for a double fit the 2 shot (larger) sieve (Fig. D). For ESE (easy serving espresso) pods use the 1 shot sieve.
-
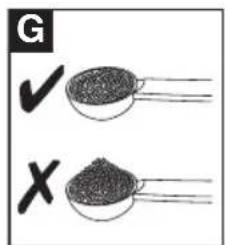
Use the measure to fill the sieve (Fig. E). For a single shot use 1 measure and for a double use 2 measures (Fig. F). The coffee in the measure should be level and not heaped (Fig. G).
-
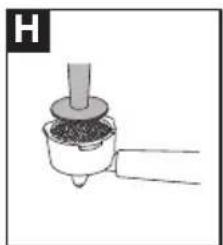
Lightly tamp (compress) the coffee into the portafilter using the flat end of the measure (Fig. H) until it is level. You need to compact the coffee just enough to create resistance to the water as it passes through the coffee. Too loose and the water passes easily through the coffee and the full flavour won't be extracted. Too tight and it will be difficult for the water to pass through the coffee and the flavour will be harsh and bitter.
natural_image
Simple line drawing of a mechanical component with a cylindrical top and base, no text or symbols present.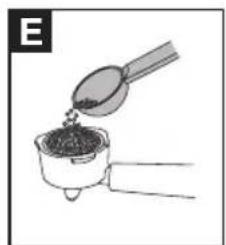
natural_image
Simple line drawing of a spoon pouring liquid into a container (no text or symbols)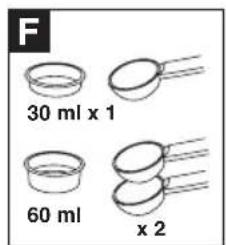
natural_image
Simple line drawing of a mechanical component with a shaft and base, no text or symbols presentFitting the portafilter
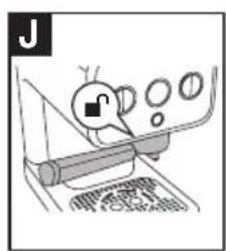
- Make sure the rim of the portafilter is free from any coffee debris. Fit it into the machine with the handle facing out to the left so that is aligned with the ▪ mark (Fig. J).
- Push the portafilter upwards then turn it to the right until it stops (Fig. K). To remove the portafilter, turn it to the left until the handle lines up with the ⚪ mark.
natural_image
Illustration of a computer monitor with a cartoon character interacting with the screen (no text or symbols visible)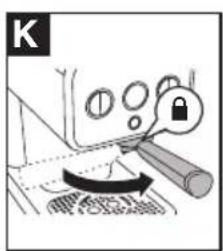
Instructions for Use
Automatic One and Two Cup Mode
Your Espresso maker can make one or two cups with the press of a single button. You can make a single shot into one cup, a double shot into one cup or a double shot shared between two cups by placing two cups side by side under the outlet and preparing the portafilter with the 2 shot sieve.
- Fill the water tank, then add the required amount of coffee to the portafilter and fit it.
- Press the ⏻ button to switch your Espresso maker on.
- Your Espresso maker will start its pre-heat cycle. The six segments in the display and the 🎨icon will light up. The first segment will flash. The flashing segment will go off and the next anticlockwise segment will flash. When all of the segments have gone off, and the √ icon comes on, your Espresso maker is heated and ready.
- Place one or two cups onto the drip tray.
- For one cup, press the 📋 button; for two cups press the 📋/💡 button.
- The six segments in the display will cycle until they all go off in a similar way to the pre-heat cycle but without showing the >>> icon.
- When the coffee is ready, all six segments will have gone off and the √ icon will come on.
NOTE: If your Espresso maker needs to pre-heat once the coffee is brewed, the pre-heat icon will show instead of the ready icon .
Manual Mode
This mode allows you to control the amount of coffee your Espresso maker dispenses.
- Fill the water tank, then add the required amount of coffee to the portafilter and fit it.
- Place one or two cups onto the drip tray.
- Press and hold the 📋/💡 button. The button light will come on.
- Hold the button until the required amount of coffee has been dispensed.
NOTES: The maximum run time in manual mode is 60 seconds.
The display will show a single segment at a time in a moving anticlockwise pattern while the button is held down.
Instructions for Use
Steam/Hot Water Functions
The steam/hot water functions can be used to heat milk, froth milk and heat drinks that have cooled. Steaming and hot water functions will always be manually controlled.
IMPORTANT: The appliance requires a short cooling period after the steaming or frothing function is completed and will not be able to brew immediately.
Steaming milk
- Press the steam button 🔊.
- The six segments in the display and the ⌘ icon will light up. The first segment will flash. The flashing segment will go off and the next anticlockwise segment will flash. When all of the segments have gone off, and the √ icon comes on, your Espresso maker is ready to make steam.
- Fill a small jug with milk.
- Hold the jug under the steam nozzle with the nozzle beneath the surface of the milk.
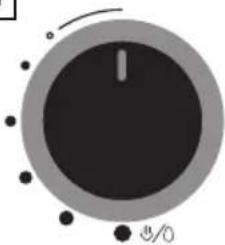
- Turn the steam/hot water control knob counterclockwise. The further counterclockwise you turn the control knob, the more steam is produced.
- When the milk is heated to your satisfaction, turn the steam/hot water control knob clockwise to the off (O) position.
- Immediately clean the steam nozzle. Refer to the Care and Maintenance section for cleaning instructions.
Frothing milk
- Follow steps 1 and 2 under 'Steaming milk'. Use cold milk from the refrigerator for best results.
- Hold the jug under the nozzle as above and open the steam/hot water control knob as desired.
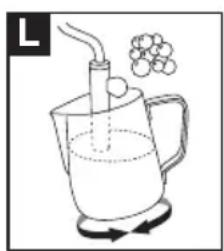
- To make frothy milk with large bubbles, hold the nozzle just under the surface of the milk and make circular motions with the jug as steam is released (Fig. L).
- To make frothy milk with small bubbles (micro foam), hold the nozzle fully under the surface of the milk and make circular motions with the jug as steam is released (Fig. M).
- Turn the steam/hot water control knob clockwise to the off (O) position when you are finished.
- Immediately clean the steam nozzle. Refer to the Care and Maintenance section for cleaning instructions.
natural_image
Simple line drawing of a laboratory flask with a beaker and a beaker above it, showing liquid level and reaction arrow (no text or symbols)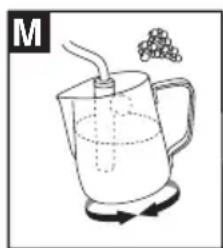
natural_image
Simple line drawing of a glass pitcher with a straw and a beaker, showing a rotating arrow (no text or symbols)Instructions for Use
Hot water
- Make sure machine has been pre-heated.
- Hold a suitable container under the steam nozzle.
- Turn the steam/hot water control knob fully counterclockwise to the ⏻/○ position.
- Hot water will come out of the steam nozzle for up to 90 seconds.
- Turn the steam/hot water control knob clockwise to the off (O) position when you are finished.
Heating drinks
- Follow the directions under 'Steaming milk' but holding the cooled drink under the steam nozzle instead of the milk.
Cleaning the steam nozzle after each use
- Clean the steam nozzle and the swivel arm immediately after every use.
- Immerse the steam nozzle in a cup of clean water.
- Turn the steam/hot water control knob counterclockwise. Let steam escape into the clear water for several seconds.
- Repeat the process several times if necessary.
- Finally, carefully remove the steam nozzle and wipe it and the swivel arm with a clean damp cloth before replacing it.
Tips
Place your espresso cups on top of the unit where they will be gently warmed.
To get a hotter espresso, warm the portafilter before use. Fit the sieve into the portafilter, fit the portafilter and run the brewing process for 5-10 seconds to heat the filter up. Then, remove the portafilter and use it as normal to make espresso. Be aware when handling the portafilter and sieve that they will be hot after doing this.
After several uses of the steam function, the temperature of the unit can become high and this will prevent further brewing until the machine has cooled a little. You can use the hot water function to cool the machine more quickly. The machine will release steam at first; when water begins to dispense, the unit will be cooled to brewing temperature again.
Care & Maintenance
Cleaning
- Unplug the appliance and let it completely cool down.
- Clean the exterior surfaces and the steam nozzle with a slightly damp cloth and then dry them thoroughly. Make sure that no water enters the product interior. The steam nozzle tip can be removed by pulling it downwards and it can then be washed separately.
- Remove the portafilter and sieve and empty out the coffee grounds. Wash under running water and dry thoroughly.
- Wipe the area on the machine where the portafilter fits.
- Empty the drip tray when you have finished using the machine, or when the drip tray full indicator pops up.
■ use the cleaning tool to unblock the openings in the portafilter.
The steam nozzle, sieves, drip tray and drip tray cover can be cleaned in a dishwasher.
Descaling
After approximately 500 cycles, the clean icon ⚙️ will appear in the display indicating that the unit should be descaled. This is a warning and will not affect coffee making but the icon will remain lit until it is reset after descaling the appliance.
Over time, calcium deposits or “scale” may build up in your brewer. Scale is non-toxic, but if left unattended, can hinder brewer performance and cause premature failure. Regularly descaling your machine helps to maintain beverage quality, as well as the lifespan of the heating element, and other internal parts that come in contact with water throughout the brew process.
A full cleaning with vinegar is recommended once a month. More frequent cleanings may be required in areas with higher water hardness. If using a proprietary descaling product, follow the manufacturer's instructions.
- Pour fresh water and the specified amount of decalcifier into the water tank. Use a 50/50 mix when using a vinegar solution.
- Repeatedly start the brewing process and also use the 'hot water' process to clean the steam nozzle and internal components.
- Do this until the water tank is empty. If necessary, repeat this process.
- After descaling, rinse the product several times by brewing water with no coffee to remove any decalcifier residue.
- To reset the light, hold the 📋/💡 button and the manual 📋/💡 button at the same time for 5 seconds. The clean icon ⚙️ will go off.
Troubleshooting
General:
| PROBLEM POSSIBLE CAUSE SOLUTION | ||
| No espresso is made. Water tank | k empty. Fill the water tank. | |
| Portafilter or sieve is blocked. Remove and clean. | ||
| Machine needs descaling. Descale the machine. | ||
| Grind is too fine or coarse. Grind the coffee to the correct consistency. | ||
| Too much tamping pressure was used. | Empty sieve and re-add coffee using less tamping pressure. | |
| Espresso leaks from around the portafilter. | The portafilter is not fitted correctly. | Remove and refit the portafilter. Make sure it is turned fully to the right until it won't turn any further. |
| Portafilter can't be fitted. Too much coffee in the sieve. Use the supplied measure/tamper as directed. | ||
| Coffee tastes weak. | Not enough coffee in the sieve. | Use the supplied measure/tamper as directed. |
| Grind is too fine or coarse. Grind the coffee to the correct consistency. | ||
| Coffee too loose in sieve. | Tamp the coffee down with more pressure. | |
The caution ! icon will appear in the display under the following circumstances:
| CAUSE | SOLUTION |
| The steam/hot water control knob is in the open position during brewing. | Close the control knob. |
| Manual brewing longer than 60 seconds. | Don’t hold the ☑/☐ button for longer than 60 seconds in manual mode. |
| Steaming longer than 180 seconds. | Don’t use the steam/hot water function for longer than 180 seconds. |
| Hot water dispensed for longer than 90 seconds. | Don’t try to dispense hot water for longer than 90 seconds. |
| The steam/hot water control knob is in the open position when the unit is switched on. | The unit will not brew. Close the control knob. |
Troubleshooting
The pre-heat 🔊️ icon and the countdown display segments along with the flashing caution ! icon will appear in the display under the following circumstances:
| CAUSE SOLUTION | |
| Attempting to brew coffee before the unit has reached the correct temperature. | Allow the unit to pre-heat fully indicated by the 🎩icon. |
| Attempting to create steam before the unit has reached the correct temperature. | Allow the unit to reach the correct temperature indicated by the 🎩icon. |
| Attempting to dispense hot water before the unit has reached the correct temperature. | Allow the unit to reach the correct temperature indicated by the 🎩icon. |
Recycling
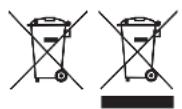
To avoid environmental and health problems due to hazardous substances, appliances and rechargeable and non-rechargeable batteries marked with one of these symbols must not be disposed of with unsorted municipal waste. Always dispose of electrical and electronic products and, where applicable, rechargeable and non-rechargeable batteries, at an appropriate official recycling/collection point.
E ^TM
EMERIL LAGASSE
TWO-YEAR LIMITED WARRANTY
(Applies only in the United States and Canada)
For service, repair or any questions regarding your appliance, call the appropriate 800 number listed within this section. Please DO NOT return the product to the place of purchase. Also, please DO NOT mail product back to manufacturer, nor bring it to a service center. You may also want to consult the website listed on the cover of this manual.
What does it cover?
Any defect in material or workmanship provided; however, Empower Brands, LLC's liability will not exceed the purchase price of product.
For how long?
Two years from the date of original purchase with proof of purchase.
What will we do to help you?
Provide you with a reasonably similar replacement product that is either new or factory refurbished.
How do you get service?
Save your receipt as proof of date of sale. Visit the online service website at www.prodprotect.com/emeril, or call toll-free 1-800-768-7806, for general warranty service. If you need parts or accessories, please call 1-800-738-0245.
How does state law relate to this warranty?
This warranty gives you specific legal rights. You may also have other rights that vary from state to state or province to province.
What does your warranty not cover?
Damage from commercial use Damage from misuse, abuse or neglect Products that have been modified in any way Products used or serviced outside the country of purchase Glass parts and other accessory items that are packed with the unit Shipping and handling costs associated with the replacement of the unit Consequential or incidental damages (Please note, however, that some states do not allow the exclusion or limitation of consequential or incidental damages, so this limitation may not apply to you.)
Are there additional warranty exclusions?
This warranty shall not be valid where it is contrary to U.S. and other applicable laws, or where the warranty would be prohibited under any economic sanctions, export control laws, embargos, or other restrictive trade measures enforced by the United States or other applicable jurisdictions. This includes, without limitation, any warranty claims implicating parties from, or otherwise located in, Cuba, Iran, North Korea, Syria and the disputed Crimea region.
EMERIL LAGASSE
PRO ESPRESSO MACHINE
We are very proud of the design and quality of our Emeril Lagasse™ Pro Espresso Machine.
This product has been manufactured to the highest standards. Should you have any questions, our friendly customer service staff is here to help you.
To contact us, call us at 1-800-768-7806.
The Emeril Lagasse trademarks are owned by Martha Stewart Living Omnimedia, Inc., used under license.
© 2024 Martha Stewart Living Omnimedia, Inc., used under license.
All other marks are trademarks of Empower Brands, LLC.
Dist. by: Empower Brands, LLC, Middleton, WI 53562
® registered trademark and ™ trademark of Empower Brands, LLC.
© 2024 Empower Brands, LLC. All rights reserved. 08/24
Made in China.
T22-9003335-C
31136 E
- OWNER'S MANUAL
- SAVE THESE INSTRUCTIONS - FOR HOUSEHOLD USE ONLY
- PRO ESPRESSO MACHINE
- Before You Begin
- Unit Specifications
- Table of Contents
- IMPORTANT SAFEGUARDS
- Please Read and Save this Use and Care Book.
- SAVE THESE INSTRUCTIONS.
- Safety Features
- POLARIZED PLUG (120V models only)
- TAMPER-RESISTANT SCREW
- ELECTRICAL CORD
- SAVE THIS
- INSTRUCTION MANUAL.
- Instructions for Use
- Before First Use
- Auto Shutoff
- Filling
- Making Espresso
- Filling the portafilter
- Fitting the portafilter
- Automatic One and Two Cup Mode
- Manual Mode
- Steam/Hot Water Functions
- Steaming milk
- Frothing milk
- Hot water
- Heating drinks
- Cleaning the steam nozzle after each use
- Tips
- Care & Maintenance
- Cleaning
- Descaling
- Troubleshooting
- Recycling
- E TM
- EMERIL LAGASSE
- TWO-YEAR LIMITED WARRANTY
- (Applies only in the United States and Canada)
- What does it cover?
- For how long?
- What will we do to help you?
- How do you get service?
- How does state law relate to this warranty?
- What does your warranty not cover?
- Are there additional warranty exclusions?
Brand : Emeril Lagasse
Model : Pro Espresso Machine EM0112-0SL
Category : Coffee maker