
TS-1 - Distributeur chauffant Taiji - Free user manual and instructions
Find the device manual for free TS-1 Taiji in PDF.


| Product Type | Electronic device (e.g., digital scale, timer) |
| Brand | Taiji |
| Model | TS-1 |
| Dimensions (approx.) | 15 × 10 × 2 cm |
| Weight (approx.) | 200 g (with batteries) |
| Power Source | 2 × AAA batteries (not included) |
| Display | LCD screen with backlight |
| Main Functions | Measurement, timer, countdown, memory recall |
| Measurement Range | 0.1 g – 5000 g or 0.1 oz – 176 oz |
| Accuracy | ±0.1 g (for weight models) |
| Units | g, oz, lb:oz, ml (water), fl.oz (water) |
| Auto-Off | Yes, after 2 minutes of inactivity |
| Tare Function | Yes, zeroing of container weight |
| Overload Indicator | Yes, warning on display |
| Low Battery Indicator | Yes, battery icon |
| Material | ABS plastic platform, stainless steel (if applicable) |
| Cleaning | Wipe with a soft, damp cloth; do not immerse in water |
| Safety | Use on a flat, stable surface; avoid overloading |
| Spare Parts | Batteries (AAA); replacement not offered separately |
| Repairability | Non-serviceable; do not disassemble |
| Warranty | 1 year limited warranty (check manufacturer) |
| Manual Languages | English (original), translations available online |
Frequently Asked Questions - TS-1 Taiji
User questions about TS-1 Taiji
0 question about this device. Answer the ones you know or ask your own.
Ask a new question about this device
Download the instructions for your Distributeur chauffant in PDF format for free! Find your manual TS-1 - Taiji and take your electronic device back in hand. On this page are published all the documents necessary for the use of your device. TS-1 by Taiji.
USER MANUAL TS-1 Taiji
Thank you for purchasing TAIJI Sake Warmer Dispenser.
· Before operating this product, please read this manual for instructions and proper operation.
· This product is for heating and dispensing sake only and intended for indoor use only.
Do not use for any other purposes.
- Keep this manual in a place where it can be reached for immediate references.

natural_image
Technical line drawing of a mechanical device with control panel and base mount (no text or symbols)Table of Contents
Safety Precautions .... 2 Installation .... 5
Applications 3 Operation Instructions 6\~8
Operating Concepts.... 3Servicing.... 9
Parts Identification .... 4Specifications .... 9
TAIJI
SAFETY PRECAUTIONS
■ WARNINGS:
Failing to adhere to the following warnings may cause danger to human life or inflict a severe injury.
- Install this product on a level, steady surface. Make sure to install the provided anti-toppling brackets.
- Do not disassemble, tamper or attempt to repair this product. Contact your distributor for servicing.
- Do not immerse this product in water or splash water on this product.
- Do not use this product outdoors. This product is for indoor use only.
- This product is to be operated by persons who understand its functions and operating procedures in commercial environments only. Keep children away from this product or any other commercial appliances.
- This product should be connected to an exclusive wall outlet supplying power of AC110-120V 15A or AC220-240V 7.5A (minimum). Do not use an extension cord.
- Avoid damaging the power cord. Do not place any object on the cord. Do not nip or tamper with the cord. Keep the cord away from any heat sources.
- Do not tamper with the plug blades.
- Contact a disposal service provider, municipal government office or your distributor for proper disposal of this product.
■ CAUTIONS:
Failing to adhere to the following cautions may result in personal injuries or property damages.
Properly and promptly discard the packaging materials such as plastic bags and Styrofoam.
Do not operate this product if it has been damaged or dropped.
Do not operate this product if the power cord or plug is damaged.
Do not pull the plug by the cord. Hold the plug when inserting into or removing from the outlet.
Make sure your hands are dry when plugging/unplugging the power cord or turning on/off the power switch.
When not in use, remove the plug from the outlet.
Do not use this product for other than heating sake (Japanese rice wine).
Avoid contacting with the sake heating unit as it gets hot when in operation.
Be very careful when pouring heated sake into a sake server.
APPLICATIONS
This product is intended for heating sake only.
The product should not be used outdoors.
OPERATING CONCEPTS
This product is an electric sake heater.
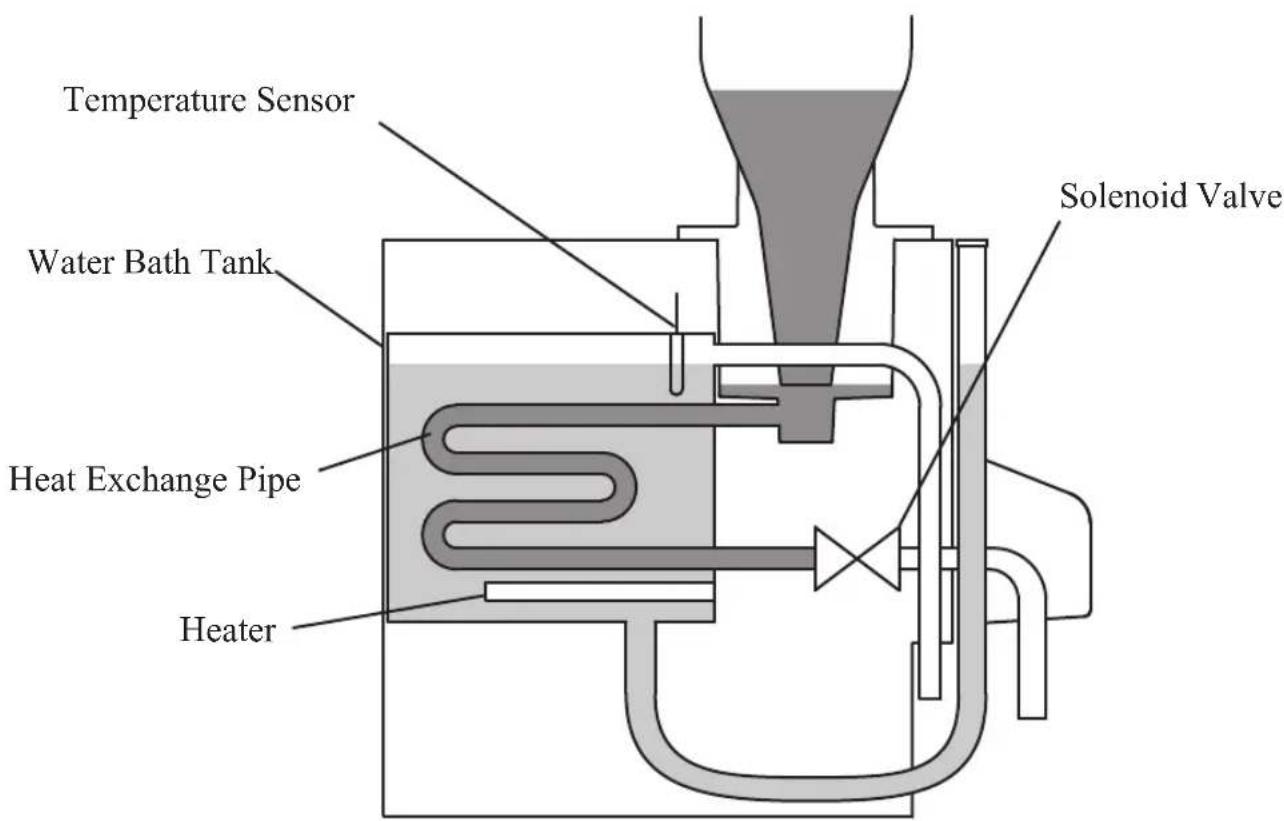
- Sake is fed into the titanium heat exchange pipe.
- The titanium pipe runs through the water bath tank.
• The water bath is heated by the heater. - The water temperature is monitored by the temperature sensor and controlled by the temperature control device.
PARTS IDENTIFICATION

INSTALLATION
-
Take the product out of the carton. Make sure you have all of the components including this manual and accessories.
-
Select the Location:
• Level and steady surface
- Ample air movement
- At least 20 inches away from any heat sources
- No direct sunlight
- Avoid high-humidity areas or near water
- Installation of Anti-Toppling Brackets:
For safe operation of this product, make sure to install the anti-toppling brackets.

- Align the holes of the bracket with the holes in the flank of the main unit.
- Insert the provided screw into the lower hole and tighten completely.
-
Repeat on the other side.
-
Cleaning the Interior:
Before you operate this product for the first time, please clean the interior of the main unit following the instructions in "Daily Cleaning" section of this manual.
OPERATION INSTRUCTIONS
Preparations
-
Connect the power cord to a wall outlet.
-
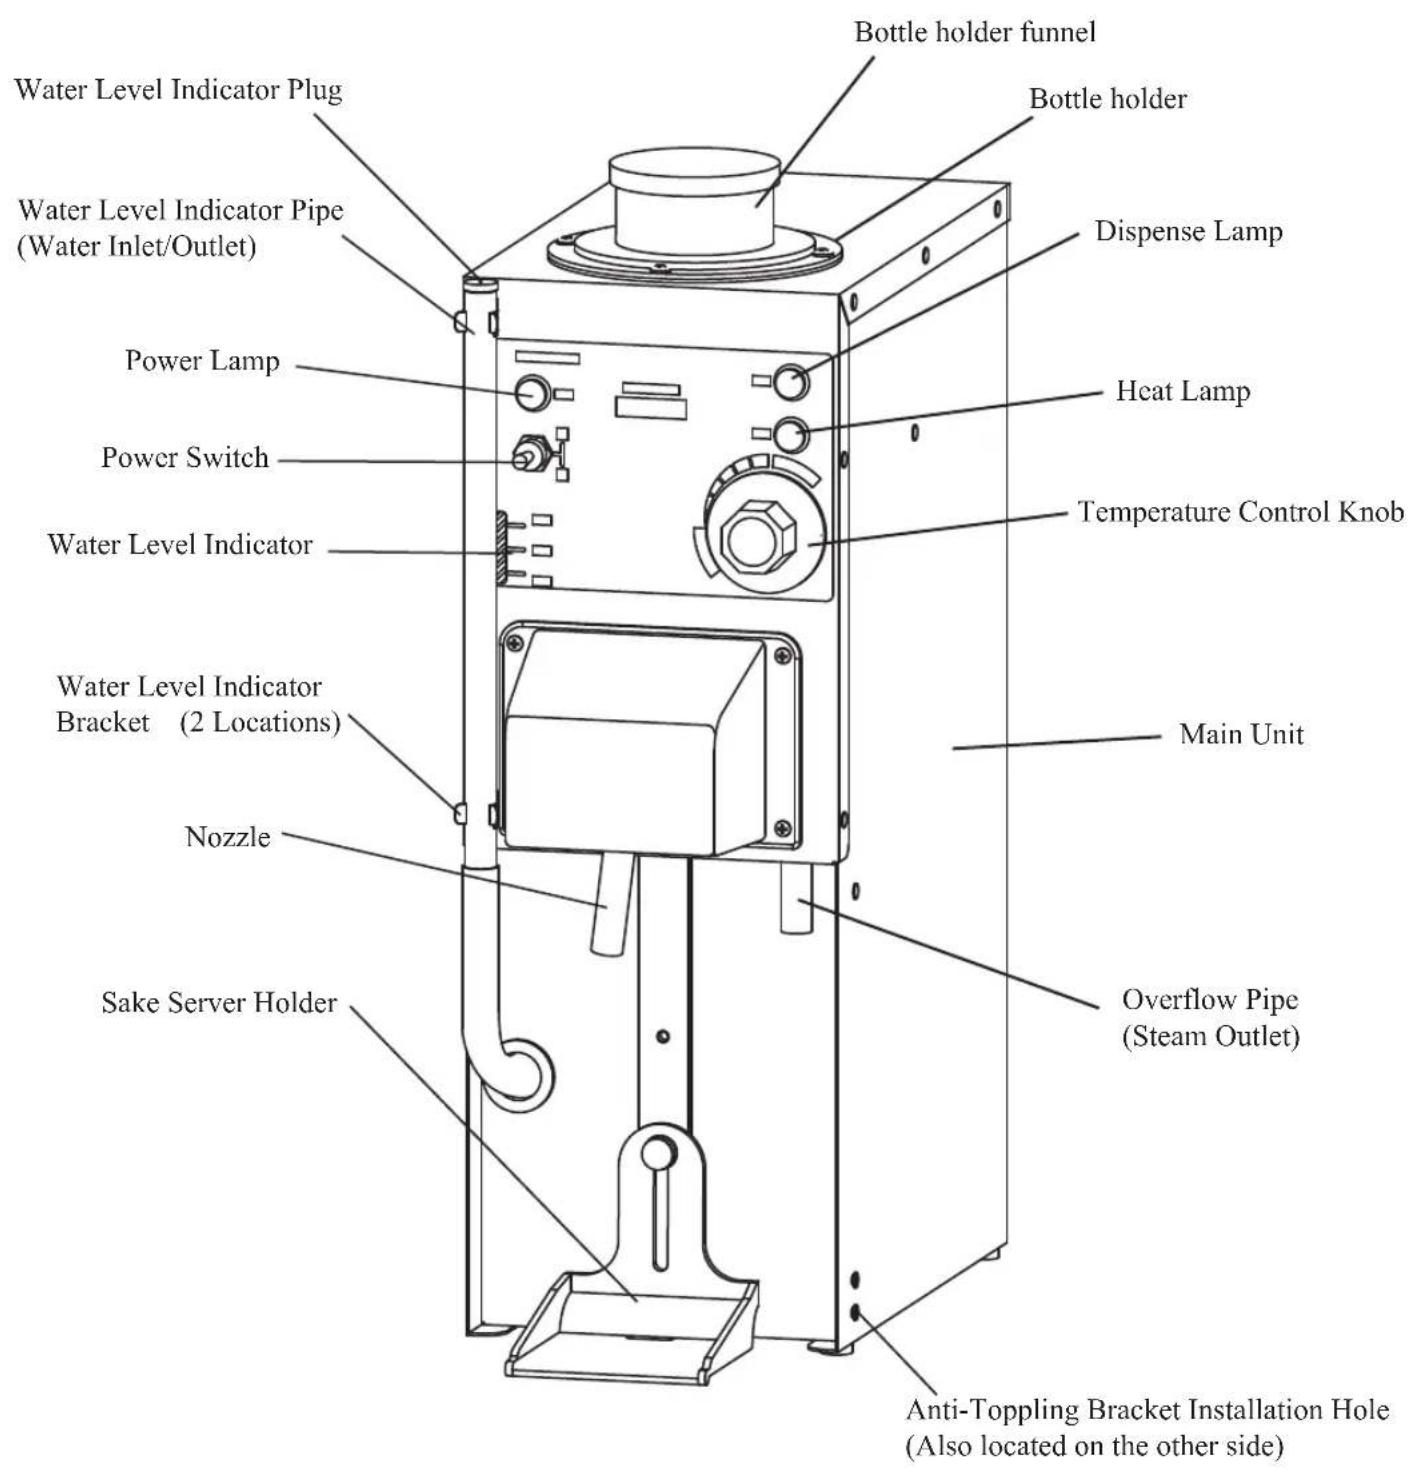
Make sure the water level indicator pipe is secured in the brackets.
-
Check the water level in the water bath.
To add water:
- Remove the plug from the water level indicator pipe.
• Using the provided funnel, slowly add water (Fig. 1).
- Add water until the water level reaches the 適量“Optimum” position on the water level indicator.
• The water bath tank holds approximately 0.63 gallon (2.4 liters) of water.
Excessive water (beyond the maximum level) will be discharged through the overflow outlet.

natural_image
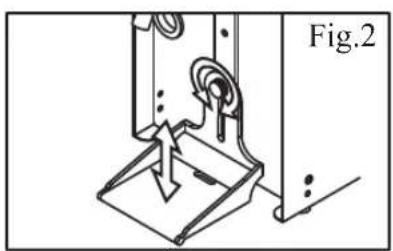
Line drawing of a laboratory setup with a funnel pouring liquid into a conical flask (no text or symbols)- Adjust the height of the sake server holder according to the size of your sake servers (Fig. 2 & 3).
natural_image
Mechanical assembly diagram showing a clamping device with wires and a base, labeled Fig.2 (no text or symbols on the diagram itself)
- Turn the power switch on. Set the sake temperature to your desired temperature by turning the sake temperature control knob. One scale step on the knob represents a temperature range of approximately 7^ F ( 4^ C) (Fig. 4).

-
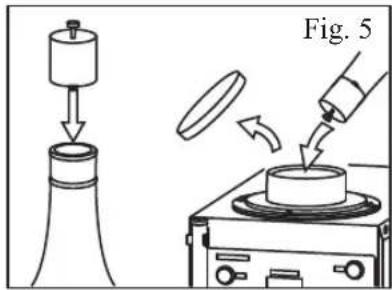
Attach the accessory cap to a sake bottle. Make sure the nozzle has been pulled. insert sake bottle in the bottle holder funnel (Fig.5).
-
Make sure the heat lamp is off - sake is at the set temperature.
-
Place a sake server on the sake server holder.
-
Fit the nozzle (sake outlet) into the mouth of your sake server bottle, lightly push the bottle until the nozzle is straight down, and place the server bottle on the server bottle holder. (Fig.6)
-
The dispense lamp is on - the warmed sake begins to come out.
-
When the server bottle is filled with the required volume of sake, the dispensing operation stops automatically and the dispensing lamp is off.
-
You can pick up the server bottle in the reverse procedure. Take out the bottle while making its posture slantwise.

Cautions:
- Be very careful not to burn yourself as the sake may be quite hot depending on the temperature setting.
- At the beginning of each operating session, pour out a little amount of sake to check the temperature and to make sure that it does not contain any impurities such as water left behind from cleaning.
- Dispensing a large amount of sake at one time or operating in a cold environment may lower the temperature of sake being dispensed. Adjust the temperature setting to compensate for the effects of such circumstances.
MAINTENANCE
- Daily Cleaning
- Pull out the sake bottle.
- Pour out sake left in the heating unit. Discard the sake or you may use it for cooking.
- Pour hot water (below 158^ F/ 70^ C) into bottler holder.
Never use detergent or any cleaning agents. - Remove the sake server holder. Place an empty vessel under the nozzle of the unit.
- Lightly push the nozzle is straight down, and let the water flow out.
- After the water flow stops completely, pull the nozzle.
- Turn the power switch off. Remove the cleaning container.
Wash sake server holder with hot water.
A small amount of cleaning water may remain in the system. At the beginning of the next operating session, pour out a small amount of sake. Discard or use this sake for cooking.
- Main Unit:
Wipe with dry or tightly-wrung wet cloth. Never use any solvent such as thinner or benzene.
•Care of the Nozzle
Clean the nozzle one or twice, or even more, each month.
Clean the sensor electrode of the nozzle tip at a tooth brush, and wash it well.
•Water Bath Tank
Replace the water in the water bath tank at least once a month.
Make sure the water bath is completely cooled down before you attempt to remove the water.
- Remove the plug of the water level indicator pipe.
- Pull the pipe off from the pipe brackets.
Tilt the pipe downward. - Let the water completely drain into a waste water vessel.
- Replace the pipe into the brackets and insert the plug into the pipe outlet.

natural_image
Line drawing of a mechanical device labeled Fig. 8, showing internal components and mounting base (no text or symbols on the device itself)SERVICING
- For after sales service, please call the store you have purchased or TAIJI sales representative, or contact TAIJI & CO., LTD. Japan.
TAIJI & CO. LTD
8-2, Okawa-cho, Kawasaki-ku, Kawasaki, 210-0858, Japan
Tel: +81-44-329-6338
E-Mail: overseas@taiji.co.jp
URL: https://www.taiji.co.jp/e/
- Components and parts of this product will be available for five years after the production of this product has ceased.
SPECIFICATIONS
| Model TAIJI SA | KE WARMER DISPENSER : TS-1 |
| Power Supply | Single Phase 110-120 or 220-240, 50/60Hz |
| Power Consumption 600 W | |
| Temperature Control | Variable Thermostat |
| Heating Method | Indirect Heating (Water Bath) |
| Capacity 0.47 Gallon (1.8 liter) bottle | |
| Safety Device | Line Fuse |
| Dimensions | W6.4in x D13.8in x H19.4in (Main Unit)(W160mm x D345mm x H485.5mm) |
| Weight | Approx. 12.8lb(Approx. 5.8kg) |
| Accessories | Sake Server Holder, Cap, Funnel, Anti-Toppling Brackets |
* Subject to change without further notice.
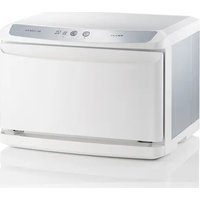
Brand : Taiji
Model : TS-1
Category : Distributeur chauffant