GGSBFAP4W10W - Ventilateur domestique Sôlt - Free user manual and instructions
Find the device manual for free GGSBFAP4W10W Sôlt in PDF.


| Product Type | Bladeless Fan (Domestic Fan) |
| Model Number | GGSBFAP4W10W |
| Brand | Sôlt |
| Dimensions (W x D x H) | 225 x 225 x 1056 mm |
| Net Weight | 5.8 kg |
| Voltage | 100-240V~, 50/60Hz |
| Adapter Output | 24V, 1.5A |
| Fan Speed Levels | 10 |
| Modes | Normal, Sleep (3 sub-settings), Auto Wind, Baby Wind (2 sub-settings) |
| Oscillation (Swing) | Yes |
| Timer | 1-12 hours |
| Remote Control | Included (batteries not included, AAA required) |
| Filter Type | HEPA Filter + Pre-Filter (2 sets included) |
| Replacement Filter Model | FQ150CJ-2 |
| Air Quality Indicator | Yes (color changes: red, yellow, blue, green) |
| Smart Wind | Yes (adjusts fan speed based on room temperature) |
| Memory Function | Yes (remembers previous settings except timer) |
| Screen-Off Function | Automatically turns off display after 60 seconds of inactivity |
| Safety Features | Polarized plug, fuse overload protection, "Do not use with solid-state speed control" warning |
| Cleaning Instructions | Unplug before cleaning; wipe body with damp cloth; vacuum pre-filter |
| Warranty | 24 months for domestic use in Australia |
| Included Accessories | Remote control, 2 HEPA filters, 2 pre-filters, user manual, quick start guide |
Frequently Asked Questions - GGSBFAP4W10W Sôlt
User questions about GGSBFAP4W10W Sôlt
0 question about this device. Answer the ones you know or ask your own.
Ask a new question about this device
Download the instructions for your Ventilateur domestique in PDF format for free! Find your manual GGSBFAP4W10W - Sôlt and take your electronic device back in hand. On this page are published all the documents necessary for the use of your device. GGSBFAP4W10W by Sôlt.
USER MANUAL GGSBFAP4W10W Sôlt
Welcome Congratulations on purchasing your new Bladeless Fan! The Sôlt brand is proudly distributed within Australia by Residentia Group Pty Ltd.
Residentia Group
Head Office.
165 Barkly Ave
Burnley
Victoria 3121
Australia
一
ACN.
600 546 656
-
Online.
residentia.group
Please refer to the warranty card at the rear of this manual for information regarding your product's parts and labour warranty, or visit us online at www.residentia.group
At Residentia Group, we are customer obsessed and our Support Team are there to ensure you get the most out of your appliance. Should you want to learn more about your Bladeless Fan features, and importantly taking care of your appliance when cleaning, our Support Team are here to help.
You can use our online Support Centre at anytime by visiting http://support.residentiagroup.com.au, or you can contact us via calling us on 1300 11 HELP (4357).
Sôlt
-
Online.
www.solt.house
一
Instagram.
/solt.house
一
Facebook.
/solt.appliances
It is important that you read through the following use and care manual thoroughly to familiarise yourself with the installation and operation requirements of your appliance to ensure optimum performance.
Again, thank you for choosing an Sôlt appliance and we look forward to being of service to you.
Kind Regards,
The Residentia Team
Contents 2 Welcome
4 General Instructions
5 Your Bladeless Fan
6 Assembly Instructions
7 Operating Instructions
11 Cleaning & Maintenance
12 Troubleshooting
12 Technical Specifications
13 Purchase Details
14 Warranty Information
Customer Care
Sôlt recommends the use of original spare parts. When contacting our customer service team, please ensure that you have the following information at hand (which can be found on your appliances' rating plate).
—ModelNumber
— Serial Number
General Instructions
CONDITIONS OF USE
- Indoor use only.
- This appliance is intended to be used in household and other residential type of environments.
SAFETY INSTRUCTIONS
- Before using the appliance, carefully read the instructions in this manual.
- The manufacturer is not responsible if an incorrect installation and use causes injuries and damages.
• Always keep the instructions with your appliance for future reference.
WARNING: To prevent any damages to your and others' life or property, you have to follow the safety notes.
WARNING: Risk of suffocation, injury or permanent disability.
- When the fan was assembled, the rotor blade guard must not be taken off anymore.
• Prior to cleaning, unplug the fan. - The rotor guard must not be dissembled / opened to clean the rotor blades.
- Wipe the fan enclosure and rotor blade guard with a slightly damp cloth
- This appliance is not intended for use by persons (including children) with reduced physical, sensory or mental capabilities, or lack of experience and knowledge, unless they have been given supervision or instruction concerning use of the appliance by a person responsible for their safety.
- Children should be supervised to ensure that they do not play with the appliance.
- Keep all packaging away from children.
INSTRUCTIONS FOR SAFE OPERATION
- Never insert fingers, pencils, or any other foreign object through the grille when fan is running.
- Disconnect fan when moving from one location to another.
- Be sure fan is on a stable surface when operating to avoid overturning.
- DO NOT use the fan near a window, rain may create an electrical hazard.
- Household use only.
INSTALLATION
- Remove all the packaging.
- Do not assemble or use a damaged appliance.
• After you have assembled the Tower Fan, do not take off the rotor blade guard anymore.
PRODUCT DISPOSAL
- Disconnect the appliance from the mains supply.
- Cut off the mains cable and discard it.
ELECTRICAL CONNECTION
WARNING: Caution, risk of fire and electrical shock!
- This appliance has a polarized plug (one blade is wider than the other). To reduce the risk of electric shock, this plug is intended to fit in a polarized outlet only one way. If the plug does not fit fully in the outlet, reverse the plug. If it still does not fit, contact a qualified electrician. Do not attempt to override this safety feature.
- WARNING: To reduce the risk of fire or electric shock, do not use this fan with any solid-state speed control device.
- WARNING: To Reduce The Risk Of Fire, Electric Shock Or Injury To Persons, Do Not Use Replacement Parts That Have Not Been Recommended By The Manufacturer (e.g. Parts Made At Home Using A 3D Printer).
- If the supply cord is damaged, it must be replaced by manufacturer or its service agent or a similarly qualified person in order to avoid a hazard.
- To protect against the risk of electrical shock, do not immerse the unit, cord or plug in water or other liquid.
- When the appliance is not in use and before cleaning, unplug the appliance from the outlet.
- This product employs overload protection (fuse). A blown fuse indicates an overload or short-circuit situation. If the fuse blows, unplug the product from the outlet. Replace the fuse as per the user servicing instructions (follow product marking for proper fuse rating) and check the product. If the replacement fuse blows, a short-circuit may be present and the product should be discarded or returned to an authorised service facility for examination or repair.
- Do not operate any fan with a damaged cord or plug.
- Discard fan or return to an authorized service facility for examination or repair.
- Do not run cord under carpeting. Do not cover cord with throw rugs, runners, or similar coverings. Do not route cord under furniture or appliances. Arrange cord away from traffic area and where it will not be tripped over.
- Do not leave the fan running unattended.
- Keep electrical appliances out of reach from children or infirm persons. Do not let them use the appliances without supervision.
- The supply cord cannot be replaced. If the cord is damaged the Adapter should be scrapped
WARNING
Only authorised technicians can carry out repairs.
Note: Your appliance requires little maintenance. If you are experiencing issues, do not try to resolve the issue or fault by yourself. If you appliance requires maintenance:
• Power off the appliance using the Power button.
- Switch off the appliance at the power outlet and remove the plug.
- Contact our customer service team.
Your Bladeless Fan
PRODUCT OVERVIEW
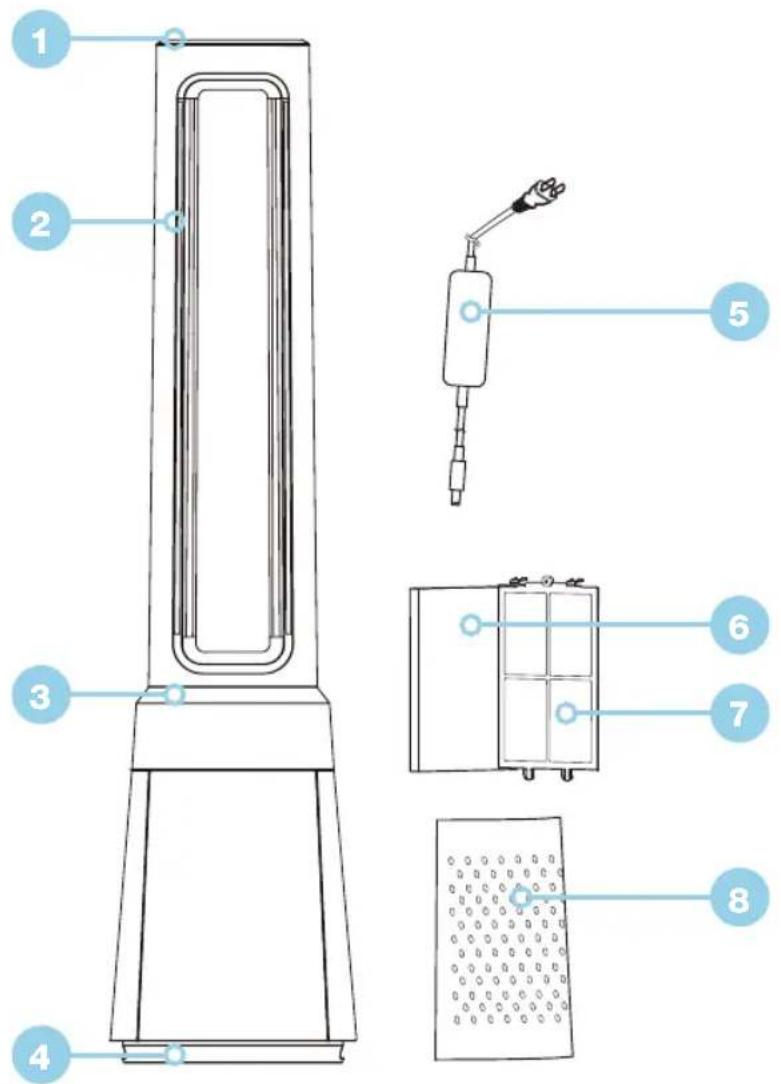
KEY
- Top Cover
- Air Outlet
- Display and Control Panel
- Base
- Adapter
- HEPA Filter × 2
- Pre-Filter × 2
- Air Inlet Grille × 2
Included by not shown:
- Remote Control
- User Manual
- Quick Start Guide
Note:
- The images in this user manual are for explanatory purposes only. Your Bladeless Fan may appear slightly different.
- Memory Function: When the fan is turned off or powered off, it will run in the previous state before turning off or power off when the power is powered on again (the timer function is not memorised).
- Screen-off function: In case of no operation for 60 seconds during normal operation, the indicator light on the body will be automatically off, but the fan will continue to operate. Press the ON/OFF button to turn off the fan when the screen is off, and press the other button to restore display.
Assembly Instructions
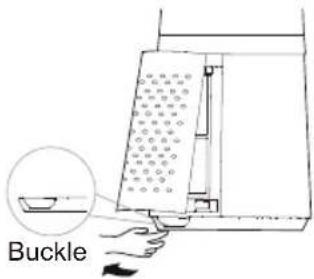
STEP 1
Take out the Bladeless Fan Body and assembly parts from the box. Remove the Air Inlet Grille using the buckle shown below.
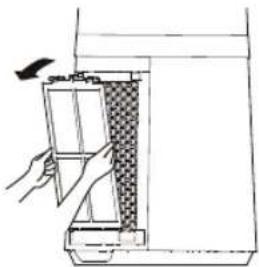
STEP 2
To take out the Pre-Filter, press the raised part on both sides to pull it outwards. Then proceed to take out the pre-filter.
natural_image
Line drawing of a hand opening a door with a checkered pattern on the wall (no text or symbols)STEP 3
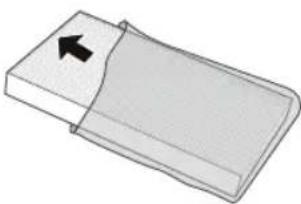
Remove the protective film of the filter.
natural_image
Simple 3D diagram of a rectangular object with a black arrow pointing to its side (no text or symbols)STEP 4
Install the HEPA Filter.
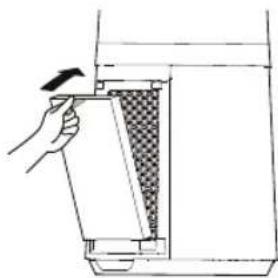
natural_image
Line drawing of a hand holding a tool interacting with a container filled with checkered pattern (no text or symbols)STEP 5
Install the Pre-Filter. Align the slot position at the bottom and buckle up the upper U-shaped buckle.
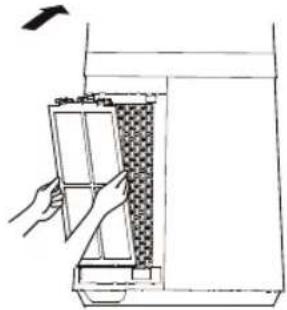
natural_image
Line drawing of a hand opening a cylindrical device with a textured interior (no text or symbols)STEP 6
Install the Air Inlet Grille. Align the upper two buckles and press them tightly, then press the two sides at lower part, slowly and gently buckle the air inlet grille.
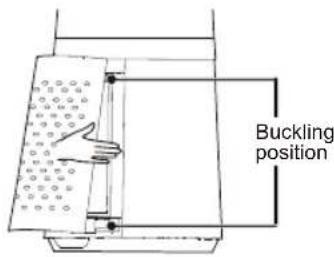
STEP 7
Install the adapter, then tighten the plug with the socket position of the base.
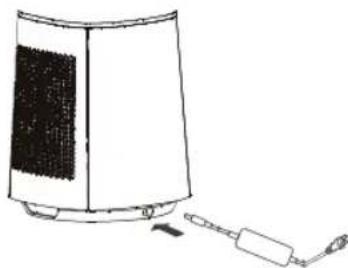
natural_image
Line drawing of a portable electric heater with a plug attached (no text or symbols)STEP 8
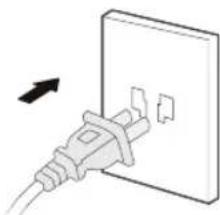
Plug in the power supply
natural_image
Illustration of a plug inserted into an electrical outlet (no text or symbols)Operating Instructions
CONTROL PANEL
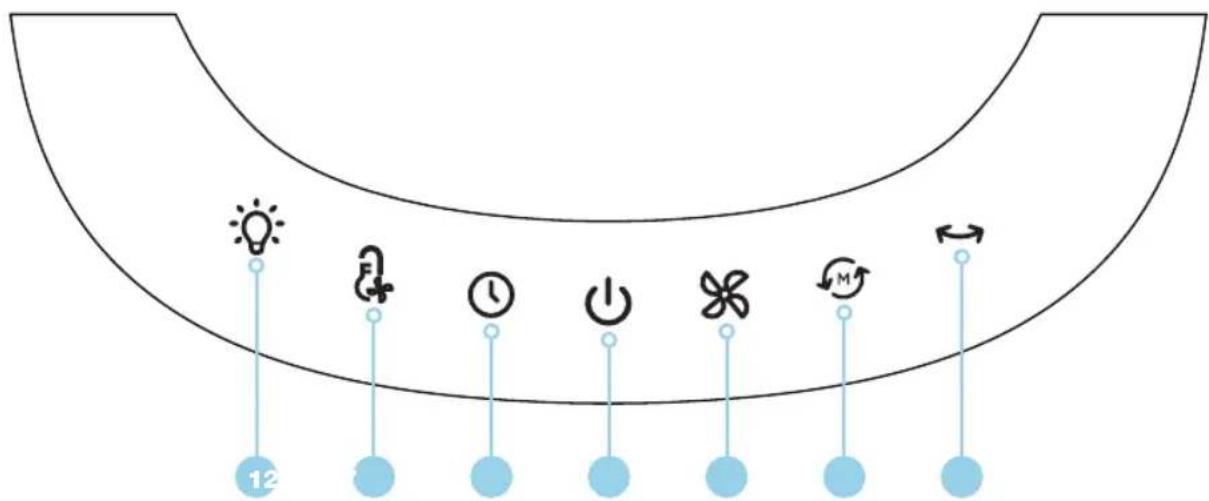
The buttons on the Control Panel body (Power, Fan Speed, Swing, Mode & Timer) are the same functions as the corresponding buttons on the Remote Control.
flowchart
graph TD
    A["Lightbulb"] --> B["Fan"]
    B --> C["Clock"]
    C --> D["Power"]
    D --> E["Windmill"]
    E --> F["Directional Arrow"]
| Number Icon Description | ||
| 1 |  | Air Quality Light: Touch this button to turn the Air Quality Light on and off. |
| 2 | Smart Wind: Dynamically adjusts the fan speed based on the surrounding air temperature. | |
| 3 |  | Timer: Press the Timer Button to program the Bladeless Fan to power off automatically between 1–12 hours.Note: Oh means that the timer is cancelled. |
| 4 |  | Power Button: This button will power the Bladeless Fan on and off. |
| 5 |  | Fan Speed: When the Bladeless Fan is powered on, the Fan Speed can be set up to 10 different wind speeds. The selected Speed setting will be displayed on the LED display. |
| 6 |  | Mode: Press this button to toggle between one of four mode settings:Normal: The wind remains a constant flow.Sleep: Choose between the 3 Sleep settings:Low, constant wind speed.Medium, constant wind speed which will gradually slow to a low, constant speed.High, constant wind speed which will gradually slow to a low, constant speed.Auto Wind: Variable wind changing with the air quality.Baby Wind: Choose between the 2 Baby Wind settings. |
| 7 |  | Swing (Oscillation): Press the Swing button to toggle on and off the oscillation mode. |
Operating Instructions
DISPLAY PANEL
| Number Icon Description | ||
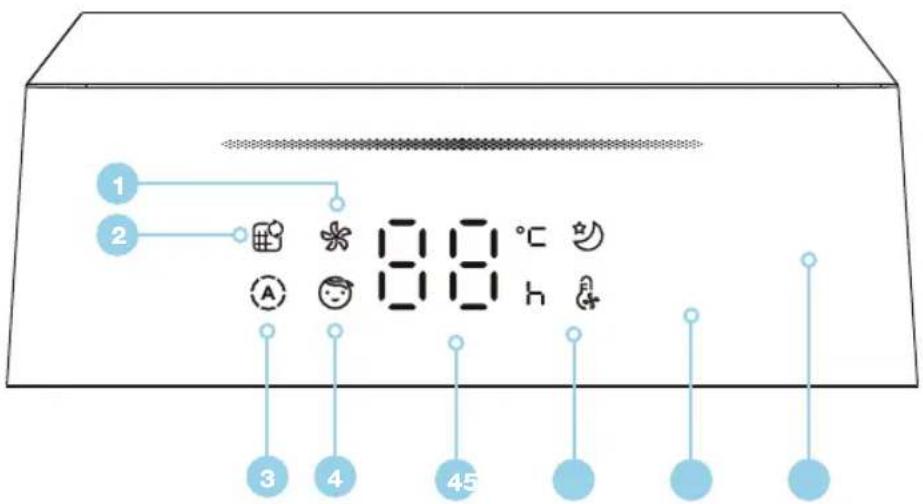
| 1 |  | Normal Wind Mode Indicator: The wind remains a constant flow. |
| 2 |  | Filter Replacement Reminder Indicator: When the icon stays on, the filter needs to be replaced. |
| 3 |  | Auto Wind Indicator: Variable wind changing with the air quality. |
| 4 |  | Baby Wind Indicator: Choose between the 2 Baby Wind settings. |
| 5 | [37ZK]  | LED Display: Displays the wind speed level or set timer, and displays the temperature in the wind mode. |
| 6 | [W065] | Smart Wind Indicator: Dynamically adjusts the fan speed based on the surrounding air temperature. |
| 7 |  | Sleep Wind Indicator: Choose between the 3 Sleep settings:Low, constant wind speed.Medium, constant wind speed which will gradually slow to a low, constant speed.High, constant wind speed which will gradually slow to a low, constant speed. |
| 8 | The colour of this indicator light reflects the air quality.As the air quality gets better, the colour of this light is red, yellow, blue and green in turn. | |
Operating Instructions
REMOTE CONTROL
Operating the Remote Control
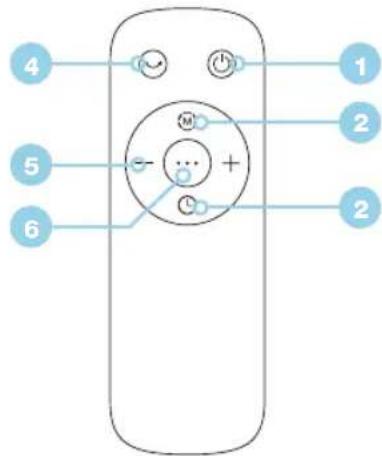
- Point the Remote Control at the receiver on the Bladeless Fan body and press the desired function button.
• The Remote Control will operate at distances of up to five meters and at an angle of 30 degrees. - The batteries must be removed from the Remote Control before it is scrapped and that they are disposed of safely.
Note: Only use manganese or alkaline "AAA" batteries.
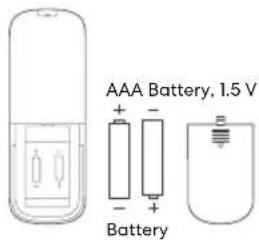
Note:
The images in this user manual are for explanatory purposes only. Your Bladeless Fan and Remote Control may appear slightly different.
| Number Icon Description | ||
| 1 | Power Button: This button will power the Bladeless Fan on and off. | |
| 2 | Mode: Press this button to toggle between one of four mode settings:Normal: The wind remains a constant flow.Sleep: Choose between the 3 Sleep settings:1. Low, constant wind speed.2. Medium, constant wind speed which will gradually slow to a low, constant speed.3. High, constant wind speed which will gradually slow to a low, constant speed.Auto Wind: Variable wind changing with the air quality.Baby Wind: Choose between the 2 Baby Wind settings. | |
| 3 | Timer: Press the Timer Button to program the Bladeless Fan to power off automatically between 1-12 hours.Note: Oh means that the timer is cancelled. | |
| 4 | Swing (Oscillation): Press the Swing button to toggle on and off the oscillation mode. | |
| 5 | - + | Fan Speed: Press + to increase the Fan Speed. Press - to decrease the Fan Speed. |
| 6 | ... | Smart Wind: Dynamically adjusts the fan speed based on the surrounding air temperature. |
Operating Instructions
BATTERY INSTALLATION
Battery not included in the packaging
- Slide the battery compartment cover.
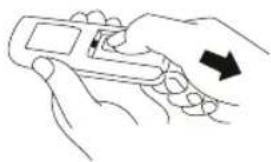
natural_image
Line drawing of two hands holding a handheld device with an arrow indicating direction (no text or symbols)- Insert the batteries, and make sure that the batteries are placed as shown.
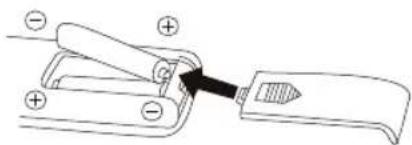
- Slide back the battery cover.
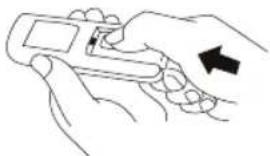
natural_image
Line drawing of two hands holding a handheld device with an arrow indicating left motion (no text or symbols)Note: Use size "AAA" manganese or alkaline batteries. Do not use rechargeable batteries
BATTERY WARNING
- Do not dispose of batteries in fire. Batteries may explode or leak.
- Do not mix old and new batteries.
- Do not mix alkaline, standard (carbon-zinc) or rechargeable (nickel-cadmium) batteries.
• Non-rechargeable batteries are not to be recharged. - Batteries are to be inserted with the correct polarity.
- Exhausted batteries are to be removed from the product.
- The batteries must be removed from the remote controller before it is scrapped and that they are disposed of safely.
ADDITIONAL FEATURES
Intelligent memory
When the fan is turned off or powered off, it will run in the state before turning off or power off when the power is powered on again (the timing function is not memorised).
Screen-off function
In case of no operation for 60 seconds during normal operation, the indicator light on the body will be automatically off, but the fan will continue to operate. Press the ON/OFF button to turn off the fan when the screen is off, and press the other button to restore display.
Cleaning & Maintenance
The fan requires minimal maintenance. Do not try to fix it by yourself. Refer it to qualified service personnel if service is needed.
- Be sure to unplug from the electrical supply source before cleaning.
- Plastic parts should be cleaned with mild soap and a damp cloth or sponge. Thoroughly to remove soap film with clean water.
- Be sure not to make water or other liquid enter inside of motor.
REPLACING THE FILTERS
- Filter model: FQ150CJ-2 2 (including 2 sets).
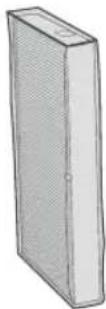
- Replace with a new filter.
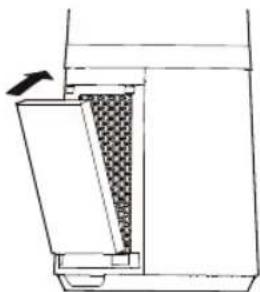
natural_image
Cross-sectional diagram of a mechanical device with internal components and an arrow indicating direction (no text or symbols)- When the reminder indicator light for replacement of filter is on, the display prompt will appear reminding you to replace the filter. If it is not replaced, the prompt will appear during each startup.

- Long press the mode button for 3 seconds to turn off the indicator light for filter replacement.

PRE-FILTER CLEANING
- Unplug the power cord.
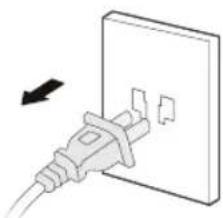
natural_image
Illustration of a plug inserted into a wall socket (no text or symbols)- Remove the dust with vacuum cleaner.
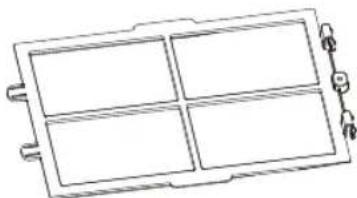
natural_image
Simple line drawing of a four-segment display panel with no text or symbols- Take out the pre-filter.
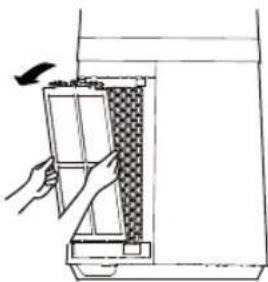
natural_image
Line drawing of a hand holding a device with a bird flying nearby (no text or symbols)- Install the machine in reverse order and plug power supply.
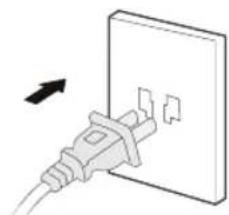
natural_image
Illustration of a plug inserted into an electrical outlet (no text or symbols)Troubleshooting
Operation of your appliance can lead to errors and malfunctions. The following contains possible causes and notes for resolving an error message or malfunction. It is recommended to read the below carefully in order to save your time and money that may cost for calling to the service center.
The machine does not work properly after installed
- The power cable may not be plugged in or has poor contact.
Make sure the plug is properly inserted into the socket.
• The power on the body is not turned on.
Press the Power button on the body of the fan.
The remote does not work
• The battery may need replacing.
- The remote is being used more than 5m away from the fan.
Use the remote closer to the fan and make sure it is pointing directly at the display panel.
Technical Specifications
Below outlines the technical specifications for your Bladeless Fan.
| Model GGSBFAP4W10W | |
| Dimensions (W × D × H mm) 225 × 225 × 1056 mm | |
| Net Weight 5.8kg | |
| Voltage 100-240V~ | |
| Frequency 50/60Hz | |
| Adapter Input 1.5A | |
| Adapter Output 24V | = 1.5A |
Purchase Details
For future reference, please record the following information which can be found on the rating plate and the date of purchase which can be found on your sales invoice.
STORE DETAILS
STORE NAME
ADDRESS
TELEPHONE
PURCHASE DATE |
PRODUCT DETAILS
MODEL NO.
SERIAL NO.*
Attach your receipt to this page
Warranty Information
WARRANTY TERMS & CONDITIONS BLADELESS FAN
This document sets out the terms and conditions of the product warranties for Residentia Group Appliances. It is an important document. Please keep it with your proof of purchase documents in a safe place for future reference should you require service for your Appliance.
1. IN THIS WARRANTY
(a) ‘acceptable quality’ as referred to in clause 10 of this warranty has the same meaning referred to in the ACL;
(b) 'ACL' means Trade Practices Amendment (Australian Consumer Law) Act (No.2) 2010;
(c) 'Appliance' means any Residentia Group product purchased by you accompanied by this document;
(d) 'ASR' means Residentia Group authorised service representative;
(e) 'Residentia Group' means Residentia Group Pty Ltd of 165 Barkly Ave, Burnley VIC 3121, ACN 600 546 656 in respect of Appliances purchased in Australia;
(f) ‘major failure’ as referred to in clause 10 of this warranty has the same meaning referred to in the ACL and includes a situation when an Appliance cannot be repaired or it is uneconomic for Residential Group, at its discretion, to repair an Appliance during the Warranty Period;
(g) 'Warranty Period' means:
(i) where the Appliance is used for personal, domestic or household use (i.e. normal single family use) as set out in the instruction manual, the Appliance is warranted against manufacturing defects for 24 months, following the date of original purchase of the Appliance;
(h) 'you' means the purchaser of the Appliance not having purchased the Appliance for re-sale, and 'your' has a corresponding meaning.
2. This warranty only applies to Appliances purchased and used in Australia and is in addition to (and does not exclude, restrict, or modify in any way) any non-excludable statutory warranties in Australia.
3. During the Warranty Period Residentia Group or its ASR will, at no extra charge if your Appliance is readily accessible for service, without special equipment and subject to these terms and conditions, repair or replace any parts which it considers to be defective. Residentia Group or its ASR may use remanufactured parts to repair your Appliance. You agree that any replaced Appliances or parts become the property of Residentia Group. This warranty does not apply to light globes, batteries, filters or similar perishable parts.
4. Parts and Appliances not supplied by Residential Group are not covered by this warranty.
- You will bear the cost of transportation, travel and delivery of the Appliance to and from Residentia Group or its ASR. If you reside outside of the service area, you will bear the cost of:
(a) travel of an authorised representative;
(b) transportation and delivery of the Appliance to and from Residentia Group or its ASR, in all instances, unless the Appliance is transported by Residentia Group or its ASR, the Appliance is transported at the owner's cost and risk while in transit to and from Residentia Group or its ASR.
-
Proof of purchase is required before you can make a claim under this warranty.
-
You may not make a claim under this warranty unless the defect claimed is due to faulty or defective parts or workmanship. Residentia Group is not liable in the following situations (which are not exhaustive):
(a) the Appliance is damaged by:
(i) accident
(ii) misuse or abuse, including failure to properly maintain or service
(iii) normal wear and tear
(iv) power surges, electrical storm damage or incorrect power supply
(v) incomplete or improper installation
(vi) incorrect, improper or inappropriate operation
(vii) insect or vermin infestation
(viii) failure to comply with any additional instructions supplied with the Appliance;
(b) the Appliance is modified without authority from Residentia Group in writing;
(c) the Appliance's serial number or warranty seal has been removed or defaced;
(d) the Appliance was serviced or repaired by anyone other than Residentia Group, an authorised repairer or ASR.
-
This warranty, the contract to which it relates and the relationship between you and Residentia Group are governed by the law applicable where the Appliance was purchased.
-
To the extent permitted by law, Residentia Group excludes all warranties and liabilities (other than as contained in this document) including liability for any loss or damage whether direct or indirect arising from your purchase, use or non use of the Appliance.
-
For Appliances and services provided by Residentia Group in Australia, the Appliances come with a guarantee by Residentia Group that cannot be excluded under the Australian Consumer Law. You are entitled to a replacement or refund for a major failure and for compensation for any other reasonably foreseeable loss or damage. You are also entitled to have the Appliance repaired or replaced if the Appliance fails to be of acceptable quality and the failure does not amount to a major failure. The benefits to you given by this warranty are in addition to your other rights and remedies under a law in relation to the Appliances or services to which the warranty relates.
-
At all times during the Warranty Period, Residential Group shall, at its discretion, determine whether repair, replacement or refund will apply if an Appliance has a valid warranty claim applicable to it.
-
Missing parts are not covered by warranty. Residentia Group reserves the right to assess each request for missing parts in a case by case basis. Any parts that are not reported missing in the first week after purchase will not provide free of charge.
-
To enquire about claiming under this warranty, please follow these steps:
(a) carefully check the operating instructions, user manual and the terms of this warranty;
(b) have the model and serial number of the Appliance available;
(c) have the proof of purchase (e.g. an invoice) available;
(d) telephone the numbers shown below.
- You accept that if you make a warranty claim, Residentia Group and its ASR may exchange information in relation to you to enable Residentia Group to meet its obligations under this warranty.
IMPORTANT
Before calling for service, please ensure that the steps in point 13 have been followed.
Telephone contacts
▶ Service: Please call 1300 11 HELP (4357)
▶ Spare Parts: Please call 1300 11 SPARE (7727)
The Australian Consumer Law requires the inclusion of the following statement with this warranty:
Our goods come with guarantees that cannot be excluded under the Australian Consumer Law. You are entitled to a replacement or refund for a major failure and for compensation for any other reasonably foreseeable loss or damage. You are also entitled to have the goods repaired or replaced if the goods fail to be of acceptable quality and the failure does not amount to a major failure.
An initiative by Residentia Group

T. 1300 11 4357
E. support@residentiagroup.com.au
www.solt.house
- Welcome Congratulations on purchasing your new Bladeless Fan! The Sôlt brand is proudly distributed within Australia by Residentia Group Pty Ltd.
- Residentia Group
- Sôlt
- Contents 2 Welcome
- Customer Care
- General Instructions
- CONDITIONS OF USE
- SAFETY INSTRUCTIONS
- INSTRUCTIONS FOR SAFE OPERATION
- INSTALLATION
- PRODUCT DISPOSAL
- ELECTRICAL CONNECTION
- WARNING: Caution, risk of fire and electrical shock!
- WARNING
- Your Bladeless Fan
- PRODUCT OVERVIEW
- KEY
- Note:
- Assembly Instructions
- STEP 1
- STEP 2
- STEP 3
- STEP 4
- STEP 5
- STEP 6
- STEP 7
- STEP 8
- Operating Instructions
- CONTROL PANEL
- REMOTE CONTROL
- Operating the Remote Control
- BATTERY INSTALLATION
- BATTERY WARNING
- ADDITIONAL FEATURES
- Intelligent memory
- Screen-off function
- Cleaning & Maintenance
- REPLACING THE FILTERS
- PRE-FILTER CLEANING
- Troubleshooting
- The machine does not work properly after installed
- The remote does not work
- Technical Specifications
- Purchase Details
- STORE DETAILS
- PRODUCT DETAILS
- Attach your receipt to this page
- Warranty Information
- WARRANTY TERMS & CONDITIONS BLADELESS FAN
- IN THIS WARRANTY
- IMPORTANT
- An initiative by Residentia Group
Brand : Sôlt
Model : GGSBFAP4W10W
Category : Ventilateur domestique