EZY7510 - Mobile Phone Oricom - Free user manual and instructions
Find the device manual for free EZY7510 Oricom in PDF.


User questions about EZY7510 Oricom
0 question about this device. Answer the ones you know or ask your own.
Ask a new question about this device
Download the instructions for your Mobile Phone in PDF format for free! Find your manual EZY7510 - Oricom and take your electronic device back in hand. On this page are published all the documents necessary for the use of your device. EZY7510 by Oricom.
USER MANUAL EZY7510 Oricom
Oricom EZY7510 is a 4G, dual display flip mobile phone with SOS button.
Features
Loud sound and ringer
2MP camera
Talking caller ID
M1, M2 One touch memory
3.5mm Headset socket
Torch
2 Way handsfree speakerphone
Talking dialling digits
20 Photo memories
SOS button
FM radio
Charger cradle
Key description
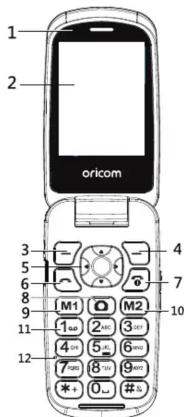
-
Earpiece
-
Camera key
2.M ain display
-
M1 key
-
Left selection key
10.M 2 key
4.R ight selection key
11.D ialing keypad
- Naviga tion keys
12.M icrophone
- Answer key
7.E nd key (Power on/off, FM radio OFF)
**#
is the hot key for switching the keypad input between ABC, abc, 123
Long press to activate / deactivate the Silent / normal / and vibrate modes.
** *+
Press once for star symbol, press twice for plus symbol.
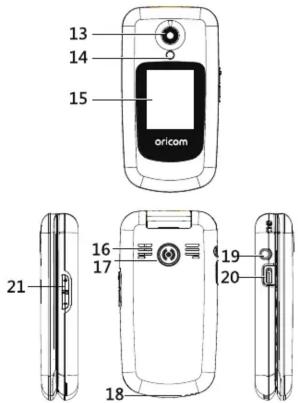
-
Camera
-
Flash LED(Torch)
15.F ront display
-
Speaker
-
SOS button
18.Charging contact
-
Headset socket
-
USB charging socket
21.Volume +- key
DISPLAY ICONS

Battery LOW

Earpiece amplification

Torch

Alarm ON

Vibrate only

Silence

Signal strength

Battery FULL

Missed call New

Message

Wireless

Wireless device paired

Roaming

Headset Plugged in

Silent icon-The telephone is in silent mode. There will be no call alert.

Headset icon-The headset is plugged in.

Battery level indicator.

Boost Symbol, this will display when on a call and the volume is adjusted to max.

Signal Strength icon-shows the current signal strength. More bars indicate more signal strength. There is one of these icons per SIM.

Roaming.

SMS icon-A new SMS (text message) has been received.

Missed call-An incoming call has been unanswered.
Get Started
Install SIM card, battery, SD card (not supplied)
!ATTENTION :
- Turn off the phone and disconnect the power supply before you remove the battery cover
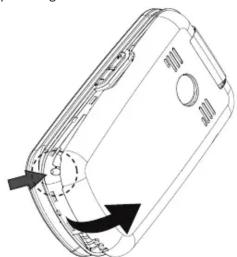
Remove the battery cover
Remove by lifting the battery cover up from the bottom left corner with a small tool as per image below.
natural_image
Line drawing of a mobile phone casing with a rotary dial and scroll wheel (no text or symbols)Insert Sim card, SD card (SD card not supplied)
Place the Sim card in either SIM 1 or SIM 2 slot, (contact pins facing down), follow the indication on the label for the cut corner direc on
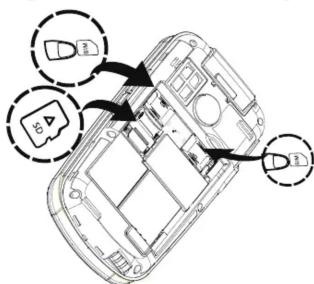
*You can insert a micro SD card (up to 32G, not included) to expand the storage memory if necessary.
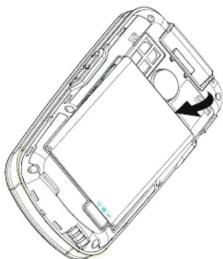
Insert the battery:
natural_image
Technical line drawing of a mobile phone casing with internal components and a highlighted portion (no text or symbols)Insert the ba ery in the ba ery compartment (ba ery contact plate facing down).
Charge the phone
Connect the USB power plug into the Phone USB charging socket or into the USB socket of the Charger cradle.
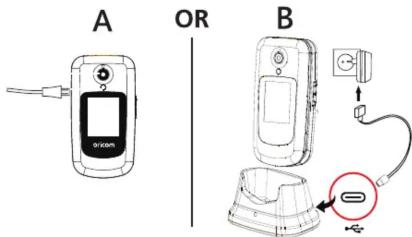
Note: Charge for at least 4 hours when charging the battery for the first time.
ATTENTION:
- Use genuine parts only, only use the battery and accessories supplied with the phone. using non-genuine parts may void our warranty.
Setup your phone
Press and Hold 📞 to power on your phone.
When powering on for the first time, you will be asked to select the language and enter time/date, the phone also displays this information automatically from your service provider, if it is correct on the screen you can press Done to accept the settings.
You can set the time/date and language at any me.
Go to Setting > Phone seems to set or change the Time, date and Language.
Make an outgoing call
Enter the phone number that you want to dial from the keypad (when you press the number, the phone will announce the number you press – talking keypad).
To activate or deactivate the talking keypad, press "Settings > Profiles > Normal > Settings > Other > Dial tone", options are "Activate" for beep tones, "Dialler voice" for talking keypad or "off" for off.
Press 📄 to dial, (or press "op tion > Call" to dial). During dialling screen, Press "H-Free" for handsfree or press "Earpiece" for handset. "H-Free" and "Earpiece" are on the right selec tion key.
Press 🔓 key to terminate the call.
During conversation
Press Right selection key to switch between Handsfree or Handset mode. Press Menu key (Left selection key) to see below functions during the conversation.
- Connect to headset - If you want to connect headset during the call, you can do it here.
- Hold - Hold the call during the conversation.
- Start recording- Record your conversation. To play the recorded file, go to Multimedia >Audio.
- Mute - Mute the microphone during call.
- Contacts - View contacts during call.
- Call logs - View call logs during call
- Message - View messages during call.
VIP-Photo
You can store 20 photo phone book memory entries. (2000 regular Contacts memory, 2 x one touch memory M1/M2 and 8 x keypad one touch memory – key 2 to key 9).
Add Photo in VIP-Photo memory
Press "VIP-Photo" > OK > "Add" (Le ft select on key).
- Modify icon
To add photo From album or Take photo
- Name
Enter name (Press # key to switch between EN/ABC/123)
- Number
Enter the phone number.
- Ring settings
You can select a ringtone for the number: Ringtone/From Files/Record.
If you select Record, you can record your own voice for the number.
When this number calls, the phone will ring with the saved ring options.
Press Up/Down key to review your VIP-photo memory, or add a new contact. You can save up to 20 VIP photo memory entries.
Contacts
Contacts memory has two types of memory: Phone and SIM card. Phone memory can store a maximum of 2000 entries. You can check your phone and SIM memory from Contacts > Options > Memory status.
Press Contacts to enter Contacts number list.
Press Up or Down to select the number you want to dial.
You can assign the numbers into "Group". There are 4 x Default groups, Family /Friends / Business / Classmates. You can also create your own group: Contacts > Right key (Move to Group) > Op tions > New Group.
Add number to Contacts
Press Contacts > Op tions > New > Phone or SIM >
- Modify Icon - Press OK to assign a photo to the number, you can select the photo from Album or take a photo from the phone camera.
- Name - Enter Name.
• Mobile - Enter Mobile number.
• Home number - Enter Home number.
- Ringtone - Assign ringtone to the number.
Add number to Group
For example, if you want to copy the number into Group – Family
Press Contacts > Right key(move to Group) > Family > OK > Op tions >
Manage members > select the number from the Contacts list > Options > OK
You can also assign a ringtone for the Group. If the number in the Group calls, the Group's ringtone will be played.
Redial or Call from Call log
Press 📞key, the display will show Missed / Dialed / Received / Rejected.
Select the number that you want to dial, then press key or Press Options > Call.
Call logs
Select Call logs, you will see:
-
Missed calls - Show your missed calls.
-
Dialed calls - Show your dialled calls.
-
Received calls - Show your received calls.
-
Rejected calls - Show your rejected calls.
-
Delete all - Delete all calls.
6.C altimers - Check call durations.
- Data service counter - Check your SIM card data.
Press Up or Down to select the call, then you can press options for the following: Details / Call / Write SMS / Add to contacts / Add to black list / Delete / Delete all
Receive a call
Open flip or press 🔔 key to answer the incoming call.
To activate / deactivate Flip to answer, go to:
Settings > Call settings > Flip to answer > Ac vate or Off.
Message (SMS) - Write SMS (or MMS)
Select Messages > Write message > Enter phone number or add from Contacts Once number is added, you can press Down key to move to Content, type
your message here.
Press Options > Send to send the SMS.
#
123/EN/En/en
*+
Key is the hot key to enter special symbols.
Under the Message menu, the following options can be accessed,
1.W rite message
2.1 nbox
3.0 utbox
4.D rafts
5.S entbox
- Voice mail Box
If your SIM card has the Voice Mail service from your service provider,
you can save your voice Mail calling number into Key 1, Select "Message"
Voice mail Box > Key 1 > Ed it, enter your mail box number here.
Read New messages
If you have new Messages, the display will show 📋 the top tool bar.
Select Message > Inbox, press Up or Down key to read your messages or New Messages.
Once you read all the New Messages, the ✉ icon will disappear.
Take photos
Press
key or select Camera to take photo (or Video).
To take Video, Press ☐ key > Opt > DV mode > OK key to start video recording. Press OK again to stop.
Zoom: Press Up or Down key to Zoom in or out during photo or Video mode
Image
Press Image to view the photos.
To view video, Press Mul : timedia > Video , the last recorded Video will be played automatically.
Or you can select Options > Local browse to select the video file that you want to play.
Multimedia
Under Mul timedia, the following op ons can be accessed:
1.V ideo - View the video files
2.F M Radio - Turn ON FM radio
3.A udio - Play the audio files
4.R ecorder - Play your recorded files
FM radio
For the FM radio to work, you will need to plug in a headset, this will act as the antenna for the radio.
Press Exit to stop the FM radio. Or Press 📄 key to exit the Standby screen (FM radio will keep playing). In standby screen, press 📄 key again to stop FM radio.
Under FM radio, the following options can be accessed:
-
Auto search- Auto search all available FM radio stations.
-
Channel list- Show all available FM radio stations.
-
Manual search- Enter the FM Frequency manually.
-
Speaker- Play FM radio and switch between Headset or Speaker.
-
Record- Record current playing FM radio.
-
Timing record- Record FM radio at your specified start time.
-
Record file list- show all FM radio record files
-
Storage - Select FM radio file memory location either Phone or SD card.
After you plug in the headset, the will be shown on the display and tool bar. If you want to play the Recorded FM radio, Press Mul media >FM radio >Options >Record file list >select the file and press OK.
If you want to play the recorded FM file, no need to plug in headset, the file can be played through speaker directly.
All recorded FM files name started from "FM_0000001.wav".
SOS
In case of emergency, the user can press and hold SOS button to call for help. Your location information will be sent to the SOS numbers saved.
The following options can be accessed under SOS:
- Mode - two SOS modes : SOS number and Service center.
2.S OS number - Save up to 5 SOS numbers.
-
Service center- Save your service center number (if applicable).
-
SOS SMS- Send SMS or set SMS content. SMS and GPS data will be sent to the SOS numbers if the SOS call is rejected or busy.
Please make sure SOS is On(SOS > Mode > On/OFF). If SOS is OFF, SOS button will not work.
If using a service center, you can save your Service center number into "SOS / Service center". When you press the SOS button, the phone will dial your Service center.
- You can save up to 5 SOS numbers.
- If you press and hold SOS button on rear of phone, the phone will dial the SOS numbers sequentially up to 5 times, unless a call is terminated by the call receiver, in which case it will continue dialing the remaining SOS numbers once.
- For SOS calls to busy and no answer SOS numbers, each number will be called 5 times.
- If SOS call is answered by Voice mail and terminated, remaining SOS numbers in list will be called once.
- SOS and co-ordinates SMS will be sent approx. 3 minutes after the SOS feature is activated.
- If red end key is pressed, the next number in SOS list will be called.
- When call is answered, a 5 min timer is started. If you wish to continue the call, an alert will be shown on the screen after 4 min 30 sec. To continue the call, press the left selection key.
- To stop SOS calling, press and hold SOS key on rear of phone.
Talking dialing digits
Talking digits will announce the numbers you press.
Settings > Profiles Normal > Settings(left selection key) > Other > Dial tone > Dialer voice.
You can also set the dial tone as typical beep tone(Ac tivate) or Off here.
Talking Caller ID
Incoming call alert type can be set in the settings menu:
(Settings > Profiles > Normal > Ring settings > SIM1 (SIM 2) call ring.
You can set your phone to announce the incoming call number, Turn the incoming number announce on in Settings > Profiles > Normal > other > Phone number voice > Activate or OFF.
If you set Phone number voice to "Activate", when reviewing Contacts or VIP-phone, the number in the Contacts or VIP-phone will be played during review.
You can assign your specified ring tone to the numbers saved in the Contacts. You can record your own voice for the numbers stored in VIP-Photo (total up to 20 memory).
Press VIP-photo > Op tions > Edit > Ring ser nts > Record > OK > Op onst> Start recording. When recording is done, press Stop and save.
Settings
1.Profiles- Set the phone to Normal / Silent / Meeting / Indoor / Outdoor. You can customize these profiles by selecting "settings".
- Phone Settings- Set time/date, language, Auto on/off and factory restore here. Factory restore password is 1234.
3.Hotspot- Tethering, share your SIM data to other mobile devices.
4.M1/M2 memory- Save numbers to M1 / M2 one touch memory buttons.
5.Torch - Turn ON /OFF Torch.
6. Call settings
- Dual SIM- When using two SIM cards, you can set which SIM card is
priority.
- Flip to answer
- Call Divert
- Call wai ting
- Call barred
- Select line (if using two SIM cards)
- Hide ID
- Other- Firewall / Call time minute reminder / Auto redial Vibration
when connected / Incoming call flash / Auto record voice.
-
Speed dial - Set keypad touch memory dialing (Key 2-Key 9).
-
Display- Set wallpaper, analog or digital clock, contrast, display and
keypad backlight here.
9. Security
PIN
Modify PIN2 - This mobile telephone allows you to set up passwords to help protect your telephone from unauthorized use.
The PIN and PIN2 codes are supplied with your SIM card. The PIN code help to protect the SIM card from unauthorised use. The PIN2 code is required to access certain services.
The PUK(PIN) and PUK2(PIN2) codes may be supplied with the SIM card. If you enter the PIN code incorrectly three times in succession, the PUK will be required. If the codes are not supplied, contact your service provider.
- Phone locked - You can set Phonelock to ON or OFF, you need to enter the factory default code 1234 to change the setting. Once you set it to ON, you will need to enter the code every time you power up the phone.
• Phone password - You can change the phone lock password here.
- Privacy - You can enable privacy for selected apps (eg Messages, Call logs... etc) Privacy password is 1234.
- Fixed dial number.
- Blacklist - Numbers in this list will be blocked when feature is activated.
10.Network
- Network account - If you have more than one network account, you can manage your accounts here.
• GPRS service - Set GPRS service on or OFF,
- Data roaming - Set Data roaming on or OFF,
• Network selection - Default is set to Auto
• Network type - User can select to use 2G, 2G/3G or 2G/3G/4G service.
Default is 2G/3G/4G
• VoLTE - Enable or disable VoLTE, default is Activated.
11.Version - Shows phone software version.
Alarm
You can set up to 3 alarms. Press OK to set alarm name, time, ringtone and mode.
You can set FM radio as alarm ringtone.
If you set FM radio as alarm ringtone, you need to make sure Headset is connected to the headphone jack.
If FM radio is set as alarm ringtone, the FM radio will be played through the phones Speaker, not headset.
FM radio alarm will play for 1 minute. Press Off to stop FM alarm or
press Snooze to stop the alarm and play again a fter 10 minutes .
If you set FM radio as alarm, we recommend the volume is set to Max.
Tools
1.My files-You can access all the files from your Phone memory and SD card here.
2.Wireless - You can pair, connect and manage your headset here.
3.C lock - You can set World clock, start Stopwatch and timer here.
4.C calendar - You can view your calendar and set appointment here.
5.C alculator
6.Pocket News - you can setup news alerts here (network dependent).
Express Warranty (Australia)
This Express Warranty is provided by Oricom International Pty Ltd ABN 46 086 116 369, Unit 1, 4 Sovereign Place, South Windsor NSW 2756, herein after referred to as "Oricom".
Oricom warrants that the product is free from defects in materials or workmanship during the Express Warranty Period. This Express Warranty does not extend to any product from which the serial number has been removed or was purchased outside of Australia.
The benefits of this Express Warranty are in addition to other rights and remedies you may have under the Australian Consumer Law. Our goods come with guarantees that cannot be excluded under the Australian Consumer Law. You are entitled to a replacement or refund for a major failure and
compensation for any other reasonably foreseeable loss or damage. You are also entitled to have the goods repaired or replaced if the goods fail to be of acceptable quality and the failure does not amount to a major failure. In the event of a minor failure, Oricom reserves the right to choose to repair or replace the product.
The Express Warranty Period will be a period of 12 months beginning on the date of purchase of the product evidenced by your dated sales receipt. You are required to provide proof of purchase as a condition of receiving Express Warranty services.
You are entitled to a replacement product or repair of the product at our discretion according to the terms and conditions of this document if your product is found to be faulty within the Express Warranty Period. This Express Warranty extends to the original purchaser only and is not transferable.
Products distributed by Oricom are manufactured using new materials or new and used materials equivalent to new in performance and reliability. Spare parts may be new or equivalent to new. Spare parts are warranted to be free from defects in material or workmanship for thirty (30) days or for the remainder of the Express Warranty Period of the Oricom branded product in which they are installed, whichever is longer. During the Express Warranty Period, Oricom will where possible repair and if not replace the faulty product or part thereof. All component parts removed under this Express Warranty become the property of Oricom. In the unlikely event that your Oricom product has a recurring failure, Oricom may always, subject to the Competition and Consumer Act 2010, at its discretion, elect to provide you with a replacement product of its choosing that is at least equivalent to your product in performance.
No change to the conditions of this Express Warranty is valid unless it is made in writing and signed by an authorised representative of Oricom.
Oricom will not be liable under this Express Warranty, and to the extent permitted by law will not be liable for any defect, loss, damage or injury arising out of or in connection with a:
-
Failure by you to adhere to the warnings and follow the instructions set out in this user guide for the proper installation and use of the product;
-
Willful misconduct or deliberate misuse by you of the product;
-
Any external cause beyond our control, including but not limited to power failure, lightning or over voltage; or
-
Modification to the product or services carried out on the product by anyone other than Oricom or Oricom's authorised service provider.
How to make a claim under your Express Warranty in Australia
Oricom has a simple warranty process for you to follow:
- Please call or email our Customer Support Team, 02 4574 8888 or support@oricom.com.au.
- A Customer Support Team member will verify after troubleshooting with you if your product qualifies under warranty. If so, they will give you a Product Return Authorisation number.
- We will then email a Return Authorisation form and a Repair Notice (if necessary), together with instructions on how to return the product for warranty service.
Please note that if a Customer Support Team member advises that your product does not qualify for return, this warranty does not apply to your product. Products that are authorised to be returned to Oricom in Australia must include all of the following:
• A completed Return Authorisation form
- A copy of your Proof of Purchase (please keep your original copy)
- The faulty product, including all accessories.
Send the approved returns to:
Oricom International Pty Ltd
Locked Bag 658
South Windsor NSW 2756 Australia
Please note that this Express Warranty excludes expenses incurred by you in returning any faulty product to us. You must arrange and pay any expenses incurred (including postage, delivery, freight, transportation or insurance of the product) to return the faulty product to us, however, we will arrange delivery of the repaired or re-placed faulty product to you.
Important Information
Repair Notice
Please be aware that the repair of your products may result in the loss of any user-generated data (such as stored telephone numbers, text messages and contact information). Please ensure that you have made a copy of any data saved on your product before sending for repair. Please also be aware that products presented for repair may be replaced by refurbished products or parts of the same type rather than being repaired.
- Features
- DISPLAY ICONS
- Get Started
- Install SIM card, battery, SD card (not supplied)
- !ATTENTION :
- Remove the battery cover
- Insert Sim card, SD card (SD card not supplied)
- Charge the phone
- ATTENTION:
- Setup your phone
- Make an outgoing call
- During conversation
- VIP-Photo
- Add Photo in VIP-Photo memory
- Contacts
- Add number to Contacts
- Add number to Group
- Redial or Call from Call log
- Call logs
- Receive a call
- Message (SMS) - Write SMS (or MMS)
- Read New messages
- Take photos
- Image
- Multimedia
- FM radio
- SOS
- Talking dialing digits
- Talking Caller ID
- Settings
- Call settings
- Security
- 10.Network
- Alarm
- Tools
- Express Warranty (Australia)
- How to make a claim under your Express Warranty in Australia
- Important Information
- Repair Notice
Brand : Oricom
Model : EZY7510
Category : Mobile Phone