
STR-BD5L - Drink dispenser Stirling - Free user manual and instructions
Find the device manual for free STR-BD5L Stirling in PDF.


| Product Type | 5 L Benchtop Keg Dispenser |
| Brand / Model | Stirling / STR-BD5L |
| Dimensions (W x D x H) | 273.9 x 480.5 x 430.4 mm |
| Net Weight | Approx. 6.1 kg |
| Rated Voltage / Frequency | 220-240 V~ 50 Hz |
| Rated Power | 60 W |
| Protection Class | Class II (Double Insulated) |
| Climate Class | T (Tropical, 18°C – 43°C) |
| Keg Capacity | 5 L |
| Temperature Range (Housing) | 2°C to 12°C (36°F to 54°F) |
| Preset Temperatures | 6 pre-programmed, adjustable manually |
| CO₂ Cartridge Type | 16 g (non-threaded, supplied) |
| Compatible Kegs | Refillable keg (no CO₂), sealed 5 L universal keg, fresh keg (with integrated CO₂) |
| Display | Digital, shows actual and target temperature |
| Tap / Drip Tray | Spring-loaded tap handle, removable drip tray (capacity 450 mL) |
| Cooling Method | Thermoelectric / compressor (not specified in manual, but likely compressor due to temperature range) |
| Cleaning / Maintenance | Hand wash only; rinse beer line after use; replace sealing rings and tapping tip as needed |
| Included Accessories | Refillable keg, 3× CO₂ cartridges, tapping unit, fresh keg adaptor, cleaning balloon, sealing rings, tapping tips, beer/CO₂ lines |
| Safety Features | Double insulation, automatic tap return, CO₂ cartridge pressure release, overfill protection |
| Warranty | 1 Year (AU/NZ) |
Frequently Asked Questions - STR-BD5L Stirling
User questions about STR-BD5L Stirling
0 question about this device. Answer the ones you know or ask your own.
Ask a new question about this device
Download the instructions for your Drink dispenser in PDF format for free! Find your manual STR-BD5L - Stirling and take your electronic device back in hand. On this page are published all the documents necessary for the use of your device. STR-BD5L by Stirling.
USER MANUAL STR-BD5L Stirling
natural_image
Modern stainless steel water dispenser with black handle and digital display (no visible text or symbols)5 L Benchtop Keg Dispenser
Model Number STR-BD5L
INSTRUCTION MANUAL
Welcome
Congratulations on choosing to buy a STIRLING® product.
All products brought to you by STIRLING ® are manufactured to the highest standards of performance and safety and, as part of our philosophy of customer service and satisfaction, are backed by our comprehensive 1 Year Warranty.
We hope you will enjoy using your purchase for many years to come.
Contents
02 Welcome
04 Warranty Details
05 General Safety Instructions
09 Product Overview
11 Getting Started
12 Instructions – Refillable Keg
15 Instructions
20 Preparation – Alternative Kegs
21 Instructions - Keg (Without CO 2 )
25 Instructions - Fresh Keg (With CO 2 )
27 FAQs & Troubleshooting Guide
31 Other Useful Information
35 Repair and Refurbished Goods or Parts Notice


5 L Benchtop Keg Dispenser
Warranty Details
REGISTER YOUR PURCHASE AT www.aldi.com.au/en/about-aldi/product-registration/ TO KEEP UP-TO-DATE WITH IMPORTANT PRODUCT INFORMATION
The product is guaranteed to be free from defects in workmanship and parts for a period of 12 months from the date of purchase. Defects that occur within this warranty period, under normal use and care, will be repaired, replaced or refunded at our discretion. The benefits conferred by this warranty are in addition to all rights and remedies in respect of the product that the consumer has under the Competition and Consumer Act 2010 and similar state and territory laws.
Our goods come with guarantees that cannot be excluded under the Australian Consumer Law. You are entitled to a replacement or refund for a major failure and to compensation for any other reasonably foreseeable loss or damage. You are also entitled to have the goods repaired or replaced if the goods fail to be of acceptable quality and the failure does not amount to a major failure.

General Safety Instructions
WARNING: DANGER OF EXPLOSION!
The CO2 cartridge is pressurised and must not be heated up to a temperature of over 50 °C. Keep the CO2 cartridge away from naked flames, heat sources and direct sunlight. Do not throw the CO2 cartridge into fire.
WARNING FOR FROSTBITE!
Do not remove the CO2 cartridge before it is completely emptied. As residual amounts of CO2 may still be present in the cartridge, which suddenly empties and results in the formation of ice.
WARNING!
Please ensure the pressure is released from the refillable keg before refilling or cleaning, this can be done by pulling the metal ring found on the lid.
IMPORTANT SAFETY INSTRUCTIONS
READ CAREFULLY AND KEEP FOR FUTURE REFERENCE
Read this manual thoroughly before first use, even if you are familiar with this type of product. The safety precautions enclosed herein reduce the risk of fire, electric shock and injury when correctly adhered to. Keep the manual in a safe place for future reference, along with the completed warranty card, purchase receipt and carton. If applicable, pass these instructions on to the next owner of the appliance.
Always follow basic safety precautions and accident prevention measures when using an electrical appliance, including the following:
Electrical Safety and Cord Handling
- Voltage: Make sure your local outlet voltage and circuit frequency correspond to the voltage indicated on the appliance rating label and your outlet socket is properly earthed. If this is not the case, do not use the appliance.
- Separate circuit: To reduce the likelihood of circuit overload, do not operate another high wattage appliance on the same circuit.
- WARNING: Do not immerse! Never immerse the cord, plug or appliance in water or other liquid, or expose the electrical connections to water or other liquid. Should liquids enter the housing, unplug the appliance from the power socket immediately and arrange for it to be repaired by a qualified technician. If the main unit falls into water, switch off the power supply immediately. Do not attempt to pull it out of the water while it is still connected to the mains power.
- No extension cord: Always unwind the power cord fully before switching on and do not use an extension cord. Take care when arranging the cord so that it cannot be pulled or tripped over.
- Protect from moisture: Do not use the appliance outdoors or expose it to humidity. Never use the appliance adjacent to water contained in a bath, shower, wash basin or other vessel. The proximity of moisture presents a danger, even when the appliance is switched off. Do not operate the appliance or touch the power cord or plug with wet hands.
General Safety Instructions (Cont.)
- Protect the power cord: Do not damage, trap, kink or squash the power cord and protect it from sharp edges. Do not let the cord touch any hot surface. Unwind and straighten the cord before use, then arrange the cord in such a way that no one can step on it or trip over it.
- WARNING: When positioning the appliance, ensure the supply cord is not trapped or damaged.
- Damage: Do not use the appliance if it has been dropped, if there are visible signs of damage or if it is leaking. A damaged cord or plug must be replaced by the manufacturer or a qualified technician in order to avoid a hazard. In case of damage, please contact our after sales support centre.
- Disconnect the appliance after every usage, before cleaning and before filling or emptying the water tank. To disconnect, turn the appliance off and remove the plug from the power socket. Pull only on the plug itself, not on the cable. The device must be switched off when inserting or removing the mains plug.
- Power supply: Do not share a power supply with other high power electrical appliances. Unplug from outlet when not in use. Do not let the cord hang over edge of table or counter, or touch hot surfaces.
- Do not open: Never attempt to open the appliance yourself, or to replace the power cord. Only have the appliance repaired by an authorised technician, or contact our after sales support centre for advice.
- RCD: Unless your home is already fitted with a residual current device (safety switch), we recommend installing an RCD with a rated residual operating current not exceeding 30 mA to provide additional safety protection when using electrical appliances. See your electrician for professional advice.
- WARNING: Do not locate multiple portable socket-outlets or portable power supplies at the rear of the appliance.
Usage Conditions and Restrictions
- Domestic use only: This appliance is designed and intended for indoor house–hold use only. It is not suitable for commercial, trade or outdoor use.
- Intended use: This device is intended to be used to draw beer. It is only suitable for connection to standard 5–litre beer kegs and fresh kegs. It is not suitable for connecting beer kegs which already have an integrated tap unit. Do not use this product for anything other than its intended purpose and only use it as described in this manual. All other use is deemed improper use.
- Common sense: These instructions are not intended to cover every possible condition and situation. As with any electrical household appliance, common sense and caution are therefore always recommended when assembling, operating and maintaining the unit.
General Safety Instructions (Cont.)
- Assembly and accessories: Ensure that all parts are correctly assembled before use. Do not use any accessories with this appliance that are not supplied or specifically recommended. Improper use of accessories may result in the risk of fire, electric shock and / or injury to persons.
- Modifications: Do not make any modifications to the device, the connecting cable, the CO2 cartridge or the accessories. If the device or the connecting cable are damaged, they must be replaced by the manufacturer or customer service department or a similarly qualified person (e.g. specialist workshop) in order to avoid any hazards.
- Do not store explosive substances such as aerosol cans with a flammable propellant in this appliance.
- Usage restriction: This appliance is not intended for use by persons (including children) with reduced physical, sensory or mental capabilities, or lack of experience and knowledge, unless they have been given supervision or instructions concerning use of the appliance by a person responsible for their safety.
- Children: This appliance is not a toy. Supervise children to ensure they do not play with the appliance. Close supervision is necessary when any appliance is used by or near children. The device, its connecting cable and the CO2 cartridges must be kept away from children.
• Unattended: Do not leave the appliance unattended when connected to power. - WARNING: Danger of explosion! The CO 2 cartridge is pressurised and must not be heated up to a temperature of over 50 °C. Keep the CO 2 cartridge away from naked flames, heat sources and direct sunlight. Do not throw the CO 2 cartridge into fire.
- Maximum fill: Do not exceed the maximum fill level (“MAX”) of the cooling container.
- Switching off the device: Switch off the device and pull the mains plug out of the plug socket:
• before inserting or removing the beer keg, - before inserting or removing the CO2 cartridge,
• before filling or emptying the cooling container,
• before assembling and taking apart the device, - before cleaning,
- before maintenance,
- if a fault occurs during operation,
• before a thunderstorm. - Positioning: Always place the product base on a flat and stable floor.
- Flammable materials: Do not operate or store the appliance in the vicinity of flammable or explosive materials.
General Safety Instructions (Cont.)
- Safe usage: Keep vents / openings clear. Do not insert anything into the ventilation openings of the device and make sure that these do not become clogged. Do not cover the device during operation in order to prevent it from catching fire.
- Heat sources: Keep the appliance away from heat sources (radiator, oven etc.), direct sunlight, moisture and sharp edges.
- Tripping hazard: Make sure that the connected mains cable does not present a trip hazard.
- Storage: Put the appliance away after every use to prevent anyone tripping over it. Store the appliance in a cool, dry indoor area, out of reach of children.
- WARNING: Danger of bursting! Never cool beer kegs in a chest freezer, as this can cause them to burst. Rapid chilling also reduces beer quality. Allow the keg to rest for about two hours before tapping to prevent excessive frothing.
- IMPORTANT: Device preparation! To ensure optimal performance, the device requires specific preparation steps, maintenance, and rest periods. Familiarise yourself with the preparation process and ensure that you allocate enough time for it.
- Cleaning: Only clean the housing with a soft, dry cloth. Do not use liquid or aerosol cleaners. Detailed cleaning instructions are provided on pages 31-32.
- CAUTION: Avoid harsh cleansers! Do not clean the appliance with solvents, alcohol or abrasive cleaning agents as these could cause damage to the appliance.
- Smoke: If you notice any smoke or fire coming out of the product, stop using it immediately and unplug the unit from the mains power supply to avoid a fire or electric shock. Contact our after sales support centre for assistance.
- Service: To reduce the risk of electric shock, do not disassemble or attempt to repair the appliance; take it to a qualified service person for examination and repair. Incorrect reassembly or repair could cause a risk of fire, electric shock, or injury to persons when the appliance is used.
- Misuse: Improper use or installation may result in the risk of fire, electric shock and/or injury. We accept no responsibility for any eventual injury or damages caused by improper use or inappropriate handling, or by any other noncompliance with the instructions in this manual.
Product Overview
Scope of Delivery

Main Unit
1 Release button (to open the lid)
2 Tap handle
3 Tap
4 Nozzle / spout
5 Display
6 "+" (Increase temperature) button
7 Water outlet
8 On / off switch (on the side of the appliance)
Documentation (Not Shown)
Quick Start Guide Instruction Manual Warranty Certificate
9 Drainage grille
10 Drip tray
11 Cooling container
12 "-" (Decrease temperature) button
13 Ventilation slots
14 Lid
15 CO 2 Pressure regulator
16 Cartridge sleeve (for the CO2 cartridge)
17 Tapping unit
NOTE: Due to continued product improvement, images and illustrations in this manual may vary slightly from the product purchased. All images in this manual are for reference purposes only. Parts are not necessarily pictured to scale.
Product Overview (Cont.)
Main Unit (Cont.)
18 CO 2 Line Valve (with white release button)
19 Beer Line Adaptor (with white release button)
Accessories – Refillable Keg (No CO 2 )
20 Non-Threaded CO 2 Cartridge (x 3)
21 Refillable Keg
22 Metal Ring (for pressure release)
Replacement Accessories
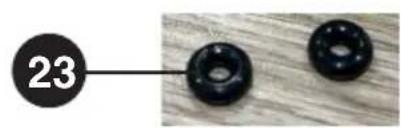
23 Sealing Ring (for CO2 Line x 3)
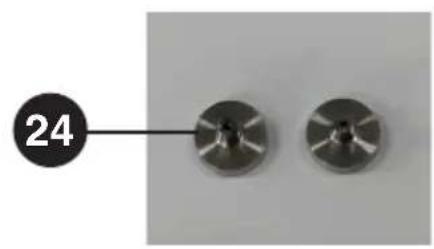
24 Tapping Tip (x 2)
25 Beer / CO 2 Lines (x 2)
natural_image
Two metallic circular components with cross-shaped markings, one labeled '24' on a black circular background (no other text or symbols)
natural_image
Close-up of a mechanical component with a central valve and flange, labeled with number 18 (no readable text or symbols beyond labels)
natural_image
Close-up of two black rubber dials on a wooden surface, one labeled with number 23 (no other text or symbols)
natural_image
Two black mechanical connectors with flanges, labeled with number 25 (no text or symbols on the connectors themselves)Getting Started
Before First Use
- Unpacking: This product has been packaged to protect it against transportation damage. Unpack the product and remove all promotional materials, stickers, protective films and packaging materials. Never remove the rating plate and any included warnings! Keep the original packaging carton and materials in a safe place. It will help prevent any damage if the product needs to be transported in the future, and you can use it to store the appliance when it is not in use. In the event that the packaging is to be disposed of, please recycle all packaging materials where possible.
Keep the packaging materials at least until you have made sure that you have unpacked all the parts listed on the parts lists on the previous pages.
- Safe packaging disposal: Plastic wrapping can be a suffocation hazard for babies and young children, so ensure all packaging materials are out of their reach and disposed of safely.
- Instructions: Make sure you have read and understood all instructions and warnings in this manual. Refer to the product overview (pages 9–10) and parts lists to familiarise yourself with the product and identify all parts. Pay particular attention to the safety instructions on the previous pages.
- Assembly: Your new 5 L benchtop keg dispenser has been shipped partially assembled to reduce wastage of packaging material, paper cartons and weight. Assembly instructions are provided on the following pages.
WARNING: Do not connect the appliance to the power supply until it is fully assembled.
- Before first use: Before using the product for the first time, and after prolonged periods of non-use, the device may need to be cleaned. Instructions for this are provided on pages 31-32.
WARNING!
Do not connect the appliance to the power supply until it is fully assembled.
Instructions – Refillable Keg
Assembling the Appliance for Use
- Ensure the main unit is positioned with adequate clearance on all sides (at least 20 cm) and above it (at least 30 cm) on a dry, flat, sturdy, and moisture-resistant surface.
- Attach the tap handle to the socket of the tap.
- Insert the drainage grille into the drip tray.
- Slide the drip tray from the front into the base of the main unit (Fig. 1).
NOTE: The drip tray must not protrude beyond the edge of the surface on which the main unit is placed. Otherwise, the drip tray could fall down when a glass is placed on it.
- Open the lid of the main unit by pressing the release button.
- Remove the refillable keg from the unit and wash with clean fresh tap water. Allow to air dry. Note: The refillable keg is not dishwasher safe.
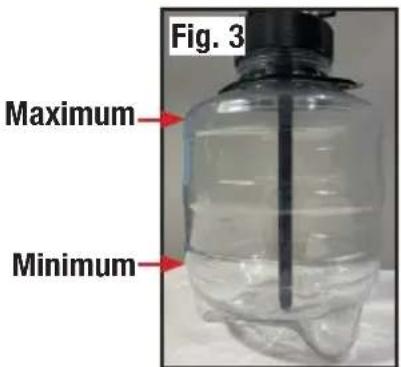
- Pour roughly 800 mL of water into the cooling container. Do not exceed the "MAX" marking in the cooling container! (Fig. 2)
NOTE: It is recommended replacing the water inside the cavity once each week. If too much water has been poured in, flip open the water outlet and allow the excess water to run into the drip tray.
NOTE: The drip tray has a maximum capacity of 450 mL.
- Fill the refillable keg with your beer of choice no higher than the maximum amount (top of the top band) and minimum amount (bottom of the bottom band).
- Press the keg down firmly onto the suction pad found at the base of the cooling container.
- Insert the adaptor of the beer line into the corresponding valve, and the valve for the CO2 line onto the corresponding adaptor (Fig. 4). Make sure that the plug can as possible so that no CO2 can escape and no beer can be audibly.
Scan the QR Code for an instructional video on the 5 L Keg Dispenser!


natural_image
Line drawing of a robotic vacuum cleaner with a small circular base component, labeled 'Fig. 1' (no text or symbols on the device itself)

natural_image
Close-up of a mechanical component with bolts and a central hub, labeled 'Fig. 4' (no readable text or symbols on the object itself)Instructions – Refillable Keg (Cont.)
Inserting the CO2 Cartridge
A 16 g CO 2 cartridge is required to draw beer.
Use one CO2 cartridge for each keg refill.
CAUTION: If the purchased kegs are pre-charged with CO2 , and do not require the use of regulator, there is no need to install the CO2 cartridge. The CO2 pressure regulator on the top cover will not work.
WARNING!
- The CO 2 cartridge may be very cold during / after use, and handling it during or immediately after use may cause severe burns. After emptying the CO 2 cartridge, wait at least ten minutes before replacing it.
- Never pull the CO2 cartridge out of the device during operation. Only remove the CO2 cartridge when it is completely empty.
- DO NOT use any damaged or icy CO 2 cartridges with the device. The CO 2 cartridges should be at room temperature for use.
- Only insert the CO2 cartridge when the CO2 pressure regulator has been turned to the "OFF" position. Otherwise, the contents of the CO2 cartridge will empty into the device!
-
DO NOT transport the device with an inserted and pierced CO 2 cartridge.
-
Make sure that the CO2 pressure regulator is turned to the “OFF” position, and the device is switched off (i.e. the switch is in the “O” position).
- If a CO2 cartridge has already been inserted, make sure that it has been completely emptied before attempting to remove it (see page 18).
- Fold out and unscrew the cartridge sleeve on the inside of the lid (Fig. 5).
- Insert a CO2 cartridge into the cartridge sleeve, removing the used one before hand if necessary.
- Screw the cartridge sleeve with the inserted CO2 cartridge onto the mount in the lid (Fig. 6).
NOTE: Make sure that the cartridge sleeve has been fully tightened so that no CO2 can escape! The gas can now flow towards the keg. - Fold the cartridge sleeve into the lid.
- Close the lid until it engages with an audible click.

natural_image
Close-up of a hand holding a cylindrical mechanical component, with an arrow pointing to a small component (no text or symbols visible)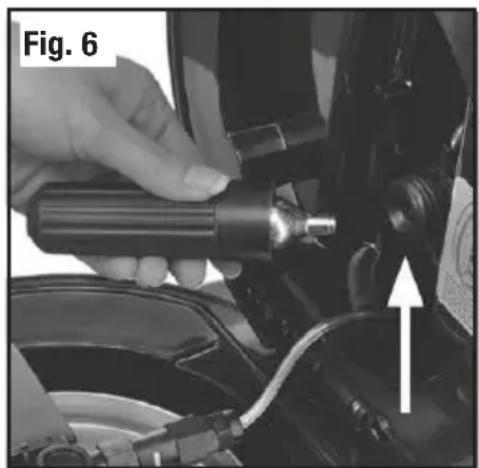
natural_image
Close-up of a hand adjusting a mechanical component, labeled 'Fig. 6' with an arrow pointing to a component (no readable text or symbols)Instructions – Refillable Keg (Cont.)
- Turn the CO2 pressure regulator anti-clockwise for approx. five seconds as far as possible, this allows the gas to flow into the keg and you should hear a hissing sound (Fig. 7), and then turn it clockwise towards the “OFF” as far as possible.
NOTE: Please note that the pressure will not change immediately but will gradually adjust over time. The line marking is a symbol of which direction to turn for the gas to release, this is not an indication of variable pressure.

natural_image
Close-up of a black dial with a white circular mark and curved white line, labeled 'OFF' (no other text or symbols)- Connect and switch on the device (see page 15). Allow the keg to rest for at least an hour so that the CO2 can integrate evenly, which will help reduce excessive frothing when drawing the beer.
CAUTION PRESSURE!
- Check the position of the pressure regulator! It should be in the “OFF” position! Screw the holder with the CO 2 cartridge quickly and firmly into the thread, so no pressure can escape.
WARNING FOR FROSTBITE!
- Do not remove the CO2 cartridge before it is completely emptied. As residual amounts of CO2 may still be present in the cartridge, which suddenly empties and results in the formation of ice.
WARNING!
- Please ensure the pressure is released from the refillable keg before refilling or cleaning, this can be done by pulling the metal ring found on the lid.
Instructions
Connecting and Switching On the Device
WARNING!
- Unwind the cable fully before connecting the device.
- Only connect the device to a wall outlet that has been properly installed. The outlet must also be readily accessible after connection so that the connection to the mains can quickly be isolated. The mains voltage must match the rating plate of the device.
-
Do not move the device during operation.
-
Ensure the on / off switch is in the "O" position before connecting the device to a wall outlet. Check that the CO2 pressure regulator is turned to the "OFF" position.
- Insert the mains plug into an easily accessible wall outlet, and switch on the outlet at the wall.
- Switch on the device by moving the on / off switch to position "I". This will start the cooling process, and the preset target temperature will briefly illuminate on the display. After this, the current temperature of the beer will appear on the display.
Use
Once the device is switched on, it will begin cooling the beer down to the target temperature. The preset target temperature of the device will be the last one set. Pressing the “+” button briefly will show the target temperature on the display. If no buttons are pressed for approx. three seconds, the display will revert back to the actual beer temperature.
NOTE: To preserve the quality of the beer, once a beer keg has been connected, it must always be kept cool, i.e. the device must remain switched on. Please do not leave a pierced beer keg connected to this device for more than a week.
Setting the Beer Temperature
- The target temperature of the beer can be set in two different ways:
* Selecting a pre-programmed temperature.
* Setting the temperature you want manually.
- The device's temperature range is between 2 irc C and 12 irc C (36 irc F and 54 irc F).
- The temperature can be displayed both in °C and in °F. To switch between the two unit displays, hold down the “+” button for a few seconds.
Selecting a Pre-Programmed Target Temperature
Six target temperatures are stored in the device. They are displayed in the following order:
4 ^ irc C gt; gt; 8 ^ irc C gt; gt; 9 ^ irc C gt; gt; 1 0 ^ irc C gt; gt; 1 1 ^ irc C gt; gt; 1 2 ^ irc C
(4 0 ^ irc F gt; gt; 4 6 ^ irc F gt; gt; 4 8 ^ irc F gt; gt; 5 0 ^ irc F gt; gt; 5 2 ^ irc F gt; gt; 5 4 ^ irc F)
- Press the “-” button and hold it down. The pre-programmed temperatures will appear one after the other on the display.
- Let go of the “−” button when the temperature you want appears on the display. The device will then start cooling until it reaches this new target temperature.
Instructions (Cont.)
Setting the Target Temperature Manually
- Briefly press the “-” button. The device will enter setting mode.
- Press the “−” or “+” button to reduce or increase the target temperature in one degree increments. The device will then start cooling until it reaches this new target temperature.
Drawing Beer
As different varieties of beer have different levels of CO2 added to them, a corresponding operating pressure (saturation pressure) is required to maximise the quality of the respective beers.
If, when drawing the beer, you notice that the beer is too fizzy or not fizzy enough, the pressure can be adjusted using the CO2 pressure regulator.
NOTE: The pressure cannot be regulated in the case of a fresh keg.
If there is insufficient pressure when drawing a beer – even though the CO2 pressure regulator is fully opened up – the CO2 cartridge may need to be replaced (see refer to “Inserting / Replacing the CO2 Cartridge” sections on pages 13-14 or pages 23-24).
WARNING!
- Never switch off the device if a beer keg containing beer is still inside it! The freshness and preservation of the beer is only maintained if the device is working, i.e. if the cooling system is switched on.
- Ensure that the CO2 pressure regulator is always in the "OFF" position when no beer is being drawn. Only turn it fully anti-clockwise if there is not enough pressure during the drawing process.
- Do not place any filled glasses down on the lid of the main unit.
-
Clean the device after each use to prevent germs and bacteria.
-
Wait until the beer has reached the set target temperature.
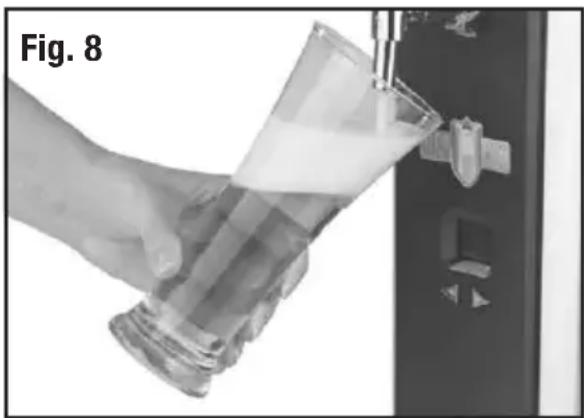
- Hold the glass tilted at an angle below the tap. Ensure that the glass does not touch the nozzle / spout.
- Pull the tap handle towards you at about a 45irc angle and keep it there. Let the beer flow down the inside of the glass (Fig. 8).
- If the beer comes out of the spout too
natural_image
Hand pouring liquid from a glass into a control panel (no text or symbols visible)slowly, you might need to increase the pressure. Turn the CO2 pressure regulator anti-clockwise all the way for about five seconds (Fig. 7), and then turn it clockwise to the “OFF” position.
NOTE: The pressure won't change immediately, so let the beer settle for at least an hour after adjusting.
- Gradually tilt the glass upright while pouring.
Instructions (Cont.)
- Close the tap once the foam reaches the glass edge by moving the tap handle back to the vertical position. It will close automatically due to the built-in spring, but it is important you avoid releasing the handle abruptly.
- Place the glass on the drainage grille and wait for the foam to settle.
- Repeat steps 2 to 5 until you achieve a pleasant ratio of beer to foam. Aim for a frothy head about two fingers wide, slightly extending beyond the glass edge.
NOTE: There will be a sharp and high-speed jet when pouring the last cup of beer from keg. Please adjust the CO2 pressure regulation to “OFF” position to close the CO2 supply and save the CO2 .
What to do if There is Too Much Frothing?
- Let the beer keg rest for about two hours before tapping it (for alternative kegs).
- After tapping, let the keg rest for at least an hour to cool down. Warm beer tends to foam a lot (for alternative kegs).
- To reduce pressure, turn the CO2 pressure regulator to the "OFF" position.
NOTE: It might take up to an hour for the pressure to change noticeably.
- Rinse glasses with cold water before pouring each beer.
- Pull the tap handle fully towards you at a 45° angle to ensure a smooth pour. Hold the glass at an angle under the tap to avoid excessive froth.
- Don't let the tap's nozzle / spout touch the beer.
In spite of all precautions, it is normal for the beer to produce a lot of froth when the first few glasses are poured after tapping into the keg.
What to do if the Beer is not Pouring?
Refer to the table below for a guide on why your keg may not be dispensing beer.
| CO2 | Beer Nozzle / Spout | |
| CO2 is full. No beer in the keg. No beer will come out but you will hear a hissing sound. | ||
| CO2 is empty. Beer is in the keg. No beer will come out and there will be no hissing sound. | ||
| CO2 is empty. No beer in the keg. No beer will come out and there will be no hissing sound. | ||
| CO2 is full. Beer is in the keg. Beer will come out with no hissing sound. | ||
Instructions (Cont.)
Use one CO2 cartridge for each keg refill.
Removing and Emptying the CO₂ Cartridge
- Switch the device off by turning on / off switch to the "O" position.
- Switch off the wall socket and unplug the device.
- Open the lid by pressing the release button.
- To make sure that the CO2 cartridge is completely empty, turn the CO2 pressure regulator anti-clockwise as far as it will go and pull the metal ring on the refillable keg lid. Do this until the hissing sound stops.
- You can now unscrew the cartridge sleeve and remove the CO2 canister.
- To install a new CO2 cartridge please refer to pages 13-14.
Removing and Emptying the Keg
- Place a suitable container under the tap. The size of the container depends the amount of beer that is still in the keg.
- Turn the CO2 pressure regulator “OFF” and at the same time pull the tap handle with the other hand towards you (approx. 45° angle) and hold it in this position. Any remaining beer will flow out of the tap.
- Once no more beer flows out of the tap, move the tap handle back into the vertical position.
- Switch the device off by turning on / off switch to the "O" position.
- Switch off the wall socket and unplug the device.
- Open the lid by pressing the release button.
- Release the beer line and the CO2 line from the valve unit. To do this, press the white release buttons on each of the valves and pull off the adaptor.
- Take the keg out of the cooling container. For refillable keg, you can now refill the bottle and refer to page 12 steps 7-10 for set up. Please follow steps 9-11 for alternative kegs.
- Remove the tapping unit or the fresh keg adaptor from the keg.
WARNING!
NEVER remove the tapping unit or the fresh keg adaptor from the keg when it is not empty and is still pressurised. Always fully empty the beer keg beforehand.
- Tapping unit: Release the mount of the tapping unit from the keg by pulling up the locking lug on one side of the mount (Fig. 9). The tapping pump can then be pulled out of the keg. You may need to apply a certain amount of force to do this.
- Fresh keg adaptor: Press together the fresh keg adaptor on both sides at the top and pull it off (Fig. 10).
- A new keg can then be connected for keg {without CO2 } see pages 21-24 and for the fresh keg {with CO2 } see pages 25-26).
- If the device is no longer going to be used, drain the water from the cooling container and thoroughly clean the device and all accessories (see pages 31-32).

natural_image
Technical line drawing of a mechanical component with a rotating arrow, labeled Fig. 9 (no text or symbols on the diagram itself)
natural_image
Technical line drawing of a mechanical component with arrows indicating direction (no text or symbols)Instructions (Cont.)
After Use
Rinsing Through the Beer Line
The beer line needs cleaning after using the keg or when no beer has been drawn overnight or for an extended period. To rinse the beer line, you'll need a supplied cleaning balloon and warm water. You may also need a special disinfecting cleaner (refer to the "Cleaning" section on pages 31-32).
NOTE: The rinsing process will interrupt the cooling of the tapped beer keg for a short while. This will have no negative effect on the preservation of the beer.
- Switch the device off by turning on / off switch to the "O" position.
- Switch off the wall socket and unplug the device.
- Open the lid by pressing the release button
- Only the beer line should be disconnected from the beer keg.
- Plug a clean fresh keg adaptor onto the adaptor of the beer line (see page 26).
This is the easiest way to clean the beer line as the tip of the cleaning balloon is too narrow for the adaptor of the beer line.
- Fill the cleaning balloon with warm water. To do this, press it together, immerse it in water and let it go again.
- Place the tip of the cleaning balloon onto the tip at the bottom of the fresh keg adaptor (Fig. 11).
- With the other hand pull the tap handle towards you (approx. 45irc angle) and hold it in this position.
- Squeeze the cleaning balloon firmly and repeatedly. This will help rinse the line. The waste water will then flow out of the tap.
- Repeat the rinsing process (steps 7 - 9) with at least three balloonfuls of water.
- Clean the tap with a damp cloth and mild detergent if necessary.
- Disconnect the fresh keg adaptor from the beer line. To do this, press the white button on the fresh keg adaptor and pull off the adaptor of the beer line.
- Connect the beer keg to the device (for refillable keg method see pages 12-14, for keg {without CO₂} see pages 21-24 and for the fresh keg {with CO₂} see pages 25-26).
- Insert the mains plug into an easily accessible plug socket.
- Switch the device on again (by moving the on / off switch to the "I" position).
NOTE: If a disinfecting cleaner was used, allow a little beer to run into a glass after rinsing through the line, and pour this beer away, as it may contain cleaner residue.

natural_image
Close-up of hands assembling a transparent plastic component with an arrow indicating assembly (no text or symbols visible)Preparation – Alternative Kegs
Preparation
IMPORTANT!
To ensure the device operates optimally, follow these initial steps. Familiarise yourself with the preparation process and make sure you have enough time before using the device.
- To prepare the beer keg and prevent excessive frothing, allow it to rest for two hours before tapping it.
- Vent the beer keg before the seal plug is removed. This prevents excessive amounts of froth escaping from the ventilation opening.
- It can take up to 21 hours for beer at a temperature of 22 – 24 °C to cool down to 2 – 10 °C in the device. We recommend cooling the beer keg in the fridge beforehand to speed up the cooling process. This allows you to have a second beer keg on hand ready to be used immediately.
WARNING! Danger of bursting!
Never cool beer kegs in a chest freezer! Cooling a beer keg in a chest freezer can result in the kegs bursting.
- Besides the risk of the keg bursting, quickly chilling beer in a chest freezer can also result in a decrease in beer quality.
IMPORTANT!
- Never place the device on a soft surface. The ventilation slots on the bottom of the device must not be covered, to avoid overheating and damage.
- Set up and operate the device in a place which is protected from direct sunlight.
- Make sure that the connecting cable is not squashed, bent or laid over sharp edges and does not come into contact with hot surfaces.
- The mains cable should not hang down from the surface on which the device is placed, in order to prevent the device from being pulled down.
- The device has rubber feet. Some items of furniture are coated with materials which could attack the rubber feet. If necessary, place a mat under the device.
How to Select a Keg
- Sealed 5 L universal keg (without CO 2 ) and sealed 5 L fresh keg (with CO 2 ).
- Pay close attention to safety and storage messages about the keg / on the keg.
- Check the keg is neither damaged nor beer out-of-date before purchasing.
- Protect the top surface from being damaged. Otherwise it could be difficult of accession for the suction tube.
- Keep the keg in a rather cold for 12 hours but not too cold place (e.g. refrigerator) until next use.
- Never shake the keg before use.
- Never put the beer keg under the sunlight.
Instructions – Keg (Without CO 2 )
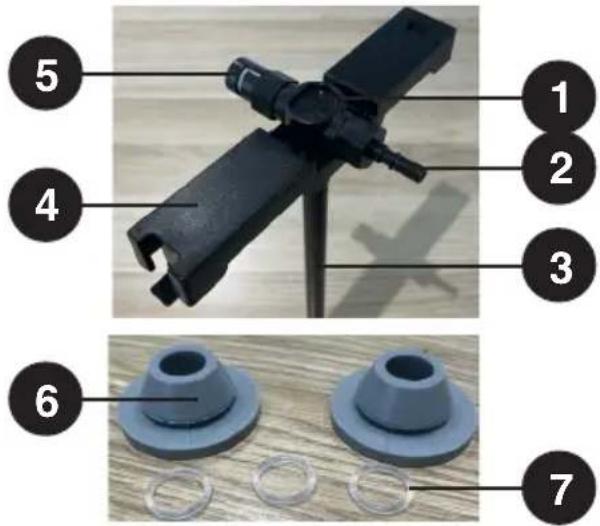
Tapping Unit – Fresh Keg (No CO 2 )
1 Valve Unit
2 CO 2 Line Adaptor
3 Tapping Pump
4 Mount
5 Beer Line Valve (with release button)
Other Accessories
6 Tapping Seal (x 2)
7 Sealing Ring (for tapping pump x 3)
Assembling the Appliance for Use
- Ensure the main unit is positioned with adequate clearance on all sides (at least 20 cm) and above it (at least 30 cm) on a dry, flat, sturdy, and moisture-resistant surface.
- Attach the tap handle to the socket of the tap.
- Insert the drainage grille into the drip tray.
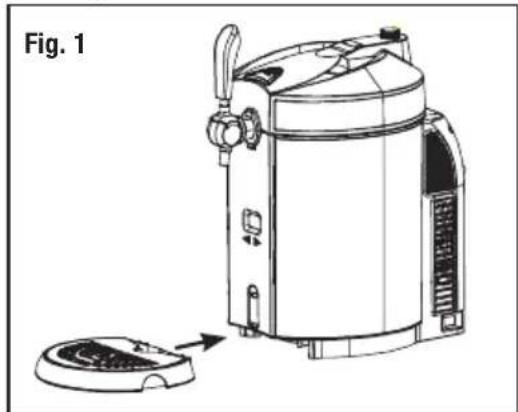
- Slide the drip tray from the front into the base of the main unit (Fig. 1). NOTE: The drip tray must not protrude beyond the edge of the surface on which
the main unit is placed. Otherwise, the drip tray could fall down when a glass is placed on it.
-
Open the lid of the main unit by pressing the release button.
-
Remove the refillable keg from the unit. The refillable keg is not necessary for this method, please keep aside for future use.
-
Pour roughly 800 mL of water into the cooling container.
Do not exceed the "MAX" marking in the cooling container! (Fig. 2)
NOTE: It is recommended replacing the water inside the cavity once each week.
If too much water has been poured in, flip open the water outlet and allow the excess water to run into the drip tray.
NOTE: The drip tray has a maximum capacity of 450 mL.
natural_image
Line drawing of a portable appliance with a lid removed, labeled 'Fig. 1' (no text or symbols on the device itself)
natural_image
Close-up of a perforated metal object with a metallic base and circular opening, labeled 'Fig. 2' in the top-left corner (no other text or symbols)Instructions – Keg (Without CO 2 ) (Cont.)
Types of Keg Plugs
Some kegs have different types of plugs. The two most commonly found are the Combi Plug and the Ventillation Plug.
Combi Plug
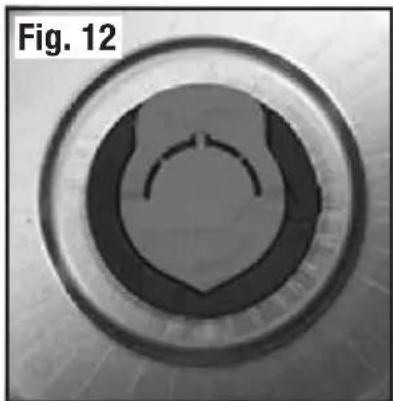
Please note, the combi plug (Fig. 12) has a black seal plug with a red plug cover.
natural_image
Circular object with a central curved line and concentric rings, labeled 'Fig. 12' (no other text or symbols)-
Vent the beer keg. To do this, flip up the tab of the plug cover and twist the plug cover in the direction of the arrow. (Fig. 13 and Fig. 14)
-
Remove the plug cover with a firm tug (Fig. 15).

natural_image
Close-up of a metallic bowl with a central rod and arrow indicating rotation (no text or symbols)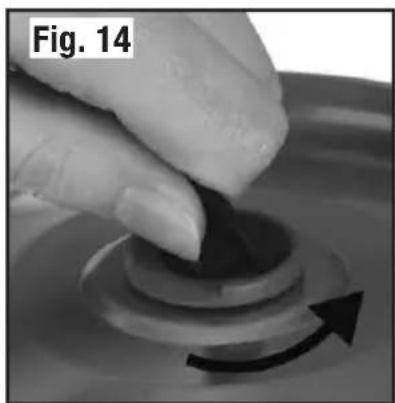
natural_image
Close-up of a hand pressing a button on a circular surface with an arrow indicating rotation (no text or symbols)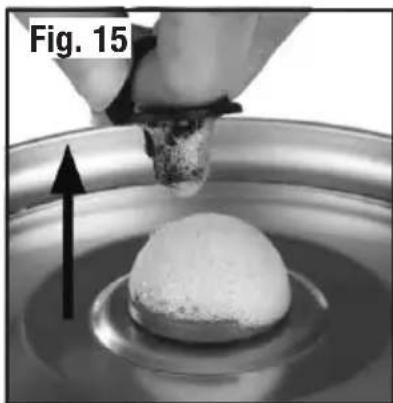
natural_image
Close-up of a hand pouring liquid into a bowl with a sphere on the surface, showing an upward arrow (no text or symbols)Ventilation Plug
Please note, the ventilation plug (Fig. 16) has a red seal plug with a black plug cover.
-
Vent the beer keg. To do this, flip up the tab of the plug cover and twist the plug cover in the direction of the arrow (see Fig. 13 and Fig. 14).
-
Remove the plug cover with a firm tug (Fig. 15).
- To remove the ventilation unit of the plug, release it from the plug using a screwdriver and hammer (Fig. 17). NOTE: The ventilation unit, which will drop into the beer keg.

natural_image
Hand holding a pipette over a container with liquid, labeled 'Fig. 17' (no text on diagram)Instructions – Keg (Without CO 2 ) (Cont.)
Inserting the CO2 Cartridge
A 16 g CO 2 cartridge is required to draw beer.
Use one CO 2 cartridge for each keg refill.
CAUTION: If the purchased kegs are pre-charged with CO2 , and do not require the use of regulator, there is no need to install the CO2 cartridge. The CO2 pressure regulator on the top cover will not work.
WARNING!
- The CO 2 cartridge may be very cold during / after use, and handling it during or immediately after use may cause severe burns. After emptying the CO 2 cartridge, wait at least ten minutes before replacing it.
- Never pull the CO2 cartridge out of the device during operation. Only remove the CO2 cartridge when it is completely empty.
- DO NOT use any damaged or icy CO 2 cartridges with the device. The CO 2 cartridges should be at room temperature for use.
- Only insert the CO 2 cartridge when the CO 2 pressure regulator has been turned to the "OFF" position. Otherwise, the contents of the CO 2 cartridge will empty into the device!
-
DO NOT transport the device with an inserted and pierced CO 2 cartridge.
-
Make sure that the CO2 pressure regulator is turned to the “OFF” position, and the device is switched off (i.e. the switch is in the “O” position).
- If a CO2 cartridge has already been inserted, make sure that it has been completely emptied before attempting to remove it (see page 18).
- Fold out and unscrew the cartridge sleeve on the inside of the lid (Fig. 5).
- Insert a CO2 cartridge into the cartridge sleeve, removing the used one before hand if necessary.
- Screw the cartridge sleeve with the inserted CO2 cartridge onto the mount in the lid (Fig. 6).
NOTE: Make sure that the cartridge sleeve has been fully tightened so that no CO2 can escape! The gas can now flow towards the keg.
-
Fold the cartridge sleeve into the lid.
-
Close the lid until it engages with an audible click.
-
Turn the CO2 pressure regulator anti-clockwise for approx. five seconds as far as possible, this allows the gas to flow into the keg and you should hear a hissing sound (Fig. 7), and then turn it clockwise towards the “OFF” as far as possible.
NOTE: Please note that the pressure will not change immediately but will gradually adjust over time. The line marking is a symbol of which direction to turn for the gas

natural_image
Close-up of a hand holding a cylindrical mechanical component, with an arrow pointing to a small component (no text or symbols visible)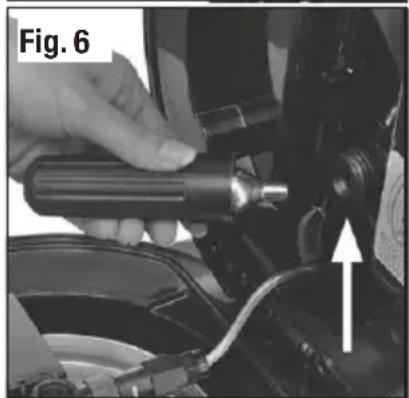
natural_image
Close-up of a hand using a tool to adjust or install a mechanical component, with no visible text or symbols.Instructions – Keg (Without CO 2 ) (Cont.)
to release, this is not an indication of variable pressure.
- Allow the beer keg to rest for at least an hour so that the CO2 can integrate evenly, which will help reduce excessive frothing when drawing the beer.
CAUTION PRESSURE!
Check the position of the pressure regulator! It should be in the “OFF” position! Screw the holder with the CO2 cartridge quickly and firmly into the thread, so no pressure can escape.

natural_image
Close-up of a black rotary knob with a white circular dot and curved edge, labeled 'OFF' (no additional text or symbols)WARNING FOR FROSTBITE!
Do not remove the CO2 cartridge before it is completely emptied. As residual amounts of CO2 may still be present in the cartridge, which suddenly empties and results in the formation of ice.
Tapping Into and Connecting the Beer Keg
- Check the lid of the beer keg for any dents or deformations.
NOTE: The mount of the tapping unit can only engage on the lid of the beer keg if it is not damaged in any way. - Prepare the keg for tapping (page 20).
- Briefly dip the tapping pump in some cold, clean water.
- Place the tapping pump vertically into the opening of the seal plug and press it forcefully and swiftly down into the beer keg until its mount locks into place on both sides of the keg with an audible click (Fig. 18).
- Ensure that the CO2 pressure regulator is turned to the “OFF” position and that the device is switched off (i.e. the switch is in the “O” position).
-
Open the lid by pressing the release button.
-
Grip the beer keg by the mount for the tapping unit and insert it into the cooling container.
NOTE: The valve for the beer line must be directed forwards towards the tap (see also the arrow on the valve unit).
-
Press the beer keg down firmly onto the suction pad on the base of the cooling container.
-
Insert the adaptor of the beer line into the corresponding valve, and the valve for the CO2 line onto the corresponding adaptor (Fig. 19). Make sure that the plug connections are as snug as possible so that no CO2 can escape and no beer can leak. They must engage audibly.

natural_image
Close-up of a hand using a mechanical tool to press down a cylindrical object on a metallic container (no text or symbols visible)
natural_image
Close-up of a mechanical component being processed with a tool, labeled 'Fig. 19' (no readable text or symbols)Instructions – Fresh Keg (With CO 2 )
Accessories – Fresh Keg (With CO 2 )
1 Cleaning Balloon
2 Fresh Keg Adaptor (x 3)
3 Connection Tubes (x 3)
Fresh Keg
A fresh keg (Fig. 20 and Fig. 21) will have an integrated valve on the top.

NOTE: For fresh kegs, there's no need to remove any seal plugs, so you won't require any tools or universal adaptors.
- Remove the seal cap from the keg.
- Press the fresh keg adaptor onto the keg's valve (Fig. 22). Ensure that it fits securely.

natural_image
Close-up of a metallic cylindrical container with black lid and central hole, labeled Fig. 20 (no text or symbols on the object itself)
natural_image
Circular metallic object with concentric rings and a central hole (no text or symbols)
natural_image
Close-up of a hand placing a small object into a cylindrical mechanical component (no visible text or symbols)Assembling the Appliance for Use
- Ensure the main unit is positioned with adequate clearance on all sides (at least 20 cm) and above it (at least 30 cm) on a dry, flat, sturdy, and moisture-resistant surface.
- Attach the tap handle to the socket of the tap.
- Insert the drainage grille into the drip tray.
- Slide the drip tray from the front into the base of the main unit (Fig. 1).
NOTE: The drip tray must not protrude beyond the edge of the surface on which the main unit is placed. Otherwise, the drip tray could fall down when a glass is placed on it.
-
Open the lid of the main unit by pressing the release button.
-
Remove the refillable keg from the unit. The refillable keg is not necessary for this method,
please keep aside for future use. Pour roughly 800 mL of water into the cooling container.

natural_image
Line drawing of a portable water heater with a lid removed, labeled 'Fig. 1' (no text or symbols on the device itself)Instructions – Fresh Keg (With CO 2 )
Do not exceed the "MAX" marking in the cooling container! (Fig. 2)
NOTE: It is recommended replacing the water inside the cavity once each week.
If too much water has been poured in, flip open the water outlet and allow the excess water to run into the drip tray.
NOTE: The drip tray has a maximum capacity of 450 mL.

natural_image
Close-up of a perforated metal component with a metallic base and circular holes, labeled 'Fig. 2' in the top-left corner (no other text or symbols)Connecting a Fresh Keg
CAUTION:
If the purchased kegs are pre-charged with CO2 , and do not require the use of regulator, there is no need to install the CO2 cartridge. The CO2 pressure regulator on the top cover will not work.
Fresh kegs already have the correct amount of CO2 , no CO2 cartridge is necessary. In this case, the CO2 pressure regulator is deactivated.
-
Make sure that the device is switched off (i.e., the switch is in the "O" position).
-
Open the lid by pressing the release button.
-
Clamp the CO2 line into the mount next to the cartridge sleeve (Fig. 23).
-
Connect the adaptor of the beer line to the fresh keg adaptor (Fig. 24).
-
Insert the fresh keg into the cooling container. NOTE: The valve with the release button on the fresh keg adaptor must be directed forwards, toward the tap.
-
Press the fresh keg down firmly on the suction pad on the base of the cooling container.
-
Connect the adaptor to the fresh keg.
-
Close the lid until it engages with an audible click.
-
Connect and switch on the device (see page 15).

natural_image
Interior view of a mechanical device with internal components and wiring (no visible text or symbols)
natural_image
Close-up of a medical or laboratory device with a white plastic tube inserted into a dark circular chamber (no visible text or symbols)FAQs & Troubleshooting Guide
If you experience problems with your 5 L benchtop keg dispenser, or it appears not to be operating correctly, check in the list below for answers to frequently asked questions. If none of the solutions offered helps you solve your problem, please contact our after sales support centre for advice using the details at the bottom of the page. Do not attempt to repair the appliance yourself!
| Problem | Possible cause Solution | |
| The device is not turning on. | The on / off switch is in the "off" (0) position. | Move the on / off switch to the "on" position (1) to switch on the device. |
| The mains plug is not inserted in the outlet correctly. | Check the fit of the plug in the socket. | |
| The wall outlet is defective. | Test the device using another wall outlet. | |
| There is no mains voltage. | Check the fuse of the mains connection. | |
| No beer is being drawn. | The beer keg is empty. | Check the beer keg and, if necessary, insert a new one (for refillable keg method see pages 12-14, for keg {without CO2} see pages 21-24 and for the fresh keg {with CO2} see pages 25-26). |
| The CO2 cartridge is empty. | Replace the CO2 cartridge (for refillable keg method see pages 12-14, for keg {without CO2} see pages 21-24). | |
| The CO2 cartridge was not pierced correctly. | Take out the cartridge and insert it again. If you still cannot pierce it, you may need to replace the tapping tip (see page 32-33). | |
| The beer keg is not connected correctly. | Check the connections to the beer pump and make any necessary adjustments (for refillable keg method (for refillable keg method see pages 12-14, for keg {without CO2} see pages 21-24 and for the fresh keg {with CO2} see pages 25-26). | |
| The lines are leaking | Check the sealing ring between the tapping pump and valve unit, and in the mount for the cartridge sleeve, replacing it if necessary (see page 33). | |
| Problem Possible cause Solution | ||
| CO2is escaping. | The cartridge sleeve has not been fully tightened. | Tighten the cartridge sleeve as far as it will go on the mount in the lid. |
| The valve of the CO2line and the corresponding adaptor are not connected correctly. | Press the valve of the CO2line as far as it will go onto the adaptor. It will engage audibly when it is fully connected. | |
| The lines have leaks. | Check the sealing ring between the tapping pump and valve unit, and in the mount for the cartridge sleeve and replace it if necessary (see the page 33). | |
| The beer is cloudy. | The beer is too cold. | Allow the beer keg to rest in the device for a little while after chilling. This allows for the cooling container to regulate the temperature. |
| The beer line is contaminated. | Clean the tap unit (see pages 31-32). | |
| The beer keg has been chilled too quickly. | Only use correctly cooled beer kegs. Do not cool beers rapidly or in chest freezers. | |
| There is not enough froth when drawing beer. | The beer is too cold. | Allow the beer keg to rest in the device for a little while after chilling. This allows for the cooling container to regulate the temperature. |
| The pressure is too low. | Set the pressure slightly higher using the CO2pressure regulator. | |
| There is grease or detergent residue in the glass. | Clean the glass and rinse it with cold, clean water. | |
| The glass is too dry. Rinse | the glass with cold, clean water. | |
| There is too much froth when drawing beer. | The beer keg was tapped too soon. | Allow the beer keg to rest for around two hours before tapping into it, and for at least one hour after tapping into and connecting it. |
| The beer is too warm. | Allow the beer to cool down sufficiently. | |
| The pressure is too high. | Set the pressure slightly lower using the CO2pressure regulator. | |
| The glass is too warm. | Rinse the glass with cold, clean water. | |
| The tap is not fully open. | Always pull the tap handle all the way towards you so that it is at a 45° angle and hold it there. | |
| The glass is being held vertically under the tap. | Hold the glass at an angle under the tap so that the beer can run down the wall of the glass. | |
| The nozzle / spout is in the beer. | Do not dip the nozzle / spout of the tap in the beer. | |
| The cooling container is heavily iced (slight icing is normal). | The device has been set up in a damp environment. | Set up the device in a drier environment. |
| The ambient temperature is too low. | Make sure the room in which you are using the device is sufficiently warm. | |
| The beer is too warm. | The on / off switch is in the off ("O") position. | Move the on / off switch to position I to start the cooling process. |
| The ventilation slots are covered or the clearance around all sides of the device is insufficient (less than 20 cm). | Uncover the ventilation slots and make sure there is sufficient clearance around all sides of the device. | |
| The beer tastes flat. | The pressure is set too low. | Set the pressure higher using the CO2 pressure regulator. |
| The beer's best-before date has passed. | Remove and refill the refillable keg or connect a new beer keg. | |
| The beer has been tapped into for too long. | Remove and refill the refillable keg or connect a new beer keg. | |
| The cooling process was interrupted. | Remove and refill the refillable keg or connect a new beer keg. | |
| The beer flows out of the tap too slowly. | The CO2 cartridge is empty. | Replace the CO2 cartridge (for refillable keg method see pages 12-14, for keg {without CO2} see pages 21-24). |
| The pressure is too low. | Set the pressure slightly higher using the CO2 pressure regulator. | |
| The beer is being squeezed out of the tap line. | Pull the tap handle towards you (at an angle of approx. 45°) and hold it in this position. | |
| The beer keg can only be tapped into with a great deal of effort. | The tapping pump has not been moistened prior to tapping. | Moisten the tapping pump by holding it under cold, clear water. |
Other Useful Information
Cleaning and Care
WARNING!
- Before cleaning the appliance, always switch it off and unplug it from the power supply.
- Do not clean the main unit or the accessories in the dishwasher!
- Never pour liquid into the CO 2 line to prevent damage to the device!
- Do not use any caustic or abrasive cleaning agents to clean the device. These may damage the surface.
Some specialty pump shops offer disinfecting cleaners in powder form, specifically designed for cleaning devices like this. Each cleaner brand includes its own set of instructions.
It's important to clean the device after each use, whenever you switch off the device, connect a beer keg with a different type of beer, or if it hasn't been used overnight or for an extended period. However, there's no need to clean if you connect a new keg of the same beer type immediately after emptying one.
For cleaning the beer line and cooling container, it's best to place the device without the drip tray on the edge of a sink. This allows the cleaning or cooling water to flow directly into the sink. If this is not possible, attach the drip tray to the device and allow the cleaning water or cooling water to run into it.
NOTE: The drip tray has a capacity of 450 mL.
Cleaning
Cleaning the Refillable Keg
- Take out the refillable keg from the cooling container. Ensure all CO2 is removed from the container by pulling the metal ring until all has escaped.
- Wash with clean fresh tap water, you may use a little mild detergent and allow to air dry. The refillable keg is not dishwasher safe.
Cleaning the Housing
-
Clean all the surfaces of the device with a damp cloth. If there is heavy soiling, you may use a little mild detergent.
-
Dry thoroughly with a soft cloth.
CAUTION! Never use harsh cleansers, as these can damage the device's surfaces.
Cleaning the Fresh Keg Adaptor
- Take the fresh keg adaptor off the keg.
- Clean the fresh keg adaptor with warm water and a little mild detergent.
Cleaning the Beer Line
-
To clean the beer line, you will need the cleaning balloon (supplied) and a vessel containing warm water (and possibly a special disinfecting cleaner).
-
Perform steps 5 - 15 as outlined on page 19.
Other Useful Information (Cont.)
Cleaning the Tapping Unit
-
Unscrew the valve unit from the tapping pump, and then remove the mount from the tapping pump. (Fig. 25).
-
Clean the valve unit, the mount and the tapping pump with warm water and a little mild detergent.
Cleaning the Cooling Container
-
The cooling container must be cleaned after every use, i.e. after the device is switched off.
-
Flip open the water outlet and allow all of the water to drain out.
-
Close the water outlet.
-
Fill the cooling container with clean water (note the MAX marking) and repeat steps 1 – 2.
-
Wipe out the cooling container with a soft, clean cloth.

Cleaning the Drip Tray and Drainage Grille
-
Pull the drip tray forwards to disconnect it from the device.
-
Detach the drainage grille from the drip tray.
-
Empty any liquid from the drip tray.
-
Clean the drip tray and drainage grille with warm water and a little mild detergent.
Storage
- Clean the device and all accessories before storing them away.
NOTE: All parts must be completely dry after cleaning before the device is assembled and stored away.
-
Remove the CO2 cartridge from the device before storing it away (see page 18).
-
Guide the valve unit from above into the mount and firmly screw on the tapping pump from below.
-
Store the device, the CO2 cartridges and all accessories in a dry, cool place that is out of the reach of children and animals.
Maintenance
Follow the instructions outlined in this chapter when replacing any expendable parts. Avoid removing any other parts of the device.
Expendable parts such as the sealing rings of the tapping pump and the CO2 line, along with the tapping tip for the CO2 cartridge, should be regularly inspected and replaced if needed.
Other Useful Information (Cont.)
Replacing the Sealing Ring of the CO2 Line and Tapping Tip
If you notice excessive CO2 losses while pouring beer, it's time to replace the sealing ring of the CO2 line. If a CO2 cartridge can't be punctured, it means the tapping tip has dulled and needs replacing.
- Before proceeding, ensure any remaining CO2 cartridge in the device is completely empty (see page 18).
- Unfold and unscrew the cartridge sleeve inside the lid.
-
Use a narrow flat screwdriver or similar tool to remove the sealing ring and, if necessary, the tapping tip from the lid mount.
-
If needed, insert a new tapping tip into the lid mount.
-
Place a new seal on the tapping tip and firmly press both parts together using an empty CO2 cartridge (Fig. 26).

Replacing the Sealing Ring of the Tapping Pump
If you notice beer leaking from the connection between the tapping pump and the valve unit, it's time to replace the sealing ring in the tapping pump.
- Unscrew the valve unit from the tapping pump and detach the mount from the tapping pump (Fig. 10).
-
Use a narrow flat screwdriver or similar tool to remove the sealing ring from the mount in the tapping pump.
-
Insert a new seal into the mount in the tapping pump.
-
Guide the valve unit from above into the mount and securely screw on the tapping pump from below.

natural_image
Technical line drawing of a mechanical component with arrows indicating direction (no text or symbols)Service, Repair and Spare Parts
If the appliance is damaged, do not attempt to repair it yourself. Do not disassemble or modify the appliance. If it requires repair or service, please contact our after sales support centre to arrange for examination or return of the product.
To purchase additional 16 g CO 2 canisters (10 pack) for the keg dispenser please visit our website:
https://tempo-accessories.org/products/co2-gas-canisters-for-str-bd5l-5l-benchtop-keg-dispenser
For more information on available spare parts for this appliance, call the centre on 1300 112 534 or email us at parts@tempo.org.
Other Useful Information (Cont.)
Technical Specifications
| Model STR-BD5L | |
| Rated voltage / frequency 220-240 V~ 50 Hz | |
| Power 60 W | |
| Protection class II | |
| Climate Class T | |
| Insulation Blowing Agent Cyclopentane | |
| Capacity 5 L beer keg | |
| Housing temperature range 2 °C - 12 °C | |
| Ambient temperature range 22 °C - 24 °C | |
| Dimensions Including Tray (approx.) (W) 273.9 x (D) 480.5 x (H) 430.4 mm | |
| Weight (approx.) 6.1 kg | |
Compliance
This appliance has been fully tested and meets all requirements as set out by standards AS/NZS 60335.1 and AS/NZS 60335.2.24.
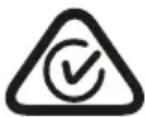
The RCM Mark (Regulatory Compliance Mark) indicates that the product complies with the relevant guidelines of the ACMA as well as corresponding government requirements for the safety of electrical devices.

CLASS II DOUBLE INSULATED APPLIANCE
This symbol indicates that the appliance has been designed in such a way that it does not require a safety connection to electrical earth (ground).

This marking indicates that the appliance is suitable for use in tropical climates under ambient temperatures of 18\ °C to 43\ °C .
Responsible Disposal

Packaging materials are recyclable. Please dispose of them responsibly for recycling.
At the end of its working life, do not throw this appliance out with your household waste. Electrical and electronic products contain substances that can have a detrimental effect on the environment and human health if disposed of inappropriately. Observe any local regulations regarding the disposal of electrical consumer goods and dispose of it appropriately for recycling.
WARNING! This refrigeration appliance contains flammable refrigerants and insulation blowing gases, which must be removed before disposal. Contact your municipal authorities for any codes or regulations concerning the disposal of such materials.
Contact your local authorities for advice on recycling facilities in your area. Or find recycling scheme services listed on Planet Ark's website at www.recyclingnearyou.com.au, or call Planet Ark on 1300 733 712.


STIRLING®
5 L Benchtop Keg Dispenser
Repair and Refurbished Goods or Parts Notice
Unfortunately, from time to time, faulty products are manufactured which need to be returned to the supplier for repair.
Please be aware that if your product is capable of retaining user-generated data (such as files stored on a computer hard drive, telephone numbers stored on a mobile telephone, songs stored on a portable media player, games saved on a games console or files stored on a USB memory stick) during the process of repair, some or all of your stored data may be lost. We recommend you save this data elsewhere prior to sending the product for repair.
You should also be aware that rather than repairing goods, we may replace them with refurbished goods of the same type or use refurbished parts in the repair process.
Please be assured though, refurbished parts or replacements are only used where they meet ALDI's stringent quality specifications.
If at any time you feel your repair is being handled unsatisfactorily, you may escalate your complaint. Please telephone us on 1300 112 534 or write to us at:
Tempo (Aust) Pty Ltd ABN 70 106 100 252
PO BOX 6097, North Sydney 2059, NSW Australia
Web support: tempo.org/support
Tempo Help Desk: 1300 112 534 (Aust)
(Operating Hours: Mon-Sat 09:00am to 06:00pm AEST)


natural_image
Icon showing a person reading a document with an exclamation mark, symbolizing information review or warning (no text present)Please read the manual
It will help you get the
best out of your product.
Still have questions?St
Call after sales support
1300 112 534
Or visit www.tempo.org
Warranty Returns
Should you for any reason need to return this product for a warranty claim, make sure to include all accessories with the product.
Product Does Not Work?
If you encounter problems with this product, or if it fails to perform to your expectations, make sure to contact our After Sales Support Centre on 1300 112 534 for advice.
For an electronic copy of this manual, go to www.stirlingappliances.com.au and download a copy, or contact our after sales support centre.
Instruction Manual Revision Index
Version No Issue Date Description
V1.0 16 April 2024 Original release 2024
V1.1 3 June 2024 Minor updates
V1.2 26 June 2024 Minor updates
- L Benchtop Keg Dispenser
- Welcome
- Contents
- Warranty Details
- General Safety Instructions
- WARNING: DANGER OF EXPLOSION!
- WARNING FOR FROSTBITE!
- WARNING!
- IMPORTANT SAFETY INSTRUCTIONS
- READ CAREFULLY AND KEEP FOR FUTURE REFERENCE
- Electrical Safety and Cord Handling
- General Safety Instructions (Cont.)
- Usage Conditions and Restrictions
- Product Overview
- Scope of Delivery
- Main Unit
- Documentation (Not Shown)
- Product Overview (Cont.)
- Main Unit (Cont.)
- Accessories – Refillable Keg (No CO 2 )
- Replacement Accessories
- Getting Started
- Before First Use
- Instructions – Refillable Keg
- Assembling the Appliance for Use
- Instructions – Refillable Keg (Cont.)
- Inserting the CO2 Cartridge
- Use one CO2 cartridge for each keg refill.
- CAUTION PRESSURE!
- Instructions
- Connecting and Switching On the Device
- Use
- Setting the Beer Temperature
- Selecting a Pre-Programmed Target Temperature
- Instructions (Cont.)
- Setting the Target Temperature Manually
- Drawing Beer
- What to do if There is Too Much Frothing?
- What to do if the Beer is not Pouring?
- Removing and Emptying the CO₂ Cartridge
- Removing and Emptying the Keg
- After Use
- Rinsing Through the Beer Line
- Preparation – Alternative Kegs
- Preparation
- IMPORTANT!
- WARNING! Danger of bursting!
- How to Select a Keg
- Instructions – Keg (Without CO 2 )
- Tapping Unit – Fresh Keg (No CO 2 )
- Other Accessories
- Instructions – Keg (Without CO 2 ) (Cont.)
- Types of Keg Plugs
- Combi Plug
- Ventilation Plug
- Tapping Into and Connecting the Beer Keg
- Instructions – Fresh Keg (With CO 2 )
- Accessories – Fresh Keg (With CO 2 )
- Fresh Keg
- Do not exceed the "MAX" marking in the cooling container! (Fig. 2)
- Connecting a Fresh Keg
- CAUTION:
- FAQs & Troubleshooting Guide
- Other Useful Information
- Cleaning and Care
- Cleaning
- Cleaning the Refillable Keg
- Cleaning the Housing
- Cleaning the Fresh Keg Adaptor
- Cleaning the Beer Line
- Other Useful Information (Cont.)
- Cleaning the Tapping Unit
- Cleaning the Cooling Container
- Cleaning the Drip Tray and Drainage Grille
- Storage
- Maintenance
- Replacing the Sealing Ring of the CO2 Line and Tapping Tip
- Replacing the Sealing Ring of the Tapping Pump
- Service, Repair and Spare Parts
- To purchase additional 16 g CO 2 canisters (10 pack) for the keg dispenser please visit our website:
- Compliance
- Responsible Disposal
- STIRLING®
- Repair and Refurbished Goods or Parts Notice
- Please read the manual
- Still have questions?St
- Warranty Returns
- Product Does Not Work?
- Instruction Manual Revision Index
Brand : Stirling
Model : STR-BD5L
Category : Drink dispenser