
IA3833 - Ice Maker Stirling - Free user manual and instructions
Find the device manual for free IA3833 Stirling in PDF.


| Product Type | Ice Cube Maker |
| Model | IA3833 |
| Brand | Stirling |
| Colour | White |
| Voltage | 220-240V ~ 50Hz |
| Power | 120W |
| Rated Current | 1A |
| Ice Output | 12 kg/24 hours |
| Ice Storage Capacity | 1.6L / 600g |
| Water Reservoir Capacity | 1.5L |
| Refrigerant | R600a (20g) |
| Dimensions (W x D x H) | 32 x 23 x 30 cm |
| Net Weight | 7.62 kg |
| Climate Type | T |
| Electrical Protection Class | I |
| Insulation Blowing Gas | Cyclopentane |
| Key Functions | Automatic ice making, ice full indicator, water shortage indicator, standby mode |
| Safety Features | Overheat protection, automatic shut-off, flammable refrigerant warnings |
| Cleaning Recommendation | After every use and at least every 24 hours; use diluted vinegar solution |
| Warranty | 12 months |
| Included Accessories | Ice scoop, removable ice basket, instruction manual, quick start guide, warranty certificate |
Frequently Asked Questions - IA3833 Stirling
User questions about IA3833 Stirling
0 question about this device. Answer the ones you know or ask your own.
Ask a new question about this device
Download the instructions for your Ice Maker in PDF format for free! Find your manual IA3833 - Stirling and take your electronic device back in hand. On this page are published all the documents necessary for the use of your device. IA3833 by Stirling.
USER MANUAL IA3833 Stirling
natural_image
White Stirling appliance with open lid and ventilation slots (no visible text or symbols on body)1.5L ICE CUBE MAKER
Model Number IA3833
Welcome
Congratulations on choosing to buy a Stirling® appliance.
All appliances brought to you by Stirling ® are manufactured to the highest standards of performance and safety and as part of our philosophy of customer service and satisfaction are backed by our comprehensive 12 month warranty.
We hope you will enjoy using your purchase for many years to come.
Contents
02 Welcome
04 Warranty Details
05 General Information & Safety Instructions
09 Product Overview
11 Getting Started
12 Instructions
16 Cleaning and Maintenance
17 Storage
18 Frequently Asked Questions
21 Repair and Refurbished Goods or Parts Notice
22 Other Useful Information

STIRLING
1.5L Ice Cube Maker
Warranty Details
REGISTER YOUR PURCHASE AT www.aldi.com.au/en/about-aldi/product-registration/TO KEEP UP-TO-DATE WITH IMPORTANT PRODUCT INFORMATION
The product is guaranteed to be free from defects in workmanship and parts for a period of 12 months from the date of purchase. Defects that occur within this warranty period, under normal use and care, will be repaired, replaced or refunded at our discretion. The benefits conferred by this warranty are in addition to all rights and remedies in respect of the product that the consumer has under the Competition and Consumer Act 2010 and similar state and territory laws.
Our goods come with guarantees that cannot be excluded under the Australian Consumer Law. You are entitled to a replacement or refund for a major failure and for compensation for any other reasonably foreseeable loss or damage. You are also entitled to have the goods repaired or replaced if the goods fail to be of acceptable quality and the failure does not amount to a major failure.
General Information & Safety Instructions
Read this manual thoroughly before first use, even if you are familiar with this type of product. The safety precautions enclosed herein reduce the risk of fire, electric shock and injury when correctly adhered to. Please keep this instruction manual in a safe place along with your purchase receipt and carton for future reference. If applicable, pass these instructions and packaging on to the next owner of the appliance. Always follow basic safety precautions and accident prevention measures when using an electrical product.

Pay particular attention to messages that follow this safety alert symbol or the words DANGER, WARNING or CAUTION. These words are used to alert you to a potential hazard that can seriously injure you and others. The instructions will tell you how to reduce the chance of injury and let you know what can happen if the instructions are not followed.
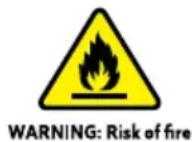
This symbol alerts you to take care as the appliance contains flammable materials: isobutane as refrigerant and cyclopentane as insulation blowing gas. While isobutane (R600a) is a gas with a high level of environmental compatibility, it is nevertheless flammable. Do not expose the appliance to high heat, sparks and open flames.
Electrical Safety and Cord Handling
-
Read all instructions before using the Stirling® 1.5L Ice Cube Maker.
-
Before turning on the Ice Cube Maker ensure the electrical voltage and frequency of the circuit corresponds to those indicated on the rating label of the product.
-
Do not use an extension cord unless completely necessary with the Ice Cube Maker. If an extension cord is used, please ensure that it has a rating equal or exceeding the rating of this product.
-
Do not pull or carry by the cord, use the cord as a handle, close a door on the cord, or pull the cord around sharp edges or corners. Keep the cord away from heated surfaces.
-
Do not bend or damage the power cord and never force the plug into an outlet.
-
Always switch off and unplug the Ice Cube Maker when not in use. To disconnect from the power supply, grip the plug and pull from the power outlet. Never pull by the cord. The plug must be removed from the power outlet before cleaning, servicing, maintenance or moving the Ice Cube Maker.
-
Do not move or lift the Ice Cube Maker while the power cord is still connected to the power outlet or still on. Always ensure it is unplugged and has cooled down before moving.
-
Do not use the Ice Cube Maker if the plug, cord, or the Ice Cube Maker itself is damaged. Please contact our After Sales Support line for further advice.
-
Unless your home is already fitted with a residual current device (safety switch), we recommend installing an RCD with a rated residual operating current not exceeding 30mA to provide additional safety protection when using electrical appliances. See your electrician for professional advice.
General Information & Safety Instructions (cont.)
Usage Conditions and Restrictions
- This appliance is intended for indoor private domestic use only, and is not intended for commercial, industrial or trade use.
- Do not use the Ice Cube Maker outdoors.
- Do not use the Ice Cube Maker for reasons other than its intended purpose, and only use it as described in this manual. Do not attempt to alter or modify this appliance in any way.
- The Ice Cube Maker is not a toy. Supervise children to ensure they do not play with this product.
- The Ice Cube Maker is not intended for use by persons (including children) with reduced physical, sensory or mental capabilities or lack of experience or knowledge unless they have been given supervision or instruction concerning use of the product by a person responsible for their safety.
- Do not position the Ice Cube Maker in a tight space. Ensure there is at least 15cm clearance on all sides of the Ice Cube Maker. Do not position near heat sources such as radiators, heaters, ovens, air ducts or direct sunlight.
- Make sure you position the Ice Cube Maker in a well ventilated area. To ensure sufficient ventilation, the rear, sides and top of the unit must be completely unobstructed. Keep any ventilation openings clear of obstructions. Choose a well ventilated area with temperatures below 30irc C.
- Do not cover the Ice Cube Maker whilst in use. Do not block any ventilation openings. Ensure that vents are not covered by newspapers, tablecloths, curtains, etc.
- Do not attempt to repair, disassemble, or modify any part of the Ice Cube Maker. Refer all servicing to a qualified technician or contact the After Sales Support line for advice.
- Improper installation may result in the risk of fire, electric shock, or injury to person.
- The manufacturer is not responsible for any eventual damage caused by improper or faulty use.
- The use of attachments not sold or recommended by the manufacturer may cause fire, electric shock or injury.
- The Ice Cube Maker is not intended to be operated by means of an external timer or any type of separate remote control system.
- Do not clean with metal scouring pads. Pieces of a metal scouring pads may break off and come in contact with the electrical parts creating a risk of electric shock.
- Do not immerse the Ice Cube Maker into water or any other liquid as this may cause an electrical shock.
General Information & Safety Instructions (cont.)
Handling and Usage
- The refrigerant isobutene (R600a) is contained within the refrigerant circuit of the Ice Cube Maker. This is a natural gas with a high level of environmental compatibility, which is very flammable. During transportation and installation of the appliance, ensure that none of the components of the refrigerant circuit become damaged. In the event of damage please contact our After Sales Support line on 1300 777 137.
- Before plugging in your new Ice Cube Maker, allow it to stand in an upright position with the cover open for at least 2 hours before use. This will allow the refrigerant gases to settle into the compressor and reduce the possibility of a malfunction in the cooling system from handling during transportation.
- When moving and transporting the Ice Cube Maker, make sure the Ice Cube Maker stays in an upright position. Do not tilt the unit more than 45irc in any direction.
- Always operate the Ice Cube Maker on a clean, dry, level surface. Operating on carpet, sinks or uneven surfaces should be avoided.
- Always ensure that the Ice Cube Maker is clean before use. If the water reservoir is dirty, the ice may be unhygienic and unfit for consumption.
- The inside of the Ice Cube Maker and the ice will be extremely cold and may cause cold burns. Do not touch the inside of the Ice Cube Maker or handle the ice cubes with your hands. Always use the ice scoop (included) to remove the ice.
- Do not overfill the Ice Cube Maker with more than the recommended amount of water (maximum 1.5L).
- Arrange the cord away from high traffic areas where it will not become a trip hazard.
- Do not place the Ice Cube Maker on carpet, as it may create a blockage to the air ventilation and create risk of fire, spontaneous combustion, or injury to persons.
- The Ice Cube Maker is very heavy. It is recommended that two people carry the Ice Cube Maker when moving or draining the water reservoir.
- Never clean this appliance with flammable cleaning agents. Do not store or use volatile, flammable or explosive propellants such as aerosol cans or liquids inside or near the Ice Cube Maker. The fumes can create a fire hazard or explosion.
- Never allow open flames or ignition sources to enter the Ice Cube Maker.
- Do not use solvent based or abrasive cleaning agents on the interior of the Ice Cube Maker as these may damage or discolour the surfaces of the appliance.
- Keep the Ice Cube Maker away from all substances that may cause ignition.
- Do not position the Ice Cube Maker in a damp place or anywhere it may come in contact with water.
- Do not switch the Ice Cube Maker on and off frequently, as this may damage the compressor.
General Information & Safety Instructions (cont.)
- The refrigerant and insulation blowing gas is flammable, when disposing of the appliance, do so only at an authorised waste disposal centre. Do not expose to flame.
- Only use potable (safe drinking water) such as still mineral, purified or tap water. Never use distilled water in the Ice Cube Maker as this may damage the appliance.
- Do not store electrical appliances inside the Ice Cube Maker.
WARNING: Do not damage the refrigerant circuit! Never use an appliance with a damaged refrigerant circuit! If the refrigerant circuit is damaged, please contact the After Sales Support line on 1300 777 137.
WARNING: When positioning the Ice Cube Maker, ensure the power cord is not trapped underneath or damaged.
WARNING: Do not locate portable multiple socket outlets or portable power supplies at the rear of the appliance.
WARNING: Do not use the Ice Cube Maker if the power cord has any cracks or abrasion damage. Any damage to the cord may cause a short circuit, fire and/or electric shock. If the power cord is damaged, it must be replaced by the manufacturer or its service agent. Contact the After Sales Support line on 1300 777 137 for further advice.
WARNING: Ice can be a choking hazard for children. Never leave the Ice Cube Maker unattended or in a place where children can easily access the ice cubes.
WARNING: This Ice Cube Maker is designed to be freestanding only and should not be recessed or built in.
WARNING: Do not tilt the Ice Cube Maker more than 45irc from upright when moving it or draining the water reservoir.
CAUTION: This appliance is heavy, take care when moving it. To avoid back or other injury, consider a two person lift when moving it or draining the water reservoir. Failure to do so can result in back or other injury.
WARNING: Do not use mechanical devices or other means to accelerate the defrosting process, other than those recommended by the manufacturer.
WARNING: Do not use electrical appliances inside the food storage compartments of the appliance, unless they are of the type recommended by the manufacturer.
WARNING: If winding the power cord, avoid tight bends as this could damage the cord.

Read this instruction manual carefully before using the Ice Cube Maker and keep it in a safe place for future reference.
Product Overview

- Automated Ice Shovel (moving part)
- Ice Dispensing Chamber
- Water Reservoir
- Transparent Viewing Cover
- Control Panel
- Main Unit
-
Drain Plug
-
Air Vent
- Back Air Vent
- Compressor Cover
- Power Cord
- Ice Scoop
- Removable Ice Basket
Included (not pictured): Instruction Manual, Quick Start Guide and Warranty Certificate.
Product Overview (cont.)
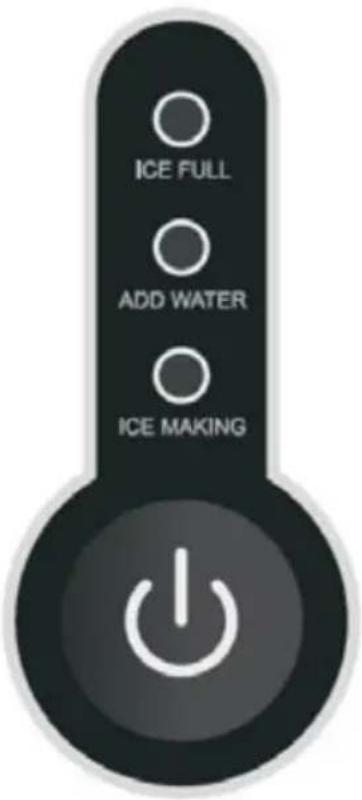
| Interface Function | |
| ICE FULL The indicator light will flash (red) when the ice basket is full. | |
| ADD WATER The indicator light will flash (red) when water the water level is too low. | |
| ICE MAKING(Standby Mode / Ice Cube Making) | The indicator light will flash (green) when the Ice Cube Maker is in standby mode.The indicator light will fully illuminate (green) when the Ice Cube Maker is ON (making ice). |
| (OPower Button) Press once to turn the Ice Cube Maker ON. The ICE MAKING indicator light will fully illuminate (green).Press again to return the Ice Cube Maker to standby mode. The ICE MAKING indicator light will flash (green). | |
Getting Started
This product has been packaged to protect it against transportation damage. Remove the Ice Cube Maker and all parts from the packaging materials and thoroughly read the instruction manual before using this appliance for the first time. Ensure all parts indicated on the product overview have been included in the gift box. Please ensure you follow the steps below before using this appliance.
- Unpack the Ice Cube Maker but keep the original carton and all packaging materials. It will help prevent any damage if the product needs to be transported in the future, and you can use it to store the appliance when it is not in use.
- Plastic wrapping can be a suffocation hazard for babies and children, so ensure all packaging materials are kept out of their reach. Remove all packaging found internally and externally before use.
- Remove the twist-tie which is securing the electrical cord. Uncoil the cord to straighten it to remove any kinks. Do not use if these parts are damaged. In case of damage, phone the After Sales Support line on 1300 777 137.
- Find a suitable position for the Ice Cube Maker on a clean, dry, level surface. Do not position it on carpets or any other surfaces which could block the ventilation.
- Check there is at least 15cm clearance on all sides of the Ice Cube Maker and ensure adequate ventilation.
- Make sure the Ice Cube Maker is disconnected from the power supply before cleaning. Clean the interior surfaces with a soft, damp cloth. Then use a soft dry cloth to remove any dust from transit and storage. Wash the removable ice basket and ice scoop in warm soapy water and dry thoroughly. Ensure all parts are thoroughly dry before turning the unit on.
- Do not turn on the Ice Cube Maker immediately after unpacking. Allow the Ice Cube Maker to rest upright with the cover open for at least 2 hours. This allows the interior of the Ice Cube Maker to air and for the gas within the compressor to settle for safe operation.
WARNING: Do not store electrical appliances inside the Ice Cube Maker.
NOTE: Position the Ice Cube Maker on a clean, dry, level surface. Ensure there is at least 15cm clearance on all sides of the Ice Cube Maker.
WARNING: Before plugging in your new Ice Cube Maker, allow it to stand in an upright position with the cover open for at least 2 hours before use. This will allow the refrigerant gases to settle into the compressor and reduce the possibility of a malfunction in the cooling system from handling during transportation.
NOTE: Never use distilled water in the Ice Cube Maker as this may damage the appliance. It is recommended to only use potable (safe drinking water) such as still mineral water, purified or tap water in the Ice Cube Maker.
WARNING: Never immerse the Ice Cube Maker in water or any other liquids.
WARNING: Keep all the Ice Cube Maker vents and the ventilation clearance around the Ice Cube Maker clear of obstructions at all times.
Instructions
Filling the Water Reservoir
Before operating the Ice Cube Maker, the water reservoir must first be filled before use. Please follow the instructions below on how to fill the water reservoir of the Ice Cube Maker.
NOTE: Never use distilled water in the Ice Cube Maker as this may damage the appliance. It is recommended to only use potable (safe drinking water) such as still mineral, purified or tap water in the Ice Cube Maker.
NOTE: Never use any other liquids in the Ice Cube Maker.
NOTE: Before first use and after prolonged storage, it is recommended to leave the cover open for at least 2 hours to allow the water reservoir to air and any stale air or smells to escape.
- Place the Ice Cube Maker on a clean, dry, level surface with at least 15cm clearance on all sides. Allow the Ice Cube Maker to rest upright for at least 2 hours before use.
- Ensure the Ice Cube Maker is switched off and unplugged from the power outlet.
- Open the cover of the Ice Cube Maker and remove the ice basket (Fig. 1).
- Pour the water (maximum 1.5L) into the water reservoir up to the MAX line. Take care not to exceed the MAX mark on the inside of the reservoir (Fig. 2).
- Place the ice basket inside the Ice Cube Maker and close the cover.
WARNING: The maximum water capacity of the Ice Cube Maker is 1.5L. Do not overfill the water reservoir as this can damage the appliance. If the water exceeds the MAX line, drain the excess water before operating the Ice Cube Maker. Please refer to the instructions on page 15 for how to safely drain the water.
WARNING: Never use the Ice Cube Maker without water in the water reservoir. Always check the water has been added to the water reservoir before use.
NOTE: When the water reservoir requires refilling, the ADD WATER indicator light will flash (red). The Ice Cube Maker will cease making ice and return to standby mode and the ICE MAKING indicator light will flash (green).

natural_image
Hand placing a white plastic bag into a white appliance with ventilation slots (no visible text or symbols)Fig. 1

natural_image
Hand placing a plastic bag into a white appliance with internal components (no visible text or symbols)Fig. 2
Instructions (cont.)
Using the Ice Cube Maker
WARNING: Before plugging in the Ice Cube Maker, allow it to stand in an upright position for at least 2 hours before use. This will allow the refrigerant gases to settle into the compressor and reduce the possibility of a malfunction in the cooling system from handling during transportation.
NOTE: Before first use and after prolonged storage, it is recommended to leave the cover open for at least 2 hours to allow the interior of the Ice Cube Maker to air and any stale air or smells to escape.
WARNING: Never plug the Ice Cube Maker into a power outlet and switch on unless the water reservoir is filled with water.
- Place the Ice Cube Maker on a clean, dry, level surface with at least 15cm clearance on all sides.
- Add the water to the reservoir. Please refer to the instructions on page 12 for how to fill the water reservoir.
- Plug the cord into a power outlet and switch on at the outlet. The ICE MAKING indicator light will flash (green) indicating that the Ice Cube Maker is in standby mode.
- Press the ⏻ power button to turn the Ice Cube Maker ON. The ICE MAKING indicator light will stop flashing and remain illuminated (green). The Ice Cube Maker compressor will turn on (sounds like a fridge), indicating the Ice Cube Maker is on and is in the process of making ice cubes.
NOTE: When the Ice Cube Maker is plugged into a power outlet and switched on at the outlet it will make a "click" sound. The compressor will turn on and water will pump into the ice making chamber. This is normal and not a product fault.
- Once the ice has formed, the ice cubes will eject into the ice dispensing chamber. The automated ice shovel will then scoop the ice cubes into the ice basket.
WARNING: The ice basket must always be placed inside the Ice Cube Maker before use. If the ice basket is not placed inside the Ice Cube Maker, the ice cubes will drop directly into the water reservoir.
NOTE: Once the ice is formed and ready to eject into the ice dispensing chamber, the Ice Cube Maker will make a "click" sound. This is normal and not a product fault.
NOTE: Once the ice has been deposited in the ice basket, the residual water will flow back into the water reservoir. This is normal and not a product fault.
- Once the ice basket is full the Ice Cube Maker will cease making ice. The ICE FULL indicator light will flash (red) and the ICE MAKING indicator light will remain illuminated (green). Open the cover and remove the ice using the scoop (included). Once the ice has been removed, the Ice Cube Maker will resume making ice (Fig. 3).

natural_image
Hand placing a small white plastic item into an open ice cream bin (no text or symbols visible)Fig. 3
Instructions (cont.)
NOTE: It is recommended to remove the ice using the ice scoop (included), before removing the ice basket to refill the water reservoir.
- When the water level is too low, the ADD WATER indicator light will flash (red). Press the power button to return the Ice Cube Maker to standby mode. Follow steps 3-5 on page 12 to refill the water reservoir.
- Press the ⏻ power button to turn the Ice Cube Maker ON. The Ice Cube Maker will continue to make ice cubes until either the ice basket is full, or the water needs refilling.
- Once you are finished making ice, press the ⏻ power button to return the Ice Cube Maker to standby mode. Switch off and unplug from the power outlet. Remove any remaining ice cubes from the ice basket and drain the water reservoir. Please refer to the instructions on page 15 for how to drain the water reservoir.
NOTE: One ice making cycle will take approximately 8-10 minutes.
NOTE: When the ice basket is full, the Ice Cube Maker will cease making ice and the ICE FULL indicator light will flash (red) indicating that the ice basket needs to be emptied.
WARNING: When the ICE FULL indicator light illuminates, the ice should be removed immediately. Do not allow the ice to overflow from the ice basket as this will affect the operation of the Ice Cube Maker and may damage the appliance.
WARNING: It is normal for the compressor and condenser surface to reach temperatures between 70°C and 90°C during operation. Please note that the surrounding areas may get very hot during use.
NOTE: Some ice cubes may appear "cloudy". This "cloudy" appearance is usually caused by air trapped in the water and will not affect quality or taste of ice. This is normal and not a product fault.
WARNING: Never leave the Ice Cube Maker unattended during operation.
NOTE: If the Ice Cube Maker is returned to standby mode or switched off at the outlet during an ice making cycle, the half formed ice will eject into the ice dispensing chamber and the automated shovel will scoop the ice into the basket. This is normal and not a product fault.
NOTE: If the Ice Cube Maker is returned to standby mode or switched off at the power outlet during an ice making cycle, small ice chips may form and lodge in the automated shovel mechanism and cause the shovel to jam. If this occurs, switch off and disconnect from the power outlet. Open the cover and gently push the shovel to the rear of the unit. Using a clean soft, damp cloth, remove the ice chips. Once the ice chips have been removed, allow the Ice Cube Maker to rest for at least 5 minutes before plugging into an outlet and switching on.
NOTE: When using the Ice Cube Maker for the first time, the ice produced may be small and/or irregular. This is normal and not a product fault.
NOTE: During use, some condensation may form on the exterior of the Ice Cube Maker. This is normal and not a product fault.
NOTE: The Ice Cube Maker can be used continuously for a maximum of 24 hours. After this time, the Ice Cube Maker should be switched off and unplugged from the power outlet. Allow the Ice Cube Maker to cool down for at least 2 hours before using again.
Instructions (cont.)
WARNING: Do not place the Ice Cube Maker in a cupboard or confined space while it is operating. The Ice Cube Maker should be positioned on a clean, dry, level surface in a well ventilated area with at least 15cm clearance on all sides, when in use.
NOTE: When the Ice Cube Maker is on and making ice, it is recommended to check the ice basket periodically.
NOTE: When the Ice Cube Maker is switched off or in standby mode for a period of time, the ice cubes will melt into the water reservoir below, which may cause the water reservoir to overflow. Do not leave ice cubes in the ice basket when the Ice Cube Maker is switched off or in standby mode for a long period of time, to avoid damaging the Ice Cube Maker.
NOTE: It is not necessary to wait until the ice basket is full to remove the ice. You can remove the ice (using the ice scoop), from the ice basket at any time during the ice making process.
Draining the Water Reservoir
For hygienic reasons, it is recommended to drain the Ice Cube Maker after every use and at least once every 24 hours. Please follow the instructions below for how to drain the water reservoir.
WARNING: The Ice Cube Maker is very heavy. It is recommended that two people carry and hold the Ice Cube Maker while draining the water reservoir. Never tilt the Ice Cube Maker more than 45irc when carrying or draining the water reservoir.
- Ensure the Ice Cube Maker switched off and unplugged from the power outlet.
- Place the Ice Cube Maker on the countertop so that the drain plug is positioned over the sink (Fig. 4).
- Remove the drain plug located on the underside of the Ice Cube Maker and allow the water to drain.
- Once the water has fully drained from the water reservoir, replace the drain plug.
- Place the empty Ice Cube Maker on a clean, dry, level surface. Dry the interior of the water reservoir with a clean, soft, dry cloth.

natural_image
White industrial machine with a handle and control panel, placed on a reflective surface (no visible text or symbols)Fig. 4
- Allow the Ice Cube Maker to rest upright for at least 2 hours before using again.
NOTE: It is recommended to drain the water from the Ice Cube Maker and clean the water reservoir at least once every 24 hours to ensure the cleanliness and freshness of the ice.
WARNING: Never remove the drain plug unless the Ice Cube Maker is switched off, unplugged from the power outlet and is positioned over a sink.
Cleaning and Maintenance
For hygienic reasons, it is recommended to clean the Ice Cube Maker (including the exterior, interior and accessories), after every use and at least once every 24 hours.
- Before performing any cleaning or maintenance, ensure that the Ice Cube Maker is switched off and disconnected from the power outlet.
- Drain the remaining water from the water reservoir into a sink. Please refer to the instructions on page 15 for how to drain the water.
- Remove the ice basket. Using a soft cloth, wipe the interior of the Ice Cube Maker with a diluted solution of water and vinegar and allow to air dry thoroughly.
- Wipe the exterior of the Ice Cube Maker with a soft, damp cloth and dry thoroughly. Ensure that all parts and surfaces are dry before operating the Ice Cube Maker once again.
- Wash the ice basket and ice scoop in warm, soapy water. Ensure the ice basket is thoroughly dry before placing back inside the Ice Cube Maker.
WARNING: The ice scoop and ice basket are not dishwasher safe. Do not place these parts in a dishwasher for cleaning.
NOTE: Do not use abrasive cleaners, caustic, or acidic substances as these can damage both the interior and exterior surfaces.
WARNING: To reduce the risk of electric shock or injury, always switch off the appliance and disconnect it from the power supply before cleaning or maintenance.
WARNING: Never spray the Ice Cube Maker with chemicals or diluted agents such as acids, gasoline, or oil.
NOTE: The water reservoir should be drained after every use and before cleaning and storing. Please refer to the instructions on page 15 for how to drain the water reservoir.
NOTE: It is recommended to drain the water from the Ice Cube Maker and clean the water reservoir at least once every 24 hours to ensure the cleanliness and freshness of the ice.
WARNING: Never clean the unit with an abrasive, acid, oil, or solvent based cleaning agent, or with abrasive pads or scourers. Never use flammable fluids or sprays for cleaning as the fumes from these substances can create a fire hazard or explosion.
WARNING: Never clean the appliance with a steam cleaner. Moisture could accumulate in the electrical components, creating danger of electric shock! Hot vapours can lead to the damage of plastic parts.
IMPORTANT: Ethereal oils and organic solvents can attack plastic parts, e.g. butyric acid, or cleansers that contain acetic acid. Do not allow such substances to come into contact with the appliance parts.
WARNING: Never immerse the Ice Cube Maker in water or any other liquids.
CAUTION: This appliance is heavy, take care when moving it. To avoid back or other injury, consider a two person lift when moving it or draining the water reservoir. Failure to do so can result in back or other injury.
Storage
- Before packing away the Ice Cube Maker for storage, ensure the water reservoir is empty and it is clean and thoroughly dry.
- We recommend storing the Ice Cube Maker in its original carton to protect it from dust, with all the parts and accessories (ice basket and ice scoop).
- Store the Ice Cube Maker in a clean and dry place, out of children's reach.
- Do not place heavy objects on top of the Ice Cube Maker during storage.
NOTE: It is recommended to store the Ice Cube Maker in its original carton with all packaging materials. It will help prevent any damage if the product needs to be transported in the future.
Frequently Asked Questions
| Problem Solution | |
| The Ice Cube Maker is not turning ON? | Check the power button has been pressed. The ICE MAKING indicator light should be fully illuminated (green).Check that the power cord is connected to a power outlet and the power outlet is switched on.Check the power outlet is working by plugging in another appliance into the same power outlet and switching on.The circuit breaker may have tripped or has blown a fuse. Please contact the After Sales Support line for further advice. |
| The compressor is making an abnormal noise? | The sound will be quite loud (like a fridge), when the compressor kicks in. This is normal and not a product fault.Check that the electrical voltage and frequency of the circuit corresponds to those indicated on the rating label of the product.If the compressor continues to make an abnormal buzzing noise, return the Ice Cube Maker to standby mode immediately, switch off and unplug from the power outlet. Please contact the After Sales Support line for further advice. |
| The indicator lights on the control panel are not illuminating? | Check that the power cord is connected to a power outlet and the power outlet is switched on.Check the power outlet is working by plugging in another appliance into the same power outlet and switching on.The fuse inside the Ice Cube Maker may have blown. Please contact the After Sales Support line for further advice. |
| The ADD WATER indicator light is flashing (red)? | The water level is too low. Press the power button to return the Ice Cube Maker to the standby mode. Add water to the water reservoir inside the Ice Cube Maker. Please refer to the instructions on page 12 for how to fill the water reservoir. |
| The ICE FULL indicator light is flashing (red)? | · The ice basket is full. Remove the ice from the ice basket using the ice scoop (included). |
| The Ice Cube Maker is turned ON but no ice is coming out? | · Check that the ADD WATER indicator light is not flashing and that there is water in the water reservoir. If the ADD WATER indicator light is flashing, refer to steps 3-5 on page 12 for how to refill the water reservoir.· Check that the ICE FULL indicator light is not flashing. If the ICE FULL indicator is flashing, remove the ice cubes from the ice basket using the ice scoop (included).· The compressor may be damaged or have no refrigerant. Please contact the After Sales Support line for further advice.· The fan motor may be damaged. Please contact the After Sales Support line for further advice. |
| All three indicator lights are flashing simultaneously? | · Some ice may be lodged inside the ice dispensing chamber blocking the automated ice shovel. Switch off and unplug from the power outlet. Remove the ice that is causing the blockage. Once the blockage has been removed, allow the Ice Cube Maker to rest for at least 5 minutes before plugging into an outlet and switching on. If the three indicator lights continue to flash simultaneously, contact the After Sales Support line for further advice. |
| The Ice Cube Maker is turned ON but the water is warm? | · The solenoid (an internal component), may be broken. Please contact the After Sales Support line for further advice. |
| The automated ice shovel is not moving when the Ice Cube Maker is turned ON? | There may be some ice chips lodged in the automated shovel mechanism which can cause the shovel to jam. Press the power button to return to standby mode, switch off and disconnect from the power outlet. Open the cover and gently push the shovel to the rear of the unit. Using a clean soft, damp cloth, remove the ice chips. Once the ice chips have been removed, allow the Ice Cube Maker to rest for at least 5 minutes before plugging into an outlet and switching on. If the automated ice shovel still does not operate, contact the After Sales Support line for further advice. |
| How often should I clean the Ice Cube Maker? | The Ice Cube Maker should be cleaned after every use and at least every 24 hours to maintain clean and hygienic ice. |
| The ICE FULL indicator light does not illuminate when the ice basket is full? | The ICE FULL sensor may be damaged. Please contact the After Sales Support line for further advice. |
| The Ice Cube Maker has stopped working and is in standby mode? | The overheat protection has activated. The Ice Cube Maker will reset and automatically restart after 5 minutes. If the Ice Cube Maker does not automatically restart after 5 minutes, contact the After Sales Support line for further advice. |

STIRLING
1.5L Ice Cube Maker
Repair and Refurbished Goods or Parts Notice
REGISTER YOUR PURCHASE AT www.aldi.com.au/en/about-aldi/product-registration/TO KEEP UP-TO-DATE WITH IMPORTANT PRODUCT INFORMATION
Unfortunately, from time to time, faulty products are manufactured which need to be returned to the Supplier for repair.
Please be aware that if your product is capable of retaining user-generated data (such as files stored on a computer hard drive, telephone numbers stored on a mobile telephone, songs stored on a portable media player, games saved on a games console or files stored on a USB memory stick) during the process of repair, some or all of your stored data may be lost.
We recommend you save this data elsewhere prior to sending the product for repair.
You should also be aware that rather than repairing goods, we may replace them with refurbished goods of the same type or use refurbished parts in the repair process.
Please be assured though, refurbished parts or replacements are only used where they meet ALDI's stringent quality specifications.
If at any time you feel your repair is being handled unsatisfactorily, you may escalate your complaint. Please telephone us on 1300 777 137 or write to us at:
UNCLE BILL'S AUSTRALIA PTY LTD
48B Egerton Street, Silverwater NSW 1811 Australia
1300 777 137 Opening Hours - 9:00am - 4:30pm (Mon-Fri), 9:00am - 3:00pm (Sat) service@unclebills.com.au
Other Useful Information
Responsible Disposal
At the end of its working life, do not throw this product out with your household rubbish. Electrical and electronic products contain substances that can have a detrimental effect on the environment and human health if disposed of inappropriately. Observe any local regulations regarding the disposal of electrical consumer goods and dispose of it appropriately for recycling. Contact your local authorities for advice on recycling facilities in your area.
WARNING! This refrigeration appliance contains flammable refrigerants and insulation blowing gases, which must be removed before disposal. Contact your municipal authorities for any codes or regulations concerning the disposal of such materials.
Please keep the original packaging carton and materials in a safe place. It will help to prevent any damage if the product needs to be transported in the future. In the event it is to be disposed of, please recycle all packaging material where possible.
If you require an alternative format of this instruction manual such as website, DVD or by email please contact service@unclebills.com.au to obtain a copy.
The Ice Cube Maker has been fully tested and meets all requirements as set out by the below testing standards:
AS/NZS 60335.1
AS/NZS 60335.2.24
Specification Table
| MODEL: | IA3833 |
| COLOUR: | White |
| VOLTAGE: 220-240V ~ 50Hz | |
| POWER: | 120W |
| RATED CURRENT: 1A | |
| CLIMATE TYPE: | T |
| ELECTRICAL PROTECTION CLASS: I | |
| INSULATION BLOWING GAS: Cyclopentane (C 5 H 10 ) | |
| DIMENSIONS: 32 x 23 x 30cm | |
| NET WEIGHT: 7.62kg | |
| ICE OUTPUT: 12kg/24 hours | |
| ICE STORAGE CAPACITY: 1.6L/600g | |
| REFRIGERANT WEIGHT: R600a (20g) | |
| WATER RESERVOIR CAPACITY: 1.5L |
Version No: 1.6
Issue Date: 12th July 2022
Notes
ALDI guarantees that our exclusive brand products are developed to our stringent quality specifications. If you are not entirely satisfied with this product, please return it to your nearest ALDI store within 60 days from the date of purchase for a full refund or replacement, or take advantage of our after sales support by calling the supplier's Customer Service Hotline.

Made in China
Stirling® is a registered trademark of ALDI Stores.
ALDI STORES, 1 SARGENTS ROAD
MINCHINBURY NSW 2770
www.aldi.com.au
- 1.5L ICE CUBE MAKER
- Welcome
- Contents
- STIRLING
- Warranty Details
- General Information & Safety Instructions
- Electrical Safety and Cord Handling
- General Information & Safety Instructions (cont.)
- Usage Conditions and Restrictions
- Handling and Usage
- Product Overview (cont.)
- Getting Started
- Instructions
- Filling the Water Reservoir
- Instructions (cont.)
- Using the Ice Cube Maker
- Draining the Water Reservoir
- Cleaning and Maintenance
- Storage
- Frequently Asked Questions
- Repair and Refurbished Goods or Parts Notice
- Other Useful Information
- Responsible Disposal
- Notes
Brand : Stirling
Model : IA3833
Category : Ice Maker