
SLBBMG100 - Massage device SereneLife - Free user manual and instructions
Find the device manual for free SLBBMG100 SereneLife in PDF.


| Product Type | Massage Device |
| Brand | SereneLife |
| Model | SLBBMG100 |
| Dimensions (approx.) | 12 x 6 x 4 inches |
| Weight (approx.) | 2.5 lbs |
| Power Source | Rechargeable battery (USB charging) or AC adapter |
| Battery Capacity | 2000 mAh |
| Charging Time | 2-3 hours |
| Massage Modes | Percussion, vibration, with adjustable intensity levels |
| Speed Settings | 3-5 speed levels |
| Heat Function | Optional infrared heat |
| Interchangeable Heads | 4-6 different massage heads included |
| Noise Level | Less than 50 dB |
| Auto Shut-off | After 15 minutes of use |
| Material | ABS plastic, silicone heads |
| Care and Cleaning | Wipe with a damp cloth; do not immerse in water |
| Safety Features | Overheat protection, auto shut-off, do not use on sensitive areas |
| Spare Parts & Repairability | No user-serviceable parts; contact SereneLife for support |
| Warranty | 1 year limited warranty |
| Recommended Use | Back, neck, shoulders, legs; relax sore muscles |
Frequently Asked Questions - SLBBMG100 SereneLife
User questions about SLBBMG100 SereneLife
0 question about this device. Answer the ones you know or ask your own.
Ask a new question about this device
Download the instructions for your Massage device in PDF format for free! Find your manual SLBBMG100 - SereneLife and take your electronic device back in hand. On this page are published all the documents necessary for the use of your device. SLBBMG100 by SereneLife.
USER MANUAL SLBBMG100 SereneLife
natural_image
Medical device with pink pill-shaped caps and white tubing, no visible text or symbolsSLBBMG100 - SLBBMP200
Bubble Bath Mat Body Spa Massage
USER GUIDE
IMPORTANT SAFETY INSTRUCTIONS KEEP INSTRUCTIONS FOR FUTURE USE
When using electrical products, especially when children are present, basic safety precautions should always be followed:
READ ALL INSTRUCTIONS BEFORE USING THIS PRODUCT DANGER: To reduce the risk of electric shock:
- Always unplug the product from the electrical outlet immediately after use (and before cleaning).
- If the appliance falls into water, unplug it immediately.
Do not reach into the water. - Do not place or store the appliance where it can fall or be pulled into a tub or sink. Do not place or drop into water or other liquid. Store in a dry place.
- This appliance must be positioned so that the plug is accessible.
- Parts incorporating electrical components must be located or fixed so that they cannot fall into the bath.
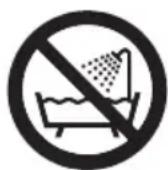
Do not use or put up over bathtubs, showers, or any basin filled with water.
Do not submerge the appliance in water or any liquid.
WARNING: To reduce the risk of burns, electrocution, fire, or injury to persons:
- The appliance should never be left unattended when plugged in. Always unplug the appliance when it is not in use.
-
Close supervision is necessary when this appliance is used by or near children, or disabled people.
-
Use this appliance only for its intended use as described in this manual. Do not use any attachments that have not been recommended by the manufacturer.
- Never operate the appliance if it has a damaged cord or plug, if it is not working properly, if it has been dropped or damaged, or dropped into water. Return this appliance to the service center for examination and repair.
- Do not use the appliance next to or near electric heaters, hot surfaces, or any heat sources. Fire, electric shock, or injury might occur.
- Do not carry this unit by holding the power cord.
- Using the appliance for more than 30 minutes is not recommended. Continuous use could lead to the product being overheated.
When the product is overheating, stop using it and allow it to cool down before operation.
- Keep the power cord away from heated surfaces.
- Disconnect the power cord by holding the plug attached to the cord instead of pulling the cord itself.
- Do not stand on this appliance.
- Never operate this appliance near an electrical oven or any heat source.
- Never operate the appliance if any openings are blocked. Keep the openings free of lint, hair, and other particles.
- Do not use the appliance outdoors or operate it where aerosol (spray) products are being used or where oxygen is being administered.
- Do not use this product if you have sensitive skin or poor circulation.
- The use by unattended or incapacitates persons can be dangerous.
- Never use while sleeping or drowsy.
-
Do not plug in the appliance before the tub is filled with water.
-
Do not overfill the tub and cause the water to run over the edge after you enter it.
- Never drop or insert any objects into any opening or the tube.
- Always ensure that the air inlet on the underside of the main unit is not covered.
- This appliance is equipped with a protective device which may render the appliance inoperable under certain conditions (such as immersion of the appliance). If the appliance becomes inoperable, return it to the service center for examination and repair.
- Do not use this product with an extension cord. This will damage the circuit protector.
- The appliance is designed to work with ordinary household current only at 120 volts A.C., 60 Hz.
INSTRUCTIONS
CAUTIONS:
- Never use this appliance as a substitute for medical attention.
Persistent ailments and symptoms could be more serious and should be investigated.
- This appliance should not be used in the following cases:
- Tuberculosis, benign and malignant tumors, hemorrhages, inflammations on the skin, phlebitis and thrombosis, open and fresh wounds, bruises, broken skin, varicose veins, or undetermined calf pain.
- Consult your physician if you have any therapeutic questions regarding its use.
- Do not use on any unexplained pain before consulting your physician.
- Stop using the product if the pain increases or swelling occurs after application.
- Do not use on any part of the body that is anesthetized.
- Do not use on any part of the body where surgery has been performed recently.
- It should not be used by children younger than 12 years old.
- It should not be used by people during pregnancy or anyone with high blood pressure or a heart condition.
- Do not use the appliance if you have sensitive skin.
- This appliance should not be left with children without supervision to prevent it from being played with.
- As additional protection, the installation of a residual current device (RCD) with a rated breaking current of no more than 30 ~mA is recommended in the electric circuit of the bathroom.
Please consult a qualified electrical engineer.
APPLIANCE CONTENTS
1. MAIN UNIT
1.1 Main unit
1.2 AC power cord
(9.8 ft., approx.)
2. AIR HOSE
2.1 Air hose
(8.2 ft., approx.)
2.2 Hose end with valve and aroma clip
2.3 Hose end without valve
The hose end (fig 2.2) should be plugged into the airflow hole of the main unit, and the other hose end (fig 2.3) should be connected to the bath mat (fig 3).
3. BATH MAT WITH SUCTION CUPS ON UNDERSIDE
(Only used for non-textured bathtubs)
3.1 There is a pair of release tabs on every suction cup (fig. A). 3.2 To remove the bath mat from your bathtub, pull on the tab of the suction cup to allow some air in and then pull up slowly (fig. B). Start from one side of the bath mat and pull each suction cup up in order. If you feel some resistance, gently slide your fingernail under the suction cup to help break the seal.
Please follow our suggestion: do not pull the suction cup too hard. Not only could the bath mat be damaged, but the reaction force could also cause you to slip and get hurt.
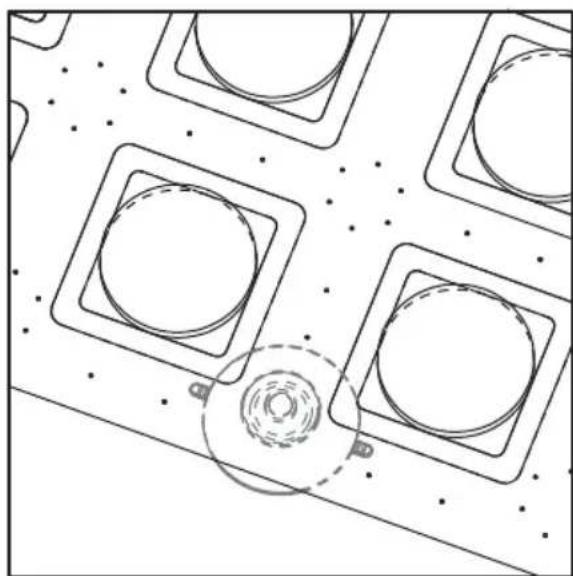
natural_image
Top-down schematic of a mechanical component with multiple square components and a central circular feature (no text or symbols)A
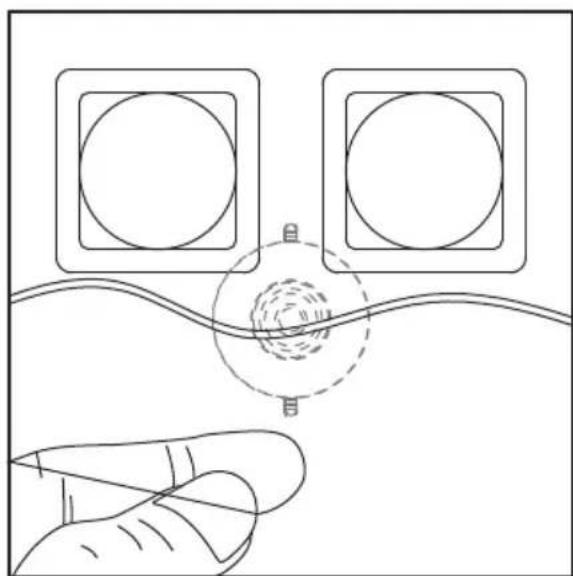
natural_image
Diagram showing two square circular components connected to a central dotted circle with internal concentric rings, above a stylized human hand (no text or symbols)B
4. REMOTE CONTROL
4.1 Remote control with function button
4.2 Suction cup for the remote control and the battery (CR2450) compartment
5. 3x AROMA CLIP WITH PADS
6. BATH PILLOW
6.1 Bath pillow
6.2 S-shaped hanger
6.3 2 suction cups for the bath pillow
7. SPARE COTTON PADS FOR AROMA CLIP (NOT SHOWN)
8. 8x DOUBLE-SIDED ADHESIVE PLATE
ASSEMBLY
-
Remove the main unit and all accessories from the box and check for any damage.
-
Ensure the Control Unit is unplugged.
-
Place the control unit on the floor or a level, sturdy surface near your bathtub.
-
Do not place the unit where it can fall into the bathtub.
-
Make sure the ON/OFF switch is in the "O" position.
-
We suggest giving your bathtub a deep cleaning for better adhesion of the bath mat to the tub floor. The mat's suction cups may not adhere properly if the bathtub surface is rough, stained, or dirty.
-
The suction cups will adhere better if they are slightly wet. Put a small amount of water on the tub floor to ensure each suction cup has enough moisture to attach securely to the bathtub.
-
Place the bath mat into the bathtub and press down on each suction cup individually to remove air from the suction cup. Ensure the bath mat is firmly attached to the tub floor and does not slide around.
-
If any part of the bathtub surface is worn down and prevents the suction cups from adhering, use the double-sided adhesive plates (refer to "DOUBLE-SIDED ADHESIVE PLATE" section for detailed instructions) to secure them.
-
The connector on the bath mat should be positioned where your feet will be.
-
Connect the hose end with the valve and aroma clip to the main unit and lock it by turning it counterclockwise.
-
Connect the other hose end to the connector on the bath mat.
-
The bath mat length is 3.9 ft. If the tub floor is shorter than 3.9 ft., extend the bath mat to where your back will be. Avoid folding or obstructing the bath mat connector.
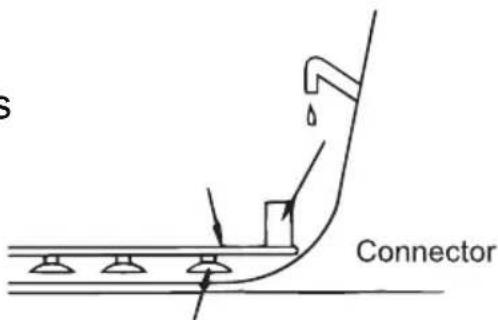
Mat Suction Cups
- After confirming that the bath mat is securely fixed, start filling the tub with water. It will be more difficult to reposition the suction cups if the water level is higher than 2 inches. You may switch on the device (see "SET CONTROL" section) at this water level to check if all suction cups are properly secured.
- The bathing water level is recommended to be lower than two-thirds of the bathtub (Fig. 2).
- Ensure the bathroom has a comfortable room temperature and start enjoying your bubble spa.
TIPS TO OPTIMIZE USER EXPERIENCE
-
Please ensure the bath mat lies flat at the bottom of the bathtub, and the hose end remains unobstructed (Fig. 2).
-
This product is not designed to be used with any soaps, gels, shampoos, or similar products. Soaps can prevent the suction cups from adhering to
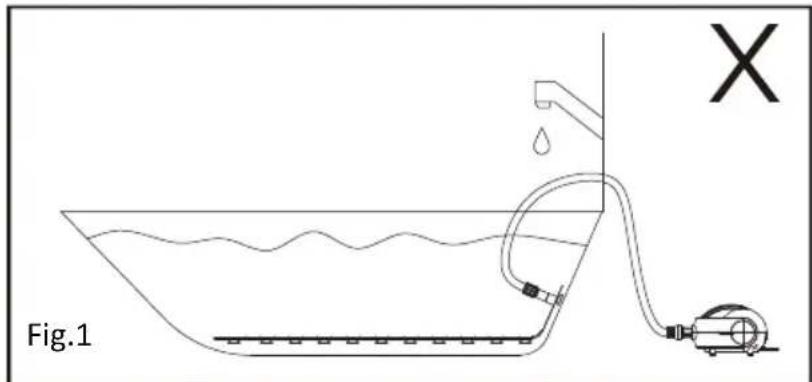
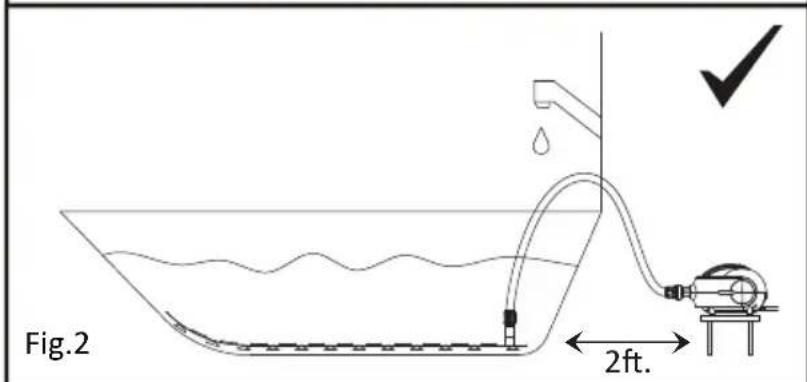
the bathtub, and bubbles may overflow, increasing the risk of slipping.
- The device has three bubble intensity modes: LOW, HIGH, and PROGRAM. Strong bubbles in HIGH mode may overflow from the bathtub. Exercise caution for safety.
-
We recommend placing the main unit at a height of 1 ft. from the ground, ideally on a solid stool, and 2 ft. away from the bathtub (Fig. 2) to keep it dry.
-
When operating the device at HIGH bubble intensity, the volume of water bubbles and the operational sound from the main unit's built-in motor system will increase. If the operating sound concerns you, consider placing the main unit at a greater distance from the bathtub to minimize its impact.
- This product does not heat up the water in the bathtub.
- Millions of air bubbles generated quickly may reduce the water temperature. If the water temperature drops, add warm water to maintain a comfortable heat level.
AROMA CLIP ASSEMBLY:
- Put a drop of essential oil on the cotton pad, place the cotton pad inside the aroma clip, and close the aroma clip (Fig. 1).
- Insert the aroma clip into the tube end (Fig. 2).
- Plug the air hose into the main machine (Fig. 3).
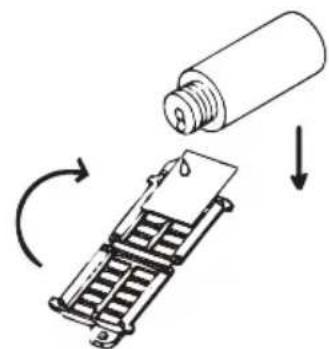
Fig. 1
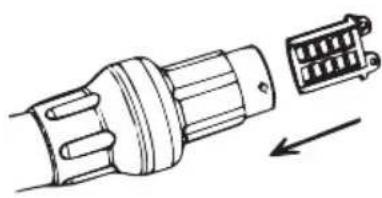
natural_image
Technical line drawing of a plug with an internal connector and an arrow indicating direction (no text or symbols)Fig. 2
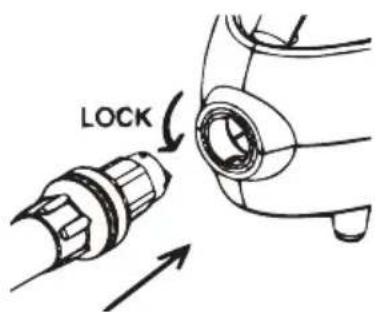
Fig 3
Note:
• The cotton pad is reusable.
• Using too much essential oil may cause erosion of the aroma clip.
USER MAINTENANCE INSTRUCTIONS:
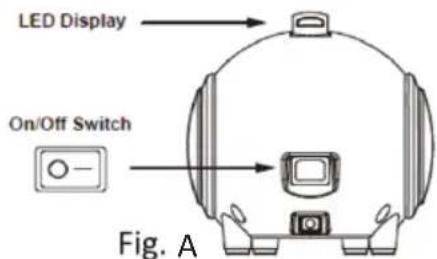
The bubble bath can be controlled directly from the unit by using the on/off switch or with the remote control.
SET CONTROL
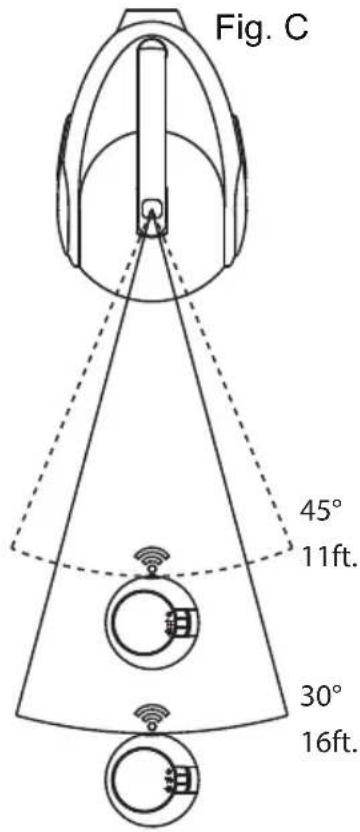
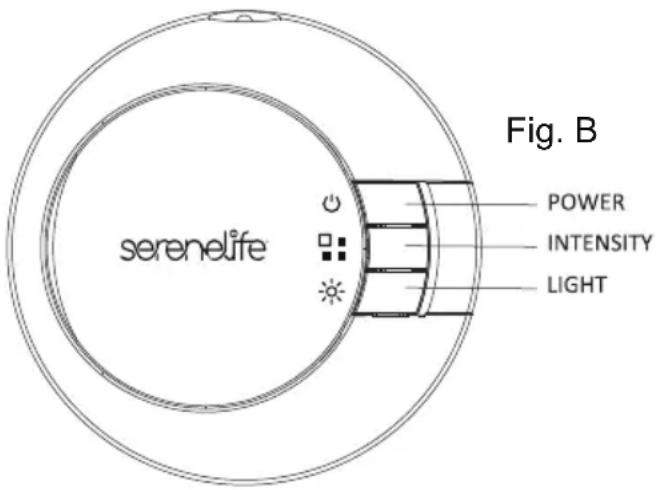
The POWER button (ON/OFF switch) can be controlled from the back side of the unit (Fig. A) and via the remote control (Fig. B) within specified distances and angles: 11 ft. (45°) and 16 ft. (30°) (Fig. C).
“O”: The device is switched off.
The remote control will not work.
“I”: The device is switched on and runs at the default (low intensity) level. You can use the remote control to switch off the device or adjust the intensity level.
Please always set the ON/OFF switch to "O" when you finish using the device each time.
The appliance automatically switches off after 20 minutes.
INTENSITY and LED indicator
Once the appliance is in place, you can turn it on by pressing the power button after carefully entering the bathtub. There are three bubble intensity modes that can be adjusted using the remote control (see Fig. B) and are indicated by the LED indicator on the handle of the unit (see Fig. A).
- When the appliance is switched on, it operates at the LOW bubble intensity level, indicated by a green LED.
- Press the intensity button once to switch to the HIGH bubble intensity level, indicated by a red LED.
- Press the intensity button again to enter PROGRAM mode, where the bubble intensity alternates continuously between LOW and HIGH levels. This mode is indicated by an orange LED.
- Press the intensity button once more to return to the Low intensity level.
REMOTE CONTROL with Colorful Light (please see Fig. B)
This remote control with colorful lights can create a great atmosphere during bath time.
- There are three buttons on the remote control. For the POWER and INTENSITY buttons, please refer to the “POWER button” and “INTENSITY and LED indicator” section.
- LIGHT button:
- Short press to turn on the light.
The light will change colors automatically.
- To select your favorite color for continuous illumination, press and hold the LIGHT button for 1 second to fix your preferred color.
- Press the LIGHT button for 1 second again to cycle through colors.
- To turn off the light, press and hold the LIGHT button for 3 seconds.
- The full neon cycle lasts approximately 1 minute and 36 seconds, following this sequence: Blue > Light blue > Cyan > White > Yellow > Pink > Magenta > Red > Orange > Chartreuse Green > Green.
- The light operates for around 20 minutes. As the time nears completion, the white light will remain on for 30 seconds. The light's operation time is independent of the main unit's timer.
- Battery Power Verification:
- Sufficient battery power: When pressing the POWER or INTENSITY button, the green light will flash.
- Low battery power: Replace the battery if any of the following situations occur:
- Pressing the POWER or INTENSITY button does not result in a flashing green light.
- Pressing the LIGHT button causes the red light to flash for 3 seconds, or the light dims.
- Pressing any button without any light response indicates low battery.
BATTERY for Remote Control (Battery type: CR 2450 lithium 3V coin battery)
To replace the battery, follow these steps:
- Turn the back case counterclockwise to open the cover.
- Use a coin to open the battery compartment cover by turning it in the direction of the arrow.
- Inside the battery compartment, you will see a metal dome opposite the white circle.
- Insert a new CR 2450 lithium 3V coin battery with the positive side facing up, applying slight pressure on the metal dome.
- After replacing the battery, use the coin again to close the battery compartment cover by turning it clockwise.
- Finally, turn the back case clockwise to securely close the cover.

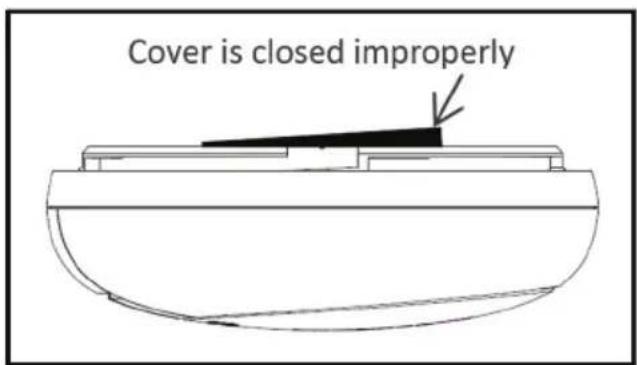
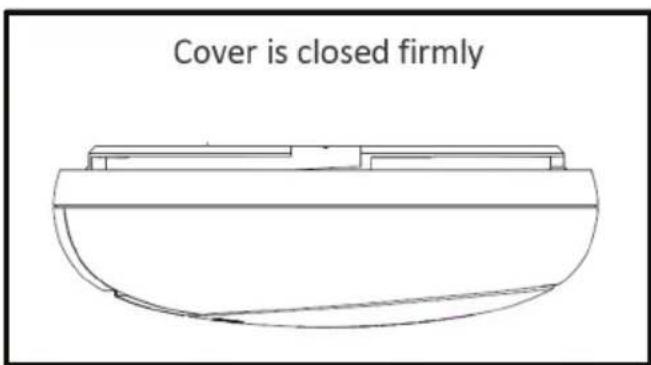
Note: When replacing the battery, ensure the waterproof O-ring (See Fig. D) around the battery cover is intact and that the battery cover lies flat to maintain waterproofing. To properly close the battery cover, align the tabs on the cover with the slots on the battery compartment, and then rotate the cover clockwise until it stops.
WATERPROOF REMOTE CONTROL
This remote control is waterproof and can be used in the bathtub.
- It is normal for water to enter the back case of the remote control.
- Deformation or detachment of the O-ring (See Fig. D) around the battery cover may lead to waterproofing failure. If water enters the battery
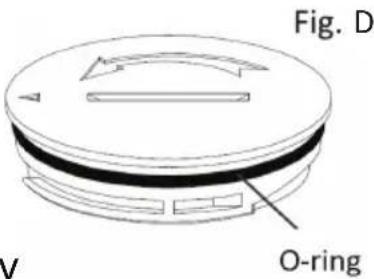
compartment, the battery life will shorten rapidly, which is normal. If this occurs, thoroughly dry the battery compartment and replace the battery before using it again.
- The waterproof performance may be compromised if the remote control is dropped on the ground.
- This remote control can only be used in clean water. Contact with water containing oil, solutes, foaming agents, etc., may affect its waterproof performance and lead to rapid failure.
▲ WARNING
- INGESTION HAZARD: This product contains a button cell or coin battery.
- DEATH or serious injury can occur if ingested.
• A swallowed button cell or coin battery can cause INTERNAL CHEMICAL BURNS in as little as 2 HOURS. - KEEP new and used batteries OUT OF REACH OF CHILDREN.
- SEEK IMMEDIATE MEDICAL ATTENTION if a battery is suspected to be swallowed or inserted inside any part of the body.

CAUTIONS:
- Battery type: CR 2450 lithium 3V coin battery.
- Remove and immediately recycle or dispose of used batteries according to local regulations and keep them away from children. DO NOT dispose of batteries in household trash or incinerate them.
• Even used batteries can cause severe injury or death.
- Call a local poison control center for treatment information.
- The CR2450 battery attached to this product is not rechargeable.
- Do not force discharge, recharge, disassemble, heat above 212°F, or incinerate. Doing so may result in injury due to venting, leakage, or explosion, causing chemical burns.
- Ensure the batteries are installed correctly according to polarity (+ and -).
- Remove and immediately recycle or dispose of batteries from equipment not used for an extended period of time according to local regulations.
- Always securely close the battery compartment. If the compartment does not close securely, stop using the product, remove the batteries, and keep them away from children.
DISPOSAL OF BATTERIES
Batteries must not be disposed of in household waste. As a consumer, you are legally obligated to take all used batteries to public collection points in your area or to locations where batteries are sold.
AIR BUBBLES
Hundreds of pinholes on the bath mat produce millions of air bubbles every minute.
HEATER
- This appliance is equipped with a built-in heater that operates when the appliance is switched on.
- The heater is not intended to heat up cold bathwater but rather to help maintain water temperature by circulating warm air generated by the main unit.
DOUBLE-SIDED ADHESIVE PLATE
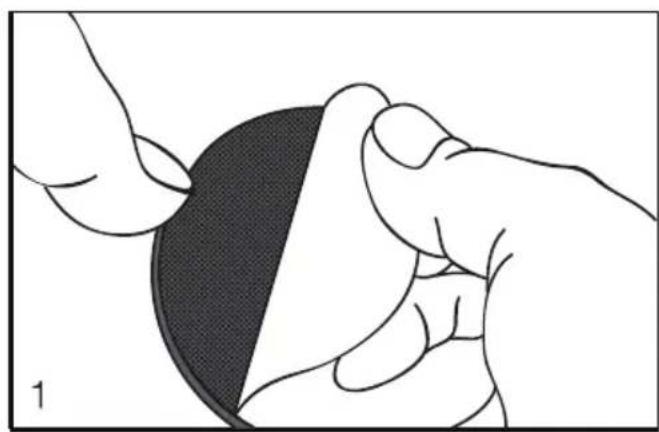
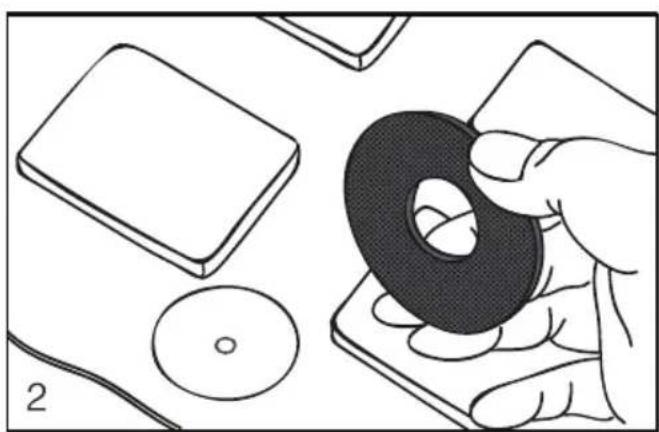
Ensure the plates are clean and not deformed before use. If a round plate is deformed, submerge it in warm water (at a temperature similar to bath water) for 5 to 10 minutes. Always allow the round plates to dry completely before attaching them to the suction cups.
- Tear off the protective paper. The side with the non-woven fabric should be attached to the suction cup.
natural_image
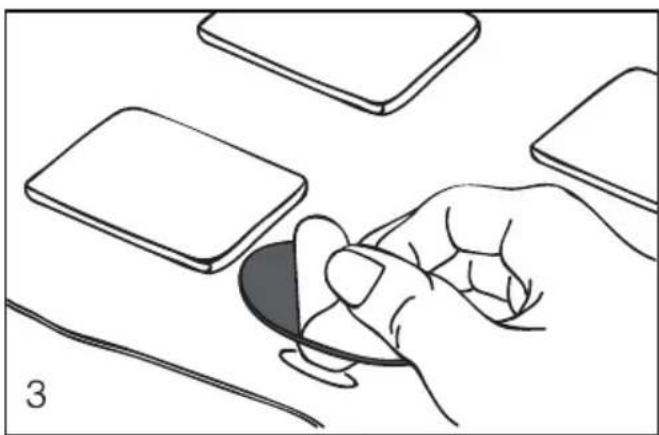
Illustration of hands holding a circular object with a shaded section, no text or symbols present- It is recommended to attach 4 round plates to the suction cups located in the 4 corners and 1 in the center.
Press the round plates firmly to ensure they are securely attached to the suction cups.
natural_image
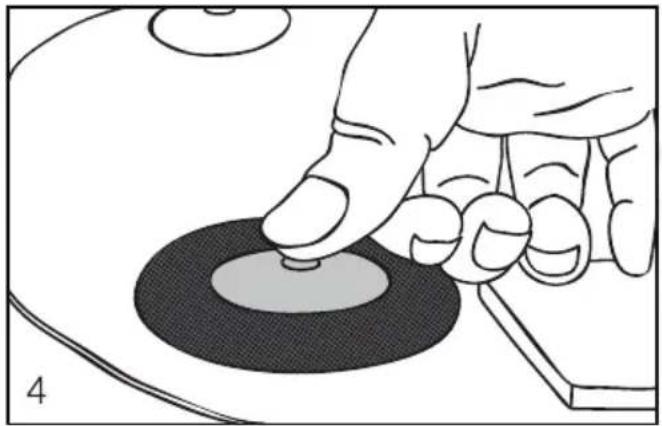
Illustration of a hand holding a black ring on a square base, with other components nearby (no text or symbols)- Remove the plastic cover on the other side of the round plate. The bath mat is now ready to be used.
natural_image
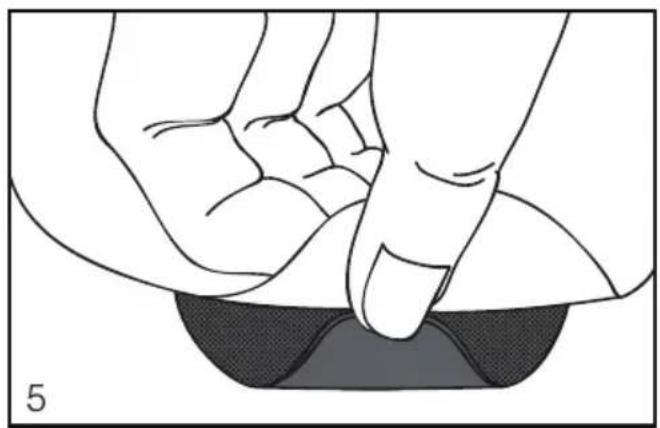
Illustration of a hand holding a small object with a dark circular shape, surrounded by other rectangular blocks (no text or symbols)- Press down each suction cup to secure the mat in place.
natural_image
Illustration of a hand pressing down on a circular object with a small hole, no text or symbols present- To remove the bath mat from the bathtub, slide your fingernail under the suction cups (or round plates) to release the vacuum.
Avoid pulling the bath mat directly to prevent damage.
natural_image
Illustration of a hand pressing down on a dark object, labeled with number 5 (no text or symbols on the object itself)- Cleaning the round plates is simple; use your fingers and water to clean them.
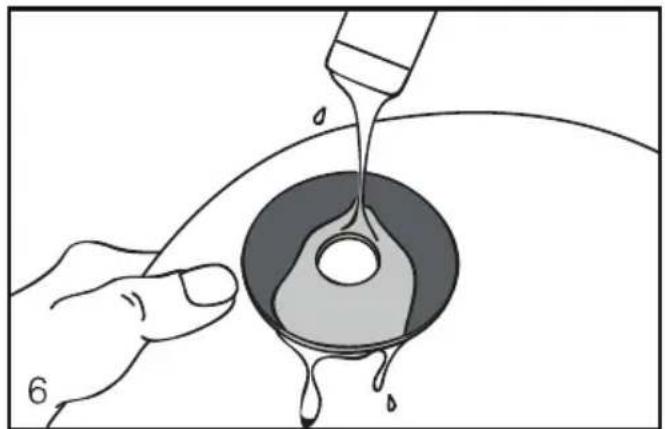
natural_image
Illustration of a hand pouring liquid into a container with droplets, no text or symbols presentCLEANING, DISINFECTION AND STORAGE
• Always unplug the appliance and allow it to cool before cleaning.
- Disinfect the bath mat periodically to keep it free from bacteria.
Use a mild household cleanser and follow the manufacturer's instructions. Disinfect once a week if used daily, especially if used by multiple people. If used less frequently, disinfect after each use.
- This product is not designed for use with soaps, gels, shampoos, or similar substances. However, if used with these substances, follow these steps to maintain the product: Fill the bath mat with fresh water through the air connection, then empty the water. Repeat several times to remove any residue.
- To remove the bath mat from the tub, carefully slide a fingernail under the suction cups to release the vacuum, and gently pull the mat sideways. Avoid tearing or pulling it forcefully.
- Turn the bath mat over, lay it flat, and press lightly to squeeze out any remaining water.
- Store the appliance in a dry and clean place. If not used for an extended period, store it in the original packaging.
- It is recommended to store the appliance at a room temperature of approximately 77°F (25°C) and to avoid exposure to sunlight.
CAUTION: READ SAFETY RULES AND OPERATING INSTRUCTIONS CAREFULLY. THIS PRODUCT IS INTENDED FOR INDOOR USE ONLY.
TWO-WIRE POLARIZED ATTACHMENT PLUG INSTRUCTIONS
This appliance has a polarized plug (one blade is wider than the other). As a safety feature, this plug will fit into a polarized outlet only one way. If the plug does not fit fully into the outlet, reverse the plug. If it still does not fit, contact a qualified electrician. Do not attempt to bypass this safety feature.
ALCI Safety Device
This appliance is equipped with an appliance leakage circuit interrupter (ALCI) safety device, designed to make the unit inoperable under abnormal conditions. The ALCI safety device has a test button to check its operation.
ALCI Testing
It is recommended to test the ALCI before each use of the appliance.
After plugging it in:
- Press the reset button on the ALCI device.
- Press the test button. The reset button should pop out, and the appliance will stop operating. This verifies that the safety device is functioning properly.
- Press the reset button again to reactivate your ALCI safety device.
- The bubble bath mat is now ready for use.
Note: If the reset button pops out during use, press the reset button. If the reset button cannot be pressed down, stop using the appliance and return it to the distributor or a designated service center.
Technical Data
Voltage: 120V\~60Hz
Watts: 470W
Remote Control:
- Battery Type: 3V CR 2450 Lithium Battery
IP Rating:
- IP44 for Main Unit
• IP67 for Remote Control

WARNING: Cancer and Reproductive Harm - www.P65warnings.ca.gov
FCC DISCLAIMER
This device complies with Part 15 of the FCC Rules and Industry Canada's license-exempt RSS(s). Operation is subject to the following two conditions:
- This device may not cause harmful interference.
- This device must accept any interference received, including interference that may cause undesired operation.
NOTE: Changes or modifications not expressly approved by the party responsible for compliance could void the user's authority to operate the equipment.
This equipment has been tested and found to comply with the limits for a Class B digital device, pursuant to Part 15 of the FCC Rules and CAN ICES-3 (B)/NMB-3(B). These limits are designed to provide reasonable protection against harmful interference in a residential installation. This equipment generates, uses, and can radiate radio frequency energy and, if not installed and used in accordance with the instructions, may cause harmful interference to radio communications. However, there is no guarantee that interference will not occur in a particular installation.
If this equipment does cause harmful interference to radio or television reception, which can be determined by turning the equipment off and on, the user is encouraged to try to correct the interference by one or more of the following measures:
- Reorient or relocate the receiving antenna.
- Increase the separation between the equipment and receiver.
- Connect the equipment into an outlet on a circuit different from that to which the receiver is connected.
- Consult the dealer or an experienced radio/TV technician for help.
Register Product
Thank you for choosing SereneLife. By registering your product, you ensure that you receive the full benefits of our exclusive warranty and personalized customer support. Complete the form to access expert support and to keep your SereneLife purchase in perfect condition.

Serenelifehome.com/ register
serenelife™
SereneLifehome.com
Questions or Comments?
We are here to help!
Phone: 1.718.535.1800
Serenelifehome.com/ContactUs
- SLBBMG100 - SLBBMP200
- Bubble Bath Mat Body Spa Massage
- USER GUIDE
- IMPORTANT SAFETY INSTRUCTIONS KEEP INSTRUCTIONS FOR FUTURE USE
- READ ALL INSTRUCTIONS BEFORE USING THIS PRODUCT DANGER: To reduce the risk of electric shock:
- WARNING: To reduce the risk of burns, electrocution, fire, or injury to persons:
- INSTRUCTIONS
- CAUTIONS:
- APPLIANCE CONTENTS
- MAIN UNIT
- AIR HOSE
- BATH MAT WITH SUCTION CUPS ON UNDERSIDE
- REMOTE CONTROL
- 3x AROMA CLIP WITH PADS
- BATH PILLOW
- SPARE COTTON PADS FOR AROMA CLIP (NOT SHOWN)
- 8x DOUBLE-SIDED ADHESIVE PLATE
- ASSEMBLY
- TIPS TO OPTIMIZE USER EXPERIENCE
- AROMA CLIP ASSEMBLY:
- Note:
- USER MAINTENANCE INSTRUCTIONS:
- SET CONTROL
- INTENSITY and LED indicator
- REMOTE CONTROL with Colorful Light (please see Fig. B)
- - LIGHT button:
- - Battery Power Verification:
- - Low battery power: Replace the battery if any of the following situations occur:
- BATTERY for Remote Control (Battery type: CR 2450 lithium 3V coin battery)
- To replace the battery, follow these steps:
- WATERPROOF REMOTE CONTROL
- ▲ WARNING
- DISPOSAL OF BATTERIES
- AIR BUBBLES
- HEATER
- DOUBLE-SIDED ADHESIVE PLATE
- CLEANING, DISINFECTION AND STORAGE
- TWO-WIRE POLARIZED ATTACHMENT PLUG INSTRUCTIONS
- ALCI Safety Device
- ALCI Testing
- After plugging it in:
- Technical Data
- Remote Control:
- IP Rating:
- FCC DISCLAIMER
- Register Product
- serenelife™
- SereneLifehome.com
Brand : SereneLife
Model : SLBBMG100
Category : Massage device