
DAP-1900 - Wi-Fi repeater D-LINK - Free user manual and instructions
Find the device manual for free DAP-1900 D-LINK in PDF.


| Product Type | AC1900 Mesh Wi-Fi Range Extender (Repeater) |
| Brand | D-Link |
| Model | DAP-1900 |
| Wireless Standards | IEEE 802.11ac, 802.11a, 802.11n, 802.11g, 802.11b |
| Frequency Bands | 2.4 GHz and 5 GHz |
| Maximum Speed | Up to 1900 Mbps |
| Interfaces | 1 Gigabit LAN port, WPS button, Reset button, Power button |
| Wireless Security | WPA3, WPA2/WPA3, WPA/WPA2, WPS |
| Advanced Features | Smart Connect, Wi-Fi Mesh, D-Link Wi-Fi App, Automatic firmware updates |
| Dimensions (W x D x H) | 100 x 100 x 181 mm (3.9 x 3.9 x 7.1 in) |
| Weight | 408 g (0.9 lbs) |
| Power Input | 100-240 V AC, 50/60 Hz |
| Power Output | 12V, 1.5A |
| Operating Temperature | 0 to 40 °C (32 to 104 °F) |
| Storage Temperature | -20 to 65 °C (-4 to 149 °F) |
| Operating Humidity | 10% to 90% non-condensing |
| Storage Humidity | 5% to 95% non-condensing |
| Certifications | FCC, IC, CE, UL, CB, RCM |
| Package Contents | DAP-1900 unit, Power adapter, Quick Install Card, Simple Setup Guide |
| LED Indicators | Status LED (Red/Orange/White) for power, connection, and WPS |
| Management | Web UI via browser (http://dlinkapxxxx.local), D-Link Wi-Fi App (iOS/Android) |
Frequently Asked Questions - DAP-1900 D-LINK
User questions about DAP-1900 D-LINK
0 question about this device. Answer the ones you know or ask your own.
Ask a new question about this device
Download the instructions for your Wi-Fi repeater in PDF format for free! Find your manual DAP-1900 - D-LINK and take your electronic device back in hand. On this page are published all the documents necessary for the use of your device. DAP-1900 by D-LINK.
USER MANUAL DAP-1900 D-LINK
natural_image
White D-Link portable electronic device with a rounded top and front panel, no visible text or symbols on the device body.User Manual
AC1900 Mesh Wi-Fi Range Extender
DAP-1900
Preface
D-Link reserves the right to revise this publication and to make changes in the content hereof without obligation to notify any person or organization of such revisions or changes.
Manual Revisions
| Hardware Revision Date Description | |||
| A1 v1.00 | 16 August, 2021 | Initial release | |
Trademarks
D-Link and the D-Link logo are trademarks or registered trademarks of D-Link Corporation or its subsidiaries in the United States or other countries. All other company or product names mentioned herein are trademarks or registered trademarks of their respective companies.
Apple ^® , Apple logo ^® , Safari ^® , iPhone ^® , and Macintosh ^® are trademarks of Apple Inc., registered in the U.S. and other countries. App Store ^SM is a service mark of Apple Inc.
Chrome™ browser, Google Play™ and Android™ are trademarks of Google Inc.
Internet Explorer ^® , Windows ^® and the Windows logo are trademarks of the Microsoft group of companies.
Copyright © 2021 by D-Link Corporation. All rights reserved. This publication may not be reproduced, in whole or in part, without prior expressed written permission from D-Link Corporation.
Table of Contents
Preface......i
Product Overview....1
Package Contents....1
System Requirements....2
Introduction 3
Features....3
What is a Wireless Extender? 4
Hardware Overview....5
LED Status Indicator ....5
Back Panel 6
Bottom of the Device 7
Installation....8
Wireless Installation Considerations....8
Hardware Setup 9
Getting Started....10
WPS-PBC Configuration 11
D-Link Wi-Fi App Setup....12
Wireless Setup Wizard....14
Access Point Mode Settings....21
Configuration....22
Home 22
Home - Connected to a Wi-Fi Mesh Router....25
Settings 26
Extender Settings 26
Existing Network....27
Smart Connect....28
Network Settings....31
Management....33
Time....33
Admin 34
System 35
Upgrade 36
Statistics 37
Wi-Fi Mesh Setup 38
Setup Using the D-Link Wi-Fi App 39
Setup Using an Ethernet Cable 40
Connecting Wireless Clients to the Extender .....41
WPS Button....41
Windows ^® 10....42
Windows® 8 - WPA/WPA2....43
Troubleshooting....45
Wireless Basics....47
Tips....48
Technical Specifications....49
GPL Code Statement....50
Regulatory Statements ......65
Product Overview Package Contents

DAP-1900 High Performance Mesh Wi-Fi Range Extender
Quick Install Card
Simple Setup Guide
If any of the above items are missing, please contact your reseller.
System Requirements
| Network Requirements | A wireless router with an active Internet connection.IEEE 802.11ac, 802.11n, 802.11g, 802.11b, or 802.11a wireless clients/devices |
| Web-based Configuration Utility Requirements | A Computer or Mobile Device with the following:Windows®, Apple® Mac OS®, or Linux-based operating systemWireless adapter or Wi-Fi functionalityAn Apple® iPhone®, iPad®, or AndroidTM deviceBrowser Requirements:Internet Explorer® 10 or laterFirefox® 28 or laterSafari® 6.0 or laterGoogle ChromeTM 28 or later |
| D-Link Wi-Fi App Requirements | iOS® or AndroidTM device (Please refer to the description of the app’s page to check whether your device is compatible.) |
Introduction
Features
High Speed Wireless Performance with Wireless 802.11ac Technology
Thanks to the wireless AC technology, the DAP-1900 provides a wireless connection at up to 1900 Mbps* with other 802.11ac wireless devices. This feature allows you to participate in real-time activities online, such as video streaming, online gaming, and real-time audio wtih smooth performance.
Compatibility
The DAP-1900 is fully compatible with the 802.11ac standard, as well as backward compatible with IEEE 802.11n/g/b/a wireless devices, so you can use your existing devices without sacrificing performance.
Compact, Convenient Design
The DAP-1900 is a compact device that is ideal for use at home or in a small office, as it does not take up much space. The signal indicator LED makes it intuitive to identify the connection status.
Latest Wireless Network Security and Encryption
The DAP-1900 supports wireless security features to prevent unauthorized access from the wireless network. Support for 802.11 128-bit AES standards ensure that you'll be able to use the best possible encryption methods with your compatible wireless devices
Extend and Customize Your Wireless AC Network with D-Link Wi-Fi Mesh
With D-Link Wi-Fi Mesh, your Wi-Fi device (e.g. Smartphone, Tablet) will automatically roam to the strongest Wi-Fi signal, eliminating the need to switch between your router's and range extender's Wi-Fi signal as you move around your home
Easy to Set Up and Use
Setting up the DAP-1900 High Performance Mesh Wi-Fi Range Extender is simple. You can use the supported D-Link Wi-Fi app on your compatible iOS or Android device to utilize the built in set up wizard. The DAP-1900 can also receive automatic over-the-air firmware updates, which ensures the best protection and the latest features for your device.
* Maximum wireless signal rate derived from standard IEEE specifications. Actual data throughput will vary. Network conditions and environmental factors, including volume of network traffic, building materials and construction, and network overhead may lower actual data throughput rate. Environmental conditions will adversely affect wireless signal range.
What is a Wireless Extender?
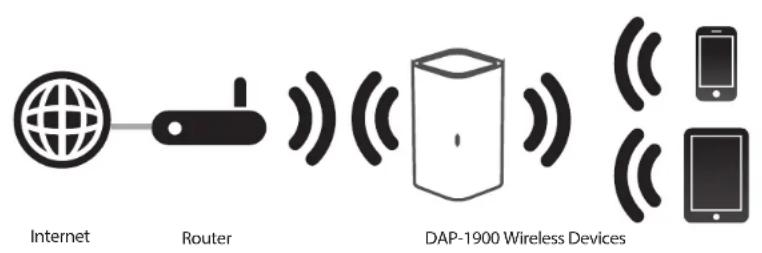
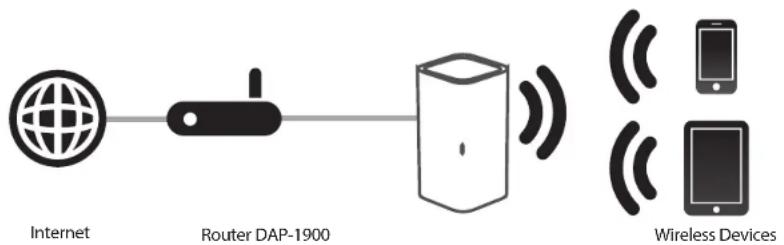
The DAP-1900 is a repeater that extends the range of an existing wireless network to provide better signals for parts of your home or office that may have poor or no reception. Your existing wireless signal will be rebroadcasted by the DAP-1900 so that you can stay connected even in the farthest corner of your home or office. Your DAP-1900 can be connected wirelessly or with an Ethernet cable. For flexibility of access control, the extended network can be configured to inherit the network credentials from the existing network, or you can specify a different network name and password.
Extend Your Wireless Network using Wi-Fi
Extend Your Wireless Network using Ethernet
flowchart
graph LR
    A["Internet"] --> B["Router DAP-1900"]
    B --> C["Wireless Devices"]
    style A fill:#f9f,stroke:#333
    style B fill:#ccf,stroke:#333
    style C fill:#cfc,stroke:#333
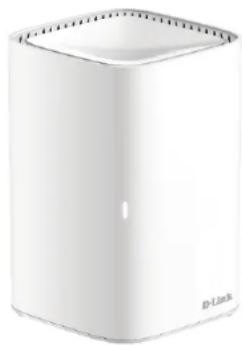
Hardware Overview LED Status Indicator
natural_image
White D-Link mobile phone box with square top and small front panel (no visible text or symbols)| Status LED | Red | Solid The device is booting up. | |
| Blinking The device is in Recovery Mode. | |||
| Orange | Solid | The device cannot sync with another device. Once set up, a blinking orange indicates there is no connection to the device. | |
| Blinking The device is upgrading software. | |||
| White | Solid | The device is powered up and running. Once set up, a solid white LED indicates a strong connection. | |
| Blinking | The device is connecting to a wireless client using Wi-Fi Protected Setup (WPS). Once set up, a blinking white LED indicates a weak connection. | ||
| None Off | The device is powered off. If the device is powered on and the Status LED is disabled, the device is working as normal. | ||
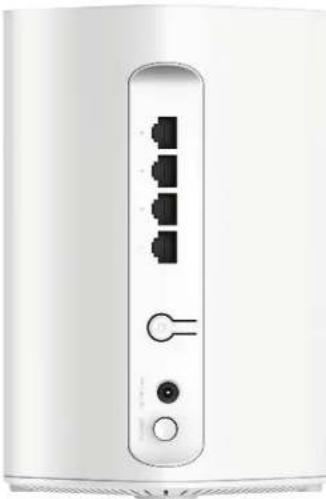
Back Panel
natural_image
Close-up of a white electronic device rear panel with three black connector pins and two control buttons (no visible text or symbols)| 1 | Power Button | Press the power button the turn the device on or off. |
| 2 | Power Connector Connector for the supplied power adapter. | |
| 3 | WPS Button | Press to start the WPS process and automatically create an encrypted connection to a WPS client. |
| 4 | Gigabit LAN Port (1-4) | Connect Ethernet devices such as computers, switches, storage(NAS) devices, game consoles. |
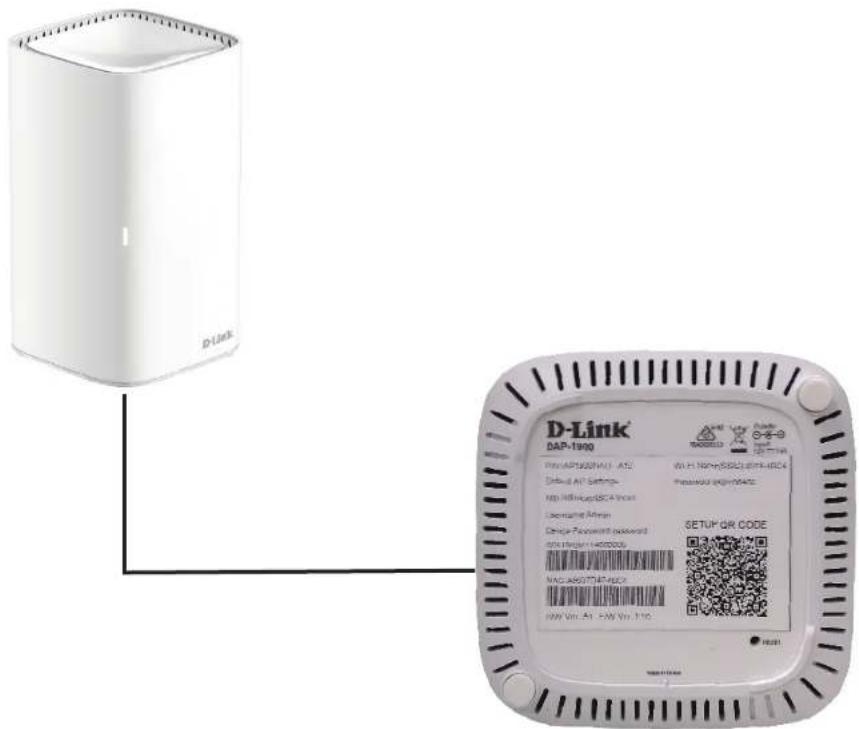
Bottom of the Device
You may locate the Wi-Fi name (SSID) and password for your DAP-1900. This information is printed on the sticker on the bottom of the device. You will need this information to connect your computer or mobile device to the default network (SSID) of your DAP-1900. This information is also provided on the Quick Install Card.
Installation Wireless Installation Considerations
The DAP-1900 lets you extend your existing wireless network's coverage as long as it is within range of the uplink network. Keep in mind that the DAP-1900's extension network's range may be limited by the number, thickness and location of walls, ceilings, or other objects that the wireless signals must pass through. Typical ranges vary depending on the types of materials and background RF (radio frequency) noise in your home or business. To maximize wireless range, follow these basic guidelines:
- Keep the number of walls and ceilings between the D-Link extender and other network devices to a minimum - each wall or ceiling can reduce your adapter's range from 3-90 feet (1-30 meters.) Position your devices so that the number of walls or ceilings is minimized.
- Be aware of the direct line between network devices. A wall that is 1.5 feet thick (0.5 meters), at a 45-degree angle appears to be almost 3 feet (1 meter) thick. At a 2-degree angle it looks over 42 feet (14 meters) thick! Position devices so that the signal will travel straight through a wall or ceiling (instead of at an angle) for better reception.
- Building materials make a difference. A solid metal door or aluminum studs may have a negative effect on range. Try to position extenders, access points, wireless routers, and computers so that the signal passes through drywall or open doorways. Materials and objects such as glass, steel, metal, walls with insulation, water (fish tanks), mirrors, file cabinets, brick, and concrete will degrade your wireless signal.
- Keep your product away (at least 3-6 feet or 1-2 meters) from electrical devices or appliances that generate RF noise.
- If you are using 2.4 GHz cordless phones or X-10 (wireless products such as ceiling fans, lights, and home security systems), your wireless connection may degrade dramatically or drop completely. Make sure your 2.4 GHz phone base is as far away from your wireless devices as possible. The base transmits a signal even if the phone is not in use.
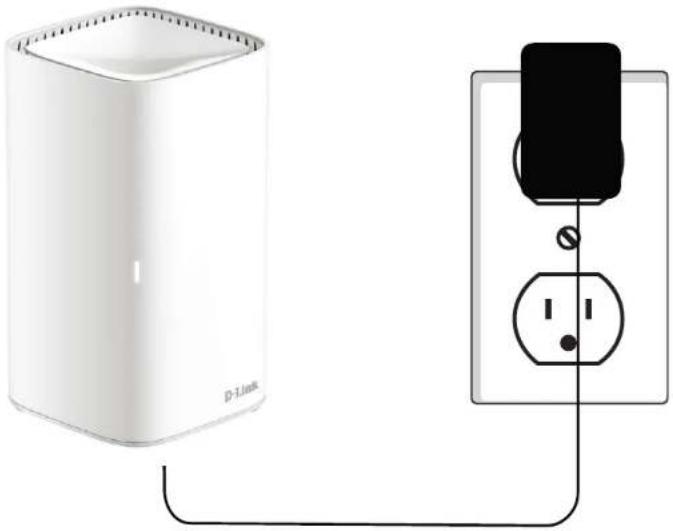
Hardware Setup
Plug in the DAP-1900 to a power outlet with the supplied power adapter. Verify that the Status LED is blinking orange before continuing with configuration.
natural_image
Diagram showing a white D-Link device connected to an electrical outlet with a black plug (no text or symbols)OUTLET
Getting Started
There are several configuration tools you can use to set up your DAP-1900.
- WPS PBC - This method provides a convenient way to extend your existing wireless network. Refer to "WPS-PBC Configuration" on page 11 for setup instructions.
- D-Link Wi-Fi App - Use your compatible iOS or Android device to configure your extender. Refer to "D-Link Wi-Fi" on page 12 for setup instructions.
- Web-based Wireless Setup Wizard - This wizard will launch when you log into the extender's web configuration utility for the first time. Refer to "Wireless Setup Wizard" on page 14 for setup instructions.
- The system provides two configuration options for extending your existing network: Ethernet or Wi-Fi. Refer to "Extender Settings" on page 26 for more information regarding configuration options. If utilizing the DAP-1900 as an extender to extend your wireless connectivity, refer to "Wireless Setup Wizard" on page 14 If utilizing the DAP-1900 as an access point through Ethernet, refer to "Access Point Mode Settings" on page 21.
WPS-PBC Configuration
Wireless Protected Setup (WPS) makes connecting your DAP-1900 easy. To use WPS, first make sure the source router or access point features a physical or virtual WPS button.
Step 1 - Initiate WPS Mode
While the Status LED is blinking orange, push the WPS button on the source wireless router or AP, and then push the WPS button on the DAP-1900. The Status LED will start to flash white. Please allow up to two minutes for the process to finish. The LED will turn solid white when the DAP-1900 has connected successfully to the source wireless router or access point.
Step 2 - Connecting Devices to the DAP-1900
The DAP-1900 is now ready to share the extended Wi-Fi network with your PCs and mobile devices. You may use the WPS method to connect devices to the extended network created by the DAP-1900 using the following network names (SSID). The password will be the same as the wireless network you are extending.
- (Your router's SSID)-EXT
The Smart Connect feature will present a single wireless network. When connecting clients to the extended network, they will be automatically added to the best band, either 2.4 GHz or 5 GHz. To disable the Smart Connect feature and individually configure 2.4 GHz and 5 GHz SSIDs, refer to “Extender Settings” on page 26.
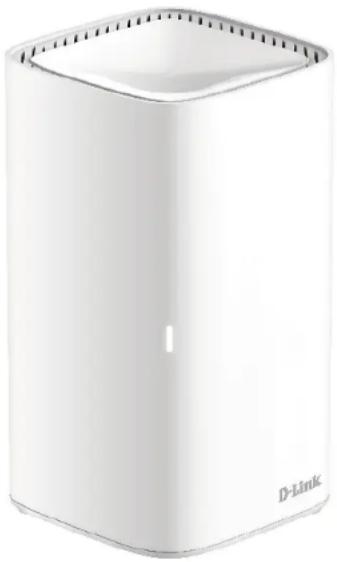
natural_image
White D-Link portable electronic device with square top and side panel (no visible text or symbols)D-Link Wi-Fi App Setup
The D-Link Wi-Fi app allows you to install and configure your DAP-1900 from your compatible Android or iOS device.
Note: The screenshots may be different depending on your mobile device's OS version. The following steps show the Android interface of the D-Link Wi-Fi app. If you are using an iOS device, the appearance may be different from that of the screenshots, but the process is the same.
Step 1
Search and install the free D-Link Wi-Fi app available on the App Store or on Google Play. You can also scan the QR code on the right, which will take you to the respective D-Link Wi-Fi app store page.
Step 2
Launch the D-Link Wi-Fi app from the home screen of your device.
Step 3
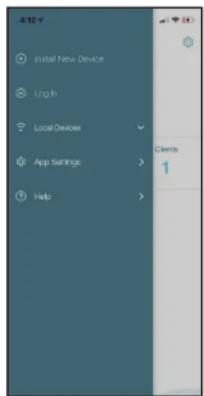
Tap Install New Device.


Section 3 - Configuration
Step 4
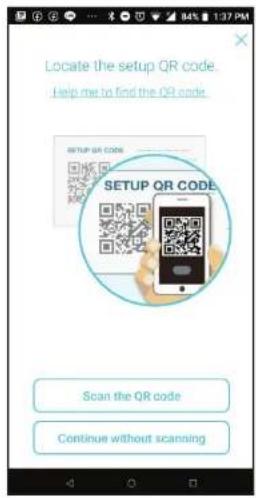
Tap Yes if you have the setup QR code with you to scan the QR code and proceed to step 6. If not, tap No and proceed to step 5.
Step 5
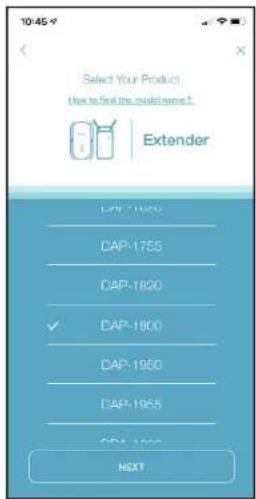
Tap Extender when presented with product options and select DAP-1900 from the list of available devices. Tap Next to continue.
Step 6
You will now be guided through a step-by-step process for setting up your DAP-1900. Simply follow the on-screen instructions to complete the installation and configuration process.
Wireless Setup Wizard
The setup wizard is designed to guide you through a step-by-step process to configure your new DAP-1900 AC1900 High Performance Mesh Wi-Fi Range Extender to extend your wireless network and connect to the Internet via a wireless setup process. To set your DAP-1900 using an Ethernet cable, please refer to "Access Point Mode Settings" on page 21.
To access the setup utility for the DAP-1900 AC1900 High Performance Mesh Wi-Fi Range Extender on your PC, first connect to the DAP-1900 wirelessly using the Wi-Fi name (SSID) and password located on the sticker. Then open a web browser and enter http://dlinkapxxxx.local/ in your browser's URL field (where "xxxx" is the last four digits of the DAP-1900's MAC address). You may also enter the IP address* of the DAP-1900.
*Once your DAP-1900 connects to the host network, it will be assigned a new IP address based on your network's DHCP settings. The IP address can be obtained from the client list of the uplink router.
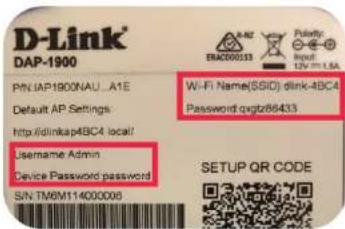

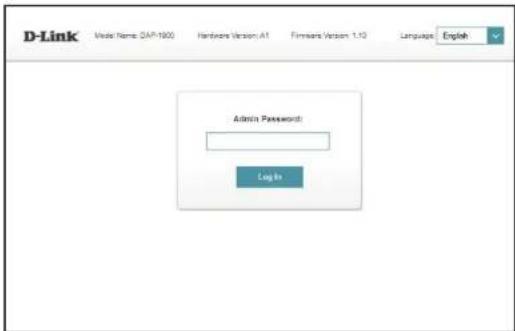
If this is your first time logging in to the extender and no connection has been established, the setup wizard will automatically appear. If the setup process was not previously completed, then enter the password as printed on the included sticker on the extender.
Section 3 - Configuration
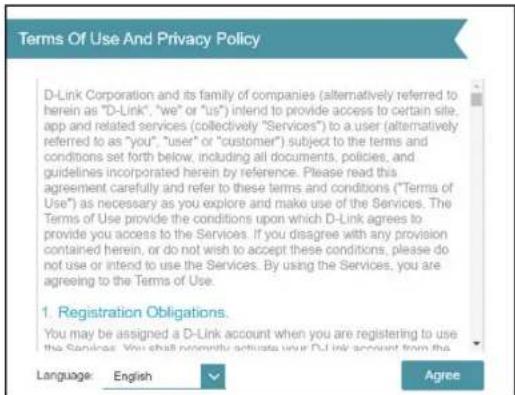
Agree to the Terms of Use and Privacy Policy to continue.
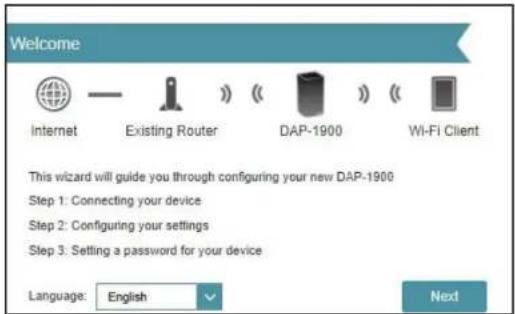
This wizard will guide you through configuring your new DAP-1900 through a wireless connection.
Click Next to begin.
Section 3 - Configuration
Please wait while your DAP-1900 scans for available Wi-Fi networks.
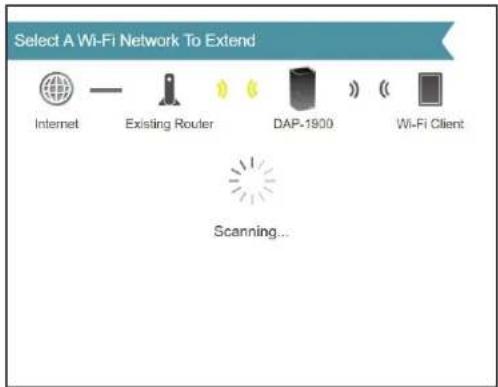
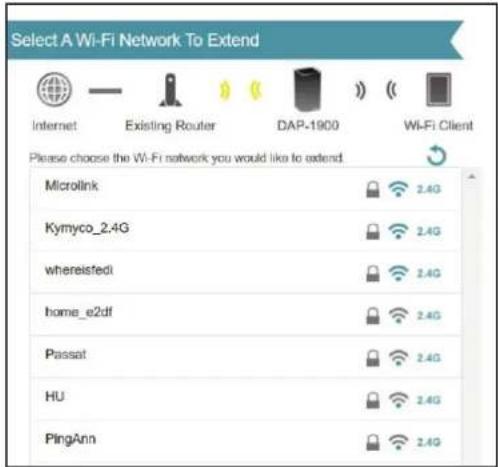
The DAP-1900 will scan for available wireless networks and display a list of results. You may choose one of the following options to proceed:
- If the wireless network you wish to extend was detected by the scan, click on the network. The extender will automatically forward you to the next step.
- If the network you would like to extend was not detected by the scan, click the Manual button.
Note: If the wireless network you would like to extend was not detected by the scan, your DAP-1900 might be out of range and you may need to reposition the extender closer to the host network device.
Section 3 - Configuration
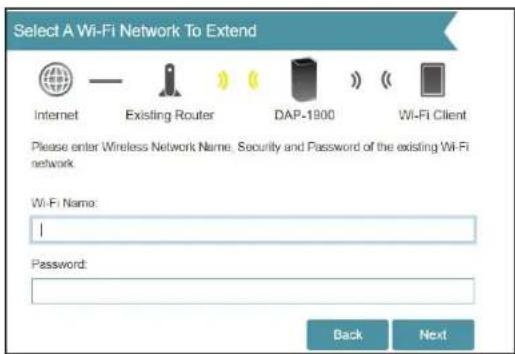
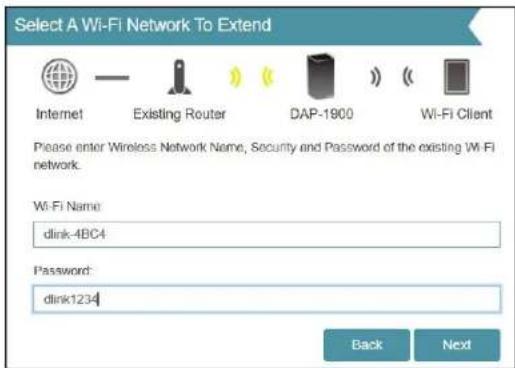
If the wireless network you wish to extend was detected by the scan, enter the password to connect to the network now. If you chose Manual, enter the Wi-Fi Network Name (SSID) and Password of the existing Wi-Fi network you wish to connect to.
Click Next to continue configuring your extended network, or click Back to return to the previous step.
Enter a name (SSID) and password for identifying and securing your extended network.
Click Next to continue, or click Back to return to the previous step.
Section 3 - Configuration
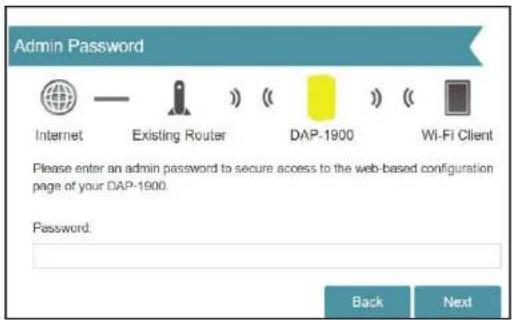
In order to secure the extender's web configuration utility, please enter an admin password. You will be prompted for this password each time you want to use the extender's web configuration utility.
Click Next to continue.
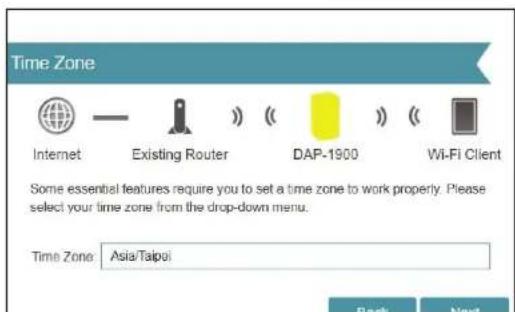
Select your time zone from the drop-down menu.
Click Next to continue.
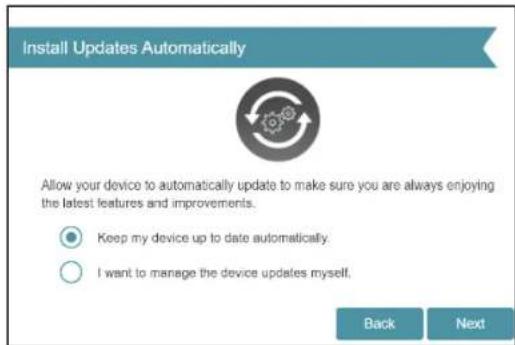
Keeping your DAP-1900 firmware up to date provides you with the latest protection and new features over the air. Choose whether to keep your device up to date automatically or to manage the device updates by yourself.
Click Next to continue.
Section 3 - Configuration
At the end of the wizard, you will be presented with a final summary of your settings. It is recommended that you record this information for future reference.
Click Finish to close the wizard.
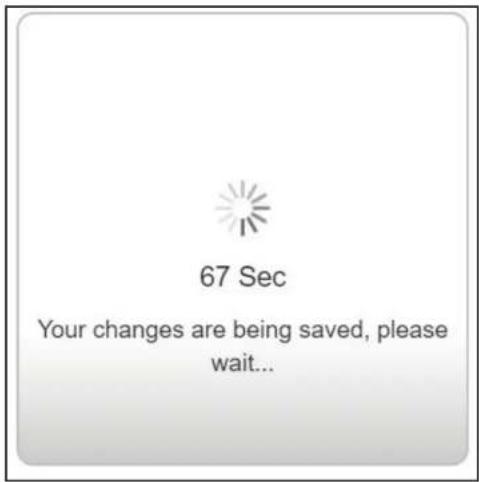
Your changes will be saved and the extender will reboot.
Devices may be connected to the new wireless extension network(s) once the extender successfully reboots.
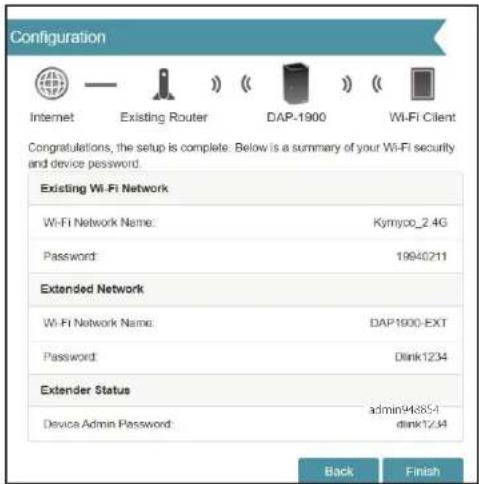
*Wireless network names and passwords are shown for example only.
Section 3 - Configuration
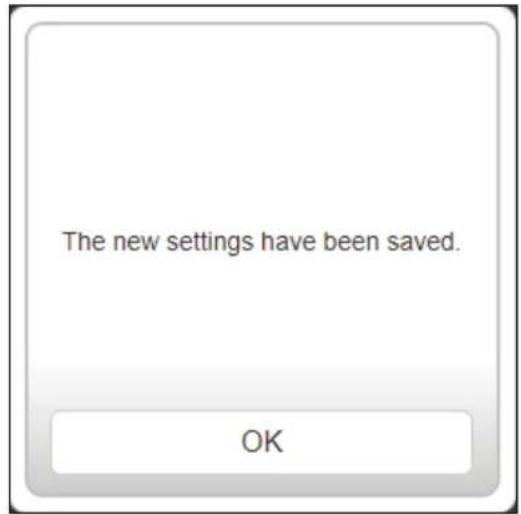
Click OK to exit the Setup Wizard. You will be redirected to the login page.
You can now place the DAP-1900 in a place where you require Internet access.
Access Point Mode Settings
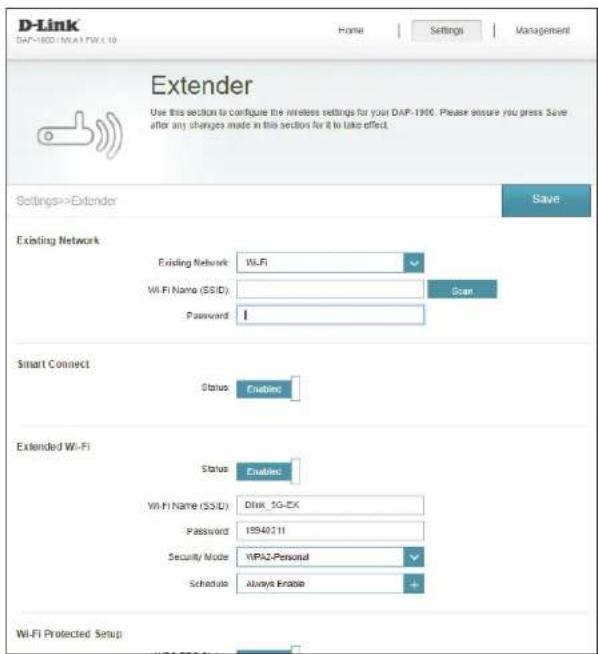
This page lets you configure the DAP-1900 as an access point. Connect an Ethernet cable from your router's LAN port to the LAN port of the DAP-1900.
To access this page, click Settings at the top of the page, then select Extender. Click Save to apply the settings when you are done with your changes.
Under Existing Network, choose Ethernet to utilize the DAP-1900 as an access point. Refer to "Extender Settings" on page 26 for more information regarding configuration options.
Configuration Home
The home screen gives a summary of the current status of devices connected to the DAP-1900. A green check between the extender and the uplink router indicates that there is an active connection. A red cross indicates that there is no connection present, or there is a connection error. If there's no active uplink connection, click on the Click to repair button to start the setup wizard.
Note: If the DAP-1900 is connected to a Wi-Fi Mesh supported router, then the home screen will only show the Firmware Upgrade function. Other functions for the DAP-1900 can be configured from the router's configuration page. For more details, refer to "Home - Connected to a Wi-Fi Mesh Router" on page 25.
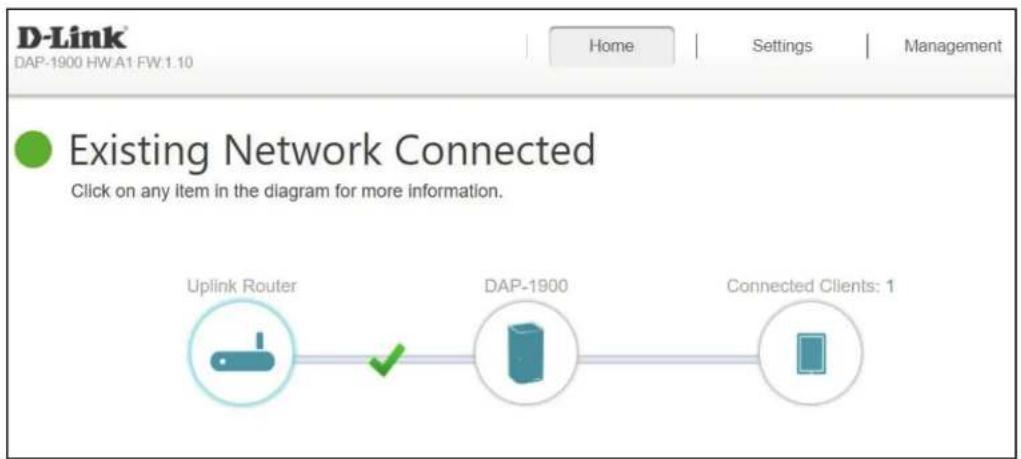
Uplink Router This icon shows the status of the Internet connection through the uplink router. It is grey if the DAP-1900 is not connected to an uplink router. Once connected, click on it to see its connection details.
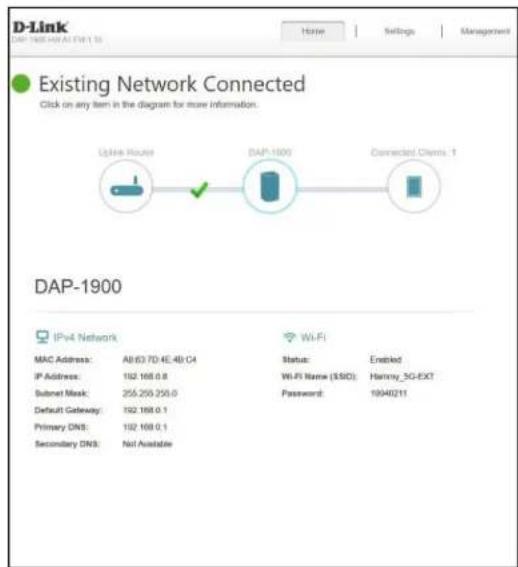
DAP-1900 Click on this icon to see network setting status such as IPv4 and IPv6 configurations of the DAP-1900.
Connected Clients Click on the Connected Clients icon to see client details.
Section 3 - Configuration
Once your Internet connection is set up, you can view the details of the IPv4 Network, the IPv6 Network and the Wi-Fi network by clicking on the DAP-1900 icon.
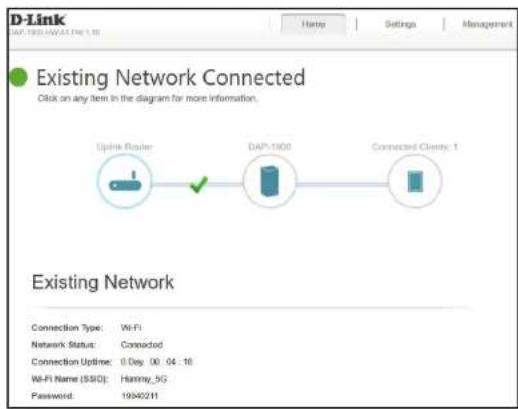
By clicking the Uplink Router icon, you will see the details of the Existing Network. This contains information regarding the Connection Type, Network Status, Connection Uptime, Wi-Fi Name (SSID), and Password.
Section 3 - Configuration
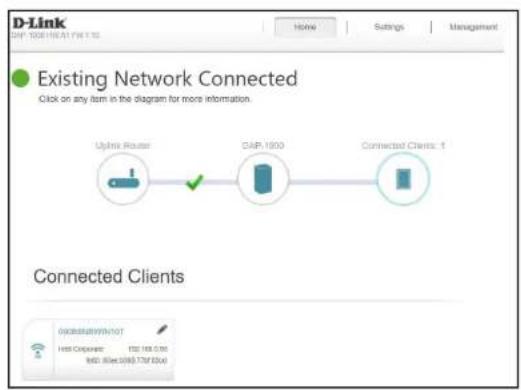
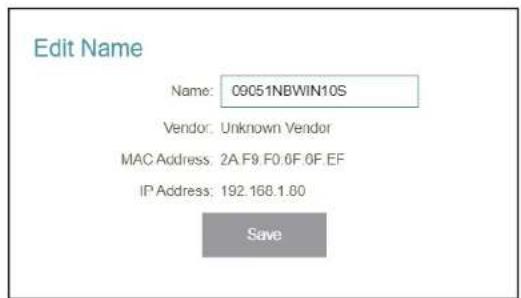
Clicking the Connected Clients icon will show you the devices that are currently connected to the DAP-1900, including their vendors and IP addresses.
To edit each client's settings, click the pencil icon.
Name Enter a custom name for this client. Vendor Displays the vendor of the device. MAC Address Displays the MAC address of the device. IP Address Displays the current IP address of this client.
Click Save when you are done.
Home - Connected to a Wi-Fi Mesh Router
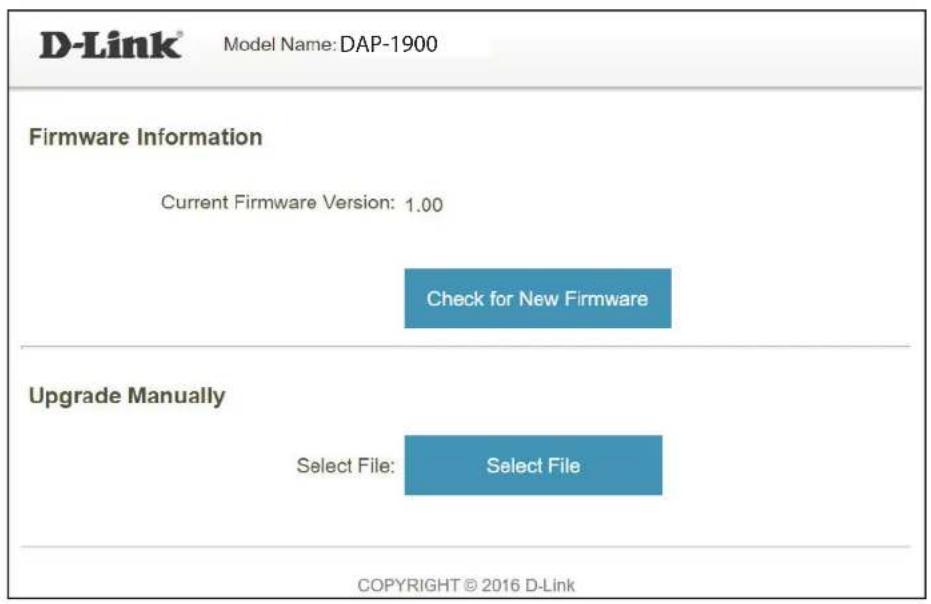
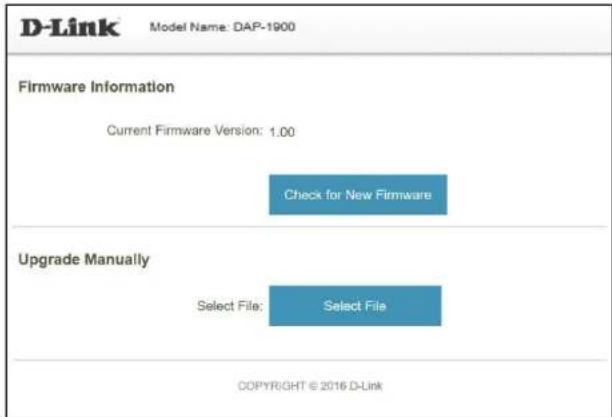
If the DAP-1900 is connected to a Wi-Fi Mesh supported router, log in to the DAP-1900's home screen by typing in your router's Admin password. The DAP-1900's home screen will only show the firmware information for the DAP-1900. Other functions for the DAP-1900 can be configured from the main router's configuration page. Please make sure that the Wi-Fi Mesh feature is enabled in your compatible router's wireless settings.
Firmware Information
Upgrade Manually
The current firmware version of your DAP-1900. Click Check for New Firmware to see if your DAP-1900 is up to date.
If you wish to upgrade manually, first download the firmware file you wish to upgrade to. Next, click the Select File button to locate the file and click Upload to install the new firmware.
Settings Extender Settings
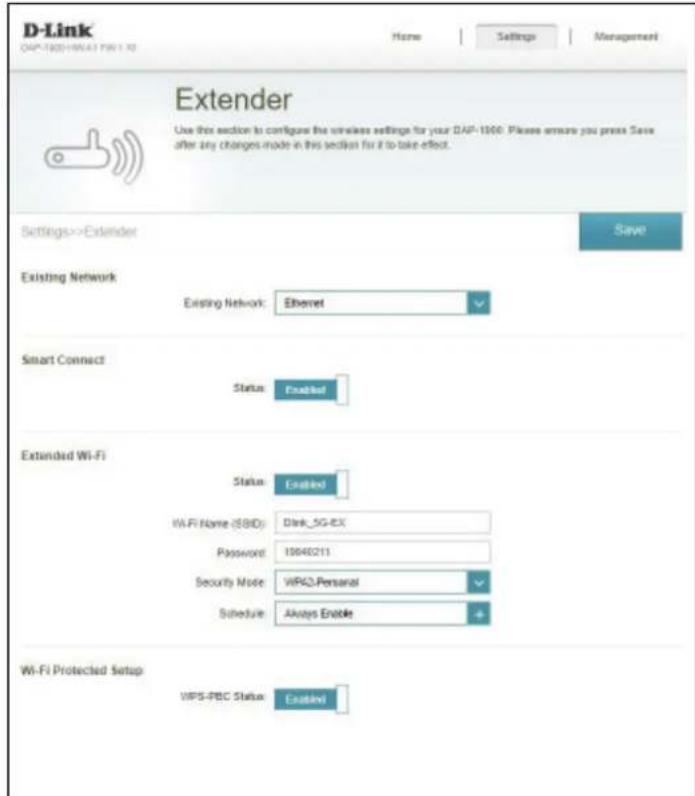
This page lets you configure the settings for the DAP-1900's extended wireless network. To access this page, click Settings at the top of the page, then select Extender. Click Save to apply the settings when you are done with your changes.
Existing Network
Existing Network
Select the type of existing network, either Ethernet or Wi-Fi for the DAP-1900 to be connected. Select Ethernet if you are connecting to your network via an Ethernet cable. Select Wi-Fi if you are connecting to your network via a wireless connection.
Wi-Fi - Existing Network
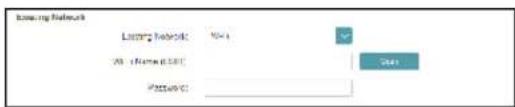
If Wi-Fi is selected, the following Wi-Fi Existing Network options will appear.
Wi-Fi Name (SSID) Type in the Wi-Fi Name of the network you would like to extend.
Password Type in the password of the network you would like to extend.
Scan
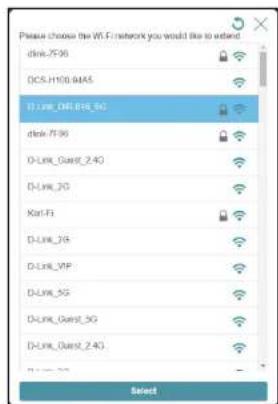
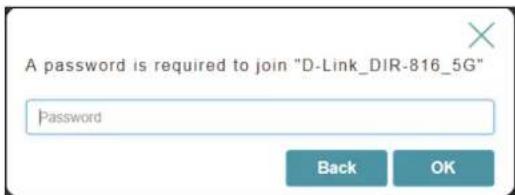
If Scan is selected, a window will pop up showing you available Wi-Fi networks. You can choose the network you would like to extend. Then enter the wireless network password if required. Click OK to start connecting the selected network.

Smart Connect
Smart Connect
Enable or disable the Smart Connect Feature. When enabled, fewer configuration options will be available to simplify configuration. And the wireless network will transmit and receive data on the 5GHz frequency if the client device supports 5GHz.
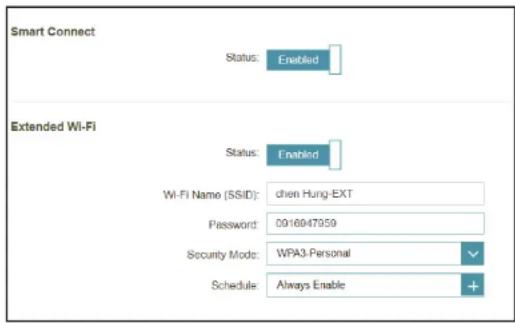
Extended Wi-Fi - Smart Connect Enabled
Status Enable or disable the Extended Wi-Fi wireless network.
Wi-Fi Name (SSID) This is the name of the DAP-1900's extended network. If using Wi-Fi, the DAP-1900 will rebroadcast the uplink router's Internet connection under this SSID. You may also manually set the SSID of the extended network.
Password Enter a password or network key that you wish to use for the extended Wi-Fi network.
Security Mode Select a connection security requirement from the following:
WPA3-Personal Wi-Fi Protected Access 3 security protocol as the strongest security.
WPA2/WPA3-Personal WPA2 and WPA3 clients can connect simultaneously.
WPA/WPA2-Personal WPA and WPA2 clients can connect simultaneously.
Schedule Select the time during which the wireless network will be available. The schedule may be set to Always Enable or you can add your own schedules.
To add a schedule:
Each box represents half an hour, with the clock time (0\~23) at the top of each column. To add a time period to the schedule, simply click on the start time and drag to the end time. You can add multiple days and multiple periods per day to the schedule.
Wireless - Smart Connect Disabled
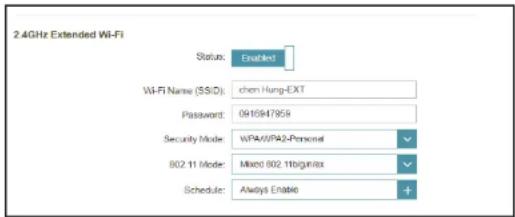
2.4 GHz Extended Wi-Fi
Status Enable or disable the 2.4 GHz network by toggling this slider.
Wi-Fi Name (SSID) This is the name of the DAP-1900's extended network. If using Wi-Fi, the DAP-1900 will rebroadcast the uplink router's Internet connection under this SSID. You may also manually set the SSID of the extended network.
Password Enter the password or network key that you wish to use for the extended 2.4 GHz network.
Security Mode Select a connection security requirement from the following:
WPA3-Personal Wi-Fi Protected Access 3 security protocol as the strongest security.
WPA2/WPA3-Personal WPA2 and WPA3 clients can connect simultaneously.
WPA/WPA2-Personal WPA and WPA2 clients can connect simultaneously.
Schedule Select the time during which the wireless network will be available. The schedule may be set to Always Enable or you can add your own schedules.
To add a schedule:
Each box represents half an hour, with the clock time (0\~23) at the top of each column. To add a time period to the schedule, simply click on the start time and drag to the end time. You can add multiple days and multiple periods per day to the schedule.
Wireless - Smart Connect Disabled (Continued)
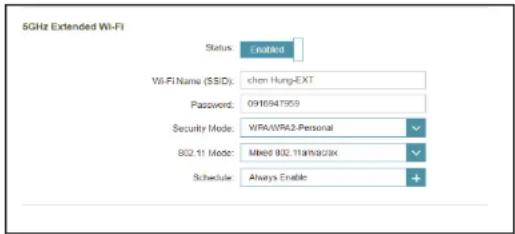
5 GHz Extended Wi-Fi
Status Enable or disable the 5 GHz network by toggling this slider.
Wi-Fi Name (SSID) This is the name of the DAP-1900's extended network. If using Wi-Fi, the DAP-1900 will rebroadcast the uplink router's Internet connection under this SSID. You may also manually set the SSID of the extended network.
Password Enter the password or network key that you wish to use for the extended 5 GHz network.
Security Mode Select a connection security requirement from the following:
WPA3-Personal Wi-Fi Protected Access 3 security protocol as the strongest security.
WPA2/WPA3-Personal WPA2 and WPA3 clients can connect simultaneously.
WPA/WPA2-Personal WPA and WPA2 clients can connect simultaneously.
Schedule Select the time during which the wireless network will be available. The schedule may be set to Always Enable or you can add your own schedules.
To add a schedule:
Each box represents half an hour, with the clock time (0\~23) at the top of each column. To add a time period to the schedule, simply click on the start time and drag to the end time. You can add multiple days and multiple periods per day to the schedule.
Network Settings
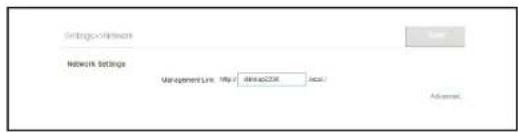
This page lets you configure the network settings for the DAP-1900. To access this page, click Settings at the top of the page, then select Network. Click Save to apply the settings when you are done with your changes.
Management Link You can change the URL name of the device by editing the text in the text box.
Advanced Settings
The Advanced Settings of the Network Settings page allows you to configure both IPv4 and IPv6 settings for communicating with the DAP-1900.
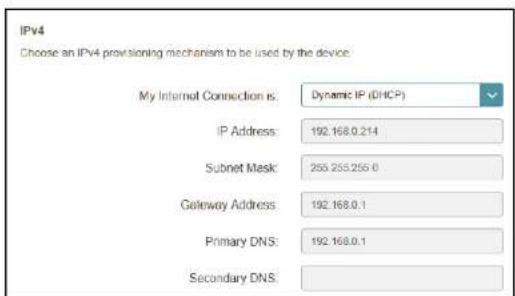
IPv4
My LAN Connection is
Configure how the IP address should be assigned: Dynamic IP or Static IP address. If you select Dynamic IP, the options below will not be available.
IP Address Assign an IPv4 address. This address should be outside of the uplink router's DHCP address pool.
Subnet Mask Enter the subnet mask. It is used to determine the subnet of an IP address.
Gateway Address
Enter the gateway address. This is usually the IP address of the uplink router.
Primary DNS Enter the address of the primary DNS server. It is the address of the server used to resolve hostnames to IP addresses.
Secondary DNS Enter the address of the secondary DNS server. This is optional but will provide backup if the primary server fails.
IPv6 - Autoconfiguration (SLAAC/DHCPv6)
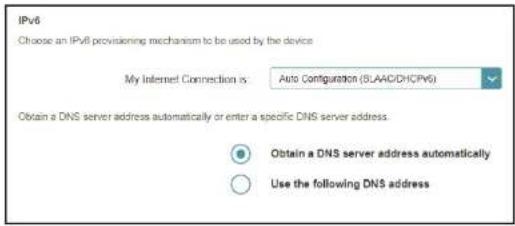
My Internet Connection is Select Autoconfiguration (SLAAC/DHCPv6) to have the DAP-1900 automatically receive an IPv6 address from the uplink router.
Obtain a DNS server address automatically You can obtain IPv6 DNS server information automatically, or configure DNS servers manually by selecting Use the following DNS address.
Primary DNS For manual settings, enter the primary IPv6 DNS server address.
Secondary DNS For manual settings, enter the secondary IPv6 DNS server address. This is optional but will provide backup if the primary server fails.
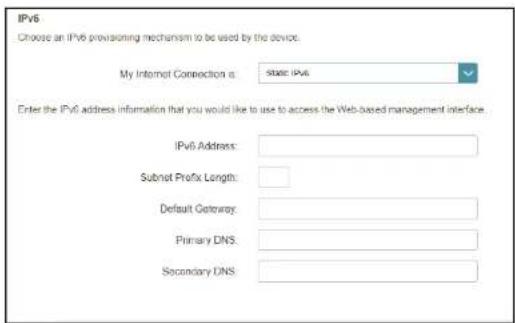
IPv6 - Static IPv6
My Internet Connection is Select Static IPv6 to manually assign an IP address to the DAP-1900.
IPv6 Address Assign an IPv6 address. This address should be outside of the uplink router's DHCP address pool.
Subnet Prefix Length Enter the length of the IPv6 subnet prefix for identifying the IPv6 subnetwork.
Default Gateway Enter the default gateway.
Primary DNS Enter the primary IPv6 DNS server address.
Secondary DNS Enter the secondary IPv6 DNS server address. This is optional but will provide backup if the primary server fails.
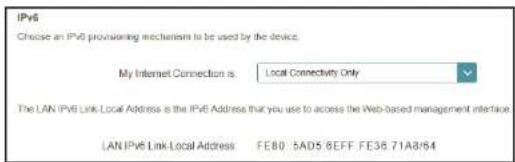
IPv6 - Local Connectivity Only
My Internet Connection is Select Local Connectivity Only to set an IPv6 address only for the local network.
LAN IPv6 Link-Local Address The link-local address of the DAP-1900 is used only within the local network specific to a physical interface.
Management Time
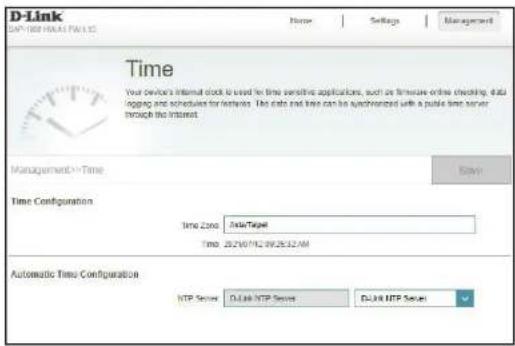
You can set time zone and the Network Time Protocol (NTP) server on this page.
In the Management menu at the top of the page, click Time. Click Save to apply the settings when you are done with your changes.
Time Configuration
Time Zone Select your time zone from the drop-down menu.
Time Displays the current date and time of the extender.
Automatic Time Configuration
NTP Server
Select from the drop-down menu to either use the D-Link NTP Server to synchronize the time and date, or choose Manual to set the NTP server name or IP address.
Admin
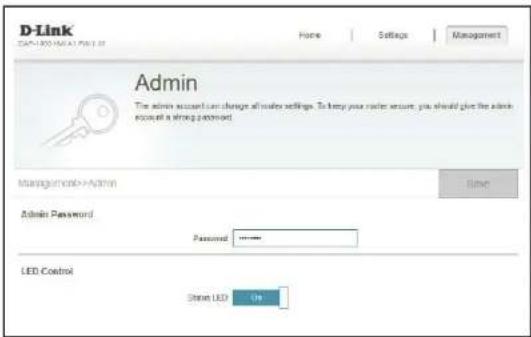
This page allows you to set a new password for the administrator account used to configure the DAP-1900. To access this page, click Management at the top of the page, then select Admin. Click Save to apply the settings when you are done with your changes.
Password Password must be 8-15 characters and contain both numbers and letters.
LED Control Turn on or off the LED status indicator.
System
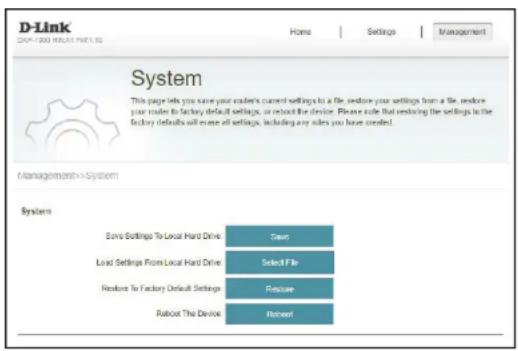
This page allows you to save or restore your system configurations as well as reset or reboot the DAP-1900. To access this page, click Management at the top of the page, then select System.
Save Settings To Local Hard Drive
Save the system settings as a single file to the download directory as specified in your browser.
Load Settings From Local Hard Drive
Load the system settings from a previously saved file on the local hard drive. Click the Restore button that appears after selecting the system settings file to update the settings.
Restore to Factory Default Settings
Restore the system settings to factory default settings. This will erase all current configurations.
Reboot the Device Click Reboot to restart the DAP-1900.
Upgrade
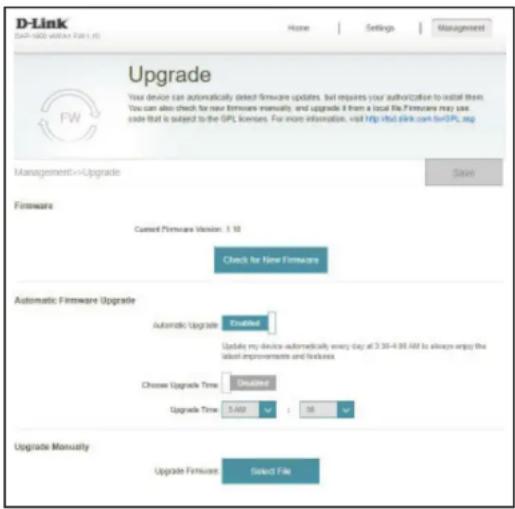
This page allows you to upgrade the DAP-1900's firmware, either automatically or manually. To manually upgrade the firmware, download the latest firmware file from http://support.dlink.com in advance. To access this page, click Management at the top of the page, then select Upgrade. Click Save to apply the settings when you are done with your changes.
Firmware
Current Firmware Version
The current firmware's version will be displayed.
Check for New Firmware
Click this button to start checking for a new firmware version. If a new version is found, it will prompt you to install it.
Automatic Firmware Upgrade
Automatic Upgrade
If enabled, the DAP-1900 will automatically check for and upgrade to the latest firmware available.
Choose Upgrade Time You may set the DAP-1900 to automatically upgrade its firmware at a set time by enabling the function. Set the hour and minute for automatic upgrade every day.
Upgrade Manually
Upgrade Firmware If you wish to upgrade manually, first download the firmware file you wish to upgrade to. Next, click the Select File button to find the file and click Upload to install the new firmware.
Statistics
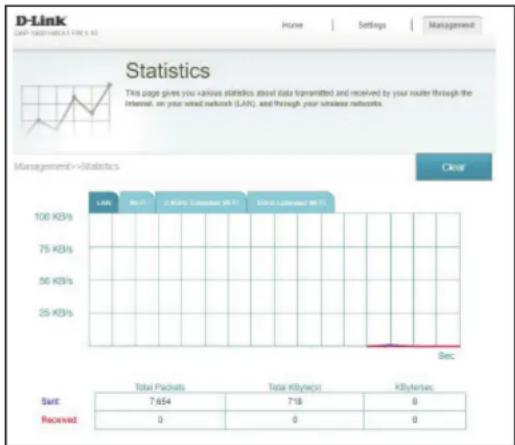
This page displays details about your wired and wireless connections. To access this page, click Management at the top of the page, then select Statistics. Click Clear to reset the statistics.
On the Statistics page you can view the amount of data that passes through the LAN and wireless interfaces on both 2.4 GHz and 5 GHz frequencies.
You can view traffic on different interfaces and radio channels: LAN, Wi-Fi, 2.4 GHz Extended Wi-Fi, and 5 GHz Extended Wi-Fi by clicking on the respective tabs at the top.
The traffic counter will reset if the device is rebooted.
line
Statistics This page gives you canvas statistics about data transmitted and received by your router through the Internet. On your virtual network (LAN), and through your wireless networks. Management=Statistics Clear LAN 80 KB/1 75 KB/1 75 KB/1 75 KB/1 75 KB/1 75 KB/1 75 KB/1 75 KB/1 75 KB/1 75 KB/1 75 KB/1 75 KB/1 75 KB/1 75 KB/1 75 KB/1 75 KB/1 75 KB/1 75 KB/1 Total Packets 7,654 Received 718 0 0 0 Total Kilbytes(ies) kKbytes/sec 0 0 0Wi-Fi Mesh Setup
D-Link's Wi-Fi Mesh is a scalable solution aiming to increase the coverage and eliminate weak spots of your wireless network. Expand your Wi-Fi coverage by adding compatible D-Link access points; mix and match suitable D-Link devices according to your budget and preferences to fit any floorplan. Setup is effortless and configuration of multiple access points can be done in minutes as settings can be passed on to other access points once the first access point is configured.
Wi-Fi Mesh intelligently finds the shortest/fastest path to your router. So even if you have eight mesh nodes, you can count on Wi-Fi Mesh to stream 4K content to your device with optimal signal strength and speeds. Wi-Fi Mesh can also automatically detect malfunctioning nodes and reroute the connection to your working mesh devices.
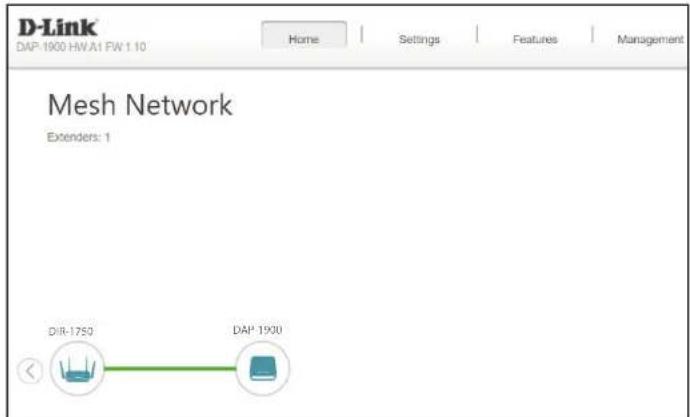
Once the mesh network has been established, you can refer to your Wi-Fi Mesh router's configuration settings to see your mesh topology report. The DAP-1900's home screen will show the firmware information for the DAP-1900. Functions for the DAP-1900 can be configured from the uplink router's configuration page. Refer to "Home - Connected to a Wi-Fi Mesh Router" on page 25 for more information.
Setup Using the D-Link Wi-Fi App
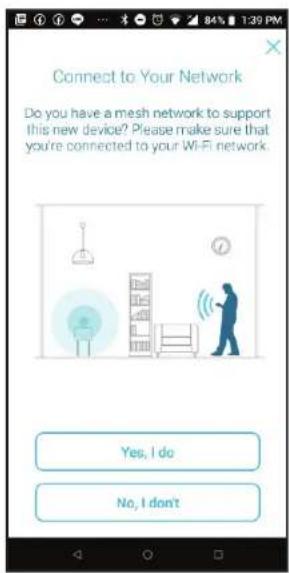
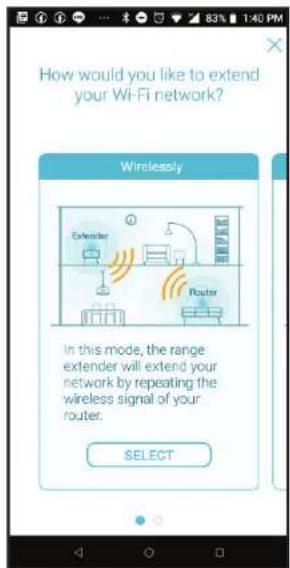
To utilize your DAP-1900 with a mesh network via a wireless connection, select "Wirelessly" as the setup option and follow the app's instructions to complete the setup. To set up using an Ethernet cable, refer to "Setup Using an Ethernet Cable" on the next page.
Setup Using an Ethernet Cable
Step 1
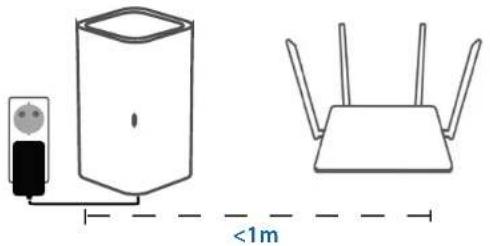
Connect and plug in the DAP-1900 close to your Wi-Fi Mesh router and wait for the LED light to blink orange.
natural_image
Diagram showing a device connected to a cylindrical tank and a wireless router, both with distance annotation <1m (no text or symbols on the devices themselves)Step 2
Use the Ethernet cable to connect the DAP-1900 to one of the LAN ports on the Wi-Fi Mesh router. The pairing process may take a few minutes. The Status LED of the DAP-1900 will turn solid white once it has finished pairing with your Wi-Fi Mesh router.
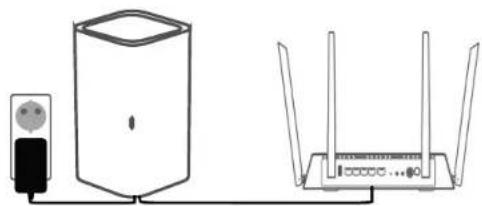
natural_image
Diagram of a portable electronic device connected to a wireless router (no text or symbols present)Step 3
Disconnect the Ethernet cable and unplug the extender. Place the extender anywhere between your router and the area where you want expanded wireless coverage.
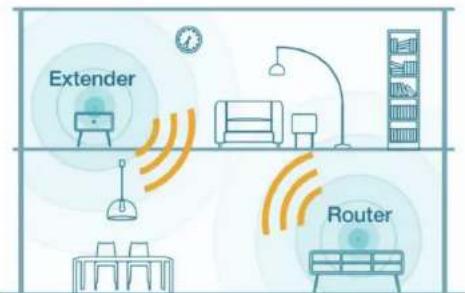
Connecting Wireless Clients to the Extender WPS Button
Once an uplink network has been established, you may use the DAP-1900's WPS function to add additional wireless clients to your extended network. Many wireless devices such as wireless routers, media players, printers, and cameras have a WPS button (or a software utility with WPS) that you can press to connect to the DAP-1900. Please refer to the user manual of the wireless device you want to connect to enable WPS. Follow the steps below for WPS connection setup:
Step 1 - Press the WPS button on the DAP-1900 for about 1 second. The Status LED on the device will start to blink.
Step 2 - Within 120 seconds, press the WPS button on your wireless device.
Step 3 - Allow up to 1 minute to configure. Once the LED light stops blinking and turns solid white, it indicates that the device is connected.
Note: If WPA3 Security Mode is used, the WPS function will be disabled. To enable or disable WPS, go to Settings > Extender and toggle the WPS-PBC Status slider at the bottom of the page.
Wi-Fi Protected Setup
WPS-PBC Status:
Enabled
Windows® 10
To join an existing network, locate the wireless network icon in the taskbar, next to the time display and click on it.
Clicking on this icon will display a list of wireless networks which are within range of your computer. Select the desired network by clicking on the SSID.
To connect to the SSID, click Connect.
To automatically connect with the router whenever your device detects the SSID, check the Connect Automatically check box.
You will then be prompted to enter the Wi-Fi password (network security key) for the wireless network. Enter the password into the box and click Next to connect to the network. Your computer will now automatically connect to this wireless network when it is detected.
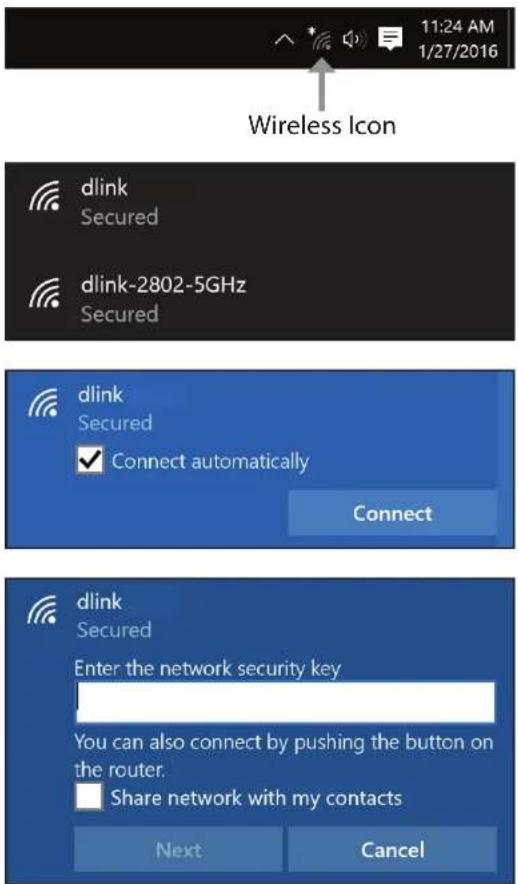
Windows® 8 - WPA/WPA2
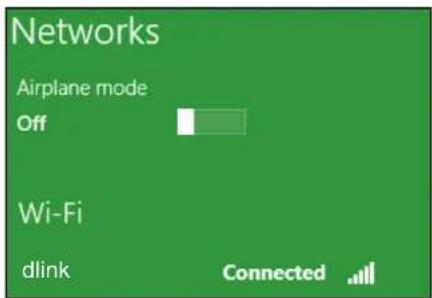
To join an existing network, locate the wireless network icon in the taskbar, next to the time display.
Clicking on this icon will display a list of wireless networks which are within connecting proximity of your computer. Select the extender's network by clicking on the network name.
You will then be prompted to enter the network security key (Wi-Fi password) for the wireless network. Enter the password into the box and click Next.
If you want to use Wi-Fi Protected Setup (WPS) to connect to the extender, you can also press the WPS button on your extender at this point to enable the WPS function.
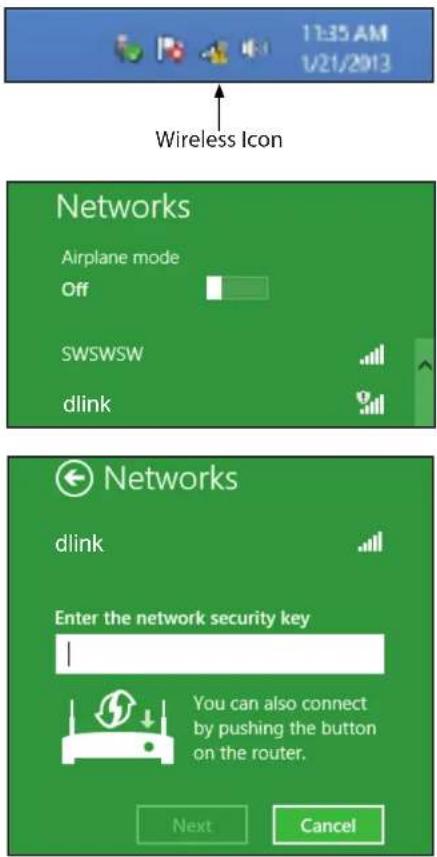
When you have established a successful connection with a wireless network, the word Connected will appear next to the name of the network that you are connected.
Troubleshooting
This chapter provides solutions to problems that might occur during the installation and operation of the DAP-1900. Read the following descriptions if you are having problems.
1. Why can't I access the web-based configuration utility?
When entering the IP address of the DAP-1900 High Performance Mesh Wi-Fi Range Extender (dlinkapxxxx.local.), your device should be in the same network as the extender.
- Make sure you have an updated Java-enabled web browser. We recommend the following:
- Internet Explorer ^ 10 or later
- Firefox® 28 or later
-
Safari® 6.0 or later
• Google Chrome™ 28 or later -
If you have an active wired LAN Ethernet connection, try temporarily unplugging the Ethernet cable from the computer you are using to eliminate possible conflicts from having two simultaneous connections on the same computer.
-
Disable any Internet security software running on the computer. Software firewalls such as ZoneAlarm, BlackICE, Sygate, Norton Personal Firewall, and Windows XP firewall may block access to the configuration pages. Check the help files included with your firewall software for more information on the operation.
-
Access the web management interface. Open your web browser and enter the address of your extender (http://dlinkapxxxx.local) in the address bar. This should open the login page for web management. If the DAP-1900 is connected to an uplink router, you can try accessing the web interface using a client IP address assigned from the uplink router.
- If you still cannot access the configuration, unplug the extender from the power outlet for at least 10 seconds and plug it back in. Wait about 30 seconds and try accessing the configuration. If you have multiple computers, try connecting using a different computer.
2. What can I do if I forgot my password?
If you forgot your password, you must reset your extender. Unfortunately this process will change all your settings back to the factory defaults.
To reset the extender, locate the reset button (hole) on the side panel of the unit. When the extender is powered on, use a paperclip to press the button and then release it (the Status LED should turn red). The extender will go through its reboot process (the LED remains red). Wait about 30 seconds to access the extender and you will be required to go through the initial setup again. Refer to Wireless Setup Wizard on page 15.
Appendix A - Wireless Basics
Wireless Basics
D-Link wireless products are based on industry standards to provide easy-to-use and compatible high-speed wireless connectivity within your home, business or public access wireless networks. Strictly adhering to the IEEE standard, D-Link wireless products allow you to securely and conveniently access your network. You will be able to enjoy the freedom that wireless networking delivers.
A wireless local area network (WLAN) is a cellular computer network that transmits and receives data with radio signals instead of wires. Wireless LANs are used increasingly in both home and office environments, and public areas such as airports, coffee shops and universities. Innovative ways to utilize WLAN technology are helping people to work and communicate more efficiently. Increased mobility and the absence of cabling and other fixed infrastructure have proven to be beneficial for many users.
Wireless users can use the same applications they use on a wired network. Wireless adapters used on laptop and desktop systems support the same protocols as Ethernet adapter cards.
Under many circumstances, it may be desirable for mobile network devices to link to a conventional Ethernet LAN in order to use servers, printers or an Internet connection supplied through the wired LAN. A wireless router is a device used to provide this link.
Tips
Here are a few things to keep in mind when you are installing your DAP-1900 AC1900 High Performance Mesh Wi-Fi Range Extender.
Centralize the extender's location
For best performance, make sure you place the extender in a centralized location within your desired usage area. Try to place the extender so that there are minimal obstructions between it and the uplink router. If possible, use an elevated power outlet, so the signal can be dispersed more easily. If you have a large home or usage area, you may need several extenders in order to achieve optimal coverage.
Eliminate Interference
Place home appliances such as cordless telephones, microwaves, and televisions as far away as possible from the extender. This can significantly reduce any interference that the appliances might cause since they operate on the same frequency.
Security
Don't let your neighbors or intruders connect to your wireless network. Secure your wireless network by utilizing the Wi-Fi Protected Access security feature on the extender and uplink router. Refer to the relevant sections of this manual for further details.
Technical Specifications
Standards
- IEEE 802.11ac
- IEEE 802.11a
- IEEE 802.11n
• IEEE 802.11g - IEEE 802.11b
- IEEE 802.3u
- IEEE 802.3ab
- IEEE 802.11k/v
Wireless Frequency Range ^1
• 2.4 GHz to 2.4835 GHz
• 5.18 GHz to 5.85 GHz
Device Interfaces
• 802.11ac/n/g/b/a Wireless LAN
• 10/100/1000 Ethernet Port
- Reset Button
- WPS Button
- Power Button
Wireless Security
- Wi-Fi Protected Access (WPA/WPA2/WPA3)
• Wi-Fi Protected Setup (WPS)
Advanced Features
• D-Link Wi-Fi setup app
- Compatible with D-Link Wi-Fi Mesh routers
Device Management
- Web UI
• Supports D-Link Wi-Fi Mobile App for compatible iOS and Android Mobile Devices - Firmware Over the Air Update(FOTA)
Diagnostic LEDs
• Power/Status indicator
Operating Temperature
- 0 to 40^ C (32 to 104^ F )
Storage Temperature
• Storage: -20 to 65 °C (-4 to 149 °F)
Operating Humidity
• 10% to 90% non-condensing
Storage Humidity
• 5% to 95% non-condensing
Power Input
• 100 to 240 V AC, 50/60 Hz
Power Output
• 12V, 1.5A
Dimensions
- 100 x 100 x 181 mm (3.9 x 3.9 x 7.1 in)
Weight
• 408 grams (0.9 pounds)
Certifications
• FCC
• IC
• CE
• UL
• CB
- RCM
GPL Code Statement
This D-Link product includes software code developed by third parties, including software code subject to the GNU General Public License ("GPL") or GNU Lesser General Public License ("LGPL"). As applicable, the terms of the GPL and LGPL, and information on obtaining access to the GPL code and LGPL code used in this product, are available to view the full GPL Code Statement at:
The GPL code and LGPL code used in this product is distributed WITHOUT ANY WARRANTY and is subject to the copyrights of one or more authors. For details, see the GPL code and the LGPL code for this product and the terms of the GPL and LGPL.
Written Offer for GPL and LGPL Source Code
Where such specific license terms entitle you to the source code of such software, D-Link will provide upon written request via email and/or traditional paper mail the applicable GPL and LGPLsource code files via CD-ROM for a nominal cost to cover shipping and media charges as allowed under the GPL and LGPL.
Please direct all inquiries to:
Email:
GPLCODE@dlink.com
Snail Mail:
Attn: GPLSOURCE REQUEST
D-Link Systems, Inc.
14420 Myford Road, Suite 100
Irvine, CA 92606
- User Manual
- Preface
- Manual Revisions
- Trademarks
- Table of Contents
- Preface......i
- Product Overview....1
- Installation....8
- Getting Started....10
- Configuration....22
- Wi-Fi Mesh Setup 38
- Connecting Wireless Clients to the Extender .....41
- Troubleshooting....45
- Wireless Basics....47
- Technical Specifications....49
- GPL Code Statement....50
- Regulatory Statements ......65
- Product Overview Package Contents
- System Requirements
- Introduction
- Features
- High Speed Wireless Performance with Wireless 802.11ac Technology
- Compatibility
- Compact, Convenient Design
- Latest Wireless Network Security and Encryption
- Extend and Customize Your Wireless AC Network with D-Link Wi-Fi Mesh
- Easy to Set Up and Use
- What is a Wireless Extender?
- Hardware Overview LED Status Indicator
- Bottom of the Device
- Installation Wireless Installation Considerations
- Hardware Setup
- Getting Started
- WPS-PBC Configuration
- Step 1 - Initiate WPS Mode
- Step 2 - Connecting Devices to the DAP-1900
- - (Your router's SSID)-EXT
- D-Link Wi-Fi App Setup
- Step 1
- Step 2
- Step 3
- Section 3 - Configuration
- Step 4
- Step 5
- Step 6
- Wireless Setup Wizard
- Access Point Mode Settings
- Configuration Home
- Home - Connected to a Wi-Fi Mesh Router
- Settings Extender Settings
- Existing Network
- Wi-Fi - Existing Network
- Scan
- Smart Connect
- Extended Wi-Fi - Smart Connect Enabled
- Wireless - Smart Connect Disabled
- GHz Extended Wi-Fi
- Wireless - Smart Connect Disabled (Continued)
- GHz Extended Wi-Fi
- Network Settings
- Advanced Settings
- IPv4
- My LAN Connection is
- Gateway Address
- IPv6 - Autoconfiguration (SLAAC/DHCPv6)
- IPv6 - Static IPv6
- IPv6 - Local Connectivity Only
- Management Time
- Time Configuration
- Automatic Time Configuration
- Admin
- System
- Upgrade
- Firmware
- Automatic Firmware Upgrade
- Upgrade Manually
- Statistics
- Wi-Fi Mesh Setup
- Setup Using the D-Link Wi-Fi App
- Setup Using an Ethernet Cable
- Connecting Wireless Clients to the Extender WPS Button
- Windows® 10
- Windows® 8 - WPA/WPA2
- Troubleshooting
- Why can't I access the web-based configuration utility?
- What can I do if I forgot my password?
- Wireless Basics
- Tips
- Centralize the extender's location
- Eliminate Interference
- Security
- Technical Specifications
- Standards
- Wireless Frequency Range 1
- Device Interfaces
- Wireless Security
- Advanced Features
- Device Management
- Diagnostic LEDs
- Operating Temperature
- Storage Temperature
- Operating Humidity
- Storage Humidity
- Power Input
- Power Output
- Dimensions
- Weight
- Certifications
- GPL Code Statement
- Written Offer for GPL and LGPL Source Code
- Email:
- Snail Mail:
Brand : D-LINK
Model : DAP-1900
Category : Wi-Fi repeater