DWP63BL - Dishwasher EDGESTAR - Free user manual and instructions
Find the device manual for free DWP63BL EDGESTAR in PDF.


| Product Type | Countertop Dishwasher |
| Model | DWP63BL, DWP63WH, DWP63SV |
| Color | Black / White / Silver |
| Dimensions (H x W x D) | 17-5/16" x 21-5/8" x 19-5/8" |
| Net Weight | 44.1 lbs |
| Voltage / Frequency | 120V AC / 60Hz |
| Current | 5.7A |
| Water Consumption (Normal Wash) | 2.85 gallons |
| Operating Temperature (Normal Wash) | 125°F |
| Max Water Temperature (Rinse Cycle) | 158°F |
| Number of Place Settings (AHAM / DOE) | 6 / 4 |
| Wash Cycles | 7 (Heavy, Normal, Light-ECO, Glass, Baby Care, Speed, Rinse) |
| Interior Material | Stainless Steel (430 SS) |
| Noise Level | 52 dB |
| Delay Start | 1-24 hours |
| Spray Arm Material | Plastic |
| Drain Pump | Yes |
| Maximum Vertical Lift (Drain) | 39" |
| Accessories Included | Quick Connect Adapter, Faucet Adapter, Drain Hose, Water Inlet Hose |
| Filter System | Coarse, Fine, Main filters |
| Power Cord | 3-prong grounding plug, 110-120V, 60Hz, 10A circuit minimum |
| Safety Features | Grounding, overflow protection, child lock (supervision required), hydrogen gas caution |
| Maintenance | Clean filters weekly, spray arms periodically, door seals; use vinegar for hard water |
| Warranty | 1 year parts, 90 days labor |
Frequently Asked Questions - DWP63BL EDGESTAR
User questions about DWP63BL EDGESTAR
0 question about this device. Answer the ones you know or ask your own.
Ask a new question about this device
Download the instructions for your Dishwasher in PDF format for free! Find your manual DWP63BL - EDGESTAR and take your electronic device back in hand. On this page are published all the documents necessary for the use of your device. DWP63BL by EDGESTAR.
USER MANUAL DWP63BL EDGESTAR
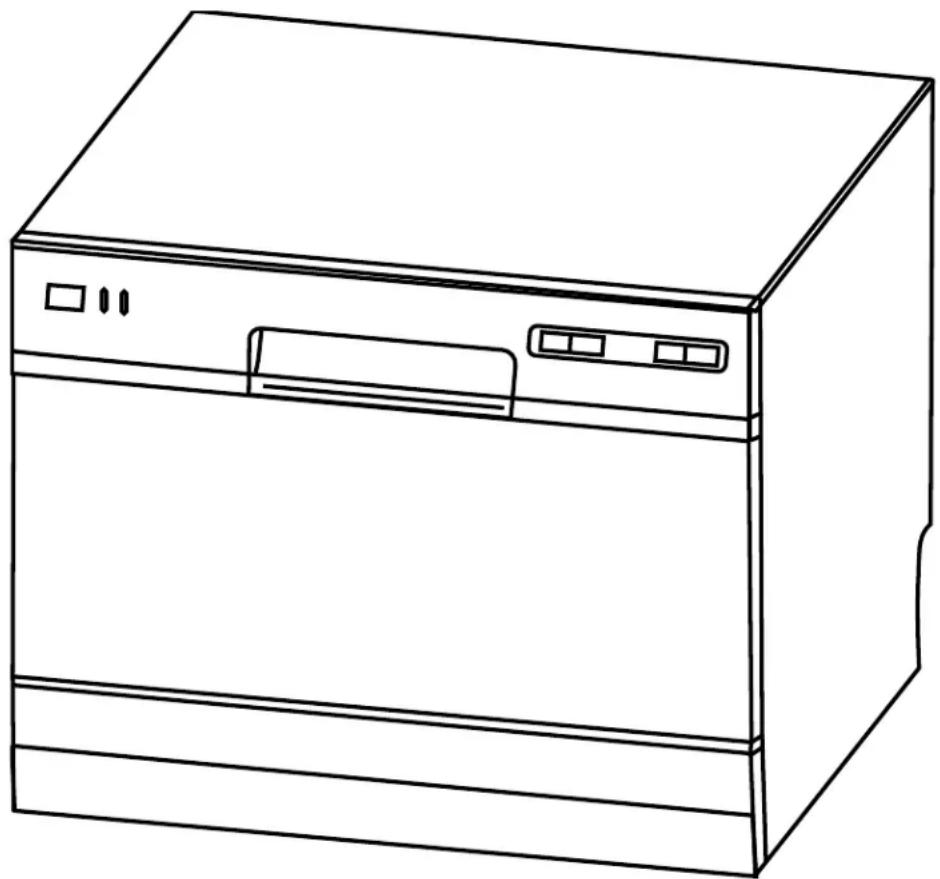
Countertop Dishwasher
natural_image
Line drawing of a kitchen appliance with front panel and side door (no text or symbols)DWP63BL / DWP63WH / DWP63SV
Owner's Manual
EDGESTAR ^®
Important Safety Information
Read all instructions carefully prior to use. For your safety, the information in this manual should be followed. Improper use and/or handling can cause serious damage to the appliance and/or to the user, including, but not limited to fire, explosion, and/or electric shock, resulting in personal injury, or death. This dishwasher is intended for domestic use only; any other use may invalidate the warranty.
Use this appliance only for its intended purpose as described in this Owner's Manual.

Electrical Safety
- Connect the dishwasher to a grounded, permanent electrical system.
- Improper connection of the equipment-grounding conductor can result in a risk of electric shock.
- Check with a qualified electrician or service representative if you are in doubt whether the appliance is properly grounded.
- Do not, under any circumstances, cut or remove the third (ground) prong from the power cord.
- Do not modify the power cord's length.
- If the power cord is damaged, it must be replaced by the manufacturer, a service agent, or a qualified technician.
- Use only the correct power supply with appropriate amperage. Do not exceed the suggested power ratings.
• To minimize the possibility of electric shock, disconnect this appliance from the power supply before attempting any maintenance. - Turning the dishwasher OFF does not disconnect the appliance from the power supply.
- If your dishwasher is connected to a wall switch, ensure the switch is ON prior to use.
- If you choose to turn the wall switch OFF between wash cycles on dishwashers with electronic controls, allow 5 - 10 seconds after turning the switch ON before touching the START/RESET button. This allows the control system to reboot.
- Do not start or stop the dishwasher by switching the circuit breaker's power on and off.
- Never plug or unplug the dishwasher with wet hands.

CAUTION: Hydrogen gas is flammable. Under certain conditions, hydrogen gas may be produced in a water heater that has not been used for more than two weeks. To prevent the possibility of damage and/or injury, turn on all hot water faucets and allow them to run for several minutes. Do this before using any electrical appliance connected to the hot water system. This simple procedure will release any built-up hydrogen gas. Since hydrogen gas is flammable, do not smoke, use an open flame, or use any appliance during this process.
EDGESTAR

General Safety
- This dishwasher should be properly installed and placed in a location in accordance with the Installation Instructions prior to operation.
- Do not attempt to repair or replace any part of your dishwasher unless it is specifically recommended in this manual.
- All other service maintenance should be completed by a qualified technician.
- Use this appliance only for its intended purpose as described in this Owner's Manual.
• This dishwasher must be installed indoors.
• This appliance is not intended for use by children. - Do not allow children to play with, on, or inside this or any appliance.
- Close supervision is necessary if this appliance is used near children.
- Use caution when opening or closing the door to avoid injury.
- Use only powder, liquid detergents, or rinse agents recommended for use in a dishwasher, and keep them out of the reach of children.
- Using a detergent that is not specifically designed for dishwashers may have an undesired result such as excessive suds.
• To avoid damage to the door seal, place sharp items strategically. - Load sharp knives handle-side up to reduce the risk of injury.
- Do not wash plastic unless it is marked as dishwasher safe. For plastic items not marked as dishwasher safe, refer to the manufacturer's recommendations.
- Do not operate your dishwasher unless everything enclosed is securely in place.
- Do not tamper with controls.
- Do not sit or stand on the door or dish rack of the dishwasher.
- The door should remain closed. Left in the down position, the door presents a tripping hazard.
- Do not discard the dishwasher without removing the door.
- Do not store or use combustible materials such as gasoline or other flammable vapors and liquids in the vicinity of this or any other appliance.
- Contents washed in anti-bacterial mode (if available) may be hot to the touch. Use care before handling.
- Do not wash non-dishware items such as furnace filters, paint brushes, etc. in your dishwasher. Discoloration, staining, and/or other damage to dishwasher may result.
- Do not touch the heating element during or immediately after use.

Note: This owner's manual is provided for reference use only. Specifications may change without prior notice. Refer to the product label on the back of your dishwasher for the latest technical information.
EDGESTAR ^®
EDGESTAR
Table of Contents
Important Safety Information 2 Electrical Safety 2 General Safety 3
First Time Operating Instructions....5 Introduction....5
Parts Identification 6
Accessories 6
Back View 6
Preparing the Dishwasher for Use....7
Unpacking the Dishwasher....7 Installation Requirements....7
Clearance Requirements 7
Water Requirements 7
Water Pressure 7 Water Temperature
Water Temperature 7 Electrical Requirements 7
Connecting the Dishwasher....8
Disconnecting your Dishwasher 10
Operating Instructions
Control Panel Functions .... 1 Wash Cycles .... 4
Loading the Dishwasher....1
AHAM: Six (6) Place Settings 14
DOE: Four (4) Place Settings 16
Detergent and Rinse Aid Dispensers....1. Using the Procer Detergent 4
Using the Proper Detergent Amount of Detergent to Use
Detergent Dispenser 12
Rinse Aid Dispenser 18
Starting a Wash Cycle 19
Changing a Wash Cycle 20 Complating a Wash Curls 7
General Maintenance 2
Cleaning the Filter System....2
Removing the Filter System....2 Clearing the Dishwasher....2
Protecting the Dishwasher Against Freezing 2
Other Maintenance Suggestions 25
Error Codes 26
Troubleshooting 2
Specifications 29
First Time Operating Instructions
Before use, make sure all packaging labels and materials are removed from the unit. Be sure to keep track of all included parts and pieces before discarding the packaging materials. It is advised that you keep the original box and packaging materials in case you ever need to move or ship the appliance in the future.
Introduction
Thank you for purchasing this EdgeStar dishwasher. We hope that this purchase will be the beginning of a lasting and rewarding relationship between you and EdgeStar. We will provide the customer support and exemplary products necessary to nurture that relationship.
This manual contains important information regarding the proper installation, use, and maintenance of your dishwasher. Following this manual will ensure that your product will work at its peak performance and efficiency.
Please save the original product packaging in case you need to safely transport your dishwasher.
For Your Records:
Please write down the model number and serial number below for future reference. Both numbers are located on the ratings label on the back of your unit and are needed to obtain warranty service. You may also want to staple your receipt to this manual as it is the proof of your purchase, and is also needed for service under your warranty.
Model Number:
Serial Number:
Date of Purchase:
For a more efficient experience, please do the following before contacting customer service:
• If you received a damaged product, immediately contact the retailer or dealer that sold you the product.
- Read and follow this instruction manual carefully to help you install, use, and maintain your dishwasher.
- Read the troubleshooting section of this manual as it will help you diagnose and solve common issues.
- Visit us on the web at https://www.edgestar.com to register your product, download product guides, and access additional troubleshooting resources and up-to-date information. You can also find an interactive self-diagnostic tool at https://support.edgestar.com
- If you need warranty service, our friendly customer service representatives are available via email at:service@edgestar.com.
EDGESTAR
EDGESTAR
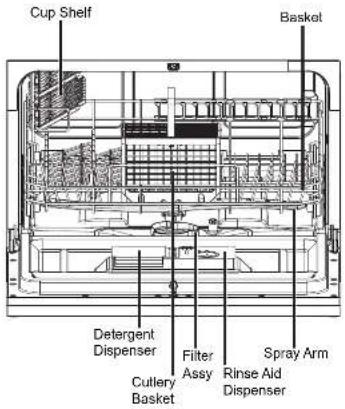
Parts Identification
Front View
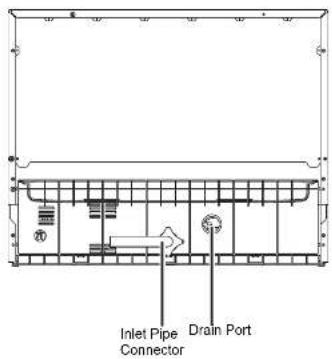
Back View
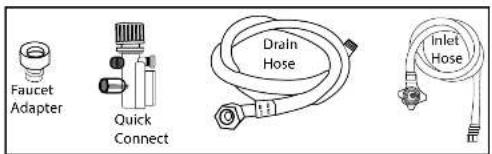
Accessories
Preparing the Dishwasher for Use
Unpacking the Dishwasher
Use at least two people to move and install the dishwasher to prevent back and other types of injuries. Carefully remove the packaging materials. Remove any shipping tape and glue from your dishwasher before using. Do not use sharp instruments, rubbing alcohol, flammable fluids, or abrasive cleaners to remove tape or glue. These products can damage the surface of your dishwasher. Check to make sure the parts necessary for installation are included. If any parts are missing, please contact our customer service. Put the dishwasher on a level and flat surface that is able to support the entire weight of the dishwasher fully loaded.
Installation Requirements
The dishwasher has been designed for a countertop installation. Please follow the instructions for clearance, water, and electrical requirements.
Clearance Requirements
The minimum height clearance required to install your dishwasher on a counter top surface with overhead cupboards is 17-3/4" (45cm).
Water Requirements
Make sure the water supply/faucet connection is within reach of the inlet and drain hose assembly (i.e. 22-3/4" / 58 cm). If your sink has a spray wand, it is recommended that the hose be disconnected and the hole plugged.
Water Pressure
For best results, incoming water pressure should be between 15 and 20 pounds per square inch (psi).
Water Temperature
For best results, the water temperature must be at least 120^ F ( 49^ C). To prevent damage to the dishwasher, the temperature of the incoming water supply should not exceed 140^ F ( 60^ C).

CAUTION: A hose that attaches to a spray wand can burst if it is installed on the same water line as the dishwasher.
Electrical Requirements
Read all safety precautions listed at the beginning of this manual. It is recommended that you use receptacles that cannot be turned off by a switch or pull chain.
Make sure there is an electrical supply (outlet) within reach of the electrical power supply cord.
The dishwasher is equipped with a power supply cord having a 3-prong grounding plug. To minimize possible shock hazard, the cord must be plugged into a mating 3-pronged and grounding-type wall receptacle providing 110-120V, 60Hz, grounded in accordance with the National Electrical Code and local codes and ordinances. If a mating wall receptacle is not available, it is the personal responsibility of the customer to have a properly grounded, 3-prong wall receptacle installed by a certified electrician. Use a circuit that is rated for at least 10 Amps.
EDGESTAR
EDGESTAR
Connecting the Dishwasher
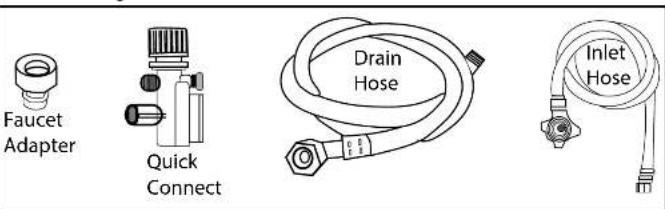
Your dishwasher comes equipped with a Faucet Adapter, Quick Connect, Drain Hose, and Inlet Hose. The Faucet Adapter must be installed on the faucet before you can connect the dishwasher. This adapter comes packaged inside your dishwasher.
The Faucet Adapter is compatible with faucets inclusive of either male (outside) or female (inside) threaded faucet connections.
- Screw the Faucet Adapter onto (or into) the faucet tap. Check for leaks (use Teflon or plumbers tape to eliminate any leaks if necessary).
- Connect the six-sided connection of the drain hose to the drain port connection on the back of the dishwasher cabinet. To avoid damage to threads, do not over-tighten.
- Connect the star-shaped connection of the inlet hose to the inlet port on the back of the dishwasher cabinet. Do not over-tighten.
- Connect the circular connection of the drain hose onto the longer (bottom) male connection on the Quick Connect.
- Connect the circular connection of the inlet hose onto the shorter (top) male connection on the Quick Connect.
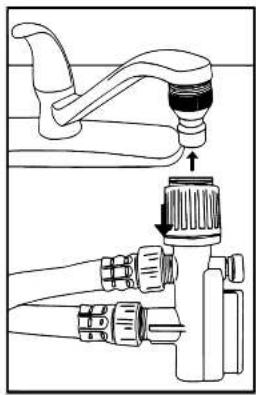
- Attach the Quick Connect assembly onto the Faucet Adapter, by pulling down the outer locking collar on the Quick Connect, while pushing the quick connect assembly upward onto the Faucet Adapter.
- Release the locking collar when the quick-connect assembly snaps onto the Faucet Adapter. Verify the connection is secure.
- Slowly open the hot water line and check for any sign of water leaks at all connections. If leaks are located, immediately close the water supply and repair the hose connections.
natural_image
Technical line drawing of a faucet and valve assembly (no text or symbols)If your existing Faucet Adapter is not compatible with the "quick connect" hose assembly supplied, then the following procedures should be followed:
- Connect the Faucet Adapter (included with dishwasher) to your faucet.
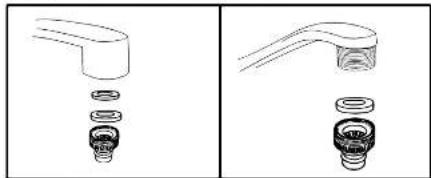
- If your faucet is inclusive of a 'female' type (threaded) connection, both rubber washers must be installed inside the faucet adapter.
- If your faucet is inclusive of a 'male' type (threaded) connection, use only the standard rubber washer (0.2"/5mm thick) supplied within the adapter. Remove the second rubber washer.
For Best Results
Your dishwasher cleans by spraying a mixture of clean hot water and detergent (under pressure) against the soiled surfaces of dishes. The water is pumped through a rotating spray arm, drained through a filter (removing food and soiled particles) and pumped back through the spray arm. Soiled water is pumped out and replaced with clean water at the end of each cycle (the number of times this is repeated depends on the wash cycle chosen)
Notes:

- Hard water conditions will adversely affect the washing performance of your dishwasher.
- Hard water conditions will also contribute to 'lime' (white film substance) deposits and/or 'scaling' on the stainless steel surface of the dishwasher tub and heater element, located in the sump underneath the removable filter screen. To assist in minimizing these conditions, it is recommended to periodically operate rinse the inside of the dishwasher (empty) using one (1) cup of white vinegar at least once a week.
EDGESTAR ^TM
EDGESTAR
Disconnecting your Dishwasher
- Close the hot water supply at the faucet.
- Disconnect the power supply cord.
- Remember to release the water pressure inside the inlet hose.
- The inlet hose is pressured when the water supply line is opened, even if closed immediately.
- To release pressure: press and hold the red pressure relief button on the quick connect assembly until the flow of water stops.
- Disconnect the quick-connect hose assembly by pulling down on the outer locking collar, releasing it from the faucet adapter.

CAUTION:
- Failure to relieve water pressure before disconnecting the quick connect assembly from the faucet adapter may result in back pressure overspray.
• The inlet water temperature can be EXTREMELY HOT. - Backpressure overspray could cause SEVERE bums and or scalding.
- Do NOT let children disconnect the dishwasher. Close supervision of children is always important around appliances.
Operating Instructions
To get the best performance from your dishwasher, read all operating instructions and follow the checklist below.
The following things should be checked before using the dishwasher.
• The dishwasher is level.
- The inlet valve is open.
• The hot water faucet is open.
• There are no leaks at the drain and inlet ports.
- The unit's power plug is connected to a grounded outlet.
• The power is switched on.
• There are no kinks in the drain and inlet hoses.
- All packing and printed materials are removed from the dishwasher.
Control Panel Functions
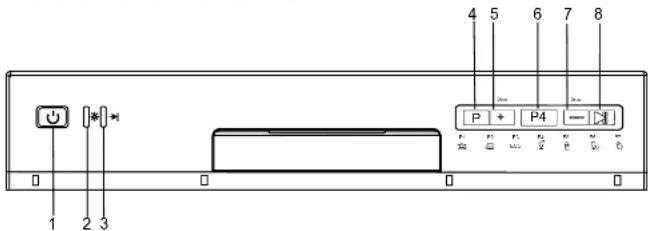
- Power Button: Press to turn the dishwasher ON/OFF.
- Rinse Aid Warning Light: Indicates when the rinse aid dispenser needs to be refilled.
-
Wash Cycle Complete Light: Indicates when the current wash cycle has ended.
-
Program Selector: Press to select your wash cycle. The wash cycles will display in sequence.
- Delay Button Increase: Press to increase the time of the delay by one (1) hour increments up to 24 hours. This establishes how much time will elapse before the selected wash cycle will begin.
- Display Screen: Shows the current dishwasher status (running or on delay) as well as the remaining run or delay time.
- Delay Button Decrease: Press to decrease the time of the delay by one (1) hour increments down to 0.
- Start/Pause Button: Press to start or pause the dishwasher wash cycle.
Wash Cycles
The sequential order of the wash cycles is as follows. Full wash cycle descriptions are provided on the next page.
P1. Heavy
P2. Normal
P3. Light-ECO
P4. Glass
P5. Baby Care and Bottles
P6. Speed
P7. Rinse
EDGESTAR
EDGESTAR
| PROGRAM | CYCLE SELECTION INFORMATION | DESCRIPTION OF CYCLE | DETERGENT | RUNNING TIME (MIN) | ENERGY (KWH) | WATER (gal) | RINSE AID |
| [204W]HeavyP1 | For the heaviest soiled loads, such as pots, pans, casserole dishes, and dishes that have been sitting with dried food on them for a while. | Pre-washPre-washWash (140°F)RinseRinseRinse (154°F)Drying | 15g/.50 oz 100 | 0.49 3.3 | ★ | ||
| [XXX5]NormalP2 | For normally soiled loads, such as pots, plates, glasses, and lightly soiled pans.Standard daily cycle. | Pre-washPre-washWash (116-126°F)RinseRinseRinseRinse (149°F)Drying | 15g/.50 oz 12Y | -159 0.38-0.42 | 1.7-3.8 | ★ | |
 Light-LED P3 Light-LED P3 | For lightly soiled loads, such as glasses, crystal, and fine china. | Pre-WashPre-WashWash (122°F)RinseRinse (140°F)Drying | 15g/.50 oz 75 | 0.32 2.8 | ★ | ||
| [2637]GlassP4 | For lightly soiled crockery and glass. | Pre-WashWash (122°F)RinseRinse (140°F)Drying | 15g/.50 oz 70 | 0.28 2.2 | ★ | ||
 Baby CareP5 Baby CareP5 | For lightly soiled loads, such as glasses, crystal, and fine china. Also great for baby bottles. | Pre-washPre-wash (122°F)Wash (131°F)RinseRinseRinse (156°F)Drying | 15g/.50 oz 90 | 0.51 3.4 | ★ | ||
 SPEED P6 SPEED P6 | A shorter wash for lightly soiled loads that do not need drying. | Pre-wash (113°F)Pre-wash (122°F)Wash (131°F)Rinse (131°F)Rinse (140°F) | 15g/.50 oz 45 | 0.31 2.8 | ★ | ||
 RINSEP7 RINSEP7 | Use for rinsing dishes, glasses and silverware that will not be washed right away. | Pre-washRinse | —— | 24 0.03 | 1.1 |

Loading the Dishwasher
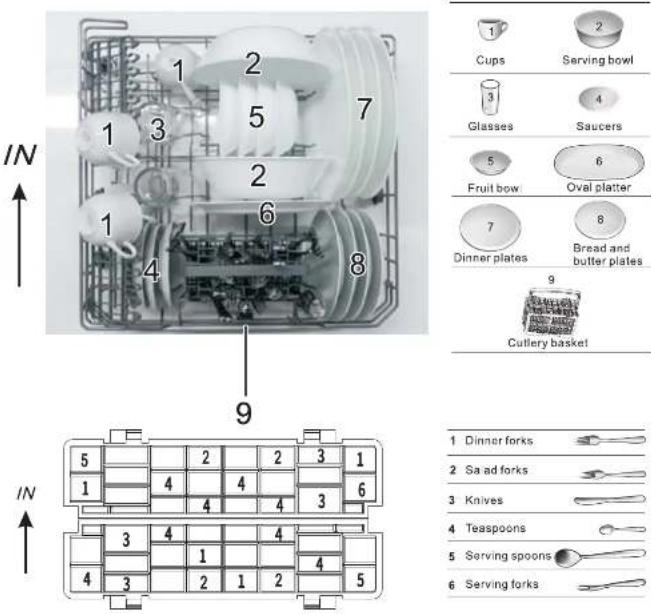
A properly loaded dishwasher is key for optimal performance. Overfilling the dishwasher can reduce the dishwasher's efficiency. Furthermore, improper placement of items can hinder the performance of the unit.
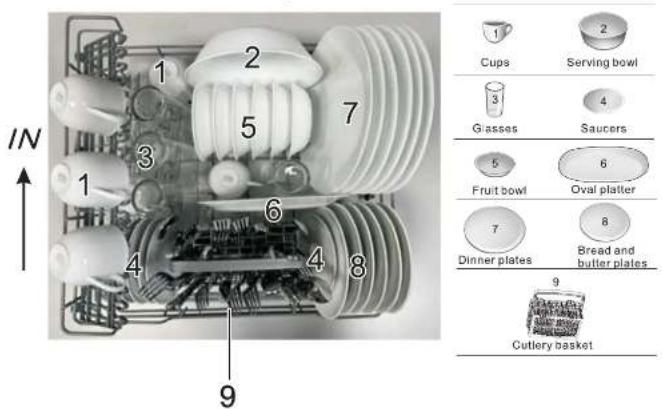
This unit is optimized for holding six (6) place settings including:
- Six (6) cups
- Three (3) glasses
- Six (6) bowls
- Six (6) large plates
- Six (6) small plates
- Six (6) saucers
- Two (2) serving dishes
- Six (6) sets of cutlery
For optimal performance:
- Load hollow items such as cups and glasses with the opening facing downwards so that water will not collect in the container.
- Be sure to secure dishes and utensils so items cannot be moved by sprayed water. Dishes and cutlery that shift in the wash cycle may hinder the spray arms from proper motion, resulting in poorly washed dishes.
-
Silverware should be placed in the basket with handles at the bottom, except for knives and other sharp objects that should be loaded with handles up.
-
If the silverware basket has side baskets, spoons should be loaded into individual slots.
• Make sure similar pieces of silverware do not nest together. - Long utensils should be placed horizontally in the basket or on the cup shelf.

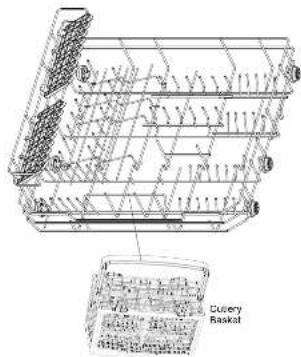
CAUTION: Do not let any item extend through the bottom of the silverware basket. This may prevent the spray arm from spinning.
EDGESTAR
AHAM: Six (6) Place Settings
natural_image
Technical line drawing of a multi-level industrial machine or container with internal structural framework (no text or symbols)Basket Plate Rack
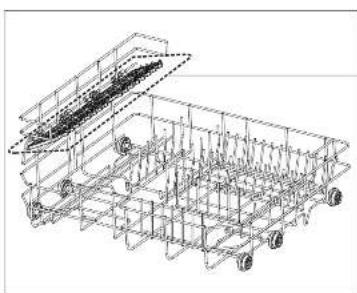
The basket is fitted with plate racks which can be stowed horizontally if required.
EDGESTAR
Cutlery Basket
Silverware should be placed in the basket with handles at the bottom, except for knives and other sharp objects that should be loaded with handles up.
- If the silverware basket has side baskets, spoons should be loaded into individual slots.
• Make sure similar pieces of silverware do not nest together. - Long utensils should be placed horizontally in the basket or on the cup shelf.
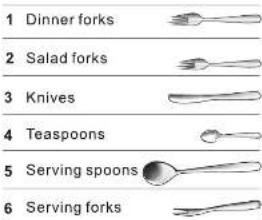

WARNING: Always load sharp utensils with the sharp point down.

CAUTION: Do not let any item extend through the bottom of the silverware basket. This may prevent the spray arm from spinning.
EDGESTAR
EDGESTAR
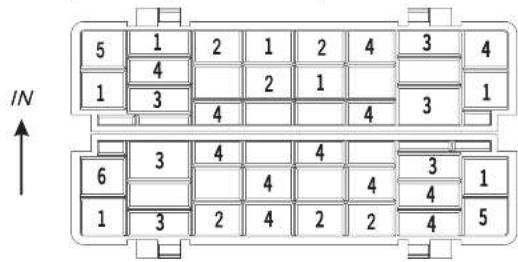
DOE: Four (4) Place Settings
Detergent and Rinse Aid Dispensers
Using the Proper Detergent
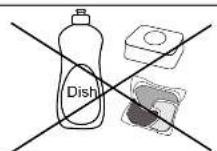
Only use detergent specifically made for use in dishwashers. Do not use dish soap or detergent pods or tabs. If using powder detergent, keep the detergent dry and do not put powder detergent into the dispenser until you are ready to wash dishes.
Using a detergent that is not specifically designed for dishwashers or using detergent pods and tabs will cause the dishwasher to fill with suds. During operation, these suds will spill out of the dishwasher vents and may cause an E4 error code.
While there may be no lasting damage to the dishwasher by using dishwashing detergent that is not formulated to work with dishwashers, your dishes may not get fully clean.

CAUTION: Do not use dish soap or detergent pods or tabs. This will cause the dishwasher to overflow.
Amount of Detergent to Use
The amount of detergent to use depends on whether your water is hard or soft. Generally, only one tablespoon (1/2 ounce) of detergent is needed for a normal wash load.
-With hard water, you may need extra detergent to remove deposits that are left by minerals.
-With soft water, less detergent is needed. Too much detergent with soft water can cause a permanent cloudiness of glassware, called etching.
To identify whether your water is hard or soft, contact your water department. A water softener is recommended for water that contains twelve or more grains. Without it, lime can build up in the water valve, which could stick while open and cause flooding.
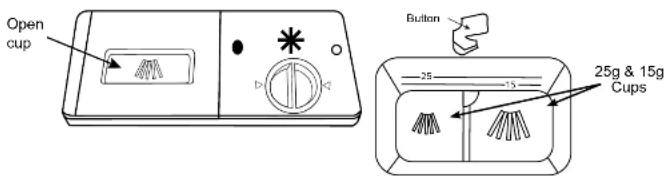
For heavily soiled loads, use the HEAVY (P1) wash cycle, fill one or both of the interior cups, depending on the hardness of your water, and also fill the open cup on the dispenser lid.
Use the information in the table below as a guideline to determine the amount of automatic dishwasher detergent to place in the dispenser:
| Number of Grains Detergent Cup(s) to Fill | |
| Less than 4 15 cup | |
| 4 to 8 25 cup | |
| 8 to 12 15 and 25 cups | |
| Greater than 12 15, 25, and the open cup |
EDGESTAR ^®
EDGESTAR
Detergent Dispenser
The dispenser must be refilled before the start of each wash cycle. Your dishwasher uses less detergent and rinse aid than a conventional dishwasher.
Always add powdered detergent just before starting the dishwasher, otherwise it could get damp and not dissolve properly during the wash cycle.
To Open the Wash Cover:
- Press the button and the wash cover will flip back, revealing the detergent dispensing cups.
Rinse Aid Dispenser
The rinse aid is released during the final rinse to remove spots, prevent new film build-up on dishes, glasses, flatware, cookware, and plastic, and improve drying time. Your dishwasher is designed to use liquid rinse aids. The rinse aid dispenser is located inside the door next to the detergent dispenser.
Filling the Dispenser
The rinse agent dispenser holds 3.5 oz. of rinse agent. Under normal conditions, this will last approximately one month. Try to keep it full, but do not overfill.
- Make sure the dishwasher door is fully open.
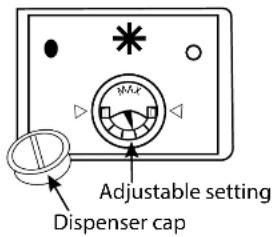
- Turn the dispenser cap counterclockwise and lift it out.
- Add rinse agent until the indicator window looks full.
- Clean up any spilled rinse agent with a damp cloth.
- Replace the dispenser cap and turn clockwise to lock into place.
Refilling the Dispenser
If the rinse aid dispenser needs to be refilled, the rinse aid warning light on the control panel (located on the front of your dishwasher) will turn on. The dispenser should be refilled before falling below 1/4 full, to ensure that rinse aid continues to be effective and to prevent streaking and spotting.
Rinse Aid Setting
The amount of rinse agent released into the final wash can be adjusted. The factory setting is at the midpoint. If there are rings of calcium (hard water) on dishes, try a higher setting.
To Adjust the Setting
Remove the dispenser cap. Then, turn the adjuster counterclockwise to increase the amount of rinse agent.

NOTE:
- Only use branded rinse aid for the dishwasher.
- Never fill the rinse aid dispenser with any other substances, such as liquid detergent.
Starting a Wash Cycle
Once the dishwasher is fully loaded follow these procedures to start the wash cycle:
- Ensure that the unit is connected to the power supply.
- Ensure that the water supply is turned on to full pressure.
- Add detergent.
- Verify that enough rinse aid is in the dispenser, if desired.
- Close the door and press the ON/OFF button to power the dishwasher on.
- Press the program button to select the desired wash cycle:
Heavy Normal Light Glass Baby Care Speed Rinse
- Press the +/- buttons to adjust the delay setting if desired.
- Press the START/PAUSE button, the dishwasher begins to start. If a delay time was selected, the dishwasher will start after the delay.
EDGESTAR ^®

NOTE: When the Start/Pause button is pressed during a wash cycle, the cycle is suspended and the display time will stop blinking. The program will remain paused until the Start/Pause button is pressed again to continue the cycle.
Changing a Wash Cycle
You can modify the washing cycle, but only when the dishwasher has been running for a short time. Otherwise, detergent may have been released, and the appliance may have already drained the water. If this is the case, the detergent dispenser must be refilled.

CAUTION:
- Opening the door during the wash cycle may result in injury from scalding hot water.
- Ensure that wash cycle has fully stopped before opening the door to refill the detergent dispenser if necessary
Pressing the START/PAUSE button for three (3) seconds or more will put the machine in a stand-by state. At this point the cycle setting can be changed.

NOTE: If the door is opened during the wash cycle, the machine will be paused. Once the door is closed, you need to press the Start/Pause button to continue the cycle.
Forgot to Add a Dish?
A dish can be added any time before the detergent dispenser opens.
- Press the START/PAUSE button.
- Open the door slightly, to stop the washing.
- You can open the door after the spray arms stop spinning.
- Add remaining dishes.
- Close the door.
- Press the START/PAUSE button. The dishwasher will restart after 10 seconds.
EDGESTAR
Completing a Wash Cycle
When the selected wash cycle has finished, the buzzer of the dishwasher will sound for eight (8) seconds.
Turn off the dishwasher using the ON/OFF button, shut off the water supply, and open the door carefully. Wait a few minutes before unloading the dishwasher to avoid handling the dishes and utensils while they are still hot.
Removing the Dishes
- Switch off the dishwasher by pressing the ON/OFF button.
- Tum off the water tap.
- Open the door carefully. Leave the door ajar and wait a few minutes before removing the dishes. This will allow the dishes to cool and assist in the drying process.
- Unload the dishwasher. It is normal for the dishwasher to be wet inside.

CAUTION:
- Opening the door during the wash cycle may result in injury from scalding hot water.
- Ensure that the dishwasher and water tap are off before opening the door to avoid potential injury
EDGESTAR
EDGESTAR
General Maintenance
Cleaning the Filter System
The filter system consists of a coarse filter, a main (flat) filter, and a micro (fine) filter.
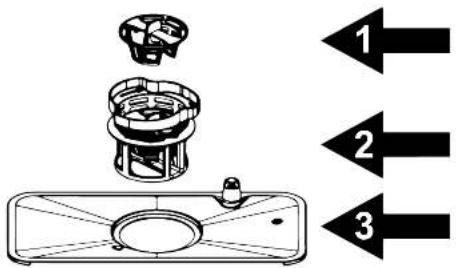
- Coarse filter:
Larger items, such as pieces of bone or glass that could block the drain are trapped in the coarse filter. To remove the items caught by the filter, gently squeeze the tab on the top of this filter and lift out.
- Fine filter:
This filter holds soil and food residue in the cylindrical base and prevents the soil from being redeposited on the dishes during wash cycle.
- Main filter:
Food and soil particles trapped by this filter are broken down by a special jet on the spray arm and washed down the drain.
The filter assembly – composed of the three filters above - efficiently removes food particles from the wash water, allowing it to be recycled during the cycle. For best performance and results, the filter assembly must be cleaned regularly. For this reason, it is a good idea to remove the larger food particles trapped in the filter after each wash cycle by rinsing the filter assembly under running water. Use a soft cleaning brush to clean the coarse filter and the fine filter.
Removing the Filter System
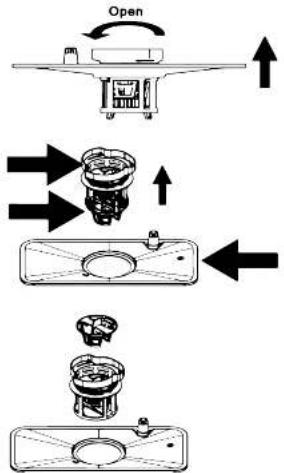
In order to remove the filter system for cleaning please follow these steps:
- Tum the entire filter system counterclockwise and then pull upward.
- Lift the coarse and fine filters out from the main filter.
- Gently squeeze the tab on the coarse filter to remove it from the fine filter.
Simply reverse this sequence to reinstall the filter system.
NOTE:
- Never run the dishwasher without the filter system in place.
- Improper replacement of the filter system or damaged filters may reduce the performance level of the dishwasher and/or damage dishes and utensils.
- Clean the entire filter system at least once a week when in use.
- Inspect the filters after each wash and remove any food remnants and clean under running water.
EDGESTAR
EDGESTAR
Cleaning the Dishwasher
The control panel can be cleaned by using a lightly dampened cloth. Dry thoroughly with a soft towel. Never use sharp objects, scouring pads, or harsh cleaners on any part of the dishwasher.
Cleaning the Door
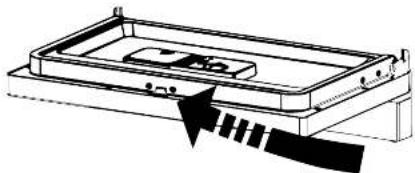
To clean the edge around the door, you should use only a soft warm damp cloth. To prevent water into the door lock or electrical components, do not use a liquid spray or cleaner of any kind.
natural_image
Diagram of a device with a rectangular panel and directional arrow indicating movement or force (no text or symbols)
NOTE: Abrasive agents or some paper towels may scratch or leave spots on the stainless steel interior surface.
Cleaning the Spray Arms
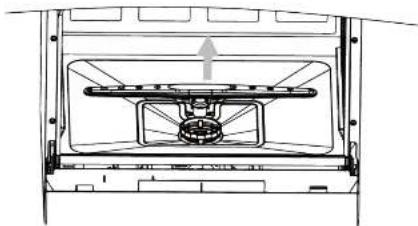
The spray arms can be removed for periodic cleaning of the nozzles to prevent possible clogging. Wash the spray arms under running water and carefully reinstall them making sure that the movement is in no way impeded. To remove, grasp the middle of the spray arm and pull it upwards. Reinstall the spray arm after cleaning and check that the arms turn freely.
natural_image
Technical line drawing of a mechanical component with an upward arrow indicating motion (no text or symbols)Protecting the Dishwasher Against Freezing
If there is a possibility the dishwasher could freeze due to a cold working environment, take the following steps after each washing cycle:
- Turn off the dishwasher.
- Turn off the water supply and disconnect the water inlet hose from the back of the unit.
- Drain the water from the inlet hose and inlet port. (Use a pan to catch the water.)
- Reconnect the water inlet hose to the inlet port.
- Remove the filter system and use a sponge to absorb the water that is in the filter (sump) area.
Other Maintenance Suggestions
In order to keep your dishwasher in good working order the following suggestions should be followed:
After Every Wash
Turn off the water supply to the appliance and leave the door slightly open so that moisture and odors are not trapped inside.
When Cleaning
Never use abrasive solvents when cleaning. Only use a dampened soft cloth with warm water. To remove spots or stains from the interior surface you may use a cloth dampened with water and a little white vinegar.
Cleaning the Door Seals
Food that remains trapped in the seals may cause odors to form. Periodic cleaning with a damp sponge will prevent this from occurring.
Clean the Filters Regularly
Cleaning the filters regularly will prevent clogs and odors from occurring.
Preparation for Storage
When preparing to put the dishwasher into storage, it is recommended that you run a wash cycle with the dishwasher empty. Disconnect the unit from power. Remove any water remaining in the sump area with a terry cloth or absorbent sponge. Turn off the water supply and leave the door of the appliance slightly open. This will help the door seals to last longer and prevent odors from forming inside the dishwasher.
If the Dishwasher Must be Moved
If the dishwasher must be moved, try to keep it in the upright position. Do not transport the unit on its side or upside down.
EDGESTAR
Items Not Suitable for Dishwasher Use:
• Cutlery with wooden, horn, china, or mother of pearl handles
- Plastic items that are not heat resistant
- Older cutlery with glued parts that are not heat resistant
• Bonded cutlery items or dishes
- Pewter or copper items
- Crystal glass
• Steel items subject to rusting
- Wooden platters
- Items made from synthetic fibers
• Silver and aluminum parts have a tendency to discolor during washing
- Glazed patterns may fade if machine washed
• Some types of glasses can become dull after a large number of washes
Error Codes
| Error Code Meaning Possible Causes | ||
| E1 Long water inlet time | The faucet may not be opened or the water pressure may be too low. The water inlet may also be kinked. | |
| E3 | Not reaching required temperature | Possible heating element malfunction. |
| E4 Overflow | Dishwasher may be leaking or overflowing because the wrong type of detergent or detergent pods are being used. | |
| Ed Circuit board error | There may be a break in the dishwasher's wiring / circuit. | |
EDGESTAR
Troubleshooting
Follow the troubleshooting guide below to resolve common issues:
| PROBLEM POSSIBLE CAUSES SOLUTION | ||
| Dishwasher does not start | Fuse is blown or circuit breaker is tripped | Replace fuse or reset circuit breaker. Remove any other appliances sharing the same circuit with the dishwasher. |
| Power Supply is not turned on | Ensure the dishwasher is turned on and the door is closed securely.Make sure the power cord is properly plugged into the wall socket. | |
| Dishwasher door is not properly closed | Close dishwasher, ensuring that the door latches. | |
| Water not pumped from dishwater | Kink in drain hose Check drain hose. | |
| Filler clogged Check coarse filter. | ||
| Kitchen sink clogged | Ensure kitchen sink is draining well. If sink is not draining, refer to a plumber. | |
| Suds in tub | Improper detergent | Use only the specified detergent. If improper detergent was used, open the dishwasher allowing suds to evaporate. Add one (1) gallon of cold water to the tub. Close and latch the door. Start the "RINSE" wash cycle to drain the water. Repeat if necessary. |
| Spilled rinse aid Always clean up rinse aid spills immediately. | ||
| Stained tub interior | Detergent used contained colorant | Do not use detergents with colorants. |
| White film on dishwasher interior surface | Hard water minerals | While wearing rubber gloves, use a damp sponge to clean the interior with dishwasher detergent.Never use any other cleaner to clean dishwasher. |
| Rust stains appear on cutlery | Items are not noncorrosive | Do not place non-dishwasher safe items in dishwasher. |
| Knocking noise inside of dishwasher | The spray arm is knocking against an item in the dish rack | Pause the wash cycle and rearrange the items which are obstructing the movement of the spray arm. |
| Rattling noise inside of dishwasher | Item is not securely placed in dish rack | Pause the wash cycle and secure the items in the dish rack. |
| Knocking noise in water pipes | Pipe cross-section may have problems | Contact a plumber. This is not related to the dishwasher. |
EDGESTAR
EDGESTAR
| PROBLEM POSSIBLE CAUSES SOLUTION | ||
| Black or gray marks on dishes | Utensils may have rubbed against dishes | Use a mild abrasive cleaner to eliminate marks. Load carefully. |
| Detergent left in dispenser cup | Dishes are blocking detergent cups | Re-load dishwasher according to instructions in this manual. |
| Dishes are not cleaned | Dishes were not loaded properly See notes on loading the dishwasher. | |
| The wash cycle was not powerful enough | Select a more intensive wash cycle. | |
| Not enough detergent was dispensed Use more or change brand of detergent. | ||
| Items are blocking the path of the spray arms | Rearrange the items so the spray arms can fully rotate. | |
| The filter combination in the base of the dishwasher is not clean or is installed Incorrectly | Clean and install the filter combination correctly. | |
| Cloudiness on glassware | Combination of too much detergent with soft water | Use less detergent and/or select the shortest wash cycle to clean glassware. |
| The filter may be dusty or blocked Clean the filter and replace it if needed. | ||
| The dishes are not dry | Improper loading Re-load dishwasher according to instructions. | |
| Not enough rinse aid Refill and For increase the amount of rinse aid. | ||
| Dishes are removed too soon | Do not remove dishes from dishwasher immediately. | |
| Wrong cycle selected | Short cycles have lower cleaning performance. Choose a more intensive cycle. | |
| Cullary has a low quality coating | Dishwasher is not suitable for low quality coating. | |
Specifications
| Dishwasher Type Portable / Countertop | |
| Model DWP63BL / DWP63WH / DWP63 | SV |
| Color Black / White / Silver | |
| Number of Place Settings 6 | |
| Maximum Diameter of place Settings 10.5" | |
| Wash Cycles 7 | |
| Accessories | Quick Connect AdapterFaucet AdapterDrain HoseWater Inlet Hose |
| Operating Temperature (Normal Wash) | 125°F |
| Max Water Temperature (Rinse Cycle) | 158°F |
| Water consumption (Normal Wash) | 2.85 gallons |
| Spray Arms | Plastic |
| Drain Pump Yes | Yes |
| Drain Pump Maximum Vertical Lift | 39" |
| Interior | Stainless Steel (430 SS) |
| Voltage / Frequency | 120V AC / 60Hz |
| Current | 5.7A |
| Delay Start | 1-24 Hour |
| Unit Dimensions (H x W x D) | 17-5/16" x 21-5/8" x 19-5/8" |
| Net Weight | 44.1 lbs. |
| Noise Level | 52 dB |
EDGESTAR ^®
One (1) Year Parts & Ninety (90) Days Labor
EdgeStar Limited Warranty
This product is warranted by EdgeStar to be free from defective workmanship and materials, subject to any conditions set forth as follows:
WHAT IS COVERED:
LABOR. For a period of NINETY (90) DAYS from the date of original purchase, labor will be performed free of charge at an authorized EdgeStar repair facility. At its option, EdgeStar will repair the product with new or remanufactured parts, or exchange the defective product with a new, refurbished, or remanufactured product. If a product is replaced, it will carry the remaining warranty of the original product. After the ninety (90) day period, EdgeStar will no longer be responsible for labor charges incurred. All defective products and parts covered by this warranty will be repaired or replaced on a mail-in basis to an EdgeStar authorized repair facility.
PARTS: For a period of ONE (1) YEAR from the date of original purchase, EdgeStar will supply new, rebuilt, or refurbished parts free of charge. EdgeStar may request a defective part be returned in exchange for the replacement part. All replacement parts or products will be now, remanufactured, or refurbished. All products and parts replaced by EdgeStar under warranty service become the property of EdgeStar.
This warranty applies to the original purchaser only, and only covers defects in workmanship experienced during operation of the product under normal service, maintenance, and usage conditions. This warranty applies to the purchase and use of this product in residential settings within the contiguous United States of America.
WHAT IS NOT COVERED:
The following limitations apply to the coverage of this warranty. This warranty does not cover:
– Labor charges for installation, setup or training to use the product.
- Shipping damage, and any damage caused by improper packaging for shipment to an authorized service center, and any damaged caused by improper voltage or any other misuse, including abnormal service, handling, or usage.
– Cosmetic damage such as scratches and dents.
- Normal wear and tear on parts or replacement of parts designed to be replaced, e.g. filters, cartridges, batteries.
– Service trips to deliver, pick-up, or repair, install the product, or to instruct in proper usage of the product.
- Damages or operating problems resulting from misuse, abuse, operation outside environmental specifications, uses contrary to instructions provided in the owner's manual accidents, acts of God, vermin, fire, flood, improper installation, unauthorized service, maintenance negligence, unauthorized installation or modification, or rental or commercial use.
– Labor, service transportation, and shipping charges incurred 91 days or more after the date of original purchase.
- The use of EdgeStar products in commercial or rental settings.
- Optional accessories, attachments, and appearance items.
- Products that have been modified to perform outside of specifications without the prior written permission of EdgeStar.
- Products lost in shipment, or theft.
– Products sold AS IS or from an unauthorized reseller.
– Products that have had their serial numbers removed or defaced. Products with serial numbers that have been invalidated.
– Damage to personal property from use of product.
- Replacement of repair of household fuses, circuit breakers, wiring, or plumbing.
OBTAINING WARRANTY SERVICE:
If you believe your product is defective, contact EdgeStar Customer Support for troubleshooting assistance and warranty service at www.edgestar.com or 1-866-319-5473. Before contacting EdgeStar, have your serial number and proof of purchase available. Once an EdgeStar authorized representative has confirmed that your product is defective and eligible for warranty service, the product must be returned to an EdgeStar repair facility. The purchaser is solely responsible for prepaying all shipping related costs to and from the repair facility. EdgeStar is not responsible for damage resulting from shipper mishandling or improper packaging. Do not return a defective product to the place of purchase. Products received without a return authorization number will be refused.
THIS WARRANTY IS IN LIEU OF ANY OTHER WARRANTY, EXPRESSED OR IMPLIED, INCLUDING WITHOUT LIMITATION, ANY WARRANTY OF MERCHANTABILITY OR FITNESS FOR A PARTICULAR PURPOSE. TO THE EXTENT ANY IMPLIED WARRANTY IS REQUIRED BY LAW, IT IS LIMITED IN DURATION TO THE EXPRESS WARRANTY PERIOD ABOVE. NEITHER THE MANUFACTURER NOR ITS DISTRIBUTORS SHALL BE LIABLE FOR ANY INCIDENTAL, CONSEQUENTIAL, INDIRECT, SPECIAL, OR PUNITIVE DAMAGES OF ANY NATURE, INCLUDING WITHOUT LIMITATION, LOST REVENUES OR PROFITS, OR ANY OTHER DAMAGE WHETHER BASED IN CONTRACT, TORT, OR OTHERWISE. IN NO EVENT AND UNDER NO CIRCUMSTANCE OF ANY TYPE OR KIND SHALL THE SELLER, MANUFACTURER AND/OR DISTRIBUTOR BE LIABLE FOR ANY REASON, UNDER ANY THEORY. FOR MORE THAN THE BASIC COST OF THE PRODUCT TO THE PURCHASER OR END USER. SOME STATES DO NOT ALLOW THE EXCLUSION OF INCIDENTAL OR CONSEQUENTIAL DAMAGES, SO THE ABOVE EXCLUSION MAY NOT APPLY TO YOU. THIS WARRANTY GIVES YOU SPECIFIC LEGAL RIGHTS. YOU MAY HAVE OTHER RIGHTS THAT VARY FROM STATE TO STATE.
EDGESTAR
EDGESTAR®
- Countertop Dishwasher
- DWP63BL / DWP63WH / DWP63SV
- Owner's Manual
- EDGESTAR ®
- Important Safety Information
- Electrical Safety
- EDGESTAR
- General Safety
- Table of Contents
- First Time Operating Instructions
- Introduction
- For Your Records:
- Preparing the Dishwasher for Use
- Unpacking the Dishwasher
- Installation Requirements
- Clearance Requirements
- Water Requirements
- Water Pressure
- Water Temperature
- Electrical Requirements
- Connecting the Dishwasher
- For Best Results
- Notes:
- EDGESTAR TM
- Disconnecting your Dishwasher
- CAUTION:
- Operating Instructions
- Wash Cycles
- Loading the Dishwasher
- Cutlery Basket
- Detergent and Rinse Aid Dispensers
- Using the Proper Detergent
- Amount of Detergent to Use
- Detergent Dispenser
- To Open the Wash Cover:
- Rinse Aid Dispenser
- Filling the Dispenser
- Refilling the Dispenser
- Rinse Aid Setting
- To Adjust the Setting
- NOTE:
- Starting a Wash Cycle
- Changing a Wash Cycle
- Forgot to Add a Dish?
- Completing a Wash Cycle
- Removing the Dishes
- General Maintenance
- Cleaning the Filter System
- Removing the Filter System
- Cleaning the Dishwasher
- Cleaning the Door
- Cleaning the Spray Arms
- Protecting the Dishwasher Against Freezing
- Other Maintenance Suggestions
- After Every Wash
- When Cleaning
- Cleaning the Door Seals
- Clean the Filters Regularly
- Preparation for Storage
- If the Dishwasher Must be Moved
- Items Not Suitable for Dishwasher Use:
- Troubleshooting
- EdgeStar Limited Warranty
- WHAT IS COVERED:
- WHAT IS NOT COVERED:
- OBTAINING WARRANTY SERVICE:
- EDGESTAR®
Brand : EDGESTAR
Model : DWP63BL
Category : Dishwasher