Deye

VSG-3 - Unknown Deye - Free user manual and instructions

Find the device manual for free VSG-3 Deye in PDF.

📄 13 pages English EN Download 💬 AI Question 10 questions ⚙️ Specs
Notice Deye VSG-3 - page 6
Pick your language and provide your email: we'll send you a specifically translated version.
Product Type Grid-Tied Solar Inverter
Model VSG-3
Rated Power 3000 W
Maximum Input Voltage (DC) 500 V
MPPT Voltage Range 120 V – 450 V
Number of MPPT Trackers 2
Nominal Output Voltage (AC) 230 V
Output Frequency 50/60 Hz
Maximum Efficiency 97.5%
Dimensions (W x H x D) 400 x 300 x 150 mm
Weight 15 kg
Protection Rating IP65
Cooling Method Natural Convection
Display LCD
Communication RS485, Wi-Fi (optional)
Safety Certifications IEC 62109, VDE-AR-N 4105
Operating Temperature Range -25°C to +60°C
Warranty 5 years (extendable to 10)
Mounting Wall
Input Connector MC4
Output Connector AC Terminal Block

Frequently Asked Questions - VSG-3 Deye

What is the recommended cable size for DC input?
For the Deye VSG-3, use 4 mm² to 6 mm² PV cables with MC4 connectors. Ensure proper polarity and secure connections.
How do I reset the inverter?
Press and hold the reset button on the side panel for 5 seconds. Alternatively, power cycle the unit by disconnecting AC and DC for 1 minute.
Can I monitor the inverter remotely?
Yes, the VSG-3 supports optional Wi-Fi dongle for monitoring via the Deye app. Connect to RS485 port for local monitoring.
What is the maximum number of solar panels I can connect?
With two MPPT trackers, each handling up to 3000W, you can connect up to 10 panels (300W each) per tracker, depending on voltage limits.
Does it work during a power outage?
No, the VSG-3 is a grid-tied inverter and will shut down during grid outage for safety (anti-islanding). For backup, consider a hybrid or battery inverter.
How often should I clean the inverter?
Clean the exterior with a soft dry cloth every 6 months. Avoid water on electrical parts. Ensure vents are dust-free for proper cooling.
What error codes are common?
Common codes: E01 (Grid overvoltage), E04 (Isolation fault), E08 (Over temperature). Refer to manual for full list and troubleshooting.
Can I install the inverter outdoors?
Yes, the IP65 rating allows outdoor installation. Avoid direct sunlight and ensure adequate airflow. Mount on a wall with at least 20 cm clearance.
How do I update the firmware?
Firmware updates are done via the Deye Service Tool connected to the RS485 port. Download the latest firmware from Deye's website and follow instructions.
What is the warranty coverage?
Standard 5-year warranty covering manufacturing defects. Extended to 10 years upon registration. Excludes damage from improper installation or overvoltage.

User questions about VSG-3 Deye

0 question about this device. Answer the ones you know or ask your own.

Ask a new question about this device

The email remains private: it is only used to notify you if someone responds to your question.

No questions yet. Be the first to ask one.

Download the instructions for your Unknown in PDF format for free! Find your manual VSG-3 - Deye and take your electronic device back in hand. On this page are published all the documents necessary for the use of your device. VSG-3 by Deye.

USER MANUAL VSG-3 Deye

Installation/UserManual

Energy Collect Device(MECD) & Energy Monitoring Analysis(EMA)
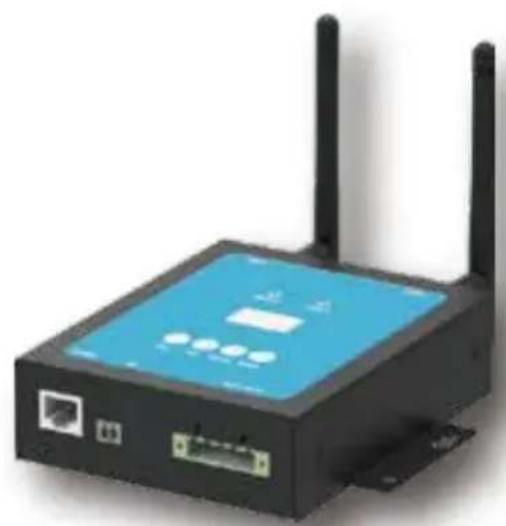
Deye VSG-3 - Energy Collect Device(MECD) & Energy Monitoring Analysis(EMA) - 1

natural_image Black wireless router with two black antennas and a blue display screen (no visible text or symbols)

Introduction

The MECD communications gateway collects and delivers modular performance data in real time, for comprehensive monitor and manage of your solar system, optimizing the performance of your solar system.

With built-in programmable DI, the MECD is able to control the microinverter connected shutdown immediately when the DI status is changed.

Features

User-friendly;

LCD display and buttons, easy operation;

Compact design and light in weight.

Capable

Built-in Zigbee, PLC and WIFI modular;

Compatible with single phase and three phase applications;

Enables remotely monitoring and management.

Safe

Support quick shutdown remotely for inverter;

Robust design, 3 years warranty.

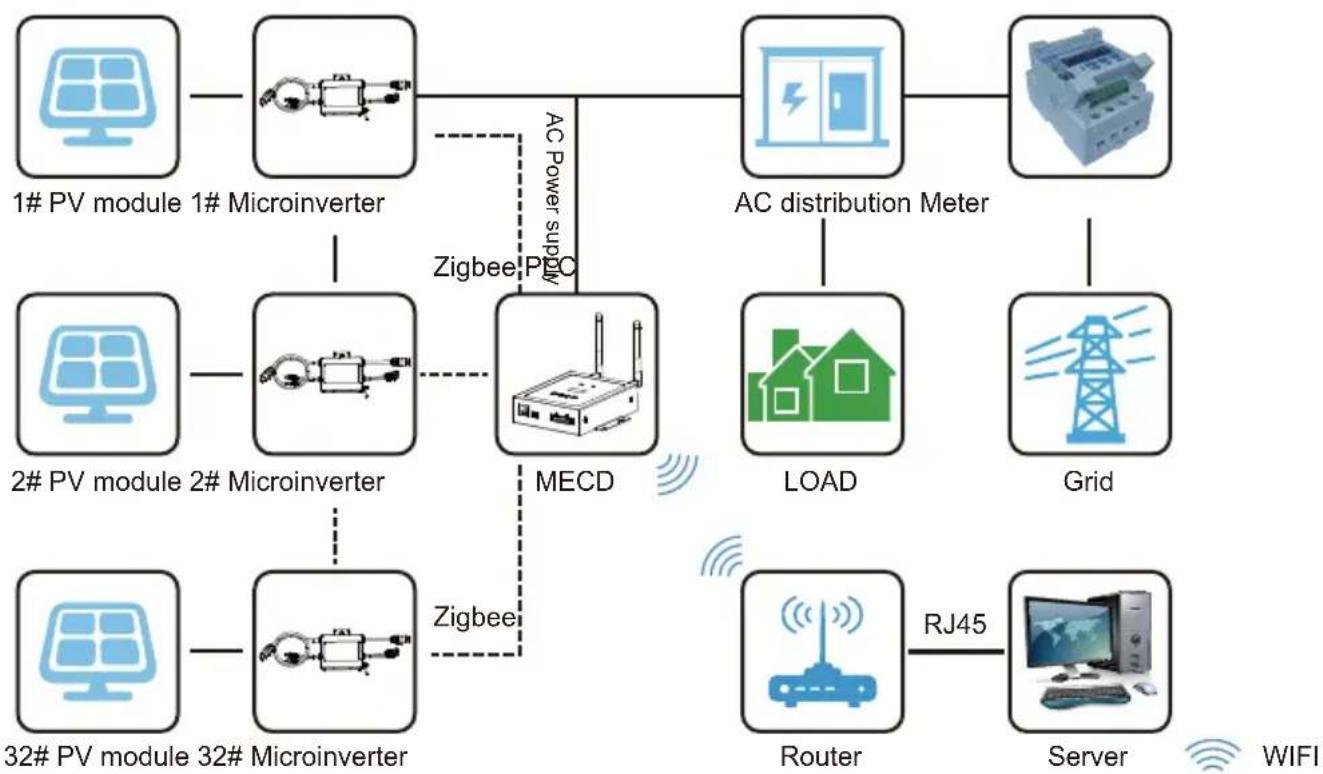
Application Diagram for Single Phase System(5#,10#,20#,32#Max)
Deye VSG-3 - Safe - 1

flowchart
graph TD
    A["1# PV module 1# Microinverter"] --> B["MECD"]
    C["2# PV module 2# Microinverter"] --> B
    D["32# PV module 32# Microinverter"] --> B
    B --> E["AC distribution Meter"]
    B --> F["Zigbee"]
    B --> G["Zigbee"]
    B --> H["AC Power Supply"]
    B --> I["Grid"]
    B --> J["Router"]
    B --> K["Server"]
    B --> L["RJ45"]
    style A fill:#f9f,stroke:#333
    style C fill:#f9f,stroke:#333
    style D fill:#f9f,stroke:#333
    style E fill:#ccf,stroke:#333
    style F fill:#ccf,stroke:#333
    style G fill:#ccf,stroke:#333
    style H fill:#ccf,stroke:#333
    style I fill:#ccf,stroke:#333
    style J fill:#ccf,stroke:#333
    style K fill:#ccf,stroke:#333
    style L fill:#ccf,stroke:#333

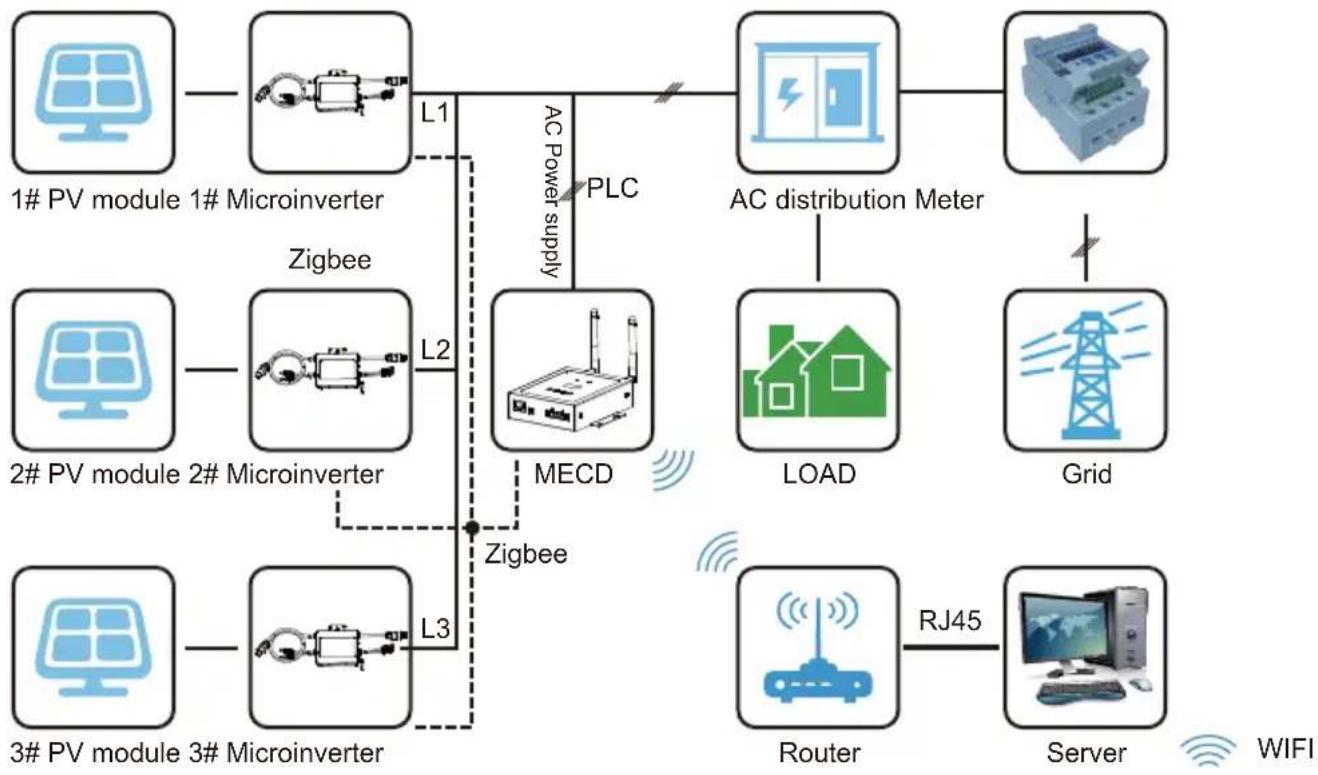
Application Diagram for Three Phase System
Deye VSG-3 - Safe - 2

flowchart
graph TD
    A["1# PV module 1# Microinverter"] -->|L1| B["Zigbee"]
    C["2# PV module 2# Microinverter"] -->|L2| D["Zigbee"]
    E["3# PV module 3# Microinverter"] -->|L3| F["Zigbee"]
    B --> G["MECD"]
    D --> G
    F --> G
    G --> H["PLC"]
    H --> I["AC Power supply"]
    I --> J["AC distribution Meter"]
    J --> K["LOAD"]
    K --> L["Grid"]
    L --> M["Router"]
    M --> N["RJ45"]
    N --> O["Server"]
    O --> P["WIFI"]
    style A fill:#cce5ff,stroke:#333
    style C fill:#cce5ff,stroke:#333
    style E fill:#cce5ff,stroke:#333
    style B fill:#cce5ff,stroke:#333
    style D fill:#cce5ff,stroke:#333
    style F fill:#cce5ff,stroke:#333
    style G fill:#cce5ff,stroke:#333
    style H fill:#cce5ff,stroke:#333
    style I fill:#cce5ff,stroke:#333
    style J fill:#cce5ff,stroke:#333
    style K fill:#cce5ff,stroke:#333
    style L fill:#cce5ff,stroke:#333
    style M fill:#cce5ff,stroke:#333
    style N fill:#cce5ff,stroke:#333
    style O fill:#cce5ff,stroke:#333
    style P fill:#cce5ff,stroke:#333

The maximum number of microinverters allowed for each branch depends on the model of the microinverter. And the total number of microinverses of the system is not allowed to exceed the maximum number of microinverter allowed of MECD.

Interface Explanation

Interface position

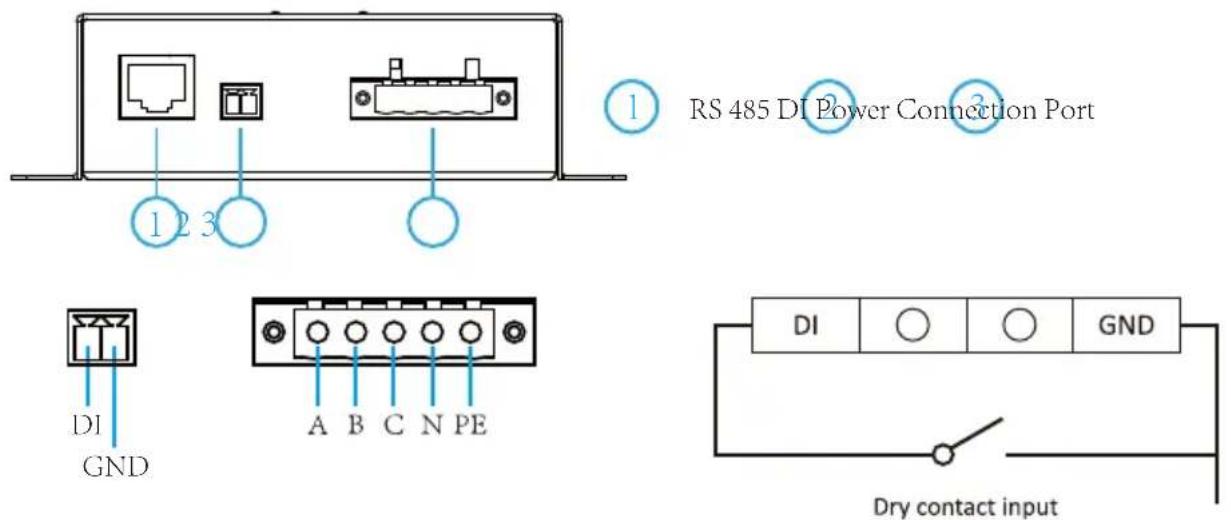
All of the MECD interface as below, from left to right, are Network port, DI and Power Connection Port.
RS 485 DI Power Connection Port DI GND A B C N PE DI GND Dry contact input

RS485: This port function is reserved.

DI: Digital input. When the DI status changed from 1 to 0, the MECD will send command to control the microinverter shutdown immediately via Zigbee or PLC.

Power connection port: L1, L2, L3, N, PE, connects power through the power line. Power cable included in the MECD package.

Preparation

Make sure you have the following things taken care of before attempting to install the ECD:

● A dedicated standard AC electrical outlet (located electrically as close to the array as is possible).
● A broadband Internet connection is available for your use.
● Wireless router is available for you use a laptop.
With a web browser (to view the EMA online monitoring application).
● A pre-programmed MECD.

Selecting an Installation Location for the MECD

● A location that is electrically as close to the array asis possible-preferably a dedicated outlet installed directly to the solar system sub-panel.
The ECD is not rated for outdoor use, so if installing outdoors near a junction box or breaker panel, making sure that you enclose it in an appropriate weather proof NEMA electrical box.
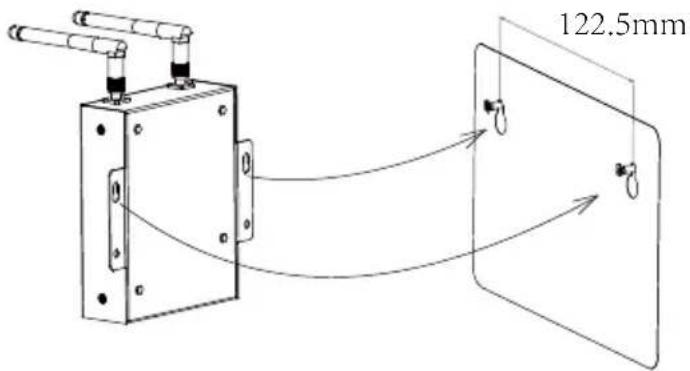
Using wall-mounted
When mounting the MECD on the wall, make sure to select a cool, dry, indoor location.
- Depending on the wall surface you are mounting the MECD, use either two #4 drywall screws or wall anchors, installed 122.5 mm apart. The drywall screws and wall anchors are NOT included in the MECD kit.
- Align and slide the MECD onto the mounting screws.
122.5mm

Connections

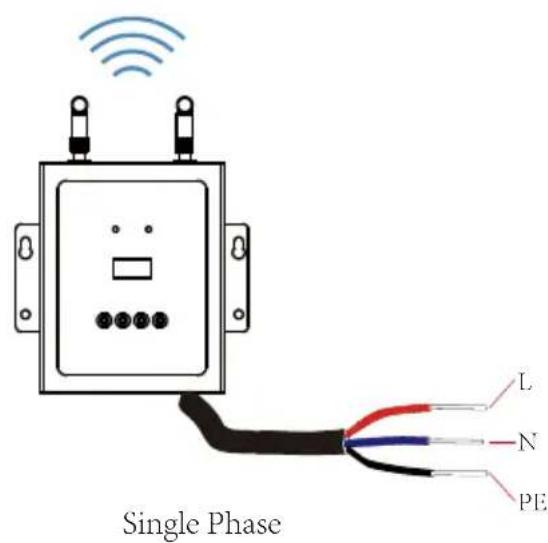
  1. Connect the power cable to the power connection port on the bottom of the ECD;
  2. Config the wifi device with your home router.

Single phase / Three phase PLC/ZIGBEE type MECD wifi connection
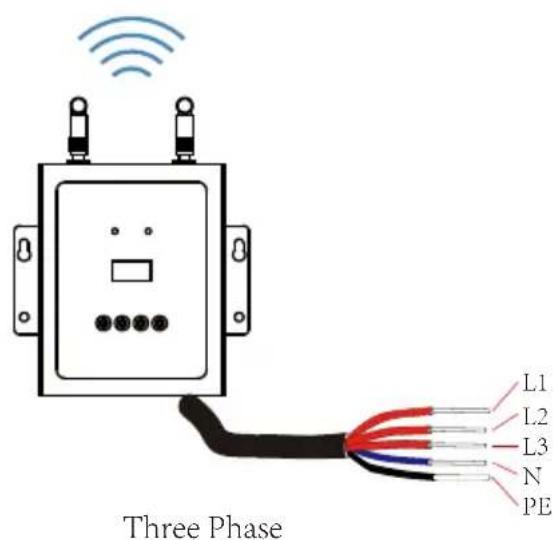
Three Phase L1 L2 L3 N PE

Single Phase L N PE

MECD + WIFI Plug Setup Sequence

Once power is supplied to the ECD, it automatically steps into the main screens on its LCD display which including below details info.
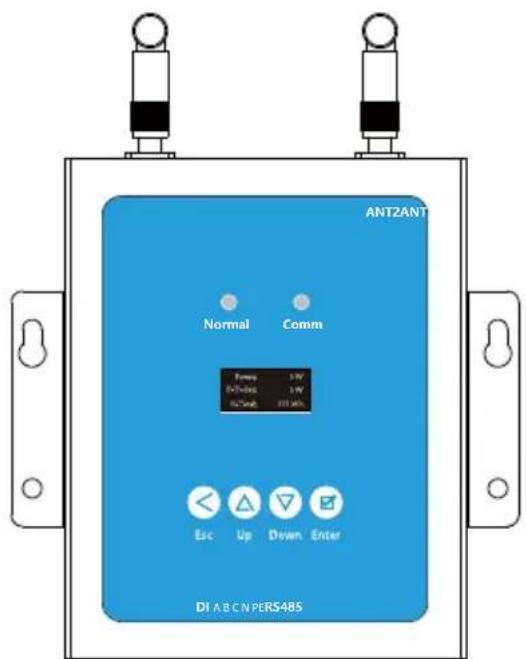
ANT2ANT Normal Comm Ecoa 1kV B+70ms 1kV TC+mb 100 kA Etc Up Divan Enter DI A B C N PERS485

Buttons Name Functions
Deye VSG-3 - MECD + WIFI Plug Setup Sequence - 2EscReturn buttonAllows you to return to the last page or end an operation.
Deye VSG-3 - MECD + WIFI Plug Setup Sequence - 3UpCursor Up buttonAllows you to go to the upper-level menu or set parameters.
Deye VSG-3 - MECD + WIFI Plug Setup Sequence - 4DownCursor Down buttonAllows you to go to the lower-level menu or set parameters.
Deye VSG-3 - MECD + WIFI Plug Setup Sequence - 5EnterConfirm buttonAllows you to go to the menu or confirm the value.

MECD LED indications

There are two indicators of the MECD. The following description will tell how it works.

Indicator Status Meaning
Normal indicator(left LED)Steady blueAll inverters connected works normal
OffAll inverters connected has alarms
Blinking blueSome inverters connected has alarms
Comm indicator(right LED)Steady blueAll inverters connected communication successfully
OffAll inverters connected communication failed
BlinkingSome inverters communication failed

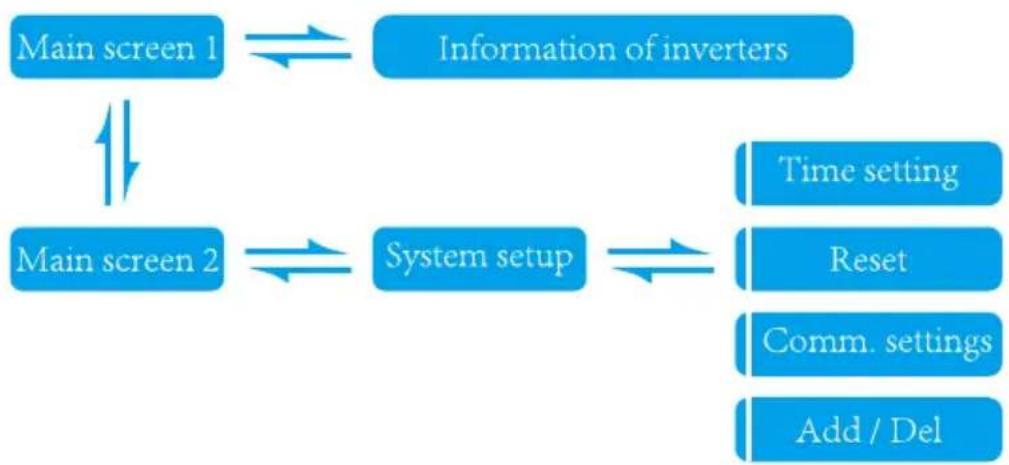
MECD LCD operation flow chart
Deye VSG-3 - MECD LED indications - 1

flowchart
graph TD
    A["Main screen 1"] --> B["Information of inverters"]
    C["Main screen 2"] --> D["System setup"]
    B --> D
    D --> E["Time setting"]
    D --> F["Reset"]
    D --> G["Comm. settings"]
    D --> H["Add / Del"]

Information on the LCD home page

Power:0 W
E-Today:0 W
E-Total:572 Wh

MECD main interface 1:

1: Output power;
2: Today's total power generation;
3: Total power generation of microinverters connected.
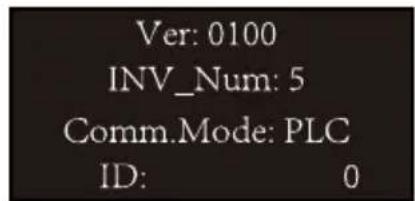
Ver: 0100 INV_Num: 5 Comm.Mode: PLC ID: 0

MECD main interface 2:

1: version information.
2: Number of connected inverters.
3: Communication method.
4: MECD Serial number.

Information of inverters
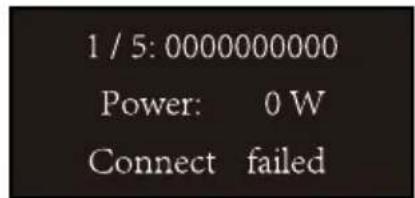
1 / 5: 0000000000 Power: 0 W Connect failed

1: Inverter ID currently connected;

2: Power generation;

3: Connection Status.

System setup
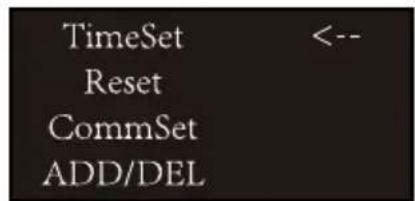
TimeSet Reset CommSet ADD/DEL <--

1: Time setting;
2: Reset;
3: Communication settings;
4: Add or Delete.

Time setting
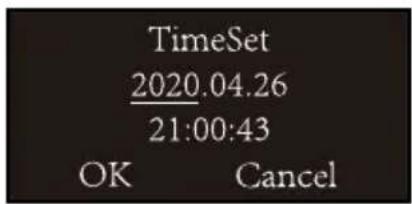
TimeSet 2020.04.26 21:00:43 OK Cancel

1: Time setting;

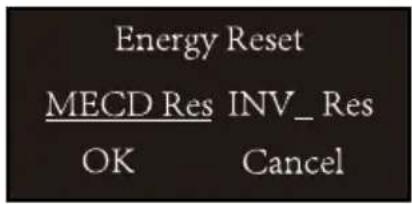
Reset

Energy Reset MECD Res INV_Res OK Cancel

1: MECD reset: reset to factory setting.
2: Inverter reset: clear all inverters information of MECD.

Communication settings
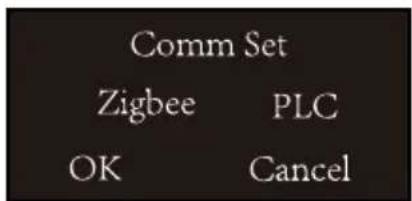
Comm Set Zigbee PLC OK Cancel

1: Zigbee or PLC communication method selection.

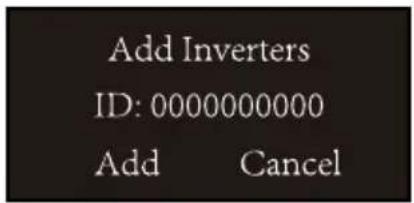
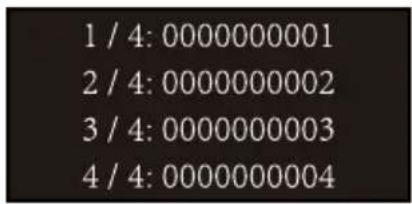
Add or delete inverter ID on ECD
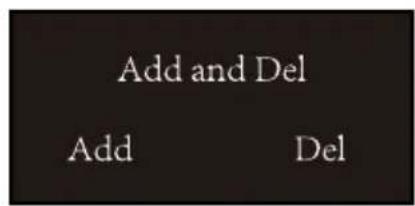
Add and Del Add Del

Add Inverters ID: 0000000000 Add Cancel

1 / 4: 0000000001 2 / 4: 0000000002 3 / 4: 0000000003 4 / 4: 0000000004

Monitoring Platform

The MECD has built-in WIFI modular which is able to connect router directly.

Web monitoring address: https://pro.solarmanpv.com; (for Solarman distributor account); https://home.solarmanpv.com (for Solarman end user account).

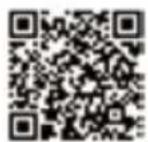
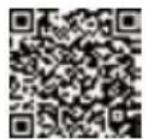
For mobile phone monitoring system, scan the below QR code to download the APP.

Or by searching “Solarman Business” in App store or Google Play store, and this app is for distributor account. Searching “Solarman Smart” in App store or Google Play store and choose “Solarman smart”, this app is for end user account.
Deye VSG-3 - Monitoring Platform - 1
SOLARMAN Smart for end user

Deye VSG-3 - Monitoring Platform - 2
SOLARMAN Business for business

3. Set WiFi connection on PC

Notice: The setting hereinafter is operated with Windows XP for reference only. If other operating systems are used, please follow the corresponding procedures.

  1. Prepare a computer or device with WiFi, e.g. tablet PC and smartphone with WiFi function.
  2. Obtain an IP address automatically.
  3. Set WiFi connection to the logger
    3.1 Open wireless network connection and click View

Wireless Networks
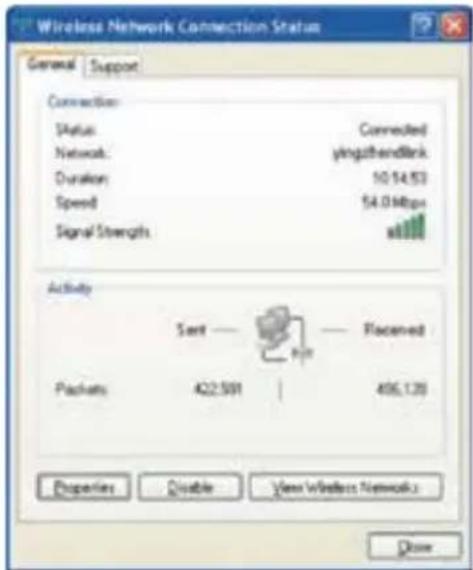
Wireless Network Connection Status General Support Connection Status Connected Network yingzhendlink Duration 10.14.53 Speed 54.0 Mbps Signal Strength Activity Send - - - Flaced Packets 422.599 | 406.128 Properties Enable View Wireless Network: Close

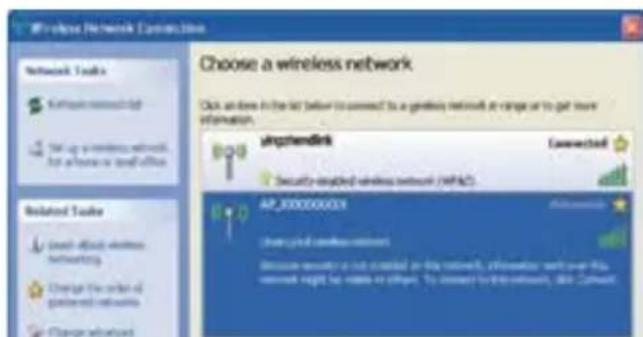
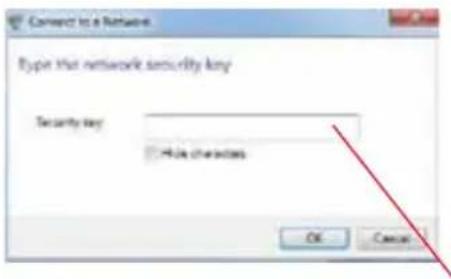
3.2 Select wireless network of the logger. The network name consists of AP and the serial number of the product. Input the password shown on the logger. Then click Connect.
Choose a wireless network Click an info in the list below to connect to a gateway network at range or to get more information. Unphendlink Connected Security-enabled wireless network (APAC) AP_000000000 Connected wireless network Because security is not created on this network, information will over the network might be made in other. To access by this network, AP-Cohort

Connect to a Network Type that network security key Security key ■ Make characters OK Cancel

Default password: 12345678

Notice: If AP_(serial number of product) is not available in the wireless network list, there may be problems in the connection or setting of logger. Please wait several minutes to refresh the list or plug in the logger again.

4. Set parameters of logger

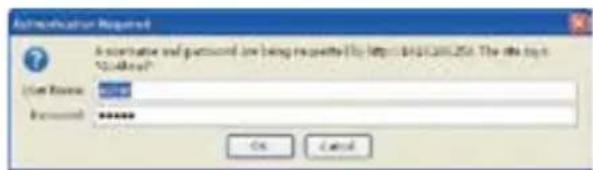
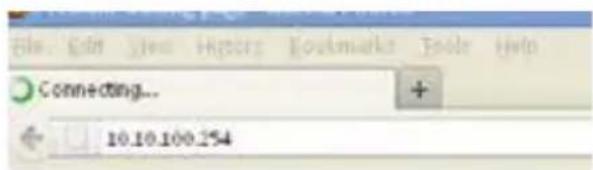
4.1 Open a web browser, and enter 10.10. 100.254, then fill in username and password, both of which are admin as default.

Recommended browsers: Internet Explorer 8+, Google Chrome 15+, Firefox 10+
Connecting... 10.10.100.254

Administration Required A certificate and password are being requested (http://813300256. The site is 1044967) User Name: Password: ****** OK Cancel

4.2 In the Status page, you can view general information of the logger.
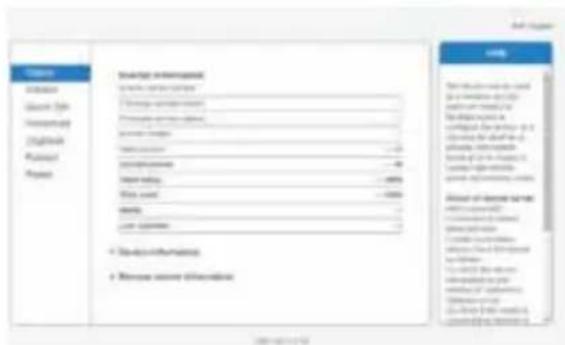
Table1 Database Search Style Resourceing English Printout Project Database information Search engine version Database version Formal version System design System name System name System name System name System name System name System name System name System name System name System name System name System name System name System name System name System name System name System name System name System name System name System name System name System name System name System name System name System name System name System name System name System name System name Database information Search engine version Database version Database name Database type: database Database size: 50000000000000000000000000000000000000000000000000000000000000000000000000000000000000000000000000000 About of database name: #1.1.1.1.1.1.1.1.1.1.1.1.1.1.1.1.1.1.1.1.1.1.1.1.1.1.1.1.1.1.1.1.1.1.1.1.1.1.1.1.1.1.1.1.1.1.1.1.1.1.1. 2. Data source: 3. Data source (e.g., data source) 4. Data source (e.g., data source) 5. Data source (e.g., data source) 6. Data source (e.g., data source) 7. Data source (e.g., data source) 8. Data source (e.g., data source) 9. Data source (e.g., data source) 10. Data source (e.g., data source) 11. Data source (e.g., data source) 12. Data source (e.g., data source) 13. Data source (e.g., data source) 14. Data source (e.g., data source) 15. Data source (e.g., data source) 16. Data source (e.g., data source) 17. Data source (e.g., data source) 18. Data source (e.g., data source) 19. Data source (e.g., data source) 20. Data source (e.g., data source) 21. Data source (e.g., data source) 22. Data source (e.g., data source) 23. Data source (e.g., data source) 24. Data source (e.g., data source) 25. Data source (e.g., data source) 26. Data source (e.g., data source) 27. Data source (e.g., data source) 28. Data source (e.g., data source) 29. Data source (e.g., data source) 30. Data source (e.g., data source) 31. Data source (e.g., data source) 32. Data source (e.g., data source) 33. Data source (e.g., data source) 34. Data source (e.g., data source) 35. Data source (e.g., data source) 36. Data source (e.g., data source) 37. Data source (e.g., data source) 38. Data source (e.g., data source) 39. Data source (e.g., data source) 40. Data source (e.g., data source) 41. Data source (e.g., data source) 42. Data source (e.g., data source) 43. Data source (e.g., data source) 44. Data source (e.g., data source) 45. Data source (e.g., data source) 46. Data source (e.g., data source) 47. Data source (e.g., data source) 48. Data source (e.g., data source) 49. Data source (e.g., data source) 50. Data source (e.g., data source) 51. Data source (e.g., data source) 52. Data source (e.g., data source) 53. Data source (e.g., data source) 54. Data source (e.g., data source) 55. Data source (e.g., data source) 56. Data source (e.g., data source) 57. Data source (e.g., data source) 58. Data source (e.g., data source) 59. Data source (e.g., data source) 60. Data source (e.g., data source) 61. Data source (e.g., data source) 62. Data source (e.g., data source) 63. Data source (e.g., data source) 64. Data source (e.g., data source) 65. Data source (e.g., data source) 66. Data source (e.g., data source) 67. Data source (e.g., data source) 68. Data source (e.g., data source) 69. Data source (e.g., data source) 70. Data source (e.g., data source) 71. Data source (e.g., data source) 72. Data source (e.g., data source) 73. Data source (e.g., data source) 74. Data source (e.g., data source) 75. Data source (e.g., data source) 76. Data source (e.g., data source) 77. Data source (e.g., data source) 78. Data source (e.g., data source) 79. Data source (e.g., data source) 80. Data source (e.g., data source) 81. Data source (e.g., data source) 82. Data source (e.g., data source) 83. Data source (e.g., data source) 84. Data source (e.g., data source) 85. Data source (e.g., data source) 86. Data source (e.g., data source) 87. Data source (e.g., data source) 88. Data source (e.g., data source) 89. Data source (e.g., data source) 90. Data source (e.g., data source) 91. Data source (e.g., data source) 92. Data source (e.g., data source) 93. Data source (e.g., data source) 94. Data source (e.g., data source) 95. Data source (e.g., data source) 96. Data source (e.g., data source) 97. Data source (e.g., data source) 98. Data source (e.g., data source) 99. Data source (e.g., data source) 100. Data sources: - 3x 3x 3x 3x 3x 3x 3x 3x 3x 3x 3x 3x 3x 3x 3x 3x 3x 3x 3x 3x 3x 3x 3x 3x 3x 3x 3x 3x 3x 3x 3x 3x 3x 3x

4.3 Follow the setup wizard to start quick setting.

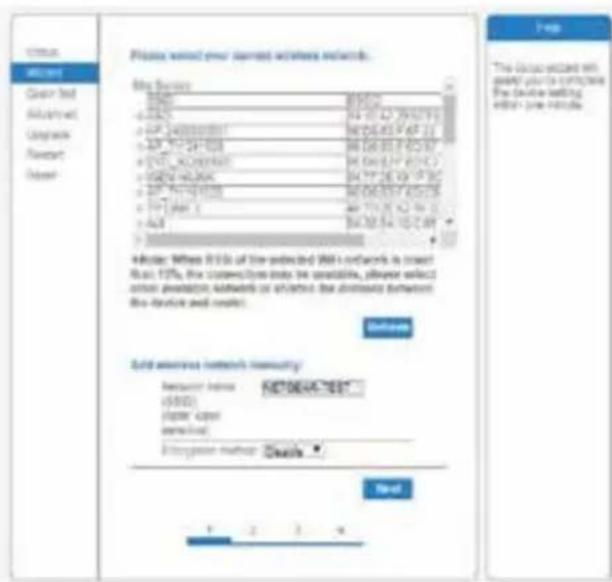
(a)Click Wizard to start. Select the wireless network you need to connect, then click Next
Please switch your serverless networks. File Device IP地址 89501 IP地址 89501 IP地址 89501 IP地址 89501 IP地址 89501 IP地址 89501 IP地址 89501 IP地址 89501 IP地址 89501 IP地址 89501 IP地址 89501 IP地址 89501 IF: IP地址 89501 IF: IP地址 89501 IF: IP地址 89501 IF: IP地址 89501 IF: IP地址 89501 IF: IP地址 89501 IF: IP地址 89501 IF: IP地址 89501 IF: IP地址 89501 IF: IP address 89501 IF: IP address 89501 IF: IP address 89501 IF: IP address 89501 IF: IP address 89501 IF: IP address 89501 IF: IP address 89501 IF: IP address 89501 IF: IP address 89501 IF: IP address IF: IP address IF: IP address IF: IP address IF: IP address IF: IP address IF: IP address IF: IP address IF: IP address IF: IP address IF: IP address IF: IP address IF: IP address IF: IP address IF: IP address IF: IP address IF: IP address IF: IP address IF: IP address IF: IP address IF: IP addresses IF: IP addresses IF: IP addresses IF: IP addresses IF: IP addresses IF: IP addresses IF: IP addresses IF: IP addresses IF: IP addresses IF: IP addresses IF: IP addresses IF: IP addresses IF: IP addresses IF: IP addresses IF: IP addresses IF: IP addresses IF: IP addresses IF: IP addresses IF: IP addresses IF: IP addresses IF: IP address IF: IP address IF: IP address IF: IP address IF: IP address IF: IP address IF: IP address IF: IP address IF: IP address IF: IP address IF: IP address IF: IP address IF: IP address IF: IP address IF: IP address IF: IP address IF: IP address IF: IP address IF: IP address IF: IP addressing network security Resource name: #03646473667 Operator open Service(s) Enterprise name: #dsx# Send Help The Company's net useful year is complete. The device setting either one or two minutes.

Notice: If the signal strength (RSSI) of the selected network is <15%, which means unstable connection, please adjust the antenna of the router, or use a repeater to enhance the signal.

The SSID of your selected router network should be less than 30 characters, in which blank space should not be included.

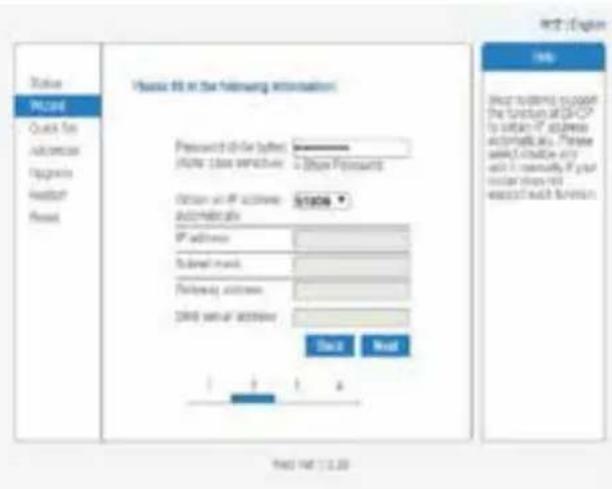
(b)Enter the password for the selected network, select Enable to obtain an IP address automatically, then click Next
Status PCLand Quick for Access Approve Headset Fixed Please 95 in the following authentication: Password to drive bytes (https://box.xn/zhv/) Other Passwords Option on IP address: automatically IP address FidUAL mask Gateway access 2000 serial access Back Next Find out: 12.00 OK Stop to continue to support the function of DCP by option IP address automatically. You. Please select choice only and it normally if your user stays not express such function.

Notice: Router password cannot be recognized if it contains any character such as '&','#','%', and blank space.

The password is being verified, please wait for a while. If you have entered an invalid password or encryption method, an error notice will pop up.

(c)Enhance security settings of the WiFi logger by selecting any options as listed, then click Next
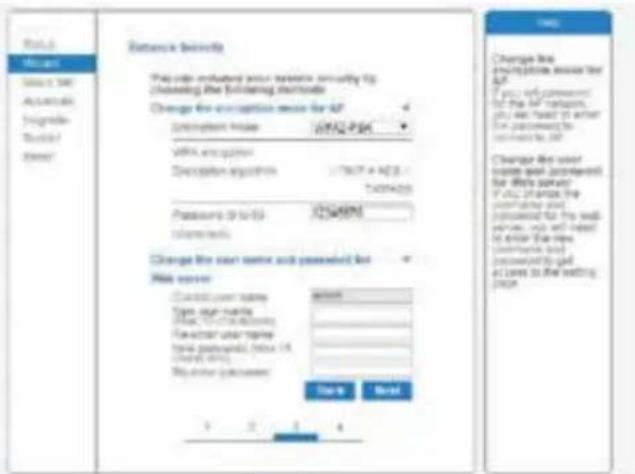
Network settings Pay code: inlbrary user terminal security tip (choosing the following mode) Change the account name for AP Description Name: 10542-9341 WWW Account Description answered: 17637 + 483 Password to IP: 12340990 Password: Change the user name and password for AP server Current user name: Type: type name Phone: Phone address File author: user name Home password: None (A) Email: email My other: password: Date: March Next Change the account name of the AP If you are not allowed for the AP version, you will need to enter the password to we have to be an CP Change the user name and password for the AP server/ if you change the password and password for the wall server, you will need to enter the new customers and password by mail at level to the waiting page

(d) If setting is successful, the following page will display. Click OK to restart.
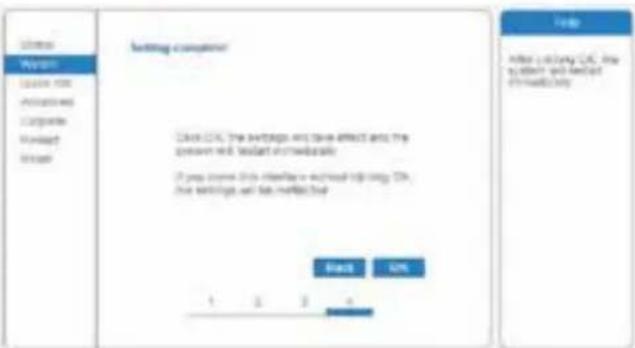
Investor Buyers Sales, net Incentives Corporate Holdings Issuer Reporting Company: Click CTR, The buybacks and save effects into the buyback will lead in marketable If you have this trading is closed at closing CTR, this trading will be made up Stock EPS 1 2 3 4 After adjusting CTR, the buyback and lead of marketable

(e) If restart is successful, the following page will display. If this page does not display automatically, please refresh your browser.
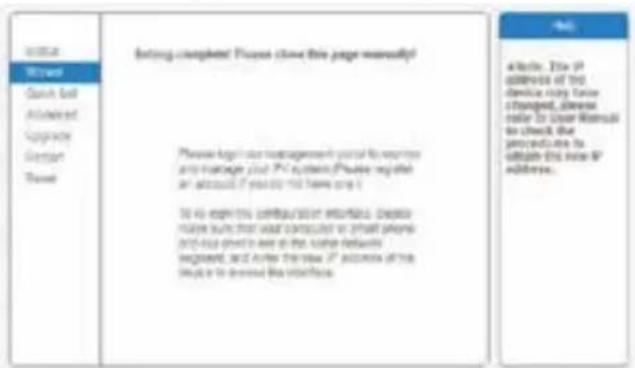
Status Stream Quick Self Advanced Copyright Gesport Travel Listing completed Process close this page manually! Please log in our management portal to ensure any manage club PC system (Please go to the account if you do not have one) To 40 exertric configuration information, please make sure that what can be used or what people need to drive the user's details, e.g., and use the new PC accounts at the end of the next session. This is also. This IP address of this device may twice be changed, unless order to User Manual to check the procedure due to obtaining this new IP address.

(f) Re- log in this setting page to Status page after the Web server restart, and check the network connection status of the logger.
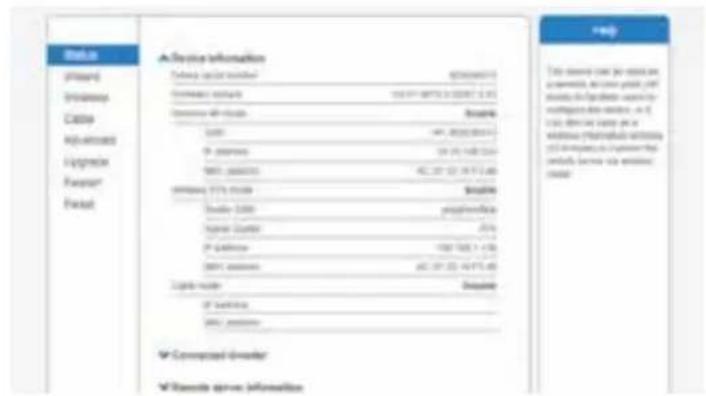
Status (please) (please) C2019 High-credit Upgrade Prepaid Prepaid A Service Information Delivery order number: 835666710 Service ID: 00448 Service ID: 00448 Service ID: 00448 Service ID: 00448 Service ID: 00448 Service ID: 00448 Service ID: 00448 Service ID: 00448 Service ID: 00448 Service ID: 00448 Service ID: 00446 Service ID: 00446 Service ID: 00446 Service ID: 00446 Service ID: 00446 Service ID: 00446 Service ID: 00446 Service ID: 00446 Service ID: 00446 Service ID: 00446 Service ID: 00445 Service ID: 00445 Service ID: 00445 Service ID: 00445 Service ID: 00445 Service ID: 00445 Service ID: 00445 Service ID: 00445 Service ID: 00445 Service ID: 00445 Service ID: 00446 Service ID: 00446 Service ID: 00446 Service ID: 00446 Service ID: 00446 Service ID: 00446 Service ID: 00446 Service ID: 00446 Service ID: 00446 Service ID: 00447 Service ID: 00447 Service ID: 00447 Service ID: 00447 Service ID: 00447 Service ID: 00447 Service ID: 00447 Service ID: 00447 Service ID: 00447 Service ID: 00447 Service ID: 00448 Service ID: 00448 Service ID: 00448 Service ID: 00448 Service ID: 00448 Service ID: 00448 Service ID: 00448 Service ID: 00448 Service ID: 00448 Service ID: 00449 Service ID: 00449 Service ID: 00449 Service ID: 00449 Service ID: 00449 Service ID: 00450 Service ID: 00450 Service ID: 00450 Service ID: 00451 Service ID: 00451 Service ID: 00451 Service ID: 00452 Service ID: 00452 Service ID: 00452 Service ID: 00453 Service ID: 00453 Service ID: 00453 Service ID: 00453 Service ID: 00453 Service ID: 00453 Service ID: 00453 Service ID: 00453 Service ID: 00453 Service ID: 00453 Service ID: 00452 Service ID: 00452 Service ID: 00452 Service ID: 00452 Service ID: 00452 Service ID: 00452 Service ID: 00452 Service ID: 00452 Service ID: 012111111111111111111111111111111111111111111111111111111111111111111111111111111111111111111111111111123333333333333333333333333333333333333333333333333333333333333333333333333333333333333333333333333333

Notice: After network setting is complete, the Wireless AP mode should be enabled and relative information of your router will display on the interface automatically. Besides the Remote server A should be connected.

If you meet any problems and need support, please provide the screenshot of the status page as shown below.
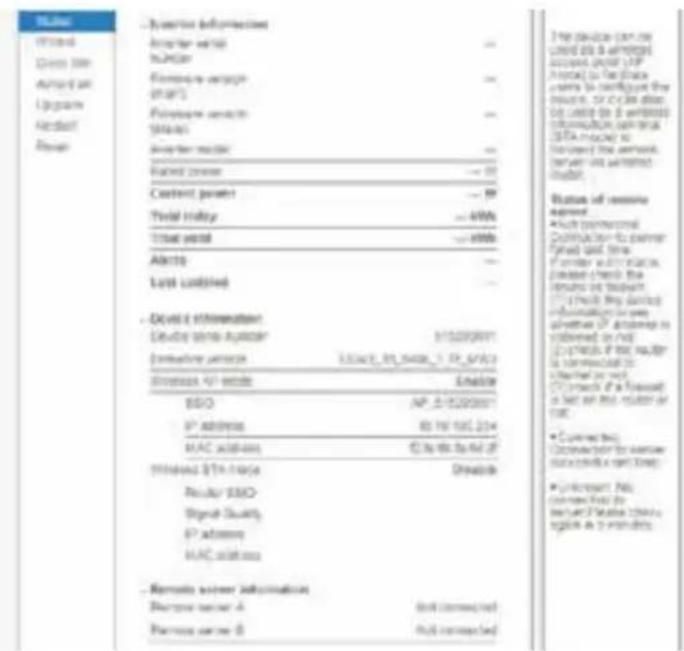
Status √ Status information Average value = - Number = - Remove version = - (0.45) Remove version = - Value = - Average model = - Result score = -10 Content parameter = -10 Total value = -1000 Total yield = -1000 Total yield = -1000 Alerts = - Last validated = - - Device information Device name: AUROR 112398971 Immediate version 13343_01_0406_1_13_0743 Description: IP address Enable ISO AP_012398971 IP address 60.76.105.224 MAC address 60.76.105.224 Threshold: 27A range Enable Regular ISO Signal Quality IP address MAC address - Remote server information Remote server A full connected Remote server B full connected The device can be used to support access point (UP) or (AP) based on the data frame to configure the system, so I can do not use any information optional (DATA) mode to monitor the system, then use an isolated model. Status of service required: ● Your commercial configuration to partner fixed unit time Former authentication: please check the system or target CP: Check by drawing information or any provider IP address is available as null CP: Check if the user is restricted to the other user or other. ● Connection: Connection to secure data center and root; ● Unknown: No connection to the user's data center in the region as 3 nodes.

Datasheet

Model MECD

Communication

Communication method Zigbee, PLC

Max. number of inverters connected 5、10、20、32 (Max.)

Communication to router

WIFI

WIFI wireless security

WEP, WPA2-PSK

RS485

Reserved

Max.distance(free space) PLC 300m; Zigbee 100m(Max. straight-line distance)

Power Supply

AC Power Supply

100 to 240V AC, 50/60Hz

Power consumption

5W typical, 10W Maxinum

Mechanical Data

Dimensions(W×H×D) 133.6×132×35.5 mm

Weight 0.3KG

Operation temperature range -20\~+50°C

Mounting method Wall-mounted

Display OLED and LED indicators

Features

Grid type Single phase / three phase

Digital Input Control device connection

Others

IEC60950, IEC61000-6-2, FCC Part15 Class B / Class CCom

Warranty 3 years

Manual assistant
Powered by Anthropic
Waiting for your message
Product information

Brand : Deye

Model : VSG-3

Category : Unknown