
HLT-370 V - Pressure washer Koblenz - Free user manual and instructions
Find the device manual for free HLT-370 V Koblenz in PDF.


User questions about HLT-370 V Koblenz
0 question about this device. Answer the ones you know or ask your own.
Ask a new question about this device
Download the instructions for your Pressure washer in PDF format for free! Find your manual HLT-370 V - Koblenz and take your electronic device back in hand. On this page are published all the documents necessary for the use of your device. HLT-370 V by Koblenz.
USER MANUAL HLT-370 V Koblenz
Manufactured by / Fabricado por:
natural_image
Exterior view of a Roblox® water purifier (no visible text or symbols on body)You have just purchased a Koblenz Self-Contained Pressure Washer. Please read this manual carefully before connecting your Pressure Washer. Keep this manual at hand for further references.
¡Felicidades!
Read all instructions before using this pressure washer.
| Important safety instructions | 2 |
| Polarized outlet | 3 |
| Product description | 3 |
| How to assemble | 4 |
| Direct connection to water supply | 5 |
| Pressure washer set-up | 5 |
| Trigger and safety button | 5 |
| Operation | 6 |
| Adjustable spray nozzle | 6 |
| Automatic stop system | 6 |
| Spray bottle | 6 |
| Maintenance | 7 |
| Storage | 7 |
| Troubleshooting | 8 |
| Water supply requirements | 8 |
| Warranty | 8 |
IMPORTANT SAFETY INSTRUCTIONS
WHEN USING THIS PRODUCT, BASIC CAUTIONS SHOULD BE FOLLOWED. INCLUDING THE FOLLOWING:
READ ALL INSTRUCTIONS BEFORE USING THIS PRESSURE WASHER.
SAVE THESE INSTRUCTIONS FOR FUTURE REFERENCE.
THIS APPLIANCE MUST NOT BE MOVED WHILE IT IS BEING USED.
WARNING
To reduce risk of fire, electrical shock, or injury:
Never use appliance if electrical cable is damaged. Have it replaced by an authorized service center. Do not use this appliance during rain or thunderstorms.
- Read all the instructions before using the product.
- To reduce the risk of injury, close supervision is necessary when a product is used near children.
- Know how to stop the product and bleed pressures quickly. Be thoroughly familiar with the controls.
- Stay alert – watch what you are doing.
- Do not operate the product when fatigued or under the influence of alcohol or drugs.
- Keep operating area clear of all persons.
- Do not overreach or stand on unstable support. Keep good footing and balance at all times.
- Follow the maintenance instructions specified in the manual.
RECOMMENDATIONS
This appliance is for outdoor use only store indoors.
- Water inside the appliance is under pressure. Keep a firm hold on the gun and be prepared to take the kickback pressure before pressing the trigger.
• Always disconnect electricity and water supplies (if a garden hose is being used) on completion of every job. - Keep water circulating constantly through appliance. Do not let appliance work without water.
- Do not use or store appliance in a frozen environment. Frozen water will damage it.
- Do not use appliance if any part of is damaged.
- Appliance has been designed to work with water only. Do not use chemicals, gasoline, acids, or any corrosive substance. These are highly flammable and they will also damage appliance.
- If appliance is to be used in danger area, check area restrictions.
- Vehicles' tires and valves must be washed from a 3 foot distance to avoid damage to them. If a tire looks discolored, it could be damage and must be checked.
- Do not use appliance to clean objects containing health -hazardous substances such as asbestos.
- Do not let water leak into the appliance.
- Jets of water must never be pointed at people, animals, electrical equipment or appliances itself. Pressure at high levels is very dangerous and presents severe health hazard.
- Use protective clothing when using the appliance.
- Never use appliance with people in the vicinity unless they are wearing protective clothing.
- Never point jet of water at yourself or others to clean clothing or footwear.
- Never use close to children or pets.
- Never allow untrained people to use appliance.
- Use only hoses, accessories and high pressure couplings recommended by Koblenz.
- Whenever the use of appliance is interrupted, it is important to operate the safety button to prevent accidental activation of trigger.
- Switch appliance off and turn water supply off (if a garden hose is being used) whenever it is left unattended.
- Never store the appliance with water inside container.
- Do not exceed 8 gallon of water inside container.
natural_image
Mechanical assembly diagram showing a container with directional arrows and components (no text or labels)ALMACENAMIENTO
natural_image
Diagram of a spray gun with multiple blades radiating from a central nozzle (no text or symbols)MANTENIMIENTO

This pressure washer is not intended to be connected to a potable water supply. To connect to a potable water supply, an appropriate back flow device must be installed conforming to the requirements of the American Society of Sanitary Engineers.
POLARIZED OUTLET
This appliance is for use on a 120 V\~ circuit, and has a polarized plug as shown in figure A.
Double insulated


PRODUCT DESCRIPTION
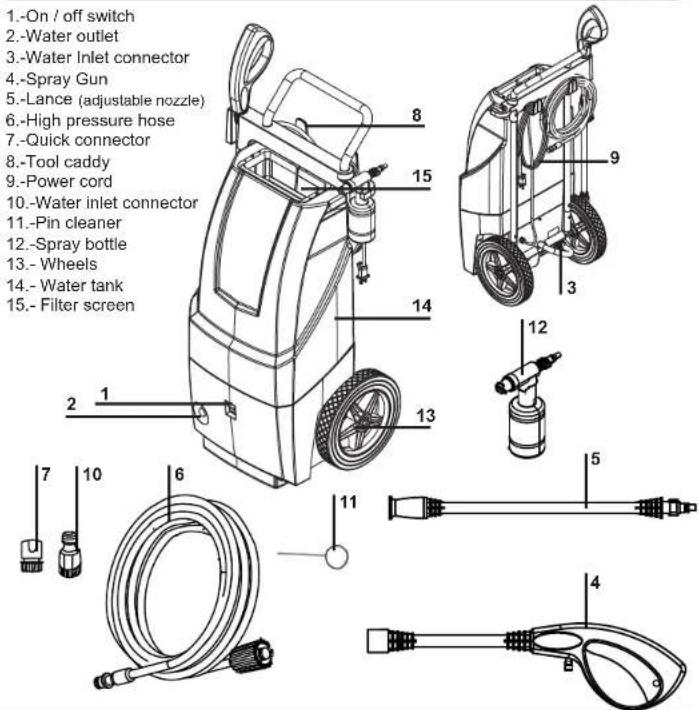

WARNING!
The following warnings symbols are displayed on the pressure washer to remind you of the safety cautions you should take when operating it.
-3-

WARNING!
This symbol is displayed on the washer to warn you not to direct the jet at persons, domestic animals, electrical equipment or the washer itself.

WARNING!
This symbol is displayed on the washer to warn you to turn the water on (if a garden hose is being used) before switching the pressure washer on.
HOW TO ASSEMBLE

WARNING!
Make sure that the pressure washer is switched off and disconnected from power supply before starting these indications.

natural_image
Diagram of a medical or laboratory procedure showing a tool with attached tubing and a pen inserted (no text or labels)- Washer must be used standing on a secure and stable position.
- Connect high pressure hose by pulling into spray gun. Fig. 1.


natural_image
Technical line drawing of a mechanical device with a handle and textured surface (no text or symbols)- Connect high pressure hose to water outlet connector at the front of pressure washer. Fig. 2
-Connect the tank hose with the quick connector, to the water inlet connector located on the back of appliance, insert firmly and check for leaks. Fig. 3
natural_image
Diagram of a medical or laboratory procedure showing a tool interacting with a curved device (no text or labels visible)natural_image
Technical diagram of a mechanical device with a handle and textured surface (no text or symbols)natural_image
Mechanical assembly diagram showing a wheel and gear mechanism (no text or symbols)
DIRECT CONNECTION TO WATER SUPPLY

natural_image
Technical line drawing of a mechanical assembly with no visible text or symbolsDisconnect tank hose from pressure washer. Fig.4

Connect quick connector to garden hose, previously connected to water supply. Fig.5

Connect garden hose with quick connector, to water inlet connector (on back to pressure washer) and then insert firmly and check for leaks. Fig. 6
PRESSURE WASHER SET-UP
Your pressure washer machine is designed to perform deep and efficient cleaning. In order to get the best performance, please follow these steps:
STEP 1. Ensure that water container is full before each use.
STEP 2. Prime pressure washer before each use.

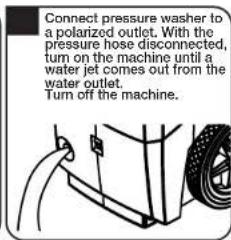
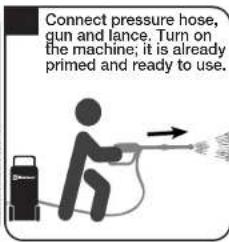

Failure to follow these steps will result in severe mechanical damage and void the warranty.
TRIGGER AND SAFETY BUTTON

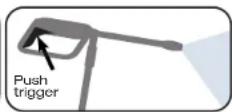
Unlock the gun trigger.
Trigger has a safety button.
Make sure it is pressed at any time you are not pressing the trigger to avoid accidents.
Push trigger lock button through the switch lever to lock the trigger in Off position. Fig. 7
OPERATION

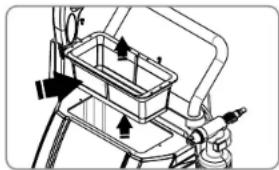
1.- Fill water tank. Fig. 8 Tank capacity: 8 gallon

Recommendation for better management of the appliance, pull rather than push, avoiding accidents with water, thus facilitating transport.
2.- Once prime realized.
3.- Connect washer plug to Power supply and press the On/off switch to the On position.

4.- Push in the lance into the gun and turn it until the two parts are completely locked. Fig. 9-10
5.- Hold washer gun and press the trigger and at the same time, tum the appliance on and adjust the spray gun to the desired position.
Pressure washer is now ready for use.

natural_image
Simple line drawing of a mechanical tool or device with a curved arrow indicating rotation (no text or symbols)
WARNING!
Temperature of incoming water supply must not exceed 40°C.
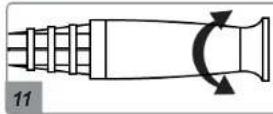
ADJUSTABLE SPRAY NOZZLE
Water maybe sprayed out either linear or fan-shaped.
Press the trigger and at the same time, turn the nozzle and adjust to the desired position. Fig. 11
AUTOMATIC STOP SYSTEM
The pressure washer is fitted with an Automatic Stop System to protect the motor when in use. When the trigger is released, motor will stop. When the trigger is pressed, motor will start up again.
SPRAY BOTTLE
To install the spray bottle
- Fill spray bottle with detergent.
- Connect spray bottle with gun turn it until the two parts are completely locked
- Press trigger and detergent will start to come out.


natural_image
Diagram of a spray gun with multiple blades radiating from a central point (no text or symbols)-6-
CAUTION: Unplug power cord before performing any maintenance on it.
- Turn appliance off.
- Unplug line cord from power outlet.
- Empty water tank by disconnecting the quick connector then, using a pin push the quick connector to open the check valve.
- Press trigger to release water pressure.
- Push safety button on trigger.
- Disconnect water hose from appliance.
- Clean filter
- Store appliance in a place where there is no risk of freezing.
- In a case of leaving it unused for long periods of time, press trigger and turn appliance on at the same time, and let water run for a few minutes.


TIP 1.
Always make sure that water connector is placed and clean.
TIP 2.
Clean up lance at least every 15 days.
TIP 3.
After each use, release pressure from machine and empty the water container.

natural_image
Pure electrical connector diagram without any text, numbers, or symbolsCleaning of nozzle before each use is important. Use pin cleaner (provided with machine). Fig. 14
Filter for water inlet should be cleaned at least every 15 days or when it becomes necessary.
- Take out screws of the filter.
- Take out the water filter.
- Rinse filter with lukewarm water.
if the filter screen is broken it must be replaced. - Reassemble components.
natural_image
Technical line drawing of a bicycle front bumper with arrows indicating parts (no text or symbols)STORAGE
Your pressure washer should be stored in a warm place without water inside the water tank store indoors. If you store it for a long time, the water inside it may dry out and cause the machine to not work properly. If this happens, press the trigger until you get a constant flow of low pressure washer.
TROUBLESHOOTING
| PROBLEM | POSSIBLE CAUSE | SOLUTION |
| The appliance does not turn on when the switch is pressed | The plug is not properly connected to the socket. | Connect the plug to the powersocket correctly |
| There is no voltage or is insufficient. | Check that the power returns to the normal voltage. | |
| The trigger is not being pressed | Turn the appliance on while keeping the trigger pressed. | |
| The appliance starts, but no water comes out. | Pressure washer has trapped air inside. | Follow prime instructions |
| There is no water supply. | Make sure that water hose is connected to the appliance and that the water supply is turned on. | |
| Make sure that there is water inside the tank | ||
| There is not enough water supply. | Clean the water filter on the water connection. | |
| The water supply is low or inadequate. | Verify that the water pressure from the faucet is strong enough to work with the appliance or if there is enough water inside tank container | |
| Verify that the hoses have no obstructions. | ||
| Uneven pressure | The high pressure nozzle is dirty. | Remove the nozzle and clean. |
| The water supply is low or inadequate. | Clean the water filter on the water connection. | |
| Make sure the hoses have no folds or knots. | ||
| Reconnect the high-pressure hose. | ||
| Check for leaks on pump and hoses. Clean the nozzle with a needle. | ||
| The pump leaks | If the appliance leaks more than 10 drops per minute, please contact an authorized service center. | |
WATER SUPPLY REQUIREMENTS
- Min water flow: 12 l/min. (When connected directly to a garden hose)
- Water should be free of dirt particles
- Max water temperature 40 °C
- Max water pressure entrance: 7 bar. (700 kPa)
Severe damage can occur to the water pump by not following these instructions, as well as the warranty being void.
WARRANTY
This product is warranted to be free from all defects in materials and workmanship in a period of one year.
The warranty does not cover parts that wear under normal use.
THIS WARRANTY SHALL NOT APPLY to damage or malfunction caused by negligence, abuse or product which has been altered or repaired by an unauthorized person or service center. To validate this warranty, you only need to show this contract along with proof of purchase in anyone of the service centers (see enclosed list of authorized service centers or call 1-800-849-4711 for instructions).
Koblenz will either repair or replace, at its election, all defective machines during the warranty period. The foregoing obligations are in lieu of all other obligations and liabilities including negligence and stale Koblenz' entire and exclusive liability and purchaser's exclusive remedy. Koblenz will in no event be liable for any direct, indirect, special, incidental or consequential damages or losses whatsoever and Koblenz' liability under no circumstances will exceed the contract price for the goods or parts for which liability is claimed.
CONTENIDO

- ¡Felicidades!
- IMPORTANT SAFETY INSTRUCTIONS
- SAVE THESE INSTRUCTIONS FOR FUTURE REFERENCE.
- WARNING
- To reduce risk of fire, electrical shock, or injury:
- RECOMMENDATIONS
- This appliance is for outdoor use only store indoors.
- ALMACENAMIENTO
- MANTENIMIENTO
- POLARIZED OUTLET
- PRODUCT DESCRIPTION
- HOW TO ASSEMBLE
- DIRECT CONNECTION TO WATER SUPPLY
- PRESSURE WASHER SET-UP
- TRIGGER AND SAFETY BUTTON
- ADJUSTABLE SPRAY NOZZLE
- AUTOMATIC STOP SYSTEM
- SPRAY BOTTLE
- CAUTION: Unplug power cord before performing any maintenance on it.
- TIP 1.
- TIP 2.
- TIP 3.
- STORAGE
- WATER SUPPLY REQUIREMENTS
- WARRANTY
Brand : Koblenz
Model : HLT-370 V
Category : Pressure washer