2IN1GSIS - Ironing board Stirling - Free user manual and instructions
Find the device manual for free 2IN1GSIS Stirling in PDF.


| Product Type | Ironing Board |
| Brand | Stirling |
| Model | 2IN1GSIS |
| Dimensions (L x W x H) | Approx. 120 x 35 x 85 cm |
| Weight | Approx. 5 kg |
| Material | Steel frame with cotton cover |
| Height Adjustment | Multiple lockable positions |
| Folding Mechanism | Yes, compact storage |
| Iron Rest | Integrated heat-resistant pad |
| Sleeve Board | Removable, for sleeves and small items |
| Steam Iron Compatibility | Yes, with steam-resistant surface |
| Maximum Load | Up to 10 kg |
| Safety Lock | Auto-lock when folded |
| Cover Material | Cotton with foam padding |
| Pad Thickness | Approx. 1 cm |
| Care Instructions | Wipe frame with damp cloth; cover machine washable up to 30°C |
| Spare Parts Availability | Replacement covers and pads available from retailer |
| Repairability | Frame can be disassembled for part replacement |
| Warranty | 1 year against manufacturing defects |
Frequently Asked Questions - 2IN1GSIS Stirling
User questions about 2IN1GSIS Stirling
0 question about this device. Answer the ones you know or ask your own.
Ask a new question about this device
Download the instructions for your Ironing board in PDF format for free! Find your manual 2IN1GSIS - Stirling and take your electronic device back in hand. On this page are published all the documents necessary for the use of your device. 2IN1GSIS by Stirling.
USER MANUAL 2IN1GSIS Stirling
natural_image
Exterior view of a modern electric lamp with adjustable arm and base (no text or symbols visible)2-in-1 Steam & Iron Station
Model Number 2IN1GSIS
INSTRUCTION MANUAL
Welcome
Congratulations on choosing to buy a STIRLING® product.
All products brought to you by STIRLING ® are manufactured to the highest standards of performance and safety and, as part of our philosophy of customer service and satisfaction, are backed by our comprehensive 1 Year Warranty.
We hope you will enjoy using your purchase for many years to come.
Contents
02 Welcome
04 Warranty Details
05 General Safety Instructions
09 Product Overview
10 Getting Started
14 Instructions
22 FAQs & Troubleshooting Guide
23 Other Useful Information
27 Repair and Refurbished Goods or Parts Notice

2-in-1 Steam & Iron Station
Warranty Details
REGISTER YOUR PURCHASE AT www.aldi.com.au/en/about-aldi/product-registration/ TO KEEP UP-TO-DATE WITH IMPORTANT PRODUCT INFORMATION
The product is guaranteed to be free from defects in workmanship and parts for a period of 12 months from the date of purchase. Defects that occur within this warranty period, under normal use and care, will be repaired, replaced or refunded at our discretion. The benefits conferred by this warranty are in addition to all rights and remedies in respect of the product that the consumer has under the Competition and Consumer Act 2010 and similar state and territory laws.
Our goods come with guarantees that cannot be excluded under the Australian Consumer Law. You are entitled to a replacement or refund for a major failure and to compensation for any other reasonably foreseeable loss or damage. You are also entitled to have the goods repaired or replaced if the goods fail to be of acceptable quality and the failure does not amount to a major failure.

General Safety Instructions
IMPORTANT SAFETY INSTRUCTIONS READ CAREFULLY AND KEEP FOR FUTURE REFERENCE
Read this manual thoroughly before first use, even if you are familiar with this type of product. The safety precautions enclosed herein reduce the risk of fire, electric shock and injury when correctly adhered to. Keep the manual in a safe place for future reference, along with the completed warranty card, purchase receipt and carton. If applicable, pass these instructions on to the next owner of the appliance.
Always follow basic safety precautions and accident prevention measures when using an electrical appliance, including the following:
Electrical safety and cord handling
- Voltage: Make sure your local outlet voltage and circuit frequency correspond to the voltage indicated on the appliance rating label and your outlet socket is properly earthed. If this is not the case, do not use the appliance.
- Separate circuit: To reduce the likelihood of circuit overload, do not operate another high wattage appliance on the same circuit.
- WARNING: Do not immerse! Never immerse the cord, plug or appliance in water or other liquid, or expose the electrical connections to water or other liquid. Should liquids enter the housing, unplug the appliance from the power socket immediately and arrange for it to be repaired by a qualified technician.
- Protect from moisture: Do not use the appliance outdoors or expose it to humidity. Never use the appliance adjacent to water contained in a bath, shower, wash basin or other vessel. The proximity of moisture presents a danger, even when the appliance is switched off. Do not operate the appliance or touch the power cord or plug with wet hands.
- No extension cord: Always unwind the power cord fully before switching on and do not use an extension cord. Take care when arranging the cord so that it cannot be pulled or tripped over.
- Protect the power cord: Do not damage, kink or squash the power cord and protect it from sharp edges. Do not let the cord touch any hot surface, including the ironing/steaming surface. Unwind and straighten the cord before use, then arrange the cord in such a way that no one can step on it or trip over it.
- Damage: Do not use the appliance if it has been dropped, if there are visible signs of damage or if it is leaking. A damaged cord or plug must be replaced by the manufacturer or a qualified technician in order to avoid a hazard. In case of damage, please contact our after sales support centre.
- Disconnect the appliance after every usage, before cleaning and before filling or emptying the water tank. To disconnect, turn the appliance off and remove the plug from the power socket. Pull only on the plug itself, not on the cable.
General Safety Instructions (Cont.)
- Power supply: Do not share a power supply with other high power electrical appliances. Unplug from outlet when not in use. Do not let cord hang over edge of table or counter, or touch hot surfaces.
- Do not open: Never attempt to open the appliance yourself, or to replace the power cord. Only have the appliance repaired by an authorised technician, or contact our after sales support centre for advice.
- RCD: Unless your home is already fitted with a residual current device (safety switch), we recommend installing an RCD with a rated residual operating current not exceeding 30 mA to provide additional safety protection when using electrical appliances. See your electrician for professional advice.
Usage conditions and restrictions
- Domestic use only: This appliance is designed and intended for indoor household use only. It is not suitable for commercial, trade or outdoor use.
- Intended use: This appliance is intended exclusively for ironing and smoothing and removal of creases and wrinkles on garments and other home textiles. Do not use it for anything other than its intended purpose and only use it as described in this manual. All other use is deemed improper use.
- Common sense: These instructions are not intended to cover every possible condition and situation. As with any electrical household appliance, common sense and caution are therefore always recommended when assembling, operating and maintaining the unit.
- Assembly and accessories: Ensure that all parts are correctly assembled before use. Do not use any accessories with this appliance that are not supplied or specifically recommended. Improper use of accessories may result in the risk of fire, electric shock and/or injury to persons.
- Usage restriction: This appliance is not intended for use by persons (including children) with reduced physical, sensory or mental capabilities, or lack of experience and knowledge, unless they have been given supervision or instructions concerning use of the appliance by a person responsible for their safety.
- Children: This appliance is not a toy. Supervise children to ensure they do not play with the appliance. Close supervision is necessary when any appliance is used by or near children.
• Unattended: Do not leave the appliance unattended when connected to power. - Water usage: Only fill water into the tank; do not add scented substances, vinegar, descaling agents or any other additives into the water tank when using the appliance, as they can cause damage to the appliance. Do not add hot water to the tank. Only use cold water, preferably cold boiled water.
General Safety Instructions (Cont.)
- Hose: Do not bend or twist the hose, as this may damage it and cause leakage.
- Iron Rest: Always set the iron/steam head on the iron rest to prevent burns after each use. Make sure the appliance is stable before doing so.
- Water tank: The water tank must be filled before connecting the appliance to the power supply. The appliance must be disconnected from the power supply before emptying or refilling the water tank. Ensure water does not run out during use to extend the lifetime of the product.
- Remaining water: There will be water left over in the iron/steam head nozzle after each use. If the unit is not in use for a long period of time, before reusing it, please flush out the water residue by turning the steam control knob to Cleaning position and pressing the steam switch, while pointing it away from the clothes. This will release any condensation from the iron and prevent water marks on the clothes.
- Temperature testing: The soleplate temperature is about 130°C, so take care when using the appliance. For extremely delicate fabrics, test iron a small area on the back or inside of the garment if you are unsure about steaming/ironing.
- Work area: Keep your work area well lit. Only use the appliance on a flat and stable surface where it is unlikely to be overturned.
- Positioning: To avoid scalding and/or scratching the iron soleplate, always rest the steam head/iron on the dedicated iron rest and place the product base on a flat and stable floor.
- Flammable materials: Do not operate or store the appliance in the vicinity of flammable or explosive materials.
- Safe usage: Keep openings clear. Do not block the holes of the steam head/iron. Do not point the appliance at people or animals when in use.
- Heat sources: Keep the appliance away from heat sources (radiator, oven etc.), direct sunlight, moisture and sharp edges.
- Brush installation/removal: To avoid scalding, always wear an insulated glove (or oven mitt) before attempting to install or remove the brush during use.
- WARNING: Do not steam clothes that are being worn! Never use the unit on clothing that you are (or someone else is) wearing.
- Storage: Put the appliance away after every use to prevent anyone tripping over it. Before storage, let the appliance cool down for at least 60 minutes. Store the appliance in a cool, dry indoor area, out of reach of children.
General Safety Instructions (Cont.)
- Cleaning: Only clean the housing with a soft, dry cloth. Do not use liquid or aerosol cleaners. Self-cleaning instructions for the steam system are provided on pages 23-24.
- CAUTION: Avoid harsh cleansers! Do not clean the appliance with solvents, alcohol or abrasive cleaning agents as these could cause damage to the appliance.
- Smoke: If you notice any smoke or fire coming out of the product, stop using it immediately and unplug the unit from the mains power supply to avoid a fire or electric shock. Contact our after sales support centre for assistance.
- Service: To reduce the risk of electric shock, do not disassemble or attempt to repair the appliance; take it to a qualified service person for examination and repair. Incorrect reassembly or repair could cause a risk of fire, electric shock, or injury to persons when the appliance is used.
- Misuse: Improper use or installation may result in the risk of fire, electric shock and/or injury. We accept no responsibility for any eventual injury or damages caused by improper use or inappropriate handling, or by any other noncompliance with the instructions in this manual.
- CAUTION: Always check the care instructions! Should the care instructions in an item to be steamed forbid ironing [ ] do not use the steamer on it or you could cause permanent damage to the item.
CAUTION: HOT!
- Burns could occur from touching hot metal parts, hot water or steam. Use care when moving the appliance — there may be hot water in the tank.
- To reduce the risk of contact with hot water emitting from the steam vents, check the appliance before each use by holding it away from your body and operating the steam switch.
- Never hold your hand over the steam head/iron or touch hot metal parts.


WARNING: HOT SURFACES!
These symbols indicates that the appliance can become hot during use. Do not touch hot surfaces! Risk of burns! Keep the power cord away from hot parts.

WARNING: DANGER OF SCALDING!
This symbol indicates that the appliance emits hot steam during use. Exercise utmost care when using the appliance to avoid scalding. Always handle with care and warn other users of the potential danger.
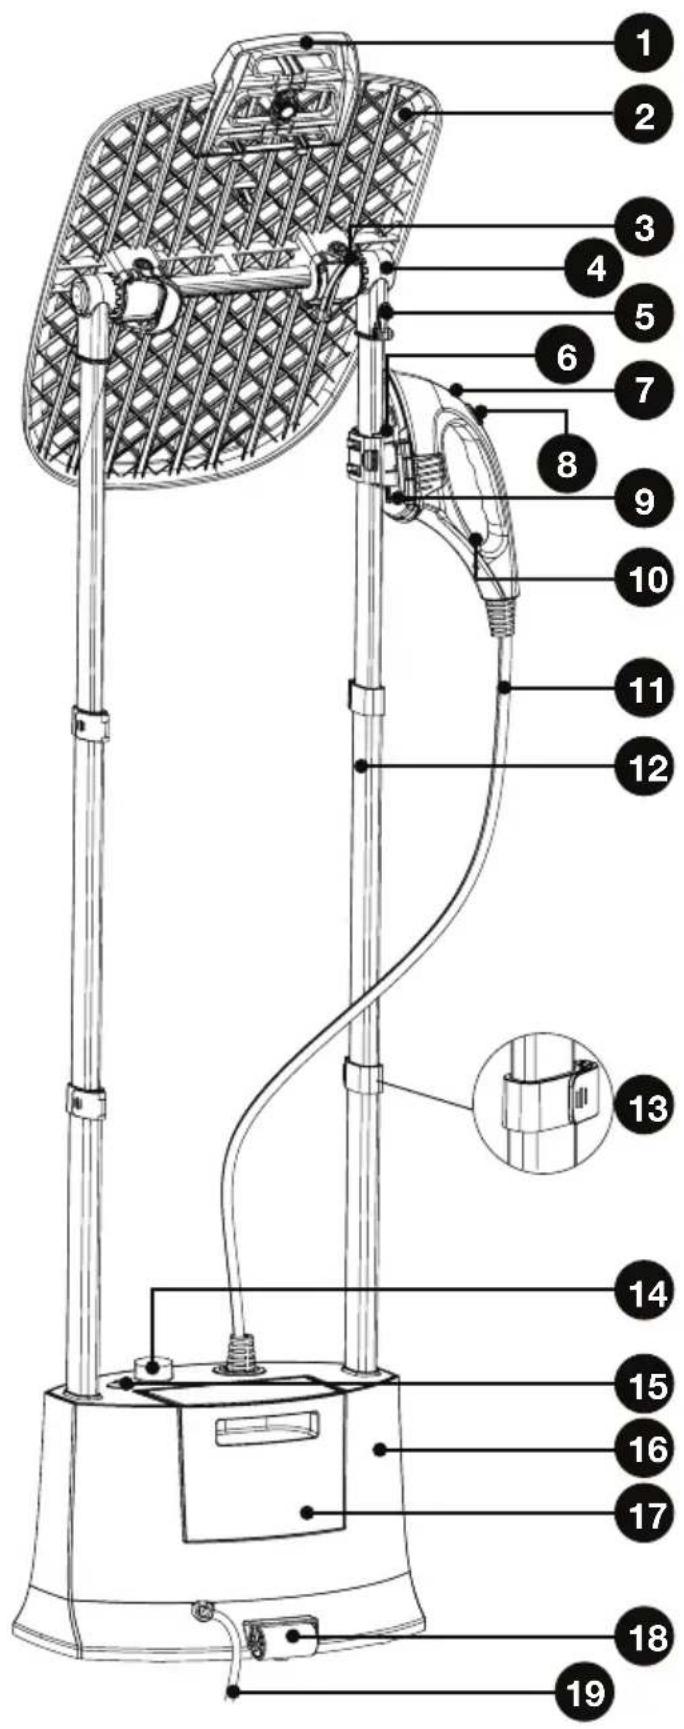
Product Overview
Scope of delivery
Assembled steam and iron station
1 Clothes hanger
2 Ironing board
3 Rotary lock
4 Fixed slot
5 Fixed slot lock
6 Iron rest
7 Temperature indicator
8 Steam switch
9 Iron rest lock
10 Iron/Steamer
11 Connecting tube
12 Support aluminium rod
13 Aluminium rod lock
14 Steam control dial
15 Indicator light
16 Main unit
17 Water tank
18 Wheel
19 Power cord
20 Iron/Steamer fabric brush head (not shown)
21 Insulation glove (not shown)
Documentation (not shown)
Instruction manual
Quick start guide
NOTE: Due to continued product improvement, images and illustrations in this manual may vary slightly from the product purchased. All images in this manual are for reference purposes only. Parts are not necessarily pictured to scale.
Getting Started
Before first use
- Unpacking: This product has been packaged to protect it against transportation damage. Unpack the appliance and remove all promotional materials, stickers, protective films and packaging materials. Keep the original packaging carton and materials in a safe place. It will help prevent any damage if the product needs to be transported in the future, and you can use it to store the appliance when it is not in use. In the event that the packaging is to be disposed of, please recycle all packaging materials where possible.
Keep the packaging materials at least until you have made sure that you have unpacked all the parts listed on the parts lists on the previous pages.
- Safe packaging disposal: Plastic wrapping can be a suffocation hazard for babies and young children, so ensure all packaging materials are out of their reach and disposed of safely.
- Inspection: Unwind and straighten the power cord. Inspect the cord and plug for damage or wear before each use. Do not use the appliance if the appliance or its cord has been damaged or is not working properly. In case of damage, please contact our after sales support centre for advice.
- Instructions: Make sure you have read and understood all instructions and warnings in this manual. Refer to the product overview (page 9) and parts lists to familiarise yourself with the product and identify all parts. Pay particular attention to the safety instructions on the previous pages.
- Assembly: Your new steam and iron station has been shipped partially assembled to reduce wastage of packaging material, paper cartons and weight. Assembly instructions are provided on the following pages.
WARNING: Do not connect the appliance to power until it is fully assembled.
- Before first use: Before using the appliance for the first time, and after prolonged periods of non-use, the appliance may need to be cleaned. Instructions for this are provided on pages 15-16.
- Operating Tips: You can use your new steam and iron station for steaming clothing or furnishings in vertical (hanging) position as well as for ironing items on the integrated ironing board. The steam head may be used for steaming garments, or without steam for dry-ironing. Basic operation principles are explained on the following pages.
WARNING!
Do not connect the appliance to the power supply until it is fully assembled.
Getting Started (Cont.)
Assembling the appliance
- Take the main unit out of the box and place it on a flat surface. Insert the aluminium support poles into the slots, facing outwards as indicated (Fig. 1).
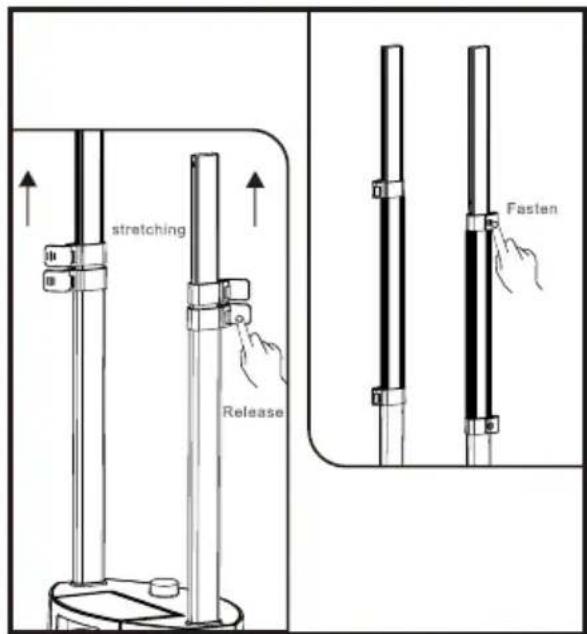
- Open the locks on the poles, and extend the poles to their maximum height. Re-fasten the locks (Fig. 2).

-
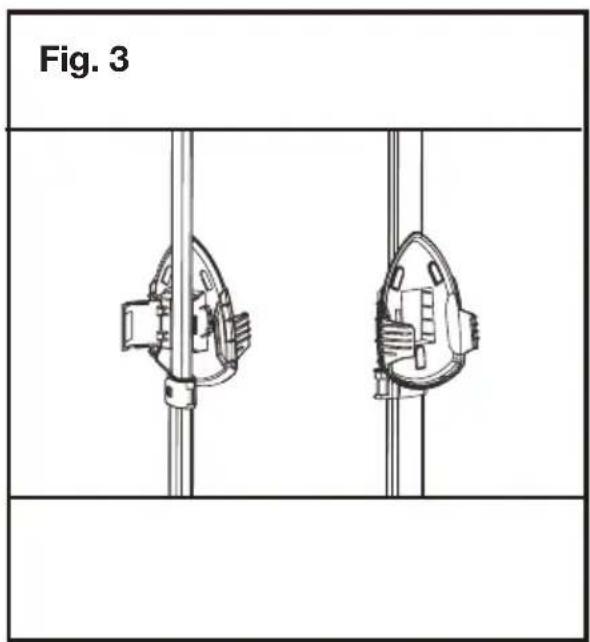
Insert the iron rest onto the pole. Adjust it to a comfortable height and re-fasten the locks (Fig. 3). It should be facing outwards, as shown.
-
You can now attach the iron to the iron rest (Fig. 4).
natural_image
Technical line drawing of two mechanical components mounted on vertical rods, labeled Fig. 3 (no text or symbols on the diagrams)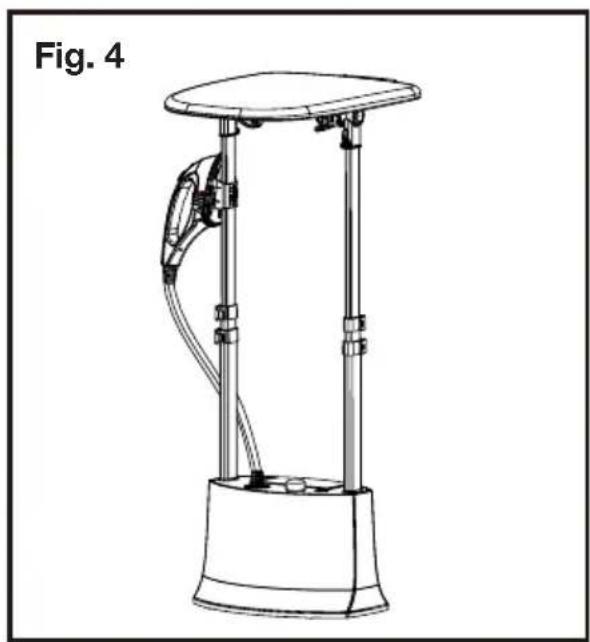
natural_image
Line drawing of a mechanical device with a top and base components, labeled 'Fig. 4' (no text or symbols on the device itself)Getting Started (Cont.)
Ironing board assembly
-
Take the ironing board out of the box. Open the rotary lock and turn the hanger 90°, then tighten the rotary lock. Insert the support bar into the top of the aluminium rod at both ends of the ironing board. Pull down on the fixed slot lock to attach (Fig. 5).
-
After transferring the ironing board, press the fixed slot lock upwards to attach it to the ironing board (Fig. 6).


Assembling the fabric brush
The fabric brush can be attached to the steam head. To avoid any injuries, make sure the appliance is off and the steamer is cool when you attempt to install or uninstall the brush
-
If the unit has been used recently, turn it off, allow all the steam to dissipate and let the steamer cool down for at least one hour.
-
Hold this accessory at the soleplate of the steam head and push it firmly onto the front part of the soleplate (Fig. 7).
Getting Started (Cont.)

natural_image
Technical line drawing of a mechanical component with two views (top and side), showing internal features and a threaded edge detail (no text or symbols)Folding/unfolding the ironing board (vertical steaming)
- To move the ironing board into a vertical position, first release the board lock and rotate the board to a vertical position (Fig. 8).
- Pull back the revolving lock and then press down the fixed lock (Fig. 9). You can now use the board for vertical steaming.

natural_image
Diagram of a table with two legs and a central circular top, labeled Fig. 8 (no text or symbols on the diagram itself)
- You can also adjust the pole height before use, to ensure maximum comfort when ironing or steaming. Ensure the pole locks have been re-fastened before use.
Instructions
Water usage
IMPORTANT!
- Never fill the water tank with chemical substances, perfumes, vinegar, mineral water, starch, descaling agents, ironing aids, cleaning agents or liquids other than water when using the steam iron. These products may cause damage to the appliance.
- Before filling and refilling with water, always remove the plug from the mains power socket. Never refill the water tank while the appliance is connected to the electricity supply as there is a risk of electric shock.
NOTE: To extend the product life, we recommend using purified water: distilled, demineralised or cold, boiled water. (Tap water may be used if it is rated very soft in your locality. If you are unsure about the water hardness level in your area, please inquire at your local water services provider.)
First Use
1. Filling the water tank
- Before filling the water tank, ensure the appliance is switched off and unplugged.
- Ensure it is located on even and stable ground, before removing the water tank (Fig. 10).
- Invert the tank and unscrew the cap. Fill with fresh, clean water before replacing the cap (Fig. 11).
NOTE: Always add cold water to the water tank, hot water will damage the tank and the inside of the appliance.
- Place the tank back into the appliance (Fig. 12).


Instructions (Cont.)
2. Electrical connection
- Plug the power cord into an appropriate wall socket.
- Ensure the Steam Control Dial is on the "OFF" position before switching the power point on.
3. Cleaning the appliance for first use
FIRST USE
- Before steam-ironing garments we recommend using the self-clean function. This will ensure all dust and potential remnants from the manufacturing process are removed from the water tank and steam system. Alternatively, use the appliance on an old rag until you are satisfied that only clean water steam is emitted from the holes on the soleplate.
-
On the first heating up of the appliance, a small volume of vapours and/or odour may be generated, caused by production residues. This is completely normal and is not dangerous. Provide for sufficient ventilation, for example, open a window.
-
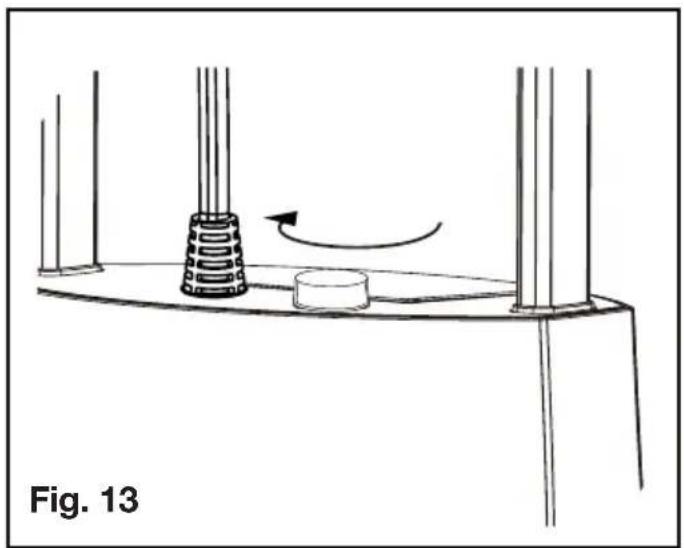
Check that the steam control dial is in the "OFF" position - the indicator light will illuminate red (Fig. 13).
- Rotate the dial to the "Clean" position (Fig. 14).
natural_image
Diagram of a mechanical setup with a rotating component and a cylindrical block, labeled Fig. 13 (no text or symbols on the diagram itself)
- Press the steam switch on the iron/steamer (Fig. 15). The appliance will enter cleaning mode.
- Aim the steam head into a sink or a heatproof container. After about 30 seconds, the machine will spray hot water, cleaning it internally. Hot water, steam and scale particles will be flushed out of the steam holes at the bottom of the steam head (Fig. 16).
Instructions (Cont.)


- Once the self-cleaning cycle is complete, the appliance is ready to use.
WARNING!
Each time the switch is turned on, it will heat up for about 30 seconds before steam is ejected (once the steam switch is pressed).
Ensure care is taken when using this appliance due to emission of steam.
4. Setting the Steam Volume
- Select from the three different steam levels (low [I], medium [II] or high [III]) by turning the steam control dial (see page 15, Fig. 14).
- To produce a quick powerful burst of steam during ironing simply press and release the steam switch.
Vertical steaming
- Prepare the appliance for vertical garment steaming, as described on page 13. Hang your garment on a clothes hanger on the appliance, or on the ironing board itself (Fig. 17).

Instructions (Cont.)
-
Insert the plug to an appropriate power outlet. The indicator light inside the steam control knob will turn red, indicating that the machine is powered on.
-
Turn this dial to the desired steam level (see page 15, Fig. 14). The temperature indicator light will illuminate and the appliance will start to heat up. To dry iron, wait until the temperature indicator light has turned off, then start ironing without pressing the steam switch (Fig. 18).
-
To create a burst of steam, wait until the temperature indicator light has turned off, then press and release the steam switch (Fig. 19).
-
Please note, in order to generate continuous steam, you can keep pressing the steam switch, or lock the switch by pressing the switch while pushing it back (Fig. 20).


-
With one hand pull the garment flat, then steam it from top to bottom. CAUTION: The steam is hot, take utmost care to avoid scalding! Hold the steam head upright and direct the steam towards the creases in the fabric.
-
To remove stubborn creases from fabrics that may be ironed, place the sole-plate on the fabric and utilise its hot temperature together with the hot steam.
-
After you have finished ironing, release the steam switch, and replace the iron on iron rest.
-
After use, rotate the steam control knob counterclockwise to the OFF position. The machine will then turn off, and the indicator light inside the knob will turn red.
-
If the machine is idle for an extended period of time, unplug the power cord.
CAUTION!
Steaming may leave your garment slightly damp, or create small wet spots. Always leave the steamed garment on a clothes hanger to cool down and fully dry before wearing it or putting it away.
Instructions (Cont.)
WARNING!
• DO NOT bend or distort the hose, as this can damage it.
- Do not excessively pull on the hose.
- Keep children away from the steamer.
- When you have finished ironing, always place the iron back to the iron rest.
Horizontal (flat) ironing
- Return the ironing board back to the horizontal position, by unlocking the board lock and then rotating the iron board so that it is flat (Fig. 21).
- Stabilise the board and fasten the fasten the rotary lock.
- Flatten your garments onto the ironing board (Fig. 22).
- Follow steaming/ironing instructions from the "Vertical Steaming" instructions (pages 16-17).
- Switch off and unplug the appliance when you are finished.

natural_image
Line drawing of a device with a curved top and base, labeled 'Fig. 21' (no text or symbols on the device itself)
natural_image
Line drawing of a hairdryer on a stand, labeled Fig. 22 (no text or symbols on the diagram itself)Instructions (Cont.)
Steam head accessories
The 2-in-1 steam & iron station comes with an accessory for the steam head, which improve its versatility for use with different types of fabric.
The fabric brush can be used when steaming thicker, heavier fabrics for faster results. The brush will help open up the weave of fabrics to improve steam penetration and help remove dust and lint. Use light pressure with the fabric brush and guide it from top to bottom over the garment, in direction of the nap or weave of the fabric.
To attach this accessory to the steam head, hold the accessory at the soleplate of the steam head and push it firmly onto the front part of the soleplate.
CAUTION!
Before attaching an accessory, make sure the appliance is switched off, disconnected from the power supply and has cooled down for safe handling.
To use the steam head with this brush, hold the steam head and guide it slowly over the garment with the brush bristles touching the garment.
CAUTION: The soleplate is hot, take utmost care to avoid scalding!
HEAT-SENSITIVE FABRICS
- Exercise caution when steaming or ironing heat-sensitive fabrics such as nylon, polyamide or other synthetic fibres. Do not touch such fabrics directly with the hot soleplate of the steam head/iron. Always check at a concealed part first (e.g., inside seam) to ensure that the hot steam will not cause any damage to the garment.
- Should the care instructions in the garment forbid ironing ☑ do not use the steamer on it, or you will risk causing permanent damage to the garment.
- Do not use the appliance on leather, velvet, impregnated furniture or steam-sensitive materials. If you do, the material/furniture could become damaged.
Instructions (Cont.)
Curtain and soft furnishing care
Creases and wrinkles can be removed from heat-resistant curtains and draperies. Always carry out a test first on a concealed part of the item. Hang the item over a pole, then follow the directions on pages 16-17 for vertical steaming.
WARNING!
Please ensure that everyone who is using this appliance is well aware of the operating methods. Improper operation may result in hot water and scale residues being sprayed onto the items to be steamed, or causing scalding.
After use
When you have finished using the appliance, take the following steps to prepare it for storage.
- Clean the steam head after each use.
• Make sure the steam switch has been released. - Ensure the steam control knob is in the OFF position.
- Unplug the appliance. Wait until it is completely cool. Drain any water from it - do NOT store this steam and iron station with water still in it.
Storage
- Place the iron/steamer into the stand.
- Open locks on the poles, and reduce them to their minimum height. Refasten the locks (Fig. 24 (1)).
- Return the ironing board back to the vertical position, by unlocking the board lock (Fig. 24 (2)) and then rotating the iron board 90 degrees (Fig. 24 (3)).
- Stabilise the board and fasten the side supporting stand lock.

Instructions (Cont.)
• The appliance is now ready for storage (Fig. 25).
- Store the appliance in a dry place, out of reach of children.
- For longer-term storage we recommend you disassemble the appliance and store it in its original packaging, in a dry location, out of reach of children.

natural_image
Line drawing of a lamp with adjustable arm and base (no text or symbols)FAQs & Troubleshooting Guide
If you experience problems with your 2-in-1 steam & iron station, or it appears not to be operating correctly, check in the list below for answers to frequently asked questions. If none of the solutions offered helps you solve your problem, please contact our after sales support centre for advice using the details at the bottom of the page. Do not attempt to repair the appliance yourself!
| Table 2: Troubleshooting guide | ||
| Problem Possible cause Solution | ||
| The steam head ejects no or very little steam. | The supply of water in the tank is exhausted. | Fill the water tank with water. |
| The steam switch is not set to steam or not set to a high enough gear. | Set the steam switch to steam or adjust to a higher gear. | |
| Limescale is causing intermittent steaming. | Use the self-clean function and/or limescale treatment to clean out the steam system (see pages 23-24). | |
| The steam head does not heat up. The power light does not come on. | The appliance is not properly connected to mains power. | Insert the plug into a wall power socket and turn on the power to the outlet. Then set the steam switch to steam. |
| The product circuitry or fuse failed, or the power switch is broken. | Have your appliance repaired by an authorised repairer. | |
| The nozzle is leaking. | The nozzle is broken. | Replace the nozzle - contact our after sales support centre. |
| The steam volume is too great. | Reduce the steam volume. | |
| The device is leaking. | The water tank cap is not tightened. | Tighten the water tank cap. |
| The low water alarm is sounding. | There is too little water in the tank. | Fill the tank with more than 200 mL of water. |
| Steaming stops during use. | The appliance will stop steaming when the water tank is empty or low. | Refill the tank. |
Other Useful Information
Cleaning and care
WARNING! Before cleaning the appliance housing, always switch off and unplug the appliance from the power supply. There is a risk of electric shock. Also ensure the appliance has cooled down and is safe to touch. There is a risk of scalding.
Cleaning the housing
If the appliance housing requires cleaning, wipe it with a soft, dry or slightly damp cloth and a mild, non-aggressive cleaning agent, if necessary.
CAUTION! Never use harsh cleansers. These can damage the surfaces.
Cleaning the steam system
The steam system inside the appliance requires regular cleaning, about every two to three weeks, to keep the system in good working order. The appliance is equipped with a self-cleaning system for this purpose.
To clean the steam system, proceed as follows:
- Set up the appliance near a sink. (Alternatively, keep a bucket close by.)
- Fill the water tank with water.
- Check that the steam control dial is in the "OFF" position - the indicator light will illuminate red.
- Rotate the dial to the "Clean" position.
- Press the steam switch on the iron/steamer. The appliance will enter cleaning mode.
- Aim the steam head into a sink or a heatproof container. After about 30 seconds, the machine will spray hot water, cleaning it internally. Hot water, steam and scale particles will be flushed out of the steam holes at the bottom of the steam head.
- At the end of the self-cleaning cycle, manually adjust to the steam mode or switch off the machine.
Other Useful Information (Cont.)
Deep Cleaning/Removing Limescale
In hard water areas, the scale may build up on the heating element. If distilled water is not used, and scale is allowed to accumulate, the steamer efficiency and product life will be reduced. In order to prolong the effectiveness of your appliance and avoid any traces of limescale, you must rinse it least once a month as described below:
- Set up the appliance near a sink. (Alternatively, keep a bucket close by.)
- Turn off the unit and unplug it. Wait for at least one hour until the appliance has cooled down completely.
- Mix water and white vinegar in a 1:1 ratio and pour the mixture into the reservoir in the main unit, filling it to the top.
- Plug in the appliance and turn the steam control knob to the "Cleaning" position. Wait about 30 seconds for it to heat up, before pressing the steam switch, and pointing the iron soleplate towards the sink/heatproof bucket.
- Steam and boiling water will emit from the nozzle on the soleplate. The discharge contains scales and minerals that deposited in steam chamber in previous uses. Please be cautious with the discharged hot water, to prevent burns.
- Gently move the iron back and forth until the water is empty. Add more distilled water into the reservoir if necessary until no water scale is coming out from the nozzle.
- After every 50 hours of usage, please take out the water tank, disassemble the telescopic poles and ironing board from the main unit, and empty the remaining water from the unit. Please do not lose the gasket seal.
Other Useful Information (Cont.)
Safety features
The appliance is equipped with two important safety features.
- A thermostat shuts off the power to the appliance when the boiler is overheating.
- If the thermostat fails, a fuse triggers when the boiler is overheating.
Service, repair and spare parts
If the appliance is damaged, do not attempt to repair it yourself. Do not disassemble or modify the appliance. If it requires repair or service, please contact our after sales support centre to arrange for examination or return of the product.
For more information on available spare parts for this appliance, call the centre on 1300 112 534 or email us at parts@tempo.org.
Technical specifications
| Model 2IN1GSIS | |
| Rated voltage / frequency 220-240 V 50-60 Hz | |
| Unit power 1345-1600 W | |
| Water tank capacity 1.6 L | |
| Steam generation time (approx.) 30 s | |
| Dimensions, assembled (approx.) 360 (L) x 270 (W) x 1535 (H) mm | |
| Weight (approx.) 5.48 kg without water, | 7.06 kg with full water tank |
Other Useful Information (Cont.)
Compliance
This appliance has been fully tested and meets all requirements as set out by standards AS/NZS 60335.1 and AS/NZS 60335.2.3 and AS/NZS 60335.2.85.

The RCM Mark (Regulatory Compliance Mark) indicates that the product complies with the relevant guidelines of the ACMA as well as corresponding government requirements for the safety of electrical devices.
Responsible disposal


Packaging materials are recyclable. Please dispose of them responsibly for recycling.
At the end of its working life, do not throw this appliance out with your household waste. Electrical and electronic products contain substances that can have a detrimental effect on the environment and human health if disposed of inappropriately. Observe any local regulations regarding the disposal of electrical consumer goods and dispose of it appropriately for recycling.
Contact your local authorities for advice on recycling facilities in your area. Or find recycling scheme services listed on Planet Ark's website at www.recyclingnearyou.com.au, or call Planet Ark on 1300 733 712.


STIRLING®
2-in-1 Steam & Iron Station
Repair and Refurbished Goods or Parts Notice
Unfortunately, from time to time, faulty products are manufactured which need to be returned to the supplier for repair.
Please be aware that if your product is capable of retaining user-generated data (such as files stored on a computer hard drive, telephone numbers stored on a mobile telephone, songs stored on a portable media player, games saved on a games console or files stored on a USB memory stick) during the process of repair, some or all of your stored data may be lost. We recommend you save this data elsewhere prior to sending the product for repair.
You should also be aware that rather than repairing goods, we may replace them with refurbished goods of the same type or use refurbished parts in the repair process.
Please be assured though, refurbished parts or replacements are only used where they meet ALDI's stringent quality specifications.
If at any time you feel your repair is being handled unsatisfactorily, you may escalate your complaint. Please telephone us on 1300 112 534 or write to us at:
Tempo (Aust) Pty Ltd ABN 70 106 100 252
PO BOX 6056 Frenchs Forest, Sydney, Australia NSW 2086
Web support: tempo.org/support
Tempo Help Desk: 1300 112 534 (Aust)
(Operating Hours: Mon-Sat 09:00am to 06:00pm AEST)


natural_image
Icon showing a person reading a book with an exclamation mark symbol (no text or numbers present)Please read the manual
It will help you get the best out of your product.
Still have questions?St
Call after sales support 1300 112 534
Or visit www.tempo.org
Warranty returns
Should you for any reason need to return this product for a warranty claim, make sure to include all accessories with the product.
Product does not work?
If you encounter problems with this product, or if it fails to perform to your expectations, make sure to contact our After Sales Support Centre on 1300 112 534 for advice.
For an electronic copy of this manual, go to www.stirlingappliances.com.au and download a copy, or contact our after sales support centre.
Instruction Manual Revision Index
Version No Issue Date Description
V1.0 3 December 2023 Original release
V1.1 12 January 2024 Minor updates
V1.2 17 January 2024 Minor updates
- 2-in-1 Steam & Iron Station
- Welcome
- Contents
- Warranty Details
- General Safety Instructions
- IMPORTANT SAFETY INSTRUCTIONS READ CAREFULLY AND KEEP FOR FUTURE REFERENCE
- Electrical safety and cord handling
- General Safety Instructions (Cont.)
- Usage conditions and restrictions
- CAUTION: HOT!
- WARNING: HOT SURFACES!
- WARNING: DANGER OF SCALDING!
- Product Overview
- Scope of delivery
- Assembled steam and iron station
- Documentation (not shown)
- Getting Started
- Before first use
- WARNING!
- Getting Started (Cont.)
- Assembling the appliance
- Ironing board assembly
- Assembling the fabric brush
- Folding/unfolding the ironing board (vertical steaming)
- Instructions
- Water usage
- IMPORTANT!
- First Use
- Filling the water tank
- Instructions (Cont.)
- Electrical connection
- Cleaning the appliance for first use
- Setting the Steam Volume
- Vertical steaming
- CAUTION!
- Horizontal (flat) ironing
- Steam head accessories
- HEAT-SENSITIVE FABRICS
- Curtain and soft furnishing care
- After use
- Storage
- FAQs & Troubleshooting Guide
- Other Useful Information
- Cleaning and care
- Cleaning the housing
- Cleaning the steam system
- Other Useful Information (Cont.)
- Deep Cleaning/Removing Limescale
- Safety features
- Service, repair and spare parts
- Compliance
- Responsible disposal
- STIRLING®
- Repair and Refurbished Goods or Parts Notice
- Please read the manual
- Still have questions?St
- Warranty returns
- Product does not work?
- Instruction Manual Revision Index
Brand : Stirling
Model : 2IN1GSIS
Category : Ironing board