OO656X - Oven OMEGA - Free user manual and instructions
Find the device manual for free OO656X OMEGA in PDF.


| Brand | Omega |
| Model | OO656X |
| Product Type | Electric Built-in Oven |
| Dimensions (HxWxD) | 865 x 595 x 550 mm (approx.) |
| Power Supply | 230 V, 50/60 Hz |
| Maximum Power | Approx. 4.6 kW (top: 3000 W, bottom: 1600 W, lamp: 25 W) |
| Oven Capacity | Not specified (standard built-in size) |
| Number of Rack Positions | 9 |
| Cooking Functions | Defrost, Convection Bake, Convection Grill, Grill, Light |
| Control Type | Electronic with push & shuttle knob and mode knob, digital display |
| Timer Functions | Minute minder (0-60 min), timed cooking (duration up to 240 min), delayed cooking |
| Child Lock | Yes (hold Time & Temp knob for 3 seconds) |
| Oven Light | Replaceable 230 V, 15-25 W bulb |
| Door | Removable for cleaning |
| Safety Features | Automatic shut-off after 12 hours, error code display, cool-to-touch handle (not specified) |
| Cleaning | Do not use steam cleaner; use soft cloth and mild detergent |
| Accessories Included | Oven racks (quantity not specified) |
| Installation | Built-in with cutout dimensions (see manual) |
| Energy Saving Mode | Eco-Bake function (may be available, not confirmed for OO656X) |
Frequently Asked Questions - OO656X OMEGA
User questions about OO656X OMEGA
0 question about this device. Answer the ones you know or ask your own.
Ask a new question about this device
Download the instructions for your Oven in PDF format for free! Find your manual OO656X - OMEGA and take your electronic device back in hand. On this page are published all the documents necessary for the use of your device. OO656X by OMEGA.
USER MANUAL OO656X OMEGA
Instruction Manual for Electric Ovens
OO655X
OO656X
00657X
00686X
00687X
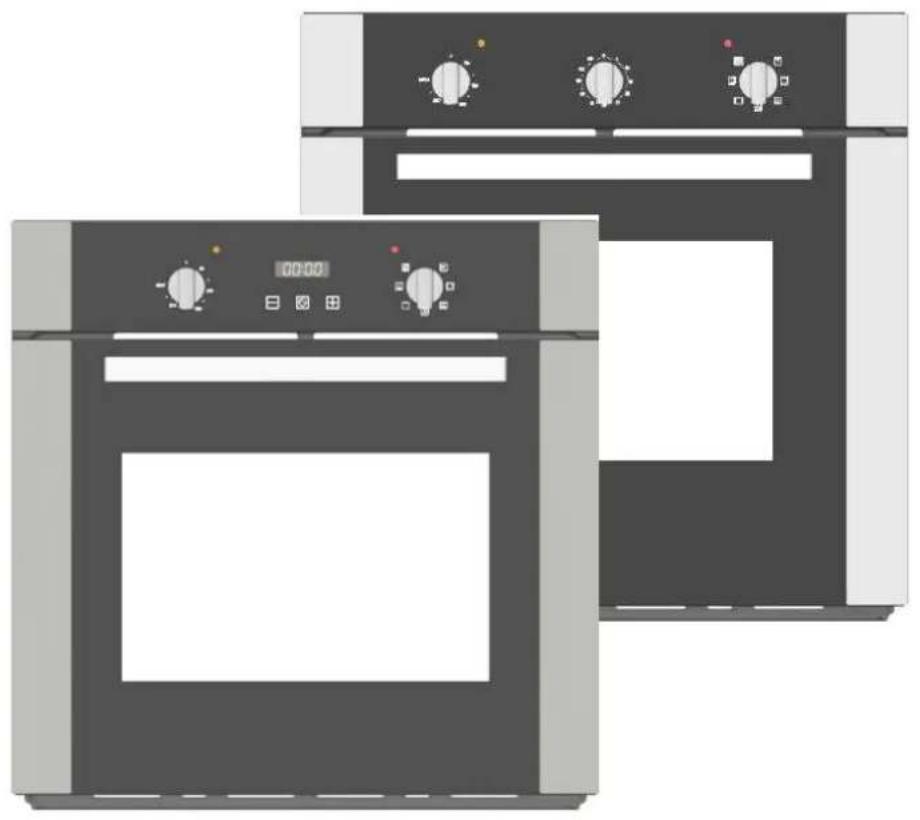
natural_image
Illustration of two kitchen ovens with control knobs and a digital display (no text or symbols)DEAR CUSTOMER,
We thank you and congratulate you on your choice.
This new carefully designed product, manufactured with the highest quality materials, has been carefully tested to satisfy all your cooking demands.
We would therefore request you to read and follow these easy instructions, which will allow you to obtain excellent results right from the start.
TABLE OF CONTENTS
Accessories....4
Safety Instruction....5
Installation of Your Oven....7
Electrical Installation....8
INSTRUCTIONS FOR USE......
Oven Racks....9
Cooking Functions....10
Electronic Control....11
Timer....12
Error Code Table....14
Oven Door Removal....15
Replacement of Oven Light....16
Guidance Temperature and Time Schedule for Cooking....17
ACCESSORIES
Important
- When you receive the appliance, unpack it or have it unpacked immediately.
Give it an overall inspection. Make note of any concerns or reservations on the delivery slip and make sure to keep a copy of this form. Keep this user guide with your appliance.
If the appliance is ever sold or transferred to another person, ensure that the new owner receives the user guide. Please become familiar with these recommendations before installing and using your oven. They were written for your safety and the safety of others.
WARNING:
- The Appliance is not intended for use by persons (including Children) with reduced physical, sensory or mental capabilities, or lack of experience and knowledge, unless they have been given supervised instruction concerning use of the appliance by a responsible person for their safety.
- Cleaning and maintenance operations must not be carried out by children without supervision.
- Children must be supervised to prevent them from playing with the appliance.
WARNING:
- During use the appliance becomes hot. Care should be taken to avoid touching heating elements inside the oven.
- Accessible parts will become hot when in use. To avoid burns and scalds, young children should be kept away.
Use
- Before using your oven for the first time, heat it while empty for approximately 15 minutes.
You should ensure you heat each element in the oven before use. Make sure that the room is sufficiently ventilated. You may notice a particular odour, or a small release of smoke. All of this is normal.
Your appliance is intended for standard household use. Do not use it for commercial or industrial purposes or for any other purpose than that for which it was designed.
This oven was designed for use by private individuals in their homes. It is intended solely for cooking foodstuffs.
This oven does not contain any asbestos-based components.
- Do not modify or attempt to modify any of the characteristics of this appliance. This would be dangerous to your safety.
- Never pull your appliance by the door handle.
- When placing dishes inside or removing them from the oven, do not place your hands close to the upper heating elements and use heat-protective kitchen gloves.
- At the end of cooking, do not pick up oven or grill items (grid) with your bare hands.
- Never place aluminium foil directly in contact with the floor of the oven, as accumulated heat may cause deterioration of the enamel.
- Do not place heavy weights on the open oven door, and make sure that children are able neither to climb nor sit on it.
- Do not use your oven as a larder or to store any items after use.
- After using your oven, make sure that all the controls are in their stop position.
- In addition to the accessories supplied with your oven, only use dishes capable of withstanding high temperatures.
Maintenance and cleaning
- Do not use a steam cleaner.
- For any cleaning operation inside the oven cavity, the oven must be switched off.
- Before unclipping the glass, allow the appliance to cool.
- Before removing the back, ensure that the appliance is powered down. After cleaning, the back should be replaced in accordance.
- Do not use harsh abrasive cleaners or sharp metal scrapers to clean the oven glass door since they can scratch the surface, which may result in shattering of the glass.
- To clean both the electronic programmer window and the oven door, use a soft cloth.
- Do not use cleaning products, abrasive creams, or scouring sponges.
Warning :
- Make sure the appliance is disconnected from the power before replacing the lamp in order to avoid the risk of electric shock.
- Change the lamp only when the appliance has cooled down. To unscrew the view port and the light, use a rubber glove, which will make disassembly easier.
Warning :
- Installation should only be performed by qualified installers and technicians.
Warning :
If the electrical supply is restricted, means of all-pole disconnection must be accessible and incorporated in the fixed wiring in accordance with the wiring rules.
If the power cable is damaged, it should be replaced by the manufacturer, its after-sales service department or by a similarly qualified person in order to avoid danger.
PACKAGING

- This appliance's packing materials are recyclable. Recycle them by depositing them in local authority containers provided for this purpose.
- Your appliance also contains many recyclable materials. It is therefore marked with this logo to
indicate that used appliances must not be mixed with other waste.
INSTALLATION OF YOUR OVEN
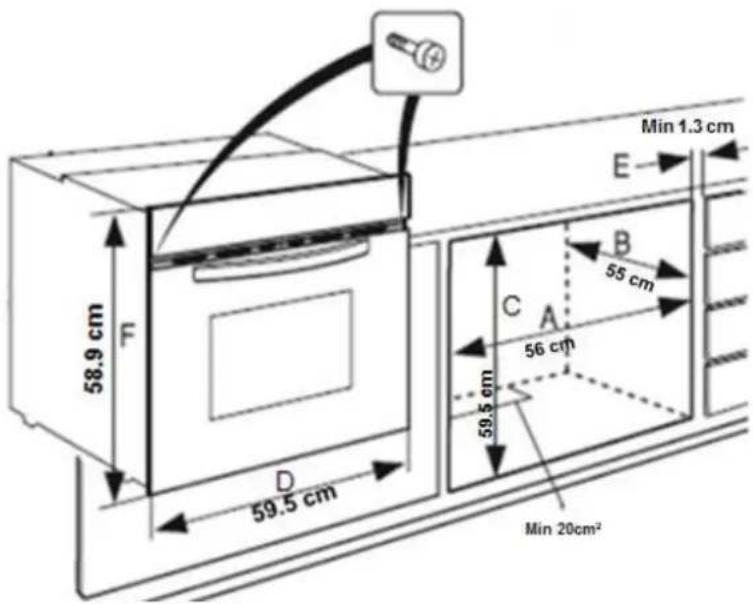
To install the oven into the kitchen a cut out should be made in accordance with the dimensions shown in below.
The apparatus is to be fastened to the top by means of the two screws provided in the kit through the holes made on the oven uprights.
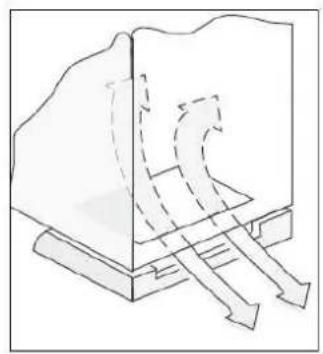
The cabinet in which the apparatus is installed shall be open on the back side to ensure a sufficient air circulation and prevent overheating.
Leave a gap of at least 20 cm ^2 for air circulation if the oven is installed in a column; this is not necessary if the oven is installed under the work top.
WARNING
As the apparatus is to be fitted in your kitchen furniture, make sure that all surfaces in contact with the oven can resist a temperature of approx 90^ C.
Option 1
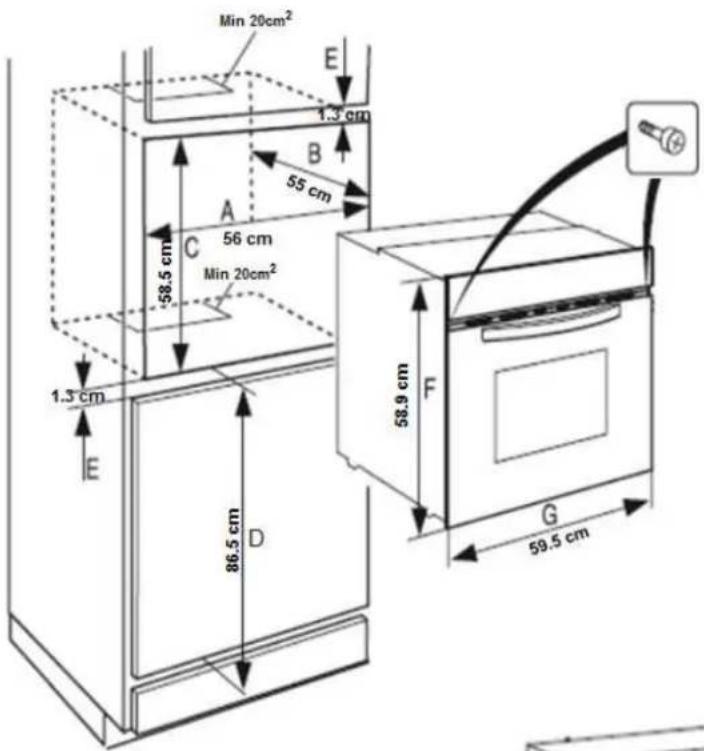
Min 20cm ^4 for air circulation
natural_image
Pure technical diagram of a mechanical or structural component with internal flow arrows (no text or symbols)Option 2
ELECTRICAL INSTALLATION
WARNING
This apparatus must be earthed.
The oven is only for domestic use.
The feed voltage and the absorbed power are as indicated on the data plate attached to the left-hand side upright, which can be seen when the oven door is open.
Connecting must be carried out by qualified personnel and in accordance with the regulations currently in force.
The manufacturer cannot be held responsible for any damages to persons or objects caused by failure to observe these instructions.
If the supply cord is damaged, it must be replaced by the manufacturer, its service agent or similarly qualified persons in order to avoid a hazard.
The oven must be connected to the mains through a multipole circuit breaker with a contact-to-contact gap of at least 3 mm, making sure that the earth wire is not disconnected.
For connecting use a flexible cable of the H05V2V2-F 3x1,5 mm2 type remembering to make it long enough to allow the oven to be removed from its housing unit when maintenance work is required.
To connect the cable to the oven, proceed as follows (see Fig. 2):
- Remove the lid (1) by unfastening the three screws (2).
- Unfasten the two screws (3) for the cable holder and feed the cable through the opening immediately below the cover.
- Remove about 12 cm of the outside insulation from the cable and shorten the two active wires (live and neutral) to 6 cm, leaving long the one to be connected to the main earth terminal on the terminal box; remove about 1 cm of the main insulation from the three wires and connect them correctly to the terminal box, Remembering to respect the polarities.
- Tighten the two screws (3) of the cable holder and put the lid (1) back on with the three screws (2).
Electricals Specification
- Absorbed power:
Oven top element: 2000+1000 W
Oven bottom element: 1200+400 W
Lamp: 25 W
- Maximum absorbed power: (see data plate).
- Supply voltage: (see data plate).
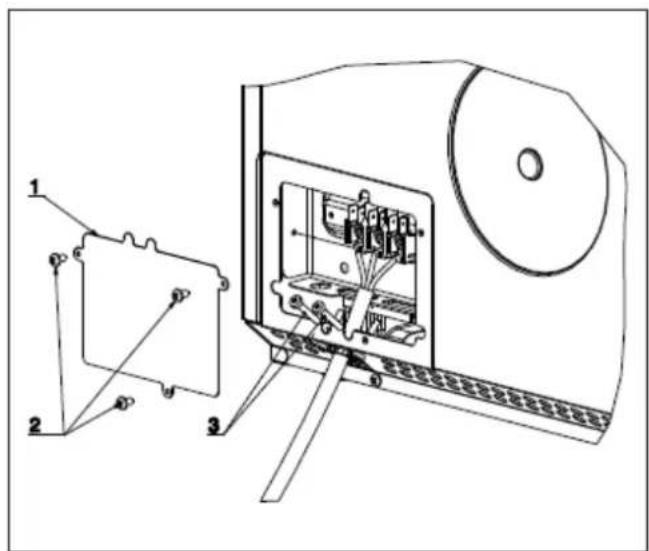
Fig. 2
INSTRUCTIONS FOR USE
Oven Racks (OO656X, OO657X, OO686X, OO687X)
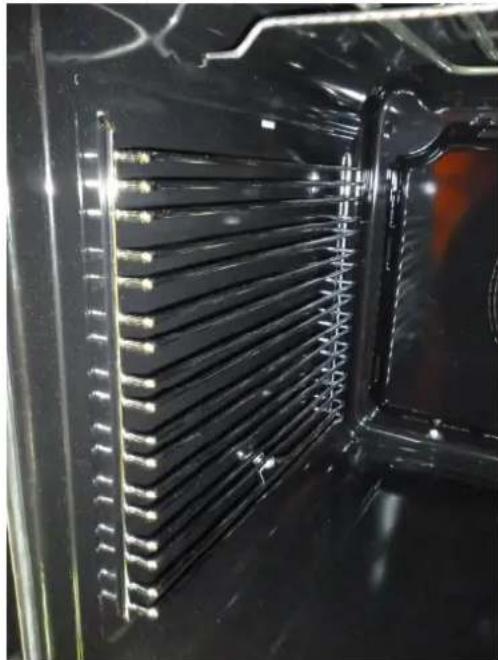
There are 9 oven rack positions available within the oven.
This allows food to be positioned at various levels for even cooking.
(OO655X has 5 oven rack positions)
natural_image
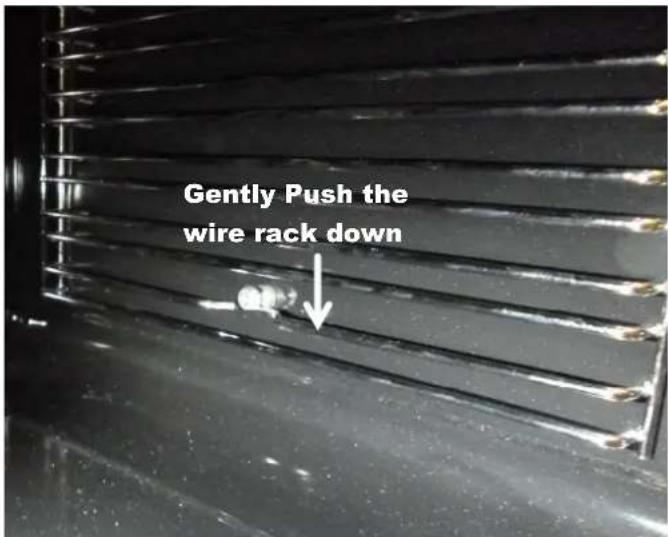
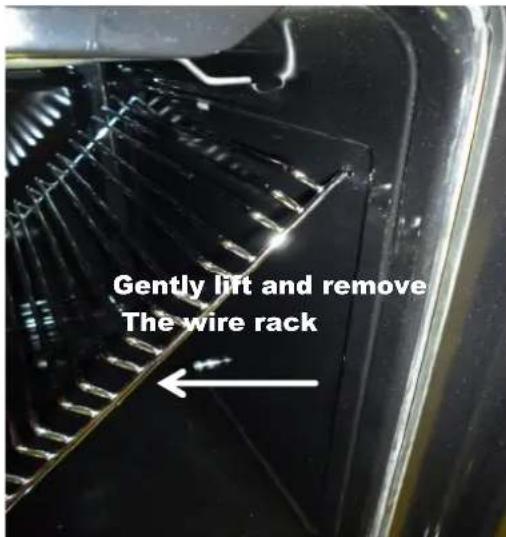
Close-up of a black industrial fan or vent with visible heat dissipation fins and cooling fins (no text or symbols)The racks can easily be removed to allow you to clean the oven cavity.
INSTRUCTIONS FOR USE Cont.
Cooking Functions
Each type of oven is provided for various cooking systems. A system can be selected by bringing the pointer of knob to the relating symbol.
(00655X, 00656X, 00657X, 00686X)
| MODE | PRESET(°C) | TMIN(°C) | TMAX(°C) | HEATING ELEMENTS | NAME | 5 FUNCTION |
| [530] | ZERO | |||||
 | - - - | LIGHT | ||||
 | - - - | DEFROST | ||||
 | 190 50 250 2300 | CONVECTION BAKE | ||||
 | 230 50 250 2000 | CONVECTION GRILL | ||||
 | 230 50 250 2000 | GRILL |
(00687X)
| MODE | PRESET(°C) | TMIN(°C) | TMAX(°C) | HEATING ELEMENTS | NAME | 7 FUNCTION |
| [4726] | ZERO | |||||
 | - - - | LIGHT | ||||
 | - - - | DEFROST | ||||
 | 190 | 50 | 250 2300 | CONVECTION BAKE | ||
 | 230 | 50 | 250 2000 | CONVECTION GRILL | ||
 | 230 | 50 | 250 2000 | GRILL | ||
| 210 | 50 | 250 2200 | BAKE | |||
 | 190 | 50 | 250 2200 | CONVECTION ROAST |
Electronic Control
Control Panel Description
(Models: OO686X, OO687X)
The oven control panel is made with one display and two knobs.
- Time & Temperature display.
- Time & Temperature knob (Push & Shuttle).
- Mode (oven functions) knob.
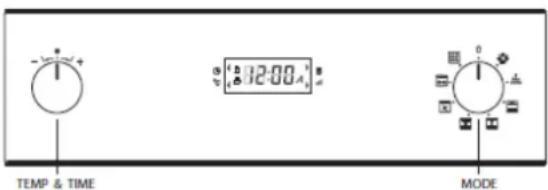
Fig. 8
The push & shuttle knob is mainly for clock or temperature setting and automatic time functions programming. Select the desired item by pushing the knob.
Programming time functions
At every power-up, the control shows the time of day blinking, set at 12:00 as the initial value. The time increases every minute. The only possible action is the “Clock Regulation”, all other oven operations are inhibited.
In general, turn the Temp/Time selector left or right in order to edit the values and modify them by steps; hold the knob on the left or right to fasten the decrease/increase operations.
Setting the time of day
The time of day is always displayed in the 24 hours format. Hours and minutes are set separately.
In order to set the time of day, mode selector must be in ZERO position, the -/+ knob acts on the time of day by default.
- Turn the selector left/right, the hours flash.
- Modify the flashing hours value turning the selector left/right.
- Push the Temp & Time selector to switch back and forth between hours and minutes.
- Modify the flashing minutes turning left/right.
- After a few seconds the whole time of day value starts flashing: wait until the new time of day is steady.
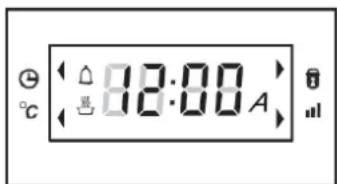
Fig. 9a
Push the knob to toggle between the time of day and the minute minder and check the set values. The clock is selected by default while the symbol appears when the minute minder is displayed.
Alarm Timer
You can set this timer to sound a buzzer after 0 to 60 minutes of cooking. First turn the knob fully clockwise, then turn it back to the desired alarm time
Setting the minute minder (Models: OO656X, OO657X)
When the symbol is displayed, turn the knob left/right in order to set the timer value. The standard value is 30 minutes, it's possible to modify it in the range between 0 and 60 minutes.
This timer has no influence on the oven activities and can be set also when the oven is off. The time of day is displayed with priority in any case, the symbol shows the minute minder is active.
When the time expires, the symbol flashes and the buzzer sounds a warning sequence (two short beeps repeated every 3 seconds) to recall the user attention. Push the knob to stop it. The buzzer stops in any case after a time-out.
Alarm Timer
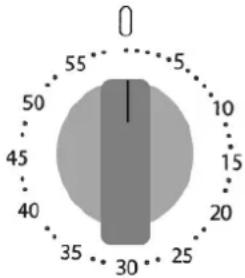
radar
| Value | |---| | 55 | | 5 | | 10 | | 15 | | 20 | | 25 | | 30 | | 35 | | 40 | | 45 | | 50 |Minute Minder
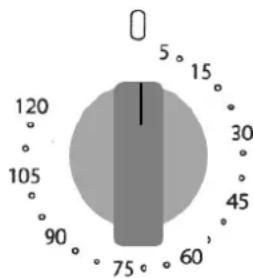
Setting an oven function manually
Turn the mode knob into the desired position, the clock display shows On for a few seconds. The oven will work for a maximum time (12hours). Depending on the oven model, the number and type of available functions can be different.
If the selected function works using any heating elements, the symbol is displayed (it doesn't appear in light and defrost position).
Turn the Temp & Time selector and set the desired oven temperature.
The control offers a PRESET temperature per every cooking mode or a full range between MIN and MAX to be adjusted by hand. Check the value on the display after having selected the temperature.
The temperature appears on the clock display for about 5 seconds when the Time & Temp selector is pushed or when a new function has just been selected.
As soon as the oven starts, the preheat led (indicated by the bars) on the left side of the clock display starts flashing and becomes steadily on when the preheat ends.
Turn the mode selector to ZERO (OFF) position to stop any activity, the display will show OFF for a few seconds.
Setting an automatic oven function
After having selected a function as described before, the control can be programmed in order to set timed cooking activities. The time program remains active even if the function is changed. The following possibilities are available:
- Timed cooking setting the cooking time (duration).
- Timed cooking setting the end of cooking time (stop time).
- Delayed cooking setting duration and stop time. Push the knob in order to toggle between cooking duration (cook time) and end of cooking time (stop time): the words "dur" or "End" are displayed respectively. Turn the knob left/right to edit the duration or the stop time when the proper word is displayed.
INSTRUCTIONS FOR USE Cont.
- When the word dur is displayed, the control shows 30' as the standard cooking duration.
Turn the knob left/right in order to set the actually desired cooking time in a range between 0 and 240 Minutes. The display will flash dur and its value alternatively for a few seconds then it will show the time of day, the pot symbol and the letter to indicate that a timed cooking is active. The end of cooking time is updated automatically.
-
When the word End is displayed, the control shows the current time as the initial stop time. In order to set the actually desired end of cooking time in a 24 hours range:
-
Turn the knob left/right, the hours flash.
- Modify the flashing hours value turning the knob left/right.
- Push the knob to switch back and forth between hours and minutes or wait a few seconds until the minutes flash.
- Modify the flashing minutes value the knob left/right.
- Wait until the new End of Cooking time value stops flashing.
The display will flash End and its value alternatively for a few seconds then it will show the time of day, the symbol and the letter to indicate that a timed cooking is active. The cooking duration is updated automatically.
-
Repeat the same operations of point 1 then push the knob until End appears. The control shows the "current time + cooking time" as the initial stop time. It's not possible to lower the end of cooking time below this value. In order to set the actually desired end of cooking time in a 24 hours range:
-
Turn the knob left/right, the hours flash.
- Modify the flashing hours value turning the knob left/right.
- Push the knob to switch back and forth between hours and minutes or wait a few seconds until the minutes flash.
- Modify the flashing minute's value turning the knob left/right.
- Wait until the new End of Cooking time value stops flashing.
The display will flash End and its value alternatively for a few seconds then it will show the time of day and the letter to indicate that a delayed cooking has been programmed. As soon as the delay time expires, the oven starts and works for the programmed cooking time. The symbol is displayed.
At the end of any timed activity the control shuts down the oven, the buzzer sounds a warning sequence (two short beeps repeated every 3 seconds) to recall the user attention, for a maximum time and makes the time related icons ( , ) flash on the display. Push the knob to silent the buzzer and reset the warning message.
Turn the mode selector to ZERO (OFF) position before reusing the oven.
Oven functions
The control can manage many cooking functions, here below described, their number and availability depends on the oven model. The temperature range is between 50^ C and 250^ C for most functions.
Preset temperatures are mainly 190^ C for convection modes, 210^ C for thermal modes and 230^ C for grilling functions.
Exceptions are Eco-Bake (preset=190°C) and low temperature modes (Light, Defrost, Keep Warm).
Eco-Bake
This function is defined in order to obtain a consistent energy saving. The cooling fan is initially off and turns on only when the inner parts temperature gets high. Cooking might be a little bit slower than the standard Bake, especially when the oven is heavily loaded.
INSTRUCTIONS FOR USE Cont.
Defrost
This function is used to defrost frozen food in a short time. It doesn't heat up the oven, only the convection fan works. The temperature display shows dEF to indicate that this special mode is active.
Commands lock for children safety Hold the Time & Temp knob for about 3 seconds to lock the control panel commands and prevent children from turning on the oven freely. Both knobs are disabled.
Buzzer volume
The buzzer volume can be set turning the Time & Temp knob left/right when the control is in light mode. At any detents the buzzer sounds a double beep, selecting the volume out of three available levels. The buzzer must always be silent between 22:00 and 8:00.
Failure declarations and error codes
The control is continuously checking the status of the system. If an abnormal condition is detected for more than 1 minute, a failure occurs:
- The heaters and the other loads are disabled.
- The display shows a "E" letter followed by a numeric code that depends on the kind of failure.
- The control emits an acoustic warning signal.
To reset a failure declaration, first remove the cause of the failure then turn the selector to (ZERO) OFF.
Error code table
| Error | Description |
| E1 | Temperature sensor broken. |
| E2 | Temperature sensor shorted. |
| E4 | Temperature sensor circuit failure. |
| E8 | Latch time-out overflow. |
| E16 | Free. |
| E32 | Free. |
| E64 | Mode selector disconnected. Cannot be reset. |
| OTHER | Sum of error codes simultaneously detected. |
INSTRUCTIONS FOR USE Cont.
Oven door removal
WARNING
Make sure that:
- The oven is cool and power to the oven has been turned off before removing the door. Failure to do so could result in electrical shock or burns.
- The oven door is heavy and fragile. Use both hands to remove the oven door. The door front is Glass. Handle care-fully to avoid breakage.
- Grasp only the sides of the oven door. Do not grasp the handle as it may swing in your hand and cause damage or injury.
- Failure to grasp the oven door firmly and properly could result in personal injury or product damage.
To remove the oven door (see Fig. 10):
- Open the door completely.
- Lift up the hinge bracket (1) into the slot (2).
- Hold the door firmly on both sides using both hands and close the door.
- Hold firmly; the door is heavy.
- Place the door in a convenient location.
To replace the oven door (see Fig. 10):
- Insert the upper arms (3) of both hinges into the upper slots (6) and the lower arms (4) into the lower slots (7). The recesses (5) must hook on the lips (8).
- Move the hinge brackets (1) back down into position.
- Close and open the door slowly to assure that it is correctly and securely in place.
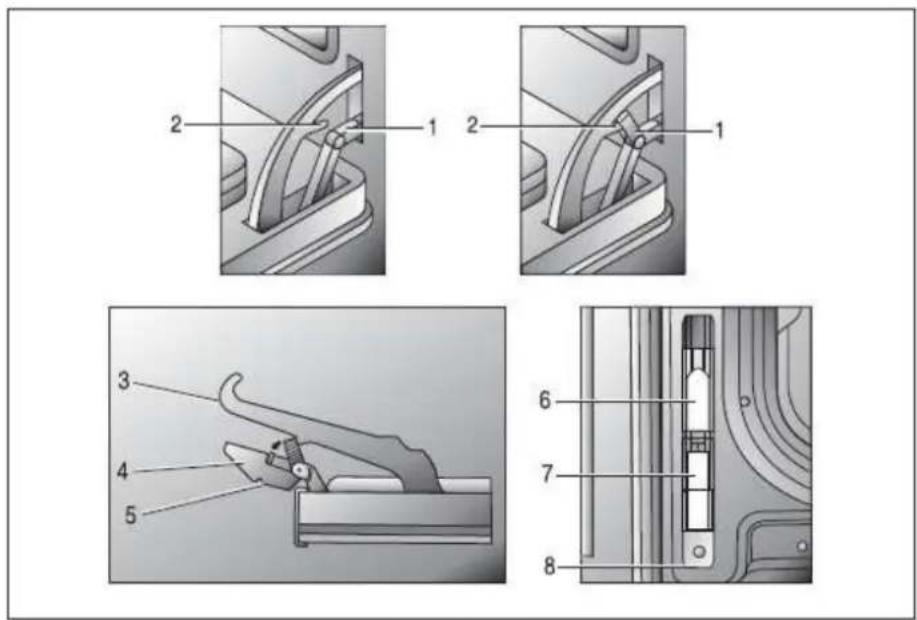
Fig. 10
INSTRUCTIONS FOR USE Cont.
Replacement of the oven light
WARNING
Make sure that:
- The oven and lights are cool and power to the oven has been turned off before replacing the light bulb(s). Failure to do so could result in electrical shock or burns.
- The lenses must be in place when using the oven.
• The lenses serve to protect the light bulb from breaking. - The lenses are made of glass. Handle carefully to avoid breakage. Broken glass could cause an injury.
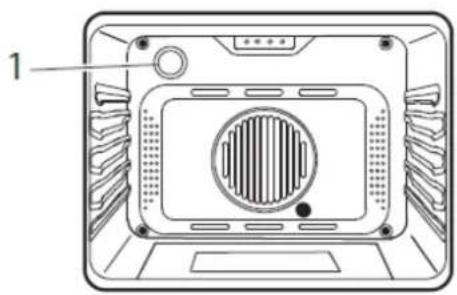
natural_image
Diagram of a device rear panel with ventilation grille and mounting holes (no text or symbols)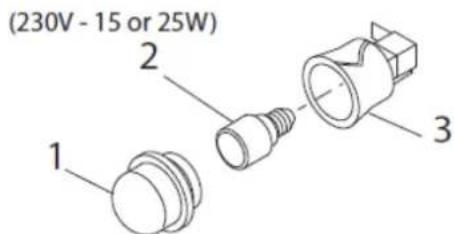
Fig. 11
- Turn off power at the main power supply (fuse or breaker box).
- Remove the lens (1) by unscrewing it.
- Remove the light bulb (2) from its socket (3).
- Replace the bulb (2) with a new one. Avoid touching the bulb with fingers, as oils from hands can damage the bulb when it becomes hot.
- Use one with the same Volt and Watt (see Fig. 11).
- Screw the lens (1) back on.
- Turn power back on at the main power supply (fuse or breaker box).
GUIDANCE TEMPERATURE AN TIME SCHEDULE FOR COOKING
| FOOD | Mode | Rack position (from the bottom) | Traditional cooking system | Hot-air cooking system | ||
| Temperature °C | Cooking time in minutes | Temperature °C | Cooking time in minutes | |||
| Poork, calf (roast) etc. |  | 2nd | 200 ÷ 225 | 100 ÷ 150 | 175 ÷ 180 | 90 ÷ 120 |
| Filett, Roastbeef |  | 2nd | 240 ÷ 250 | 40 ÷ 50 | 210 ÷ 225 | 20 ÷ 30 |
| Poultry (goose, duck, turkey, chicken) whole (4) |  | 1st | 190 ÷ 240 | 150 ÷ 180 | 180 ÷ 225 | 60 ÷ 75 |
| Chicken | 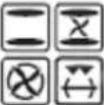 | 2nd | 225 ÷ 250 | 30 ÷ 45 | 210 ÷ 225 | 45 ÷ 60 |
| Hamburger,Chops of Lamb, Chicken thighs |  | 3th | 200 ÷ 220 | 10 ÷ 20 for each side | 180 ÷ 190 | 10 ÷ 15 for each side |
| Game (4) | 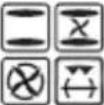 | 1st | 210 ÷ 230 | 80 ÷ 100 | 250 | 45 ÷ 60 |
| Fish |  | 1st | 180 ÷ 190 | 35 ÷ 45 | 175 ÷ 180 | 35 ÷ 45 |
| Cakes |  | 1st | 170 ÷ 200 | 40 ÷ 80 | 150 ÷ 170 | 35 ÷ 70 |
| Biscuits |  | 2nd | 225 | 10 ÷ 20 | 170 ÷ 180 | 10 ÷ 15 |
| Pizza |  | 2nd | 210 ÷ 240 | 15 ÷ 20 | 200 ÷ 210 | 10 ÷ 12 |
| Pizza Multilevel |  | 2nd & 3th or 2nd & 4th | 200 ÷ 210 | 15 ÷ 20 | ||
Warning for hot-air cooking - Position of pans:
- For cooking on 1 plane make use on 2nd holder from the bottom
- For cooking on 2 planes make use of 2nd - 4th holders from the bottom
- For cooking on 3 planes make use of 2nd - 3th and 4th holders from the bottom
- (4) The time depends of poultry dimension, (40 ÷ 45 mins for kg).
IMPORTANT: The cooking times are considered with oven preheated.
We appreciate your feedback.
Please review our products on
www.omegaappliances.com.au
- DEAR CUSTOMER,
- TABLE OF CONTENTS
- INSTRUCTIONS FOR USE......
- ACCESSORIES
- Important
- WARNING:
- Use
- Maintenance and cleaning
- Warning :
- PACKAGING
- INSTALLATION OF YOUR OVEN
- WARNING
- ELECTRICAL INSTALLATION
- This apparatus must be earthed.
- Electricals Specification
- - Absorbed power:
- INSTRUCTIONS FOR USE
- Oven Racks (OO656X, OO657X, OO686X, OO687X)
- INSTRUCTIONS FOR USE Cont.
- Cooking Functions
- Electronic Control
- Control Panel Description
- Programming time functions
- Setting the time of day
- Alarm Timer
- Setting the minute minder (Models: OO656X, OO657X)
- Setting an oven function manually
- Setting an automatic oven function
- Oven functions
- Eco-Bake
- Defrost
- Buzzer volume
- Failure declarations and error codes
- Oven door removal
- Make sure that:
- Replacement of the oven light
- GUIDANCE TEMPERATURE AN TIME SCHEDULE FOR COOKING
- Warning for hot-air cooking - Position of pans:
Brand : OMEGA
Model : OO656X
Category : Oven