
SV431DVIUAQV - Switch StarTech.com - Free user manual and instructions
Find the device manual for free SV431DVIUAQV StarTech.com in PDF.


| Product Type | 4-Port DVI USB KVM Switch with Dual DVI Console and Quad View 4-in-1 Display |
| Model Number | SV431DVIUAQV |
| Number of Computers Supported | 4 (expandable up to 32 via daisy chain) |
| Video Interface | DVI (2 console ports, 4 PC ports) |
| USB Interface | USB 2.0 for keyboard/mouse and peripheral sharing |
| Audio Support | 3.5mm audio jacks for microphone and speaker |
| Display Modes | Full, PIP (Picture-in-Picture), Quad, PAP (Picture-and-Picture) |
| On-Screen Display (OSD) | Yes, with menu navigation and hotkey programming |
| Daisy Chain | Up to 8 additional units via RJ-45 ports |
| RS-232 Control | Yes, for remote management |
| Power Supply | External DC adapter (included with 3 regional power cords) |
| Rack Mountable | Yes, with included brackets |
| Compliance | FCC Class B, CE, RoHS |
| Warranty | 2 years limited |
| Included Accessories | 4x DVI cables, 4x USB A-B cables, 4x 3.5mm audio cables, upgrade cable, rack mount brackets, power adapter, 3 power cords (NA/UK/EU) |
Frequently Asked Questions - SV431DVIUAQV StarTech.com
User questions about SV431DVIUAQV StarTech.com
0 question about this device. Answer the ones you know or ask your own.
Ask a new question about this device
Download the instructions for your Switch in PDF format for free! Find your manual SV431DVIUAQV - StarTech.com and take your electronic device back in hand. On this page are published all the documents necessary for the use of your device. SV431DVIUAQV by StarTech.com.
USER MANUAL SV431DVIUAQV StarTech.com
4 Port DVI USB KVM Switch with Dual DVI Console and Quad View 4-in-1 Display
SV431DVIUAQV
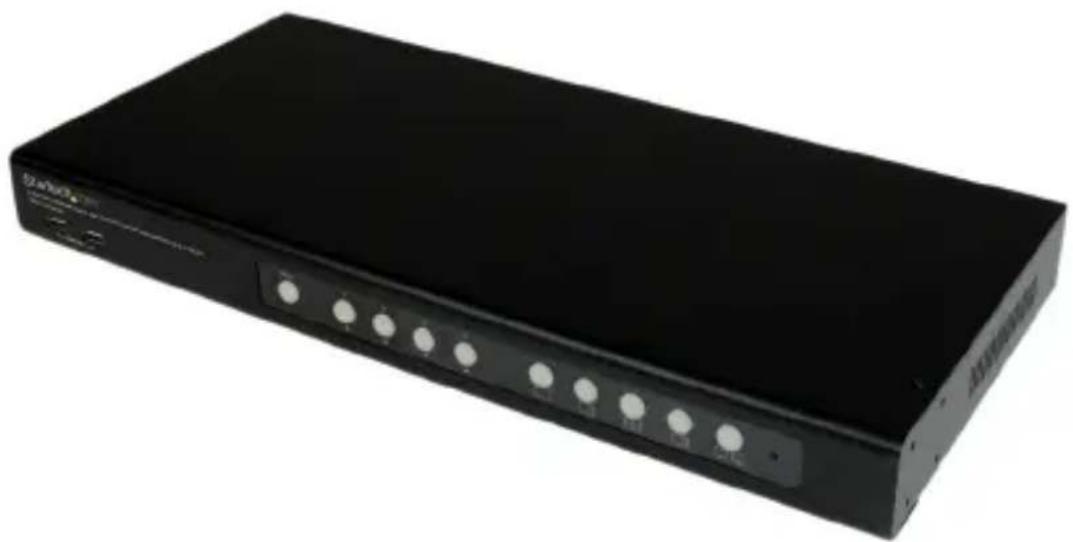
natural_image
Black rectangular electronic device with illuminated ports and indicator lights (no visible text or symbols)*actual product may vary from photos
For the most up-to-date information, please visit: www.startech.com
FCC Compliance Statement
This equipment has been tested and found to comply with the limits for a Class B digital device, pursuant to part 15 of the FCC Rules. These limits are designed to provide reasonable protection against harmful interference in a residential installation. This equipment generates, uses and can radiate radio frequency energy and, if not installed and used in accordance with the instructions, may cause harmful interference to radio communications. However, there is no guarantee that interference will not occur in a particular installation. If this equipment does cause harmful interference to radio or television reception, which can be determined by turning the equipment off and on, the user is encouraged to try to correct the interference by one or more of the following measures:
• Reorient or relocate the receiving antenna.
- Increase the separation between the equipment and receiver.
- Connect the equipment into an outlet on a circuit different from that to which the receiver is connected.
- Consult the dealer or an experienced radio/TV technician for help.
Use of Trademarks, Registered Trademarks, and other Protected Names and Symbols
This manual may make reference to trademarks, registered trademarks, and other protected names and/or symbols of third-party companies not related in any way to StarTech.com. Where they occur these references are for illustrative purposes only and do not represent an endorsement of a product or service by StarTech.com, or an endorsement of the product(s) to which this manual applies by the third-party company in question. Regardless of any direct acknowledgement elsewhere in the body of this document, StarTech.com hereby acknowledges that all trademarks, registered trademarks, service marks, and other protected names and/or symbols contained in this manual and related documents are the property of their respective holders.
Table of Contents
Introduction......1
Packaging Contents .... 1
Product Overview ....1
Front View .... 1
Rear View....3
Installation 3
Console Connection....3
Computer Connection ....4
Technical Support ....5
Warranty Information......5
Introduction
Packaging Contents
• 1 x DVI USB Quad View KVM Switch
- 4 x DVI Cables
- 4 x USB A-B Cables
• 4 x 3.5mm Audio Cables
- 1 x Upgrade Cable
• 2 x Rack Mount Brackets
- 1 x Power Adapter
• 3 x Power Cords (NA / UK / EU)
Product Overview
Front View

| No. | Item | Description |
| 1 | USB2.0 port | Connect to USB peripherals. |
| 2 | OSD menu button | ■ Press to enable the OSD menu.■ Same function as Enter key under OSD menu.■ To close the OSD menu, press ESC button. |
| 3 | PC selection button1/2/3/4 | ■ Press to select PC.■ Select the main/subordinate display in PIP mode.Press □ button to enter PIP mode.· To switch the main display, press the desired PC selectionbutton when the □ button lights solid.· To switch the subordinate, press □ button again to lightsblink, and then press the desired PC selection button.■ Lights to indicate the current connected PC.■ Flashes to indicate the USB connection may beincorrect. Please check the USB connection betweenPC and this unit once the button is flashing.■ Press and hold PC selection button 1 before turningon the power. The upgrade mode will be activatedafter turning on the power.■ Turn the power off. Press and hold PC selectionbutton 3, and then turn the power to on. The outputresolution will be adjusted to 1024x768 after turningon the power.■ To setup the hotkey, press PC selection button 4more than 5 seconds. |
| Arrow key ◀/▶/▼/▲ | Press to move the cursor under OSD menu. | |
| 4 | Display mode buttons | Press to switch the display mode directly.Lights to indicate the current display mode.■ □ Full view■ □ PIP view■ □□ Quad view■ □□ PAP view |
| 5 | □□ Display mode menu | Press to enable display mode menu on screen. |
| 6 | Restart pin hole | Insert a paperclip into the hole to restart the system. |
Rear View

| No. | Item | Description |
| 1 | Power switch | Press to turn on or off the unit. |
| 2 | DC Jack | Connect power adapter. |
| 3 | Daisy Chain (Input /Output) | Connect to up to 8 additional SV431DVIUAQV units. |
| RS-232 control (Input port) | Connect to a computer with RJ45 to RS232 cable for command sending using HyperTerminal. | |
| 4 | Console ports | Connect console DVI monitors, audio, USB mouse and keyboard respectively refer to the icons marked on the unit (A: primary monitor, B: auxiliary monitor). |
| 5 | PC ports | Connect to computers. Each section comprises audio jack, DVI connector and USB type B connector. |
| 6 | Reset pin hole | To restore the factory default settings, insert a paperclip into the hole before turning on the power. |
Installation
Console Connection
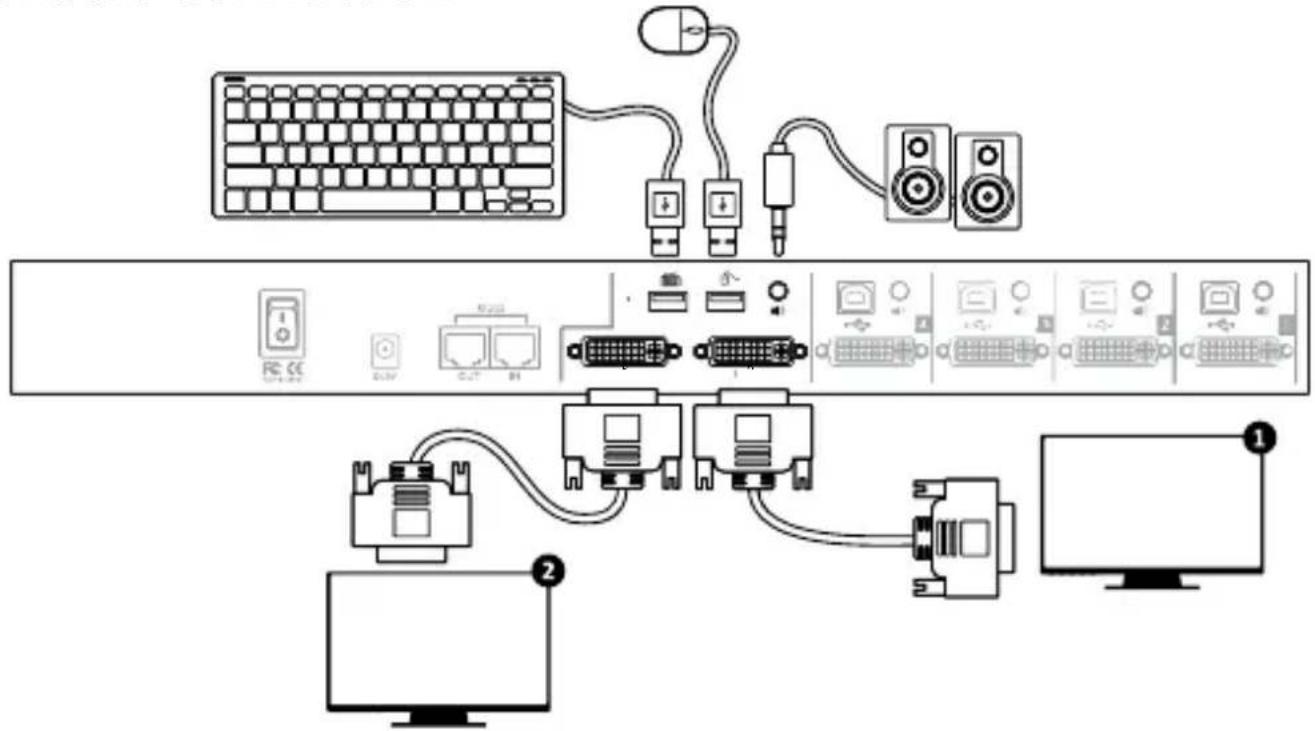
- Connect the AC adapter to the DC jack on the KVM and then to an AC outlet.
- Connect your Primary monitor (1) and Auxiliary monitor (2 - optional).
Note: Connecting monitors with the same resolution / specifications to both console ports is strongly recommended. If using different monitors, please connect the highest resolution monitor to connector B (auxiliary monitor).
-
Connect a keyboard to the USB Type A connector with a keyboard icon marked on the unit.
-
Connect a mouse to the USB Type A connector with a mouse icon marked on the unit.
-
Connect speakers to the audio jack (optional).
Computer Connection
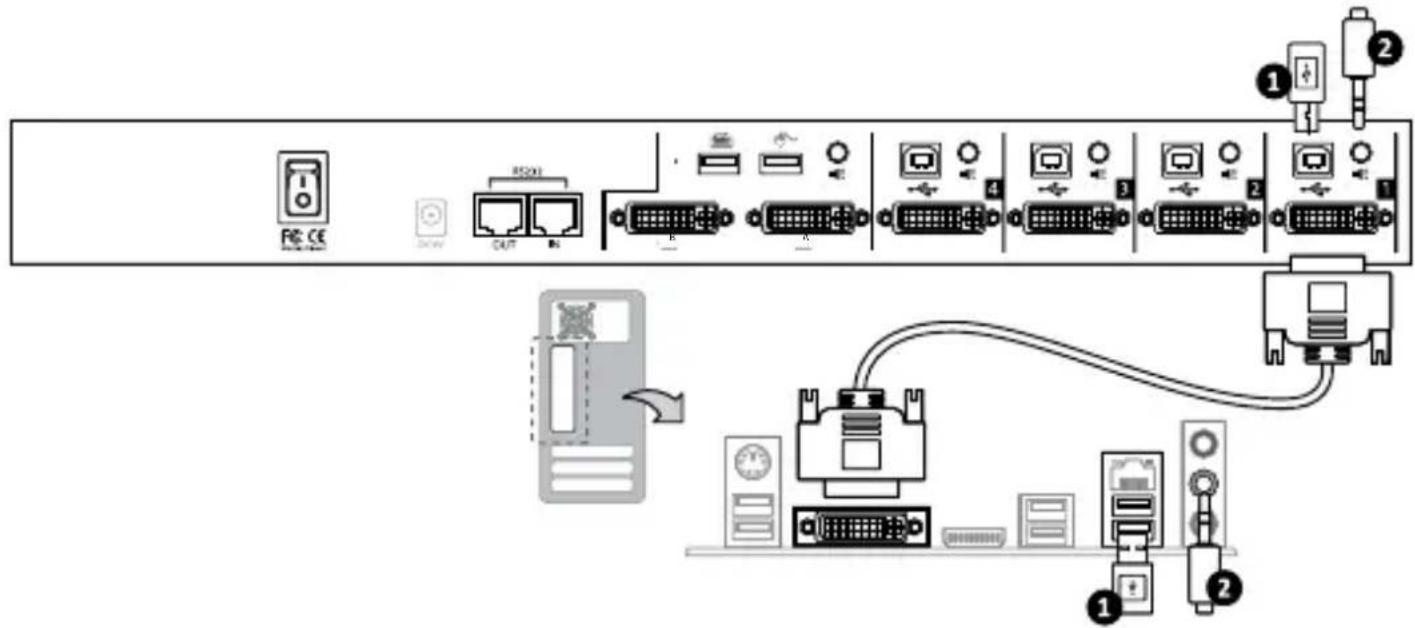
- Connect a USB A-B cable from one of the KVM PC ports to your computer USB port.
- Connect a 3.5mm audio cable from the KVM PC port to your computer audio out jack (optional).
- Connect a DVI cable from the KVM PC port to your video card DVI out.
For full operating instructions, please visit www.startech.com/SV431DVIUAQV
Technical Support
StarTech.com's lifetime technical support is an integral part of our commitment to provide industry-leading solutions. If you ever need help with your product, visit www.startech.com/support and access our comprehensive selection of online tools, documentation, and downloads.
For the latest drivers/software, please visit www.startech.com/downloads
Warranty Information
This product is backed by a two year warranty.
In addition, StarTech.com warrants its products against defects in materials and workmanship for the periods noted, following the initial date of purchase. During this period, the products may be returned for repair, or replacement with equivalent products at our discretion. The warranty covers parts and labor costs only. StarTech.com does not warrant its products from defects or damages arising from misuse, abuse, alteration, or normal wear and tear.
Limitation of Liability
In no event shall the liability of StarTech.com Ltd. and StarTech.com USA LLP (or their officers, directors, employees or agents) for any damages (whether direct or indirect, special, punitive, incidental, consequential, or otherwise), loss of profits, loss of business, or any pecuniary loss, arising out of or related to the use of the product exceed the actual price paid for the product. Some states do not allow the exclusion or limitation of incidental or consequential damages. If such laws apply, the limitations or exclusions contained in this statement may not apply to you.
Hard-to-find made easy. At StarTech.com, that isn't a slogan. It's a promise.
StarTech.com is your one-stop source for every connectivity part you need. From the latest technology to legacy products — and all the parts that bridge the old and new — we can help you find the parts that connect your solutions.
We make it easy to locate the parts, and we quickly deliver them wherever they need to go. Just talk to one of our tech advisors or visit our website. You'll be connected to the products you need in no time.
Visit www.startech.com for complete information on all StarTech.com products and to access exclusive resources and time-saving tools.
StarTech.com is an ISO 9001 Registered manufacturer of connectivity and technology parts. StarTech.com was founded in 1985 and has operations in the United States, Canada, the United Kingdom and Taiwan servicing a worldwide market.
- Port DVI USB KVM Switch with Dual DVI Console and Quad View 4-in-1 Display
- FCC Compliance Statement
- Use of Trademarks, Registered Trademarks, and other Protected Names and Symbols
- Table of Contents
- Introduction......1
- Product Overview ....1
- Installation 3
- Technical Support ....5
- Warranty Information......5
- Introduction
- Packaging Contents
- Product Overview
- Front View
- Computer Connection
- Technical Support
- Warranty Information
- Limitation of Liability
Brand : StarTech.com
Model : SV431DVIUAQV
Category : Switch