
2030-DCR - Door/window sensor KIDDE - Free user manual and instructions
Find the device manual for free 2030-DCR KIDDE in PDF.


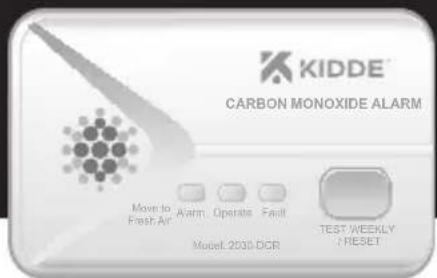
| Product Type | Carbon Monoxide Alarm |
| Brand | Kidde |
| Model | 2030-DCR |
| Power Source | 2 x AA alkaline batteries (not included) |
| Sensor Type | Electrochemical |
| Audible Alarm | 85+ dB(A) at 3 m, 3.0 to 3.5 kHz pulsing pattern (4 quick beeps every 5 seconds) |
| Visual Indicators | Green (normal), amber (trouble), red (alarm) LED |
| Operating Temperature Range | -10°C to +40°C |
| Operating Humidity Range | Up to 90% RH non-condensing |
| Storage Conditions | -20°C to +60°C, 5-95% RH non-condensing |
| Battery Life | Minimum 1 year under normal conditions |
| Product Life | 10 years from date of manufacture (date code on unit) |
| Standards Compliance | EN 50291-1:2018 |
| Mounting Options | Wall-mount (recommended) or free-standing |
| Dimensions | Not specified in manual; typical Kidde CO alarm: approx. 120 mm diameter x 40 mm depth |
| Weight | Not specified; approximate 200 g (with batteries) |
| Warranty | 3-year limited warranty (batteries excluded) |
| Cleaning | Vacuum or compressed air through openings; wipe exterior with damp cloth (water only); do not use detergents or solvents |
| End-of-Life Warning | 2 amber LED blinks and 2 chirps every 60 seconds after 10 years; can be silenced for up to 7 days then must be replaced |
| Low Battery Warning | Amber LED blink and chirp every 60 seconds; can be silenced for 24 hours; replace within 30 days |
| Reset Function | Test/Reset button to temporarily silence nuisance alarms and clear alarm memory |
| Included Accessories | Mounting backplate, screws, wall plugs, quick start instructions |
Frequently Asked Questions - 2030-DCR KIDDE
User questions about 2030-DCR KIDDE
0 question about this device. Answer the ones you know or ask your own.
Ask a new question about this device
Download the instructions for your Door/window sensor in PDF format for free! Find your manual 2030-DCR - KIDDE and take your electronic device back in hand. On this page are published all the documents necessary for the use of your device. 2030-DCR by KIDDE.
USER MANUAL 2030-DCR KIDDE
Battery Carbon Monoxide Alarm
User and Installer Guide
Model: 2030-DCR
Quick Start Instructions included at the back of this User Guide
Type Approved
Safety
Regular Production
Surveillance
www.luv.com
ID 1111246918


EN 50291-1:2018
P/N: 2030-7202-01

2030-7202-01_2030-DCR_UG_54x96_TUV_80%.indd 122-1-7 下午3:17
Thank You for Purchasing this Kidde Alarm
Powered by two AA batteries, this model includes a Reset function to temporarily silence nuisance alarms.
Teach children how to respond to the alarm and that they should never play with the unit. This alarm is designed to detect carbon monoxide from any source of combustion in a residential environment. It is not designed for use in caravans, motor homes or boats.
NOTE: Please thoroughly read this user guide and save the document for future reference and to pass on to any subsequent owner.
IMPORTANT: Additional markings can be found on the back of the unit.
The manufacturer recommends replacing this alarm ten years from the date code on the side of alarm.

ENVIRONMENTAL PROTECTION
Waste electrical products should not be disposed of with household waste. Please recycle where facilities exist. Check with Local Authority or Supplier for recycling advice.
Product Support: 0800 917 0722
Please write down the below information and have this at hand when you call.

Date Code (on side): ____
Date of Purchase: ____
Where Purchased: ____
Date to Replace: ____

Contents
-
Carbon Monoxide Alarm: What To Do When the Alarm Sounds.... 4
-
Other Alarm Visual and Audible Indicators.... 5
-
Troubleshooting Guide....6
-
Introduction, Product Features and Specifications.... 7
-
Limitations of CO Alarms....9
-
Recommended Locations for Alarms.... 11
-
Locations to Avoid....12
-
Installation....13
-
Operation and Testing....14
-
Recognizing Nuisance Alarms....16
-
Battery .... 17
-
General Carbon Monoxide (CO) Information....19
-
Cleaning Your Alarm.... 22
-
Service and Warranty.... 23
Quick Start Instructions 24


2030-7202-01_2030-DCR_UG_54x96_TUV_80%.indd 322-1-7 下午3:17
1. Carbon Monoxide Alarm: What To Do When the Alarm Sounds
The carbon monoxide (CO) alarm pattern is four quick beeps repeating every 5 seconds. The red LED blinks in sync with the beep pattern.

WARNING: CARBON MONOXIDE ALARM ACTIVATION INDICATES THE PRESENCE OF CARBON MONOXIDE (CO) AT HIGH CONCENTRATIONS WHICH CAN KILL YOU.
Based on recommendations from EN 50292, follow these steps if alarm sounds:
- Keep calm and open all doors and windows. Turn off all fuel-burning appliances if possible. Note: it is possible that outdoor conditions could influence domestic CO alarms (bad traffic pollution in cold weather, for example). In these circumstances, the level of indoor CO might actually increase when doors and windows are opened.
- If the alarm continues to sound, even after being reset (where appropriate), then evacuate the premises, alerting other occupants to the risk. Leave doors and windows open. Do not re-enter the premises.
- Get medical help for anyone suffering the effects of CO poisoning, and advise that CO inhalation is suspected.
- Call Gas Emergency Services: 0800 111 999, or your local Gas Safe Registered Engineer:
PHONE NUMBER:
Never restart the source of the CO problem until it has been corrected. Never ignore the sound of the alarm!
NOTE: See Section RECOGNIZING NUISANCE ALARMS, for nuisance alarm situations.

- Other Alarm Visual and Audible Indicators
| Operational Mode Visual Indications Audible Indications Action/Note: | |||
| Normal (standby) | Green LED blinks approx every 60 sec. | ||
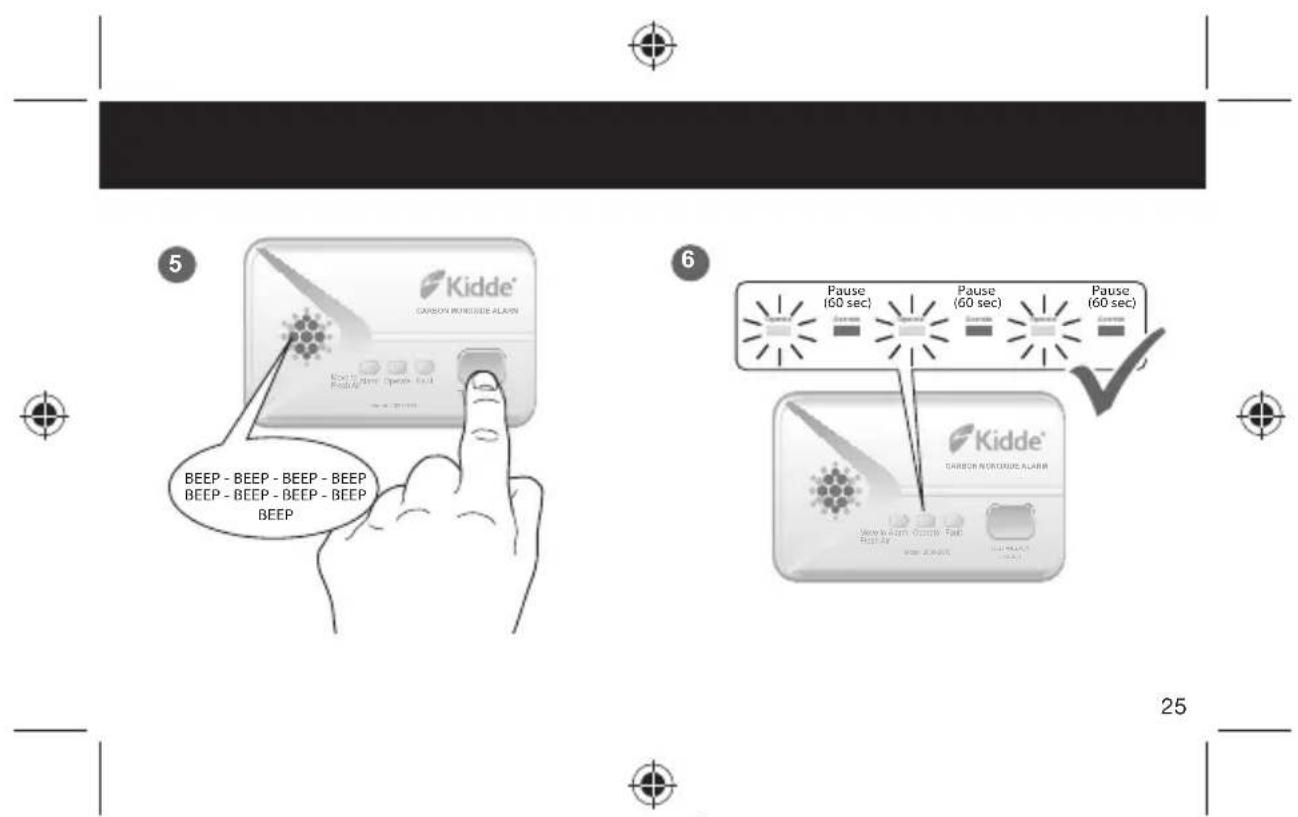
| Test (button press when no alarm condition is present) | Green and amber LED's illuminate.Red LED blinks in sync with beep pattern. | 4 loud pulses, a pause,4 loud pulses.Single beep | Perform test button press once a week to verify proper alarm operation. |
| CO Alarm Memory (unit has experienced a CO alarm event or 100 ppm or more CO within the last 14 days) | Red LED blinks 1 time every 60 sec. None. Push button to clear Alarm Memory. | ||
| CO alarm reset | Red LED continues to signal the alarm pattern. | After button push: CO alarm pattern stops. | Unit is confi ming if CO is present or if it experienced a nuisance situation.Re alarm means danger. Move to fresh air and call 0800 111 999. |


2030-7202-01_2030-DCR_UG_54x96_TUV_80%.indd 522-1-7 下午3:17
3. Troubleshooting Guide
| Trouble Condition Visual Indications Audible Indications Action: | |||
| Low Battery | Amber LED blinks every 60 sec. | Chirp every 60 sec. * Push test button once to silence for 24 hrs.Note: 30 days after Low Battery begins, the notifi cations cannot be silenced.* Replace batteries as soon as possible. | |
| Memory Fault | Amber LED blinks 3 times every 30 sec. | Chirp every 30 sec. * Push test button once to attempt to reset the unit. | |
| CO Fault | Amber LED blinks 5 times every 30 sec. | Chirp every 30 sec. * See Cleaning Your Alarm section.* Push test button once to attempt to reset the unit | |
| End of Unit Life | Amber LED blinks 2 times every 60 sec. | Two chips every 60 sec. | * The notification will continue to at least 30 days when End of Unit life begins.* Push button once to silence for 24 hrs.Note: 7 days after End of Unit Life begins, the notifi cations cannot be silenced.* Remove, dispose unit, and replace as soon as possible. |
| MCU Failure | None. | Constant tone. * Replace alarm. | |
| Stuck Button | Amber LED blinks every 5 sec. | Chirp every 5 sec. | * Push button to dislodge it from being stuck.If button cannot be unstuck, remove, dispose unit, and replace as soon as possible. |
NOTE: If at any time your alarm fails to operate correctly (erratic or low sound, for example), or if you require further information, please contact customer support at 0800 917 0722.

2030-7202-01_2030-DCR_UG_54x96_TUV_80%.indd 622-1-7 下午3:17
4. Introduction, Product Features and Specifications
Introduction
This alarm detects carbon monoxide using an electrochemical sensor. Many times throughout this User Guide, we will refer to Carbon Monoxide as "CO."
Ten (10) years after the unit was installed, this unit will automatically alert you that it is time to replace the unit. This is called "End of Unit Life" mode. See Troubleshooting Guide. To help track the life of your alarm, write the installation date in the space provided on the side of the alarm. A label has been provided that has important information on what to do in case of a CO alarm. Place the label at eye level on a wall near the alarm after it is mounted.
Product Features and Specifications:

• Temperature Operating Range: -10^ to +40^
• Humidity Operating Range: up to 90% RH non-condensing
• Audible Alarm: 85+ dB(A) at 3 m, 3.0 to 3.5 kHz pulsing alarm
• CO Sensor: Electrochemical
- CO Alarm Reset
- Powered by AA batteries
- Storage and Transport Conditions: -20°C to +60°C, 5-95%RH (non-condensing)


2030-7202-01_2030-DCR_UG_54x96_TUV_80%.indd 7 22-1-7 下午3:17
Product Features
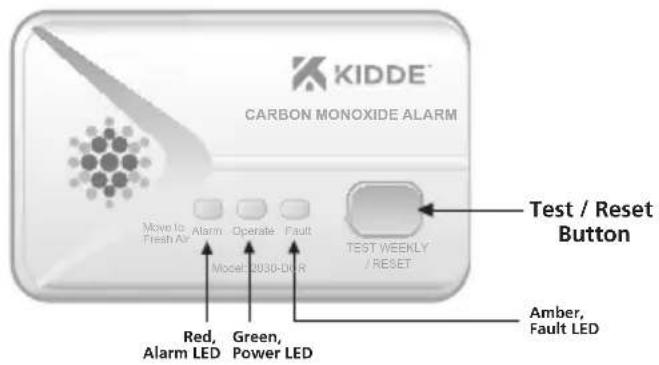
Model: 2030-DCR
8
2030-7202-01_2030-DCR_UG_54x96_TUV_80%.indd 822-1-7 下午3:17

5. Limitations of CO Alarms
WARNING: PLEASE READ CAREFULLY AND THOROUGHLY
This alarm is not intended to alert hearing impaired individuals.
LIMITATIONS OF CO ALARMS
- IMPORTANT: This alarm is designed to detect carbon monoxide gas from ANY source of combustion. It is NOT designed to detect any other gas. This alarm has not been tested specifically for use in caravans or boats. Only CO alarms certified to EN50291-2 are fully approved for this purpose.
CAUTION: This alarm will only indicate the presence of carbon monoxide gas at the sensor. Carbon monoxide gas may be present in other areas. Never restart the source of a CO problem until it has been fixed. NEVER IGNORE THE ALARM!
WARNING: THIS PRODUCT IS INTENDED FOR USE IN ORDINARY INDOOR LOCATIONS OF FAMILY LIVING UNITS. IT IS NOT DESIGNED TO MEASURE COMPLIANCE WITH COMMERCIAL AND INDUSTRIAL STANDARDS. THIS ALARM IS NOT SUITABLE FOR INSTALLATION IN HAZARDOUS LOCATIONS.
IMPORTANT: THIS CARBON MONOXIDE ALARM IS DESIGNED TO DETECT CARBON MONOXIDE FROM ANY SOURCE OF COMBUSTION INCLUDING IMPROPER OR MALFUNCTIONING APPLIANCES. THE INSTALLATION OF THIS DEVICE SHOULD NOT BE USED AS A SUBSTITUTE FOR PROPER INSTALLATION, USE AND MAINTENANCE OF FUEL BURNING APPLIANCES INCLUDING APPROPRIATE VENTILATION AND EXHAUST SYSTEMS.
- This alarm does not prevent CO from occurring, nor can it solve any existing CO problem.


2030-7202-01_2030-DCR_UG_54x96_TUV_80%.indd 922-1-7 下午3:17
WARNING: THIS DEVICE IS DESIGNED TO PROTECT INDIVIDUALS FROM ACUTE EFFECTS OF CARBON MONOXIDE EXPOSURE. IT MAY NOT FULLY SAFEGUARD INDIVIDUALS WITH SPECIFIC MEDICAL CONDITIONS. IF IN DOUBT, CONSULT A MEDICAL PRACTITIONER. INDIVIDUALS WITH MEDICAL PROBLEMS MAY CONSIDER USING WARNING DEVICES WHICH PROVIDE AUDIBLE AND VISUAL SIGNALS FOR CARBON MONOXIDE CONCENTRATIONS UNDER 30 PPM.
• This alarm has not been investigated for carbon monoxide detection below 50 PPM.
- This alarm requires a continuous supply of electrical power – it will not work without power.
WARNING: THIS CARBON MONOXIDE ALARM IS NOT A SUBSTITUTE FOR INSTALLING AND MAINTAINING AN APPROPRIATE NUMBER OF SMOKE ALARMS IN YOUR HOME. THIS ALARM WILL NOT SENSE SMOKE, FIRE, OR ANY POISONOUS GAS OTHER THAN CARBON MONOXIDE. FOR THIS REASON YOU MUST INSTALL SMOKE ALARMS TO PROVIDE EARLY WARNING OF FIRE AND TO PROTECT YOU AND YOUR FAMILY FROM FIRE AND ITS RELATED HAZARDS.


6. Recommended Locations for CO Alarms
Note: CO alarms should be installed following the guidance of relevant local standards, such as EN50292.
- Whether the alarm is wall-mounted or ceiling mounted, place the alarm a horizontal distance of between 1 metre and 3 metres from a fuel burning appliance.
- When mounting the alarm on the wall, use an inside wall with the top edge of the alarm at a minimum of 150 mm below the ceiling. The bottom of the alarm should also be at a level greater than the height of any door or window.
- Locate within hearing distance of bedrooms* and place at sleeping height if a heating appliance is in the bedroom.
• CO alarms in rooms with sloped ceilings should be located on the high side of the room. - Ceiling mounted alarms should be at least 300 mm from any wall.
- If there is a partition in the room, locate the alarm on the same side of the partition as the potential source.
* A CO alarm should be installed in all rooms containing a fuel burning appliance. Additional CO alarms should be installed in rooms where most awake time is spent, in every sleeping area, and on every level of the home.
7. Locations to Avoid
- In the garage. Products of combustion are present when you start your motor vehicle.
- Do not install alarms adjacent to, or directly above, heaters or air-conditioning vents.
- In very humid areas (above 90% RH, non-condensing), such as bathrooms and shower rooms. Do not install directly above a sink, or near dishwashers or washing machines. Moisture or steam can cause nuisance alarms.
- Do not install within 1 m of heating or cooking appliances, measured horizontally.
- In an area where the temperature may fall below -10^ or rise above 40^ such as garages and unfinished attics.
- Do not install alarms in dusty areas. Dust particles may cause nuisance alarm or failure to alarm.
• In insect-infested areas. - Within 300 mm of a light fitting, as electronic "noise" generated by the electronics may cause nuisance alarms.
- Do not install in an enclosed space (cupboard) or where the ventilation openings in the unit could be impeded by items such as newspapers, table-cloths, furniture, curtains, etc.
- Do not install next to a door, window, extractor fan, flue, chimney, or any other area where high air flow may occur or the unit may be directly exposed to weather.
- Do not install in locations that are difficult or dangerous to reach for testing or maintenance.
WARNING: TO REDUCE THE RISK OF FIRE OR ELECTRIC SHOCK, DO NOT EXPOSE THIS PRODUCT TO RAIN OR MOISTURE.

8. Installation / Activation
CAUTION: THIS UNIT IS SEALED. THE COVER IS NOT REMOVABLE!
NOTE: YOUR CO ALARM MUST BE INSTALLED BY A COMPETENT PERSON, AND IS TO BE INSTALLED ACCORDING TO THESE INSTRUCTIONS.
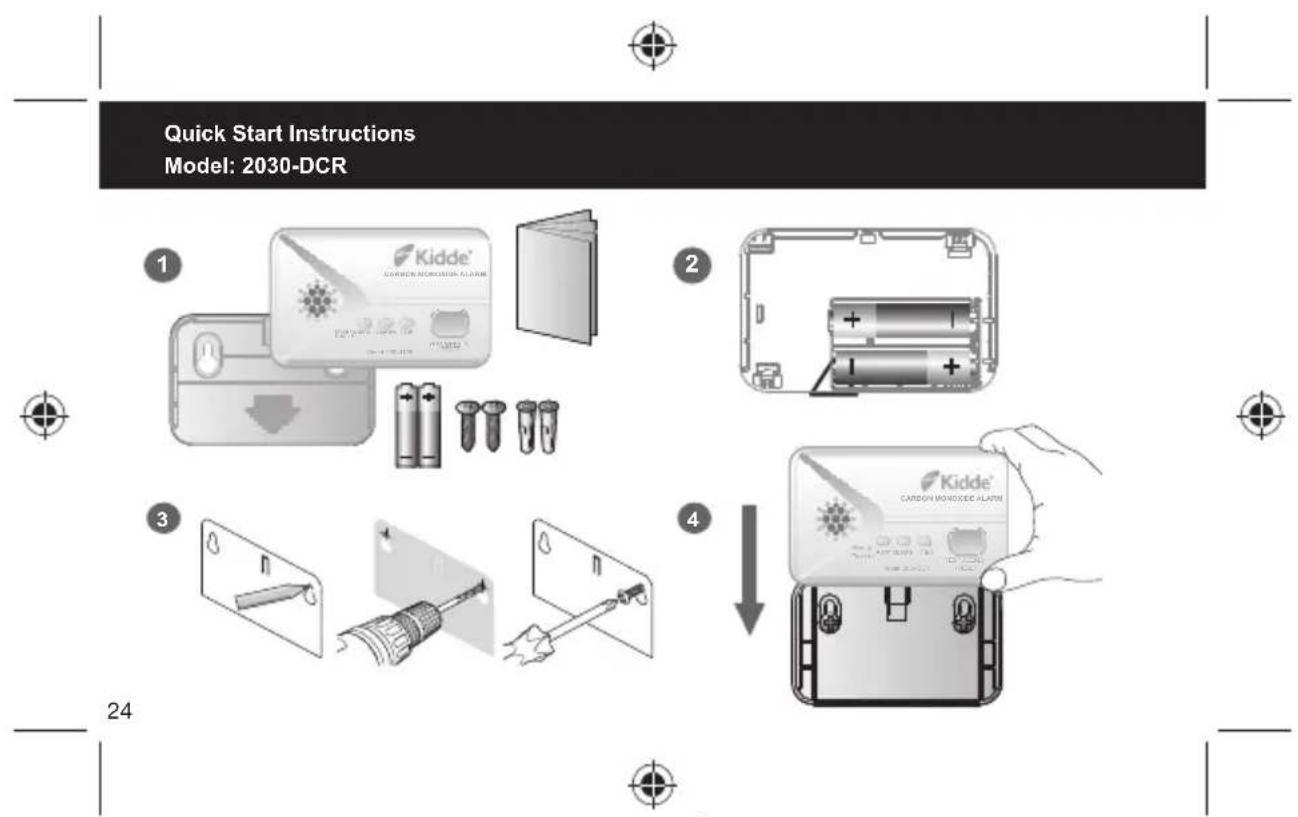
After selecting the proper alarm location as described in the "Recommended Locations for CO Alarms" section, you may choose either a wall mounting or free-standing installation.
Wall-mounting (recommended by the manufacturer, if possible)
-
Drill two holes in a wall 61 mm apart (you may wish to use the back-plate for guidance)
-
Insert the two wall plugs that are supplied into the holes
-
Insert the two screws as supplied into the holes ensuring enough of the screw sticks out of the wall (approx. 3mm)
-
Hook the alarm back-plate over the screws, and then tighten the screws to fasten the back-plate
-
Slide the alarm onto the back-plate
Free-standing
Note: When sliding the back-plate on the alarm, apply pressure to the back-plate to ensure that it latches.
ALWAYS BE CAREFUL TO LOCATE A FREE-STANDING ALARM WHERE IT IS UNLIKELY TO BE KNOCKED TO THE
FLOOR, AND IN ACCORDANCE WITH THE RECOMMENDED LOCATIONS SECTION
Ensure free-standing alarms are placed in the upright position, and not lying flat on a surface.
Activation
-
Remove the batteries from the pack and insert them into the battery compartment. Make sure that you fit the batteries in accordance with the polarity markings (+ or -) within the battery compartment. If correctly installed, the alarm will blink red/green/amber LED once.
-
Slide the alarm onto the back-plate.
The alarm is now activated! After installation / activation, test your alarm as described in Operation and Testing section.
WARNING: FAILURE TO PROPERLY INSTALL AND ACTIVATE THIS ALARM WILL PREVENT PROPER
OPERATION OF THIS ALARM AND WILL PREVENT ITS RESPONSE TO HAZARDS.

9. Operation and Testing
Operation
The alarm is operating once it is activated and testing is complete (see "TESTING" below). When CO is detected, the unit sounds a loud alarm. See Section 1 for alarm signal descriptions. In high levels of CO, the unit will go into alarm in a shorter period of time than at low levels of CO.
| Parts per Million (PPM) of CO | Time until Alarm |
| 50 60 – 90 Minutes | |
| 100 10 – 40 Minutes | |
| 300 Must alarm in less than 3 minutes | |


Testing
Test your alarm weekly, or after returning from a vacation or absence, by pressing and releasing the button quickly. A quick beep will confirm the button has been pushed followed by the test sequence. See Other Alarm Visual and Audible Indicators table. The alarm will sound if the electronic circuitry, horn, and batteries are working. If the alarm does not sound, or gives erratic or low volume sound, the unit must be replaced.
WARNING: DUE TO THE LOUDNESS OF THE ALARM, ALWAYS STAND ABOUT 1 METRE AWAY FROM THE UNIT OR USE EAR PROTECTION WHEN TESTING.


10. Recognizing Nuisance Alarms
Carbon Monoxide (CO) Nuisance
RESET: Pushing the test / reset button during CO alarm allows the unit to reset calculations and double check for the presence of CO. If the unit re-alarms, it is sensing high levels of CO which can quickly become a dangerous situation. Move to fresh air and call 0800 111 999.
WARNING: IT IS IMPOSSIBLE TO DETERMINE THE SOURCE OF A CO ALARM USING SIGHT OR SMELL. ALWAYS CONSIDER A CO ALARM EVENT AS DANGEROUS.


11. Batter y
This alarm is powered by two AA batteries. Under normal operating conditions, the batteries will last a minimum of one year. NOTE: Constant exposures to extreme temperatures and humidities may affect battery life.
WARNING: DO NOT ATTEMPT TO OPEN THE ALARM FOR ANY REASON! DO NOT TRY TO REPAIR THE ALARM YOURSELF.
Low Battery
This alarm is equipped with a low battery monitor circuit. If the battery capacity is nearing the point where it can no longer provide adequate power for all alarm functions, the low battery condition will occur. See Troubleshooting Guide. The batteries must be replaced within 30 days of the first occurrence of the "Low Battery Warning" to provide continuous alarm protection.
Replace battery
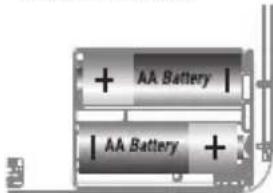
Slide alarm from back-plate. Insert 2 x replacement 'AA' batteries (noting polarity – see sketch) Replace back-plate and test the alarm
Recommended Batteries.
Duracell MN1500, MX1500
Gold Peak 15A
Golden Power GLR6A
Energizer E91

NOTE: Do not use Lithium batteries in this unit.
These batteries can be purchased from your local retailer.
WARNING! Alarm will not attach to back-plate unless batteries are installed. Depleted or removed batteries will render this alarm inoperative.
Chirping:
When End of Unit Life or Low Battery chirping begins, you can temporarily silence these chirps by pressing the test button. See Troubleshooting Guide.

12. General Carbon Monoxide (CO) Information
What is Carbon Monoxide?
Carbon monoxide (CO) is a highly poisonous gas with no taste, colour or smell.
Potential Sources of CO
- Wood-burning stoves
• Gas boilers and fires
Gas Hobs
• Oil and coal burning appliances - Portable gas heaters
- Blocked flues and chimneys
• Fumes from integral garages - Barbecues
• High concentrations of tobacco smoke
This CO alarm is not a substitute for proper installation, use and maintenance of fuel burning appliances including appropriate ventilation and exhaust systems. Carbon monoxide can be produced from poorly burning appliances or from blocked flues and chimneys.
If your alarm has sounded and you have ventilated the room, the CO may have dispersed before help arrives. It is crucial that the source of CO is determined and appropriate maintenance carried out.
Carbon monoxide is a cumulative poison. Long term exposure to low levels may cause symptoms.
This alarm is time-weighted – the higher the level of CO, the sooner it will alarm.
NOTE: The apparatus may respond to brief exhaust gas emissions, for example during the initial start-up of an appliance. Also, hydrogen acts as an interferent and can arise from some battery charging activities and the curing of concrete or cement under certain circumstances. Volatile Organic Compounds (VOCs), e.g. alcohols, which may eventually activate the alarm, can be generated from use of damp-proofing materials or other coatings containing alkylalkoxysilanes.

The table below shows the effects of different levels of CO poisoning on the body;
| Parts per Million (PPM) | Effects on Adults |
| 100 Slight headache, nausea, fatigue (flu-like symptoms) | |
| 200 Dizziness and headache within 2 – 3 hours | |
| 400 | Nausea, frontal headache, drowsiness, confusion and rapid heart rate. Risk to life after over 3 hours of exposure |
| 800 Severe headaches, convulsions, vital organ failures. Death possible within 2 – 3 hours | |
⚠ WARNING: The device cannot warn against the chronic effects of exposure to carbon monoxide or protect individuals who are at specific risk.
NOTE: If you recognise any of the above symptoms consult your Doctor immediately.
NOTE: Young children, elderly and pets are more susceptible to the dangers of CO.
NOTE: Your Kidde alarm is designed to detect CO gas. It is not designed to detect other gas such as natural gas.
NOTE: This product is intended for use in ordinary family homes. It is not designed to measure compliance with occupational safety and the HSE.
NOTE: Individuals with certain specific medical conditions may need an alarm that operates below 30ppm. If this applies consult your Doctor.

IMPORTANT: Ensure that all family members are familiar with the symptoms of CO poisoning and how your alarm works. To be safe, know the possible sources of CO in your home. Keep fuel burning appliances and their chimneys and vents in good working condition. Learn the early symptoms of exposure, and if you suspect CO poisoning, move outside to fresh air and get emergency help. Your first line of defence is an annual inspection and regular maintenance of your appliances. Contact a licensed contractor or call your local utility company for assistance. In rented properties your Landlord (or Council/ Housing Association), will have an Emergency Response phone number, and be liable for the regular maintenance of their combustion appliances (Gas/LPG/Oil/Solid Fuel).


13. Cleaning Your Alarm
Your Alarm Should be Cleaned at Least Once a Year
You can clean the interior of your alarm by using compressed air or a vacuum cleaner hose and blowing or vacuuming through the openings around the perimeter of the alarm. The outside of the alarm can be wiped with a damp cloth. Use only water to dampen the cloth, use of detergents or cleaners could damage the alarm. If the alarm is in Fault mode, the alarm may be in need of cleaning. After cleaning, press the test button. If the fault does not clear, the alarm needs to be replaced.
- Never use detergent or other solvents to clean the unit.
- Avoid spraying air freshener, hair spray, or other aerosols near the alarm.
- Do not paint the unit. Paint will seal the vents and interfere with the sensor's ability to detect CO.
- Keep away from nappy buckets.
- Never attempt to disassemble the unit to clean inside. Altering the alarm in any way may lead to a risk of electric shock or prevent it from functioning correctly. This action will void your warranty.
- The following substances can affect the CO sensor and may cause false readings and damage to the sensor: Methane, propane, isobutane, iso-propanol, ethyl acetate, hydrogen sulfide, sulfide dioxides, alcohol based products, paints, thinner, solvents, adhesives, hair spray, aftershave, perfume, and some cleaning agents.
NOTE: there could be other compounds occurring within a particular household which could cause similar effects.
- Move the Alarm and place in another location prior to performing any of the following:
Staining or stripping wood floors or furniture
Painting
Wall papering
Using adhesives
Storing the unit in a plastic bag during any of the above projects will protect the sensors from damage. When
household cleaning supplies or similar contaminates are used, the area must be well ventilated.
WARNING: REINSTALL THE ALARM AS SOON AS POSSIBLE TO ENSURE CONTINUOUS PROTECTION.
22

2030-7202-01_2030-DCR_UG_54x96_TUV_80%,indd 22 22-1-7 下午3:17
14. Service and Warranty
Three-Year Limited Warranty
KIDDE SAFETY EUROPE LTD warrants to the original purchaser that the enclosed alarm (batteries excluded) will be free from defects in material and workmanship or design under normal use and service for a period of three years from the date of purchase. The obligation of KIDDE SAFETY EUROPE LTD under this warranty is limited to repairing or replacing the alarm or any part which we find to be defective in material, workmanship or design (part replacement only, no installation), free of charge to the customer, upon sending the alarm with proof of date of purchase, postage and return postage prepaid, to distributor: Warranty Service Department, Kidde Safety Europe Ltd, Ash House, Littleton Road, Ashford, TW15 1TZ, UK. Before shipping, please remove the batteries from the alarm.
This warranty shall not apply to the alarm if it has been damaged, modified, abused or altered after the date of purchase or if it fails to operate due to improper maintenance or inadequate A.C. or D.C. electrical power.
THE LIABILITY OF KIDDE SAFETY EUROPE LTD OR ANY OF ITS PARENT OR SUBSIDIARY CORPORATIONS ARISING FROM THE SALE OF THIS ALARM OR UNDER THE TERMS OF THIS LIMITED WARRANTY SHALL NOT IN ANY CASE EXCEED THE COST OF REPLACEMENT OF THE ALARM AND, IN NO CASE, SHALL KIDDE SAFETY EUROPE LTD OR ANY OF ITS PARENT OR SUBSIDIARY CORPORATIONS BE LIABLE FOR CONSEQUENTIAL LOSS OR DAMAGES RESULTING FROM THE FAILURE OF THE ALARM OR FOR BREACH OF THIS OR ANY OTHER WARRANTY, EXPRESS OR IMPLIED, EVEN IF THE LOSS OR DAMAGE IS CAUSED BY THE COMPANY'S NEGLIGENCE OR FAULT.
This warranty does not affect your statutory rights.

2030-7202-01_2030-DCR_UG_54x96_TUV_80%.indd 24 22-1-7 下午3:17
Kidde Helpline (UK) 0800 917 0722 / (Ireland) 1800 818 601
Emergency Numbers:
Gas Emergency Services 0800111999
HETAS (Solid Fuel Emergency) 0845 634 5626
Oftec (oil) 0845 658 5080

Kidde®

© 2021 Carrier. All rights reserved.
Manufactured By:
Walter Kidde Portable Equipment Inc.
1016 Corporate Park Drive, Mebane, NC 27302, USA
Telephone: 0800 917 0722
www.kiddesafetyeurope.co.uk
Made in China
EU Authorised Representative
Carrier Fire & Security B.V.
Kelvinstraat 7
6003 DH Weert, NL

2030-7202-01_2030-DCR_UG_54x96_TUV_80%.indd 26 22-1-7 下午3:17
- Thank You for Purchasing this Kidde Alarm
- Contents
- Carbon Monoxide Alarm: What To Do When the Alarm Sounds
- WARNING: CARBON MONOXIDE ALARM ACTIVATION INDICATES THE PRESENCE OF CARBON MONOXIDE (CO) AT HIGH CONCENTRATIONS WHICH CAN KILL YOU.
- Based on recommendations from EN 50292, follow these steps if alarm sounds:
- PHONE NUMBER:
- Troubleshooting Guide
- Introduction, Product Features and Specifications
- Limitations of CO Alarms
- Recommended Locations for CO Alarms
- Locations to Avoid
- WARNING: TO REDUCE THE RISK OF FIRE OR ELECTRIC SHOCK, DO NOT EXPOSE THIS PRODUCT TO RAIN OR MOISTURE.
- Installation / Activation
- Free-standing
- Activation
- Operation and Testing
- Operation
- Testing
- Recognizing Nuisance Alarms
- Batter y
- Low Battery
- Replace battery
- Chirping:
- General Carbon Monoxide (CO) Information
- Cleaning Your Alarm
- Service and Warranty
- Kidde®
Brand : KIDDE
Model : 2030-DCR
Category : Door/window sensor