
Aristocrat AS1716PN - Lighting Quoizel - Free user manual and instructions
Find the device manual for free Aristocrat AS1716PN Quoizel in PDF.


User questions about Aristocrat AS1716PN Quoizel
0 question about this device. Answer the ones you know or ask your own.
Ask a new question about this device
Download the instructions for your Lighting in PDF format for free! Find your manual Aristocrat AS1716PN - Quoizel and take your electronic device back in hand. On this page are published all the documents necessary for the use of your device. Aristocrat AS1716PN by Quoizel.
USER MANUAL Aristocrat AS1716PN Quoizel
Tools Required: Flathead screwdriver, Phillips screwdriver, pliers, wire cutters, wire strippers, electrical tape, safety glasses.
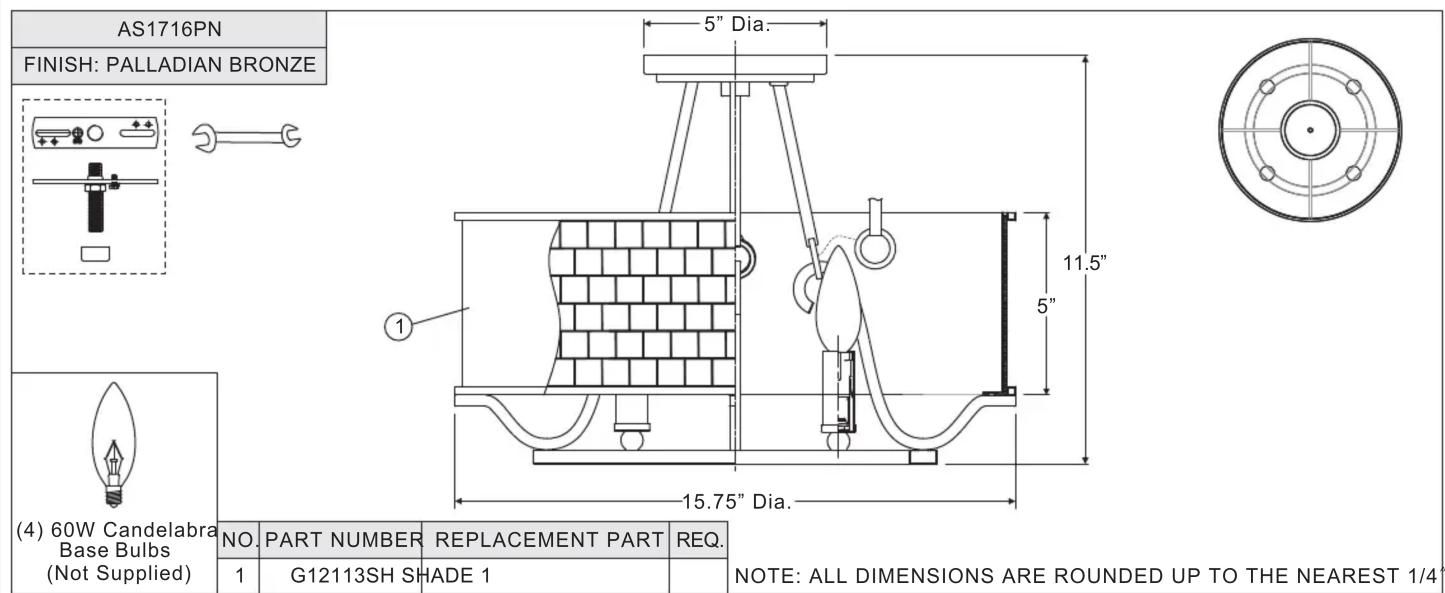
LightSource: (4)B10 CandelabraBase 60WMaximum.
EstimatedAssemblyTime: 30-45minutes
Preparation: Identify and inspect all parts before beginning installation. Check package content list and diagrams below to be sure all parts are present. If any parts are missing or damaged, do not attempt to assemble, install, or operate the fixture. Contact customer service for replacement parts.
⚠️ Warnings and Cautions
Turn off electricity at circuit breaker or main fuse box before installation. Consult a licensed electrician if in doubt.
These instructions are provided for your safety. It is very important you read them completely before installing the fixture. We strongly recommend that a licensed, professional electrician perform the installation.
Disconnect fixture from power source before replacing bulbs. Make sure bulbs are given sufficient time to cool before removal. Do not subject glass parts to any shock while in operation or shattering may result.
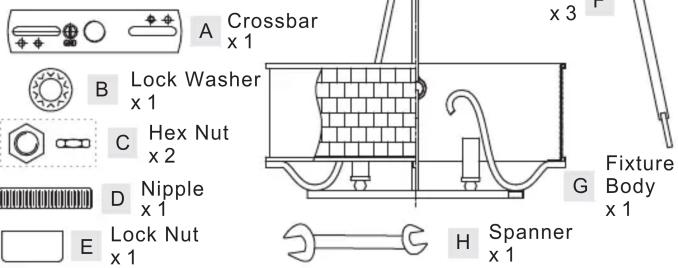
Package Contents
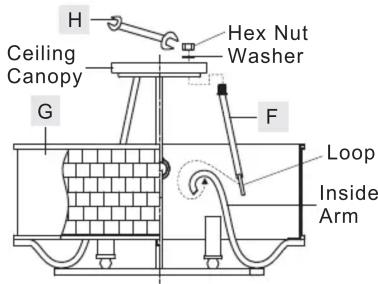
STEP 1 Assemble Side Arms
A. Remove Hex Nut and Washer from the Side Arm (F). Attach the loop end of the Side Arm (F) to the inside arm of the Fixture Body (G).
Pass the nipple at the top end of the Side Arm (F) through the hole on the Ceiling Canopy. Place the Washer back onto top end of the Side Arm (F) and by using Spanner (H) thread the Hex Nut onto the Side Arm (F) to secure them together. Hand tighten until snug.
Figure 1
STEP 2 Install Crossbar—
A. A) Attach the Crossbar ( to the Outlet Box with the head of the Green Ground Screw facing you. Secure it with Outlet Box Screws (not included). Tighten until snug.

STEP 3 Install Fixture Body
* Pliers is required for this step.
A. Thread Hex Nut (C) to the middle of the Nipple (D). Place Lock Washer (B) over the Nipple (D) and then thread the Nipple (D) into the Crossbar (A) until the Nipple (D) is about 0.375" above the Crossbar (A).
(Step 3 Continued)
B. Place the Ceiling Canopy of the Fixture Body (G) over the Nipple (D) against the ceiling to determine the correct position of the Nipple (D). Thread the Lock Nut (E) onto the Nipple (D). Adjust the Nipple (D) to allow the Ceiling Canopy of the Ceiling Fixture Body (G) to rest against Canopy the ceiling when held in place by the Lock Nut (E).
C. Remove the Lock Nut (E) and the Fixture Body (G). Tighten the Hex Nut (C) against the Crossbar (A) to secure in place.
D. Refer to Step 4 for wire connections.
E. Place the Ceiling Canopy of the Fixture Body (G) back over the Nipple (D) and secure with the Lock Nut (E). Hand tighten until snug.
Figure 3

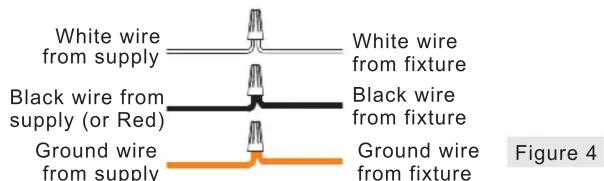
STEP4-Wire Connections
A. Use standard wire connectors (not included) to make all wire connections. (Connectors are not included with fixture.) Twist connectors until wires are tightly joined together. Wrap each connection with approved electrical tape and carefully stuff all the connected wires into the Outlet Box.
STEP 5 - Install Shade to Fixture
A. This fixture uses candelabra bulb with screw base. Maximum 60 watts. Insert bulb and screw snugly into place.
Your fixture is now assembled and ready to use. Enjoy!

Figure 5
Thank you for purchasing a Quoizel product.
Need assistance with parts or assembly? Call Quoizel customer service at 1-631-273-2700
or visit us on-line at www.quoizel.com
August2015
Brand : Quoizel
Model : Aristocrat AS1716PN
Category : Lighting