
AIWD160 - Sorbet maker Accucold - Free user manual and instructions
Find the device manual for free AIWD160 Accucold in PDF.


| Product Type | Ice Cream Maker |
| Brand | Accucold |
| Model | AIWD160 |
| Dimensions (W x D x H) | 12 x 10 x 14 inches |
| Weight | 15 lbs |
| Power Supply | 120 V, 60 Hz, 180 W |
| Capacity | 1.5 quarts |
| Freezing Method | Compressor-based (self-freezing) |
| Functions | Mix and freeze, automatic shutoff, keep cool |
| Control Type | Digital touchpad |
| Timer | Up to 60 minutes |
| Bowl Material | Stainless steel (double-wall) |
| Paddle Material | BPA-free plastic |
| Lid | Transparent with ingredient spout |
| Cleaning | Wash bowl, paddle, and lid with warm soapy water; do not immerse base |
| Safety Features | Overload protection, auto shut-off, cool-touch handle |
| Certifications | ETL listed |
| Spare Parts Available | Bowl, paddle, lid, and mixing arm |
| Repairability | Authorized service centers; user-replaceable parts |
| Warranty | 1 year limited |
Frequently Asked Questions - AIWD160 Accucold
User questions about AIWD160 Accucold
0 question about this device. Answer the ones you know or ask your own.
Ask a new question about this device
Download the instructions for your Sorbet maker in PDF format for free! Find your manual AIWD160 - Accucold and take your electronic device back in hand. On this page are published all the documents necessary for the use of your device. AIWD160 by Accucold.
USER MANUAL AIWD160 Accucold
natural_image
Line drawing of a simple kitchen appliance with solar panel and side-mounted grilles (no text or symbols)User's Manual
BEFORE USE, PLEASE READ AND FOLLOW ALL SAFETY RULES AND OPERATING INSTRUCTIONS
Write Model and Serial Numbers here:
Model No.: ____
Ser. No.:
FELIX STORCH, INC.
Summit Appliance Division
An ISO 9001:2015 registered company
770 Garrison Avenue
Bronx, New York 10474
Table of Contents
Important Safeguards 3-5
Product Specification 6-9
Product Rating....6 Location of Parts....7-9
Unpacking, etc. 10
Product Installation....10-14
General Instructions....10
Requirements for plumbing 11
Water Quality....11
Requirements for Power Supply....12
Panel disassembly method 13
Connection method for water supply and drainage....14
How to start the product....15-17
Button operation....15
Function button description (FND display window) 16
Three drainage functions (forced drainage, automatic draining, water drainage)...17
Stop switch....17
Product Maintenance....18-23
Actions required to prevent frost 18
Emptying the drainage gutter (AIWD450)....18
Maintenance, repair, and disinfection....19
Maintenance schedule....20
Cautions when cleaning exterior panel (stainless steel)....21
How to clean and disinfect.... 22-23
Circuits Diagram 24-25
Product Troubleshooting.... 26-27
Before Requesting Service....29
Product Warranty ....30
Your safety and the safety of others are very important.
We have provided many important safety messages in this manual and on your appliance. Always read and obey all safety messages.

This is the Safety Alert Symbol. This symbol alerts you to potential hazards that can injure or kill you and others.
Safety messages will follow the Safety Alert Symbol and either the words "DANGER", "WARNING" OR "CAUTION".

DANGER!
DANGER means that failure to heed this safety statement may result in severe personal injury or death.

WARNING
WARNING means that failure to heed this safety statement may result in extensive product damage, serious personal injury or death.
CAUTION
CAUTION means that failure to heed this safety statement may result in minor or moderate personal injury, or property or equipment damage.


| What you must obey | Prohibited | Disassembly Prohibited | No Contact | Remove Power Plug | Grounding |
All safety messages will alert you to what the potential hazard is, tell you how to reduce the chance of injury, and let you know what can happen if the instructions are not followed.
IMPORTANT SAFETY INSTRUCTIONS
WARNING: To reduce the risk of fire, electric shock or injury when using your ice maker, follow these basic precautions:
- Plug into grounded 3-prong outlet. Disconnect power before cleaning.
- Do not remove grounding prong. - Disconnect power before servicing.
- Do not use an adapter. -Replace all panels before operating.
- Do not use an extension cord. - Use two or more people to move & install ice maker.
SAVE THESE INSTRUCTIONS

Before the ice/water dispenser is used, it must be properly positioned and installed as described in this manual, so read the manual carefully. Accucold® by Summit Appliance strongly recommends that you have a professional install your new machine. The warranty may be affected or voided by an incorrect installation. To reduce the risk of fire, electrical shock or injury when using the ice/water dispenser follow basic precautions, including the following:
! DANGER !
- Plug into a grounded 3-prong outlet; do not remove grounding prong, do not use an adapter, and do not use
an extension cord.
- It is recommended that a separate circuit, serving only your ice maker, be provided. Use receptacles that cannot be turned off by a switch or pull chain.
- Do not connect or disconnect the electric plug when your hands are wet.
- Never unplug the dispenser by pulling on the power cord. Always grip the plug firmly and pull straight out from the outlet.
- Never clean dispenser parts with flammable fluids. Do not store or use gasoline or other flammable vapors and liquids in the vicinity of this or any other appliance. The fumes can create a fire hazard or explosion.
- Before proceeding with cleaning and maintenance operations, make sure the power line of the unit is disconnected and the water line is shut off.
• Before operating, put all panels back into place. - Never allow children to operate, play with the ice dispenser.
- Do not touch the evaporator with your hand when the machine is operating.
- Unplug the ice dispenser or disconnect power before cleaning or servicing. Failure to do so can result in electrical shock or death.
- Do not attempt to repair or replace any part of your ice dispenser unless it is specifically recommended in this manual. All other servicing should be referred to a qualified technician.
WARNING
- Use two or more people to move and install the ice maker. Failure to do so can result in back or other injury.
- Never install or operate the unit in an enclosed area, such as a closed cabinet. To ensure proper ventilation for your ice maker, the front of the unit must be completely unobstructed. Choose a well-ventilated area with temperatures above 50°F (10°C) and below 100°F (38°C). The optimum supplied water temperature would be below 50°F. This unit MUST be installed in an area protected from the elements, such as wind, rain, water spray or drips.
• The dispenser is for indoor use only. - The dispenser should not be located next to ovens, grills or other sources of high heat.
- The dispenser must be installed with all electrical and water connections in accordance with state and local codes. A standard electrical supply (115 V AC, 60 Hz, 15 A), properly grounded in accordance with the National Electrical Code and local codes and ordinances, is required.
- Do not kink or pinch the power supply cord between the dispenser and cabinet.
• The fuse (or circuit breaker) size should be 15 amperes. - It is important for the dispenser to be leveled in order to work properly. Otherwise water may not flow properly through the evaporator (ice mold). The ice production will be less than normal. You may need to make several adjustments to level it.
- All installations must be in accordance with local plumbing code requirements.
• Make certain that hoses are not pinched, kinked or damaged during installation.
- Check for leaks after water line is connected.
- Although the unit has been tested and cleaned at the factory, due to long-term transit and storage, the first batch of cubes must be discarded.
- Remove the packing materials and clean the dispenser before using.
- Turn on the water supply tap before switching on the ice maker. Never turn the water supply tap off when the dispenser is working.
- Except to take ice from the unit, keep the door closed in order to reduce ice melting and to promote proper ice formation.
- If the dispenser will not be used for a long time, before the next use it must be thoroughly cleaned. Follow carefully any instructions provided for cleaning or use of sanitizing solution. Do not leave any solution inside the dispenser after cleaning.
- Do not touch the condenser fins. They are sharp and can be easily damaged.
- DO NOT use solvent-based cleaning agents or abrasives on the interior. These cleaners may transmit taste to the ice cubes, or damage or discolor the interior.
- The ice machine cleaner contains acids. Do not use or mix with any other solvent-based cleaning products. Use rubber gloves to protect hands. Carefully read the safety instructions on the container of the ice machine cleaner.
- Do not use the apparatus other than for its intended purpose.
- Do not place heavy objects or containers containing water on the ice maker. The objects or containers may fall and cause water to leak and the insulation may be weakened, resulting in a fire due to a short circuit.
- Do not install the product in a humid place or where there is a risk of water splashing. Insulation may be weakened, resulting in short circuit, electric shock, or fire.
- Do not use: If the product malfunctions, such as smoke or burning smell, unplug the power cord to stop operation. If you continue operating in abnormal conditions, there is a risk of fire or electric shock.
- Do not use: Do not use if the outlet is loose or has a problem. There is a risk of fire due to electric shock or short circuit.
- Do not modify or repair the product yourself. Ignition or abnormal operation is dangerous and may cause more trouble.
- Do not allow electrical cords or plugs to be pinched or twisted. The cord or plug may be peeled and there is a risk of fire or electric shock. If the cord or plug is peeled or damaged, be sure to ask the service to replace it.
- Do not damage the inside of the dispenser with a sharp tool. The ice reservoir may break or become damaged.
- When not in use for a long time, remove ice and water (to prevent winter frost), and unplug the power cord from the outlet.
- If there is a risk of slippery water or oil on the floor near the ice maker, please wipe it. There is a risk of injury if you slip on the dispenser or get hands or feet in the bottom of the side.
- When transferring this dispenser to another person, please hand it along with the instruction manual. New users need a manual for safe use.
- Do not put your hands or feet on the bottom of the ice maker. The bottom of the dispenser has iron plates and various parts which may cause injury.
- If you unplug the power plug from the wall outlet and plug it back in again, wait at least 5 minutes before reinserting. If it is plugged in immediately, it may cause a trouble in operation of the freezer and it may cause malfunction of the ice maker.
- In areas where there is a lot of lime content in the water, please install a lime removal filter at the entrance of the product water supply (the product life may be shortened by calcareous).

Do not let children hang on the product. There is a danger of the
dispenser twitching or falling, resulting in injury. In particular, do not let children hang on the reservoir not fixed to the product. Never allow children to operate, play with, or crawl inside the dispenser.
Product Specifications
| WATER/ICE DISPENSER | |||
| Model | AIWD282/SCIWD282 | AIWD450 | AIWD160 |
| AC Supply Voltage: | 115 V 60 Hz, 1 PH | 115 V 60 Hz, 1 PH | 115 V 60 Hz, 1 PH |
| Refrigerant: | R404A | R404A | R134A |
| Amount of refrigerant: | 11.29 oz | 14.10oz | 6.35 oz |
| Design Pressure: High Side | 360 PSIG | 375 PSIG | 250 PSIG |
| Design Pressure: Low Side | 190 PSIG | 193 PSIG | 150 PSIG |
| Compressor | LRA 40A | LRA 20A | LRA 53A |
| Fan Motor | 115 V, 0.7 A | 115 V, 1.1A | 115 V, 0.2A |
| Geared Motor | 115V, 1.6A | 115V, 1.6A | 115V, 1.6A |
| Maximum Fuse Size | 20A | 15A | 20A |
| Max. HACR Breaker (USA Only) | 20A | 15A | 20A |
| Max. HACR Breaker (Canada Only) | 20A | 15A | 20A |
| Min. Circuit Ampacity | 5.8A (570W) | 14.47A (840W) | 2.8A (322W) |
| FCC Identifier | ICTR-TR-E191162-OA | ICERT-TR-E213382-0A | |
| Condensation Method | Air-cooled | Air-cooled | Air-cooled |
| Ice Shape | Nugget | Nugget | Nugget |
| Discharging method | Solenoid | Solenoid | Solenoid |
SAVE THESE INSTRUCTIONS
Location of Parts (AIWD282/SCIWD282)
Front Top/Bottom

Display panel
Ice exit
Ice discharge lever
Drain box
Height-adjustable feet

Upper vent
Left Side

Right Side

Location of Parts (AIWD450)


Top

Bottom

natural_image
Technical line drawing of a mechanical or electronic component with no visible text, numbers, or symbols.Location of Parts (AIWD160)


natural_image
Technical line drawing of a mechanical or electronic component with no visible text, numbers, or symbols.Unpacking, etc.
- After removing the packing materials, check the appearance of the dispenser for possible defects or irregularities. If the product shows any irregularity in its appearance, contact the distributor.
- All the packing materials (straps, box, Styrofoam, wood, etc.) should never be left within the reach of children and should be disposed of according to local regulations.
- For safety, the product should be installed and used with caution in accordance with the User's manual.
- Incorrect installation or careless use of the product may damage or injure the environment, humans, animals, and/or materials and property. The manufacturer does not bear any responsibility for the aforesaid damage or injury.
• The dispenser performs best at room temperature of 50\~75°F and a supply of water at 50°F. - The dispenser should only be installed indoors and should NOT be installed near heat generators such as heaters, stoves, or dishwashers
Product Installation
| Where there is no heat source.※ Install in a place where there is no heating device such as a fireplace or a gas range and do not install in an area outside the range of 10 ~ 38 °C/50 ~100°F. | 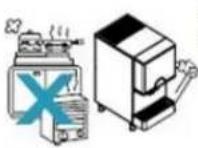  | |
| Allow enough ventilation• For normal operation, install the dispenser at least 4 inches away from the back wall and 6 inches above the top of the dispenser.※ Never block the upper vents and do not place any load on it.• Poor ventilation will decrease the unit's ability to make ice. | 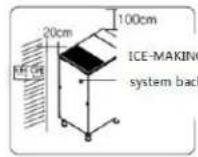  | |
| Install on a flat surface※ Unstable installation may cause vibration and noise.The recommended angle of installation is 1°• A flat surface is recommended because there is a possibility that the product will fall and cause injury when the installation is made in a sloping place. |  | |
| • Installation should be indoors in a clean place• The drain hose should be installed at an angle so that drainage is good. | ||
| • During installation and use, water leakage may occur due to various reasons. It must be used at a place where drainage facilities are fully equipped• When installing the product indoors (places such as living room, store, the floor where damage may occur due to leakage), please install natural drainage facilities and waterproof the floor.• Even when installing in the kitchen, a drain hole must be provided, and a drain hose must be connected.• The manufacturer shall not be held responsible for the spreading damage caused by insufficient drainage facilities in case of the above-mentioned problems and problems due to water supply hose deviation or breakage. | ||
Requirements for plumbing
Plan the arrangement of the water supply pipes.
Connect a 1/4" diameter copper cable with the tap water pipe.
Install a shutoff valve between the tap water pipe and the product so that the user can operate the valve. Do not install the shutoff valve at the back of the product. Do not use a self-piercing valve. If the tap water has a high level of minerals, a pipeline filter will be required.
The pressure of the tap water should be maintained at a level between 20psi (1.4bar) and 80psi (5.5bar). The tap water and drain pipeline should be planned and prepared at the place of installation. If an electric outlet is available just at the back of the ice maker, installation may be easier. The electric power, tap water pipeline and drain pipeline should satisfy all the provisions under local laws and regulations. For the position of the tap water, refer to the installation specifications and drawings on pages 10 and 11.
Important Information: The dispenser is designed for use in a fixed position but it may be necessary to pull the unit forward for service. Therefore, do not install any material at the front, upper or lower end of the product which may act as an obstacle when moving the ice maker.
Water quality
- There is no such thing as “perfectly pure” water. All kinds of water including tap water contain some impurities. Rainwater absorbs impurities from the atmosphere or when it passes through soil. Some impurities consist of solid particles called suspended solids and are filtered through micro filters. Any remaining impurities cannot be filtered because they are chemically combined with water molecules. These impurities are called dissolved solids.
- The mineral content of the ice produced by the dispenser is reduced compared to the content in the water before conversion into ice. Water containing a low level of impurities is rapidly frozen. The reason for this is that the impurities elevate the temperature of the water. Through such action, most of the impurities condensed in the water-tank of the dispenser form a hard precipitation called scale.
- This dispenser reduces the mineral level by circulating water during the harvest cycle (the excessive quantity is removed through the outlet tube). Each cycle requires about 0.64 quart (0.6 ) of water. For each quart, about 0.5 quart is used in rinsing the water tank and the remaining quantity is removed through the outlet pipe. In this process, some impurities unavoidably remain and may accumulate on the internal parts of the ice maker, forming abnormally-shaped ice cubes. If a large quantity of mineral scale accumulates, the lifespan of the dispenser may be reduced.
- For best operation of the ice maker, impurities and minerals should be decomposed by washing periodically. The method of cleaning the dispenser is described on pages 18 -19.
- In general, it is best to use filtered water. Filters may remove not only bad odor but also particles. Neutral water is not recommended.
- Water softener is not recommended because it exchanges minerals. If the hardness of the water is very high, softening may lead to the formation of opaque pieces of ice.
- If you have any questions about the purity of your water, address your inquiry about water treatment to an expert in water quality.
- This product was thoroughly washed at the factory. However, check the cleanness of the inside before use and keep it clean during use.
Requirements for power supply
120VAC, 60Hz, 15-amp circuit breaker and electric power are required. A separate circuit is required for grounding.
The power cord of the product should be inserted into a suitable 3-prong grounding-type socket.
Important Information: A Ground Fault Circuit Interrupter (GFCI) is not recommended because it could cause the operation of the product to stop.
Important Information: The provisions of the National Electric Code as well as any local laws and instructions should be observed when installing the product.
Electrical Connection
Do not, under any circumstances, cut or remove the third (ground) prong from the power cord. For personal safety, this appliance must be properly grounded. The power cord of this appliance is equipped with a 3-prong grounding plug that mates with a standard 3-prong grounding wall outlet to minimize the possibility of electric shock hazard from the appliance. Have the wall outlet and circuit checked by a qualified electrician to make sure the outlet is properly grounded. When a standard 2-prong wall outlet is encountered, it is your responsibility and obligation to have it replaced with a properly grounded 3-prong wall outlet. The dispenser should always be plugged into its own individual electrical outlet which has a voltage rating that matches the rating label on the appliance. This provides the best performance and also prevents overloading house wiring circuits which could cause a fire hazard from overheated wires. Never unplug your dispenser by pulling on the power cord. Always grip the plug firmly and pull straight out from the outlet. Repair or replace immediately all power cords that have become frayed or otherwise damaged. Do not use a cord that shows cracks or abrasion damage along its length or at either end. When moving the ice maker, be careful not to damage the power cord.
Extension Cord
Because of potential safety hazards under certain conditions, it is strongly recommended that you do not use an extension cord with this dispenser.
Warning!
Do not use extension cords or 2-prong adapters. The product must be grounded. Never cut off the grounding terminal of the 3-prong grounding plug.
Panel Disassembly Method
- Upper panel: Open the front door and lift the upper panel, then the back magnets will be separated and disassembled.
- Front panel: Remove the lower set screws of the drain box, then loosen the set screws on the top of the front panel and pull out the front panel taking both sides.
- Side panel: Open the door, loosen the screws on the top of the front panel, push the front panel forward, and slide the side panel forward to remove it.

• Precede the assembly work in the reverse order of disassembly.
Connection to water supply and drainage [Connection of water and drainage hoses]
| Division | Proper water temperature | Water pressure | Hose to be used |
| ICE MAKING water supply | 50 ~ 90 °F | 14.22 ~ 71.12 psi20 ~ 80 psi | OD ø6.35PE TUBENPT 3/8" |
| ICE MAKING drainage | - | - | ID ø20 hoseNPTF 3/4" |
- If the temperature of the ICE MAKING water supply is too high, the amount of ICE MAKING may be reduced.
- If the water pressure is too low, it may not be possible to freeze. In this case, an auxiliary hydraulic pump should be installed.
- Connect the ø6.35 PE TUBE to the bottom right of the product as shown in the picture and secure the clip to prevent hose detachment.

After the installation is complete, please operate the product and check whether there is leakage in the water supply and drainage parts.
- Please connect a hose with an inner diameter of 20mm or more for the ice making drain hose and the drain outlet should be 5cm above the drain floor level. If the drain outlet dips in the drainage, the drainage may flow back into the dispenser and damage the product and the floor.

Be careful not to bend the drainage hose during the installation and also confirm that the hose is not exposed to fire or sharpness which may result in the hose burst (This will become the cause of the PL accident and the manufacturer shall not be held responsible)
STARTING THE PRODUCT
1) Water supply hose protection --Do not place heavy objects on the water supply hose leading to the water supply, or keep the hose from treading.
2) Proper water pressure, water temperature, ambient temperature
Water pressure: 14.22 \~ 71.12 psi
For AIWD160 model: 20 \~ 80 psi
Water temperature: 50 \~ 90 °F
Ambient temperature: 50 \~ 100 °F
3) Please connect only the water you can drink.
Power connection - connect the dispenser to a dedicated outlet.
4) Water supply - open the faucet and let the water supply.
5) Ice making operation - Turn the ICE MAKING-OFF-WASH switch to ICE MAKING
ICE MAKING-
OFF-WASH
switch

natural_image
Front view of a computer interface with monitor, keyboard, and drive unit (no text or symbols visible)6) Start ice production - There is a slight difference depending on the ambient temperature and water temperature, ice starts to be generated from about 3 minutes after starting the ice making operation. After about 70 minutes, the reservoir will be full of ice. (You can use ice after about 10 minutes.)
BUTTON OPERATION

| ICE | - If you turn on the power, this will always come in first. The initial water subtraction is done three times and then the ICE MAKING operation is preceded. If you put the cup in the ice exit, you can discharge the ice for the time set in F1. |
| WATER | Press the button to light up. If you put the cup on the ice exit, you can discharge the water for the time set in F1. |
| ICE & WATER | Press the button to light up. If you put the cup on the ice exit, you can simultaneously discharge ice and water for the time set in F1. |
NOTE: When the FULL light is on. The storage bin is full of ice. (AIWD450 model)
When ERROR occurs
- ICE-WATER-ICE & WATER button will flicker in order and will disappear when restarting after the action against the ERROR.
Service cycle setting notification (parts check / replacement cycle notification) - If the motor is running for more than 10,000 hours, the corresponding lamp blinks for 5 seconds in the initial stage of the ice maker.
- If the motor is operated for more than 11,000 hours, all the buttons will blink for 5 seconds in 1 hour cycle.
※ If all the buttons are flashing, it is a signal to check / replace regular replacement parts and you should contact the customer service center (paid service).
Failure to check / replace parts may result in higher repair costs.
Function Button Description (FND Display Window)
| F. 1 | Maximum Discharge Time | 1 SOLENOID Maximum operating time adjustment function.2 3^rd , 4^th digits: 20 seconds (5 seconds ~ 30 seconds, Set Unit of one second) |
| F. 2 | Complete removal of ice in the reservoir | 1This function can be entered in "OFF" state of ICE MAKING-OFF-WASH switch.2Press two buttons (WATER, ICE) simultaneously for 3 seconds and Button part LED lights up.3Press the discharge lever for continuous operation of SOLENOID and the motor. Keep 'ON' state. |
| F. 3 | Automatic ice discharge function | 1 When ICE, WATER &ICE button is selected, ice is automatically emitted for the set time.2 Automatic operation is not possible when OFF is set. (Manual operation)3 Automatic discharge is performed for the set time of At01 ~ 99. |
| F. 4 | Initial water subtraction function | 1 It operates first when "ICE MAKING" switch is operated.2 FND 1^st , 2^nd digits (drain time) 30 seconds (oF ~ 99 seconds, Set Unit of one second)3 Water supply operation after drainage to high water level.4 FND 3^rd , 4^th digits (number of repetitions) Standard: 3 times (1 ~ 9 times) |
| F. 5 | Automatic drain function | It operates when "ICE MAKING" switch is operated.2 FND 1^st , 2^nd digits (drain time): 2 seconds (oF ~ 9 seconds, Set Unit of one second)3 FND 3^rd , 4^th digits (drain interval): 1.0 hour (0.5 ~ 9.5 hours, every 30 minutes) |
| F. 6 | ICE + WATER volume control | 1 1^st , 2^nd digits Ice time Default 5 seconds (up to 99 seconds)2 3^rd , 4^th digits Water time Default 5 seconds (up to 99 seconds) |
| F. 7 | UV LAMP time adjustment | 1 1^st , 2^nd digit lighting time Default 3minutes (99 minutes possible)2 3^rd , 4^th digits off time Default 1 hour (9 hours available) |
| F. 8 | Notify service period setting | 1 A.1.0 After using 10,000 hours, the corresponding mode LED blinks for 5 seconds (for the first 5 seconds during ice making)2 A.1.1 After using 11,000 hours, all LEDs blink for 5 seconds (1 hour cycle) |
| F. 9 | Cumulative uptime | 1 The FND display is displayed in year, month, day, and hour, and is displayed in order from right to left.2 Cumulative operation time of product is expressed in hour unit.3 Calculation example: 12 months for 1 year, 30 days for 1 month, 24 hours for 1 day. |
| F. 10 | Change temperature unit | Function of setting the unit of temperature in degrees Celsius or Fahrenheit |
| F. 11 | Evaporation inlet temperature display | |
| F. 12 | Evaporation outlet temperature display | |
| F. 13 | Choose ice water discharge method | ordE : Discharge ice first and then discharge water join : Simultaneous discharge of ice and water |
Three Draining Functions
(Forced Draining, Automatic Draining, Water Draining)

| Forced drainage function | Must be implemented to prevent freezing in winter storage. Use this function for cleaning the inside.- Turn on the power switch and press the "DOWN + SET" button simultaneously for 3 seconds with any signal on the FND display. (30 seconds) |
| Automatic drain function (F. 5) | Turn on the power switch and turn the ice making switch to "ICE MAKING" to start the operation.1 FND 1^st , 2^nd digits (drain time): 2 seconds (oF ~ 99 seconds (09 seconds for AIWD450 model) , Set Unit of one second).2 FND 3^rd , 4^th digits (drain interval): 1.0 hour.(0.5 to 9.5 hours, every 30 minutes) |
| Initial water draining function (F. 4) | Turn the power switch off and then on again (the ICE MAKING-OFF-WASH switch at "ICE MAKING" position) to operate the function.1 Clean the water line and ice making cylinder thoroughly.2 FND 1^st , 2^nd (drain time) 30 seconds (oF ~ 99 seconds, Set Unit of one second).3 Water supply operation to high water level after drainage.4 FND 3^rd , 4^th digits (number of repetition) Reference: 3 times (1 ~ 9 times). |
Stop switch
- With the power switch turned on, turn the "ICE MAKING-OFF-WASH" switch to center OFF, then the ice making stops and the motor runs for another 60 seconds.
• This function protects the motor by removing the ice remaining in the product.
• If you sell the remaining ice even when it is OFF, ice discharging will be done.
Actions required to prevent frost
(Water Removal in Water Tank and Evaporator)
CAUTION
- If the ambient temperature falls below 0^ C/32 ^ F, water will freeze inside the machine and machine operation will be impossible.
- If not use in for a long period of time in the winter, be sure to completely remove the water inside the body by following the instructions below. If you do not remove the water or if it is insufficient, it will cause serious damage to the product. This shall not be guaranteed by the manufacturer and may result in repair costs. Please observe the following points.
- Turn on the power switch and press the DOWN + SET button at the same time for 3 seconds with any signal on the FND window. Forced drainage will be done for 30 seconds.
- Turn off the power switch and disconnect the power plug from the outlet.
- Remove the upper panel → the front panel.
- Remove the evaporator cylinder drain hose clamp and remove the hose, and wait until the ice in the evaporator cylinder completely melts down. It is possible to remove internal water quickly by using compressed air gun etc.
- Reassemble the evaporator cylinder drain hose and tighten the clamp.
- Assemble in the order of left panel → upper panel → front panel.
• AIWD450: back panel → upper panel

Emptying the drainage gutter (AIWD450)
- When the water in the front drain is full, a white float comes up, so empty out the drain and pour water.
- (If water overflows, it may flow onto the floor, so empty it from time to time).
Maintenance, repair, and disinfection
※ Please keep the product according to the instruction manual and label provided.
- Be sure to have a qualified service technician service the product.
- To reduce the risk of electric shock, do not touch or disassemble the parts of the ice maker.
- Before service
- Turn off the power switch of the dispenser and the earth leakage breaker, and disconnect the power plug from the outlet.
- Choking hazard - After performing maintenance and repair, make sure that all components (such as fixtures, screws, bolts, etc.) are completely assembled.
- Be careful not to let any components fall into the ice making compartment and ice reservoir.
Maintenance Schedule
※ The following maintenance schedule is a guideline.
※ Maintenance and repair should be done more frequently according to water quality, equipment usage environment and local hygiene regulations.
| Inspection Schedule | Area | Contents |
| Daily | Chute | 1. Clean the ice scoops with a neutral detergent.2. Rinse thoroughly after cleaning. |
| Weekly | Air Filters (air-cooled) | 1. Inspect for dust and wash dirt with warm water and neutral detergent. |
| Monthly | External water filter | 1. Make sure that the pressure is adequate and make changes if needed. |
| Outside of the icemaker | 1. Wipe it with a clean, soft cloth, and use a cloth dampened with a neutral detergent to wipe away any accumulated dust or grease.2. Clean the chlorine dye (green spots) with non-abrasive detergent. | |
| The bottom of the ice maker | 1. Wipe clean with clean cloth and warm water. | |
| Every six months | Dispenser and reservoir | 1. Clean and disinfect according to the disinfection instructions given in the instruction manual. |
| Evaporator condensate drain pan and Geared motor drain pan | 1. Wipe clean with clean cloths and warm water, and slowly pour a cup of disinfectant solution (prepared as described in the instructions for disinfection in the manual) into the evaporator condensate drain pan.2. Take care not to overflow the drain pan.3. This disinfectant solution will flow out through the geared motor drain pan and drain passage.4. Rinse repeatedly with a glass of clean water. | |
| Ice maker and reservoir | 1. Always check that it is kept clean. | |
| Ice exit fixing seal bolt | 1. Check for leaks around the seal bolt. Tighten if necessary and replace O-rings.2. Always replace the O-ring when loosening the seal bolt and tighten it again. If there is no O-ring, apply Loctite 243 or equivalent fixing agent so that it does not leak. | |
| Every year | Water supply valve and Drain valve | 1. Close the shutoff valve to shut off the water supply line and drain the water.2. Clean the inlet of the water supply valve and check the water supply valve and drain valve for leakage and operation. |
| Water hose | 1. Check the water hose and clean it if necessary. | |
| Condenser (air-cooled) | 1. Inspect for cleaning. If necessary, clean with a brush or vacuum cleaner2. If the dust adhesion is severe, spray the pin cleaning agent, clean the dust, spray it with clean water, rinse and dry with air gun. | |
| Ice maker | 1. Inspect for oil marks, loose components, tightening parts and wires. | |
| Upper bearing (Ice exit head) | 1. Check that 0.5mm (0.02mm for AIWD160 model) round bar or pin gauge (o clearance gauge) is inserted into auger and bearing clearance, and replace all upper and lower bearings (ice exit head and lower housing) (Paid service) | |
| Mechanical seal | 1. Check for leaks in the bottom housing, and if there is a leak, disassemble the auger to replace the mechanical seal. (Paid service) (Water with a lot of calcium will shorten the life of replacement parts.) | |
| Every three years | Upper and lower bearings,Housing O-ring,Mechanical seals,Evaporator cylinder,Auger | 1. Please check if the auger and bearing clearance exceeds the factory recommended value (0.5mm or less (0.02mm or less for AIWD160 model)), and replace both the upper and lower bearings.If the contact surface of the mechanical seal is worn, cracked, or scratched, replace it. |
Caution when cleaning exterior panel (stainless steel)
| How to clean the rust state | |
| Stain type initial rust | Since the initial rusted stainless steel surface itself is only slightly affected by the stain, it can be returned to almost the original surface by selecting the neutral detergent or a commercially available cleaning solution. If it is regularly cleaned at a proper frequency, the state of the rust can stop at this stage and you can remove the rust easily and cheaply. |
| Red Rust | If the initial rust is let for a long time, it will result in a thick brown rust that can damage the stainless steel surface. In this condition, it is not east to remove the rust, and the surface cannot be restored. Therefore, it is important to remove the rust in the early stage of rusting.If the rust is not removed by a commercial cleaning agent, it can be easily removed by using a cleaning agent after removing some rust in advance with sandpaper or a stainless steel brush. In this case, it is necessary to fix the surface by cleaning and regrinding the surface. |
| Rust by iron powder | Rust by iron powder can occur due to welding spatter at the time of construction, rust water flowing down from steel in the upper part of stainless steel, and rust generated in contact with stainless steel and ordinary iron products during storage. It should be removed with neutral detergent at the first sign of rusting. If the rusting state is further developed, it should be removed with 15% nitric acid solution or commercially available stainless steel cleaner. |
| Rust due to exhaust gas or acid rain | Exhaust gas or acid rain, sometimes found in high traffic cities, may affect this unit. Relatively light rusts can be cleaned with a neutral detergent or soapy water, but if they get worse, they should be removed with 15% nitric acid solution or a commercially available stainless steel cleaner. |
| Rust due to salt deposition | When exposed to sea breezes like a window frame or verandah railway pipe that faces the ocean, the icemaker may experience red rust in a short time. To avoid red ruse, ensure regular cleaning according to this manual. |
| Rust by disinfection and cleaning agent | Chlorine-based disinfectants are used to disinfect water in places such as swimming pools and bathrooms. In the case of chlorine-based cleaning agents such as ROX used for cleaning toilets, etc., many chlorine compounds are attached to the surface of stainless steel and can result in rusting. When chlorine- based disinfectants are used, it is important to thoroughly wash them with water to ensure that no residue remains. They must be removed with 15% nitric acid solution or stainless steel cleaner. |
How to Clean and Disinfect
The dispenser should be cleaned and disinfected at least twice a year. More frequent cleaning and disinfection may be required.

WARNING
Please observe the following points.
- Do not use ammonia-type detergents to prevent personal injury or damage to the ice maker.
- Disinfection and cleaning should be handled according to the instructions provided.
- Always wear protective eyewear and waterproof gloves to prevent skin or eye contact with water and disinfectant.
- After cleaning and disinfection, do not use ice made from cleaning agent and disinfectant. Be careful that no disinfectant remains in the dispenser and any parts in the reservoir.
| Washing solution | Use a scale remover that is not harmful to the human body by diluting with water, and add more if necessary.It is important to use the diluted cleaning solution immediately for safety and maximum effect. |
| Washing procedure | 1) Shut off the water supply by locking the valve of the waterline of the ice maker.2) Switch the ICE MAKING-OFF-WASH switch to the "WASH" position.3) The water in the water tank is drained through the evaporator cylinder and washing is done by this (max. 5 minutes).4) Turn the ICE MAKING-OFF-WASH switch to "OFF" position.5) Remove all ice from the ice maker and reservoir.6) Pour the wash solution into the wash solution inlet until the evaporator assembly and the water tank are full. (Until the wash solution overflows to the drain box)7) Leave the ice maker for 10 minutes before starting the operation. If the water supply hose is clogged, remove it before operation.8) As described below, please disassemble and clean the water level sensor (high and low) if it is in bad water condition.If not, proceed to step 9.Remove the water level sensor from the water tank cover.Clean the level sensor with washing solution.Wash the water level sensor thoroughly with clean water.Fix the level sensor to the correct position.9) Switch the ICE MAKING-OFF-WASH switch to the "ICE MAKING" position to start the ice maker. Keep it running until ice making stops.(※ Water supply valve should be locked so that water is not supplied.)10) Switch the front ICE MAKING-OFF-WASH switch to the "WASH" position, and drain the remaining water in the water tank and evaporator cylinders for 5 minutes.11) Switch the ICE MAKING-OFF-WASH switch to the "OFF" position.12) Open the water supply valve of the ice maker, and switch the ICE MAKING-OFF- WASH switch to the "ICE MAKING" position so that water can be supplied to the water tank.13) When the geared motor is activated, switch the ICE MAKING-OFF-WASH switch to the "WASH" position and drain the water (drain is possible for 5 minutes).14) Turn OFF the power switch and disconnect the power cord from the outlet. |
| Disinfection wash | Dilute 10 L of warm water and 400 mL of 5.25% sodium hypochlorite solution (bleach). (※ Dilution ratio may vary depending on the solution manufacturer, please refer to the solution manual).If this is the minimum amount to be used, use more washing solution.※ To ensure safety and maximum effect, please use the washing solution immediately after dilution. |
| Disinfection procedure - initial | 1) Shut off the water supply by closing the valve of the water supply line and make sure that the power switch is turned to “OFF” position and the power plug is disconnected from the outlet, and then remove the front panel and the upper panel.2) Pour the disinfectant solution over the water inlet until the evaporator assembly and the water tank are full. (Until the disinfecting solution overflows to the drain box)3) Open the top cover and disassemble the ice reservoir lid.4) Disassemble packing, bush, etc. inside the lid.5) Turn the Agitator to the left to disassemble it.6) Remove the Ice Base Plate.7) Disinfect the inside of the reservoir and the removed parts for 10 minutes and wipe them.8) Remove Spout, clean for 10 minutes and wipe.9) Please thoroughly rinse all parts with clean water. (※ If there is residual washing solution, it will cause corrosion.)10) Assemble all parts in the correct position.11) Connect the power plug to the outlet, turn the power switch to “ON”, turn the ICE MAKING-OFF-WASH switch to “ICE MAKING” and keep the operation until the disinfectant solution is exhausted and the ice production stops.12) Switch the ICE MAKING-OFF-WASH switch to the "WASH" position and let the remaining water drain out for 5 minutes.13) Turn the power switch to “OFF” and disconnect the power plug from the outlet. |
| Disinfection procedure - final | 1) Mix the disinfection solution in a new bowl.2) Check that the water valve is closed, the power switch is turned off and the power plug is disconnected from the outlet, and then remove the front panel and the upper panel.3) Pour the disinfectant solution over the water inlet until the evaporator assembly and the water tank are full.(Until the disinfecting solution overflows to the drain box)4) Leave the ice maker for 10 minutes before operating the ice maker.5) Connect the power plug to the outlet, turn on the power switch, and turn the ICE MAKING-OFF-WASH switch to 'ICE MAKING' until the disinfectant solution is exhausted and the ice stops generating.6) Switch the ICE MAKING-OFF-WASH switch to 'WASH' and drain the remaining water for 5 minutes.7) Switch the ICE MAKING-OFF-WASH switch to "ICE MAKING" and open the valve of the ice-maker water supply line so that water can be supplied to the water tank.8) When the geared motor starts to operate, switch the ICE MAKING-OFF-WASH switch to the 'OFF' position.9) Switch the ICE MAKING-OFF-WASH switch to 'WASH' and discharge the remaining water for 5 minutes.10) Turn the ICE MAKING-OFF-WASH switch to 'ICE MAKING' position to generate ice for 30 minutes, then turn off the power switch.11) Pour warm water into the ice reservoir to dissolve the ice and drain it. Use a neutral detergent to wash the reservoir. After washing, rinse thoroughly with clean water. |
- When cleaning the hopper water, use a cleaning valve.
- Disassemble the hopper lid and use the cleaning valve to clean the inside.
Circuit Diagrams
AIWD282 SCIWD282
Wiring Diagram

flowchart
graph TD
    A["MAIN SWITCH"] --> B["MP5"]
    B --> C["COMP"]
    C --> D["FAT MOTOR"]
    D --> E["DRAGON MOTOR"]
    E --> F["DRAGON PASE"]
    F --> G["POWER"]
    G --> H["Switch"]
    H --> I["POWER"]
    I --> J["CO2"]
    J --> K["CO2"]
    K --> L["CO2"]
    L --> M["CO2"]
    M --> N["CO2"]
    N --> O["CO2"]
    O --> P["CO2"]
    P --> Q["CO2"]
    Q --> R["CO2"]
    R --> S["CO2"]
    S --> T["CO2"]
    T --> U["CO2"]
    U --> V["CO2"]
    V --> W["CO2"]
    W --> X["CO2"]
    X --> Y["CO2"]
    Y --> Z["CO2"]
    Z --> AA["CO2"]
    AA --> AB["CO2"]
    AB --> AC["CO2"]
    AC --> AD["CO2"]
    AD --> AE["CO2"]
    AE --> AF["CO2"]
    AF --> AG["CO2"]
    AG --> AH["CO2"]
    AH --> AI["CO2"]
    AI --> AJ["CO2"]
    AJ --> AK["CO2"]
    AK --> AL["CO2"]
    AL --> AM["CO2"]
    AM --> AN["CO2"]
    AN --> AO["CO2"]
    AO --> AP["CO2"]
    AP --> AQ["CO2"]
    AQ --> AR["CO2"]
    AR --> AS["CO2"]
    AS --> AT["CO2"]
    AT --> AU["CO2"]
    AU --> AV["CO2"]
    AV --> AW["CO2"]
    AW --> AX["CO2"]
    AX --> AY["CO2"]
AIWD450

① When Error occurs, the front use button (ICE-WATER-ICE & WATER) of the door lights alternately to the left and right. Restart after action.
② When the button is lit alternately to the left and right, open the door and press the bottom setting button of the control buttons, Error display will appear.
| Display | Error type | Causes | Action | Release | Operation |
| Er01 | Evaporator temperature error | When the Evaporator temperature is 0 °C or more after 30 minutes passed during the ice making | Check refrigerant leakageCheck sensor and attachment abnormality | Resupply power after resolving cooling problem | Stop ice making |
| Er03 | Evaporator temperature error | When the Evaporator temperature is over -5 °C after 30 minutes passed | Check refrigerant leakageCheck sensor and attachment abnormality | Resupply power after resolving cooling problem | Keep on ice making |
| Er06 | Temperature sensor error | Displayed when temperature sensor is open or shorted. | Check sensor and attachment abnormality | Start operation after sensor part repair | Stop ice making |
| Er07 | Temperature Sensor Error | Occurs when the temperature sensor of COND OUT (F11) is broken (All operations will be stopped and the "water" dispensing mode will be activated) | Check sensor and attachment abnormality | Start operation after sensor part repair | Stop ice making |
| Er13 | High pressure switch error | Condenser dust, fan motor failure, cold cycle abnormality, etc. | Remove dust, Check Fan motor Check for abnormal cold cycle | Automatic return after action | Stop compressor. Stop motor after operating 10 seconds. |
| Er14 | High pressure switch error | Occurs when High pressure switch is OPEN 3 times or more | Contact service representative | Start operation after action | Stop compressor. Stop motor after operating 10 seconds. |
| Er15 | Water supply error | When water level is not detected by the water level sensor due to no water supply for 120 seconds. | Water supply pressure check Water level sensor check | Start operation after action | Stop ice making |
| Er16 | Water level sensor defect | At the start of ice making, when the upper and lower limits are not detected by the water level sensor for 60 seconds | Replacement of Water Level Sensor | Start operation after action | Stop ice making |
| Er20 | Cover error | When the outlet cover is open | Cover closed | Operation after action | Stop dispensing |
| Er25 | Motor restraint | Occurs when Evaporator inlet /outlet temperature is -18 °C or less for 10 minutes. Poor water supply, Agitator restraint, Ice jams due to scale | Unlock ice jams Check water supply line Check motor restraint fault | Start operation after action. Machine stops after 3 repetitions | Stop ice making |
NOTES
Before Requesting Service
If the operating condition of the machine is not good, please refer to the table below to identify the issue. If you still require assistance, contact your dealer or service center. For expedited service, it is best to have the following information on hand: model name, serial number, name of dealer, and date of purchase.
| Operating status | Things to check | Action |
| 1. Machine does not work | Is power supplied? | Please plug in the power cord. |
| Is the circuit breaker switch disconnected? | After removing the cause, please raise (turn on) the earth leakage breaker located on the back of the unit. | |
| Is power supplied to 220V ± 10%? | Please check the power and use a dedicated outlet. | |
| Is the front power switch on? | Set the front power switch on the front display to the on ('ICE') position | |
| 2. No water supply. | Is the water valve locked? | Please open the water supply valve. |
| Is the water supply hose properly installed? | Check and take action. | |
| Has the water supply stopped? | Wait until water supply is confirmed. | |
| Is the water supply valve operating? | After confirming, contact A / S center. | |
| 3. Ice freezes too late | Machine is too dirty (lots of dust) (Air-cooled) | After removing the front cover, remove the dust net to the side and remove the dust using the vacuum cleaner. If a lot of dust accumulates, the performance of the machine may deteriorate and a lot of electricity bill may be charged. |
| Is the ambient temperature too high or too low? | The operating temperature of the product is within 10 °C ~ 38 °C. Control the ambient temperature according to the operating temperature. | |
| Is there accumulation of debris inside the water supply valve? | Disassemble the water supply valve, and then remove any foreign matter from the sieve. Be sure to lock the faucet at this time. | |
| 4. The noise is too big and abnormal | Is the installation floor unstable or weak? | Fit the floor flat |
| Is the front and rear of the dispenser not touching the wall? | Please keep more than 50cm on the front and back. | |
| Is the water supply temperature too low? | Use water with a supply water temperature of 10 °C to 32 °C. | |
| Does the ice generator produce loud noise? | Turn the power switch to 'OFF' to completely dissolve the ice, then switch back to 'ICE'. Please contact A / S center |
LIMITED WARRANTY
ONE-YEAR LIMITED WARRANTY
Within the 48 contiguous United States, for one year from the date of purchase, when this appliance is operated and maintained according to instructions attached to or furnished with the product, warrantor will pay for factory- specified parts and repair labor to correct defects in materials or workmanship. Service must be provided by a designated service company. Outside the 48 states, all parts are warranted for one year from manufacturing defects. Plastic parts, shelves and cabinets are warranted to be manufactured to commercially acceptable standards, and are not covered from damage during handling or breakage.
5-YEARS COMPRESSOR WARRANTY
- The compressor is covered for 5 years.
- Replacement does not include labor.
ITEMS WARRANTOR WILL NOT PAY FOR:
- Service calls to correct the installation of your appliance, to instruct you how to use your appliance, to replace or repair fuses or to correct wiring or plumbing.
- Service calls to repair or replace appliance light bulbs or broken shelves. Consumable parts (such as filters) are excluded from warranty coverage.
- Damage resulting from accident, alteration, misuse, abuse, fire, flood, acts of God, improper installation, installation not in accordance with electrical or plumbing codes, or use of products not approved by warrantor.
- Replacement parts or repair labor costs for units operated outside the United States.
- Repairs to parts or systems resulting from unauthorized modifications made to the appliance.
- The removal and reinstallation of your appliance if it is installed in an inaccessible location or is not installed in accordance with published installation instructions.
DISCLAIMER OF IMPLIED WARRANTIES; LIMITATION OF REMEDIES
CUSTOMER'S SOLE AND EXCLUSIVE REMEDY UNDER THIS LIMITED WARRANTY SHALL BE PRODUCT REPAIRS PROVIDED HEREIN. IMPLIED WARRANTIES, INCLUDING WARRANTIES OF MERCHANTABILITY OR FITNESS FOR A PARTICULAR PURPOSE, ARE LIMITED TO ONE YEAR. WARRANTOR SHALL NOT BE LIABLE FOR INCIDENTAL OR CONSEQUENTIAL DAMAGES. SOME STATES DO NOT ALLOW THE EXCLUSION OR LIMITATION OF INCIDENTAL OR CONSEQUENTIAL DAMAGES, OR LIMITATIONS ON THE DURATION OF IMPLIED WARRANTIES OF MERCHANTABILITY OR FITNESS, SO THESE EXCLUSIONS OR LIMITATIONS MAY NOT APPLY TO YOU. THIS WARRANTY GIVES YOU SPECIFIC LEGAL RIGHTS AND YOU MAY ALSO HAVE OTHER RIGHTS, WHICH VARY FROM STATE TO STATE.

WARNING: This product can expose you to chemicals including Nickel (Metallic) which is known to the State of California to cause cancer. For more information go to www.P65Warnings.ca.gov
Note: Nickel is a component in all stainless steel and some other metal components.
FELIX STORCH, INC.
770 Garrison Avenue
Bronx, NY10474
Phone: (718) 893-3900
Fax: (844) 478-8799
www.accucold.com
accucold
For parts and accessory ordering,
troubleshooting and helpful hints,
visit:www.summitappliance.com/support
Printed in Korea
- Table of Contents
- Your safety and the safety of others are very important.
- DANGER!
- WARNING
- CAUTION
- IMPORTANT SAFETY INSTRUCTIONS
- WARNING: To reduce the risk of fire, electric shock or injury when using your ice maker, follow these basic precautions:
- SAVE THESE INSTRUCTIONS
- ! DANGER !
- an extension cord.
- Location of Parts (AIWD282/SCIWD282)
- Unpacking, etc.
- Product Installation
- Requirements for plumbing
- Water quality
- Requirements for power supply
- Electrical Connection
- Extension Cord
- Warning!
- Panel Disassembly Method
- Connection to water supply and drainage [Connection of water and drainage hoses]
- STARTING THE PRODUCT
- BUTTON OPERATION
- When ERROR occurs
- Three Draining Functions
- (Forced Draining, Automatic Draining, Water Draining)
- Stop switch
- Actions required to prevent frost
- Emptying the drainage gutter (AIWD450)
- Maintenance, repair, and disinfection
- Maintenance Schedule
- How to Clean and Disinfect
- Please observe the following points.
- Circuit Diagrams
- NOTES
- Before Requesting Service
- LIMITED WARRANTY
- ONE-YEAR LIMITED WARRANTY
- 5-YEARS COMPRESSOR WARRANTY
- ITEMS WARRANTOR WILL NOT PAY FOR:
- DISCLAIMER OF IMPLIED WARRANTIES; LIMITATION OF REMEDIES
Brand : Accucold
Model : AIWD160
Category : Sorbet maker