
MN50HD - Camcorder MINOLTA - Free user manual and instructions
Find the device manual for free MN50HD MINOLTA in PDF.


| Product Type | Camcorder |
| Brand | Minolta |
| Model | MN50HD |
| Dimensions (approx) | 70 x 80 x 120 mm (2.8 x 3.1 x 4.7 in) |
| Weight (approx) | 300 g (10.6 oz) |
| Power Supply | Rechargeable lithium-ion battery (7.4V, 1200mAh) |
| Recording Media | SD/SDHC memory card (up to 32GB) |
| Video Resolution | Full HD 1080p (1920x1080) |
| Image Sensor | 1/3-inch CMOS sensor |
| Optical Zoom | 10x optical zoom |
| Digital Zoom | 120x digital zoom |
| Display | 3.0-inch LCD touchscreen |
| Image Stabilization | Electronic image stabilization |
| Focus Control | Auto focus / Manual focus |
| Exposure Control | Auto / Manual exposure (+/-2 EV) |
| White Balance | Auto, Daylight, Cloudy, Fluorescent, Tungsten |
| Built-in Light | LED video light |
| Connectivity | HDMI mini, USB 2.0, AV output, microphone input |
| Battery Life | Approximately 90 minutes recording time |
| Maintenance | Clean lens with soft dry cloth; store in cool dry place |
| Safety | Avoid exposure to water, extreme temperatures, and dust |
| Spare Parts | Battery (NP-120), AC adapter, USB cable, HDMI cable |
| Repairability | Some components replaceable by authorized service center |
Frequently Asked Questions - MN50HD MINOLTA
User questions about MN50HD MINOLTA
0 question about this device. Answer the ones you know or ask your own.
Ask a new question about this device
Download the instructions for your Camcorder in PDF format for free! Find your manual MN50HD - MINOLTA and take your electronic device back in hand. On this page are published all the documents necessary for the use of your device. MN50HD by MINOLTA.
USER MANUAL MN50HD MINOLTA
Congratulations on purchasing the Minolta MN50HD 1080p Camcorder!
The contents of this manual are subject to change without notice. Note that the example screens and product illustrations shown in this User's Guide may differ somewhat from the screens and configuration of the actual camera.
Copyright
This manual contains proprietary information protected by copyright. All rights are reserved. No part of this manual may be reproduced by any mechanical, electronic or other means, in any form, without prior written permission of Elite Brands Inc. © 2017.
FEDERAL COMMUNICATIONS COMMISSION INTERFERENCE STATEMENT
This equipment has been tested and found to comply with the limits for a Class B digital device, pursuant to Part 15 of the FCC Rules. These limits are designed to provide reasonable protection against harmful interference in a residential installation. This equipment generates, uses and can radiate radio frequency energy and, if not installed and used in accordance with the instructions, may cause harmful interference to radio communications. However, there is no guarantee that interference will not occur in a particular installation. If this equipment does cause harmful interference to radio or television
reception, which can be determined by turning the equipment off and on, the user is encouraged to try to correct the interference by one or more of the following measures:
- Reorient or relocate the receiving antenna.
- Increase the separation between the equipment and receiver.
- Connect the equipment into an outlet on a circuit different from that to which the receiver is connected.
- Consult the dealer or an experienced radio/TV technician for help.
CAUTION:
Any changes or modifications not expressly approved by the party responsible for compliance could void the user's authority to operate the equipment.
This device complies with Part 15 of the FCC Rules. Operation is subject to the following two conditions:
(1) This device may not cause harmful interference and
(2) This device must accept any interference received, including interference that may cause undesired operation.
RF exposure warning
This equipment complies with FCC RF radiation exposure limits set forth for an uncontrolled environment. This equipment must be installed and operated in accordance with provided
instructions and must not be co-located or operating in conjunction with any other antenna or transmitter. End-users and installers must be provided with antenna installation instructions and transmitter operating conditions for satisfying RF exposure compliance.
FCC: SAR standard Value: 1.6 W/Kg, Maximal Measure: 0.4 W/kg
CE Mark Warning
This is a Class B product, in a domestic environment, this product may cause radio interference, in which case the user may be required to take adequate measures.
Safety and Handling Precautions
Camera Information
- Do not take apart or attempt to service the camera yourself.
- Do not expose the camera to moisture, or extreme temperatures.
- Allow the camera to warm up when moving from cold to warm temperatures.
- Do not touch and put pressure on the camera lens.
- Do not expose the lens to direct sunlight for extended periods.
- Do not use abrasive chemicals, cleaning solvents or strong detergents to clean the product. Wipe the product with a slightly damp soft cloth.
- Do not use the flash or LED Light near a person's eyes to prevent possible eye injury.
• To prevent you from falling over or resulting in traffic accident, please do not use the
camera while you are walking, driving or riding a vehicle.
- Please handle the camera strap with care, and never place the strap around the neck of an infant or child. Wrapping the strap around a neck may cause suffocation.
- Do not subject the LCD monitor to impact.
- To prevent the risk of fire or electric shock, do not expose this appliance to rain or moisture.
- Battery Information
- Turn off the camera before installing or removing the battery.
- Use only the provided batteries or type of battery and charger that came with your camera. Using other types of battery or charger may damage the device and invalidate the warranty.
- Inserting the battery upside down can cause damage to the product and possibly cause an explosion.
- When the camera is used for an extended period of time, it is normal for the camera body to feel warm.
- Download all pictures and remove the battery from the camera if you are going to store the camera for a long period of time.
- The type of battery and the battery power level may cause the lens to be stuck up.
Ensure you use the correct battery type and use a fully charged battery.
- Risk of explosion if battery is replaced by an incorrect type. Dispose of used batteries according to the instructions.
- Please keep the batteries out of the reach of children to prevent from swallowing batteries, which might cause poisoning.
- Once the battery's color changes or its shape is twisted, please stop using it.
- USB adapter Information
- Do not expose the adapter to high temperatures or moisture places. Otherwise, it may cause fire or electric shock.
- Do not attempt to repair, disassemble, change or transform the adapter.
- Avoid sudden changes in temperature, which may cause condensation on the adapter's internal surfaces. Please do not use it immediately in this situation.
- Do not touch the plug with wet hands. Otherwise, it may cause electric shock.
- Do not use the travel voltage converter or AC/DC power inverter. Otherwise, it may cause damage, overheating, malfunction or fire to the camera.
Contents
Preparing for First Use....8
▶ Camcorder Body Overview....8
▶ Inserting and Charging the Battery 10
▶ Inserting a Memory Card (SD Card) 11
Basic Operation 12
▶ Powering the Camcorder On and Off.... 12
▶ Navigating the Camcorder's Menus 12
▶ Setting the Date & Time 13
▶ Formatting the SD Card 13
▶ Photo, Video and Playback Modes 14
▶ Display Icons on the LCD Screen 15
▶ Setting Up Your Camcorder for Use.... 18
Recording Video 20
▶ Video Mode Menu....21
Shooting Photos 23
▶ Photo Mode Menu....24
Playback 27
▶ Playback Photos ...... 28
▶ Playback Mode Menu.... 28
Connections....29
▶ Connecting the Camcorder to an HDTV.... 29
▶ Download Files to Your Computer.... 29
▶ Use the Camcorder as a PC Camera (Windows XP Only)...... 30
Software Installation 31
Technical Specification 33
Attribution and Tech Support....35
Preparing for First Use
▶ Camcorder Body Overview
- LCD screen
- Up / Playback button
- Power button
- T (Zoom-In) button
- W (Zoom-Out) button
- Mode button
- Charging Indicator
- Shutter button
-
OK / MENU button
-
Right / LED lamp button
-
USB port
-
HDMI port
-
Down button
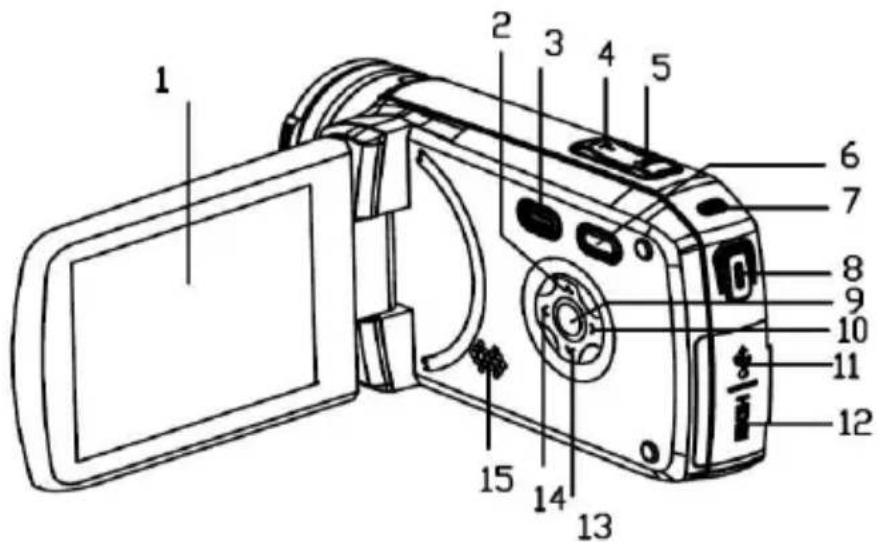
- Left button
- Speaker Output
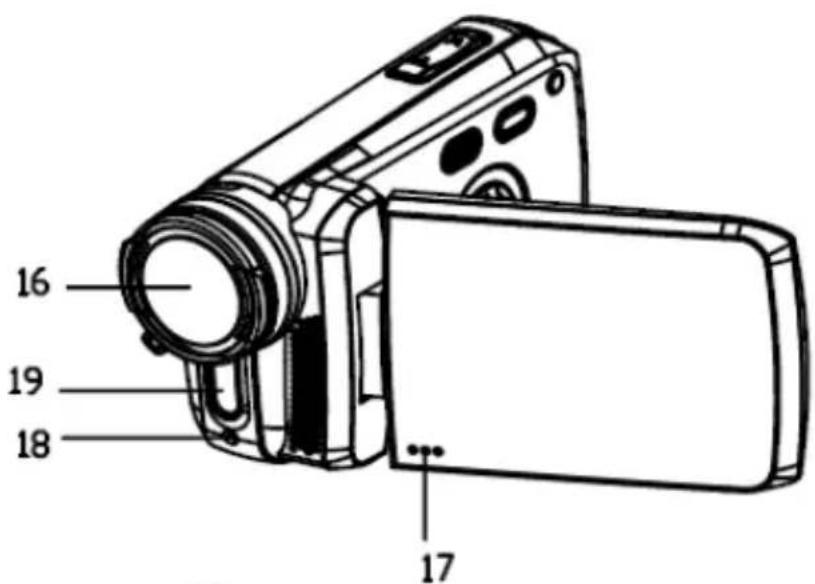
- Front Lens
- Microphone
- Self-timer Indicator
- LED lamp
- Wrist strap
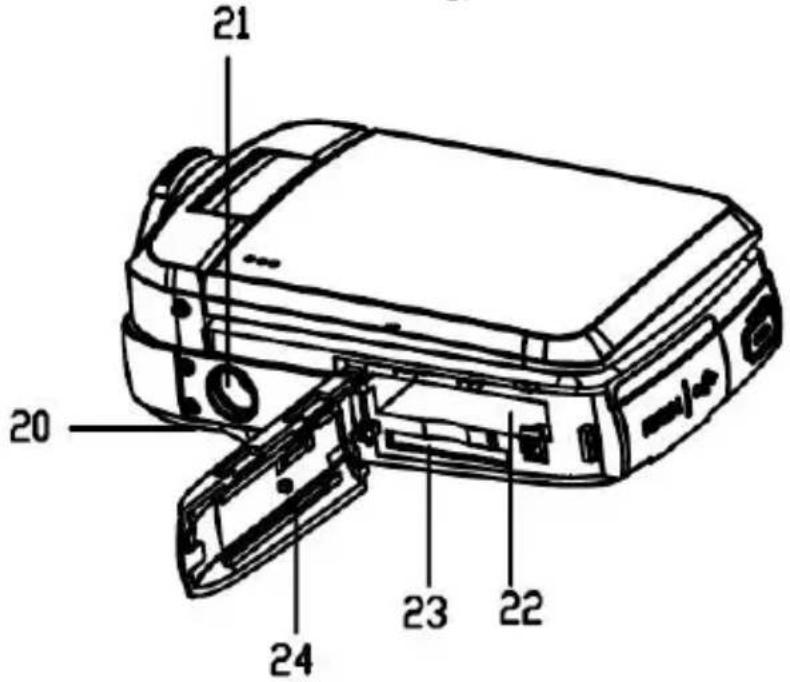
- Tripod socket
- Battery compartment
- SD Card slot
- Compartment door
Inserting and Charging the Battery
-
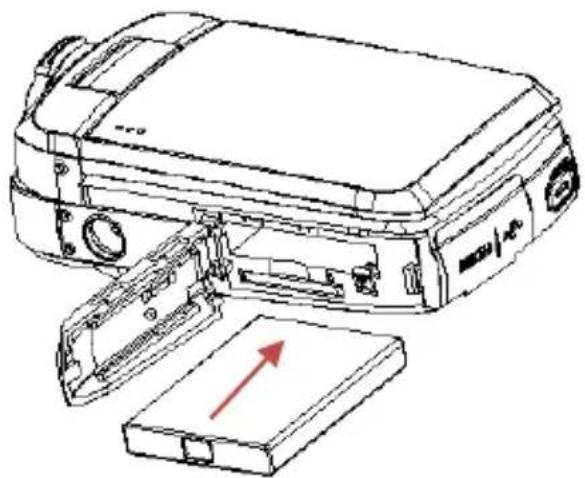
Slide open the battery compartment door.
-
Insert the included lithium-ion battery into the larger slot as shown in the figure. Ensure that the polarity on the battery match the polarity inside the battery slot.
-
To remove the battery, slide the battery latch back, and the battery will pop out from the battery compartment.
-
To charge the battery, connect the included USB cable and AC adaptor to your camcorder's USB port. Charging will begin once the camcorder's screen is closed. A red indicator light will stay solidly lit while charging, and will turn off once charging is completed. Please allow 3 hours to fully charge.
natural_image
Line drawing of a device with an open lid and internal components, showing no text or symbols.Inserting a Memory Card (SD Card)
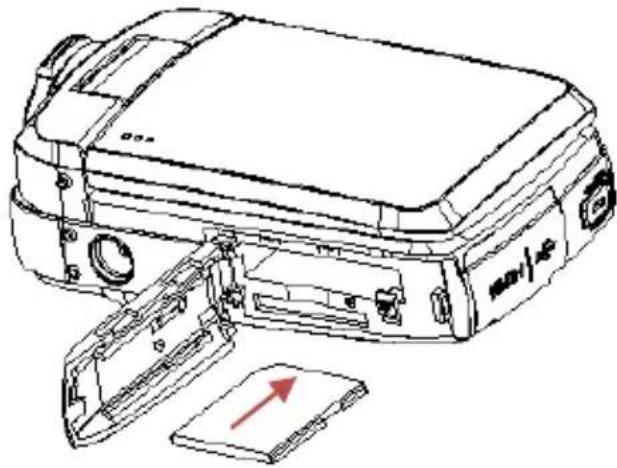
- Slide open the battery compartment door.
- Insert the included 8GB SD Card into the smaller slot as shown in the figure below. Ensure that the direction of insertion is correct.
- Once it is inserted correctly, audible click is heard. Do not try to
force the SD card into the slot. It can only be inserted one way.
- To remove the SD card, press down on the card again and the card will pop out from the memory card slot.
Note: The maximum capacity and speed memory card compatible with your camcorder is 32GB, class 10.
natural_image
Line drawing of a DGA printer with an open lid and red arrow indicating a fold (no text or symbols present)Basic Operation
Powering the Camcorder On and Off
There are two ways to power the camcorder on and off.
-
The camcorder can be powered on or off by flip-opening or flip-closing the LCD screen. Once flip-opening the LCD screen, allow the camcorder two seconds for the CPU to initiate.
-
The camcorder can be powered on or off by pressing the power button.
Navigating the Camcorder's Menus
You may navigate through the menus and user interface utilizing the buttons and the touch screen. The instructions below will be outlined utilizing the physical buttons on the camcorder button. All of the menus may also be accessed by tapping or touching the LCD screen as well.
Setting the Date & Time
- Power the camcorder on.
- Press the OK/MENU button to enter the main menu.
- Press the Right button to enter the Setup menu.
- Press the Up and Down buttons to move the indicator onto "Date & Time".
- Press the OK/MENU button to enter the submenu.
- Press the Up, Down, Right and Left buttons to adjust the date and time.
- Press the OK/MENU button to confirm the settings and exit the menu.
▶ Formatting the SD Card
Note: It is important to format the SD Card for first time use. Please note that all data stored on the SD Card will be deleted including protected files. Be sure to download or transfer any files you want to retain to your computer before the SD Card is formatted.
- Power the camcorder on.
-
Press the OK/MENU button to enter the main menu.
-
Press the Right button to enter the Setup menu.
- Press the Up and Down buttons to move the indication bar onto "Format".
- Press the OK/MENU button to enter the submenu.
- Press the Up and Down buttons to select "Yes".
- Press the OK/MENU button to begin the formatting process.
- Press the Left button to exit the setup menu.
➢ Photo, Video, and Playback Modes
| Icon Display | Title | Description | |
 | Photo Capture mode | For shooting photos | |
 | Video Capture mode | For recording video | |
 | Playback mode | For playback of media | |
Press the MODE button to switch between the modes. You may directly press on the icons on the LCD screen to access the same modes.
▶ Display Icons on the LCD Screen
Video Capture Mode
- Capture Mode Icon
- Resolution Setting
- Loop Recording
- Voice Recording
- Digital Stabilization
- Memory Capacity
- Battery Level
- MENU
- MODE
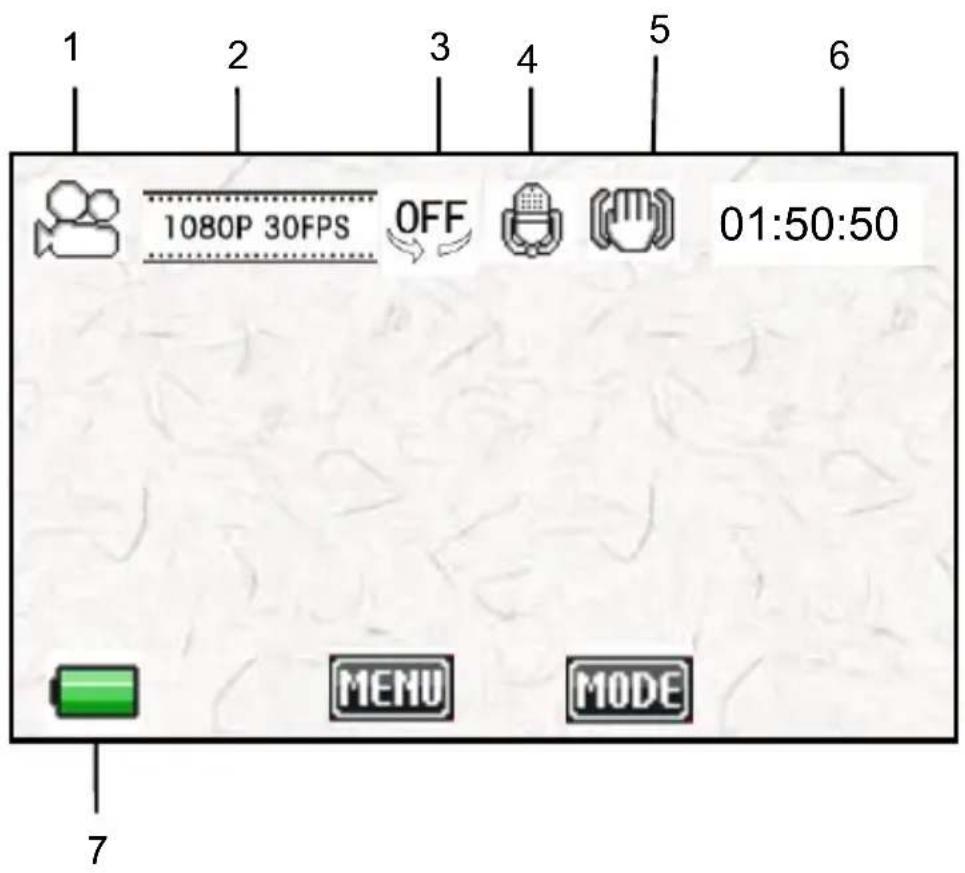
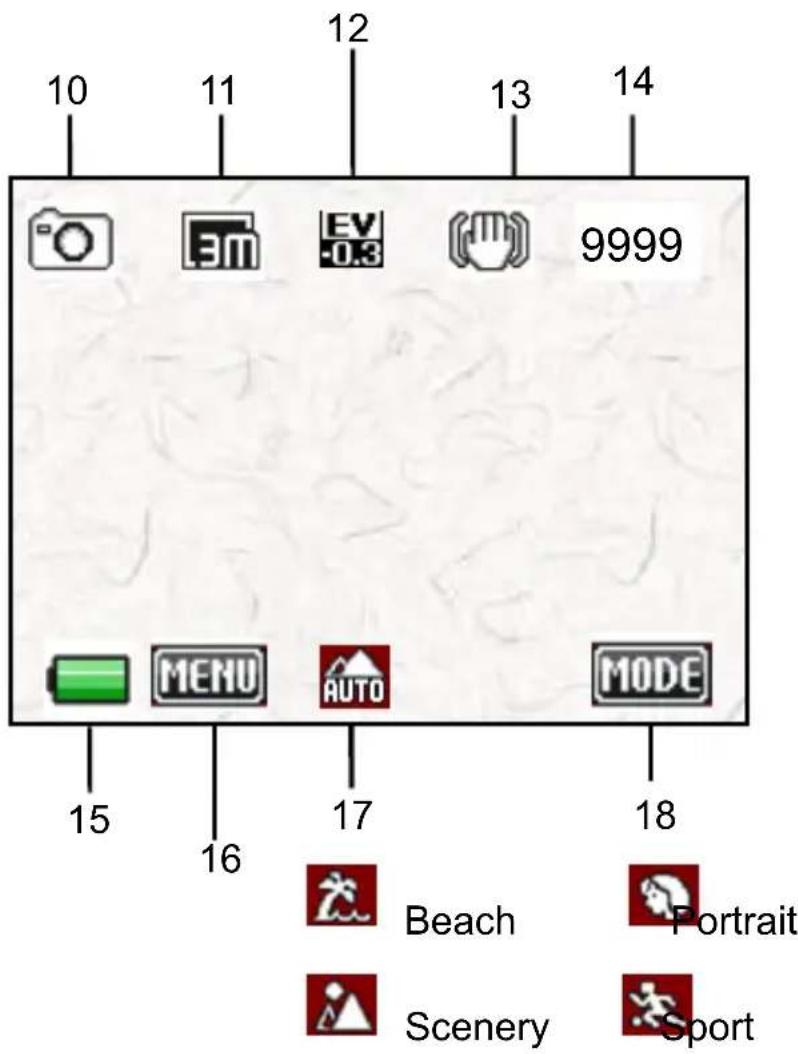
Photo Capture Mode
- Capture Mode Icon
- Resolution Setting
- Exposure
- Digital Stabilization
- Memory Capacity
- Battery Level
- MENU
- Scene Mode
- MODE
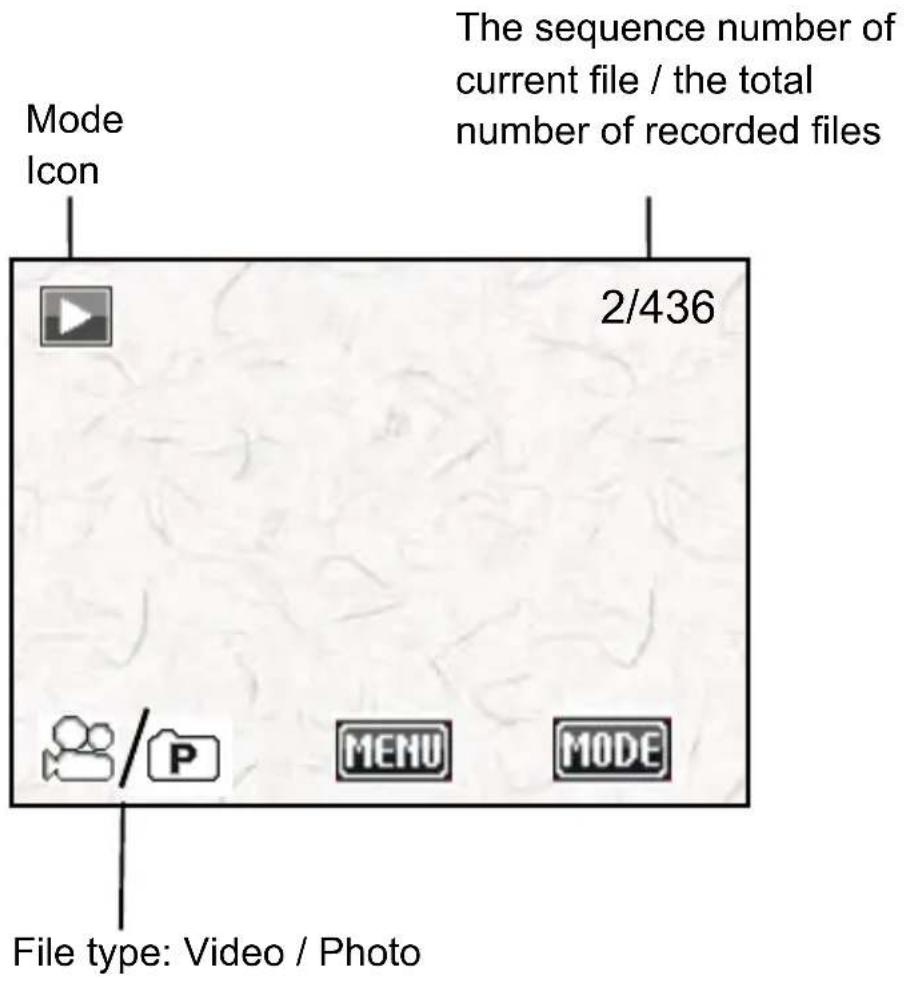
Playback Mode
Setting Up Your Camcorder for Use
After powering your camcorder on, press the Menu button to enter the Setup Menu. Press the Right button to bring up the full setup menu as outlined below. The “gear” icon will be highlighted once you are in the Setup Menu. Press the Right / Left / Up / Down / OK button to navigate and confirm an option and exit.
| Menu | Function |
| Sounds... | Set the sound type and volume levels.Shutter: [On] / [Off]Start-up: [On] / [1] / [2] / [3]Beep: [On] / [Off]Volume: [0] / [1] / [2] / [3] |
| Back Light | Sets the duration of the LCD back light.Options: [1min] / [3min] / [5min] / [On] |
| LED | Set the state of the front red LED.Options: [On] / [Off] |
| Power Save | For conserving battery power, the camcorder will automatically power off after a period of inactivity. Options: [1min] / [3min] / [5min] / [Off] |
| Date & Time | Sets the date and time of the camcorder. Press the Up / Down / Left / Right buttons to set the date and time. |
| Language | Sets the on-screen language: [English] / [German] / [Italian] / [Spanish] / [Portuguese] / [Dutch] / [French]. |
| Power Frequency | Light Frequency should be set depending on your region: [50Hz] / [60Hz]. |
| USB | Set the default mode for when connecting the camcorder to a computer by USB cable: [MSDC] / [UVC] |
| Format | Format your SD card. This will delete all files including the protected files. Options: [Yes] / [No] |
| Reset All | Restores the camera to default settings: Options: [Yes] / [No] |
Recording Video
- Insert a compatible SD card into the camcorder.
- Power the camcorder on. The camcorder should default to Video Mode upon powering up. If not, set it to Video Mode by pressing the MODE button or pressing directly on the MODE icon on the screen. Once in video mode, the Video icon will appear in the top left.
- Press the shutter button to begin or end recording. The recording duration will show on the top right of the LCD screen.
Notes:
- Use the T (Zoom-In) and W (Zoom-Out) buttons for zooming.
- Press the Up button to pause recording.
- Press the Right button to enable or disable the LED video light.
- Press the Left button to show the on-screen display information, or to power the screen off to conserve power.
- The camcorder will automatically stop recording when the SD card has reached its maximum capacity.
Video Mode Menu
| Menu | Function |
| Movie Size | Sets the video resolution. Options:1080p30fps / 720p60fps / 720p30fps |
| White Balance | Sets the white balance to adapt to different light settings. Options: [Auto] / [Daylight] / [Cloudy] / [Fluorescent] / [Tungsten] |
| Video Quality | Sets the video quality. Options: [Super Fine] / [Fine] / [Normal] |
| Stabilizer | Use this function to minimize hand shake when shooting pictures. Options: [On] / [Off] |
| Voice Rec | Enables and disables the microphone when recording video. Options: [On] / [Off] |
| Loop Recording | Sets the duration of loop recording. Setting is for duration of video. Options: [Off] / [1min] / [3min] / [5min] |
| Slow Motion | Enables and disables slow-motion recording. Options: [On] / [Off] |
| Time-lapse | Enables and disables time-lapse recording. Setting is for time between each time-lapse.Options: [Off] / [3sec] / [5sec] / [10sec] / [30sec] / [1min] / [3min] |
| Time-lapse Duration | Set the duration of time-lapse recording.Options: [Unlimited] / [3min] / [5min] / [10min] / [15min] / [20min] / [30min] / [60min] |
| Effect | Adds a color filter to each video being recorded.Options: [Normal] / [B&W] / [Sepia] / [Red] / [Green] / [Blue] |
Shooting Photos
- Insert a compatible SD card into the camcorder.
- Power the camcorder on and set it to Photo Mode by pressing the MODE button or pressing directly on the MODE icon on the screen.
- Press the shutter button to take photo. Once a photo is captured, it will be displayed on the LCD screen for a brief second.
Notes:
- Use the T (Zoom-In) and W (Zoom-Out) buttons for zooming.
- The memory capacity displayed at the top right of the display will decrease with each image captured.
- Press the Right button to enable or disable the LED assistive light.
- Press the Left button to show the on-screen display information, or to power the screen off to conserve power.
Photo Mode Menu
| Menu | Function |
| Resolution | Set the photos resolution. Options: 20 MP / 16 MP / 12 MP / 8 MP / 5 MP / 3 MP / VGA |
| White Balance | Sets the white balance to adapt to different light settings. Options: [Auto] / [Daylight] / [Cloudy] / [Fluorescent] / [Tungsten] |
| Image Quality | Sets the photo quality. Options: [Super Fine] / [Fine] / [Normal] |
| Metering | Sets the determination of the best capture speed and aperture. [Center] / [Multi] / [Spot] |
| Sharpness | [Hard] / [Normal] / [Soft] |
| ISO | Sets the level of light sensitivity to adapt to the current scene. Options: [Auto]/ [50] / [100] / [200] / [400] / [800] / [1600] |
| Exposure | Manually sets the exposure value to compensate in various scenes. Options: [-2.0] / [-1.7] / [-1.3] / [-1.0] / [-0.7] / [-0.3] / [0.0] / [+0.3] / [+0.7] / [+1.0] / [+1.3] / [+1.7] / [+2.0] |
| Stabilizer | Use this function to minimize hand shake when shooting pictures. Options: [On] / [Off] [On]/ [Off]. |
| Detection | Options: [OFF]: Select OFF to disable any type of face detections. [Face Tracking]: Your camera will identify and track a face. A white frame will display on the screen. [Smile Detect]: Your camera will track faces. A white frame will display on the screen. Press the shutter button once, and the white frame will change to a yellow frame. A photo will now automatically be captured once the yellow frame detects a face's smile. Press the shutter button again to deactivate the smile detection. |
| Auto Review | Determines the amount of time to display a captured photo. Options: [Off] / [1sec] / [3sec] / [5sec] |
| Self-Timer | Sets the time of automatically capturing a photo. Options: [Off] / [2sec] / [10sec] |
| Photo Burst | Sets the amount of photos to capture after pressing the shutter button. Options: [Off] / [3] / [5] / [10] |
| Time-lapse | Sets the time-lapse taking pictures. Options: [Off] / [3sec] / [5sec] / [10sec] / [30sec] / [1min]/ [3min] |
| Time-lapse Duration | Sets the duration of time-lapse Options: [Unlimited] / [3min] / [5min] / [10min] / [15min] / [20min] / [30min] / [60min] |
| Scene | Automatically adjusts your settings based on the scene mode selected. Options: [Auto] / [Portrait] / [Scenery] / [Sport] / [Beach] |
| Effect | Adds a color filter to each photo being captured. Options: [Normal] / [B&W] / [Sepia] / [Red] / [Green] / [Blue] |
| Date Stamp | Adds a date, time or Options: [Off] / [Date] / [Date&Time]. |
Playback
Power the camcorder on and set it to Playback mode ▶ by pressing the MODE button, or by pressing directly on the MODE icon on the screen.
You may also press the Up button (while in Video mode or Photo mode to also switch to the Playback mode).
Notes:
- Press the Down button, or the T and W buttons to view your photos and videos one by one.
- Press the MENU/OK button to select a file and enter the Playback menu interface.
▶ Playback Video Clips
- After entering Playback mode, select "Video File".
- After selecting a video clip, press the Shutter button to play the video.
- Press the Up button to pause playback, and press the Shutter or MODE button again to stop playback.
▶ Playback Photos
- After entering Playback mode, select "JPG File".
- Press the T (Zoom-In) and W (Zoom-Out) buttons to adjust the photo size.
- Press OK/MENU button to enter or exit the menu.
- Use the directional buttons to explore the details of the photo or use the T (Zoom-In) and W (Zoom-Out) buttons to adjust the photo size again.
▶ Playback Mode Menu
| Menu | Function |
| Lock | Use this function to protect your files from being deleted. Options: [Single] / [Lock All] / [Unlock All]. |
| Delete | Use this function to delete a single file or all files. Options: [Single] / [All] |
Connections
Connecting the Camcorder to an HDTV
- Connect the camcorder to an HDTV with an HDMI cable.
- Power the HDTV on and switch to the selected source on your TV.
- Power the camcorder on and set the camcorder to Capture mode to use your HDTV as the display monitor.
- Enter Playback mode to playback all of your media onto the HDTV.
Playback operation is the same as the playback of the camcorder.
Download Files to Your Computer
- Connect your camcorder to a computer with the included USB cable and "MSDC" will display on the camcorder's screen.
- On your computer, go into "My Computer" from the "Start" menu.
Look under the “Removable Disk” or “Devices with Removable Storage” group, and the name of your memory card will be displayed. -
Double click on "Removable Disk" or the name of your memory card, and continue through the categorized folders until you can access your media.
-
You may now highlight and or all the files you wish to transfer to your computer. Once highlighted, go to the "EDIT" menu in the window, and select "COPY". Now you can navigate to your target location and select "PASTE" for the "EDIT" menu. Your media may take several seconds for the transfer to complete.
Use the Camcorder as a PC Camera (Windows XP Only)
- Power your camcorder off. Connect your camcorder to the computer with the included the USB cable.
- Power your camcorder on. If the display shows "MSDC", press the MODE button to switch to PC Camera mode. Your screen will now show "PCCAM".
- In Windows XP, go into "My Computer" and double click "USB video tool". The camcorder will now function as a PC Camera.
- Press the Power button to exit PCCAM mode.
Note:
In Windows 7 and 8, the PC Camera function can only be used in a video communication software such as Skype.
Software Installation
The bundled software CD contains software that comes with camcorder. Installation of the software is not required for using the camcorder.
Insert the CD into your CD-ROM drive and run it, then double click the "start". An installation MENU as below will appear:
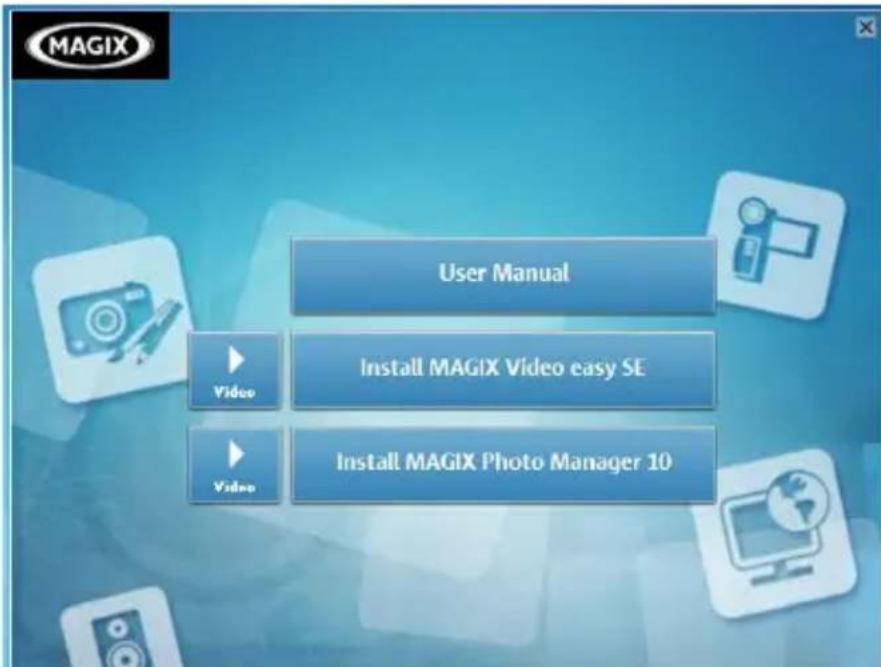
The following software is listed:
- User manual – PDF version of this user manual.
- Install MAGIX Video Easy SE – Installs software for editing video clips.
- Install MAGIX Photo Manager – Installs software for editing photos.
Notes:
1) To use MAGIX Video easy SE or MAGIX Photo Manager with no time limit, you will have to register the software first.
2) Please do install the Quick Timer Player during the installation of MAGIX Video easy SE.
3) MAGIX Video easy SE and MAGIX Photo Manager work in Windows XP, Windows Vista, Windows 7 and Windows 8.
Technical Specifications
| Model Number | Minolta MN50HD |
| Lens | Fixed Focus; 8X Digital Zoom • f=3.5mm • F/2.8 |
| Image Sensor | 1/1.7" IMX179 Sony CMOS; 3288x2512 pixels |
| Shutter | Electronic • Digital Stabilization |
| Pixels | JPEG: 20 MP • 8 MP • 5 MP • 3 MP • VGA • 3:2 • 16:9 (10 MP) • 16:9 (2 MP) |
| MOV: 1080p30 • 720p60 • 720p30 | |
| Shutter Speed | 1/2 ~ 1/2000 sec |
| Exposure | +2.0 EV ~ -2.0 EV |
| ISO Sensitivity | Auto • 50 • 100 • 200 • 400 • 800 • 1600 |
| LCD Monitor | 230k 3.0 in. HVGA Touch Screen |
| Assistive Light | Dual White LED (Constant) |
| Continuous Shooting | OFF • 3 Shots • 5 Shots • 10 Shots |
| White Balance Control | Auto • Daylight • Cloudy • Tungsten • Fluorescent |
| Scene Modes | Auto • Beach • Portrait • Scenery • Sport |
| Special Features | Loop Recording • Slow Motion • Time-Lapse • Photo Burst |
| Recording Media | SD • SDHC; Maximum: 32GB |
| I/O Ports | 8-pin Mini USB, USB 2.0 (high speed) • Mini HDMI • Microphone • Speaker |
| Power | NP-60; 3.7v, 1050mAh |
| Dimensions | 4.51 x 1.65 x 2.70 in. • 4.88 oz. |
| PC Camera | Yes |
| Operating Temperature | 32 ~ 104 Degrees Fahrenheit |
| Included Accessories | USB Cable • HDMI Cable • AC Adaptor • Pouch • Lithium-Ion Battery • CD-ROM • 8GB SD Card |
| Compatible Devices | Windows 7 / 8 / 10 • Mac OS 10.8 / 10.9 / 10.10 |
MINOLTA®
Minolta is a registered trademark of JMM Lee Properties, LLC and is used in the United States by Elite Brands Inc. under license.
If you're having difficulties with your camera, or would like further assistance, please call our toll-free technical support hotline at 800-441-1100. Please be sure to have your camera handy when calling.


MINOLTA
Division of Elite Brands Inc., 40 Wall Street, 61st Floor
New York, NY 10005 · Tel: 1-800-441-1100
Minolta is a registered trademark of JMM Lee Properties, LLC
and is Used in the United States by Elite Brands under license
- Copyright
- FEDERAL COMMUNICATIONS COMMISSION INTERFERENCE STATEMENT
- CAUTION:
- RF exposure warning
- CE Mark Warning
- Safety and Handling Precautions
- Camera Information
- Contents
- Preparing for First Use....8
- Basic Operation 12
- Recording Video 20
- Shooting Photos 23
- Playback 27
- Connections....29
- Software Installation 31
- Technical Specification 33
- Attribution and Tech Support....35
- Preparing for First Use
- ▶ Camcorder Body Overview
- Inserting and Charging the Battery
- Inserting a Memory Card (SD Card)
- Basic Operation
- Powering the Camcorder On and Off
- Navigating the Camcorder's Menus
- Setting the Date & Time
- ▶ Formatting the SD Card
- ➢ Photo, Video, and Playback Modes
- ▶ Display Icons on the LCD Screen
- Video Capture Mode
- Photo Capture Mode
- Setting Up Your Camcorder for Use
- Recording Video
- Notes:
- Shooting Photos
- Playback
- ▶ Playback Video Clips
- ▶ Playback Photos
- ▶ Playback Mode Menu
- Connections
- Connecting the Camcorder to an HDTV
- Download Files to Your Computer
- Use the Camcorder as a PC Camera (Windows XP Only)
- Note:
- Software Installation
- The following software is listed:
- MINOLTA®
- MINOLTA
Brand : MINOLTA
Model : MN50HD
Category : Camcorder