
KASMGROWSTA - Jardinage intérieur Kogan - Free user manual and instructions
Find the device manual for free KASMGROWSTA Kogan in PDF.


| Product Type | Hydroponic Growing System |
| Brand | Kogan |
| Model | KASMGROWSTA |
| Pod Capacity | 14 pods |
| Water Tank Capacity | 5 liters (MAX fill line) |
| Power Adapter Input | 100-240V AC, 50/60Hz |
| Power Adapter Output | 12V DC |
| Light Modes | Seeding, Vegetables, Fruit & Flowers |
| Light Spectrum | Seeding: cool blue; Vegetative: white; Bloom: red & white |
| Pump Type | Submersible water pump with circulation |
| Connectivity | Wi-Fi 2.4GHz, Bluetooth for setup |
| Smart App | Kogan SmarterHome (iOS/Android) |
| Voice Control | Google Home, Amazon Alexa |
| Included Accessories | Base, light hood, light post, power adapter, pump, 14 plant spacers, 14 grow domes, 14 seed pods, nutrient set (A & B) |
| Safety Features | Auto-off if overheating? Not specified; no child lock; do not submerge base or light hood |
| Maintenance | Unplug before cleaning; wipe base with damp cloth; clean pump regularly; replace water monthly |
| Material | Plastic (ABS) base and components |
| Dimensions (Approx.) | 45 x 25 x 50 cm (including light hood) |
| Weight (Approx.) | 2.5 kg |
| Warranty | Standard Kogan warranty (if applicable, refer to help.kogan.com) |
Frequently Asked Questions - KASMGROWSTA Kogan
User questions about KASMGROWSTA Kogan
0 question about this device. Answer the ones you know or ask your own.
Ask a new question about this device
Download the instructions for your Jardinage intérieur in PDF format for free! Find your manual KASMGROWSTA - Kogan and take your electronic device back in hand. On this page are published all the documents necessary for the use of your device. KASMGROWSTA by Kogan.
USER MANUAL KASMGROWSTA Kogan
natural_image
White electronic device with a flat top and vertical support structure (no visible text or symbols)KOGAN SMARTERHOME™ HYDROPONIC GROWING SYSTEM
(14 PODS)
KASMGROWSTA
Safety & Warnings 3
Components 4
Overview 5
Installation 6
Connect to SmarterHome™ App 11
Google Home Control 14
Amazon Alexa Control 17
Operation 20
Notes 27
SAFETY & WARNINGS
- Read all instructions carefully and retain this user guide for future reference.
- Always unplug this product from the electrical outlet before cleaning.
- Keep the power cord away from heated surfaces.
- Do not use this product outdoors.
- Do not operate this product where aerosols are being used or stored.
- Do not touch moving or hot components such as pumps, lights, reflective surfaces, and the like.
- Do not place or submerge the base, cord, plug or light hood in water or other liquids to clean it.
- Ensure the light hood does not get wet.
- Children should be supervised to ensure they do not play with this product.
- This product is intended for household use only and is not designed for commercial use.
- Never operate this product with the air openings blocked. Keep air openings free of lint, hair and the like.
COMPONENTS

natural_image
Line drawing of a rectangular container with a vertical scale and side supports (no text or symbols)Base

natural_image
Pure technical line drawing of a mechanical component or bracket (no text or symbols)Light Hood

Light Post

natural_image
Simple icon of a plug with a cable, no text or symbols presentPower Adapter

natural_image
Simple line drawing of a mechanical component with no text or symbolsPump
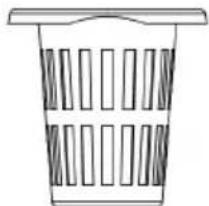
natural_image
Simple line drawing of a trash bin with no text or symbolsPlant Spacer (x14)

Grow Dome (x14)

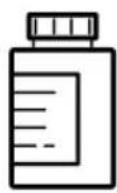
Seed Pod (x14) Nutrient (x2)
OVERVIEW
Front View

1 Control Panel
2 Light Hood
3 Power Input Port
4 Pump Power Port
5 Light Post
6 Grow Deck
7 Base
INSTALLATION
- Place the hydroponic system:
- On a sturdy, water-tolerant surface.
o Near a standard electrical outlet.
- Out of reach of children or pets.
○ Away from direct sources of heat (e.g. stove or furnace), or cold (e.g. window drafts or air conditioner vents).
- This hydroponic system does not need additional light. Too much direct sunlight can overheat the plants.
Step 1:
Firmly push the light post into the base.

Step 2:
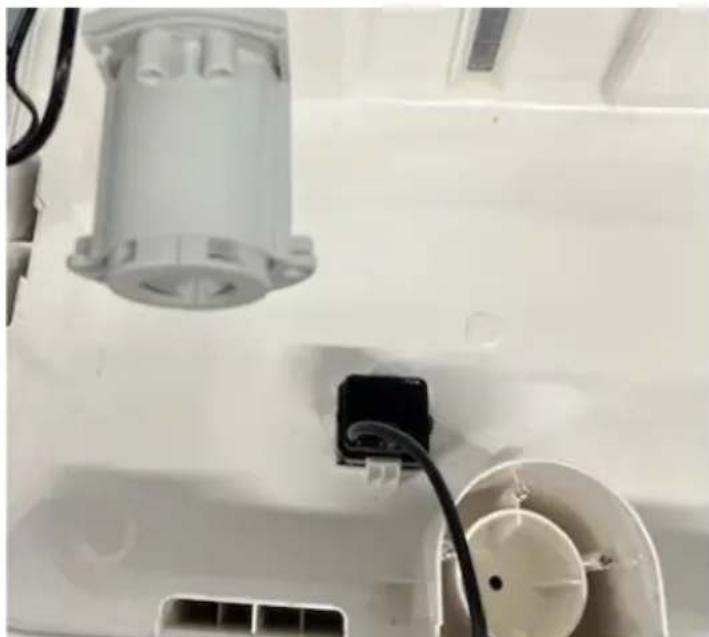
Insert the pump into the grooves in the base until it clicks into place.
natural_image
Close-up of a white industrial air conditioner unit with attached black plug and wiring (no visible text or symbols)Step 3:
Insert the grow deck into the base.

Step 4:
Attach the light hood onto the light post.

Step 5:
Insert the power adapter connector to the Power input port. Connect the power adapter to an electrical outlet.

Note:
Do not use this hydroponic system with any other power adapter other than the one provided.
Add Water
- This product requires room temperature tap water or bottled water. Do not use softened water, such as distilled water or rainwater. This may interfere with the nutrients, as they contain levels of sodium usually harmful to plants.
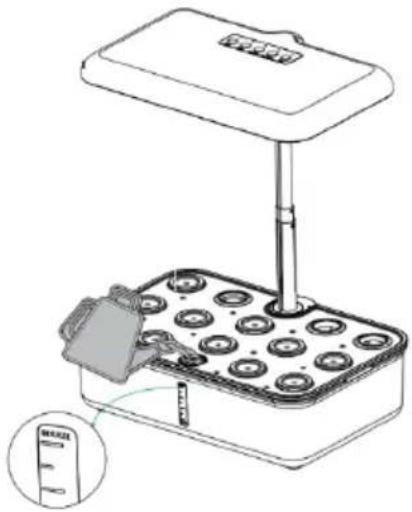
- Add water to 'MAX 5L' fill line located under the water port.
- For best results, always keep the water level topped up to the fill line.
Add Nutrients
- Nutrient instructions are printed on the packaging, as well as in the Seed Pod Kit instruction booklet. Read and follow the instructions carefully.
- Use only the recommended amount of nutrients.
- Do not overfeed the plants. Too many nutrients may be harmful to your plants.
- Always top up the water level when adding nutrients. For best results, top up the water level regularly.

Add Seed Pods
- Insert the seed pods into the openings in the grow deck.
- Plants grow and look best if medium or tall plants are in the back openings and short plants are in the front openings.
- Insert a seed pod or plant spacer into every opening in the grow deck.

Add Grow Domes
- Place a grow dome over each seed pod. It is not necessary to place grow domes over plant spacers.
- Grow domes rest on seed pods and may not click into place.
- Leave the grow domes on the seed pods until the plants have sprouted and their leaves nearly touch the domes.
- Once removed, grow domes may be reused/recycled.

CONNECT TO SMARTERHOME™ APP
Install App
Download the "Kogan SmarterHome" app from the Play Store (Android) or App Store (iOS).

Play Store (Android)


App Store (iOS)

To register:
- If you already have a SmarterHome account, select 'Log In'. To register a new account, select 'Sign Up'.
- The system will automatically recognise your country. If needed, you can manually select your country from the drop-down box. Enter your email address and tap 'Get Verification Code' to continue.
- A 6-digit code will be sent to the submitted email address. Enter this code before the one-minute timer expires.
- Continue to the next page and complete your SmarterHome profile.


Set Device in Pairing Mode
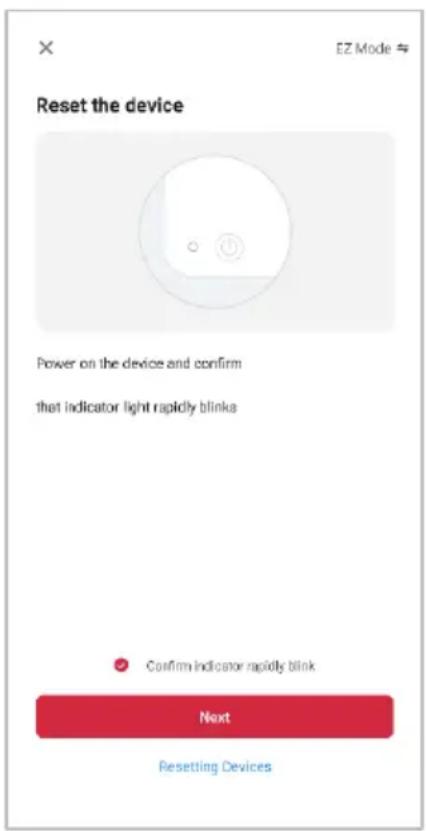
When the device is first turned on, it may automatically enter pairing mode (the power indicator will rapidly flash green).
If not automatically in pairing mode when powered on, you can manually set the device in pairing mode by pressing and holding the Power button for 5 seconds until the power indicator rapidly flashes green.
Add Device Through Network
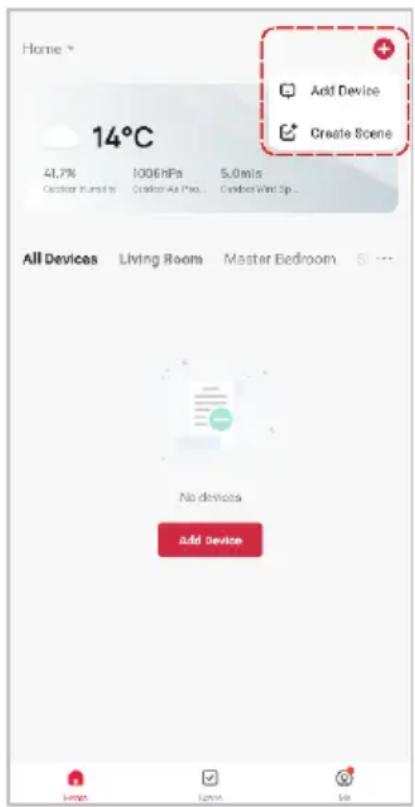
- Once registered, tap "Add Device" on the app's home page, or the "+" in the upper right corner, to add a new device through the network.
- Select the product type from the list of options in the app (Garden > Smart Growing System).
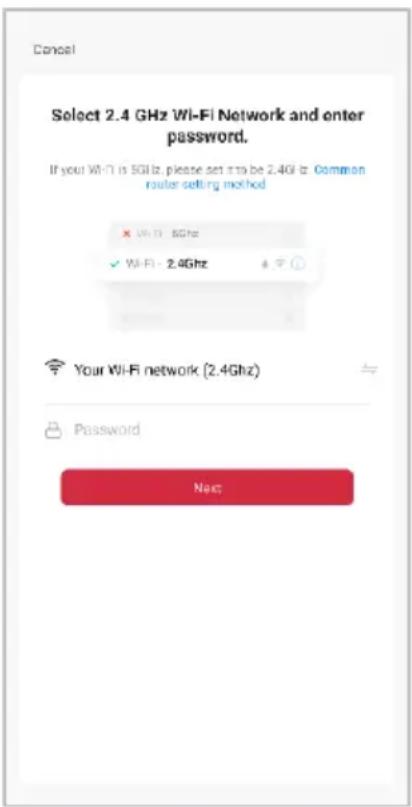
- Enter your Wi-Fi details. It is important that your SmarterHome™ device and the app are connected to the same Wi-Fi network during setup.

Note:
- The device and the app have to use the same Wi-Fi network.
- The device is only compatible with 2.4Ghz networks.
-
Depending on the product, Steps 3 and 4 may be in opposite order.
-
Ensure that the device is in pairing mode, with the Power indicator rapidly flashing, and tap "Confirm light is rapidly flashing".
- The device will commence the pairing process and connect to the app. Ensure your Wi-Fi router, mobile phone, and the SmarterHome™ device are kept close until connection is complete.
- After successfully being added, you will have the option to rename the device and assign it to a location. It will now be listed on the app's home page. Tap the device listing to enter its control page.


Note:
Once connected, you can select Create Scene from the “+” in the upper right corner (or from the Scene tab) to group connected SmarterHome™ products and automate their functions.
GOOGLE HOME CONTROL
Note:
You will need to have set up a Google Home account prior to linking your Kogan SmarterHome™ device.
Adding "SmarterHome" to the Google Home App
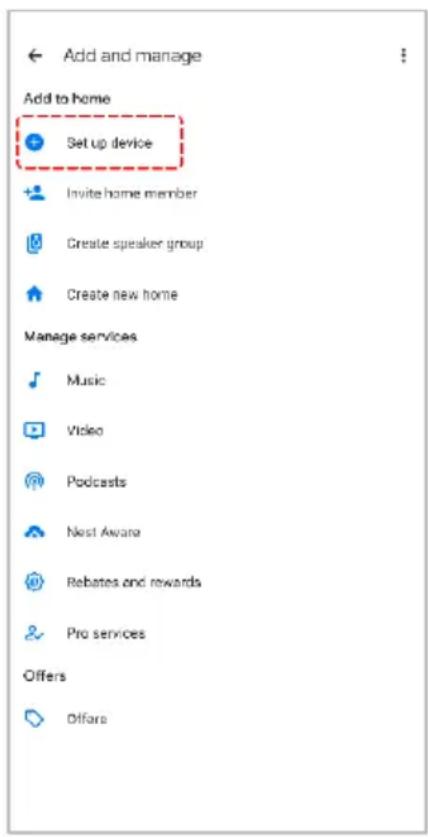
- From the home page of the Google Home app, select the “+” icon (top left corner, see arrow in the below screenshot) to access the ‘Add and manage’ page.
- Select 'Set up device', then select the 'Works with Google' option.


- Select the search bar and type 'Smarter Home' to locate the Kogan SmarterHome™ service.
- From here, you will be prompted to sign into your SmarterHome™ account using either your email or mobile phone number, depending on which method you used to register your account.
- Select "Kogan SmarterHome™" from the app options.

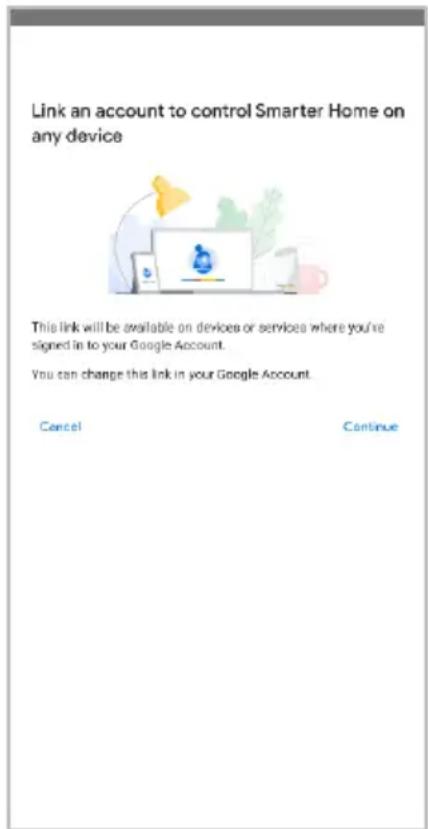

- Tap 'Authorise' to grant Google permission to access the SmarterHome™ app and your devices.
- Once connected, the app will display any compatible devices linked to your SmarterHome™ account. From here you can assign them to rooms and set up any routines. Tap on any of the devices to view a list of available commands.

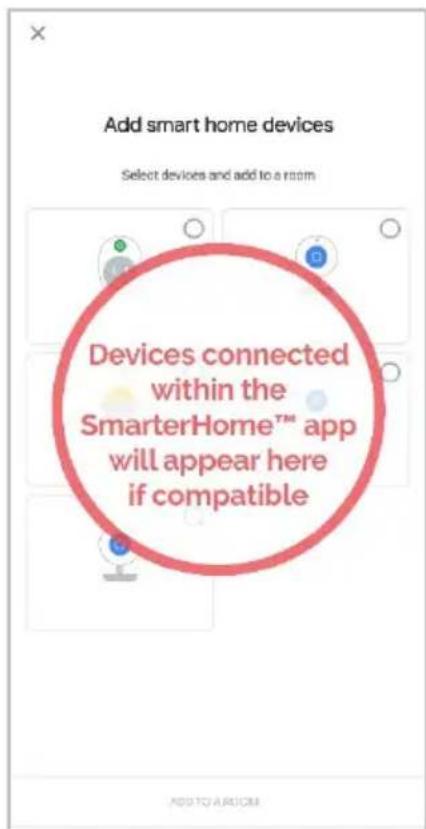
Note:
Please note that Google Home can only control the base/core functions of any compatible SmarterHome™ devices. To make full use of this product's smart functionality, please use the Kogan SmarterHome™ app.
AMAZON ALEXA CONTROL
Note:
Once connected, you can select Create Scene from the “+” in the upper right corner (or from the Scene tab) to group connected SmarterHome™ products and automate their functions.
Adding "SmarterHome" to the Alexa App
- From the home page of the Alexa app, select the “≡” icon in the bottom-right and select “Skills & Games” from the sidebar.
- Select the search bar and type 'Smarter Home' to locate the Kogan SmarterHome™ skill.


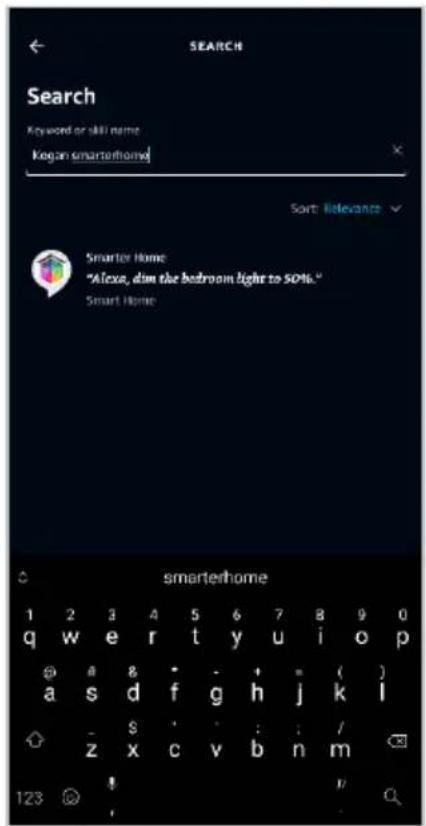
- Tap 'Enable to Use' to add the Kogan SmarterHome™ skill to Alexa.
- From here, you will be prompted to sign into your SmarterHome™ account using either your email or mobile phone number, depending on which method you used to register your account.
- Select "Kogan SmarterHome™" from the app options.
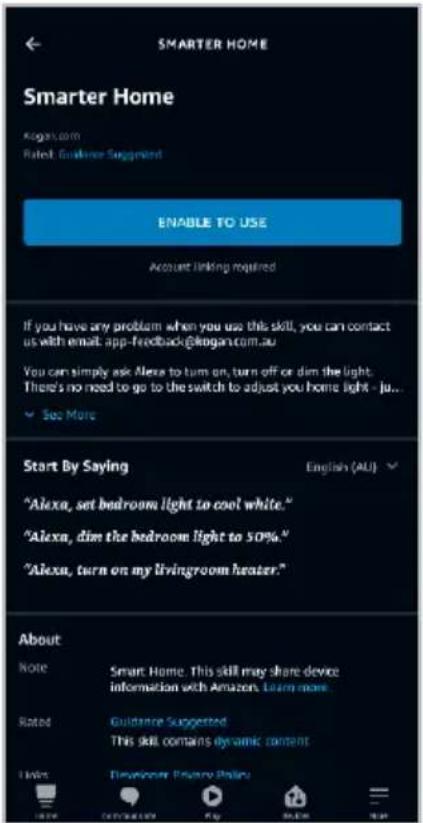


- Tap 'Authorise' to grant Alexa permission to access the SmarterHome™ app and your devices.
- Once connected, the app will perform a search and display the devices linked to your SmarterHome™ account. When your devices have successfully connected to the Alexa app, you will be able to control your Kogan SmarterHome™ devices via Alexa's voice commands.


Note:
Please note that Alexa can only control the base/core functions of any compatible SmarterHome™ devices. To make full use of this product's smart functionality, please use the Kogan SmarterHome™ app.
OPERATION
Control Panel
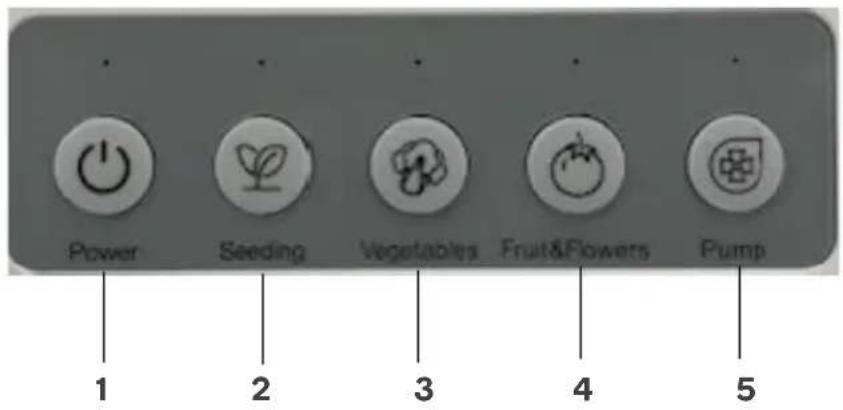
1 Power Button
- Press to turn the hydroponic system on/off.
- Press and hold for 5 seconds to place the hydroponic system in pairing mode.
2 Seeding Light Button
Press to turn Seeding light mode on/off.
3 Vegetables Light Button
Press to turn Vegetables light mode on/off.
4 Fruit & Flowers Light Button
Press to turn Fruit & Flowers light mode on/off.
5 Pump Button
Press to turn the pump on/off.
Pump and Water Circulation
- The pump and water circulation system in your hydroponic system is essential for maintaining optimal plant health and growth.
- The pump functions to continuously circulate nutrient-rich water to the plants' roots, ensuring they receive a consistent supply of essential nutrients and oxygen.
- This circulation prevents water stagnation, nutrient imbalances, and the growth of harmful microorganisms.
Growing Lights
Proper lighting is fundamental for indoor hydroponic gardening, as it serves as a substitute for natural sunlight. Different stages of plant growth require varying light spectrums and intensities. Select the button for the appropriate mode depending on what is being grown.
Seeding Light:
- During the germination and seedling stages, plants require a gentle light source to encourage healthy root and stem development.
- Seeding lights typically emit a cool, blue spectrum, which promotes compact, sturdy growth without inducing excessive stretching.
Vegetative Light:
- Once your plants have established themselves and entered the vegetative phase, they need more intense light to support robust foliage growth.
- Vegetative lights emit white wavelengths, encouraging lush leafy growth and preparing plants for flowering.
Bloom Light:
- As your plants transition into the flowering stage, they require a different light spectrum to stimulate prolific flower and fruit development.
- Bloom lights emit red and white wavelengths encouraging budding, flowering, and the production of dense, flavourful fruits or flowers.

1 Power
2 Pump
3 Grow Light Timer
4 Light Modes
5 Nutrient Countdown
Turn the growing system on/off.
- Turn the pump on/off.
- Set a timer for the pump.
Set a timer for the grow lights.
Tap the relevant mode to adjust the light.
Set a countdown for when to add nutrients.
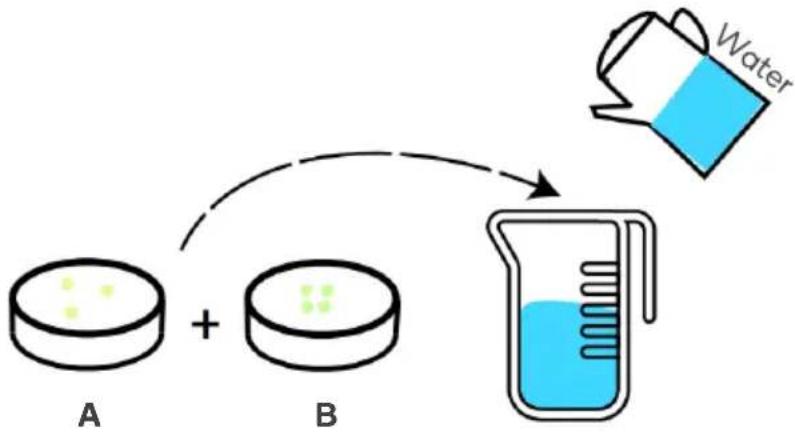
Nutrient Solution
| Water Mixture Ratio | |
| 1L 3ml A | + 3ml B |
| 2L | 6ml A + 6ml B |
| 3L 9ml A | + 9ml B |
| 4L 12ml A | + 12ml B |
| 5L 15ml A | + 15ml B |
flowchart
graph TD
    A["Petri dish A"] -->|+| B["Petri dish B"]
    B --> C["Beaker with liquid and water pouring"]
Notes:
- Nutrient particles have a storage life of 2 years in unopened bottles if stored at room temperature without exposure to sunlight.
- Well-mixed nutrient solution prepared by adding water has a storage life of 5 months without exposure to sunlight.
• Over time, the nutrient solution may separate. This is normal and will not affect its effectiveness. - Keep the nutrient solution out of reach of children.
Planting a Cotton Block
- Soak the cotton blocks in clean water for approximately 6 hours. After 6 hours, place the seeds into the hole of the fully soaked cotton block.
• In general, it is recommended to put 2 seeds into each cotton block. - During the seedling period, the ones growing well can be reserved, and the ones growing poorly can be gently pulled out or cut off with scissors.

flowchart
graph LR
    A["Blue cup with liquid"] --> B["White cup with green dots"]
    B --> C["White container with green dots"]
Planting
- Many seed pods are labelled for height. Gardens grow and look their best when tall plants are planted at the back, medium plants are along the sides and short plants are in front. If plants are all the same size, like salad greens, they can be planted anywhere.
- Do not remove labels from seed pods. The labels identify the plant type and plant height, show the germination time, and prevent algae growth.
- Grow domes help regulate moisture and temperature for optimal germination. Leave them on until plants are nearly touching the domes.
Germination
- Some seeds germinate in less than 24 hours. Some take 24 days or more. Most labels give an estimate of how long the seeds will take to germinate, but many factors impact germination.
- Plants are impacted by temperature. Cold weather plants like salad greens germinate better in cooler weather.
- Plants such as tomatoes and peppers will germinate faster in warmer temperatures (above 21°C).
- If you are growing your own seeds, plant 5-6 seeds per pod and check the seed packet for information regarding temperature.
Pruning
- Lower your plants, don't raise your lights. You will achieve more compact growth and bigger harvests if you prune plants to keep the lights closer to all plants.
- Fast growing plants (like basil) make gardeners want to raise the lights too soon. Pruning the plant just above a new leaf set (Diagram A) and leaving the lights down low will ensure that slow-growing and low-growing plants in your garden get all the light they need.
- Not pruning is the number one mistake made. Prune early and often to maintain a healthy garden, but never take more than 1/3 of each plant at a time.

Diagram A
Light
- Always keep the grow lights as close to your plants as possible. Plants should be 2.5-5cm below the grow lights.
- Always check to see if you can prune plants instead of raising the grow lights. After pruning, lower your lights back down to within 2.5-5cm of the plants if possible.
- You do not need to replace the grow lights unless individual diodes start to fail. If this occurs, contact help.Kogan.com for support.
Nutrients
• Typically, your plants will need nutrients every 2 weeks.
- Follow the instructions for feeding amounts printed on the nutrient packaging.
- For best results, once a month, empty all water, add fresh water and nutrients, and reset your 'Add Nutrient' alert.
Pollinating
You will need to start pollinating your fruiting plants (tomatoes, peppers, strawberries, etc.) once they begin to flower (approximately 4-6 weeks after planting). To pollinate, use one or more of the following methods:
- Place an open hand inside plant branches and gently move your hand back and forth to shake the plant and spread the pollen.
- Place a fan near your plants and the moving air will pollinate the plants.
- Strawberries can benefit from more aggressive pollination. Using an electric toothbrush, touch each flower with the brush, moving from flower to flower.
NOTES
Need more information?
We hope that this user guide has given you the assistance needed for a simple set-up.
For the most up-to-date guide for your product, as well as any additional assistance you may require, head online to help.kogan.com
kogan.com
- KOGAN SMARTERHOME™ HYDROPONIC GROWING SYSTEM
- SAFETY & WARNINGS
- COMPONENTS
- OVERVIEW
- Front View
- INSTALLATION
- Step 1:
- Step 2:
- Step 3:
- Step 4:
- Step 5:
- Note:
- Add Water
- Add Nutrients
- Add Seed Pods
- Add Grow Domes
- CONNECT TO SMARTERHOME™ APP
- Install App
- To register:
- Set Device in Pairing Mode
- Add Device Through Network
- GOOGLE HOME CONTROL
- Adding "SmarterHome" to the Google Home App
- AMAZON ALEXA CONTROL
- Adding "SmarterHome" to the Alexa App
- OPERATION
- Pump and Water Circulation
- Growing Lights
- Seeding Light:
- Vegetative Light:
- Bloom Light:
- Nutrient Solution
- Notes:
- Planting a Cotton Block
- Planting
- Germination
- Pruning
- Light
- Nutrients
- Pollinating
- NOTES
- Need more information?
Brand : Kogan
Model : KASMGROWSTA
Category : Jardinage intérieur