ICB-500B - Blender Imarflex - Free user manual and instructions
Find the device manual for free ICB-500B Imarflex in PDF.


| Product Type | Blender |
| Brand | Imarflex |
| Model | ICB-500B |
| Voltage | 230 V a.c. |
| Capacity | 1.5 L (estimated) |
| Material | Glass jar, plastic base |
| Functions | Blending, grinding, soy milk making |
| Speed Settings | 5 speeds + pulse |
| Safety Features | Safety ring mechanism, overload protection |
| Maximum Operation Time | 1 minute continuous |
| Included Accessories | Glass jar, blade assembly, lid, center lid, grinder base, grinder cover, filter |
| Cleaning | Hand wash jar and blade; wipe base with damp cloth |
| Dimensions (approx.) | 20 x 20 x 40 cm |
| Weight (approx.) | 2.0 kg |
| Warranty | Standard manufacturer warranty (register card) |
Frequently Asked Questions - ICB-500B Imarflex
User questions about ICB-500B Imarflex
0 question about this device. Answer the ones you know or ask your own.
Ask a new question about this device
Download the instructions for your Blender in PDF format for free! Find your manual ICB-500B - Imarflex and take your electronic device back in hand. On this page are published all the documents necessary for the use of your device. ICB-500B by Imarflex.
USER MANUAL ICB-500B Imarflex
When using electrical appliances, basic safety precautions should always be followed, including the following:
- Read all instructions carefully.
- Before using the unit, check if the voltage indicated corresponds with the convenience outlet (230Va.c.).
- Do not use two-way socket with other appliance.
- Do not use any appliance with a damaged cord or plug. If the cord is damaged it should be replaced with the same type and size or bring the unit to the nearest Imarflex Authorized Service Center.
- Do not place the unit near gas stove, electric stove or in a heated oven.
- Put the unit on flat stable surface, keep it away from the edge of counter to avoid accident.
- Children should be supervised to ensure that they do not play with the appliance.
- This appliance is not intended for use by persons (including children) with reduced physical, sensory or mental capabilities, or lack of experience and knowledge, unless they have been given supervision or instruction concerning use of the appliances by a person responsible for their safety.
- To protect against electric shock, do not immerse the base in water.
- Blade is sharp, handle it carefully.
- Do not put the blade assembly on the base without the glass jar.
- Do not use the blender if the glass jar has a crack.
- Do not use the unit for outdoor use.
- Do not use this unit other than its intended use.
- For household use only.
-
Save this instruction manual for future reference.
-
Center Lid
- Lid
- Glass Jar
- Safety Ring
- Rubber Packing
- Blade Assembly
- Jar Support
- Motor Base
- Selector Switch
- Grinder Cover
- Grinder Base
- Filter
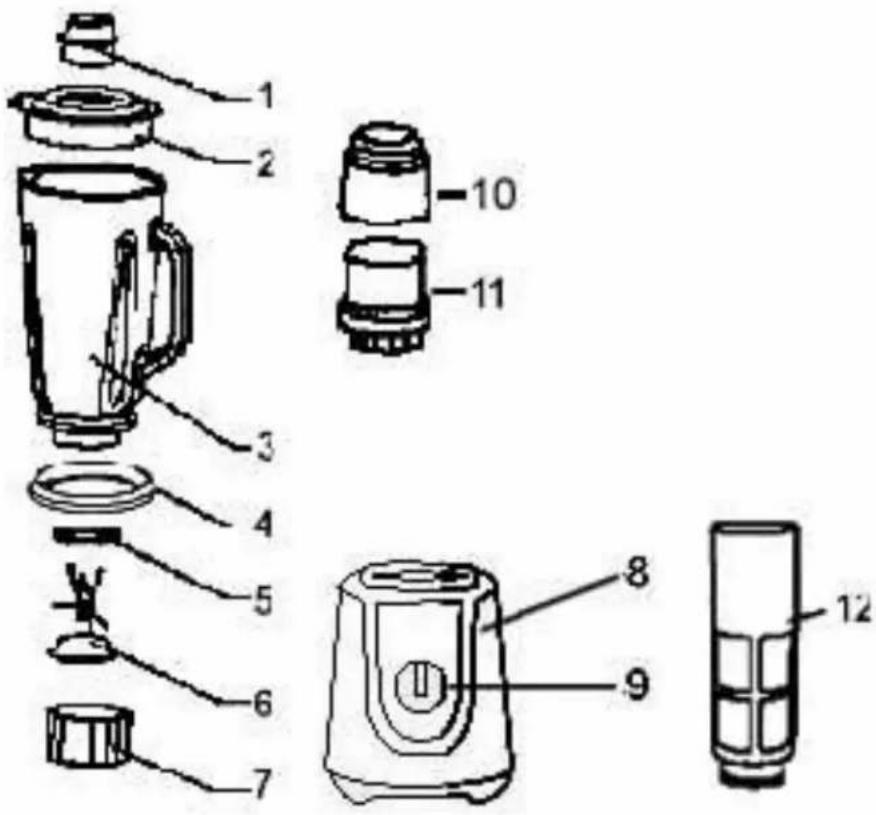
ASSEMBLING THE GLASS JAR:
- Put the Blade Assembly (6) into the Jar Support (7).
- Put the Rubber Packing (5) on the inner edge of the Blade Assembly (6).
- Attach the Safety Ring (4) into the bottom of the Glass Jar (3).
- Insert the assembled Jar Support into the bottom of the Glass Jar (3) and turn clockwise until Glass Jar (3) locks into place.
- Make sure that the blender is switched OFF.
- Place the Glass Jar with Blade Assembly on the Motor Base (8) and press down until securely engaged.
- Put the Center Lid (1) on the Lid (2).
- Secure the Lid (2) into the Glass Jar (3) and press down.
HOW TO USE
A. Blender
- For initial use, wash glass jar and blade assembly thoroughly.
- Put the glass jar with safety ring and blade assembly on the motor base.
- Plug the unit into the convenience outlet.
-
Be sure to remove the seeds of the fruits/vegetables.
-
Put the desired mixture.
-
Put the lid on the glass jar and close securely. Place the center lid into the hole of the lid and turn clockwise to lock.
-
Switch to pulse, to crack the ice cube or ice tube and then set the desired speed.
-
Additional ingredients can be added through opening in the center lid.
-
Maximum single operation should be up to 1 minute only.
-
After use switch OFF and unplug the unit from the convenience outlet.
Note: This unit is designed with a safety feature. If the Safety Ring is not properly secure into the bottom of the glass jar, this unit will not function.
SPEED SETTING GUIDE
| SPEED | USE |
| 1 | Low; for light usage with liquid |
| 2 | Medium-Low; for yogurt and milk based drink |
| 3 | Medium; soft/ripe fruits and softened vegetables |
| 4 | Medium-High; for mixing liquids and solid foodstuffs |
| 5 | High; for mixing liquid with more solid consistency |
| Pulse | for ice crushing & short, powerful impulse movements |
NOTE: Maximum continuous operation time is 1 minute.
Some electric smell may be observed on first use.
The unit has an overload protection, motor will automatically stop when it gets hot.
CAUTION: When using cube ice or tube ice, use the pulse speed first before setting to desired speed.
B. Grinder
- Plug the unit into the convenience outlet.
- Align the Grinder Base into the Motor Base.
- Place the coffee beans, almonds or peanuts into the grinder base.
- Put the grinder cover and close securely.
- Switch the unit ON by selecting your desired speed.
- After use switch OFF and unplug the unit from the convenience outlet.
C. Soy Milk Maker and How to Assemble the Filter
- Place the filter inside the glass jar and press down until securely engaged.
- Place the foodstuff you wish to process into the filter. Seeds and pips will be kept out of your juice by this convenient filter.
- Put the lid on the glass jar and close securely. Place the center lid into the hole of the lid and turn clockwise to lock.
- Switch the unit ON by selecting your desired speed.
- After use switch OFF.
How to Make Soy Milk
- You need about 125g of soy beans and 750ml of water.
- Clean the soy beans and soak them in water for 6-10 hours or overnight.
- Place the filter inside the glass jar and press down until securely engaged.
- Plug in the unit into the convenience outlet.
- Put the lid on the glass jar and close securely. Remove the center lid.
- Drain the soaked soy beans and put the soy beans inside the filter with 750ml of water.
- Place the center lid back into the hole of the lid and turn clockwise to lock.
- Switch the unit ON by pressing the pulse button then select your desired speed until the soy beans grind and filtered.
- Switch the unit OFF after use.
- Pour the soy milk into the container.
- Boil the soy milk for about 5 to 10 minutes. After cooling, the soymilk is ready.
- Soy milk can be drunk as such but taste can be improved by adding some salt or fresh fruits depending on your taste.
USEFUL TIPS
- To achieve the best results when pureeing solid ingredients, place small portions through the opening in the lid one by one.
- When mixing solid ingredients, start with a small amount of liquid. Gradually add more liquid through the opening in the lid.
- For stirring solid or very thick liquid ingredients, we recommend that you use the blender in pulse mode to prevent the blades from stuck up.
CLEANING AND MAINTENANCE
- Unplug the unit before cleaning.
- Glass jar and blade assembly can be washed using soap and water.
- Wipe the base of the unit with damp cloth.
- Do not use abrasive materials to avoid scratches.
REMINDER: Please do not forget to fill up and send the warranty card
Brand : Imarflex
Model : ICB-500B
Category : Blender