F10 FHD - Digital photo frame Vankyo - Free user manual and instructions
Find the device manual for free F10 FHD Vankyo in PDF.


User questions about F10 FHD Vankyo
0 question about this device. Answer the ones you know or ask your own.
Ask a new question about this device
Download the instructions for your Digital photo frame in PDF format for free! Find your manual F10 FHD - Vankyo and take your electronic device back in hand. On this page are published all the documents necessary for the use of your device. F10 FHD by Vankyo.
USER MANUAL F10 FHD Vankyo
Please read this manual carefully before use and keep it for future reference.

natural_image
Simple line drawing of a rectangular frame with no text, numbers, or symbolsV1.07

natural_image
Simple gray icon of a crescent shape inside a circle (no text or symbols)Thank you for purchasing from VANKYO. If you need further assistance, please contact us at support@ivankyo.com (North America) / support.uk@ivankyo.com (United Kingdom). For the detailed tutorial videos, please visit YouTube channel—Vankyo.
EN
[PACKING LIST]
![Vankyo F10 FHD - [PACKING LIST] - 1](/content/2026/05/941429/images/856c3712220664098622096f2655a88b485cf0a3be965f31ae85b23645105160.jpg)
natural_image
Simple line drawing of a rectangular frame with no text or symbolsDigital Photo Frame
![Vankyo F10 FHD - [PACKING LIST] - 2](/content/2026/05/941429/images/ef80a6807cc5212d9fce2537e0f5b973eec5848ca29123736865c6f9a530b7dc.jpg)
natural_image
Simple line drawing of a cable with a rectangular connector and terminal connector (no text or symbols)AC Power Adapter (5V/2A) x 1
![Vankyo F10 FHD - [PACKING LIST] - 3](/content/2026/05/941429/images/b2a6a4e666ec8b05b000dec06cbd1c7a8d6642ae55a7aff90fad58494e54b26a.jpg)
Stand x 1
![Vankyo F10 FHD - [PACKING LIST] - 4](/content/2026/05/941429/images/69789d1ec9e3287dead0898ed6da85d2392b29155f156a597d7dde02a0e0cd68.jpg)
User Manual x 1
PRODUCT OVERVIEW

support@ivankyo.com

01
1 Screen
2 Light Sensor
3 Motion Sensor
4 Power Button
5 Hanging Hole
6 Speaker
7 Slot for Stand
8 Wooden Frame
(removable)
9 SD Card Slot
10 USB Port
11 Micro USB Port
12 DC Input
(3.5mm; 5V/2A)
EN

Tip:
① The F10 FHD photo frames are equipped with wooden frames.
② The F10 photo frame has two types: with wooden frame and without wooden frame. Whether the photo frame comes with a wooden frame depends on which type you choose.
GETTING STARTED
Stand Installation and Removal
Step 1:
Flip over the photo frame and place it on a flat surface.
Step 2:
Align the Stand with the Slot for Stand, then plug it in until it fully snaps in.
Step 3:
Push the Stand in to fix it.
02 support.uk@ivankyo.com
EN
For Portrait

For Landscape

natural_image
Technical line drawing of a mechanical component with a blue arrow indicating downward motion (no text or symbols)[Figure]

natural_image
Technical line drawing of a rectangular device with a blue upward arrow indicating a component or connection (no text or symbols present)* To remove the Stand, just pull the Stand out, then take it out from the slot.

natural_image
Technical line drawing showing a device inside a rectangular frame before and after assembly, with no visible text or symbols.Power On
Option 1
Step 1:
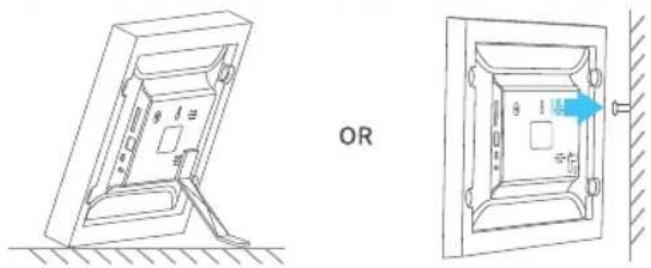
Place the photo frame on a flat and stable surface by using the Stand or hang it up through the Hanging Hole.
natural_image
Technical line drawing of a device mounting bracket with base and side views, no text or symbols present04 support.uk@ivankyo.com
EN
EN
Step 2:
Plug one end of the AC Power Adapter to the DC Input of the photo frame, then plug the other end to a socket. The photo frame will power on automatically once plugged in.

natural_image
Line drawing of a cable being inserted into a rectangular device (no text or symbols)
Tips:
① Please use the ORIGINAL adapter we provided to supply the power.
② The frame will automatically play the photos and videos in a loop if there are any in the frame and if there is no operation after 30s. Just tap the file and ← to go back to the previous interface.
Option 2:
If the frame is turned off when it's connected to power, long press the Power Button for around 3 seconds to power on the frame.

Power Off
Option 1
Long pressing the Power Button for around 3 seconds, the options of Power Off and Restart will be displayed. Select Power Off to turn off the frame.

Option 2
Long press the Power Button for around 7 seconds to do a forced shutdown when it's frozen.
Option 3
Unplug the Power Adapter to power off the frame.
06 support.uk@ivankyo.com
EN
EN
Screen On/Off
Option 1:
Simply press the Power Button once to switch the screen off when the frame is ON; press it again to wake the frame up.
Option 2:
Go to Setting > Frame > Display to turn on/off the Motion Sensor. When the Motion Sensor is turned on, the screen will be automatically off once you leave for over 5 minutes and it will light up again once you approach the frame.
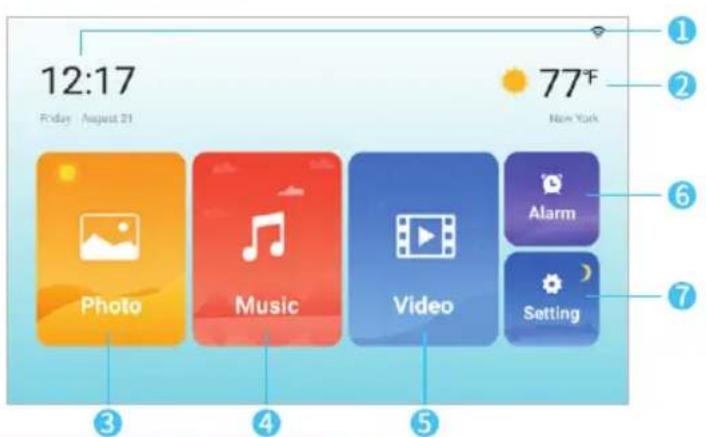
HOME SCREEN
support@ivankyo.com 07
1 Tap to check the date and time
2 Tap to check the weather of your location and add a new location
3 Tap to check all the photos and videos
4 Tap and listen to the music copied from the external storage device
5 Tap to check the videos
6 Tap and set alarms
7 Check the detailed settings of your photo frame
FUNCTIONS OVERVIEW
Network Connection
Option 1
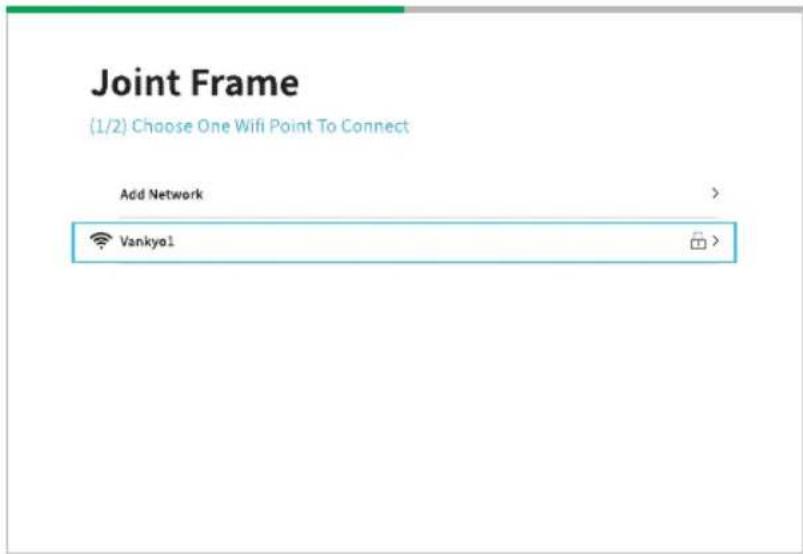
Follow the starting guide to connect the frame to your WiFi.
08 support.uk@ivankyo.com
EN
EN
Option 2
If you accidentally missed the starting guide, please go to Setting > WiFi to connect to a working 2.4GHz WiFi.

Notes:
① This photo frame can only support a 2.4GHz WiFi network.
② Only when you connect your photo frame to the WiFi network can you get the Frame ID and Frame Email for receiving files. Please get a WiFi connection in the first place when using the photo frame.
Share Photos and Videos with Your Photo Frame
Sending Photo and Video Files
IMPORTANT:
Connecting to a working WiFi is required for receiving files via App and Email.
1. Via App(WiFi Required)
Step 1:
Search for JointFrame on App Store™/ Google Play™ or scan the QR codes to download and install it on your mobile device.

iOS™ 11.0 and later

Android ^™ 8.0 and later
Note:
Google Play ^™ is a trademark of Google Inc. App Store ^™ is a trademark of Apple Inc. All other trademarks are the property of their respective owners.
10 support.uk@ivankyo.com
EN
EN
Step 2:
Launch JointFrame and create a new account.
Step 3:
Enter the correct username and password to log in, then get ready to add your frame.


Tip:
After tapping Forgot Password and enter your email address, you'll receive an email. Please follow the instructions in it to retrieve your password.
Step 4:
Go to Setting > Device Sync of the photo frame to check your Frame ID.

Tip:
The Frame ID will be generated after the frame is connected to a working WiFi network. Sharing your Frame ID with friends and relatives, they can send pictures and videos to you via the JointFrame app.
Step 5:
Enter the Frame ID on the App and name your frame.

Tip:
One Frame ID can be connected to 20 JointFrame app accounts at most and one JointFrame account can add 20 frames at most.
Step 6:
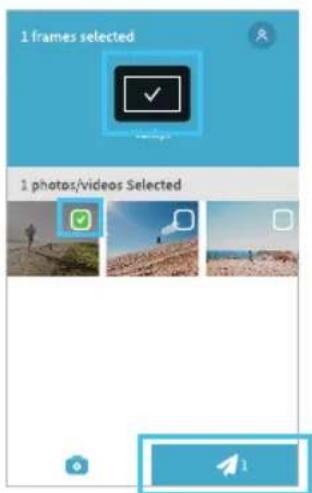
Select the photos or videos (2 to 30 seconds) you want to share and choose your photo frame, then tap ↗ to send them.
EN


12 support.uk@ivankyo.com
EN

Tips:
① To send the original image, you need to tap the photo and select Full Image, then tap Send.
② Only send up to 20 photos and videos in total at a time via App.
\* More functions of JointFrame app
Tap 🔒 to check more functions.
1 Tap to log out your account
2 Add more frames (up to 20) as needed
3 Tap to check the information about your frame
2. Via Email(WiFi Required)
Step 1:
Log in to your email and upload the selected photos or videos.
Step 2:
Go to Setting of the photo frame to check the email address of the frame.


support@ivankyo.com
13
Step 3:
Send the photos or videos via your email to the email address of the frame.
Step 4:
There will be a pop-up window, please select AGREE to receive the files.
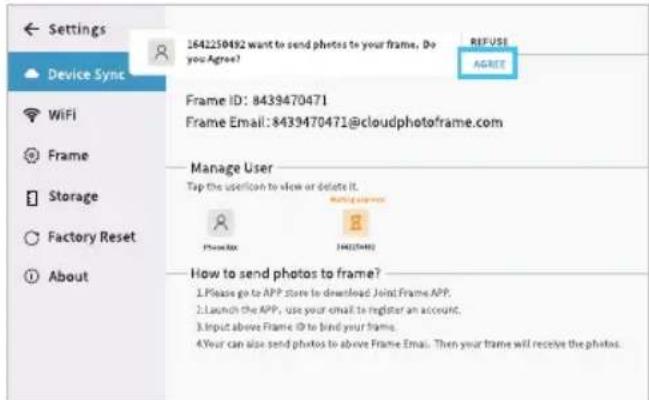
Tips:
① If you registered JointFrame App with the same email address, there will be no pop-up window.
② If there are no files received, please check if the size of your photo and videos exceeds the limitation of your mailbox or check if there is a network failure.
14 support.uk@ivankyo.com
EN
EN
3. Via SD Card and USB Drive(No WiFi Required)
Step 1:
Plug an SD card or a USB drive to the SD Card Slot or the USB Port of the frame.

natural_image
Line drawing of a computer monitor rear panel with two USB drives inserted (no text or symbols)
Tips:
① The frame supports up to 128G SD Card and 2.0/3.0/3.1 USB drive.
② The USB Port is only for sending and receiving files.
③ The Micro USB Port is only for software debugging purpose.
Step 2:
Go to Photo or Video on the home screen of the photo frame to check if the frame can read the external storage device.
Step 3:
Follow the instructions below to check how to transfer files.
• We will take transferring photos as an example.


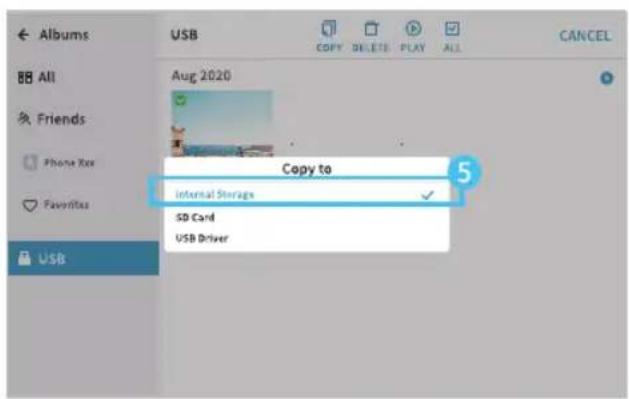
16 support.uk@ivankyo.com
EN
EN
Tip:
Select Internal Storage to copy the files from your USB drive or SD card into the photo frame; in contrast, select SD Card or USB Driver to copy the files from photo frame to the external storage device.
Play Photos and Videos
Play Photos
Tap Photo on the home screen of the frame to check photos.

All: includes all the files
Friends: includes the files your friend sent to you
Favorites: your favorite file(s)
Private: includes the files that you've made private
- Tap the thumbnail of one photo, then tap the photo again to show more icons.

① Delete the photo you selected. ② Rotate the photo you selected.
3 Select multiple photos under the photo category, then tap it to play a slideshow.
4 Mark it as your favorite. 5 Detailed settings for your photo.
Tip:
The photo automatically rotates when you move the frame between portrait and landscape.
18 support.uk@ivankyo.com
EN
EN
- Tap … to check more settings of photo.

natural_image
Person walking on a sandy hill under a bright sun and blue sky (no text or symbols visible)
1 Turn on/off the music when displaying the photos.
2 To randomly or sequentially display your photos
3 Display the photos without limit or display the latest 50/100/200/500 photos
4 Select the animation effect for displaying photos, such as random, cube, etc.
5 Set the duration of each photo. 5 seconds, 10 seconds, 30 seconds, 1 minute and 2 minutes are selectable.
6 Make the photo(s) private or make it (them) public when playing a slideshow.
7 Check who and when sent the photo, and the photo size.
support@ivankyo.com
19
- Tap the photo again to hide the icons.

natural_image
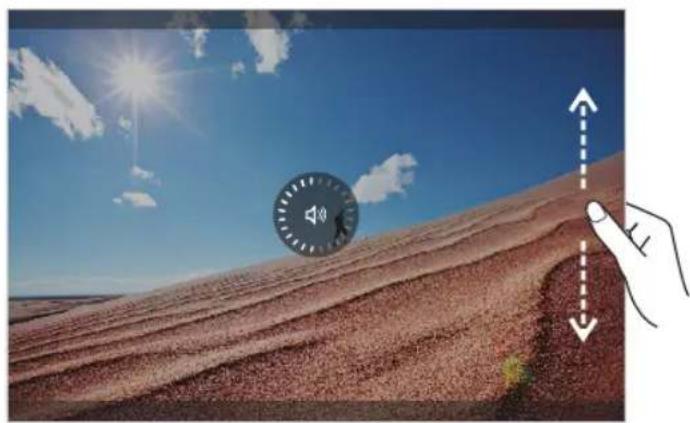
Illustration of a hand pointing at a circular device against a desert landscape with a sun and blue sky (no text or symbols)Slide upward/downward on the left side of the screen to adjust the display brightness.
natural_image
Desert landscape under a bright sun with a speaker icon and directional arrows, no text or symbols present.Slide upward/downward on the right side of the screen to adjust the volume of music.
Play Videos
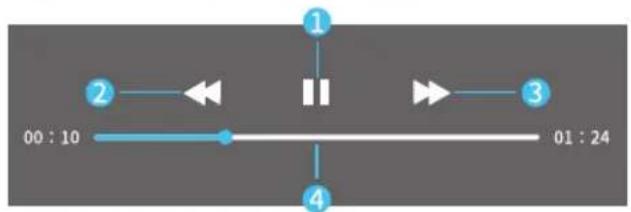
Tap Video on the home screen of the frame to check the videos.
flowchart
graph LR
    00:10 --> 1
    1 --> 2
    1 --> 3
    3 --> 01:24
① Play/pause the current video
② Fast reverse the current video
③ Fast forward the current video
4 Adjust the progress bar
20 support.uk@ivankyo.com
EN
EN
Tip:
The video automatically rotates when you move the frame between portrait and landscape.
Share Music with Your Photo Frame
Sending Music Files
IMPORTANT:
Music can only be sent by SD card or USB drive.
Step 1:
Plug an SD card or USB drive to the SD Card Slot or the USB Port of the frame.
Step 2:
Go to Music on the home screen of the photo frame to check if the frame can read the external storage device.
Step 3:
Follow the instructions below to check how to transfer files.
support@ivankyo.com
21


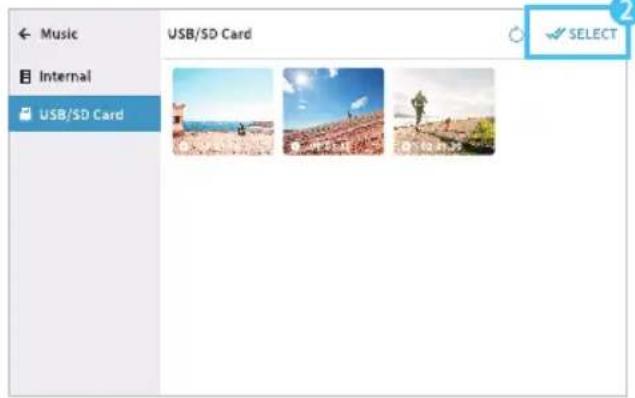
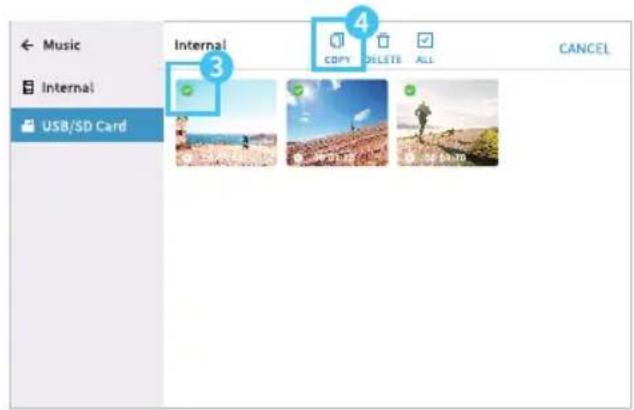


22 support.uk@ivankyo.com
EN

√ SELECT
EN
Play Music

Playing Mode:
1 — Play in order
① —— Repeat the song
× — Shuffle
2 Volume Adjustment
3 Brightness Adjustment
Alarm Setup
Tap Alarm on the home screen to set alarm clocks.
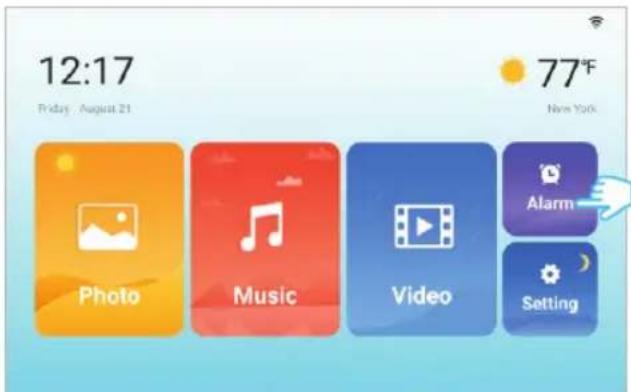
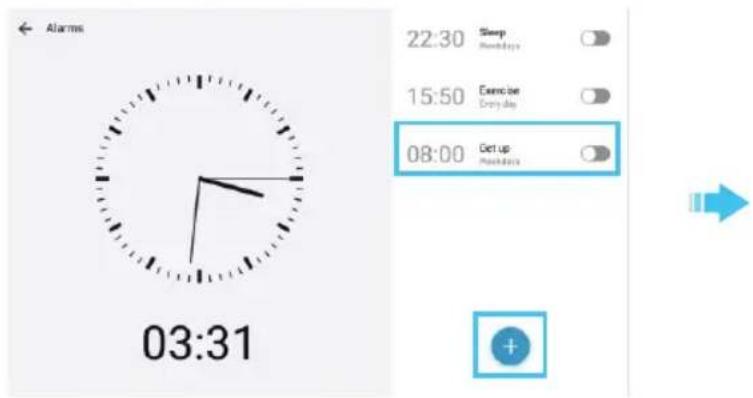

Calendar
Tap the time on the home screen to check the calendar.

24 support.uk@ivankyo.com
EN
EN
Weather
Tap the real-time temperature on the home screen to check the weather in the place you located in three days.


Tips:
① Once your frame is connected to WiFi, it will automatically show the weather information of your city.
② Tap ☺ on the upper right corner to refresh and get local weather information.
③ Tap ④ on the left bottom side to add a new location. (Templates for entering location: full county name + state abbreviation, e.g., Los Angeles, ca; or: full county name + state abbreviation + country abbreviation, e.g., Los Angeles, ca, us)
④ Tap ▶ and DEFAULT to set the newly added location as the default location.
SETTING BASICS
Device Sync
* Check your Frame ID and frame's Email Address
* Guide for sending photos to frame
* Check the QR code for downloading the App
* Manage your user account
WiFi
* Select and connect to a working WiFi.
Frame

26 support.uk@ivankyo.com
EN
EN
1 Set Language of your Frame
2 Set the time period and frequency for automatically screen on/off of the frame
3 Enable/disable the touch sound, adjust the volume of the system sound and notification sound
4 Enable/disable the auto brightness, manually adjust the brightness, show/hide time and weather on the home screen; turn on/off the Motion Sensor
5 Enable/disable the auto date&time, or manually set the date and time; switch between 12-hour and 24-hour time format

Storage
* Check the wireless data and internal storage.
Tip:
If the storage for wireless data nearly runs out, please contact us directly.
Factory Reset
* Tap RESET to restore to factory settings.
Tips:
① Please remove all external devices if you ever need to reset the digital photo frame.
② When the frame is reset, the previous settings and data will be all cleared.
About
* Tap to check whether there is a newer firmware version.
* Online network diagnostic and more.
Tip:
These information may be required when the technical support is needed.
28 support.uk@ivankyo.com
EN
EN
SPECIFICATION
| Display | 10.1" IPS Touch Panel |
| Resolution | 800 x 1280 (for F10) / 1200 x 1920 (for F10 FHD) |
| Speaker | 8Ω/0.8W |
| Storage Capacity | 16GB |
| External Storage | SD/MMC/SDHC/SDXC |
| Ports | SD Card Slot and Micro USB Port |
| Photo Format Supported | JPEG / BMP / PNG |
| Audio Format Supported | Mp3 / WMA OGG / AAC / WAV |
| Video Format Supported | MPEG1, MPEG2, MPEG4, Xvid, AVI, M-JPEG, H.263, H.264 BP/MP/HP, VP8, VC-1 |
| Frequency Range | Wi-Fi: 2412~2472MHz/2422~2462MHz |
| Transmit Power(Peak)(Only for FCC) | Wi-Fi: 19.67dBm(802.11b), 18.34dBm(802.11g), 18.71dBm(802.11n-HT20), 20.24dBm(802.11n-HT40) |
| Transmit Power(EIRP)(Only for CE) | 17.69dBm(802.11b), 18.67dBm(802.11g), 18.54dBm(802.11n-HT20), 18.41dBm(802.11n-HT40) |
support@ivankyo.com
29
[TROUBLESHOOTING GUIDE]
- Why is the photo in the frame not clear enough?
* It may be that you did not select the original image when sending the photo. Please tap the photo you want to share and select Full Image, then tap Send.
- Why can't my frame receive the photo from my friend's email?
* Check if the size of the photo or video exceeds the limitation of your mailbox.
* Check if there is a network failure.
- Why can't my frame receive the photo that my friend sent through the App?
* There may be a network failure or disconnection on either JointFrame App or photo frame.
- Why can't my photo frame connect to WiFi?
* The photo frame only supports a 2.4GHz WiFi network (802.11 b/g/n). Please connect to a 2.4GHz network.
* For dual-band routers, please temporarily disable the dual-band-in-one function.
* Make sure you've entered the correct password.
* Please set the WiFi encryption to wpa/wpa2.
* Please place the photo frame within 10 meters from the WiFi router.
* The photo frame of current version cannot be connected to the WiFi network with the password consisting of 10
30 support.uk@ivankyo.com
EN
EN
digits. Please update the photo frame to a higher system version.
* Try to connect your frame to the WiFi Hotspot on your mobile device.
* Please visit our YouTube channel for more detailed tutorial videos or contact our customer service team.
- What should I do if the photo frame freezes?
* Please press and hold the Power Button for 7 seconds to do a forced shutdown.
* Try to unplug the power adapter, then plug it again to restart the photo frame.
- Why can't my friend send photos through App or email after using a long time?
* If there are no issues of the frame, please go to Setting to check whether the storage of Wireless Data runs out. If so, please contact our customer service team to upgrade the cloud storage.
- What should I do when the positioning of your location is not so accurate?
* The photo frame has no GPS but gets the location information through your router's WiFi. If not so accurate, please manually tap + to select your city to check the weather.
- Why can't the music files be sent to my photo frame through App or email?
* Music files can only be sent to the photo frame through USB drive or SD card.
- Why can't the home screen rotate when I move the frame between portrait and landscape?
* The screen of the frame can only rotate in Photo, Music and Video interface temporarily.
- What should I do when the screen is too dark to see?
* The screen brightness is adjusted automatically with the light sensor. If the brightness doesn't meet your requirement, please go to Setting>Frame>Display to disable the option of Automatic Brightness, then manually adjust the brightness.
- Why is the storage space of my frame taken up by extra 3GB?
* Because the frame has a total of 3GB system storage that takes up the storage space.
- Why does the size and resolution of the picture change by tapping Rotate when I'm viewing that picture?
* Because the picture will be recomposed when it is rotated, which influences its size and resolution.
32 support.uk@ivankyo.com
EN
EN
FCC Caution
Any Changes or modifications not expressly approved by the party responsible for compliance could void the user's authority to operate the equipment.
This device complies with part 15 of the FCC Rules. Operation is subject to the following two conditions:
(1) This device may not cause harmful interference, and
(2) this device must accept any interference received, including interference that may cause undesired operation.
Note: This equipment has been tested and found to comply with the limits for a Class B digital device, pursuant to part 15 of the FCC Rules. These limits are designed to provide reasonable protection against harmful interference in a residential installation. This equipment generates, uses and can radiate radio frequency energy and, if not installed and used in accordance with the instructions, may cause harmful interference to radio communications. However, there is no guarantee that interference will not occur in a particular installation. If this equipment does cause harmful interference to radio or television reception, which can be determined by turning the equipment off and on, the user is encouraged to try to correct the interference by one or more of the following measures:
—Reorient or relocate the receiving antenna.
—Increase the separation between the equipment and receiver.
—Connect the equipment into an outlet on a circuit different from that to which the receiver is connected.
—Consult the dealer or an experienced radio/TV technician for help.
This equipment complies with FCC radiation exposure limits set forth for an uncontrolled environment. This equipment should be installed and operated with minimum distance 20cm between the radiator& your body.
EN
This transmitter must not be co-located or operating in conjunction with any other antenna or transmitter.
ISEDC Warning
This device complies with Industry Canada licence-exempt RSS standard(s). Operation is subject to the following two conditions:
(1) This device may not cause interference, and
(2) This device must accept any interference, including interference that may cause undesired operation of the device.
The device is compliance with RF exposure guidelines, users can obtain Canadian information on RF exposure and compliance. The minimum distance from body to use the device is 20cm.
RISK OF EXPLOSION IF BATTERY IS REPLACED BY AN INCORRECT TYPE.
DISPOSE OF USED BATTERIES ACCORDING TO THE INSTRUCTIONS

The symbol indicates DC voltage
RECYCLING
This product bears the selective sorting symbol for Waste electrical and electronic equipment (WEEE).
This means that this product must be handled pursuant to European directive 2012/19/EU in order to be recycled or dismantled to minimize its impact on the environment. User has the choice to give his product to a competent recycling organization or to the retailer when he buys a new electrical or electronic equipment.
This product can be used across EU member states.
EU Compliance Statement: Shenzhen VanTop Technology & Innovation Co., Ltd. hereby declares that this device is in compliance with the essential requirements and other relevant provisions of the Directive 2014/53/EU.
A copy of the EU Declaration of Conformity is available online at https://doc.vantop.com/.
NOTES:

- High Sound Pressure
- Hearing Damage Risk
3.Do not listen at high volume levels for long periods.
Manufacturer:
Shenzhen VanTop Technology & Innovation Co., Ltd.
Manufacturer address:
502, 5th Flr. BLDG 4, MinQi Technology Park, No. 65 Lishan Road, Taoyuan Street, Nanshan District, Shenzhen, China.
CUSTOMER SUPPORT
North America support@ivankyo.com
United Kingdom support.uk@ivankyo.com
- EN
- [PACKING LIST]
- PRODUCT OVERVIEW
- Tip:
- GETTING STARTED
- Stand Installation and Removal
- Step 1:
- Step 2:
- Step 3:
- Power On
- Option 1
- Tips:
- Option 2:
- Power Off
- Option 2
- Option 3
- Screen On/Off
- Option 1:
- HOME SCREEN
- FUNCTIONS OVERVIEW
- Network Connection
- Notes:
- Share Photos and Videos with Your Photo Frame
- Sending Photo and Video Files
- Via App(WiFi Required)
- Step 4:
- Step 5:
- Step 6:
- \* More functions of JointFrame app
- Via Email(WiFi Required)
- Via SD Card and USB Drive(No WiFi Required)
- Play Photos and Videos
- Play Photos
- Play Videos
- Share Music with Your Photo Frame
- Sending Music Files
- IMPORTANT:
- Playing Mode:
- Alarm Setup
- Calendar
- Weather
- SETTING BASICS
- Device Sync
- WiFi
- Frame
- Storage
- Factory Reset
- About
- [TROUBLESHOOTING GUIDE]
- FCC Caution
- ISEDC Warning
- RECYCLING
- Manufacturer:
- Manufacturer address:
- CUSTOMER SUPPORT
Brand : Vankyo
Model : F10 FHD
Category : Digital photo frame