
ZIPK16N1 - NAS Speco Technologies - Free user manual and instructions
Find the device manual for free ZIPK16N1 Speco Technologies in PDF.


User questions about ZIPK16N1 Speco Technologies
0 question about this device. Answer the ones you know or ask your own.
Ask a new question about this device
Download the instructions for your NAS in PDF format for free! Find your manual ZIPK16N1 - Speco Technologies and take your electronic device back in hand. On this page are published all the documents necessary for the use of your device. ZIPK16N1 by Speco Technologies.
USER MANUAL ZIPK16N1 Speco Technologies
Quick Installation Guide
Speco Gray Viewer Series Surveillance System
When the NVR is powered on for the first time, a password is required to be set. Make sure to store the username and password in a safe place.
1 Connection Diagram

flowchart
graph TD
    A["Router"] --> B["Internet"]
    B --> C["Router"]
    C --> D["Server"]
    D --> E["1"]
    D --> F["2"]
    D --> G["3"]
    D --> H["4"]
    D --> I["5"]
    D --> J["or"]
    style A fill:#f9f,stroke:#333
    style B fill:#ccf,stroke:#333
    style C fill:#cfc,stroke:#333
    style D fill:#fcc,stroke:#333
    style E fill:#cff,stroke:#333
    style F fill:#ffc,stroke:#333
    style G fill:#cfc,stroke:#333
    style H fill:#fcc,stroke:#333
    style I fill:#ffc,stroke:#333
    style J fill:#fcc,stroke:#333
1) The recorder can be connected to the Internet for remote viewing.
2) Connect the included power adapter.
3) A USB flash drive can be connected for backups and firmware updates.
4) Connect the video output of the NVR to the TV or monitor via HDMI or VGA connection.
5) Connect the cameras to the ethernet ports. The ports provide power to the cameras
via the ethernet cable. Video will show automatically and may take up to 1 minute to take effect.
2 Startup Wizard
Startup menu includes: start wizard page, Network, Network Configuration, Date/Time, IP Camera Setup, Disk, Resolution, Mobile and Summary.
1) Start wizard

2)Network Configuration
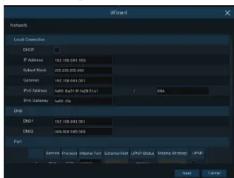
Please check the DHCP box if connecting to a network that assigns IP addresses automatically. A router will typically have DHCP capability.
IP Address : The IP address identifies the NVR in the network. It consists of four groups. of numbers between 0 to 255, separated by periods. For example, "192.168.001.100".
This address allows the NVR to access the Internet. The format of the Gateway address in the same as the IR Address. For example, "102.168.001.001".
Gateway address is the same as the IP Address. For example, 192.166.001.001. : DNS1 is the primary DNS server and DNS2 is a backup DNS server. DNS1/DNS2 Usually should be enough just to enter the DNS1 server address.
Port
Web Port: This is the port that you will use to log in remotely to the NVR (e.g. using the Web Client). If the default port 80 is already taken by other applications, please change it.
Client). If the default port 60 is already taken by other applications, please change it.
Client Port: This is the port that the NVR will use to send information through (e.g. using the mobile app). If the default port 9000 is already taken by other applications, please change it.
This is the port that the NVR uses to transmit real-time streaming to other RTSP Port devices (e.g. a streaming media player)
UPNP: To log in remotely to the NVR using a web browser through DDNS, port forwarding must be set up in the router. Enable this option if the router supports UPnP.
3) Date/Time
This menu allows you to configure the Date, Time, Date Format, Time Format, Time Zone, NTP and DST.
Date and Time
Click on the calendar icon to set the current system date.

Date: Click on the calendar icon to set the system date.
Click to set the system time.Time:
Date Format: Choose from the dropdown menu to set preferred date format Time Format: Choose time format between 24 hours and 40 hours
Set the correct time zone.Time Zone:
NTP
NTP stands for Network Time Protocol. This allows the date and time to be synchronized with a time server on the Internet. To use this feature, make sure the NVR is connected to the Internet.

Check the " " box, and select the NTP server.NTP
DS ^-
DST stands for Daylight Savings Time.
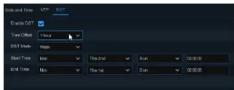
DST: Enable If Daylight Saving Time (DST) is observed in your region Time Offset : Select the amount of time to offset for DST Time Mode : Choose to set the daylight saving time in weeks or in days Start Time/End Time : Set the start time and end time for daylight saving
4) IP Camera
IP cameras that are on the local network can be added to the NVR through this menu. Note that if all 4 cameras have been added to the NVR through the camera ethernet ports, there is no need to add cameras again.

Click to search IP cameras in the same network. Choose the IP camera(s) Search you want to add, and then click → icon to add to the NVR.
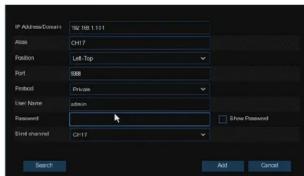
Enter the camera's user name & password (default: admin/admin) to add the camera(s). You can also click 🔒 button to add individual IP camera to a single channel.
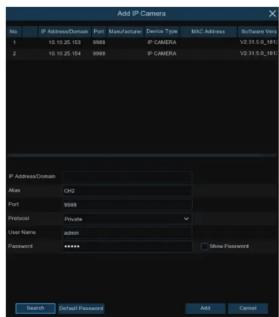
Click the Search button to search for cameras on the local network and then click on a camera in the list.
IP Address/Domain: IP address or domain name of the IP camera.
Alias: Nickname of the camera.
Position: Position to display the camera name on the screen.
Port: Port of the IP camera.
Protocol: Choose the protocol of the IP camera from the dropdown menu
User Name: User Name of the IP camera
Password: Password of the IP camera
Bind channel: Choose a channel on the NVR to associate with the camera.
5) Disk

The HDD in the NVR already comes formatted and is ready to use out of the box. Unless there is a specific reason, do not format the HDD as it will erase all
recorded data. To format the HDD, select the HDD and then click Format HDD. Overwrite : Use this option to overwrite the old recordings on the HDD when the HDD is full.
For example, if you choose the option 7 days then only the last 7 days recordings are kept on the HDD. To prevent overwriting any old recordings, select Disable. If you have disabled this function, please check the HDD status regularly, to make sure the HDD is not full.
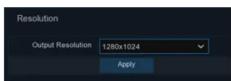
6) Resolution
Choose the appropriate output resolution to match the monitor. Every time the NVR boots up, it automatically detects the best resolution to match the monitor
7) Mobile
As an alternative to DDNS, the QR code can be scanned with the mobile app to view the NVR remotely. The mobile app, Speco Gray, can be downloaded from the App Store and Google Play Store.

8) Summary
Summary shows the information that was set during the setup. Check "Don't show this window next time" if you don't want the setup wizard to start when the NVR is rebooted. Click Finish to save and exit.

Live View Screen Overview

Status Icons
This indicates that the NVR is currently recording.
This icon appears when the camera has detected motion.
The icon indicates that the external I/O alarm device is triggered
This icon indicates that the HDD has an error.
This icon indicates the HDD is unformatted
This icon indicates the HDD is full.
This icon indicates the HDD is read-only.
IP camera is disconnected. No Camera:
Click to open menu to add IP cameraQuick Add
Click to edit current IP camera
3 Remote Access via Web Client
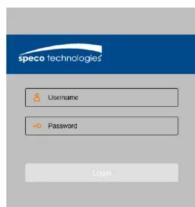
The NVR can be accessed remotely in multiple ways on the PC. The simplest way is to access it using the Speco Gray Viewer application which is available for download on our website. If on the same network as the NVR, enter the LAN IP address of the NVR in Speco Gray Viewer. If the NVR is on a different network, enter the P2P ID of the NVR. Internet Explorer can also be used for remote access. There are 2 ways to access the NVR through Internet Explorer. First is with a LAN IP address if the NVR is on the same network as the PC. Second, if DDNS was set up, the NVR can be accessed through DDNS from a different network.
Login to Web Client
4 Remote Live View on Mobile Devices
-
Open the App Store(iOS) or play store(Android).
-
Search for and install "Speco Gray Viewer".
-
Open the Speco Gray app

-
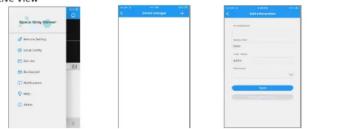
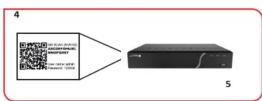
Go to Device, Press '■' and choose Manual to add a new device. Press the QR code icon next to Device ID and scan the QR code on the NVR. Then enter the client port (default 9000), user name, and password. Press "Save" to finish setup.
-
Live View

ATTENTION!
As we are continuing to update our products with the latest features, please download the latest manual and tools from the following link and QR code.
Scan this QR code or use the URL below to go to the product page below to download the manual.

https://specotech.com/product/zipk4n1

https://specotech.com/product/zipk8n2
Brand : Speco Technologies
Model : ZIPK16N1
Category : NAS