MSP610 - Sandwich Toaster MISTRAL - Free user manual and instructions
Find the device manual for free MSP610 MISTRAL in PDF.


| Product Type | Sandwich Press / Toaster |
| Brand | Mistral |
| Model | MSP610 |
| Power Consumption | 2000 W |
| Supply Voltage | 240 V ~ 50 Hz |
| Material | Stainless steel body; non-stick coated cooking plates |
| Dimensions (approx.) | 31 x 23 x 12 cm |
| Weight (approx.) | 2.3 kg |
| Cooking Functions | Sandwich toasting, open cheese melts, grilling |
| Adjustable Plate Height | Yes; automatically adjusts to sandwich thickness |
| Indicators | Red power light; green ready light |
| Preheating Time | 5–8 minutes |
| Safety Features | Hot surface warning; auto-adjusting top plate; non-slip feet |
| Cleaning & Maintenance | Wipe with damp cloth; use plastic scraper; no abrasive cleaners |
| Storage | Upright position; locking latch to close plates; power cord wraps around legs |
| Intended Use | Household use only; not for outdoor or commercial |
| Warranty | Refer to manufacturer; no user-serviceable parts |
Frequently Asked Questions - MSP610 MISTRAL
User questions about MSP610 MISTRAL
0 question about this device. Answer the ones you know or ask your own.
Ask a new question about this device
Download the instructions for your Sandwich Toaster in PDF format for free! Find your manual MSP610 - MISTRAL and take your electronic device back in hand. On this page are published all the documents necessary for the use of your device. MSP610 by MISTRAL.
USER MANUAL MSP610 MISTRAL
Stainless Steel Sandwich Press
natural_image
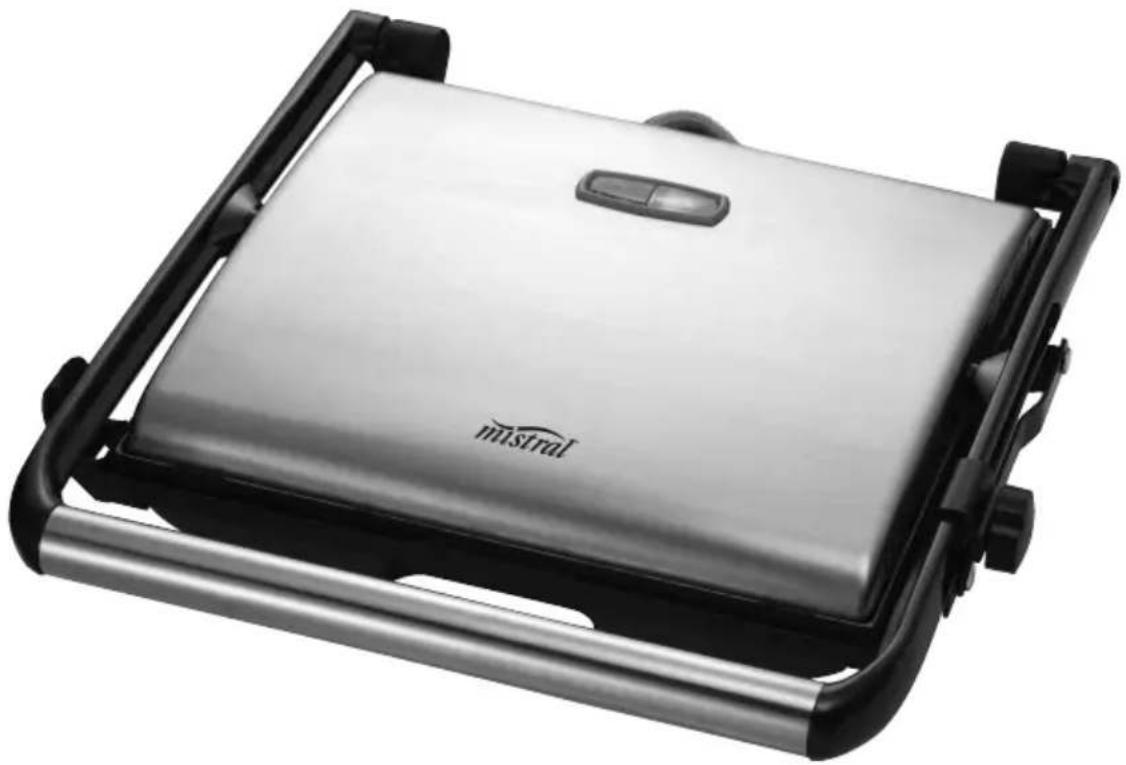
Exterior view of a stainless steel grater with black frame (no text or symbols visible)Instruction Manual
Model: MSP610
Important Safeguards
When using electrical appliances, in order to reduce the risk of fire, electric shock, and/or injury to persons, basic safety precautions should always be followed, including:
For Your Safety
Read all instructions carefully, even if you are quite familiar with the appliance.
- To protect against the risk of electric shock DO NOT IMMERSE any part of this appliance in water or any other liquid.
- This appliance is not intended for use by persons (including children) with reduced physical, sensory and mental capabilities, or lack of experience and knowledge, unless they have been given supervision or instruction concerning use of the appliance by a person responsible for their safety.
• Children should be supervised to ensure that they do not play with the appliance. - Switch off and remove the plug from the power outlet before cleaning or when not in use.
- To unplug grasp the plug and pull from the power outlet. Never pull power cord. Never carry the appliance by the power cord.
- Do not operate the appliance with a damaged power cord or plug or after the appliance malfunctions, has been dropped or damaged in any manner.
- Do not let the power cord hang over the edge of a table or counter, or touch hot surfaces. Do not place any part of this appliance on or near a hot gas or electric burner or in a heated oven.
- Do not use this appliance for anything other than its intended use. This product is intended for household use only.
- Do not attempt to repair or disassemble the appliance. There are no user-serviceable parts.
-
Do not use outdoors.
-
The use of attachments or accessories not recommended or sold by this appliance manufacturer may result in fire, electric shock or personal injury.
- Avoid touching hot surfaces during use as they may become hot and could cause burns. Allow to cool before cleaning.
- The appliance should always be operated on a level, heat resistant surface. Operating the appliance on sinks, drain boards, uneven or inclined surfaces should be avoided.
- Never use harsh, abrasive or caustic cleaners or oven cleaners to clean this appliance.
- The appliance is not intended to be operated by means of an external timer or separate re-mote control system.
FAILURE TO OBSERVE THESE CAUTIONS MAY RESULT IN DAMAGE TO THE APPLIANCE.

CAUTION: HOT SURFACES.
The surfaces are liable to get hot during use, do not touch.
Warning
If the supply power cord is damaged, the power cord must be replaced by the manufacturer, its service agent or similarly qualified persons in order to avoid a hazard.
This product has not been designed for any uses other than those specified in this booklet.
Save These Instructions
Features of Your Stainless Steel Sandwich Press
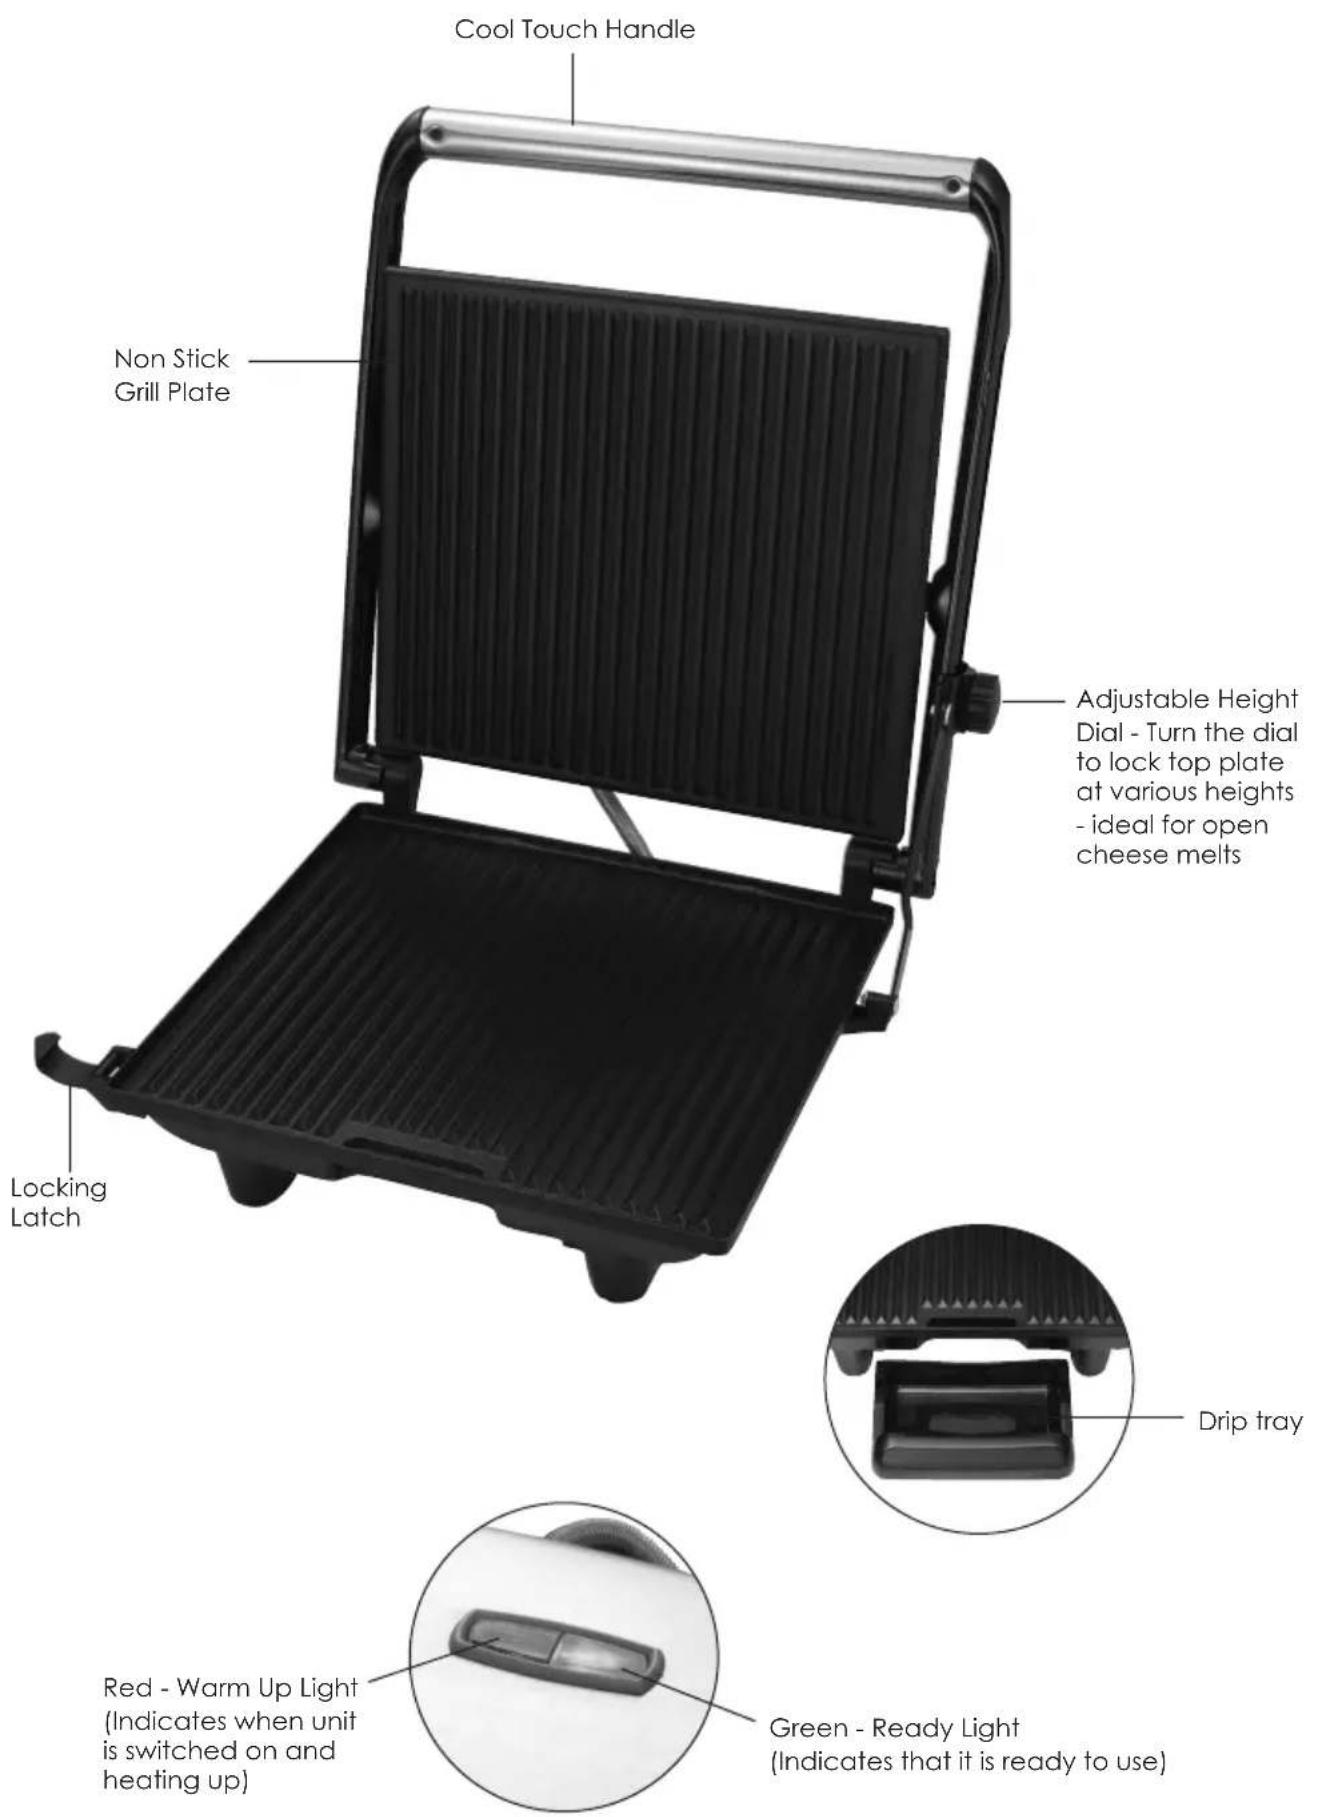
Getting To Know Your Stainless Steel Sandwich Press
Congratulations on the purchase of your new In My Kitchen Stainless Steel Sandwich Press.
Before first using your new In My Kitchen Stainless Steel Sandwich Press, it is important that you read and follow the instructions in this handbook, even if you feel you are familiar with this type of appliance.
Your attention is drawn particularly to the section dealing with IMPORTANT SAFEGUARDS.
Find a safe and convenient place to keep this handbook for future reference.
This appliance has been designed to operate from a standard domestic power outlet. It is not intended for industrial or commercial use.
How to Use Your Stainless Steel Sandwich Press
Note: When using the Stainless Steel Sandwich Press for the first time, the unit will emit a fine smoke. This is caused by the heating of the elements and new components and can be disregarded.
Before first use, carefully unpack the Stainless Steel Sandwich Press and remove all packaging material. Wipe the body of the Stainless Steel Sandwich Press with a soft dry or damp sponge or cloth.
Place the Stainless Steel Sandwich Press on a flat level surface and slide the storage locking latch on the right side of unit away from you. (It will unlock the cooking plates).
Cooking plates must be in the closed position for pre-heating.
Before using your Stainless Steel Sandwich Press for the first time, the non-stick plates must be seasoned during the preheating time (until the green light comes on) to protect the non-stick surface. When the Stainless Steel Sandwich Press is hot it is recommended that you season the non-stick surface by rubbing 1 tablespoon of oil over the Stainless Steel Sandwich Press plates. Use a thick amount of paper towels and take care – remember the Stainless Steel Sandwich Press is hot.
- Plug the power cord into a standard domestic power outlet and switch the power outlet ON. The Power light (Red) light will illuminate and stay on.
- Preheat the plates for 5-8 minutes (or until the green light illuminates). Season the plates accordingly if using the Stainless Steel Sandwich Press for the first time.
-
During the preheating time prepare your sandwich and when ready, open the Stainless Steel Sandwich Press and place the sandwich on the Bottom Cooking Plate. Always place Sandwiches towards the rear of the cooking plate. Close the Top Cooking Plate and it will automatically adjust to the thickness of the sandwich because of the adjustable plate height. This will ensure an even toasting.
-
Toasting should take approximately 5-8 minutes. However, exact toasting times will depend on types and thickness of breads and different fillings used.
- Open the lid when the sandwich is cooked. Always remove the sandwich by using plastic or wooden spatula. Never use metal utensils as this may damage the Non-Stick Coating.
- Close the lid to preserve the heat until ready to toast the next sandwiches.
- After use, remove the plug from the wall socket.
Note: The green light will go on and off throughout the cooking process indicating that the correct temperature is being maintained.
Open Cheese Melts
Pre-heat the Stainless Steel Sandwich Press until the Green Ready Light illuminates (Cooking plates must be in a closed position).
Place the Sandwich to be melted on the bottom plate. Adjust the adjustable height dial so that the top plate sits just above the open sandwich surface. Close the unit.
The Top Plate will radiate the desired heat to melt the ingredients.
Toasting "Melts" should take approximately 3-4 minutes. The toasting time will vary depending on the ingredients being used, the height of the top plate and personal preference.
For Better Results
Breads with a high-sugar content (e.g. fruit loaf, raisin bread or brioche) will toast more quickly than sandwich breads. White, brown or wholemeal bread can be used.
For sweet snacks, sprinkle caster sugar over the buttered sides of the bread.
For a wholesome meal, Panini bread can be toasted quickly and easily with any number of nutritious fillings and served with a side salad.
Be careful when biting into a freshly toasted sandwich. Fillings such as cheese, tomato and jam retain heat and can burn if eaten too quickly.
Suggested Breads
Turkish bread
Foccacia
Olive bread
Sour dough
Baguettes
Bagels
English muffins
Crusty Italian-style bread
Lavash bread, mountain bread, pita bread or tortillas may be rolled around most fillings.
Try raisin bread or brioche with sweet fillings.
Suggested Fillings
- Cut surfaces of bread and rub with a sliced garlic clove, top with thinly sliced spicy char grilled lamb, finely sliced red onion, hummus and fruit chutney.
- Spread bread with prepared pesto, top with a selection of char-grilled marinated vegetables such as eggplant, capsicum, and zucchini. Layer over baby spinach leaves and top with sliced mozzarella or bocconcini cheese.
- Make a simple potato rosti by coarsely grating a potato and squeezing out excess moisture. Combine with crispy bacon pieces and chopped chives. Pan fry in a little oil until crisp and golden. Place warm rosti on bread, top with thinly sliced roast beef, and spread with seeded mustard.
- Combine chopped barbecued chicken, finely diced onion and shredded tasty cheese in a small bowl. Spread bread with sweet chilli or barbecue sauce, top with chicken mixture.
- Top bread with thinly sliced salami, button mushrooms, chopped sun-dried tomatoes and sliced olives. Sprinkle mixed herbs over filling and finish with sliced mozzarella cheese.
- Top bread with shaved turkey with cranberry sauce and camembert or brie cheese. Add sliced avocado, if desired.
- Place a fried egg on the base of a muffin, top with sliced Colby cheese and finish with crunchy cooked bacon strips.
- Spread bread thinly with pizza sauce, top with shaved ham, thinly sliced pineapple rings, sliced green capsicum and grated mozzarella cheese and sprinkle with oregano.
- Combine softened cream cheese with chopped capers and freshly ground black pepper. Spread over base of bagel and top with smoked salmon slices.
Care & Cleaning
Cleaning the interior
Switch off the power outlet and unplug the Stainless Steel Sandwich Press; ensuring you let the Stainless Steel Sandwich Press cool before cleaning.
To remove burnt on fillings, use a plastic scraper after the appliance has cooled. Never use a sharp metal object such as a knife as this will scratch the non-stick surface.
Use a soft damp cloth or sponge to remove any crumbs from the cooking plates before drying the cooking plates thoroughly.
Do not clean the cooking plates with any abrasive scouring pad or steel wool as this will damage and scratch the Non-Stick Plates.
Storage
Your Stainless Steel Sandwich Press will store in an upright position in cupboards, shelves or on the worktop.
Lock the plates together using the locking latch and wrap the power cord around the legs of the appliance for safe and secure storage.
Specifications:
Supply Voltage:....240V \~50Hz Power Consumption:....2000W
Note: As a result of continual improvements, the design and specifications of the product within may differ slightly to the unit illustrated from the packaging.
Notes

Gerard Sourcing & Manufacturing
GSM International Ltd.
GSM International Ltd has a policy of continual improvement throughout the product range. As such the unit contained within may differ slightly from the unit illustrated on the pack.
MADE IN CHINA for GSM International Ltd. Mistral is a registered trademark of GSM International Ltd.
- Stainless Steel Sandwich Press
- Important Safeguards
- For Your Safety
- CAUTION: HOT SURFACES.
- Warning
- Save These Instructions
- Features of Your Stainless Steel Sandwich Press
- Getting To Know Your Stainless Steel Sandwich Press
- How to Use Your Stainless Steel Sandwich Press
- Open Cheese Melts
- For Better Results
- Suggested Breads
- Suggested Fillings
- Care & Cleaning
- Cleaning the interior
- Storage
- Specifications:
- GSM International Ltd.
Brand : MISTRAL
Model : MSP610
Category : Sandwich Toaster