MPRC601B - Multicooker MISTRAL - Free user manual and instructions
Find the device manual for free MPRC601B MISTRAL in PDF.


User questions about MPRC601B MISTRAL
0 question about this device. Answer the ones you know or ask your own.
Ask a new question about this device
Download the instructions for your Multicooker in PDF format for free! Find your manual MPRC601B - MISTRAL and take your electronic device back in hand. On this page are published all the documents necessary for the use of your device. MPRC601B by MISTRAL.
USER MANUAL MPRC601B MISTRAL
6 Litre Multi-function Pressure Cooker
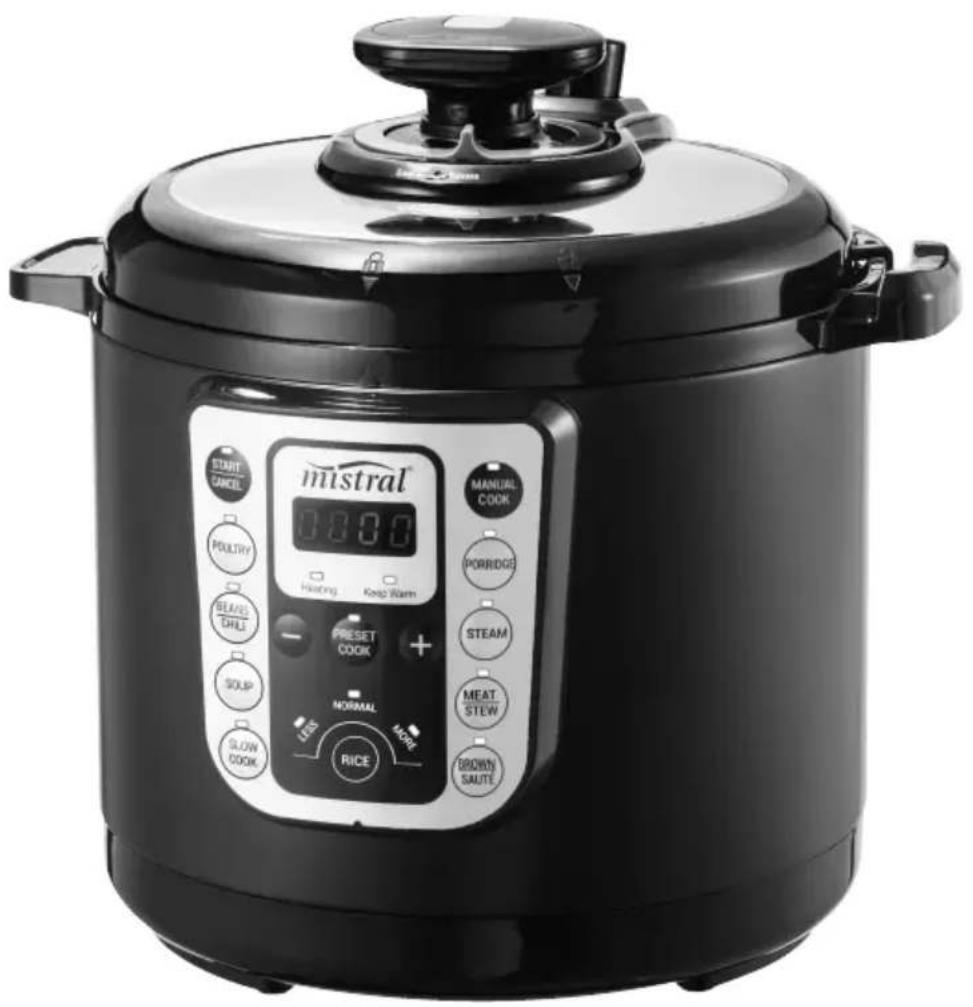
Instruction Manual
Model: MPRC601B
Important Safeguards
When using electrical appliances, in order to reduce the risk of fire, electric shock, and/or injury to persons, basic safety precautions should always be followed, including:
For Your Safety
Read all instructions carefully, even if you are quite familiar with the appliance.
- To protect against the risk of electric shock, DO NOT IMMERSE the plug, power cord or the cooker in water or any other liquid.
- This appliance is not intended for use by persons (including children) with reduced physical, sensory and mental capabilities, or lack of experience and knowledge, unless they have been given supervision or instruction concerning use of the appliance by a person responsible for their safety.
• Children should be supervised to ensure that they do not play with the appliance. - Switch off the power outlet and remove the plug before cleaning or when not in use. To unplug, grasp the plug and pull from the power outlet. Never pull the power cord. Never carry the appliance by the power cord.
- Do not operate any appliance with a damaged power cord or plug; if the appliance malfunctions; or if it is dropped or damaged in any manner.
- Do not allow the power cord to hang over the edge of a table or counter, or touch hot surfaces.
- Do not operate or place any part of the appliance on or near any hot surfaces (such as a hot gas or electric burner, or in a heated oven).
- Do not use this appliance for anything other than its intended use. This product is intended for household use only.
- This appliance is intended to be plugged in a standard domestic power outlet only.
- Do not attempt to repair, disassemble or modify the appliance. There are no user serviceable parts.
-
Do not use outdoors.
-
Operate on a dry level surface; sinks, drainboards or uneven surfaces must be avoided.
- The use of attachments or accessories not recommended or sold by the manufacturer can cause fire, electric shock or injury.
- Allow to cool before cleaning.
• Do not use with an extension power cord.
• Store the unit indoors in a dry location. - Do not operate under or near flammable materials, such as curtains, drapes or any other combustible materials.
- Do not touch hot surfaces of pressure cooker. Use handles only.
- Close supervision is necessary when the pressure cooker is used near children. It is not intended for use by children.
- NEVER ATTEMPT TO OPEN THE LID WHILE THE UNIT IS OPERATING. Do not open the pressure cooker until the unit has cooled and all internal pressure has been released. If the lid is difficult to rotate, this indicates that the cooker is still pressurized. Do not force it to open. Any pressure in the cooker can be hazardous.
- Extreme caution must be used when moving a pressure cooker containing hot liquids or foods.
- This appliance cooks under pressure. Improper use may result in scalding injury. Make certain unit is properly closed before operating. Do not fill unit to more than 4/5 full. When cooking foods that expand during cooking, such as dried vegetables, legumes, beans or grains do not fill the unit to more than 12 full. Overfilling may cause a risk of clogging the pressure limit valve and developing excess pressure.
- Wear oven gloves when rotating Pressure limit valve to Open position to avoid injury from steam release.
- Do not use under hanging cabinets; steam from pressure release may cause damage.
- Always attach plug to appliance first before plugging into wall outlet. To disconnect, turn control to "off", then remove plug from outlet.
- Be aware that certain foods, such as apple sauce, cranberries, pearl barley, oatmeal and other cereals, split peas, noodles, macaroni, rhubarb, or spaghetti can foam, froth and
splatter, and clog the pressure release devices. These foods should not be cooked in a pressure cooker unless following the recipe on the manual.
• Always check the pressure release devices for clogging before use.
• Do not use this pressure cooker for frying oil.
- Do not move the seal ring in the lid with any tools or external forces. If the ring breaks off the lid, stop using the cooker and replace the whole lid with a new one.
- Clean the filter regularly to keep the cooker clean.
- Do not open the lid with external force when the floating valve has not sunk.
- Never add any additional weight on the pressure limiting valve or replace the pressure limiting valve with another object.
- Never use the inner bowl if damaged as this will cause air leakage.
- Food will not be kept warm for more than 24 hours.
- If steam releases around the lid during the cooking process, please stop using the device and contact an authorised repair centre.
- Never plug in or switch on your appliance without the inner bowl placed inside the cooker.
- Only use the removable inner bowl supplied. Do not use any other bowl inside the cooker.
- Never operate the cooker without food or water in the inner bowl.
- Do not place the removable inner bowl when hot on any surface that may be affected by heat.
- Avoid scalding from escaping steam when opening the lid.
- The ducts in the pressure regulator allowing the escape of steam should be checked regularly to ensure that they are not blocked.
- To prevent damage to the appliance do not use alkaline cleaning agents when cleaning, Use a soft cloth and a mild detergent.
- This appliance is intended to be used in household and similar applications such as:
– staff kitchen areas in shops, offices and other working environments; - farm houses;
– by clients in hotels, motels and other residential type environments;
- WARNING: To avoid spillage on the connector. The heating element surface is subject to residual heat after use.
- CAUTION: To prevent damage to the appliance do not use alkaline cleaning agents when cleaning, use a soft cloth and a mild detergent.
Compulsory Warning
If the supply power cord is damaged, the power cord must be replaced by the manufacturer, its service agent or similarly qualified persons in order to avoid a hazard.
This product has not been designed for any uses other than those specified in this booklet.
Save These Instructions
Features of Your Multi-function Pressure Cooker
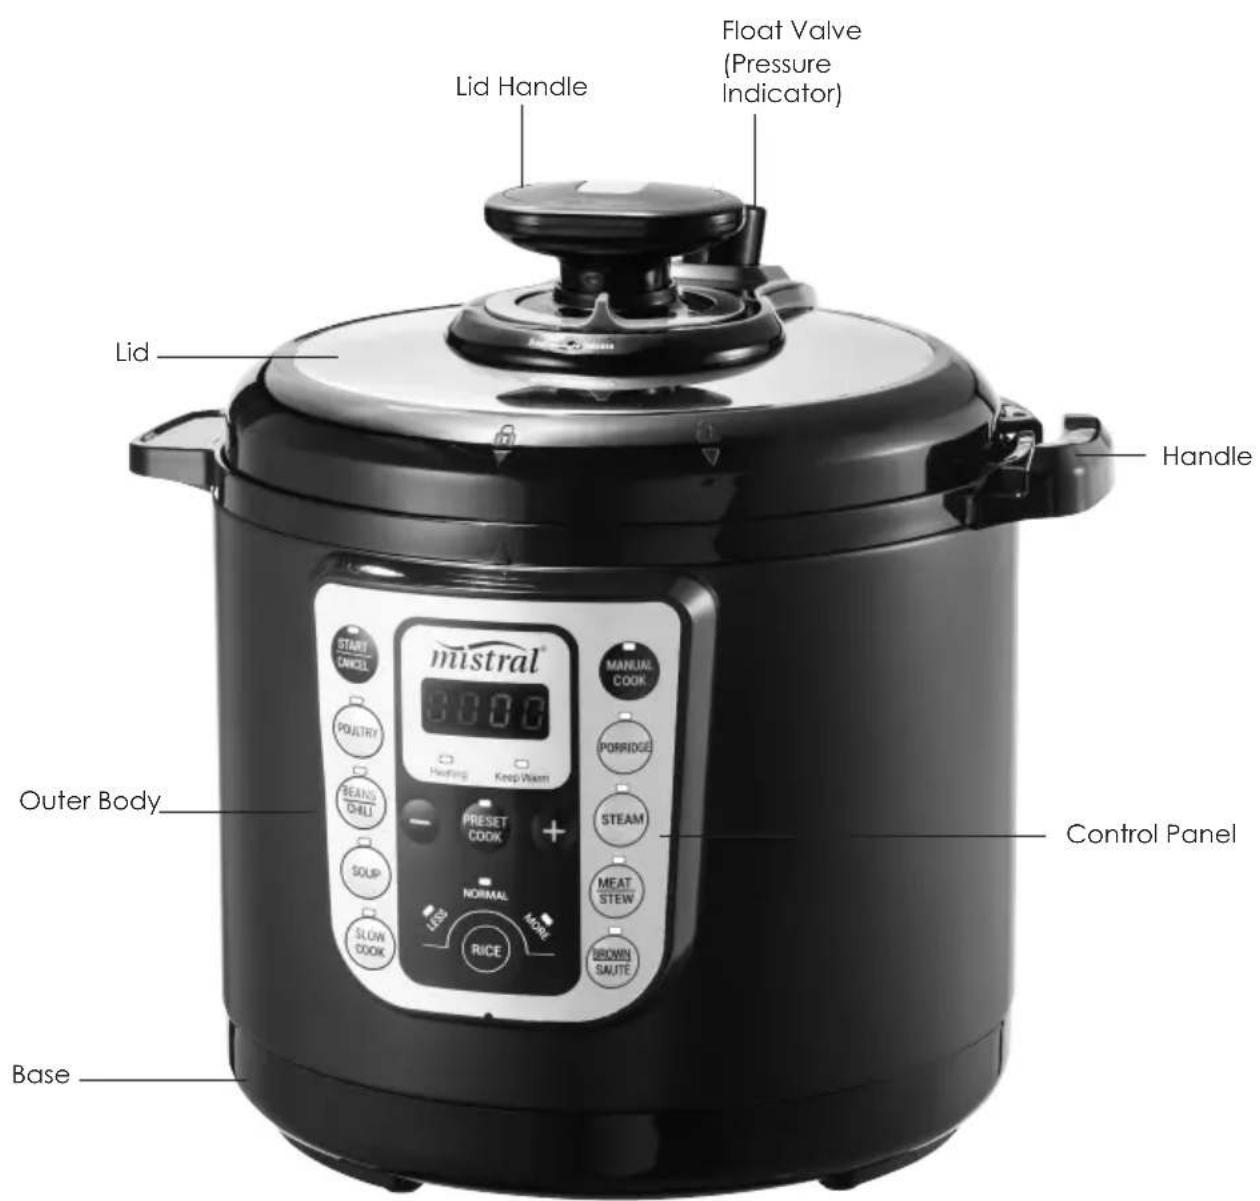
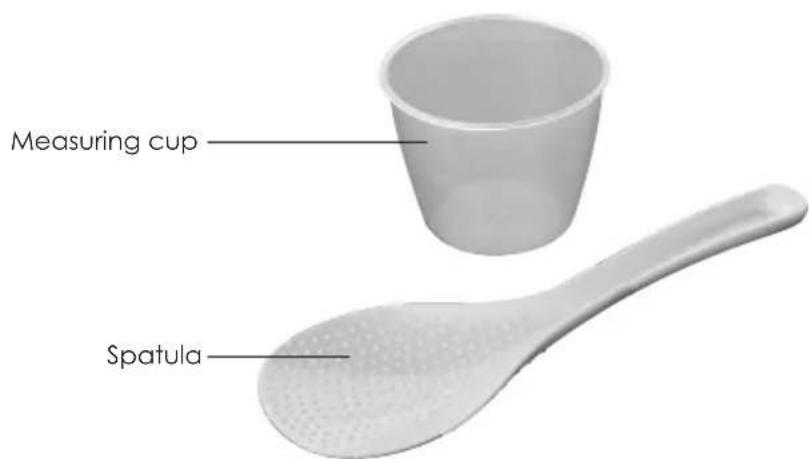
Control Panel
1. START/CANCEL Button
This button serves two functions:
a. Press it to start a selected cooking mode.
b. Cancel cooking process during operation, cancel any previously selected cook mode if changing your mind or inadvertently chosen the incorrect cook mode or manual cook time settings.
2. '+' and '-' Buttons
Pressing these buttons allows you to:
a. Manually set any cooking time between 2 and 99 minutes at 1 minute intervals after having pressed Manual cook button.
b. Decrease or Increase dedicated cook modes default cooking times to suit your liking (Under cook or over cook).
c. Set timer (After pressing Preset cook button) for delay cooking start.
Note : you can either continue press buttons to increase or decrease time at 1 minute intervals or hold buttons to speed scroll to desired time setting.
3. Dedicated cooking mode buttons
Poultry, Bean/Chili, Soup, Porridge, Steam, Meat/Stew, Brown/Saute, Rice and Slow Cook.
Pressing any of these buttons selects a default "ideal cooking time", for the respectively chosen dish.
The Slow cook function is for Cook your food slowly, to retain flavor and tenderness (10-hour timer).
The time can be changed by pressing "+" and "-" Buttons to range from 4 to 10 hours at 1 hour intervals.
Note: This function will cook food at 90-95C, which is the lowest setting on a traditional slow cooker; most recipes using a slow cooker require 8-9 hours cooking time.
4. Preset Cook Button:
Pressing this button selects "TIMER" to delay the start-up of the cooking process.
To be used in conjunction with dedicated cooking mode and + /- Buttons to select your desired delay start-up time from 0.5 - 12 hours at 0.5 hour intervals.
The unit will start cooking by pressed "START/CANCEL" Button and when set time has expired.
Note : This function cannot be activated in conjunction with the dedicated Slow cook mode, the reason be, that some ingredients cannot be left for extended periods of time in the delayed cooking start time.
5. Manual Cook:
Pressing this function button allows you to manually select any cooking time in conjunction with the +/- buttons, from 2 to 99 minutes if you wish to have independent control.
LED Display:
1. Standby mode
"OFF" icon appears on the display.
2. Keep Warm mode
00:00 appears on the display and start to count the time of keep warm, the "Keep warm" indicator light illuminates at the same time. The keep warm time length is 12 hours.
3. Preset Cook
To set delayed cooking start up time, first select Dedicated Cook Mode (Soup, Rice etc.) or manual selected cooking time, then press "PRESET COOK" Button. 01:00 appears on the display, "01:00" will flash for 20 seconds, locks in and cooking will commence by pressing "START/CANCEL" button for cooking to start after one hour.
Delay Start cooking time can be increased, ranging from 0.5 to 12 hours by pressing "+" Button within the 20 second flash time frame locks in and will commence cooking by pressing "START/CANCEL" button and after newly set time has lapsed.
4. Dedicated Cooking Modes (Soup, Rice etc.)
Default cooking time MM (e.g. Rice, 12) appears on the LED display.
Will flash for approximately 20 Seconds, locks in and commences cooking for 12 Minutes.
Time can be adjusted up or down, ranging from 5 to 16 Minutes at 1 minute interval within the 20 second flashing time frame by pressing "+" or "-" buttons, selected time will flash and locks in new time and commences cooking for the selected time.
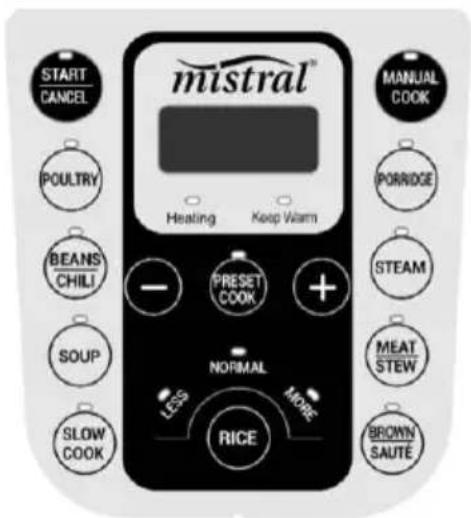
Indicator Lights
1.Heating indicator light
The indicator light illuminating means the appliance is in heating status.
2. Keep Warm indicator light
The indicator light illuminating means the appliance is in Keep warm mode after the cooking mode is completed.
3. Less, Normal, More indicator light
The corresponding indicator light illuminates depending on your selection and volume of rice to be cooked, e.g less cooking time required for smaller volume, longer cooking time required for larger volume.
Press "RICE" Button repeatedly to select either of the three settings.
Getting To Know Your Electric Pressure Cooker
Congratulations on the purchase of your new Pressure Cooker.
Before using your new Pressure Cooker, it is important that you read and follow the instructions in this Use and Care booklet, even if you feel that you are quite familiar with this type of appliance. Find a place to keep this booklet handy for future reference. Attention is particularly drawn to the section dealing with "IMPORTANT SAFEGUARDS".
This appliance has been designed to operate from a standard domestic power outlet. It is not intended for industrial or commercial use.
Before First Use
Remove any packaging materials and promotional labels from your electric pressure cooker.
Be sure all parts have been included before discarding any packaging materials. You may want to keep the box and packing materials for use at a later date.
Please tear off the protective film on cover the control panel in before first time use.
Before using your Electric Pressure Cooker for the first time, remove any dust from shipping by wiping clean with a damp cloth. Thoroughly clean the lid and the cooking pot. The cooking pot can be cleaned in the dishwasher or with warm soapy water.
Rinse with clean water, towel or air dry, and place into the pressure cooker.
-
Place the pressure cooker on a clean, flat surface where you intend to cook.
-
Place the condensation collector in rear of the unit until it clicks into place.(Fig1).
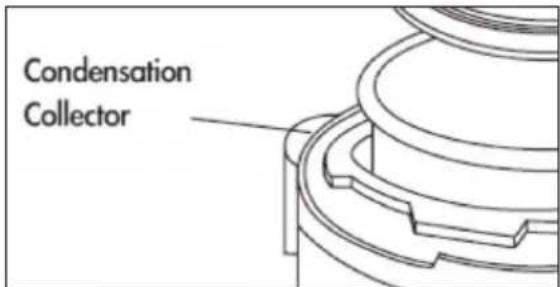
Fig.1
- Place the pressure limit valve on the lid steam vent nozzle, ensuring it seats securely.
Note: The pressure limit valve does not click or lock in to place. Even though it will have a loose fit, it is safely secured.
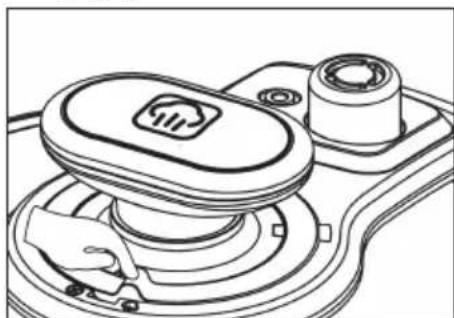
- Set the pressure release control ring under the lid handle by turn the tab to the 'Seal' position.(Fig.2)
natural_image
Technical line drawing of a mechanical component with a handle and circular housing (no text or symbols)Fig.2
Instructions For Use
Once the pressure cooker is assembled properly, you are ready to begin pressure cooking.
Clean cover, internal surface of external lid and rim of cooking pot before first use and after each cooking session to maintain proper sealing at all times with lid locked in position.
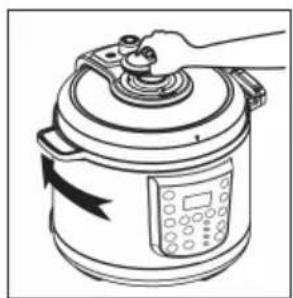
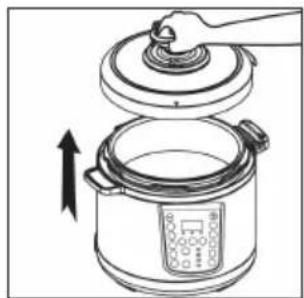
- To remove lid, grasp lid handle, turn it in clockwise direction, the 'Unlock' mark on the lid to point to the 'Arrow' mark on the appliance housing above the control panel, then lift the lid. (Fig.3 & 4)
natural_image
Line drawing of a hand operating a digital rice cooker with control panel (no text or symbols)fig.3
natural_image
Illustration of a hand placing a lid onto a rice cooker with an upward arrow indicating motion (no text or symbols)fig.4
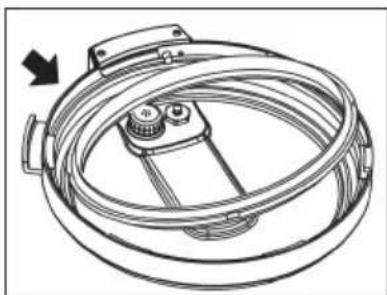
- At the same time, clean the lid and the rubber seal ring then refit the seal ring onto the lid. Ensure the rubber seal ring is properly seated into the seal register of the lid.(Fig.5)
natural_image
Technical line drawing of a mechanical component with a circular housing and internal structure (no text or symbols)Fig.5
- Add food and liquids as the recipe directs, and then place cooking pot into the pressure cooker.
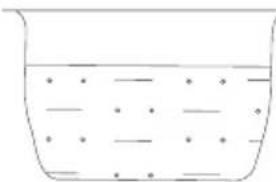
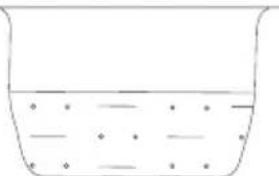
Note: the maximum volume of both food and liquid must not exceed 4/5 capacity of the cooking pot, indicated by level mark inside the cooking pot as 4/5 and Full (Fig.6). for foods such as dried vegetables, beans, rice or grains (These ingredients expand a lot with absorption of liquid), the maximum volume of ingredients and liquid must not exceed 50% of the cooking pot capacity, In the middle of 2/5 and 3/5 Level marking of the cooking pot or 9 Cup Level (Fig.7).
natural_image
Simple line drawing of a container with liquid and dots inside, no text or symbols present4/5
natural_image
Simple line drawing of a beaker with liquid and scattered dots (no text or symbols)Middle of 2/5 and 3/5 marking or 9 cup
Figure 6
Figure 7
Note: The cup supplied with the pressure cooker is NOT Standard Australian 250 ml, but actually 160 ml full to the rim. The corresponding level marking inside the cooking pot reflects 160 ml cups, e.g. 4 cups is 640ml, 10 cups is 1600 ml etc. of ingredients and then fill with liquid to the corresponding cup level marking of the cooking pot and that gives you the correct amount of liquid for the food you are cooking.
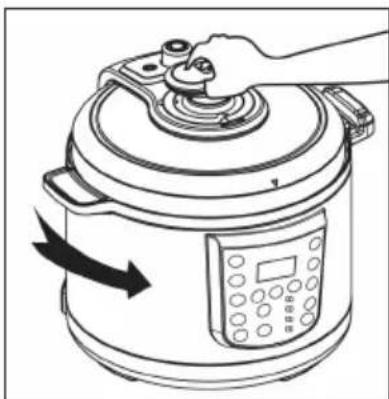
- Lock the lid by turning the lid in anti-clockwise direction, by aligning the 'Arrow/Locked icon' marked on the lid with the 'Arrow' mark on the unit housing.(Fig.8)
natural_image
Line drawing of a rice cooker with a hand operating the lid and a digital display on the side (no text or symbols)Fig.8
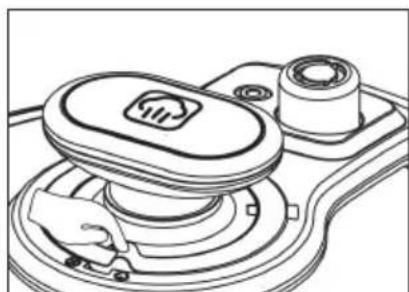
- Ensure the Pressure Limit Valve is properly seated in the steam vent nozzle, then turn the Pressure release control ring tab to the "Seal" position.(Fig.9)
natural_image
Line drawing of a hand operating a mechanical switch with a circular component (no text or symbols)Fig.9
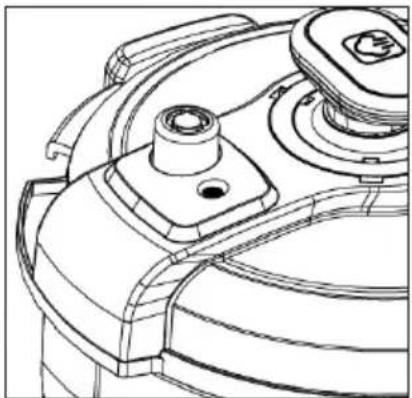
Note: The Pressure Limit Valve should be correctly positioned, This valve may appear loose and wobbly but this is normal. It is secured when it sits right down. The Red float Valve(Pressure Indicator) adjacent to the Pressure Limit Valve must be fully down (Black dot in Figure 10) and level with the lid surface to properly seal the pot, this can only be achieved when lid is in fully locked position. If it sits up and cannot be pushed down, the lid is not in fully locked position.
natural_image
Technical line drawing of a mechanical component with no visible text or symbolsFig.10
-
Plug the connector of the power cord supplied into the base of the pressure cooker and then plug it into wall power outlet, switch ON wall power outlet. The LED Display will show 'OFF', indicating it is in standby mode.
-
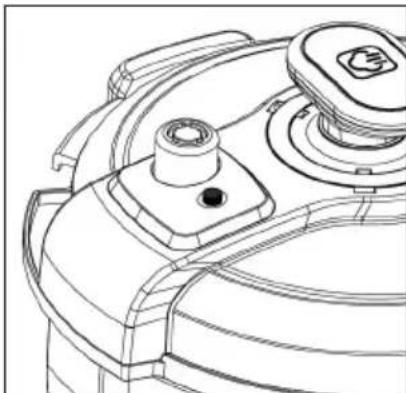
While pressure cooker is in operation, the "Heating" indicator light illuminates, the appliance is heating up, producing steam and slowly pressurizing the cooking pot. Once the cooking pot reaches adequate pressure the Red float valve will rise, indicating that appliance is now pressurized. (Fig.11, Black dot in figure is red float valve)
natural_image
Technical line drawing of a mechanical component with no visible text or symbolsFig.11
Operating Instructions
Prepare ingredients / liquid quantities to fill the pressure cooker cooking pot. Refer to recipes and cooking time tables further in the booklet. Place and close the pressure cooker lid.
Connect appliance power supply cord to the both the pressure cooker and wall power outlet and switch ON at wall power outlet.
The LED display will be illuminated, the pressure cooker is now ready to use. Subject to recipe chosen, either select/press default cooking modes with or without delay start up time or the fully manual mode (Where the user entirely controls their preferred cooking times). Explanation of functions additional to default cooking modes detailed below :
Preset Cook Function
Pressing this button selects "TIMER" to delay the start-up of the cooking process.
To be used in conjunction with dedicated cooking mode and +/- Buttons to select your desired delay start-up time from 0.5 - 12 hours at 30 minutes intervals.
The unit will start cooking by press "START/CANCEL" button and when set time has expired
Note: In order to maintain food freshness and adhere to safe food handling practices, you should apply this when using appliance in conjunction with delayed start ("Preset Cook") cooking modes or extended keep warm times to ensure that specific ingredients that spoil quickly are cooked and consumed before it spoils, particular important for meat, chicken, eggs or similar ingredients.
The "SLOW COOK" function can NOT be used in conjunction with the "PRESET COOK" function, as delayed cooking will affect the freshness of the liquids and ingredients contained.
Note: After Delay start-up time is selected, you must shortly thereafter select the actual cooking time through Dedicated cooking mode or Manual Cook time, delay in doing so will revert the appliance back to Stand By mode.
“+,-” Button
Pressing these buttons allows you to :
a. Manually set any cooking time between 2 and 99 minutes at 1 minute intervals after having pressed Manual cook button.
b. Decrease or Increase dedicated cook modes default cooking times to suit your liking (Under cook or over cook).
c. Set timer (After pressing Preset cook button) for delay cooking start.
Note: you can either continuously press buttons to increase or decrease time at 1 minute intervals or hold buttons to speed scroll to desired time setting.
For example, when in stand-by mode press the dedicated "RICE" button, the Default cooking Time displayed is 12 Minutes, by pressing "+" Button you can increase this to 16 Minutes or by pressing "-" Button decrease it to 5 Minutes.
Press the "START/CANCEL" button, the pressure cooker will start to cooking.
Note : After the dedicated cooking mode buttons have been pressed you can change the cooking time before by press the "START/CANCEL" button.
Automatic Keep Warm Feature
At completion of the cooking period, the unit will beep 5 times and automatically shift to keep warm mode, with the light of the “keep Warm” indicator light illuminating.
Note : where possible, limit the time the appliance remains in Keep Warm Mode as the quality / texture of the food will change progressively after an hour compared to freshly cooked food. During the Keep Warm period a little condensation will settle in the upper rim of the appliance, this is as a result of the appliance naturally de-pressurizing during the first half hour in Keep Warm Mode, this is normal.
To Stop Or Cancel
At any time during the operation of the appliance or set up process (incorrectly chosen cooking mode/time etc.) you can stop operation or cancel settings by pressing "START/CANCEL" Button and the appliance will revert back to Stand-By Mode.
To Open Lid
When pressure cooking cycle is finished, the unit will automatically switch to the Keep Warm mode. At this point you may choose to release pressure in 1 of 3 ways – Natural Pressure Release, Quick Pressure Release, or a Interrupt Pressure Release. The choice will be dictated by the particular food being cooked and indicated in the recipe. If adapting your own recipe for pressure cooking, find a similar recipe in our recipe booklet and use that as a guide.
-
Natural Pressure Release – Following pressure cooking, allow the unit to remain on Keep Warm. The pressure will begin to drop – time for pressure to drop will depend on the amount of liquid in the pressure cooker and the length of time that pressure was maintained. Natural Pressure Release will take from 12 to 30 minutes. During this time cooking continues, so it is recommended for certain cuts of meats, and some desserts. When pressure is fully released, the Float Valve (Pressure Indicator) will drop and the lid can be unlocked and removed.
-
Quick Pressure Release - Turn the Pressure limit Valve control ring by the tab under lid handle to the "Release" position, the Pressure limit Valve will tilt and Steam will immediately begin to release through the valve vents. Keep face, hands and forearms away from steam when it is releasing.
Do not release the pressure with the appliance positioned under overhanging cabinets, as these can be damaged by the steam. When pressure is fully released, the Red Float Valve (Pressure Indicator near the Pressure limit Valve) will drop and lid can be unlocked to open.
- Interrupt Pressure Release- There is a pressure release button on the lid handle
center, press down and hold the button the Steam will immediately begin to release through the valve vents, when releasing downward pressure on the button, steam flow will stop and appliance will maintain pressure.
For some recipes, we have chosen to use this pressure release way.
Allow Natural Pressure Release for the time indicated in the recipe(food will continue to cook slightly) followed by Quick Pressure Release..
Open The Lid:
When Red Float Valve (Pressure Indicator) is completely dropped down (Indicating pressure has been released) to the lid surface level (See Fig.10), turn the lid clockwise and lift to remove.
Lid Rest (Stand)
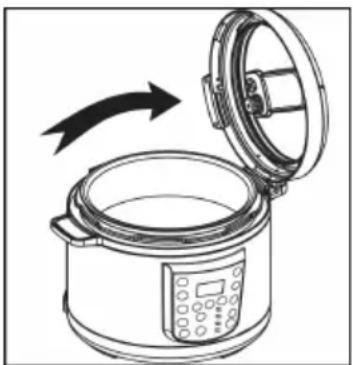
For your convenience and after the lid has been unlocked and removed, the lid can be placed in the upright position on the appliance when serving the contents of the cooking pot. Hold the lid by the handle and angle the lid locking tab underneath the slot on the appliance and tilt upright to stand in position. (Fig.13)
natural_image
Line drawing of a rice cooker with an open lid and digital display (no text or symbols)Fig.13
Note: Do not push or pull lid in that position as it does not act as a hinged lid, doing so could damage the lid or the appliance handle.
To remove the lid from its standing position do so in the reverse manner of fitting it.
Warning : Use extreme caution when releasing pressure. If the pressure is not fully released you are unable to open the lid as handle remains locked by safety mechanism in the lid. Do not try to OPEN the lid unless you see that the float valve has completely dropped down.
Warning: Do not touch the Pressure Limit Valve and Float Valve while cooking or releasing the steam to avoid of burns.
Warning: If unable to release the steam pressure by pressing the pressure release button when cooking cycle is completed, it maybe due to the Pressure Limit Valve being blocked, in that instance do not try to force, unplug the pressure cooker and allow it to "Natural Pressure Release", this may take 30 minutes and observe that the float valve is in full down position before attempting to remove the lid.
Do not force open the Lid until the pressure in the pressure cooker is fully released.
Pressure Cooking
The appliance will start cooking after the selected time has been entered and pressed the "START/CANCEL" button. It will start slowly heating up (the time digits (00:MM) will continue to flash during this period), and progressively pressurising the cooking pot until it reaches peak pressure. Depending on how full this cooking pot is and the type of food being cooked, reaching the top food temperature/peak pressure can take 8 to 45 minutes. When the pressure seals the cooking pot, the floating valve is pushed/raised upwards.
When reaching top temperature a single beep will sound, stopping flashing of the hour digits, appliance will maintain peak pressure in this state and the set cooking time will now start to count down.
Rice
Plug cord into to wall power outlet and switch Power outlet On, appliance is now in Stand By Mode.
- Press "RICE" Button, 12 appears on LED Display, this reflects the Default cooking time of 12 minutes, it will flash for approximately 20 seconds in conjunction with the "NORMAL" volume rice illuminated indicator light at the center of the panel.
- Within the 20 second flash time you can either increase or decrease to your preferred cooking time by pressing "+" or "-" Buttons (The adjustment time range is 5-16 minutes), or alternatively continue to press "RICE" Button to scroll to the "LESS" volume rice or "MORE" volume rice options with the respective 08 minute or 16 minute displayed cooking times illuminated.
- The cooking process will start by pressing the "START/CANCEL" Button.
- The appliance will beep 5 times when selected cooking time has lapsed and will automatically switch to Keep Warm Mode at this point.
- If forgetting to press the "START/CANCEL" button after cooking program was selected, the pressure cooker will continue "beep" sound and "GO" is displayed in LED to remind you it will not start cooking.
Note: When cooking large amount of rice, the appliance will enter twice into stop heating mode, this is perfectly normal and allows for the rice to absorb the water for a better rice consistency outcome.
Soup
- Plug cord into to wall power outlet and switch Power outlet On, appliance is now in Stand By Mode.
- Press "SOUP" Button, 06 appears on LED Display, this reflects the Default cooking time of 6 minutes, it will flash for approximately 20 seconds.
- Within the 20 second flash time you can either increase to your preferred cooking time by pressing "+" Buttons (The adjustment time range is 06-40 minutes.
- The cooking process will start by pressing the "START/CANCEL" button.
- The appliance will beep 5 times when selected cooking time has lapsed and will automatically switch to Keep Warm Mode at this point.
- If forgetting to press the "START/CANCEL" button after cooking program was selected, the pressure cooker will continue "beep" sound and "GO" will display in LED to remind you it will not start cooking.
Poultry
- Plug cord into wall power outlet and switch power outlet on, appliance is now in stand by Mode.
- Press "POULTRY" Button, 12 appears on LED display, this reflects the Default cooking time of 12 minutes. It will flash for approximately 20 seconds.
- Within the 20 seconds flash time you can either increase to your preferred cooking time by pressing "+" button (The adjustment time range is 01-25 minutes)
- The cooking process will start by pressing the "START/CANCEL" button.
- The appliance will beep 5 times when selected cooking time has lapsed and will automatically switch to Keep Warm Mode at this point.
- If forgetting to press the "START/CANCEL" button after cooking program was selected, the pressure cooker will continue "beep" sound and "GO" will display in LED to remind you it will not start cooking.
Meat/Stew
- Plug cord into to wall power outlet and switch Power outlet On, appliance is now in Stand By Mode.
- Press "MEAT/STEW" Button, 20 appears on LED Display, this reflects the Default cooking time of 20 minutes, it will flash for approximately 20 seconds.
- Within the 20 second flash time you can either increase to your preferred cooking time by pressing "+" Buttons (The adjustment time range is 01-50 minutes.
- The cooking process will start by pressing the "START/CANCEL" Button.
- The appliance will beep 5 times when selected cooking time has lapsed and will automatically switch to Keep Warm Mode at this point.
- If forgetting to press the "START/CANCEL" button after cooking program was selected, the pressure cooker will continue "beep" sound and "GO" will display in LED to remind you it will not start cooking.
Porridge
- Plug cord into to wall power outlet and switch Power outlet On, appliance is now in Stand By Mode.
- Press "PORRIDGE" Button, 18 appears on LED Display, this reflects the Default cooking time of 18 minutes, it will flash for approximately 20 seconds.
- Within the 20 second flash time you can either increase or decrease to your preferred cooking time by pressing "+" or "-" Buttons (The adjustment time range is 08-24 minutes).
- The cooking process will start by pressing the "START/CANCEL" Button.
- The appliance will beep 5 times when selected cooking time has lapsed and will automatically switch to Keep Warm Mode at this point.
- If forgetting to press the "START/CANCEL" button after cooking program was selected, the pressure cooker will continue "beep" sound and "GO" will display in LED to remind you it will not start cooking.
Steam
- Plug cord into to wall power outlet and switch Power outlet On, appliance is now in Stand By Mode.
- Press "STEAM" Button, 05 appears on LED Display, this reflects the Default cooking time of 05 minutes, it will flash for approximately 20 seconds.
- Within the 20 second flash time you can either increase to your preferred cooking time by pressing "+" Buttons (The adjustment time range is 05-40 minutes.
- The cooking process will start by pressing the "START/CANCEL" Button.
- The appliance will beep 5 times when selected cooking time has lapsed and will automatically switch to Keep Warm Mode at this point.
- If forgetting to press the "START/CANCEL" button after cooking program was selected, the pressure cooker will continue "beep" sound and "GO" display in LED to mind you it will not start cooking.
Beans/Chili
- Plug cord into to wall power outlet and switch Power outlet On, appliance is now in Stand By Mode.
- Press "BEANS/CHILI" Button, 20 appears on LED Display, this reflects the Default cooking time of 20 minutes, it will flash for approximately 20 seconds.
- Within the 20 second flash time you can either increase to your preferred cooking time by pressing "+" Buttons (The adjustment time range is 20-40 minutes).
- The cooking process will start by pressing "START/CANCEL" button.
- The appliance will beep 5 times when selected cooking time has lapsed and will automatically switch to Keep Warm Mode at this point.
- If forgetting to press the "START/CANCEL" button after cooking program was selected, the pressure cooker will continue "beep" sound and "GO" will display in LED to remind you it will not start cooking.
Slow Cook
- Plug cord into to wall power outlet and switch Power outlet On, appliance is now in Stand By Mode.
- In order to maintain food freshness and adhere to safe food handling practices, with the appliance in "Slow cook" cooking mode, you are unable to use this function in conjunction with the delayed cooking start "Preset Cook" mode.
- Press "SLOW COOK" Button, 04:00 appears on LED Display, this reflects the Default cooking time of 4 hours, it will flash for approximately 20 seconds.
- Within the 20 second flash time you can either increase to your preferred cooking time by pressing "+" Buttons (The adjustment time range is 4-10 hours).
- The cooking process will start by pressing "START/CANCEL" button.
- The appliance will beep 5 times when selected cooking time has lapsed and will automatically switch to Keep Warm Mode at this point.
- If forgetting to press the "START/CANCEL" button after cooking program was selected, the pressure cooker will continue "beep" sound and "GO" appears in LED display to remind you it will not start cooking.
Brown/Saute
This cooking mode is special function, the cooking mode can proceed without closing the lid.
Note: Do not close the lid when using this cooking mode, when completing browning /saute can you then add other ingredients/liquids to close the lid to start pressure cooking and adhere to the normal pressure cooking process and safety guidelines.
- Plug cord into to wall power outlet and switch Power outlet On, appliance is now in Stand By Mode.
- Press "BROWN/SAUTE" Button, 20 appears on LED Display, this reflects the Default cooking time of 20 minutes, it will flash for approximately 20 seconds.
- Within the 20 second flash time you can either increase to your preferred cooking time by pressing "+" Buttons (The adjustment time range is 20-40 minutes).
- The cooking process will start by pressing "START/CANCEL" button. the icon "On" appears on the LED display and waiting for the cooking pot to heat up, the "Hot" icon appears on the LED display, the appliance is ready to add the ingredients to be browned/sauteed into the cooking pot.
- The appliance will beep 5 times when selected cooking time has lapsed and will automatically switch to Keep Warm Mode at this point.
- If forgetting to press the "START/CANCEL" button after the cooking program was selected, the pressure cooker will continue "beep" sound and "GO" will display in LED to remind you it will not start cooking.
- At any time of "BROWN/SAUTE" process, you can stop cooking process by pressing the "START/CANCEL" button.
Manual Cook
- This cooking mode allows you to manually select any cooking time for all types of food, specifically useful for ingredients that require longer cook time than 60 minutes or don't have dedicated default cooking times.
- In this cooking mode you can choose to have the actual cooking time set anywhere from 2 to 99 minutes.
- Plug cord into to wall power outlet and switch Power outlet On, appliance is now in Stand By Mode.
- Press "MANUAL COOK" Button, 02 appears on LED Display, this reflects the lowest possible cooking time of 2 minutes, it will flash for approximately 20 seconds.
- Within the 20 second flash time you can increase to your preferred cooking time by pressing “+” each time to increase at 1 minute intervals or hold button to scroll to your desired time, up to a maximum of 99 minutes.
- The cooking process will start by pressing "START/CANCEL" button.
- The appliance will beep 5 times when selected cooking time has lapsed and will automatically switch to Keep Warm Mode at this point.
- If forgetting to press the "START/CANCEL" button after cooking program was selected, the pressure cooker will continue "beep" sound and "GO" will display in LED to remind you it will not start cooking.
The dedicated cooking function set time as below:
Cooking Preset Time and Time Length Table
| Cooking mode Default time (inminutes) | Min cooking time (in minutes) | Max cooking time (in minutes) | |
| Rice 12 08 16 | |||
| Soup 06 06 40 | |||
| Poultry 12 1 25 | |||
| Slow cook 4 hours 4 hours 10 hours | |||
| Porridge 18 08 24 | |||
| Steam 05 05 40 | |||
| Meat/Stew 20 1 50 | |||
| Brown/Saute 20 20 40 | |||
| Manual cook 2 1 99 | |||
| Preset cook 30 30 12 hours | |||
| Bean/Chili | 20 20 40 | ||
Safety Devices
There are seven safety devices installed in the pressure cooker to assure its reliability and safety.
1. Open-and-Close Lid Safety Device
The appliance will not start pressurizing until the lid is closed and locked properly.
The lid cannot be opened when the appliance pressurizing.
2. Pressure Control Device
The correct pressure level is automatically maintained during the cooking cycle.
3. Pressure Limit Valve
The pressure limit valve will release steam pressure automatically when the pressure inside exceeds the preset pressure.
4. Anti-Block Cover
Prevents any food material from blocking the pressure limit valve
5. Pressure Relief Device
When the pressure cooker reaches the maximum allowable pressure and temperature, the cooking pot will move down until lid separates from the sealing ring, releasing steam pressure.
6. Thermostat
The power will automatically switch off when appliance has reached peak temperature or heating up without food in cooking pot and continues to cycle On /Off to maintain peak temperature.
7. Thermal Fuse
In the unlikely event of thermostat failure, where temperature continues to rise beyond peak preset temperature and exceeding the temperature rating of the thermal fuse, the fuse will open circuit, rendering the appliance inoperable (Cannot be reset).
8. Magnetic Power Control Switch
The pressure cooker has a built-in magnetic power control switch to activate /deactivate power to heating element when lid is fully locked or turned to unlock for pressure cooking specific functions ( Other than "SLOW COOK" and "BROWN/SAUTE" modes ).
When lid is not fully closed, The continues "Beep" sound will activate to indicate that lid is not fully closed and cooking process cannot start.
Cleaning
- Unplug the appliance power cord before cleaning.
- Clean the outer body with a soft cloth such as a paper towel or fibre cloth. Do not immerse the outer body in water or pour water into it.
- Rinse with warm water the underside of the lid including the sealing ring, pressure limit valve, anti-block cover, air escape and float valve. Dry completely.
- Clean area under upper ring with dampened cloth or micro fibre cloth. Do not use chemical cleaners.
- Cooking pot is dishwasher-safe. To hand-clean the cooking pot, use a soft cloth or sponge and wipe. Be careful not to damage the inside coating. Never use harsh chemicals or scouring pads.
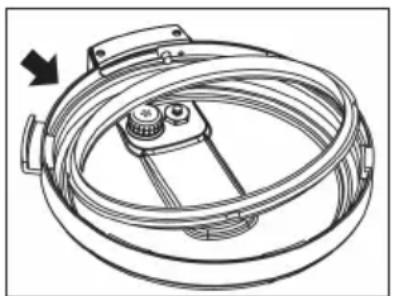
- To clean sealing ring, hold the lid and pull the sealing ring off and rinse in water. After cleaned, put the sealing ring back in the seal register of the lid.
natural_image
Technical line drawing of a mechanical component with no visible text or symbolsFig.14
-
To clean the Pressure Limit Valve, remove and rinse it with water, then reposition it.
-
To clean the condensation collector, remove and clean it with warm soapy water, then reinstall it.
Troubleshooting
| Symptom Probable Cause Action | ||
| Lid does not lock Lid not correctly | ly positioned Reposition Lid | |
| Floating valve is stuck in raised position | Push floating valve down manually. | |
| Cannot open lid after cooking chamber is depressurized | Floating valve is stuck in raised position | Press the float down with chopsticks |
| Air / Steam escaping from around the rim of the lid | Sealing ring not put back in place after cleaning | Install the sealing ring |
| Food residue remaining on sealing ring | Clean sealing ring | |
| Sealing ring damaged or worn Replace sealing ring | ||
| Lid not locked properly Reposition lid | ||
| Air / Steam escaping from around the floating valve | Food deposits stuck on float valve seal | Clean float valve seal |
| Floating valve seal damaged or worn out | Replace valve seal | |
| Float valve will not rise The pressure | ure limit valve is not sitting in place or the pressure release control ring under the lid handle not turned to CLOSED position. | Set pressure limit valve in place and rotate pressure release control ring to CLOSE position. |
| Insufficient volume of food and liquid in the cooking pot | Check all seals for damage or wear | |
| Air/ Steam escaping around the lid rim and around pressure limit valve | Call Consumer Service Centre 1300373199 | |
| E1 appears on the display Sensor | open circuit Call Consumer Service Centre 1300373199 | |
| E2 appears on the display Sensor | short circuit Call Consumer Service Centre 1300373199 | |
| E4 appears on the display Pressure | switch faulty Call Consumer Service Centre 1300373199 | |
| E5 appears on the display The lid | not full closed Re-close the lid completely | |
Note: These time specifications are for reference only and may vary depending on the circumstances.
Pressure Cooking Timetable for Rice and Grains
| Rice & Grain Water Quantity (Grain : Water ratios) Cooking Time (in Minutes) | ||
| Barley, pearl 1:4 25-30 | ||
| Barley, pot 1:3~1:4 25-30 | ||
| Porridge, thick 1:4~1:5 15-20 | ||
| Porridge, thin 1:6~1:7 15-20 | ||
| Couscous 1:2 5-8 | ||
| Corn, dried, half 1:3 25-30 | ||
| Kamut, whole 1:3 10-12 | ||
| Oats, quick cooking 1:1 2/3 6 | ||
| Oats, steel-cut 1:1 2/3 10 | ||
| Quinoa, quick cooking | 1:2 | 8 |
| Rice, basmati | 1:1.5 8 | |
| Rice, brown | 1:1.5 | 10-15 |
| Rice, white | 1:1.5 8 | |
| Rice, wild | 1:3 25-30 | |
| Sorghum | 1:3 20-25 | |
| Spelt berries | 1:3 15-20 | |
| Wheat berries 1:3 25-30 | ||
Pressure Cooking Timetable for Dried Beans, Legume and Lentils
| Dried Beans & Legume Dry, Cooking Time (in Minutes) | Soaked, Cooking Time (in Minutes) | |
| Adzuki 25-40 15-20 | ||
| Anasazi 20-25 15-20 | ||
| Black beans 25-40 15-20 | ||
| Black-eyed peas 25-40 15-20 | ||
| Chickpeas (chick peas, garbanzo bean or kabuli) | 35-40 20-25 | |
| Cannellini beans 35-40 20-25 | ||
| Soy beans 25-30 20-25 | ||
| Scarlet runner 20-25 10-15 | ||
| Peas 15-20 10-15 | ||
| Pinto beans 25-30 20-25 | ||
| Navy beans 25-30 20-25 | ||
| Kidney beans, white 35-40 20-25 | ||
| Kidney beans, red 25-30 20-25 | ||
| Lima beans 20-25 10-15 | ||
| Lentils, yellow, split (moong dal) | 15-18 | N/A |
| Lentils, red, split | 15-18 | N/A |
| Lentils, green, mini (brown) | 15-20 | N/A |
| Lentils, French green | 15-20 | N/A |
| Great Northern beans | 25-30 20-25 | |
| Gandules (pigeon peas) | 20-25 15-20 | |
Pressure Cooking Timetable for Meat (Poultry, Beef, Pork and Lamb)
| Meat Dry, Cooking Time (in Minutes) | |
| Beef, stew meat 15-20 | |
| Beef, meat ball 10-15 | |
| Beef, dressed 20-25 | |
| Beef, pot roast, steak, rump, round, chuck, blade or brisket, large | 35-40 |
| Beef, pot roast, steak, rump, round, chuck, blade or brisket, small chunks | 25-30 |
| Beef, ribs 25-30 | |
| Beef, shanks 25-30 | |
| Beef, oxtail 40-50 | |
| Chicken, breasts 8-10 | |
| Chicken, whole 20-25 | |
| Chicken, cut up with bones 10-15 | |
| Chicken, drumsticks, legs or thighs 10-15 | |
| Cornish Hen, whole 20-30 | |
| Duck, cut up with bones 15-20 | |
| Duck, whole 25-30 | |
| Ham slice 9-12 | |
| Ham picnic shoulder 25-30 | |
| Lamb, cubes, | 10-15 |
| Lamb, stew meat | 10-15 |
| Lamb, leg | 35-45 |
| Pheasant | 20-25 |
| Pork, loin roast | 55-60 |
| Pork, butt roast | 45-50 |
| Pork, ribs | 20-25 |
| Turkey, breast, boneless | 15-20 |
| Turkey, breast, whole, with bones | 25-30 |
| Turkey, drumsticks (leg) | 15-20 |
| Veal, chops | 5-8 |
| Veal, roast | 35-45 |
| Quail, whole | 8-10 |
Pressure Cooking Timetable for Seafood and Fish
| Seafood and Fish Fresh, Cooking Time (in Minutes) Frozen, Cooking Time (in Minutes) | |
| Crab 3-4 5-6 | |
| Shrimp or Prawn 1-2 2-3 | |
| Seafood soup or stock 6-7 7-9 | |
| Mussels 2-3 4-5 | |
| Lobster 3-4 4-6 | |
| Fish steak 3-4 4-6 | |
| Fish fillet 2-3 3-4 | |
| Fish, whole (trout, snapper, etc.) | 5-6 7-10 |
Fresh or Frozen Vegetable Pressure Cooking Timetable
| Vegetable Fresh Cooking Time | (in Minutes) | Frozen, Cooking Time (in Minutes) |
| Artichoke, whole, trimmed without leaves 9- | 11 11 - 13 | |
| Artichoke, hearts 4-5 5-6 | ||
| Asparagus, whole or cut 1-2 2-3 | ||
| Beans, green/yellow or wax, whole, trim ends and strings | 1-2 2-3 | |
| Beets, small roots, whole | 11-13 | 13-15 |
| Beets, large roots, whole 20-25 | 25-30 | |
| Broccoli, florets | 2-3 3-4 | |
| Broccoli, stalks | 3-4 4-5 | |
| Brussel sprouts, whole | 3-4 4-5 | |
| Cabbage, red, purple or green, shredded 2- | 3 3-4 | |
| Cabbage, red, purple or green, wedges | 3-4 4-5 | |
| Carrots, sliced or shredded | 1-2 2-3 | |
| Carrots, whole or chunked | 2-3 3-4 | |
| Cauliflower florets | 2-3 3-4 | |
| Celery, chunks 2-3 3-4 | ||
| Collard | 4-5 5-6 | |
| Corn, kernels | 1-2 2-3 | |
| Corn, on the cob | 3-4 4-5 | |
| Eggplant, slices or chunks | 2-3 3-4 | |
| Endive | 1-2 2-3 | |
| Escarole, chopped 1-2 2-3 | ||
| Green beans, whole 2-3 3-4 | ||
| Greens (beet greens, collards, kale, spinach, swiss chard, turnip greens), chopped | 3-6 4-7 | |
| Leeks 2-4 3-5 | ||
| Mixed vegetables 2-3 3-4 | ||
| Okra 2-3 3-4 | ||
| Onions, sliced 2-3 3-4 | ||
| Parsnips, sliced 1-2 2-3 | ||
| Parsnips, chunks 2-4 4-6 | ||
| Peas, in the pod 1-2 2-3 | ||
| Peas, green 1-2 2-3 | ||
| Potatoes, in cubes 7-9 9-11 | ||
| Potatoes, whole, baby 10-12 12-14 | ||
| Potatoes, whole, large 12-15 15-19 | ||
| Pumpkin, small slices or chunks | 4-5 6-7 | |
| Pumpkin, large slices or chunks | 8-10 | 10-14 |
| Rutabaga, slices | 3-5 4-6 | |
| Rutabaga, chunks | 4-6 6-8 | |
| Spinach | 1-2 3-4 | |
| Squash, acorn, slices or chunks | 6-7 8-9 | |
| Squash, butternut, slices or chunks | 8-10 | 10-12 |
| Sweet potato, in cubes 7-9 9-11 | ||
| Sweet potato, whole, small | 10-12 12-14 | |
| Sweet potato, whole, large | 12-15 15-19 | |
| Sweet pepper, slices or chunks | 1-3 2-4 | |
| Tomatoes, in quarters | 2-3 4-5 | |
| Tomatoes, whole | 3-5 5-7 | |
| Turnip, chunks | 2-4 4-6 | |
| Yum, in cubes | 7-9 9-11 | |
| Yum, whole, small | 10-12 12-14 | |
| Yum, whole, large 12-15 15-19 | ||
| Zucchini, slices or chunks | 2-3 3-4 |
Pressure Cooking Time Table for Fruits
| Fruits Fresh Cooking Time (in Minutes) Dried, Cooking Time (in Minutes) | ||
| Apples, in slices or pieces 2-3 | 3-4 | |
| Apples, whole 3-4 4-6 | ||
| Apricots, whole or halves 2-3 | 3-4 | |
| Peaches 2-3 4-5 | ||
| Pears, whole 3-4 4-6 | ||
| Pears, slices or halves 2-3 4-5 | ||
| Prunes 2-3 4-5 | ||
| Raisins N/A 4-5 | ||
Specifications of product
Power: 220-240V\~50Hz 1000W
Capacity: 6.0L
Pressure: 40-70Kpa.
NOTE: As a result of continual improvements, the design and specifications of the product within may differ slightly to the unit illustrated on the packaging.
Recipes
Multigrain Rice
- 3 cups brown rice, wild rice or other whole grains, rinsed
• 2 tablespoons of oil (olive oil preferred)
• 9 cups of water
• 1 ½ teaspoons salt (optional)
Beer Potato Fish
• 1/2 kg fish fillet
- 4 medium size potatoes, peeled and diced 1 cup beer
• 1 red pepper sliced
- 1 tablespoon oil
• 1 tablespoon oyster flavored sauce
• 1 tablespoon rock candy
- 1 teaspoon salt
Red Bean Soup Recipe
• 2 cups of red beans
• 1/2 cup of dry lotus seeds, with the sprouts removed
• 1/2 cup of dry chestnuts (Optional)
- 2 small pieces of dried mandarin or lemon peel, broken into tiny pieces (Optional)
- 8\~12 cups of water, depending on whether you prefer thick or thinner soup
Duck Cooked With vegetables
• 1 medium size duck
• 1 cucumber cut into pieces
• two carrots cut into pieces
- 1 tablespoon cooking wine or 2 tablespoons wine
- 2 cups water
• 1 small piece of ginger cut into pieces
• 2 teaspoons salt
Chicken With Shallots And Balsamic Vinegar
• 500g shallots, peeled
• 500g Maryland chicken
• 2 tablespoons unsalted butter
• 2 tablespoons olive oil
• 30ml dry red wine
• 125ml chicken stock
• 30ml balsamic vinegar
- Salt and pepper

Gerard Sourcing & Manufacturing
GSM Retail Group
GSM Retail Group has a policy of continual improvement throughout the product range. As such the unit contained within may differ slightly from the unit illustrated on the pack.
MADE IN CHINA for GSM Retail Group Mistral is a registered trademark of GSM Retail Group
Cat. No. MPRC601B
December 2020
- Litre Multi-function Pressure Cooker
- Important Safeguards
- For Your Safety
- Compulsory Warning
- Save These Instructions
- Features of Your Multi-function Pressure Cooker
- Control Panel
- START/CANCEL Button
- '+' and '-' Buttons
- Dedicated cooking mode buttons
- Preset Cook Button:
- Manual Cook:
- LED Display:
- Standby mode
- Keep Warm mode
- Preset Cook
- Dedicated Cooking Modes (Soup, Rice etc.)
- Indicator Lights
- 1.Heating indicator light
- Keep Warm indicator light
- Less, Normal, More indicator light
- Getting To Know Your Electric Pressure Cooker
- Before First Use
- Instructions For Use
- Operating Instructions
- Preset Cook Function
- “+,-” Button
- Automatic Keep Warm Feature
- To Stop Or Cancel
- To Open Lid
- Open The Lid:
- Lid Rest (Stand)
- Pressure Cooking
- Rice
- Soup
- Poultry
- Meat/Stew
- Porridge
- Steam
- Beans/Chili
- Slow Cook
- Brown/Saute
- Manual Cook
- Safety Devices
- Open-and-Close Lid Safety Device
- Pressure Control Device
- Pressure Limit Valve
- Anti-Block Cover
- Pressure Relief Device
- Thermostat
- Thermal Fuse
- Magnetic Power Control Switch
- Cleaning
- Pressure Cooking Time Table for Fruits
- Specifications of product
- Recipes
- Multigrain Rice
- Beer Potato Fish
- Red Bean Soup Recipe
- Duck Cooked With vegetables
- Chicken With Shallots And Balsamic Vinegar
- GSM Retail Group
Brand : MISTRAL
Model : MPRC601B
Category : Multicooker