
HPA24RO-3-1LL-M6 - Refrigerator Kalamazoo - Free user manual and instructions
Find the device manual for free HPA24RO-3-1LL-M6 Kalamazoo in PDF.


| Product Type | Undercounter Refrigerator |
| Model | HPA24RO-3-1LL-M6 |
| Brand | Kalamazoo |
| Series | Signature Series |
| Total Gross Volume | 147.25 litres |
| Total Storage Volume | 135.35 litres |
| Temperature Range (Refrigerator) | -1°C to 6°C |
| Factory Set Point | 3°C |
| Climate Class | Not specified, but suitable for outdoor use down to 3°C daily low |
| Installation | Outdoor or indoor; requires clearance and proper ventilation |
| Material | Commercial grade stainless steel interior and exterior |
| Door Type | Solid door (model dependent; manual mentions solid wood or stainless steel) |
| Interior Light | Adjustable blue and white LED lighting |
| Digital Temperature Control | Yes, with setpoint adjustment, min/max temperature storage, defrost, on/off, and keyboard lock |
| Master Power Switch | Yes, located behind louvered toe kick |
| Refrigerant | Flammable gas blowing agent for insulation; specific refrigerant not mentioned |
| Condenser Cleaning Interval | Every 3 months |
| Winterization Temperature Threshold | Below 3°C daily low for refrigerator models |
| Warranty - Basic | 3 years (or 2 years if not registered within 90 days) |
| Warranty - Extended (Hermetically Sealed System) | 6 years total (including basic period) |
| Country of Applicability | Australia and New Zealand |
| Certification | AS/NZS 4474.1:2007 |
| Power Supply | Standard household electrical (specific voltage not listed, but typical for region) |
| Weight | Not specified; estimated ~30-40 kg |
| Dimensions (HxWxD) | Not specified; typical undercounter dimensions ~34" x 24" x 24" (estimate) |
Frequently Asked Questions - HPA24RO-3-1LL-M6 Kalamazoo
User questions about HPA24RO-3-1LL-M6 Kalamazoo
0 question about this device. Answer the ones you know or ask your own.
Ask a new question about this device
Download the instructions for your Refrigerator in PDF format for free! Find your manual HPA24RO-3-1LL-M6 - Kalamazoo and take your electronic device back in hand. On this page are published all the documents necessary for the use of your device. HPA24RO-3-1LL-M6 by Kalamazoo.
USER MANUAL HPA24RO-3-1LL-M6 Kalamazoo
USE AND CARE GUIDE USE AND CAR
Kalamazoo RefrigerationKal
AUSTRALIA AND NEW ZEALAND AUSTRAL

TABLE OF CONTENTS
Warranty Information 2
Safety Information 4
Operation 5
Digital Temperature Control 5
Outdoor Model Start-Up/Winterizing ....7
CONGRATULATIONS
Congratulations on your purchase of a Kalamazoo high quality residential refrigeration product. Kalamazoo's innovative product offering gives you the opportunity to enjoy the functionality and user friendliness in just about any room of your home, including kitchens, bedrooms, entertainment rooms, basements and even bathrooms.
All Kalamazoo products are built with commercial grade stainless steel, providing you with the beauty and durability for a lifetime of use. This installation guide will show you how to properly install your new Kalamazoo product.
We dedicate considerable time to ensure that our products provide the highest level of customer satisfaction. If, however, service is required, call Winning Appliances at +61 (0) 2 9694 0300. For your own protection, never return merchandise for credit without our approval.
We thank you again for selecting a high quality Kalamazoo product. We hope you enjoy using it.
Model Number: ____
Serial Number: ____
Purchase Date: ____
Dealer Name/Address:
Phone Number: ____


Stainless Steel Care and Cleaning 8
Product/Replacement Part Information....9
Troubleshooting....10
KALAMAZOO RESIDENTIAL REFRIGERATION PRODUCTS WARRANTY:
Winning Appliances warrants to the original retail purchaser that during the Basic Warranty Period, Kalamazoo's products will be free from defects in material and workmanship, and during the Extended Warranty Period, the hermetically sealed refrigeration system contained in Kalamazoo's undercounter refrigerator will be free from defects in material and workmanship. This system consists entirely of the compressor, condenser, drier, connecting tubing, evaporator and hot gas bypass valve.
The Basic Warranty Period is as follows:
- For a new product or floor display model, other than the H50IM Clear Ice Maker: The three (3) year period commencing on the date of purchase by the original retail purchaser, except that the Basic Warranty Period will be the two (2) year period commencing on the date of purchase by the original retail purchaser if the purchase of the product is not registered with Winning Appliances within ninety (90) days of purchase in the manner described below.
The Extended Warranty Period applies only to the hermetically sealed refrigeration system contained in Kalamazoo's undercounter refrigerators. The Extended Warranty Period is the portion of the six (6) year period commencing on the date of purchase by the original retail purchaser that is not covered by the Basic Warranty Period.
REMEDY:
For a new product or floor display model, other than the H50IM Clear Ice Maker: The three (3) year period commencing on the date of purchase by the original retail purchaser, except that the Basic Warranty Period will be the two (2) year period commencing on the date of purchase by the original retail purchaser if the purchase of the product is not registered with Kalamazoo within ninety (90) days of purchase in the manner described below.
IMPORTANT!
Read and understand all information in this manual before attempting the installation. All plumbing and electrical work must be performed by a qualified technician and conform to all applicable state and local codes.
REGISTRATION:
Your Kalamazoo product can be registered at KalamazooGourmet.com.
OTHER TERMS AND CONDITIONS:
This Warranty applies only to products installed in the six states of Australia and New Zealand.
To obtain the warranty coverage described in this Warranty, Kalamazoo or its authorized distributor or dealer must receive written notice of the warranty claim within the applicable warranty period. To receive parts and/or service and the name and telephone number of the nearest Kalamazoo authorized service representative, please contact Winning Appliances Service at +61 (0) 2 9694 0300. In addition, you can notify Winning Appliances of a warranty claim by visiting the Winning Appliances website at WinningAppliances.com.au and filling out and submitting the support request form that appears there. Please see KalamazooGourmet.com for full warranty statement.
This Warranty applies only to the original retail purchaser of the Kalamazoo product, and may not be assigned or transferred.
This Warranty does not apply to:
• Damage to Products occurring during transportation.
- Products that are used in a manner that is not normal residential or light commercial use.
- Products that are: improperly installed; misused or abused; operated with low voltage; wired in a manner not conforming to electrical codes; not properly operated in accordance with Kalamazoo's instructions; not cleaned or maintained in accordance with Kalamazoo's instructions; modified; or damaged by lightning or other acts of nature.
- Consumable items such as light bulbs.
- Cosmetic damage.
- Adjustments to controls, door reversal, cleaning the condenser or other routine maintenance.
- Products for which the original proof of purchase, delivery date or serial number cannot be verified.
- Products for which the defective parts are not returned for inspection if requested by Kalamazoo.
- Damage to other property caused by the products, including but not limited to loss of food due to spoilage and damage caused by water leakage.
THIS LIMITED WARRANTY IS IN LIEU OF ANY OTHER WARRANTY, EXPRESSED OR IMPLIED, INCLUDING BUT NOT LIMITED TO ANY IMPLIED WARRANTY OF MERCHANTABILITY OR FITNESS FOR A PARTICULAR PURPOSE; PROVIDED HOWEVER, THAT TO THE EXTENT REQUIRED BY LAW, IMPLIED WARRANTIES ARE
INCLUDED BUT DO NOT EXTEND BEYOND THE DURATION OF THE EXPRESS WARRANTY FIRST SET ABOVE.
KALAMAZOO'S SOLE LIABILITY AND YOUR EXCLUSIVE REMEDY UNDER THIS WARRANTY ARE SET FORTH IN THE PARAGRAPH ENTITLED "REMEDY" SET FORTH ABOVE.
KALAMAZOO SHALL HAVE NO LIABILITY WHATSOEVER FOR ANY INCIDENTAL, CONSEQUENTIAL OR SPECIAL DAMAGES ARISING FROM THE SALE, USE OR INSTALLATION OF THE PRODUCT OR FROM ANY OTHER CAUSES WHATSOEVER, WHETHER BASED ON WARRANTY (EXPRESS OR IMPLIED) OR OTHERWISE BASED ON CONTRACT, TORT OR ANY OTHER THEORY OF LIABILITY. IN NO EVENT SHALL KALAMAZOO'S LIABILITY WITH RESPECT TO A PRODUCT EXCEED THE PURCHASE PRICE OF THE PRODUCT.
Some states do not allow limitations on how long an implied warranty lasts, or the exclusion or limitation of incidental or consequential damages, so the above limitations and exclusions may not apply to you. This Warranty gives you specific legal rights, and you may also have other rights, which vary from state to state.
ADDITIONAL INFORMATION
Per AS/NZS 4474.1:2007 Marking Requirements 4.3, the food storage compartment type for all models is FRESH FOOD COMPARTMENT.
Per AN/NZS 4474.1:2007 Marking Requirements 4.5, the following information shows the rated gross and storage volumes for models included in this manual.
| Model Total Gross | Volume | Total Storage Volume |
| HPA24 147.25 litres 135.35 litres | ||
| HHA24 87.78 litres 79.45 litres |
SAFETY
PLEASE READ all instructions completely before attempting to install or operate the unit. Take particular note of the DANGER, WARNING and CAUTION information in the manual. The information is important for the safe and efficient installation, operation and care of your Kalamazoo unit.
DANGER
Indicates a hazard that WILL result in serious injury or death if precautions are not followed.
WARNING
Indicates a hazard MAY cause serious injury or death if precautions are not followed.
CAUTION
Indicates a hazard where minor injury or product damage may occur if precautions are not followed.
BEFORE USE
DANGER Do not store explosive substances such as aerosol cans with a flammable propellant in this appliance.
A DANGER If the supply cord is damaged, it must be replaced by the manufacturer, its service agent or similarly qualified persons in order to avoid a hazard.
WARNING This product uses a flammable gas blowing agent for the insulation. This product must be disposed of in accordance with all federal and local codes that have jurisdiction.
WARNING This appliance is not intended for use by persons (including children) with reduced physical, sensory or mental capabilities, or lack of experience and knowledge, unless they have been given supervision or instruction concerning use of the appliance by a person responsible for their safety. Children should be supervised to ensure that they do not play with the appliance.
WARNING When positioning the appliance, ensure the supply cord is not trapped or damaged.
WARNING Do not locate multiple portable socket-outlets or portable power supplies at the rear of the appliance.
CAUTION This appliance is intended to be used in household and similar applications such as:
- staff kitchen areas in shops, offices and other working environments;
- farm houses and by clients in hotels, motels and other residential type environments;
• bed and breakfast type environments;
• catering and similar non-retail applications.
OPERATION
MASTER SWITCH
Signature Series products come equipped with a master power switch located behind the louvered toe kick. Remove the toe kick to turn power on or off to the unit.
INTERIOR LIGHT
Door units are equipped with an interior light that illuminate when the door is opened. All HPA24 and HHA24 models come standard with adjustable blue and white LED lighting. The cabinet also comes equipped with a manual light switch for displaying the products through a glass door.
Always ensure that the manual light switch is in the OFF position before closing a solid wood or stainless steel door. If manual light switch is left on for an extended period of time, it may increase the cabinet temperature, and cause the refrigeration system to run harder.
LOADING PRODUCT
Before storing perishables, turn unit on and allow it to operate for a minimum of 24 hours to allow temperatures to stabilize.
When loading items into the unit, do not block internal louvers and fan guard openings or performance will be decreased.
CHECKING PRODUCT TEMPERATURE
1). To accurately check the temperature of product stored in the refrigerated compartment, insert an accurate thermometer into a plastic unbreakable bottle, partially filled with water. Tighten bottle cap securely.
2). Place the bottle in the desired area for 24 hours. Refrain from opening the unit during the testing period. After 24 hours, check the temperature of the water. Adjust the temperature accordingly using the following procedures:
DIGITAL TEMPERATURE CONTROL

Figure 1. Digital Temperature Controller
Kalamazoo Signature Series and Signature Sottile units come standard with state-of-the-art digital control. The following information is instructions on how to use the controller.
Programming Button Definitions:

SET button

DEFROST button (melting snowflake)

UP arrow

DOWN arrow

ON/OFF button
To Set Target Temperature
Press and release the SET button. Display will show the current temperature setpoint.
To Change Setpoint Temperature
-
Press and hold the SET button until the display shows the current setpoint temperature with the "C" flashing.
-
Use the UP and DOWN arrow button to scroll to the desired temperature.
To Set Maximum Stored Temperature
Press the UP arrow button to see the maximum stored temperature. To reset the maximum stored temperature, while displayed, press and hold the SET button until 'rst' flashes in the display.
To Set Minimum Stored Temperature
Press the DOWN arrow button to see the minimum stored temperature. To reset the minimum stored temperature, while displayed, press and hold the SET button until 'rst' flashes in the display.
On/Off
Press the ON/OFF button to turn the unit on or off.
Key Combinations:

Press the UP and DOWN arrow buttons to lock and unlock the keyboard
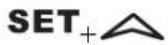
Press the SET and UP arrow buttons simultaneously to return to room temperature display.
NOTE: Dependent on the model and configuration, the controllers have been programmed to only allow a temperature adjustment within a specified range.
| Signature Series – HPA24 Models | |||
| Model Min Temp Set Max Temp Set Factory Set Point | |||
| HPA24R -1°C 6°C 3°C | |||
| HPA24B -1°C 9°C 6°C | |||
| HPA24W 4°C 20°C 7°C | |||
| Signature Sottile – HHA24 Models | |||
| Model Min Temp Set Max Temp Set Factory Set Point | |||
| HHA24RS -1°C 6°C 3°C | |||
| HHA24BS -1°C 9°C 6°C | |||
| HHA24WS 4°C 20°C 7°C | |||
LED Functions
The following table describes LED functions
| LED Mode | Function | |
 | ON Compressor is on | |
 | Flashing | Anti-short cycle delay is on |
 | ON | Defrost is on |
 | ON | Alarm is on |
 | Flashing | You are in the process of programming the unit |
MAINTENANCE
SEASONAL MAINTENANCE FOR OUTDOOR MODELS
Winterizing
This process should occur when the daily low temperatures is at or below the temperatures stated below:
Refrigerator models: 3°C
Beverage Center: 6°C
Wine Reserve: 7°C
It is best to winterize your unit before the low temperatures listed above.
- Turn the unit to OFF position by pressing the OFF button on the controller. The controller displays the word "OFF" and, for Signature Series models, turn the master switch located behind the grille off (if the power cord is accessible, unplug the power cord. If not, turn off the circuit breaker to the electrical receptacle the cabinet is plugged into).
- Remove all contents from the unit.
- Remove the front grille.
- Clean the condenser by using a vacuum cleaner to remove loose debris (leaves, dirt, etc.) that may have accumulated inside the grille.
- Reinstall the front grille.
- Clean the interior of the unit using stainless steel cleaner and polish (see page 7).
- Clean the exterior of the unit using stainless steel cleaner and polish (see page 7).
NOTE: Do not place a cover over the unit. While not required, you may choose to remove the unit from the outdoor location and store indoors.
CAUTION
Operating the unit at temperatures lower than those recommended will void the warranty.
Spring Start-Up
This process should occur after the daily low temperatures is above the temperatures stated below:
Refrigerator models: 3°C
Beverage Center: 6°C
Wine Reserve: 7°C
- Remove the grille.
- Check the condensing unit to ensure it is clear of loose debris, and clean as necessary with a vacuum cleaner.
- Re-attach front grille to the unit.
- Clean the interior of the unit using stainless steel cleaner and polish (see page 7).
- Clean the exterior of the unit using stainless steel cleaner and polish (see page 7).
- Plug the unit into the electrical receptacle or turn on the circuit breaker.
- Turn on the master switch located behind the grille if model is Signature Series. Press the OFF button one time to turn the unit on. The controller display will show the actual temperature inside the cabinet.
- The cooling process will begin to bring the unit to the set temperature. It's recommended you run the unit for 24 hours to stabilize the operating temperature before using.
DANGER
Never attempt to repair or perform maintenance on the unit until the main electrical power to the unit has been disconnected!
STAINLESS STEEL CARE & CLEANING
General
Stainless steel is a "passive" metal because it contains other metals like chromium, nickel and manganese that stabilize the atoms. Chromium provides an invisible passive film that covers the steel surface, acting as a shield against corrosion. As long as the film is intact and not contaminated, the metal is passive and stainless. If the passive film of stainless steel has been broken, equipment can start to corrode and rust.
Three materials or processes can break down stainless steel's passive layer and allow corrosion to occur:
- Mechanical abrasion
- Deposits and water
- Chlorides
Mechanical abrasion refers to items that will scratch a steel surface. Steel pads, wire brushes and scrapers are prime examples.
Water comes out of the faucet in varying degrees of hardness. Hard water may leave spots. When allowed to sit, these deposits will break down the passive chromium layer and rust stainless steel. Other deposits from food preparation must be promptly removed with an appropriate cleaning agent.
Chlorides are found nearly everywhere. They are in water, food and table salt. Household and industrial cleaners are the worst offenders.
Preventing Stainless Steel Rust
Use non-abrasive tools to clean stainless steel products. Soft cloths and plastic scouring pads will not harm the steel's passive layer.
Clean with polish lines. Some stainless steels have visible polishing lines or "grain". When visible lines are present, always scrub in a motion parallel to the lines. When the grain cannot be seen, polish in a consistent straight pattern and not in a circular motion.
Use alkaline, alkaline chlorinated or non-chloride containing cleaners. While many traditional cleaners are loaded with chlorides, the industry is providing an ever-increasing choice of non-chloride cleaners. If you are not sure of chloride content in the cleaner being used,
contact your cleaner supplier. If your present cleaner contains chlorides, ask your supplier for an alternative. Avoid cleaners containing quaternary salt; it also can attack stainless steel and cause pitting and rusting.
Keep food equipment clean. Use alkaline, alkaline chlorinated or non-chloride cleaners at recommended strength. Clean frequently to avoid build-up of hard, stubborn stains. The single most likely cause of damage is chlorides in the water. Remember, adding heat to cleaners that contain chlorides dramatically increases their effect on stainless steel.
If chlorinated cleaners are used, immediately rinse and wipe equipment and supplies dry. The sooner you wipe standing water, especially when it contains cleaning agents, the better. After wiping equipment down, allow it to air dry. Oxygen helps maintain the stainless steel passive film.
Cleaning the Cabinet Interior/Exterior
CAUTION
NEVER use hydrochloric acid (muriatic acid) on stainless steel.
Do not use abrasive cleansers or cloths on any interior or exterior surfaces or removeable parts.
Glass panels may be cleaned using any standard glass cleaner available on the market.
To clean interior and exterior non-metallic surfaces and removable parts, wash with mild solution of soap and lukewarm water with a little baking soda. Rinse and dry thoroughly. Avoid getting water on the lights, controllers, fan motors and unfinished wood wine rack faces.
Cleaning the Condenser
The condenser (located behind the front grille cover) should be cleaned every three (3) months. Use a soft bristle brush and vacuum to remove dust and lint.
CAUTION
Avoid damaging or crushing the condenser fins or tubing.
Recommended Cleaners for Specific Situations
| Job Cleaning Agent Comments | ||
| Routine cleaning Soap, ammonia, detergent Apply with sponge or soft cloth | ||
| Fingerprints and smears Areal 20, Lac-O-Nu, Lumin Wash, O-Cedar Cream Polish | Provides barrier film to minimize fingerprints. Can be used on all finishes. Rub the surface with a cloth as directed on the package. | |
| Stubborn stains and discolorations AllChem Con | Centrated Cleaner, Samae, Twinkle, Cameo Copper Cleaners, Grade FFF Italian Pumice Whiting, Steel Bright, Lumin Cleaner, Zud Restoro, Sta-Clean, Highlite Cooper's Stainless Steel Cleaner or Revere Stainless Steel Cleaner | Apply with a damp sponge or cloth, then rinse with clear water and wipe dry. |
| Old Dutch, Lighthouse Sunbrite, Wyandotte Bab-O, Gold Dust, Sapollo, Bon Ami or Comet | For these household cleaners, rub with a damp cloth. They may contain chlorine bleaches so rinse thoroughly after use and wipe dry. | |
| Liquid NuSteel or Dubois Temp For these products, rub the surface with a dry cloth using only a small amount of cleanser. Rinse with water and dry. | ||
| Heat tint or heavy discoloration Penny-Brite, Cooper Brite, Paste Nu-Steel, Dubois Temp or Tarnite | Rub onto surface with a dry cloth | |
| Bar Keepers Friend, Revere Stainless Steel Cleaner, Allen Polish, Steel Bright Wyandotte Bab-O or Zud | When using these cleaners, apply with a damp sponge or cloth, rinse thoroughly and wipe dry. | |
| Tenacious deposits, rust, discoloration, industrial atmospheric stains | Oakite No. 33 Dilac, Texo NY, Flash-Klenz Caddy Cleaner, Turco Scale 4368 or Permag 57 | Swab and soak with a clean cloth. Let stand for 15 minutes or more according to directions on package, then rinse and wipe dry. |
| Rust discoloration or corrosion caused by cleaning agents containing hydrochloric (muriatic) acid or chlorine bleach | 3M Scotch Pad, type A, grade "fine" Clean off the surface soil using cleaning methods above. Then rub discolored or corroded areas lightly with a dry pad. | |
| Use of property names is intended only to indicate a type of cleaner and does not constitute an endorsement. Omission of any proprietary cleaner does not imply its inadequacy. All products should be used in strict accordance with instructions on the package.NOTE: Do NOT use steel wool or scouring pads to clean stainless steel. | ||
For Product Information
- Contact your selling dealer
• Inquire via the web at KalamazooGourmet.com - Call +61 (0) 2 9694 0300 for product assistance from Winning Appliances.
- Email Winning Appliances at Service@Winning.com.au
For Service, Replacement Parts and Accessories
- Use only genuine Kalamazoo replacement parts and accessories. Genuine Kalamazoo parts and accessories are designed to work correctly with Kalamazoo products and offer superior service life. The use of non-Kalamazoo parts can damage the unit and may void the warranty.
- Check the model and serial number of your unit located on the label attached to the inside top of the cabinet. Call +61 (0) 2 9694 0300 for service from Winning Appliances.
- Email Winning Appliances at Service@Winning.com.au
TROUBLESHOOTING
If the unit appears to be malfunctioning, read through the OPERATION section of this manual first. If the problem persists, check this troubleshooting section to see if you can refer to the cause and remedy of the problem and resolve it without a service call.
! DANGER
Never attempt to repair or perform maintenance on the unit until the main electrical power to the unit has been disconnected!
| Problem Cause Solution | ||
| No interior light LED board is inoperable • Contact Winning Appliances service at | +61 (0) 2 9694 0300 | |
| Light stays on when door switch is closed Manual switch is on • Turn manual switch off | ||
| Door is not making contact with the door switch | • Make sure the door closes tightly | |
| Noisy operation Soft sounds from compressor, fan motor and valves heard | • Normal operation | |
| LED Controller display is flashing "P1" Thermostat probe has failed • Contact Winning Appliances service at +61 (0) 2 9694 0300 | ||
| LED Controller display is flashing "P2" | Evaporator probe has failed | • Contact Winning Appliances service at +61 (0) 2 9694 0300 |
| LED Controller display is flashing "HA" | Internal compartment has exceeded the high temperature alarm preset value for over 30 minutes. | • Make sure the door is completely closed.• Check the door gasket seal. Replace if necessary.• Check the condenser and clean it if necessary.• Make sure the louvered plate is unobstructed. If surrounding ambient temperature has recently changed dramatically, the compartment may be affected.• Make sure the interior light is off.• Warm product was recently placed in the cabinet. Wait 24 hours for the product to chill and then recheck the temperature. |
| LED Controller display is flashing "LA" Internal compartment has exceeded the low temperature alarm preset value for over 30 minutes. | • Make sure the door is completely closed.• Check the door gasket seal. Replace if necessary.• If the surrounding ambient temperature has recently changed dramatically, the compartment temperature may be affected. | |
| Unit is not running | No power is going to the unit. | • Home circuit breaker was tripped. Reset the circuit breaker.• ON/OFF keypad is turned off. Turn it on.• If it is a Dual-Zone model, check the Dual-Zone power switch (see page 4). |
| Condenser is dirty. | • Clean the condenser | |
| Compartments are warmer than usual Control | preset is set to warm • Lower the setpoint temperature. Refer to changing the set point for the specific model | |
| Light is staying on • Turn the manual light switch off. | ||
| Condenser is dirty or obstructed • Clean the condenser and clear obstruction. | ||
| The door is open or has been opened more frequently lately. | • Wait 24 hours and recheck the temperature. | |
| Internal louvers and/or the fan guard is obstructed. | • Reset the preset temperature if necessary – refer to page 5 and 6 of this guide.• Make sure the louvers and/or the fan are not obstructed. | |
| Warm product was recently placed in the cabinet. | • Wait 24 hours for product to chill, then recheck the temperature. | |
| System runs for a long period of time. Condenser is dirty or obstructed. • Clean the condenser and clear the obstruction. | ||
| Condensation forms inside the compartments | High humidity and/or frequent door opening • Normal operation | |
| Door is not closing and sealing properly • Make sure the door is closing properly.Check the door seal and replace if necessary.• If condensation persists, contact Winning Appliances service at +61 (0) 2 9694 0300 | ||


- KALAMAZOO REFRIGERATIONKAL
- TABLE OF CONTENTS
- CONGRATULATIONS
- KALAMAZOO RESIDENTIAL REFRIGERATION PRODUCTS WARRANTY
- REMEDY
- IMPORTANT
- REGISTRATION
- OTHER TERMS AND CONDITIONS
- ADDITIONAL INFORMATION
- SAFETY
- DANGER
- WARNING
- CAUTION
- BEFORE USE
- OPERATION
- MASTER SWITCH
- INTERIOR LIGHT
- LOADING PRODUCT
- CHECKING PRODUCT TEMPERATURE
- PROGRAMMING BUTTON DEFINITIONS
- TO SET TARGET TEMPERATURE
- TO CHANGE SETPOINT TEMPERATURE
- TO SET MAXIMUM STORED TEMPERATURE
- TO SET MINIMUM STORED TEMPERATURE
- ON/OFF
- KEY COMBINATIONS
- LED FUNCTIONS
- MAINTENANCE
- SEASONAL MAINTENANCE FOR OUTDOOR MODELS
- WINTERIZING
- SPRING START-UP
- STAINLESS STEEL CARE & CLEANING
- GENERAL
- PREVENTING STAINLESS STEEL RUST
- CLEANING THE CABINET INTERIOR/EXTERIOR
- CLEANING THE CONDENSER
- FOR PRODUCT INFORMATION
- FOR SERVICE, REPLACEMENT PARTS AND ACCESSORIES
- TROUBLESHOOTING
Brand : Kalamazoo
Model : HPA24RO-3-1LL-M6
Category : Refrigerator