
PFF330 - Pet food dispenser Lenoxx - Free user manual and instructions
Find the device manual for free PFF330 Lenoxx in PDF.


| Product Type | Smart Pet Food Dispenser |
| Brand | Lenoxx |
| Model | PFF330 |
| Capacity | 5.5 liters (holds up to 2.5 kg dry food) |
| Food Type | Dry pet food only |
| Power Supply | USB (adapter not included) |
| Connectivity | Wi-Fi 2.4GHz via Smart Life app |
| Bluetooth | Yes (for initial setup) |
| App Control | Yes (Smart Life app for iOS/Android) |
| Scheduled Feeding | Yes, multiple meals per day via app |
| Portion Control | Adjustable servings per feeding |
| Manual Feeding | Instant feeding button on device |
| Voice Recording | Yes, record and play at feeding time |
| Bowl Material | ABS + PP (removable, washable) |
| Head Cover | Removable for filling |
| LED Indicators | Power light (green) and Wi-Fi status (red) |
| Wi-Fi Range | Up to 10 meters (no obstacles) |
| Operating Temperature | -10°C to 55°C (indoor use only) |
| Suitable For | Cats and small to medium dogs |
| Safety Features | Anti-electric shock design, cord management |
| Cleaning | Detachable bowl is dishwasher safe (top rack) |
| Dimensions (Approx.) | 30 x 20 x 30 cm (estimated) |
| Weight | 1.5 kg (estimated) |
Frequently Asked Questions - PFF330 Lenoxx
User questions about PFF330 Lenoxx
0 question about this device. Answer the ones you know or ask your own.
Ask a new question about this device
Download the instructions for your Pet food dispenser in PDF format for free! Find your manual PFF330 - Lenoxx and take your electronic device back in hand. On this page are published all the documents necessary for the use of your device. PFF330 by Lenoxx.
USER MANUAL PFF330 Lenoxx
natural_image
White and black electric air fryer with a pet icon, feeding food into a black tray (no text or symbols visible)Model no: PFF330
Batch no: PR4229
PLEASE READ AND RETAIN THESE INSTRUCTIONS FOR FUTURE REFERENCE.
This appliance is intended for household use only.
ABOUT THE PRODUCT:
This Smart Pet Food Feeder is the perfect solution for cats and dogs up to medium size who prefer to eat on a timely schedule. This feeder is also perfect for pet owners who live busy lives on-the-go.
Fury friends deserve the best quality of life. This pet food dispenser can be controlled by the button on the front of the feeder or through the smartphone app. Simply connect the feeder to your home's Wi-Fi, ensure the connection is strong between the router and the feeder, then sit back and enjoy a wide range of benefits through the downloadable smartphone app.
The app can opt to set up a feeding plan based on your personal schedule. It allows you to set and adjust the feeding times, including multiple daily feeding times, and the food dispensing quantity. This allows your pets to develop regular eating habits and also works for households with multiple pets.
This 5.5 litre food dispenser holds up to 2.5 kilograms of dry pet food so the feeder can dispense plenty of food for those late nights at work. To make your furry loved ones feel most comfortable when home alone, you can even set a personalised voice recording to playback when it is feeding time.
This Smart Pet Food Feeder comes pre-packaged with one removable, easily washable food tray made with safe ABS + PP materials, making it the perfect choice for cats and dogs of medium size.
SAFETY AND WARNINGS:
- Only suitable for indoor use.
- Do not drop anything other than dry pet food into the food hopper. Failure to do so may cause a malfunction.
- To prevent the Pet Feeder from being hit by pets, it is recommended to place the feeder in a corner or against the wall.
- Please shield or organise the power cord well to prevent the pet from biting the cord. Failure to do so could cause serious harm or even death.
- Do not disassemble or modify the Pet Feeder.
• This feeder is only suitable for cats or small to medium sized dogs.
- The pet food shape and density will cause some deviations from the food hoppers capacity and the feeding units' quantity.
- After each fill up of the hopper, the portions may be different for the initial feeding. It is recommended to calibrate the feeder manually (Click the Instant Feeding Button until food is dispensed).
- To protect against electric shock, do not immerse the cord, USB plug (not included) or Pet Feeder into water or other liquid.
- Close supervision is necessary when any appliance is used by or near children.
- Do not operate the Pet Feeder with a damaged cord or USB plug (not included) or if the appliance has been damaged in any manner.
- The use of other accessory attachments is not recommended as it may damage the appliance or cause injury to other users.
- Do not use the appliance outdoors.
- Do not let the cord hang over the edge of a table or counter or touch hot surfaces.
- Do not place on or near a hot gas or electric burner or in a heated oven.
- Do not use the appliance for other than intended use.
- This appliance is not intended for use by persons (including children) with reduced physical, sensory or mental capabilities or lack of experience and knowledge, unless they have been given supervision or instructions concerning use of the appliance by a person responsible for their safety.
• Children should be supervised to ensure that they do not play with the appliance.
- If the supply cord is damaged, it must be replaced by the manufacturer, its service agent or similar qualified persons in order to avoid a hazard.
PARTS:
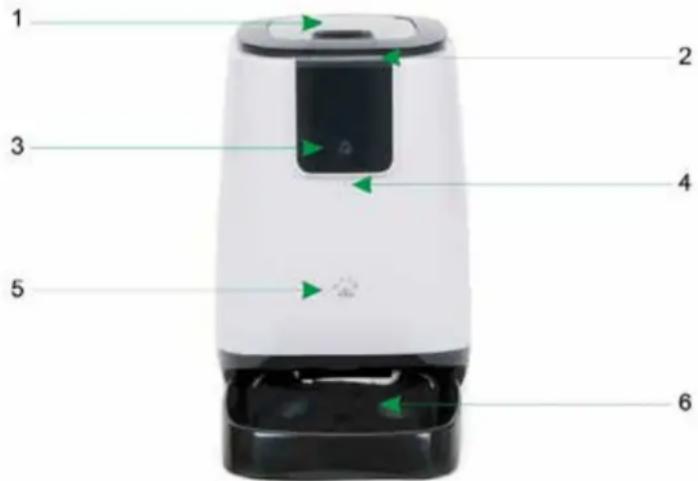
- Head Cover
- LED lights, Power light
- Instant feeding button
- Microphone
- Speaker
- Detachable feeding bowl
USE:
- Remove the USB power lead from the packaging.
- Plug the USB power lead into the power connection on the rear of the Pet Feeder.
- Then connect the USB end into your own USB power adaptor (not included).
- Place the feeder in a horizontal position and install the Detachable Feeding Bowl to the corresponding position on the feeder.
- Open the Head Cover and add dry pet food to the internal food bucket.
- Connect the feeder to the "Smart Life" App, to set up your pets feeding plan.
DOWNLOAD THE "SMART LIFE" APP:
- Scan the QR code to download the "Smart Life" App and complete its installation.
Or
Search for the app "Smart Life" through the relevant app store and download it to your Smart Device.
- Register:
Open the already installed "Smart Life" App.
Click on the "Register" button.
Enter your mobile number or email address, then click on "Get Verification Code".
Enter the verification code that you received to verify.
Set the login password of the account and login successfully.

Connect the feeder to the "Smart Life App", by using the Bluetooth mode, EZ mode or AP mode and connect it to your smart devices.
BLUETOOTH CONNECTION:
- Ensure the feeder is powered on and the feeders LED Power Light is green.
- Press and hold the feeding button for 5 seconds and wait for the WIFI indicator (red light) to flash rapidly (2 flashes per second).
- Turn on your smart devices Bluetooth and allow the App to access the permissions.


- Open the App, click on the "+ "in the top right corner to add the device on the homepage, enter the distribution network page.

- After waiting a short while, the App will automatically discover the device.
- Click "Go to add".
- Connect the smart device to the WIFI network to be configured and ensure that the device can access the network normally.
- Enter the WIFI password and click "Confirm" to enter the network distribution process.


- Wait a few moments, for the device to be added successfully.

CONNECT THE FEEDER TO THE "SMART LIFE APP". EZ MODE:
- Ensure the feeder is powered on and the feeders LED Power Light is green.
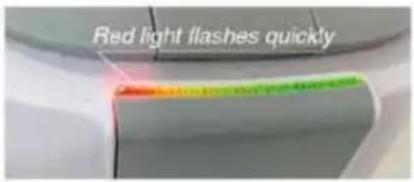
- Press and hold the feeding button for 5 seconds and wait for the WIFI indicator (red light) to flash rapidly (2 flashes per second).

- Open the App, click on the "+ "in the top right corner to add the device on the homepage, enter the distribution network page.
- Choose "Small Home Appliances", then choose "Pet Feeder".
- Connect the smart device to the WIFI Network to be configured and ensure that the smart device can access the network normally.
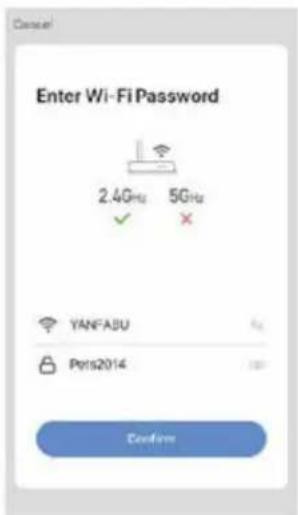
- Enter the WIFI password and click "Confirm" to enter the network distribution process.
- Wait for a few moments, for the message to show that the device was added successfully.


CONNECT THE FEEDER TO THE "SMART LIFE APP". AP MODE:
- Ensure the feeder is powered on and the feeders LED Power Light is green.
- Press and hold the feeding button for 5 seconds and wait for the WIFI indicator (red light) to flash rapidly (2 flashes per second). Then press and hold the feeding button again for 5 seconds and wait for the WIFI indicator (red light) to flash slowly (one flash every three seconds).


- Open the App, click on the "+ "in the top right corner to add the device on the homepage, enter the distribution network page.
- Choose "Small Home Appliances", then choose "Pet Feeder".
- Click "Pairing mode" in the top left corner and select "AP Mode".
- Connect the smart device to the WIFI Network to be configured and ensure that the smart device can access the network normally.
- Enter the WIFI password and click "Confirm" to enter the network distribution process.
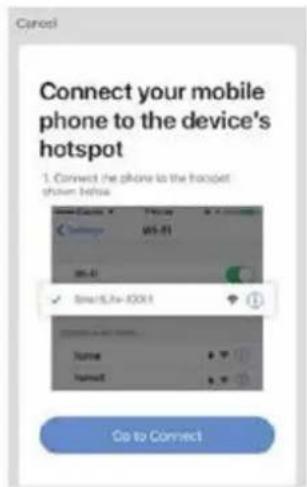
- Connect your smart devices WIFI to the Pet Feeders hotspot.



- Wait for a few moments, for the message to show that the device was added successfully.


TROUBLESHOOTING NETWORK FAILURES:
-
Ensure the Pet Feeder is powered on the and the green light is always on.
-
Ensure that the device is in the correct state for network configuration.
"EZ mode" (default): The Pet Feeders red light flashes quickly (2 flashes per second).
"AP mode": The Pet Feeders red light flashes slowly (1 flash every 3 seconds).
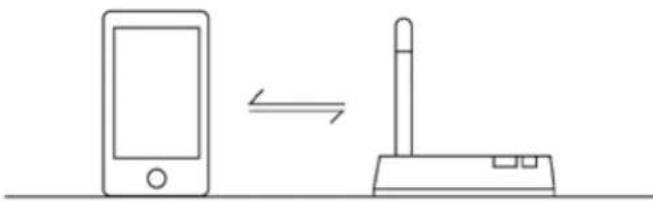
- Ensure the Pet Feeder, smart device and router are close.

natural_image
Line drawing showing three electronic devices: a mobile phone, a wireless router, and a smart speaker (no text or symbols)- Ensure the router and smart device network is un-blocked.
natural_image
Simple line drawing showing a smartphone transforming into a wireless router (no text or symbols)-
Ensure the entered router password is correct (lower case, uppercase, number, characters, etc).
-
Ensure that the 2.4G WIFI band of the router is used to add devices. WIFI needs to enable broadcasting, can not be set to hidden.

- Ensure that the encryption method in the wireless settings of the router is WPA2-PSK type, the authentication type is AES, or both are set as default, and the wireless mode cannot be 11n only.


- Ensure the router WIFI name is not in Chinese.
- If the number of router access devices reaches the upper limit, you can try to turn off the WIFI function of a device to leave channel reconfiguration.
- If the router enables wireless MAC address filtering, you can try to remove the device from the routers MAC filter list to ensure that the router does not prohibit the device from networking.
- If the above problems have been eliminated, please change the devices network configuration mode, and try both the EZ mode and the AP mode.
"SMART LIFE" APP OPERATION INTERFACE:
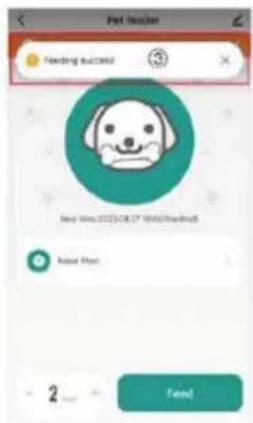
- Once the Pet Feeder is added successfully, you can see the newly added device on the homepage.

-
Click to enter the operation of feeding and feeding plan for the Pet Feeder.
-
Set the number of servings with one click.
-
Click "Feed" to feed.
-
Prompt box for feeding success message.


- Feeding plan list.
- Click "Add" to add a feeding plan.
- Set a feeding time.
- Set feeding interval.
- Set number of servings per feeding.
MANUAL FEEDING:
Press the Instant Feeding Button to feed instantly.
The default quantity is one portion, customisable through the app.
VOICE RECORDING:
- Double press on the Instant Feeding Button, the green indicator light will start to flash.
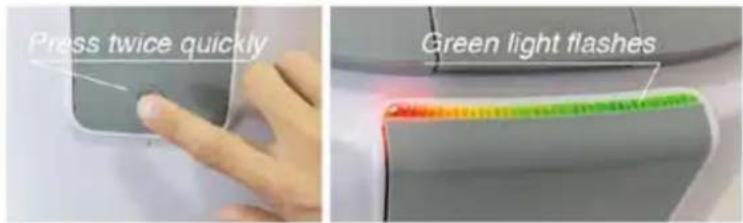
- Speak close to the Speaker.
- Press the Instant Feeding Button once to end voice recording.
- When food is dispensed, the voice recording will be audible.
SPECIFICATIONS:
Capacity: 5.5 Litre holds up to 2.5 kilograms of dry pet food
Communication: WIFI (2.4GHz)
Range between router and feeder: 10 meters with no obstacles and obstructions
Operating temperature: - 10 Degrees Celsius to 55 Degrees Celsius, indoor use only
LENOXX
www.lenoxx.com.au

1300 666 848

LenoxxElectronics

LenoxxElectronics

@LenoxxAustralia
- ABOUT THE PRODUCT:
- SAFETY AND WARNINGS:
- PARTS:
- USE:
- DOWNLOAD THE "SMART LIFE" APP:
- BLUETOOTH CONNECTION:
- CONNECT THE FEEDER TO THE "SMART LIFE APP". EZ MODE:
- CONNECT THE FEEDER TO THE "SMART LIFE APP". AP MODE:
- TROUBLESHOOTING NETWORK FAILURES:
- "SMART LIFE" APP OPERATION INTERFACE:
- MANUAL FEEDING:
- VOICE RECORDING:
- SPECIFICATIONS:
- LENOXX
Brand : Lenoxx
Model : PFF330
Category : Pet food dispenser