Pro Soloist - Audio software Cherry Audio - Free user manual and instructions
Find the device manual for free Pro Soloist Cherry Audio in PDF.


| Product Type | Audio software (virtual synthesizer) |
| Platform | Standalone, VST2, VST3, AU, AAX |
| Polyphony | Up to 16 voices (mono and poly modes) |
| Presets | 30 factory presets (original ARP Pro Soloist) plus unlimited user presets |
| Synthesis Architecture | Analog modeling with VCO, 5-band Resonator Bank, 24dB/oct ladder VCF, VCA, ADSR and AR envelopes |
| Resonator Bank | 5 bandpass filters with adjustable frequency, resonance, level, and preset frequency curves |
| Effects | Distortion (Tube/Fuzz), Phaser (2-8 stage), Flanger/Chorus, Echo (Digital/Tape/Ping Pong/Spread), Reverb (Spring/Plate/Room/Hall/Galactic), Global Limiter |
| Arpeggiator | Yes, with sync to tempo, range 1-3 octaves, patterns: Up, Down, Up/Down, Random |
| Modulation Matrix | 6 slots with source, via, destination, and bipolar amount control |
| Touch Sensor (Aftertouch) | Mono, Last, Poly modes; controls: Bend, Wow, Growl, Brill, Vol, WahWah, Trem, Vibrato |
| MIDI Control | Full MIDI learn, global or per-preset mappings, CC, aftertouch, note, MMC, key triggers |
| Oversampling | 1x, 2x, 3x, 4x (selectable) |
| Keyboard | Onscreen QWERTY musical typing keyboard (MTK) with velocity, pitch bend, mod wheel, sustain |
| System Requirements | Modern CPU, 4GB RAM (recommended), macOS 10.12+ or Windows 7+, compatible audio interface |
| License | Demo mode (occasional inharmonic tones), full version available for purchase |
| Developer | Cherry Audio |
Frequently Asked Questions - Pro Soloist Cherry Audio
User questions about Pro Soloist Cherry Audio
0 question about this device. Answer the ones you know or ask your own.
Ask a new question about this device
Download the instructions for your Audio software in PDF format for free! Find your manual Pro Soloist - Cherry Audio and take your electronic device back in hand. On this page are published all the documents necessary for the use of your device. Pro Soloist by Cherry Audio.
USER MANUAL Pro Soloist Cherry Audio
At the beginning of the 70s, analog synthesizers were just making their way into the hands of working musicians, and their operation was still something of a mystery to most folks outside of a college music lab. In order to avert potential user intimidation and bring synthesis to the masses, manufacturers including Moog, Elka, and later Roland and Yamaha, produced simple monophonic preset synths, intended to sit atop an organ. ARP's first foray into the organ-top preset lead synth market was the Soloist, released in 1970, with 18 presets and basic controls.
Soon thereafter in 1972, the ARP Pro Soloist was released. With much-improved tuning stability, and now featuring 30 presets, it expanded the Soloist's feature set to include an innovative "touch sensor" keyboard - what's now commonly known as a aftertouch, where pressing harder after playing a note introduces changes in the sound, allowing highly expressive playing. Specifically, the Pro Soloist's touch sensor controls enabled pitch bend, wow (wah), growl (a sax-like rapid filter mod), brilliance, volume, and
vibrato. This was pretty heady stuff in the early 70s, and the Pro Soloist proved popular with touring and recording musicians for its ability to rapidly emulate lead instrument sounds such as horns, strings, woodwinds, and more. Most notably, Genesis' Tony Banks made use of a Pro Soloist on numerous tracks of their seminal release, "The Lamb Lies Down on Broadway."
With the advent of fully-programmable, polyphonic synths such as the Prophet-5 and Oberheim OB-series synths at the end of the 70s, preset monophonic instruments like the Pro Soloist rapidly fell by the wayside. But other than Yamaha's pricey CS-series poly synths, aftertouch wouldn't be seen again in instruments until the advent of the 80's MIDI instrument era.
Here at Cherry Audio, we've had frequent requests to reproduce this oft-forgotten expressive gem of a synth, particularly Genesis connoisseurs! Our frequent collaborator Mark Barton is one of those folks, and not only has he programmed an incredibly accurate emulation (including spot-on emulations of the original presets), but together we've massively expanded the Pro Soloist's capabilities by making it fully polyphonic (up to 16 voices), AND we've "brought out" all of the parameters of its unique analog synthesis architecture, most notably, the five parallel bandpass filter "Resonator Bank," (these are the key to the Pro Soloist's realistic acoustic orchestra timbres) allowing full user programmability. Additionally, we've added a full six-slot mod matrix, and studio-quality effects - converting this somewhat bare bones monophonic lead synth into a massive, polyphonic powerhouse.
We've been pleasantly surprised at the stunning sounds we've been able to coax from this hot-rodded Pro Soloist; we hope you'll enjoy it as much as we do.
Pre-Purchase Demo Mode

If you haven't purchased the full version of Pro Soloist, it will run in demo mode. All functions will work, but inharmonic tones will occasionally sound (the LED next to Demo in the top toolbar will illuminate when the ugly tones are sounding). We've also added a handy button to make purchasing easy, so you've got no excuse! As you might expect, all the demo stuff disappears once Pro Soloist is purchased.
Technical Assistance
Cherry Audio's online store and automatic updating should make operation a smooth experience, but if you run into any issues or have questions, you can discuss issues online at the Cherry Audio Forums, or communicate directly with our swell tech support staff at https://cherryaudio.kayako.com/.
The purple strip at the top of the Pro Soloist interface is where you'll load, save, and create sound presets. It also contains utility functions such as undo/redo, UI zoom and Focus controls, under-the-hood settings, and more. Let's go over them:
New- Opens a new blank patch preset. If an unsaved patch is currently open or you've modified an existing saved patch, a dialog asks if you'd like to save the patch in its current state. This greatly reduces the possibility of losing an edited unsaved patch.
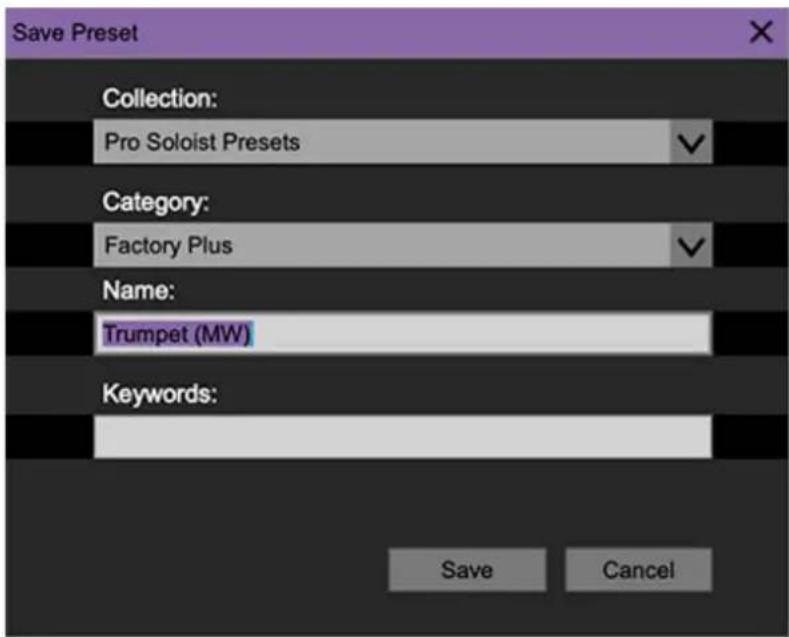
Save- Use this to save patches. There are a couple of levels of hierarchy:
- Collection- This is the top level of organization, and contains entire “sets” of presets. The Pro Soloist Presets are the main included collection. We also include a User Presets Collection for storing your own presets, but you’re free to create your own collections. To create a new collections, click in the Collection text field (where it says User Presets above) and type a name. User-created sounds can be freely saved to any collection; we like to keep ‘em separated for organizational purposes.
- Categories- Within each Collection are a number of sound categories. As with collections, you're free to create as many categories as you like. To create a category, click in the Category text field of the Save dialog window and type a new category name.
- Patch- A patch is an individual sound. To save a patch, simply type the name in the Name field and click Save.
- Keywords- You can add descriptive words such as "huge," "lead," "poly," etc., to patches to make them appear when terms are typed in the Search field. Use commas to separate multiple keywords entries.
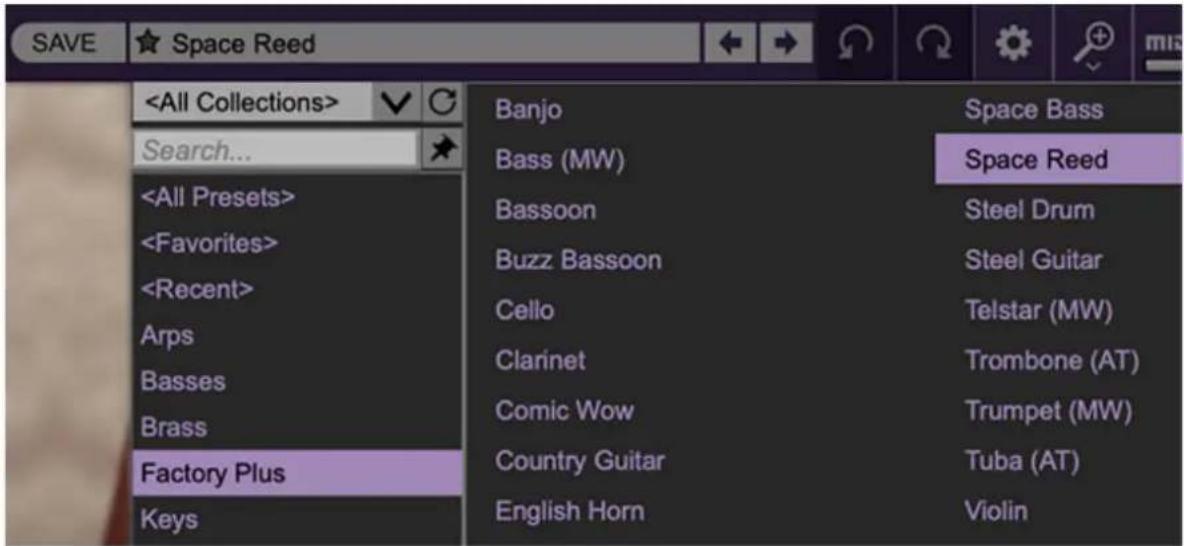
Browsing Patches- Patches can be browsed by clicking the
Clicking on the left-side categories narrows down which patches are displayed.
will show presets from all collections and categories. displays recently used presets. - Refresh- This is the circular arrow button to the right of the downward arrow; clicking this checks the Cherry Audio server for new or updated presets.
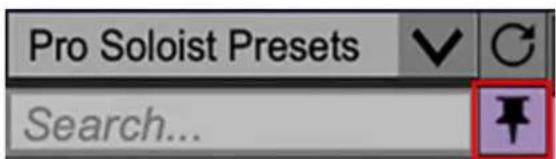
Pin- Clicking the push-pin icon locks the patch selection list open, allowing fast and easy browsing and auditioning of patches. Click the icon again to
disable pin mode. when in pin mode, the up and down arrow keys can be used to select patches.
Preset- Step Back/Forward Arrows- These step to the previous or next preset. macOS [⌘+left/right arrow key] or Windows [CTRL+left/right arrow key] will navigate through presets back and forth in the currently selected collection/category.
Undo/Redo- These circular arrows will undo or redo the last action. It remembers many steps, so if you really loused something up, keep on clickin'...
Settings- This is where user preferences for user interface, audio interfaces, user account, and more are configured. See the Settings section for full information.
Importing Presets with drag-and-drop
Presets can be imported singly or en masse (as a single compressed ZIP file) simply by dragging and dropping from the desktop anywhere on the user interface.
If a single .*preset file is dragged and dropped, the sound is immediately loaded and the standard Save Preset dialog appears; this lets you save the sound to the instrument's preset browser. Note that you don't have to save the sound to preset browser; if you just want to hear and play the sound, click the Cancel button in the Save Preset dialog - the sound will still be loaded.
Compressed zip files containing multiple sounds can also be drag and dropped onto the UI. This works the same as with single sounds, but instead of the Save Preset dialog, you'll see the Import Preset Collection dialog. The presets will be added as a new collection and available in the categories for which they were tagged.
| Current Zoom: 150% |
| Zoom To Normal (0) |
| Zoom In (3€=) |
| Zoom Out (3€-) |
| 50% |
| 60% |
| 70% |
| 80% |
| 90% |
| 100% |
| 110% |
| 120% |
| 130% |
| 140% |
| √ 150% |
Zoom Magnifying Glass- Click to resize the Pro Soloist interface. Selecting 100% returns the user interface to native size.
MIDI Tab- Opens the MIDI controllers tab for configuring internal and hardware MIDI controls. See the MIDI Controllers Setup and MIDI Tab section for full information.
! (MIDI Panic) - Click to send an all-notes-off message in case of, "why won't this thing stop making noise?!?" stuck-note incidents.
Tempo (Standalone Version Only)- Displays Pro Soloist's current internal tempo setting. Pro Soloist's internal tempo affects LFO rate (including Performance Repeat function), arpeggio rate, and the phaser, flanger/chorus, and echo effects rates when the corresponding Sync buttons are enabled. The tempo setting can be changed by moving the mouse up and down anywhere in the tempo section, or by double-clicking the number and entering the desired BPM value.
The tempo display only appears in the standalone version of Pro Soloist. VST, AU, and AAX plug-in versions receive tempo data from their host DAW app.
natural_image
Abstract geometric pattern with vertical stripes inside a circle on a dark purple background (no text or symbols)QWERTY Musical Typing Keyboard- Opens an onscreen keyboard allowing a standard QWERTY computer keyboard to be used for playing music notes. For more information, see QWERTY Musical Typing Keyboard (MTK) section.
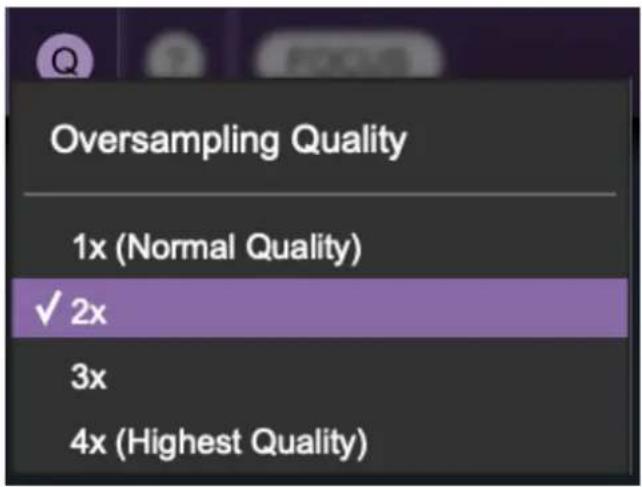
Oversampling Quality (Q)- The Q button sets Pro Soloist's internal oversampling rate; the higher the setting, the better audio fidelity will be, with the caveat that more computer processing power will be required.
Internal processing can be set to 1x (same rate as the current sample rate of the host DAW or in the Settings>Audio/MIDI window for the standalone version) or to 2x, 3x, or 4x the current sample rate. The sample rate is downsampled at the instrument output stage to match the current host sample rate.
For example, if the current DAW/instrument sample rate setting is 48 kHz, and oversampling is set to 2x, Pro Soloist's internal processing runs at 96 kHz, and is then reduced back to 48kHz at the output stage.

natural_image
Simple graphic icon with a yellow circle containing the letter 'Q' and a downward arrow, on a dark purple background (no text or symbols beyond the icon itself)When oversampling is set to any multiple greater than 1x, the Q button glows yellow.
Dependent on a number of factors (audio system D/A converter quality, monitor speakers, the nature of the current Pro Soloist patch, etc.), you may not hear a big difference with higher settings. Generally speaking, audible differences may be noticeable when using sounds with a great deal of high harmonics.

Help- Clicking this launches your web browser and opens the help document you're currently reading, which is a really meta concept.
Pro Soloist logo (middle of left side)- Clicking this displays "about" information, and shows the version number and current registered user ID.
Focus Button
If you're using a tiny laptop, the user interface can potentially be hard to see. With this in mind, the Focus button conveniently blows up Pro Soloist's view to roughly twice its normal size within the current window size. Unlike the Zoom "magnifying glass" function, Focus doesn't affect the current window size. By default, the patch panel section fills the current window, but the view can be scrolled vertically and horizontally with a mouse wheel, track pad, or Apple Mighty Mouse finger-scrolling. Or if you're the last person on earth using a single-button mouse, scroll bars will appear at the window edges when in Focus mode. (Drop us a line from your SBC Global email account, umkay?)
Using Focus mode couldn't be easier - just click the Focus button the top menu bar. To return to standard view, clickReset. There's also a superfast key shortcut - on Mac, hold the Ⓧ [COMMAND] key and click the mouse; in Windows, hold the [OPTION] key and click the mouse. Focus can be reset with the same key shortcuts.
Preset List Right-Click Functions
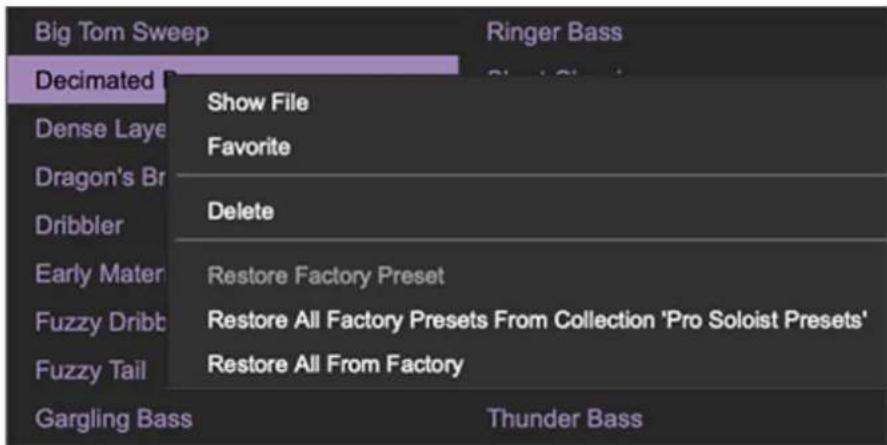
Show File- This displays the selected preset in the Mac or Windows folder containing it. This is useful for backing up or sending a preset file to another user.
Show In Original Category- Selects the preset within its category, i.e. the category will highlight in the left preset menu. The Show In Original Category command only displays if the preset was selected within the
Favorites- Favorited presets will show in when the
Delete- Deletes the selected preset.
Restore Factory Preset- If one of the factory (i.e. not user) patches is edited and saved, selecting this command restores the patch to its unaltered "factory" setting. This menu will be grayed-out for user bank patches.
Restore All Factory Presets From 'Pro Soloist Presets'- If any patches from the "factory" Pro Soloist bank are edited and saved, selecting this command restores all of them to their unaltered "factory" setting.
Restore All From Factory- If any patches from the "factory" banks are edited and saved, selecting this command restores all of them to their
unaltered "factory" setting. At the time of writing, the Pro Soloist bank mentioned above is the only factory bank, so this function and the Restore All Factory Presets From 'Pro Soloist Presets' above have the same effect.
The upper left tabs and nine buttons above the keyboard affect which of the three panel "views" is currently visible and editable, as well as how Pro Soloist plays layers.

Panel Mode
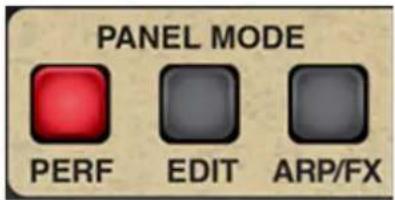
There are three panel views for the main control area above the keyboard. Each of these displays a different group of controls - essentially like tabbed windows on a computer (but with a more vintage-synth vibe). These are set by clicking the Perf, Edit, and FX Panel Mode buttons.
The current Panel Mode setting has no effect on sound, it simply changes which set of parameter controls are currently displayed. Following is a rundown of each Panel Mode button:
Perf (Performance)- This is the default view. If you're familiar with the original ARP Pro Soloist, this view is almost identical to the original instrument panel. This is intentional so that users can play Cherry Audio's Pro Soloist just like the real thing (don't forget the bell-bottoms). If you'd just like to use the old-school presets and Touch Sensor controls like the the original instrument, you don't need to use the other Panel Mode views and controls.
Edit- The original instrument's spartan control panel would lead one to believe the Pro Soloist was a relatively simple affair, but in fact, an impressively complex synthesis architecture lived under the hood. The Edit panel allows user editing of the full roster of Pro Soloist's synthesis parameters, including its unique five bandpass filter Resonator Bank and a powerful six-slot tabbed Mod Matrix.
Arp/FX- This where you'll enable and edit Pro Soloist's arpeggiator and audio effects, including Global Limiter, Distort, Phaser, Flanger/Chorus, Echo, and
Reverb effects.
Layer Mode
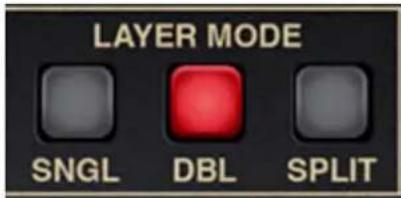
These buttons globally sets keyboard voice triggering.
- Single (Sngl)- This is the standard keyboard mode where one voice plays, just like the original. The upper voice plays across the entire keyboard range, and the lower voice is disabled.
- Double (Dbl)- Upper and lower voices are stacked and both play across the entire keyboard range.
- Split- The keyboard is split with the lower voice playing in the keyboard range below the split point, and the upper voice playing in the keyboard range above the split point.
To set the split point, click the Split button; the button flashes. Play the key of the desired split point. The LED note display stops flashing and the split point is set.
Layer Control Tabs and Buttons
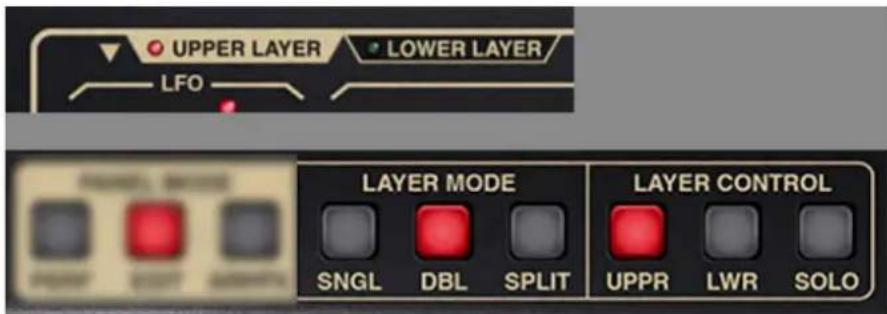
These tabs and buttons select which layer's Panel Controls are currently viewed and editable when Double or Split Layer Mode is enabled. If Single mode is currently selected, only the Upper layer plays, and the Layer Control buttons aren't needed. When Single mode is selected, the Layer Control
Lower and Solo buttons are disabled and will appear dimmed, and the Upper Layer and Lower Layer tabs will be hidden.
- Upper Layer tab and Upper (Uppr) button- Panel controls affect the Upper layer only. LED's and illuminated buttons are red. Note that the Upper Layer tab and Upper Layer Control buttons do the same thing and function in sync.
- Lower Layer tab and Lower (Lwr) button- Panel controls affect the Lower layer only. LED's and illuminated buttons are green. Note that the Lower Layer tab and Lower Layer Control buttons do the same thing and function in sync.
- Solo- Solos the sound output of the currently selected edit layer. The button flashes when Solo mode is engaged. This is useful if you're editing a sound and you'd like to essentially mute the other layer.
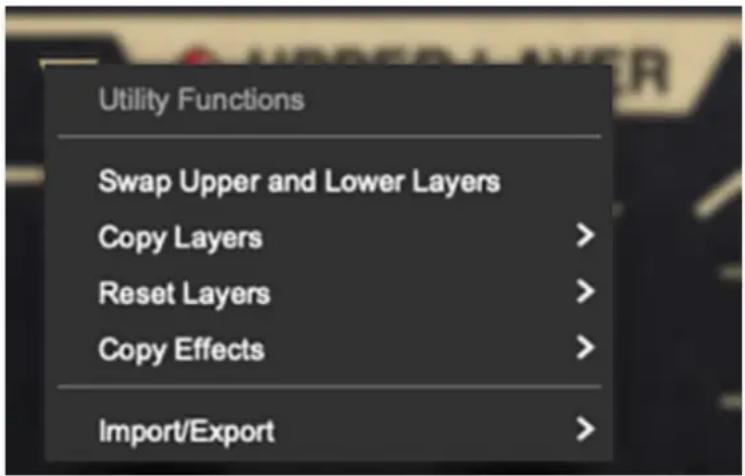
Layer Utility menu- This one is real easy to miss, but clicking the inverted gold triangle (good band name) opens the Layer Utility menu. It allows Upper and Lower layer sounds to be moved back and forth, independently initialized, and more. Remember that if you accidentally mess anything up with these commands, you can always undo with [ALT-Z] (Windows) or [HZ] (Mac), or by clicking the counterclockwise undo arrow in the top menu strip.
- Swap Upper and Lower Layers- Reverses the locations of the the upper and lower layer.
- Copy Layers- Duplicates one layer to the other.
- Reset Layer- Initializes all settings of the selected layer only.
- Copy Effects- Duplicates the settings of all effects from one layer to the other; this is only relevant if FX Mode is set to Dual Layer on the Arp/FX
page. If FX Mode is currently set to Global, the Copy Effects menu options will be grayed out.
- Import/Export- The Import/Export command allows layers to be moved between sound presets. Data from the source preset isn't affected.
The process is simple - select the appropriate Copy
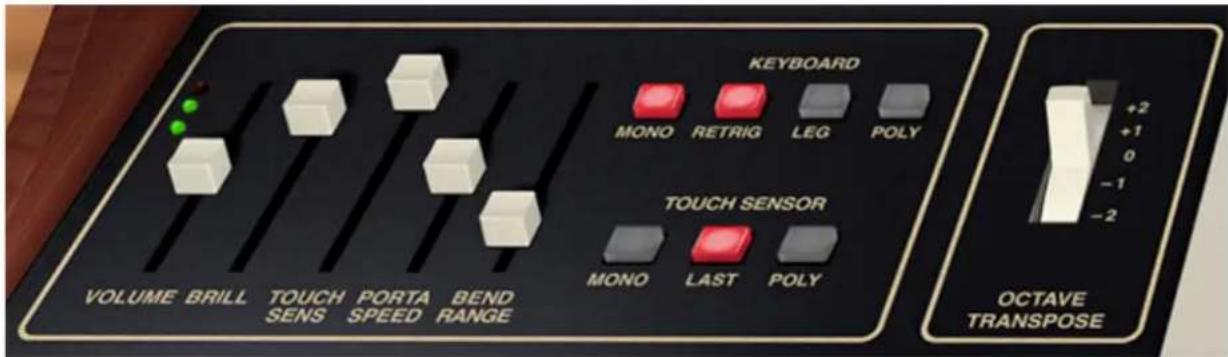
These are the controls to the left of the virtual keyboard. They effect overall volume, performance controls, and keyboard trigger modes.
With the exception of the Volume slider and LED level meter, each of these are independent per layer when in Double or Split mode.
Left-Hand Sliders
Volume- This globally sets overall volume for the entire instrument. You'll want to keep level in the green zone, or else ugly digital clipping can result. Engaging the Global Limiter in the FX Panel will help keep levels under control.
Brill (Brilliance)- Attenuates the ADSR and AR to VCF cutoff frequency signals, and opens the filter a little bit on its own, too.
Touch Sensitivity- Global depth control for all eight of the Touch Sensor Effects paddles (visible in the Perf Panel Mode).
Porta Speed- Sets the rate of the portamento effect when the paddle switch is engaged in the Perf Panel Mode; the higher the setting, the slower the glide. To review, portamento is a sliding effect between notes.
Keyboard Mode
Mono- One note can be played a time with one voice sounding. Mono mode is last-note priority - this means the most recently played note will always sound. There are two triggering styles when in Mono mode:
- Retrigger- The envelope generators retrigger with every note played. This tends have a more snappy and "modern" response. A good guitar-related analogy would be that every note played is picked.
- Legato- The envelope generators retrigger only when all notes have been released. This has a smoother sound. Using our previous guitar analogy,
this would be akin to picking a single note, then sliding your finger up and down the string.
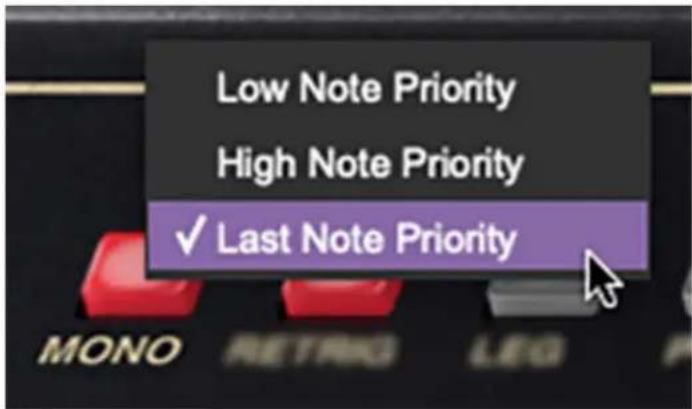
By default, mono mode uses low-note priority - that is, the lowest note played takes precedence over any other note currently played. This is how the original Pro Soloist operated. To select high-note, or last-note priority, click and hold the Mono button and select in the popup menu.
Poly- Multiple notes can be played with individual envelope articulations (up to 16 notes of polyphony). When the Poly button is clicked the first time, you'll see a popup menu for selecting the maximum number of simultaneous voices. If you're using a newer fast computer, the 16 Voices selection shouldn't be a problem. If you have any issues using an older CPU, we suggest lowering the Max Voices setting.
The Max Voices popup menu is "smart" - if Pro Soloist was previously in Mono mode, it only shows the first time you click the Poly button, allowing quick switching between Mono and Poly Keyboard modes. Clicking the Poly button a second time displays the Max Voices menu again.
Touch Sensor
These regulate how aftertouch affects the Touch Sensor Effects on the Perf Panel Mode page. Note that Touch Sensor was ARP's ol' timey name for what we now refer to as "aftertouch."
Pro Soloist responds to polyphonic aftertouch, but you'll need a controller capable of transmitting it. In the last decade or two, very few synths and MIDI controllers were capable of transmitting poly aftertouch (old Ensoniq keyboards, Kurzweil MIDIBoard, or MIDI MPE controllers from Roli, Keith McMillen, Roger Linn Linnstrument, etc.). Most synths and controllers
only transmit what's known as "channel aftertouch"- essentially a single control signal summed or averaged from all keys.
The good news is that, as of late 2023, poly AT is making a comeback in MIDI/USB keyboard controllers including the Native Instruments Kontrol S-Series MK3 and the upcoming Korg Keystage, as well as the ASM Hydrasynth synthesizer, so surely others will follow
Finally, if your controller transmits plain ol' mono aftertouch, the good news is that Pro Soloist includes a unique Last mode, which lets you pretty effectively mimic poly aftertouch.
The Touch Sensor modes are as follows:
Mono- Increasing pressure to any held key varies mod amount equally for all currently sounding notes.
Last- Increasing pressure to any held key varies mod amount for the most recent note played only.
Poly- Increasing pressure to a held key sends aftertouch control data independently for each key played. As mentioned, poly aftertouch requires a keyboard controller capable of transmitting poly aftertouch, so don't go bonkers on ihatepluginmanufacturers.com if you don't have the right kind of controller for poly AT.
Octave Tranpose
Octave Transpose- Transposes the currently viewed layer up or down by up to two octaves.

This is the primary panel mode, intentionally designed to closely emulate the original Pro Soloist panel control configuration. Here you'll select from the Pro Soloist "factory" paddle-switch presets, and enable the Touch Sensor aftertouch controls, "wahwah" and vibrato mod, and more.
Touch Sensor Effects
As mentioned, "Touch Sensor" is ARP terminology for what we now call aftertouch, and to review, aftertouch refers to modulation applied by pressing a keyboard key harder after a note has been played.
The global amount of Touch Sensor mod is set using the Touch Sensitivity left-hand slider and it must be set higher than zero for Touch Sensor effects to work.
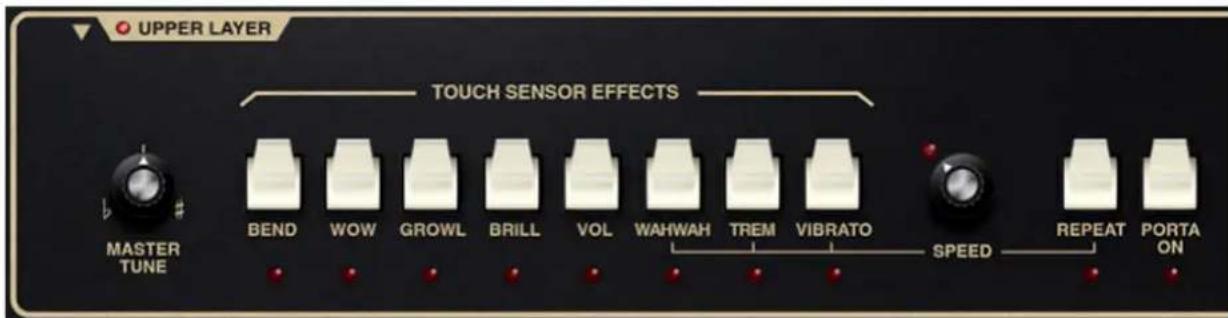
Bend- Enables upward pitch bend via aftertouch.
Wow- Enables resonant filter brightness mod via aftertouch. Note that when Wow is engaged, the filter resonance gets cranked and the Resonance knob in the Edit Panel Mode is disabled and dimmed. Also short for "Wendy O. Williams," late vocalist of 80s TV-wall-destroyers, The Plasmatics.
Growl- This is a clever bit of aftertouch modulation intended to emulate the growling sound of woodwind and brass instruments. For you tech-y types, it's a 32 Hz LFO modulation of the filter cutoff frequency using a unique waveform, and the LFO is independent of the "normal" onboard LFO.
Brill (Brilliance)- Enables filter brightness mod via aftertouch. It's basically the same as the above Wow effect but the resonance level is unaffected.
Vol (Volume)- Enables volume mod via aftertouch - pressing harder makes notes louder.
WahWah- Enables aftertouch-controlled filter cutoff (brightness) mod via LFO. Wahwah-ing rate is set with the Speed knob to the right.
Trem (Tremolo)- Enables aftertouch-controlled amplitude mod via LFO. Tremolo rate is set with the Speed knob to the right.
Vibrato- Enables aftertouch-controlled pitch mod via LFO. Vibrato rate is set with the Speed knob to the right.
Speed- Sets the onboard LFO rate for Touch Sensor Wahwah, Tremola Vibrato, and Repeat as well as for any other LFO routed mod (particularly mod routings configured using the Edit Panel Mode Mod Matrix). The LED flashes at the current rate. Note that the Speed control is duplicated in the Edit Panel Mode LFO section; these controls are locked to each other and for all intents and purposes are the same control, just displayed in two places for convenience.
Repeat- Automatically retriggers the ADSR envelope generator at the current Speed setting. Repeat is not affected by aftertouch control. It's super useful for banjo settings, because fake vintage-analog synth banjo solos are BLOWIN' up the charts these days, take our word! You can thank us later when you're rich.
Porta On (Portamento)- Enables portamento, aka glide. Instead of instantly snapping between pitches, glide slides gently between notes. The Porta On switch works in conjunction with the Porta Speed slider in the left-hand controls section, and is unaffected by aftertouch control.
Preset Paddles

flowchart
graph LR
    A["REEDS"] --> B["BASSOON"]
    B --> C["ENGL HORN"]
    C --> D["OBOE"]
    D --> E["OFF"]
    E --> F["BUZZ BASSOON"]
    F --> G["SAX"]
    G --> H["SPACE REED"]
    H --> I["OFF"]
    I --> J["CLARINET FLUTE"]
    J --> K["OFF"]
    K --> L["TUBA"]
    L --> M["TROMB"]
    M --> N["FR. HORN"]
    N --> O["TRUMPET"]
    O --> P["NOZE"]
    P --> Q["PULSAR"]
    Q --> R["COMIC WOW"]
    R --> S["MUTE TRUMPET"]
    S --> T["OFF"]
    T --> U["STEEL GUITAR"]
    U --> V["HARPSI-CHORD"]
    V --> W["OFF"]
    W --> X["BASS"]
    X --> Y["PIANO"]
    Y --> Z["BANJO"]
    Z --> AA["OFF"]
    AA --> AB["FUZZ GUITAR 1"]
    AA --> AC["FUZZ GUITAR 2"]
These engage super-accurate emulations of the original Pro Soloist's 30 factory presets. We eliminated the original instrument's semi-wonky "bank" switch - to select a preset, either click the paddle repeatedly, or drag it with the mouse. Note that only one preset per layer can be active at any given time, and selecting a preset automatically disables the previously selected preset (i.e., sets its paddle switch to the Off position).
Hierarchically speaking (had to google the spelling), the Preset Paddles are a level down from the main Cherry Audio preset browser. That is, Preset Paddle selections are saved within the main preset browser. If any controls or parameters are edited in the Perf, Edit, or Arp/FX panels, these are saved with the preset browser sound.
We won't walk you through every single Preset Paddle, but suffice to say, we went to a fair effort to precisely match these to the original instrument. If you don't want to delve into the synth parameters on the Edit page, mixing Preset Paddle combinations in Double mode can yield surprisingly nifty sound combinations, particularly when goosed (that's a technical term there) with Pro Soloist's onboard effects. To do this, set Panel Mode to Perf, Layer Mode to Double, and use the Layer Control Upper and Lower buttons to alternate the view of the Preset Paddles for the Upper and Lower layers.
Preset Paddles and Effects - Important!
Engaging one of the Preset Paddles will disable any currently engaged effects. This was done to ensure that the original factory presets sound "vintage-correct" when the Preset Paddles are engaged. Besides the on/off/mode buttons, all other effects controls settings are retained.
Keep in mind, that disabling effects happens when combining Preset Paddles in Double or Split mode as well. This makes it easy to audition different Preset Paddle combinations.

This is where you can get under the hood and really get into trouble precisely edit Pro Soloist's surprisingly advanced analog voicing. The original instrument was a preset-only affair, with minimal user voice editing capabilities, but for all intents and purposes, we've "brought out" all of its synthesis parameters to the Edit panel, and with a few small tweaks, we've unearthed a hugely powerful synth!
Because there's a lot to cover here, we've broken this into separate sections (to prevent a web page that scrolled downward 63 miles).
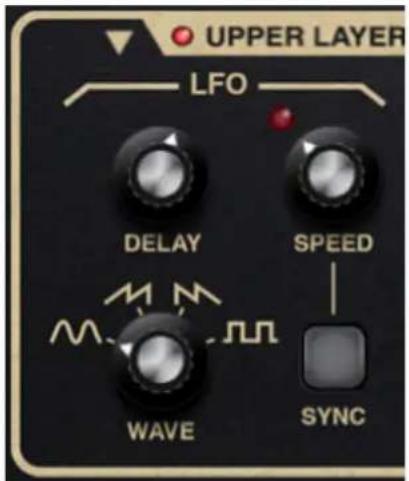
The LFO (low-frequency oscillator) generates sub-audio range signals intended for modulation purposes.
Delay- Moving this slider up gradually delays the onset of LFO depth. The delay time can be set from 0 to 3 seconds. LFO delay is polyphonic; that is, if Keyboard mode is set to Poly, each note played will be delayed independently.
Speed- The Speed knob sets the speed of the LFO, from 0.01 to 30 Hz (with Sync button off) or from 8 beats up to 1/64th note triplets (Sync button on). The LED above the Speed knob flashes at the current modulation rate.
Wave- Selects the repeating pattern of the LFO. Available waveforms are since, ramp, sawtooth, and square. Only one waveform can be selected at any time.
Sync- When the Sync button is enabled, LFO speed will lock to host tempo when using Pro Soloist within DAW software, or to the current tempo in the top menu bar when using the standalone version.
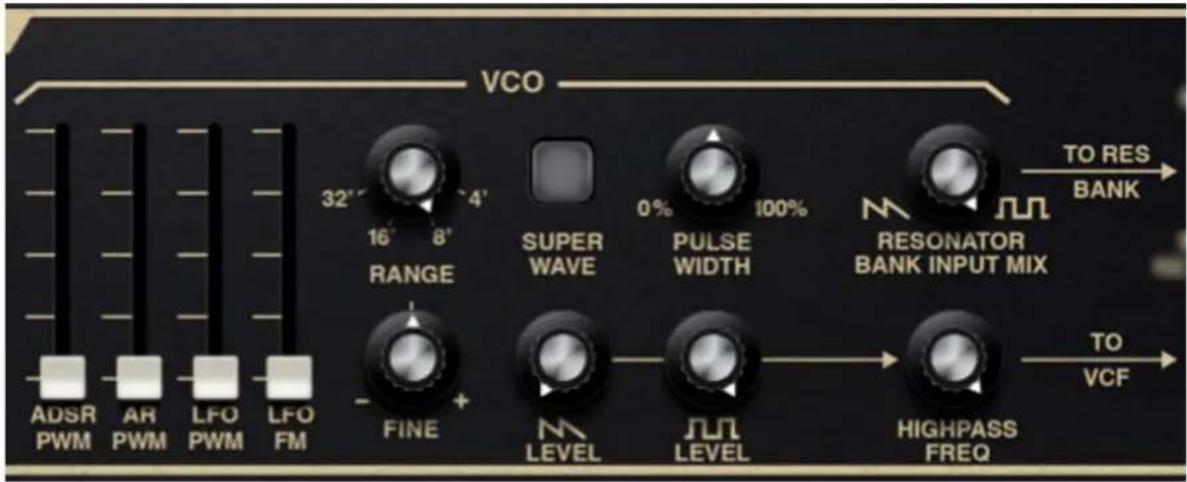
VCO is short for "voltage-controlled oscillator." There's just one oscillator per voice, but the Pro Soloist's unique architecture gets a heck of a lot of mileage out of it. Here's the rundown of its controls:
VCO Modulation Sliders
- ADSR PWM- Sets the amount of modulation of pulse wave width via the ADSR envelope generator.
- AR PWM- Sets the amount of modulation of pulse wave width via the AR envelope generator.
- LFO PWM- Sets the amount of modulation of pulse wave width via the low-frequency oscillator.
- LFO FM- Sets the amount of oscillator frequency modulation via the low-frequency oscillator.
Range- Coarsely sets the VCO pitch range in octaves. These are at standard organ footage settings of 32', 16', 8', and 4'.
Fine- Detunes the oscillator by slightly over a fifth, up or down. This can be used to fatten up multiple oscillator patches by detuning a small amount, or for "building-in" a set interval.
Super Wave- Toggling this engages what's sometimes known as a "super saw" mode, i.e., a big fat, chorusey version... and best of all Super Wave works for the saw and pulse waves. Super Wave is a quick way to make really large poly sounds if you don't want to delve into dual-layer patches.
Pulse Width- Sets the width or "duty-cycle" of the pulse width. A setting of 50% creates a perfect square wave. Pulse Width has no affect on the ramp
wave.
Ramp (icon) Level- Sets the volume of the ramp wave that gets routed to through the highpass filter and then to the VCF section.
Pulse (icon) Level- Sets the volume of the pulse wave that gets routed to through the highpass filter and then to the VCF section.
Highpass Frequency- Sets the highpass filter cutoff frequency from 20 Hz (essentially bypassed) up to 1300 Hz. This is used to remove low frequencies from the ramp and pulse waves.
Resonator Bank Input Mix- In addition the ramp+pulse>highpass filter>VCF routing explained above, the oscillator also feeds the Resonator bank in parallel fashion (i.e., simultaneously). Unlike the ramp+pulse>highpass filter>VCF chain, Resonator Bank Input Mix acts as a balance knob between the ramp and pulse wave. The Resonator Bank signal path can be effectively turned off by making sure the Enable Resonator button is toggled off for all five tabs (tabs have white backgrounds if they're not visible but active - see the following Resonator Bank section for more information).
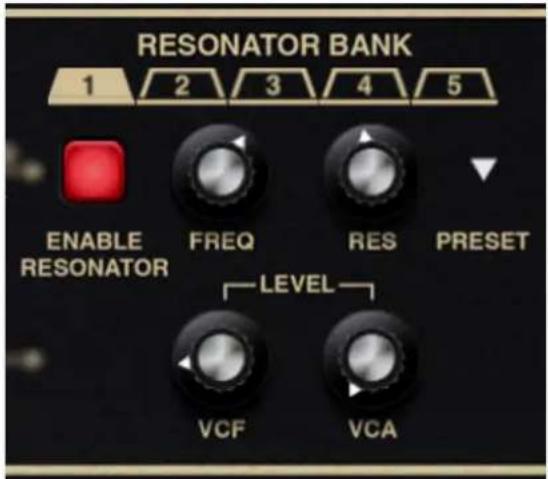
Pro Soloist's Resonator Bank is a rather distinctive feature seen in very few other synths, and we've improved it considerably from the original implementation. There are five individual resonators, arranged in a tabbed user interface.
The original Pro Soloist contained ten fixed frequency, non-modulatable resonators, with up to five of these active per patch. We redesigned this to be five fully adjustable resonators with continuously variable frequency and resonance controls. The frequency curves of the originals are accessible via a simple popup menu. Best of all, Resonator Bank parameters are all individually modulatable via the Mod Matrix.
Resonator Bank Tabbed Interface
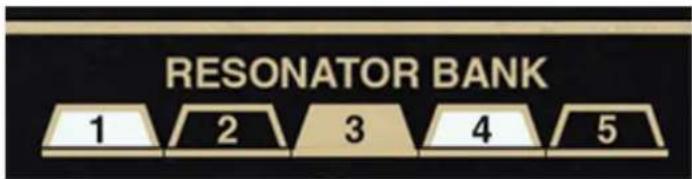
Since Pro Soloist includes five individual resonators, each with identical controls, they make use of a tabbed user interface. The tab background coloring works as follows:
- The currently selected resonator tab will be gold. The controls will affect that resonator only.
- If a resonator is not currently selected and is disabled, the tab background will be black.
- If the resonator is currently enabled, but not selected, the tab background will be white. This makes it easy to see which resonators are currently
active without having to individually click each tab.
Resonator Controls
It's helpful to know that each of the resonators are in fact 2-pole bandpass filters with adjustable frequency and bandwidth. When used subtly, they are excellent for mimicking the formant and body resonances of acoustic instruments (the Resonator presets will further help you with us).
Enable Resonator- Turns the resonator on.
Frequency (Freq)- Sets the center frequency of the resonator bandpass filter.
Resonance (Res)- Sets the bandwidth of the resonator bandpass filter.
Level-
- VCF- Sets the volume of the resonator signal routed to the VCF input. Use this if you'd like to further process the signal with the voltage-controlled filter.
- VCA- Sets the volume of the resonator signal routed to the VCA input. Use this if you'd like to bypass voltage-controlled filter processing and route the signal directly to the VCA.
Preset triangle- Remember when we mentioned the original Pro Soloist's fixed resonator frequency curves? We've built these into a popup menu - simply click on the upside-down triangle to select one of the "factory" frequency curves. Unlike the original instrument, any of the resonators can be set to any of the curves, in any combination.
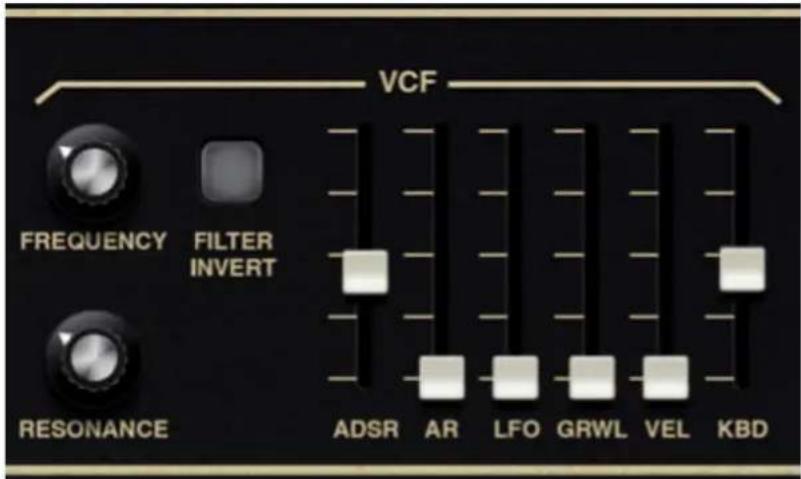
The VCF section is classic 24 dB/oct lowpass "ladder" filter. If you're not familiar with how voltage-controlled filters operate, a lowpass filter (LPF) removes high frequencies as its cutoff frequency setting is decreased from max, resulting in a dulling of sound.
Frequency- Sets the point where high-frequency attenuation begins.
Resonance- Emphasizes sound energy at and around the current cutoff frequency by adding feedback from the filter's output back to its input. At lower settings, this can be used to create mild resonances such as those heard in acoustic instruments. When combined with moving or modulating the Frequency slider, higher Res settings will give the familiar analog synth "wah" sound that launched 1000 disco records (or synthesized mute trumpets).
Filter Invert- There are two audio paths into the VCA - one from the VCF and the other from the resonator banks. This creates a number of frequency selective phase reinforcement and cancellation effects. Engaging the phase button inverts the VCF and effectively doubles the number of available timbres. Relative gain, mentioned above, also affects this. If the VCF is the only source into the VCA, Filter Invert will have no effect on sound.
VCF Modulation Sliders
- ADSR- Sets the amount of modulation of cutoff frequency via the ADSR envelope generator.
- AR- Sets the amount of modulation of cutoff frequency via the AR envelope generator.
- LFO- Sets the amount of modulation of cutoff frequency via the low-frequency oscillator.
- Growl (Grwl)- Sets the amount of modulation of cutoff frequency via the specialized "growl" low-frequency oscillator. This LFO used a unique waveform running at a frequency of 32 Hz, and is normally used in conjunction with the Touch Sensor Growl mod routing.
- Velocity (Vel)- Sets the amount of cutoff frequency modulation via keyboard velocity. Higher slider settings lower the initial cutoff frequency, and playing harder = higher cutoff frequency/brighter filter tone).
- Keyboard (Kbd)- Commonly known as "keyboard tracking," this causes the cutoff frequency to increase as ascending notes are played on a keyboard. The idea behind this is, because actual note frequencies rise as higher pitches are played, the Kbd slider adds a CV from the keyboard to the cutoff frequency in order to maintain the brightness of notes as higher pitches are played.
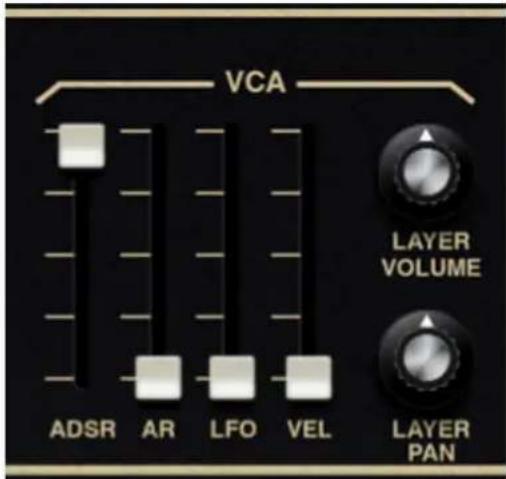
VCA is short for “voltage-controlled amplifier,” and for all intents and purposes, you can think of it as the automated volume knob the controls the amplitude of each note played. It has a number of mod sources, but is primarily controlled by either the ADSR or AR envelope generator.
VCA Modulation Sliders
- ADSR- Sets the amount of modulation of amplitude via the ADSR envelope generator.
- AR- Sets the amount of modulation of amplitude via the AR envelope generator.
- LFO- Sets the amount of modulation of amplitude via the low-frequency oscillator. This useful for tremolo-type effects.
- Velocity (Vel)- Sets the amount of amplitude modulation via keyboard velocity. Higher slider settings lower the initial amplitude, and playing harder = louder notes.
Layer Volume- Sets the volume for the currently selected layer. This is useful for balancing volume levels when using the Double or Split modes.
Layer Pan- Sets channel panning for the currently selected layer. This is useful for panning layers when using the Double or Split modes.
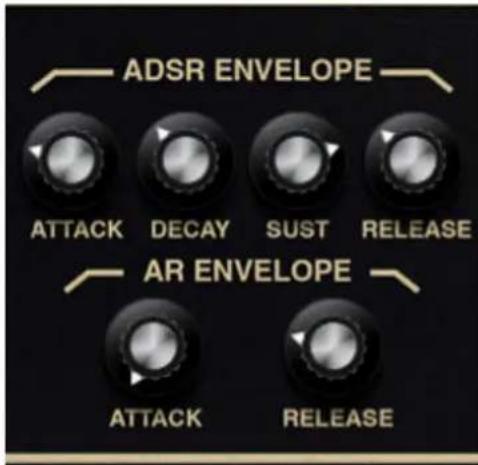
Pro-Soloist includes two envelope generators - a standard ADSR (attack/decay/sustain/release), and an AR (attack/release). These are most often used to modulate the VCA for shaping the amplitudes of notes, but also can modulate a number of other destinations using the cream-colored sliders and the Mod Matrix.
ADSR Envelope Generator
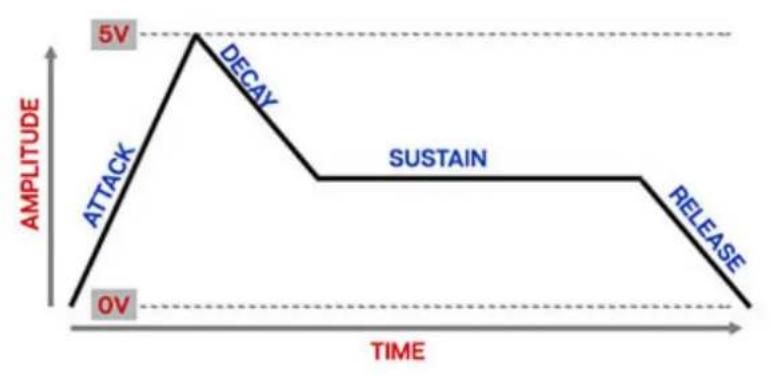
If you're not familiar with how envelope generators work, here's a CliffsNotes explanation of how an ADSR works... a real conversation starter at parties!
line
| Time | Amplitude | |------|---------| | 0 | 0V | | Peak | 5V | | Sustain | 5V | | Release | 5V |When Pro Soloist sees a gate voltage from a note, the envelope generator outputs a dynamically changing voltage, according to the settings of its four stages. The attack stage defines how long it takes for the output voltage to rise from 0 to 5 volts. Once the attack stage reaches 5V, it moves to the decay phase, which defines how long it takes to fall from 5V to the setting of the Sustain phase. Unlike the attack, decay, and release phases, which define times, sustain simply sets the held voltage level following the attack and decay phases - this equates to the envelope output level while holding down a key. Finally, the release slider defines the the length of time it takes
for the voltage to fall back to 0V when the gate input voltage is removed, i.e. when the key is released.
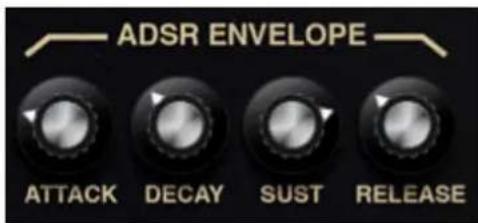
Attack- Defines the length of time for voltage to rise from 0V to 5V when a key is played.
Decay- Defines the length of time for voltage to fall from the attack stage 5V peak to sustain stage setting.
Sustain- Sets the voltage level following attack and decay phases while a note is held.
Release- Defines the length of time for voltage to fall from sustain level to 0V when a key is released.
AR Envelope Generator
A simple envelope generator with attack and release segments only. Pro Soloist's AR envelope could more accurately be labeled an ASR - attack-sustain-release envelope, because the voltage holds at 5V when key is held.
The AR envelope functions as follows:
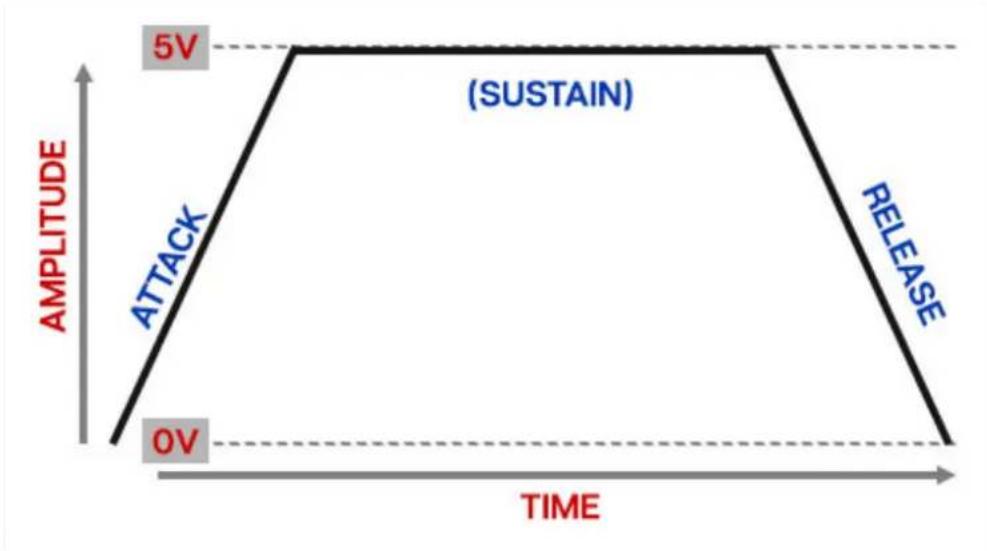
The attack stage defines how long it takes for the output voltage to rise from 0 to 5 volts. Once the attack stage reaches 5V, it remains there until the key is released. The release control defines the length of time it takes for the voltage to fall back to 0V when the gate input voltage is removed, i.e. when the key is released.
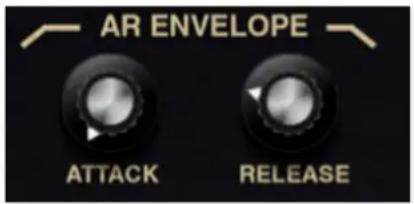
Attack- Defines the length of time for voltage to rise from 0V to 5V when the gate voltage is applied.
Release- Defines the length of time for voltage to fall to 0V when a key is released.
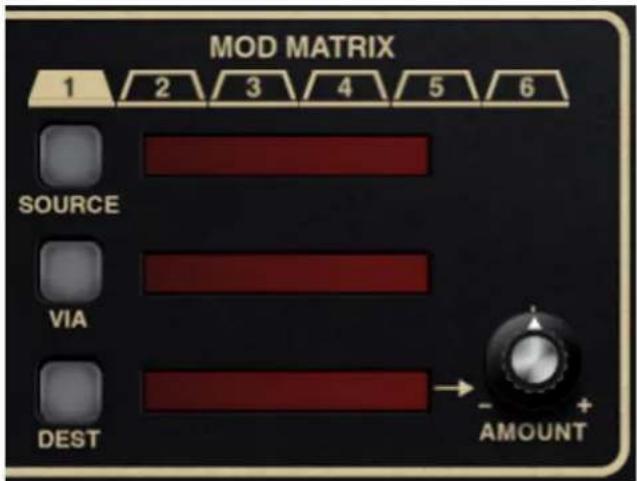
Pro Soloist's modulation routings are extensive and super easy to use. Each of its six mod slots have source, via, and destination popup menus and a bipolar attenuator to adjust the amount of mod.
Mod Slot Select tabs 1-6 - To configure a mod routing choose which slot you'd like to use by clicking on one of the numbered tab.
The tab colors change to indicate their status as follows:

Pro Soloist includes six mod slots, each with identical controls that make use of a tabbed user interface. The tab background coloring works as follows:
- The currently selected mod slot tab will be gold. The controls will affect that mod slot only.
- If a mod slot is not currently selected and does not have a destination set up, the tab background will be black.
- If the mod slot currently has a destination setting, but it isn't selected, the tab background will be white. This makes it easy to see which mod slots have routings configured without having to individually click each tab.
Source button and display- Clicking on the display screen opens a popup menu that selects the modulation source. Modulation sources are divided into type submenus.
Via button and display- The Via button allows a mod source to dynamically control how much modulation is occurring. When using a Via mod source, the
Amount attenuverter sets the maximum mod amount. Via is often used to set up mod wheel-controlled vibrato.
Amount attenuverter knob- Sets the amount of mod applied to the parameter for the currently chosen mod routing. The Amount knob is bipolar, so center position is off; turning the knob to the right applies positive modulation, and turning to the left applies negative modulation.
Modulation from two or more sources can be routed to the same parameter by combining multiple Mod Matrix slots (or multiple mod sources can be combined from the Mod Matrix and the dedicated oscillator Center and Width mod boxes). All modulation is additively summed.
Destination (Dest) button and display- The Dest button opens a popup menu that selects the modulation destination, i.e. what's getting modulated. Modulation destinations are divided into type submenus.
Mod and Via Sources
MOD SOURCES/VIA CATEGORY MOD SOURCE
LFOs LFO
LFOs GROWL
LFOs PHASER LFO
LFOs FLANGER/CHORUS LFO
ENVELOPES ADSR ENVELOPE
ENVELOPES AR ENVELOPE
OSCILLATOR SAWTOOTH WAVE
SIGNALS POLY RANDOM DC
SIGNALS +10V DC
Mod Destinations
DESTINATION CATEGORY DESTINATION
LFO SPEED
LFO DELAY
VCO FREQUENCY
DESTINATION CATEGORY DESTINATION
VCO SAW LEVEL
VCO PULSE LEVEL
VCO HIGHPASS FREQUENCY
VCO RESONATOR MIX
RESONATORS 1/2/3/4/5 FREQUENCY
RESONATORS 1/2/3/4/5 RESONANCE
RESONATORS 1/2/3/4/5 VCF AMOUNT
RESONATORS 1/2/3/4/5 VCA AMOUNT
VCF CUTOFF
VCF RESONANCE
VCA VOLUME
VCA PAN
ADSR ATTACK
ADSR DECAY
ADSR SUSTAIN
ADSR RELEASE
AR ATTACK
AR RELEASE
DESTINATION CATEGORY DESTINATION
DISTORT DRIVE
DISTORT TONE
DISTORT LEVEL
PHASER FREQUENCY
PHASER DEPTH
PHASER RESONANCE
FLANGER/CHORUS FREQUENCY
FLANGER/CHORUS DEPTH
FLANGER/CHORUS FLANGER DELAY
FLANGER/CHORUS FLANGER RESONANCE
FLANGER/CHORUS MIX
ECHO TIME
ECHO FEEDBACK
ECHO DAMPING
ECHO SPREAD
ECHO MIX
REVERB DECAY
REVERB HIGHPASS
DESTINATION CATEGORY DESTINATION
REVERB LOWPASS
REVERB MIX

Pro-Soloist includes a full-featured arpeggiator with clock sync, and is independent for each layer when using Double or Split mode.
Effects are also on this panel, and include Distort, Phaser, Flanger/Chorus, Echo, and Reverb, plus a Global Limiter. These can be used in any combination. When in Double or Split mode, effects settings can be global for the entire instrument, or independent for each layer, so it's like having two sets of effects (except for the Global Limiter, which is always global, hence the name...).
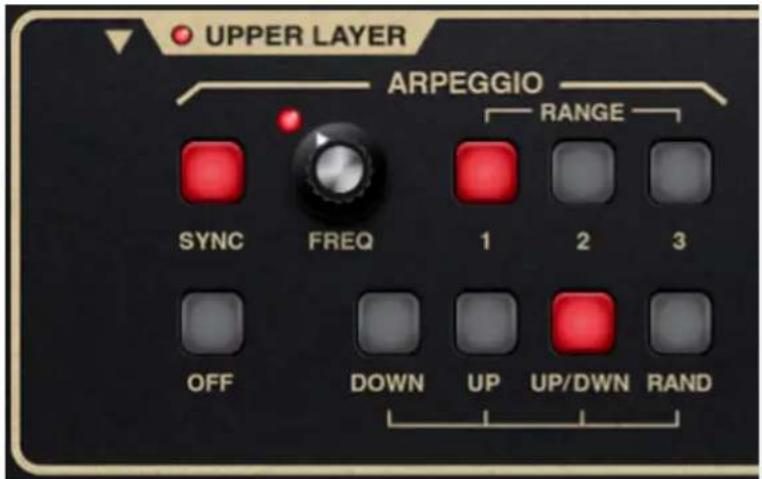
An arpeggiator is basically a step sequencer that plays each note of a chord individually in an ascending or descending pattern across one or more octaves.
Sync- Engaging the Sync button locks arpeggio timing to master tempo. When engaged, the Rate knob snaps to note values ranging from 1/64th note triplet to 8 beats. Sync mode locks to the tempo in the top toolbar when using the Sines standalone version or the current project tempo when the plug-in version is used in a DAW.
Frequency (Freq)- Sets the playback speed of arpeggiator sequences, from 0.25 to 30 Hz (with Sync disabled).
Range 1/2/3- Selects how many octaves the pattern will play before repeating. Only one button can be pressed at any time.
Off/Pattern buttons- These buttons enable the arpeggiator and select the order in which the notes of chords are played.
- Off- Disables the arpeggiator.
- Down- Notes play in order from highest to lower.
- Up- Notes play in order from lowest to highest.
- Rnd (Random)- Notes are played in a random order.
- Up/Dwn- Notes play in order from bottom to top, then back down again. Not to be confused with Diana Ross' 1980 hit, "Upside Down," where the same thing just repeats, over and over and over.
Using Arpeggio in Double and Split Layer Modes
If Pro Soloist is set to Double or Split Layer Mode, you'll essentially have two completely independent arpeggios - as usual, all illumination will be green when using the Lower layer. If you'd like both layers to behave the same, simply set the control values the same.

Pro Soloist includes six simultaneous effects: Distortion, Phaser, Flanger/Chorus, Delay, and Reverb. These can be used in any combination.
Global Limiter
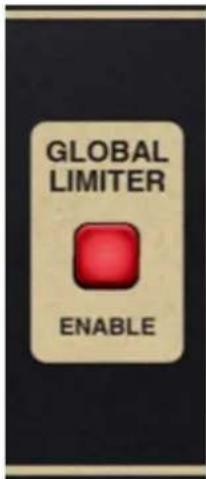
Pro Soloist's onboard limiter gently controls overall output level to prevent ugly clipping in case you're playing 16 notes at once with your elbows. It's super transparent, so you can leave it on all the time without detrimentally affecting audio.
Unlike the other effects, it's global, so it affects the entire instrument, and is not independent per layer when using the Double and Split modes.
FX Mode
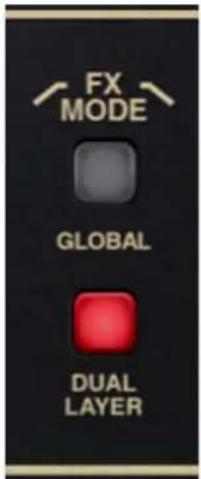
When set to the Global position, both layers run through a single set of effects. This is useful when you'd like the same effects settings for both layers when creating doubled (layered) or split patches. When set to the Dual Layer position, an entirely independent effects section is available for the upper and lower layers (Layer Control Upper and Lower settings will behave as with all other parameters.)
The FX Mode buttons are only applicable when in Double or Split Layer Mode.
Distort
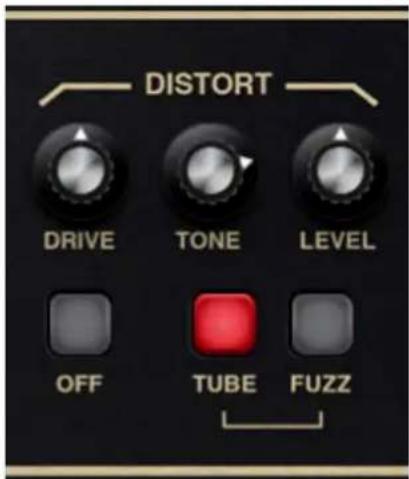
Drive- Overall amount of distortion.
Tone- Sets the brightness of tone.
Level- Overall volume; this doesn't affect the amount of distortion. Increasing drive will cause an overall volume increase, Level can used to balance things out.
Mode buttons-
- Off- Distort effect is disabled.
- Tube- Relatively mellow distortion mode. Use it to add just little bit of vintage hair to sounds.
- Fuzz- Aggressive and raunchy vintage fuzz tone.
Phaser
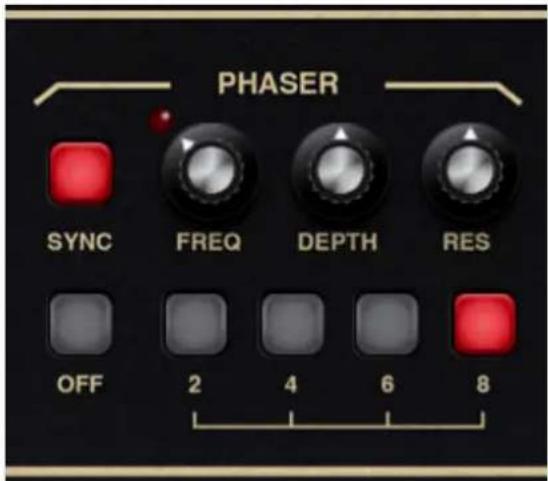
Sync- The Sync button locks the rate of the Phaser's modulation LFO to the tempo in the top toolbar when using the Pro Soloist standalone version, or to the current project tempo when the plug-in version is used in a DAW. When engaged, the Freq knob snaps to note values ranging from 1/64th note triplet to 8 beats.
Frequency (Freq)- Sets the phaser's internal LFO speed from 0.01 to 8 Hz. The LED flashes at the current rate
Depth- Sets the effect depth - essentially an amount control.
Res (Resonance)- Increasing the amount of Res intensifies the phasing effect. This is sometimes referred as "feedback" in other phaser units.
Mode buttons-
- Off- Phaser effect is disabled.
- 2/4/6/8 Stage setting- Who do we appreciate?!? Sorry... Pro Soloist's phaser includes up to 8 stereo all-pass filter stages. As a general rule, more stages = lusher phase, but there are plenty of interesting tones to be had using the lower stage settings.
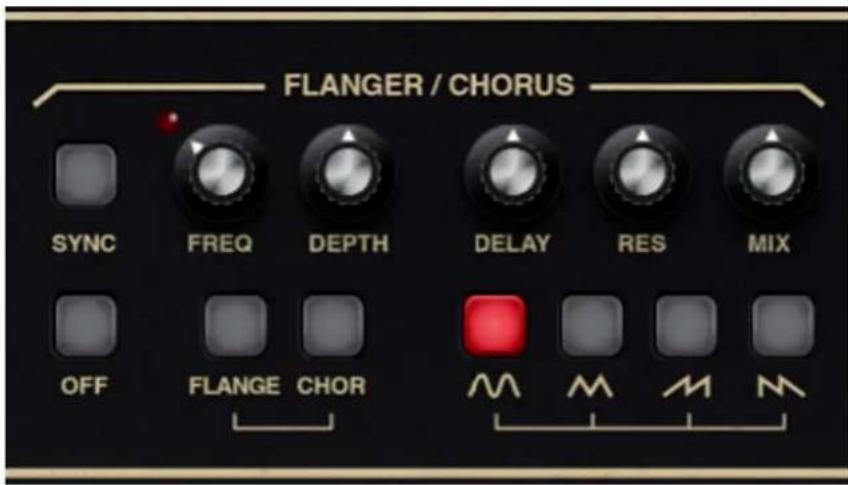
We've included a thick and warm flanger/chorus effect. Flanging and Chorus are closely related - the general difference being that flangers use a shorter time range and some amount of feedback (this intensifies the "jet-flyby" whoosh), whereas choruses utilize a slightly longer delay time, and no feedback.
Sync- The Sync button locks the rate of the Flanger/Chorus's modulation LFO to the tempo in the top toolbar when using the Pro Soloist standalone version, or to the current project tempo when the plug-in version is used in a DAW. When engaged, the Freq knob snaps to note values ranging from 1/64th note triplet to 8 beats.
Freq- Sets the phaser's internal LFO speed from 0.01 to 8 Hz.
Mix- Sets the ratio of clean to effected sound. Flanging and chorusing is usually optimal at a 50/50 setting, but we've added the Mix control by popular demand to allow more subtle (or warble-riffic) tones.
Depth- Sets effect depth, i.e. the amount of modulation.
Delay Time- Sets the amount of delay time when in Flanger mode, from 1-13ms.
Res- Sets the amount of internal feedback when in Flange mode.
Mode buttons-
- Off- Flanger/Chorus effect is disabled.
- Flange- Flange mode is enabled.
- Chorus- Chorus mode is enabled. Note that the Delay and Res knobs are disabled when in Chorus mode.
Modulation Waves- Selects the shape of the modulation waveform. Options include sine, triangle, ramp, and sawtooth.
Echo
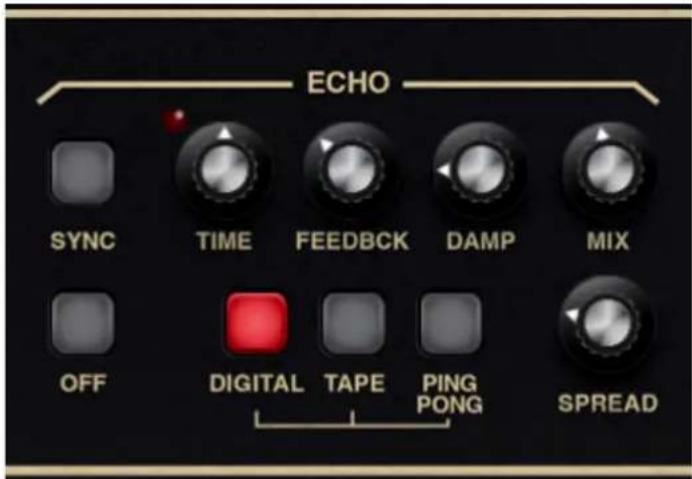
Sync- The Sync button locks the delay time to master tempo. When engaged, the Time knob snaps to note values ranging from 1/64th note triplet to 8 beats. Sync mode locks to the tempo in the top toolbar when using the Pro Soloist standalone version or the current project tempo when the plug-in version is used in a DAW.
Time- Sets delay time, from 1 to 2000 ms. If the Sync button is enabled, time settings snap to synchronized note values.
Feedback- Routes the output to the input for additional repeats. Be careful at high settings as this can result in runaway feedback madness.
Damp- Attenuates high-frequencies as the knob amount is increased. Not only does this create more natural sounding decays, it also reduces the "stacking" effect that occurs with high feedback levels.
Mix- Sets the ratio of clean to effected sound.
Mode buttons-
- Off- Disables Echo effect.
• Digital- A pristine sounding digital delay. - Tape- Reproduces the effect of a vintage "space echo" tape delay.
- Ping Pong- Echoes alternate between audio channels.
Spread- Alters the left and right channel delay times creating a stereoizing effect. Greater amounts of spread increase the delay time differential and thus the stereo separation.
Reverb
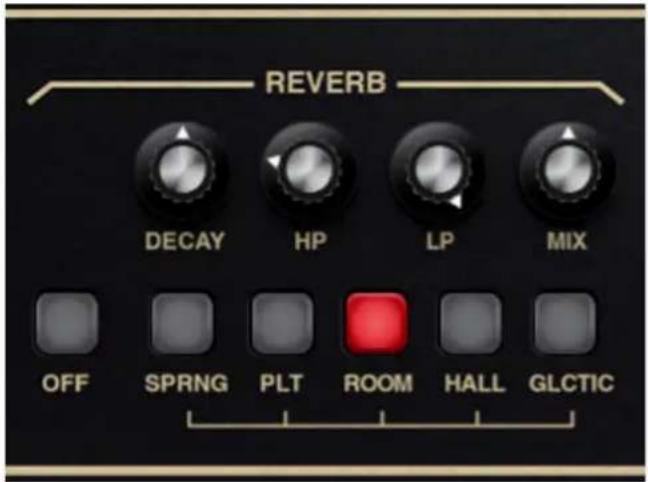
Decay- Sets the length of reverb release time/size of room.
HP- A highpass filter affecting wet reverb signal only. Low frequencies are increasingly attenuated as the knob setting is increased.
LP- A lowpass filter affecting wet reverb signal only High frequencies are increasingly attenuated as the knob setting is decreased.
Mix- Sets the ratio of clean to effected sound.
Mode buttons-
• Off- Disables Reverb effect.
- Spring- Recreates mechanical spring-reverb effect often seen (and kicked) in vintage guitar amps.
- Plate- A medium-to-large studio plate-style algorithm.
- Room- Recreates a vintage algorithmic-style medium room verb.
• Hall- A large, hall-style reverb.
• Galactic (Glctic)- Cherry Audio's exclusive, giant, spacey reverb.
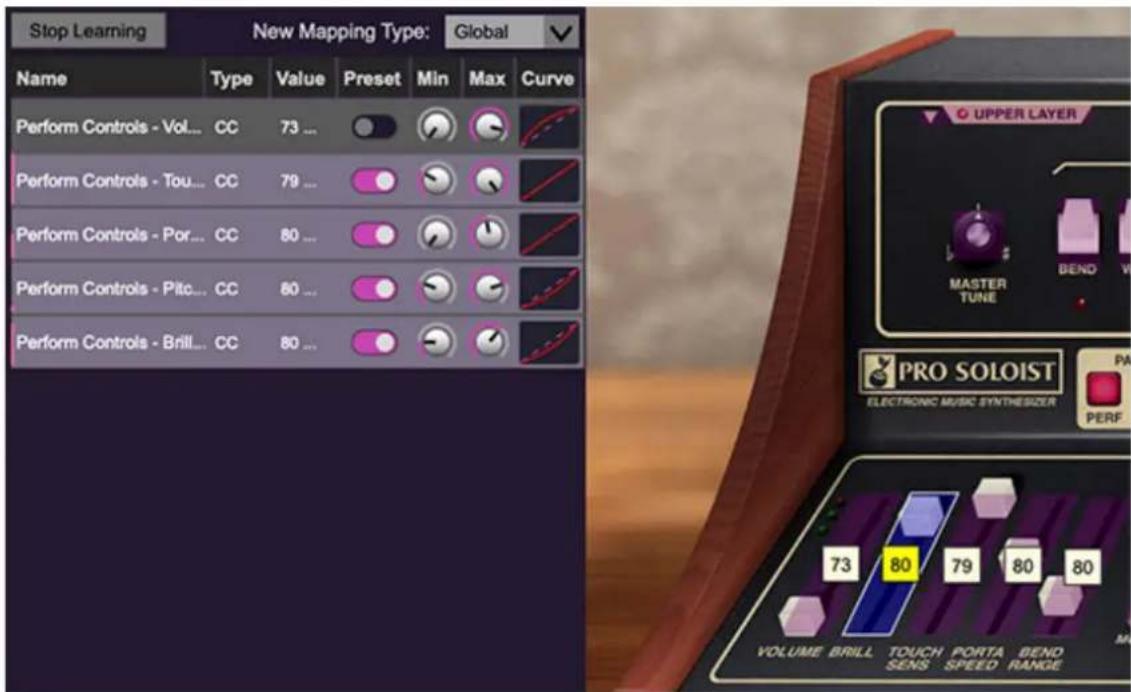
Assigning internal and external hardware controls adds a whole new dimension of control and musicality to patches, and it's really easy to do. The MIDI Tab is where all controller assignments can be viewed and tweaked. First we'll show how to assign an external hardware controller to a Pro Soloist control, then we'll go over all parameters in the MIDI Tab.
Basic External Hardware Control Assignment
This is the quick, "I just want to assign a hardware control right now!," section. We recommend reading this whole section to best take advantage of Pro Soloist's cool MIDI control assignments.
In this example, we'll assign a hardware knob和社会 control to the VCF section Frequency knob.
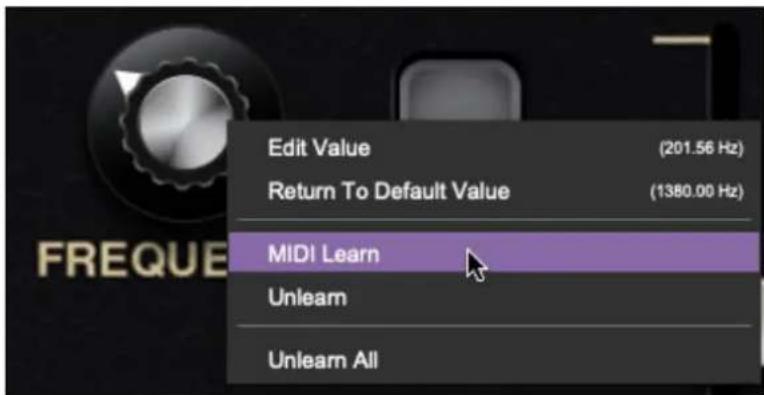
Begin by right-clicking on the Frequency knob in the VCF section and selecting MIDI Learn. A transparent purple overlay appears over the entire slider indicating that it's in learn mode. Now move the desired hardware control device. The purple overlay disappears and the hardware control will move the onscreen knob. If you get cold feet (or accidentally put the wrong control into learn mode), learn mode can be aborted by right-clicking and selecting Stop Learning.
This is the basic procedure for assigning hardware controllers to almost any Pro Soloist control.
Once a MIDI controller has been assigned, in addition to real-time control of a Pro Soloist parameter, you'll also be able to record and play back controller data from a DAW.
The MIDI Tab
This is command central for all MIDI controller assignments. Here you'll be able to see information about all currently assigned controllers and adjust control ranges.
To view or hide the MIDI Tab, click the MIDI button in the top toolbar.
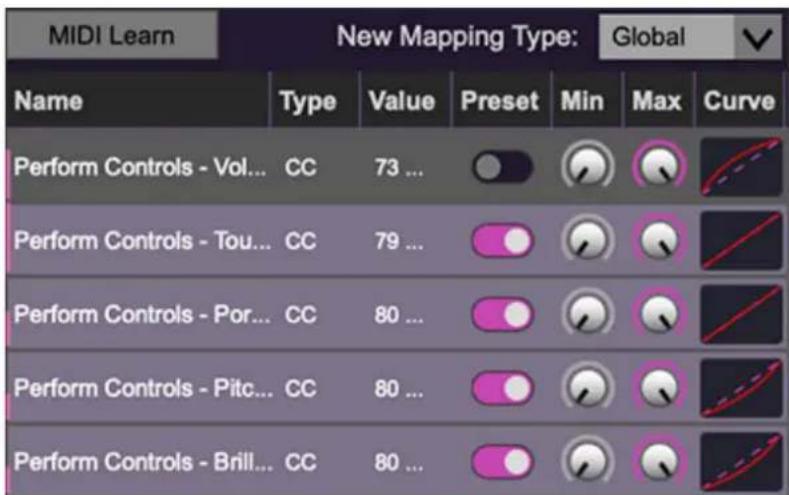
MIDI Learn button- This is almost exactly the same as enabling MIDI learn mode by right-clicking a control. Click the MIDI Learn button to enter learn mode (all controls turn purple). Unlike right-clicking on specific knobs, where
Pro Soloist automatically exits controller assignment mode, clicking the MIDI Learn knob "stays on" to enable assignment of multiple hardware controls. This is handy for quickly assigning a bunch of continuous controls or the buttons of a grid-style controller.
bar
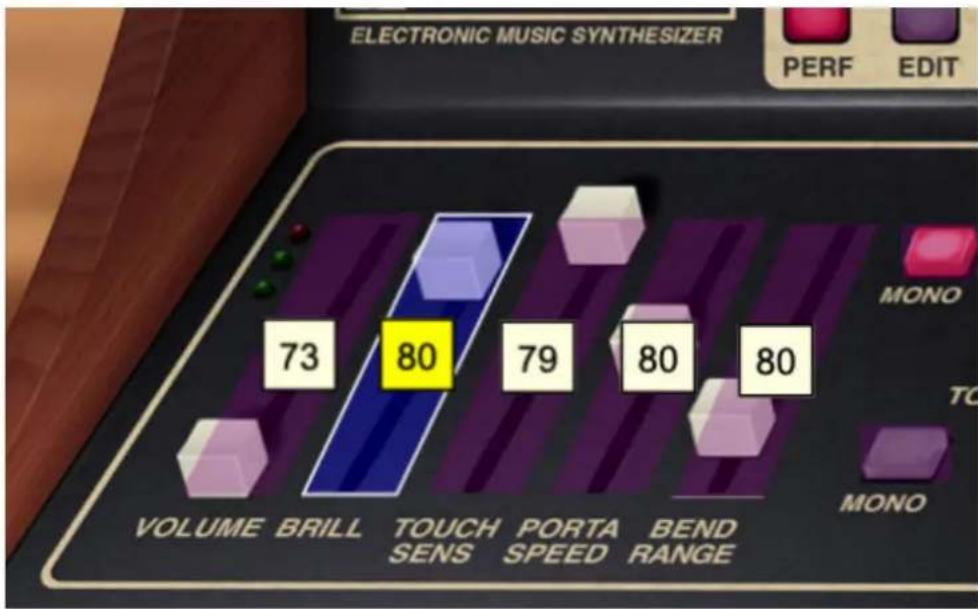
ELECTRONIC MUSIC SYNTHESIZER | Category | Value | |---|---| | VOLUME | 73 | | BRILL | 80 | | TOUCH SENS | 79 | | PORTA SPEED | 80 | | BEND RANGE | 80 | | PERF | (not labeled) | | EDIT | (not labeled) | | MONO | (not labeled) |When in MIDI Tab learn mode, any previously assigned controller numbers are displayed atop onscreen controls. These indicate the MIDI continuous controller number of the assigned hardware control (these are also displayed in the MIDI library tab at left).
To assign multiple controls, click MIDI Learn, click an on-screen control, move the desired hardware knob or slider, continue clicking and assigning on-screen controllers until all desired controls are assigned, then click Stop Learning to exit learn mode.
Remember that a single hardware knob和社会按钮 isn't limited to controlling just one parameter - a single hardware controller can simultaneously operate as many controls as you'd like. (Feel free to impress friends by referring to this as "multiplexing," or if you REALLY want to lay it on thick, refer to it as "mux'ing")
New Mapping Type- This popup menu selects whether newly assigned MIDI mappings will be global (affects all sounds and doesn't change when different presets are selected) or saved with individual presets.
MIDI Tab Columns
Name- Displays the name of the parameter being controlled.
Type- There are five possible types of controller automation in Pro Soloist:
- Note- Notes played on a MIDI keyboard controller, expressed as C-1 to G9
- CC (MIDI Continuous Controller)- The standard 128 MIDI controller numbers as defined in the MIDI spec. More specifically, these are the controllers transmitted by hardware knob and slider controls. MIDI CC's can be used to control parameters in real-time or recorded and played back within DAW software.
- MMC (MIDI Machine Control)- The MIDI control protocol for tape machine-style transport controls. Back in the dark ages, this was used to control wonky old Tascam and Fostex reel-to-reel monsters, but it's useful if your MIDI controller has tape-style transport control buttons.
- Pressure- Some keyboard controllers transmit controller data when keys are pressed and released as they're held down; this is known as a "pressure" or "aftertouch." The vast majority of keyboard controllers with aftertouch transmit "mono" aftertouch only; in other words, aftertouch data is the sum of all keys to one single data stream.
- Key- This allows keys of the computer QWERTY keyboard to act as button controls for Pro Soloist's onscreen controls.
Value- Displays the specific automation controller. In the case of a Note this would show a MIDI note number (C-1 to G9, for a MIDI CC, this would be the MIDI CC controller number, etc. Clicking on the value opens a pop-up menu where all values are displayed and can be selected.
Preset- This slider works in conjunction with the New Mapping Typemenu. In the left position (gray background), the MIDI mapping is global (affects all sounds and doesn't change when different presets are selected), in the right position (lavender background), the MIDI mapping is saved with, and only affects the current sound preset.
The Preset switch is super nifty, because it means MIDI mappings can easily be changed to global or per-preset status at any time. (A lot of folks asked us for this feature.)
Min- Sets a limit on the lowest value any automation control can set a mapped controller to. This actually recalibrates the range of the automation controller to the remaining parameter range.
Max- Sets a limit on the highest value any automation control can set a mapped controller to. This actually recalibrates the range of the automation
controller to the remaining parameter range.
- Super Tricky Min-Max Tricks Not only can parameter ranges be limited via the Min and Max knobs, mapped control destinations can be completely inverted by setting the Min knob all the way up and the Max knob all the way down (or anywhere in between).
Limiting and inverting parameter ranges with the Min/Max controls is particularly useful when multiplexing a single hardware control to operate multiple parameters. Along with the Curve control, the customization possibilities are super flexible.
Curve- These allow the customization of how incoming MIDI CC controls affect the movement of Pro Soloist's onscreen controls, ranging from exponential to linear to logarithmic curves.
MIDI Tab Column Configuration Right-Click Menus
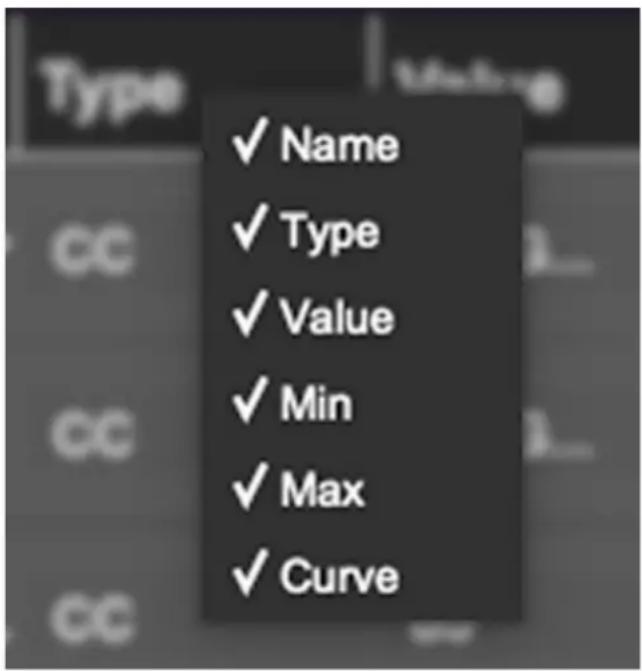
Right-clicking anywhere in the top row (Name, Type, Value, etc.) displays the column configuration menu. Checking/unchecking these allows hiding and display of each column. This has no effect on assignments.
MIDI Tab Parameters Right-Click
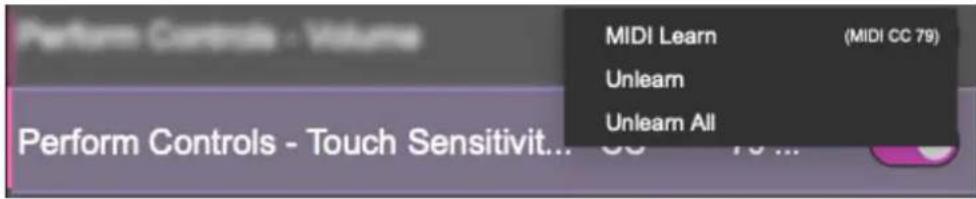
Right-clicking on an assigned parameter opens the menu above.
MIDI Learn- This is used to change the controller assigned to a particular parameter.
Unlearn- Deletes the selected automation parameter.
Unlearn All- Deletes all controller assignments for the patch. Pro Soloist will display a warning dialog prior to deletion in order to thwart potential unlearn-related disasters.
![QWERTY Keyboard CONTROL VELOCITY: 90 BEND - / + MOD [0-9] SUSTAIN RESET C4 C5 OCT- STEP- A S D F G H J K L ; W E T Y U O P OCT+ STEP+](/content/2026/05/940657/images/b9a27cc190146537073e81dd8cf32835598d27c907ee75faabd8a0f91487c0a4.jpg)
If you don't have a MIDI keyboard attached to your computer, the standard QWERTY computer keyboard can be used to play notes - we're pretty sure you've got one of those! We'll refer to this as the "MTK." Following is a list of MTK keyboard modifiers and functions:

natural_image
Abstract geometric pattern with vertical stripes inside a circle on a dark purple background (no text or symbols)Opening and Closing the MTK - click the the circular keyboard icon in the top toolbar. To close the MTK, click the keyboard icon in the top toolbar, or click the X in the top right corner.
Play Notes- To trigger notes, simply press the corresponding computer keyboard key or mouse click the onscreen keys.
Adjust Currently Visible MTK Range- Slide the purple scroll bar horizontally to adjust the currently visible keyboard range.
Adjust Overall Visible Keyboard Range- Clicking and dragging the right edge of the MTL window allows the overall size of the window to be adjusted. This lets you view more or less of the onscreen keyboard. Note that the MTK window's borders cannot exceed the overall outside dimensions of the Mercury-4 window.
Shift Range Up/Down Octave- Click the Oct- and Oct+ buttons at the top left and right of the onscreen MTK. The current range is displayed above the keyboard.
Shift Range Up/Down Semitone- Click the Step- and Step+ buttons at the bottom left and right of the onscreen MTK. The current range is displayed above the keyboard.
Hide/View Controllers- Clicking Control at the far left hides and displays velocity, bender, mod, and sustain control parameters. Hiding the control view makes more space available for the keyboard.
Set Note Velocity- Move the purple Velocity bar to adjust the output velocity of notes.
Pitch Bend- To pitch a note or notes, press the + or - computer keyboard keys while playing a note. Notes will bend up to an octave. Notes can also be pitchbent by clicking the mouse in the Bend area.
Mod Wheel- To add mod wheel modulation, press the number keys from 0-9 (above the character keys) while playing a note. The modulation amount will vary from none (0) to full modulation (9). Note that modulation will "stick" at the selected number; to disable modulation, click the 0 key. Mod can also be engaged by clicking the mouse in the mod bar area.
Sustain- The Sustain button mimics the functionality of a standard sustain pedal. Click the [TAB] key to engage sustain, or [SHIFT]+[TAB] to lock it. The Sustain button can also be engaged by mouse clicking it.
Reset- Initializes all MTK parameters including keyboard range and control parameters.
Clicking the settings gear icon in the top purple menu strip opens a window with multiple tabs for configuring various "under-the-hood" settings. These are mostly set-and-forget kind of parameters - all the stuff you'll want to tweak is on the front panel, as the heavens intended!
General
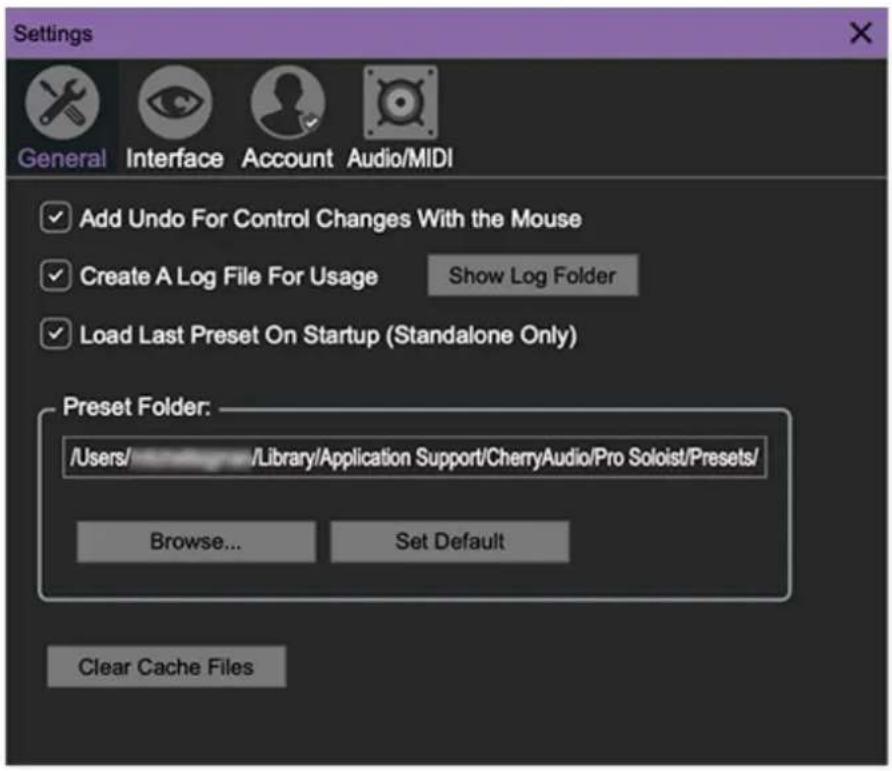
- Add Undo For Control Changes With The Mouse- Enabling this allows undo of knob和社会verbush button adjustments. You'll want this on if you want the ability to undo all aspects of patch editing and programming.
- Load Last Preset On Startup (Standalone Only)- Automatically loads the last preset used when Pro Soloist standalone version is started.
- Create A Log File For Usage- This creates a text doc of all of Pro Soloist's internal and routines during use. It is mainly intended for our tech staff should you experience any issues. Clicking Show Log Folder opens the folder containing Pro Soloist log file docs.
- Preset Folder- Displays the current location of Pro Soloist's sound presets. This can be changed by clicking and typing in the field.
- Browse... - Displays the current location of preset folder in the file manager.
- Set Default- Sets the current displayed Preset Folder path as the default location
- Clear Cache Files- Deletes all log files, temporary sounds, and the image cache.
Interface
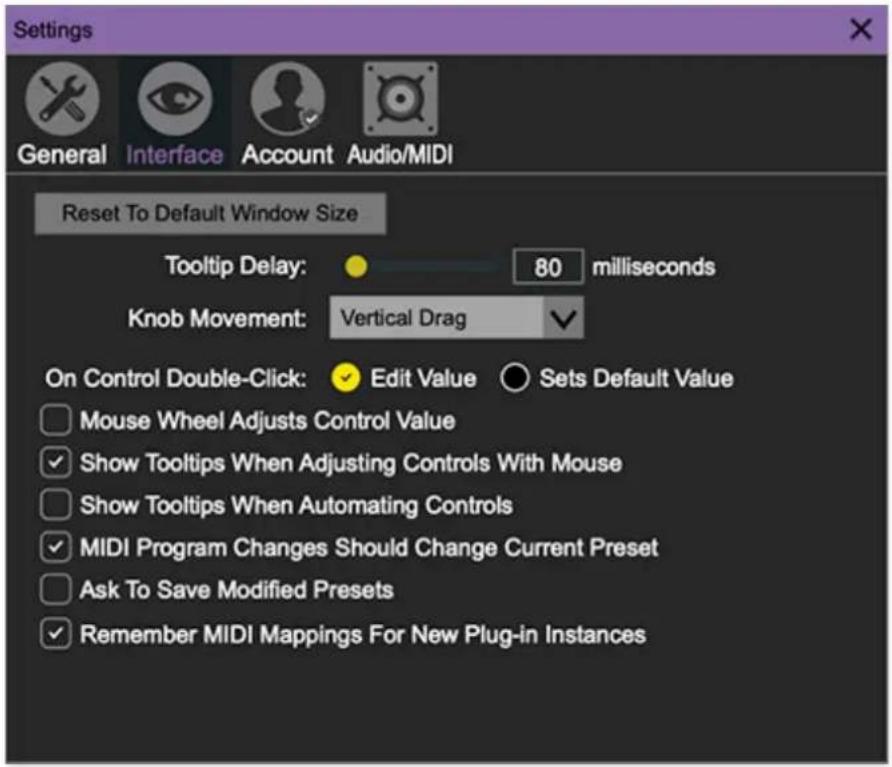
Allows customization of Pro Soloist's user interface settings.
- Reset To Default Window Size- Resets the Pro Soloist workspace to 100%. Use this to reset the window size if Pro Soloist's workspace somehow becomes too large for your display and can't be resized.
- Tooltip Delay- Tooltips are those informative bits of text that pop up when hovering over a control (go ahead and try it, we'll wait...). The Tooltip Delaysetting defines how long you must hover before the tooltip pops up.
-
Knob Movement- Defines which how mouse movements related to turning onscreen knobs. It defaults to Vertical Drag, but can be changed to Horizontal Drag, or Rotary Drag if you're one those folks that cut their teeth on the Steinberg Model E VST back in 2000.
-
On Control Double-Click- Defines what happens when the mouse is double-clicked on a control. If Edit Value is selected, an exact number can be entered by typing the number and hitting [ENTER] or [RETURN]. If Sets Default Value is selected, double-clicking a control resets it to its default value.
- Mouse Wheel Adjusts Control Value- Enabling this lets you adjust knob, slider, and switch values by moving the mouse wheel. This works great with a standard mouse wheel, but you'll want to disable it if you're using an Apple Magic Mouse (which will move the control AND scroll the window).
- Show Tooltips When Adjusting Controls With Mouse- Displays parameter tooltips/values when the mouse is hovered over a control or as a control is moved with mouse button down.
- Show Tooltips When Automating Controls- Displays parameter tooltips/values next to controls a if a control is moved via an assigned MIDI controller or automation.
- MIDI Program Changes Should Change Current Preset- Allows MIDI program change messages to change Pro Soloist patches.
- Ask To Save Modified Presets- This opens a dialog window asking if you'd like to save changes if a patch has been edited and a new patch is selected. If you're the type that likes to click through presets and tweak a control here and there, it can be annoying to have a window pop-up asking if you'd like to save every time you switch presets - if you're that person, keep this off.
- Remember MIDI Mappings For New Plug-in Instances- When enabled, Pro Soloist remembers all MIDI Tab controller settings.
Account
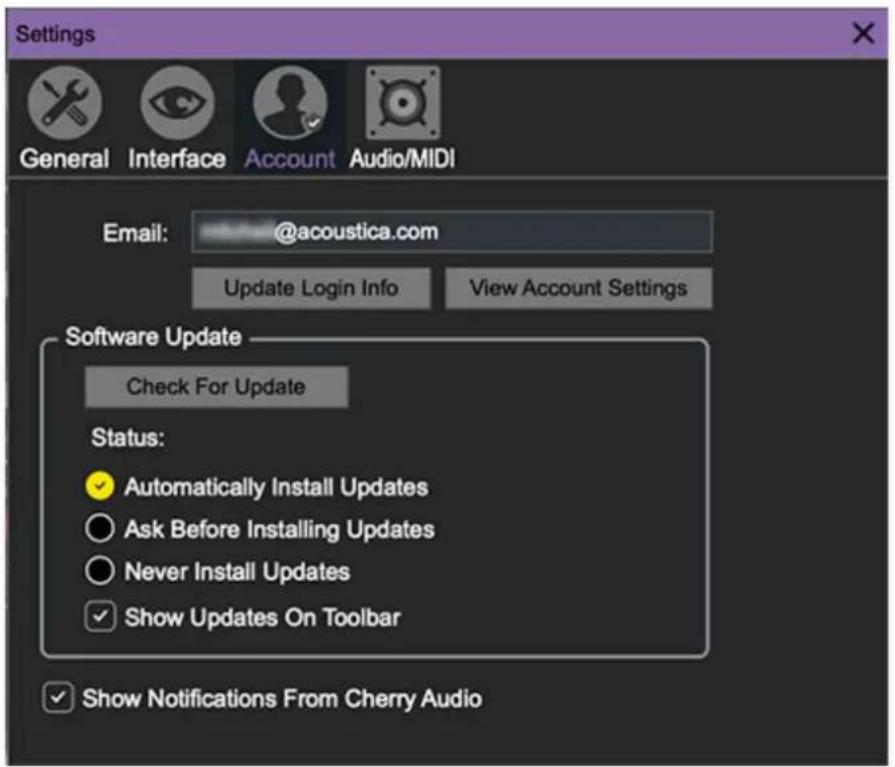
Settings for personal login information and account.
- Email- Displays the email address of the current login.
- Update Login Info- Clicking this opens the same email and password login screen you'll see when initially launching Pro Soloist. Click here for updates about yacht rock superstar, Kenny Loggins.
- View Account Settings- This opens your personal account page on the Cherry Audio Store website containing information about modules purchased and more.
Software Update
- We often fix bugs and make improvements; below are options defining how Pro Soloist handles updates.
- Check For Update- Click this to see if an updated version of Pro Soloist available.
Status-
- Automatically Install Updates- Updates are automatically downloaded and installed.
- Ask Before Installing Updates- By default, Pro Soloist automatically downloads new versions of modules when available. Checking this box defeats automatic updates and will ask if you'd like to install updates
when they become available.
We'll never make changes that can potentially "break" existing patches but we recommend enabling Ask Before Installing Updates if you're using Pro Soloist for live performances or other "mission critical" situations.
- Never Install Updates- Pro Soloist never automatically installs updates.
• Show Updates On Toolbar- Checking this will display an icon in the toolbar next to the logo letting you know there's an update available.
Show Notifications From Cherry Audio- We occasionally will fire off in-app advertisements; disabling this checkbox will hide them. We hate repetitive, annoying ads as much as you, so we won't use this feature too often. When we do, it'll be for something super cool (like a killer sale), so we recommend leaving it on.
Audio/MIDI
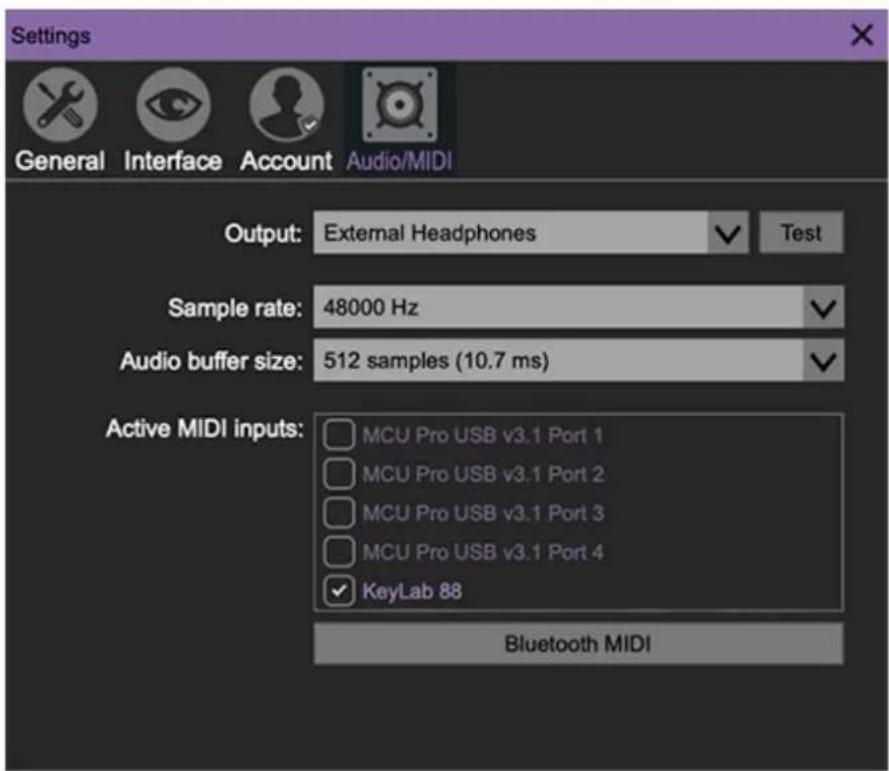
Settings for audio and MIDI hardware input and output.
This tab is only visible in the standalone version of Pro Soloist.
- Output- Use this drop-down menu to choose a physical audio output source. This defaults to Built-In Line Output, i.e. your computer's onboard
system audio, but you'll get better fidelity with an external professional audio interface. The biggest audible difference is usually reduced background noise or hum, but external audio hardware also offers greater flexibility in terms of number of inputs and outputs and built-in mic or low-level instruments pres (i.e. electric guitars). These are especially useful if you're using Pro Soloist's external inputs to process sound. The Test button will produce a sine wave when clicked; this will help with troubleshooting, aka, "WHY THE HECK ISN'T THIS MAKING ANY NOISE?!?"
- Sample Rate- This sets Pro Soloist's global sample rate. Lower sample rates offer better performance, but if you have a fast computer, high sample rates may offer slightly improved fidelity.
- Audio Buffer Size- As with any digital audio app, this defines performance vs. note latency, and will largely depend upon computer CPU speed. A professional external audio interface will almost always exhibit better performance than “built-in” system audio. Lower settings will result in less latency (in the form of faster response to notes played), but will increase the chances of audio gapping or crackling noise.
- Active MIDI Inputs- Displays all available MIDI input sources, i.e. keyboards, pad controls, MIDI knob/fader control surfaces, etc. Check boxes to enable one or more devices. If notes aren't playing when using Pro Soloist in standalone mode check to make sure your USB/MIDI controller is checked in this area.
- Pre-Purchase Demo Mode
- Technical Assistance
- Importing Presets with drag-and-drop
- Focus Button
- Preset List Right-Click Functions
- Panel Mode
- Layer Mode
- Layer Control Tabs and Buttons
- Left-Hand Sliders
- Keyboard Mode
- Touch Sensor
- Octave Tranpose
- Touch Sensor Effects
- Preset Paddles
- Preset Paddles and Effects - Important!
- VCO Modulation Sliders
- Resonator Bank Tabbed Interface
- Resonator Controls
- Level-
- VCF Modulation Sliders
- VCA Modulation Sliders
- ADSR Envelope Generator
- AR Envelope Generator
- Mod and Via Sources
- Mod Destinations
- Using Arpeggio in Double and Split Layer Modes
- Global Limiter
- FX Mode
- Distort
- Mode buttons-
- Phaser
- Echo
- Reverb
- Basic External Hardware Control Assignment
- The MIDI Tab
- MIDI Tab Columns
- MIDI Tab Column Configuration Right-Click Menus
- MIDI Tab Parameters Right-Click
- General
- Interface
- Account
- Software Update
- Status-
- Audio/MIDI
- This tab is only visible in the standalone version of Pro Soloist.
Brand : Cherry Audio
Model : Pro Soloist
Category : Audio software