
TRMRP164TB - Security Camera Turing - Free user manual and instructions
Find the device manual for free TRMRP164TB Turing in PDF.


| Product Type | Smart NVR System with Bridge |
| Brand | Turing |
| Model | TRMRP164TB |
| Supported Cameras | Up to 16 IP cameras (PoE or local network) |
| PoE Ports | Yes (on applicable NVR models) |
| Storage | Local HDD (up to 2 drives) and cloud storage |
| Hard Drive Installation | Internal SATA HDD, tool-less or screw mounting |
| Video Output | HDMI, VGA |
| Audio | Audio in/out, bidirectional talk |
| Alarm I/O | Yes |
| Network | Ethernet (RJ45), requires internet for activation |
| AI Detection | Intrusion detection, enter area detection |
| Mobile App | TURING app for iOS and Android |
| Web Interface | Yes, at https://ai-video.turingvideo.com |
| RMA Policy | 30-day return, 36-month hardware warranty (IP cameras and NVRs) |
| Power Supply | 120V outlet (power adapter included) |
| Bridge Included | Yes, Turing Bridge TV-SERVER |
| Compliance | FCC Part 15 |
Frequently Asked Questions - TRMRP164TB Turing
User questions about TRMRP164TB Turing
0 question about this device. Answer the ones you know or ask your own.
Ask a new question about this device
Download the instructions for your Security Camera in PDF format for free! Find your manual TRMRP164TB - Turing and take your electronic device back in hand. On this page are published all the documents necessary for the use of your device. TRMRP164TB by Turing.
USER MANUAL TRMRP164TB Turing
natural_image
Abstract geometric network pattern with interconnected nodes and triangular facets (no text or symbols)
For Installer Only

Internet Access Required
TURING
SMART INSTALLATION QSG
Smart Series NVR and BridgetUR-SI-QSG-V18
What's in the box
Congratulations on your purchase of the TURING Smart Series IP Cameras and NVR system! This system provides Video Surveillance as a Service features with local storage and connectivity - as as well as cloud storage capabilities.
PARTS: Check to be sure the following parts have been included in your purchase. If anything is missing, please contact our support at support@turingvideo.com.
TURING BRIDGE TV-SERVER
Bridge Hardware
Power adapter


Peripherals Needs (Not Included)

Internet Access
TURING SMART SERIES NVR
NVR Hardware
■ Accessories Box
Power cord
- SATA cable

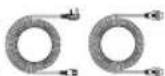

Network Cable
CATS / CAT6

HDMI CableMonitor
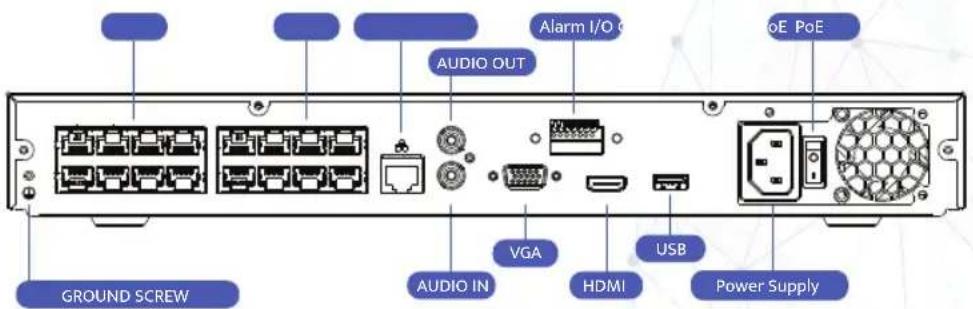
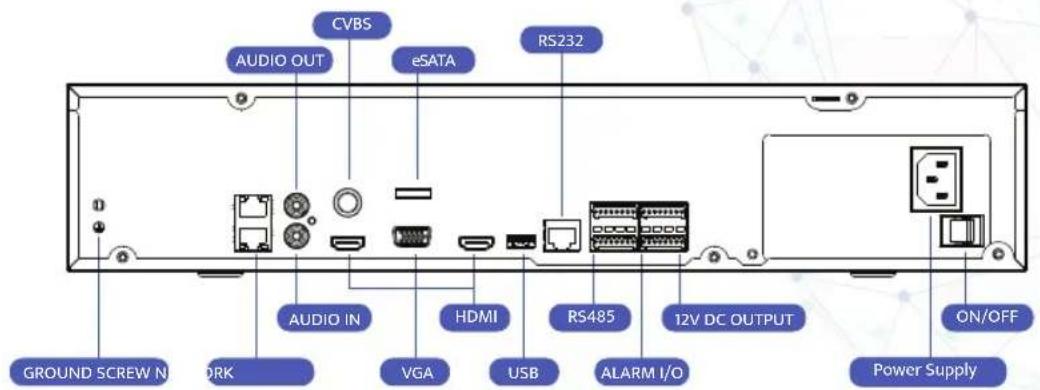
Available Ports
NVR PART NUMBERS: TR-MRP04(2T), TR-MRP08(2T), TR-MRP16(4T)
NVR PART NUMBERS: TR-MR32R, TR-MR64R
Installing Hard Drive
NVR PART NUMBERS: TR-MRPO4(2T), TR-MRPO8(2T), TR-MRP16(4T)
If you need to install a drive into the NVR, use a Phillips head screwdriver and remove four rear screws and two side screws.
Lift cover off and position the drive over the holes shown below.
Insert four screws under the NVR and connect them to the four holes in the bottom of the drive.

Installing Hard Drive
NVR PART NUMBERS: TR-MRPO4(2T), TR-MRPO8(2T), TR-MRP16(4T)
Insert the drive's SATA data and power supply cables to the control board as shown below.

NOTE: Data cables and power cables must be inserted into the control board in order. For a single drive, you must connect it to HD1, and for a second drive, you must connect it to HD2. Be sure not to skip any ports, in order for the NVR to function properly.
*The image is for illustration only. Insert the HDD SATA and power cables in the order indicated on the NVR control board.
Installing Hard Drive
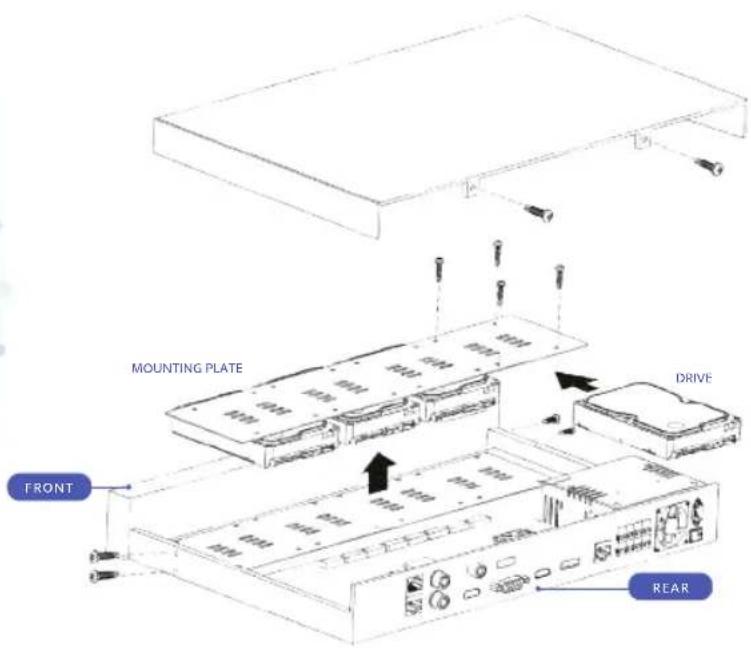
NVR PART NUMBERS: TR-MR32R, TR-MR64R
To install a drive into the NVR, remove the two rear screws and four side screws using a Phillips head screwdriver.
Lift the cover off and swing the mounting plate out of the base.
Position the drives into the mounting plate. Be sure to align the four holes in each of the drives with the corresponding holes in the plate.
Insert and tighten screws to secure each drive to the mounting plate and re-insert plate back down into base.
Installing Hard Drive
NVR PART NUMBERS: TR-MR32R, TR-MR64R
Insert the drive's SATA data and power cables to the control board as shown.

NOTE: Data cables and power cables must be inserted into the control board in order. For a single drive, you must connect it to HD1, and for a second drive, you must connect it to HD2. Be sure not to skip any ports, in order for the NVR to function properly.
*The image is for illustration only. Insert the HDD SATA and power cables in the order indicated on the NVR control board.
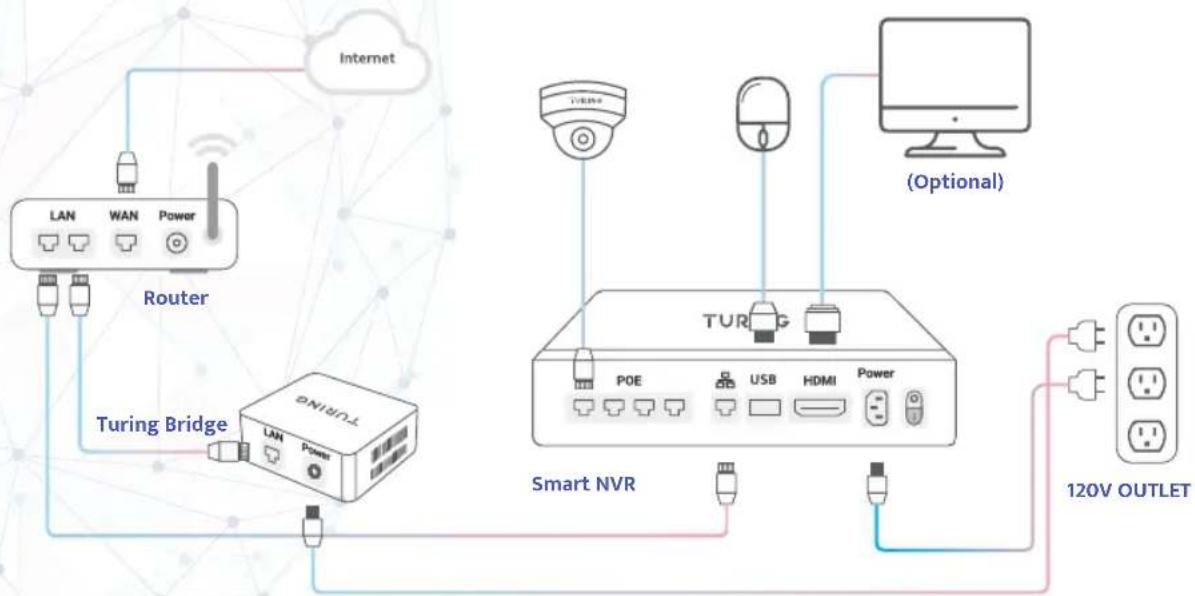
Wiring and connections
For NVRs with PoE ports: Connect the cameras to PoE ports on the NVR.
For NVRs without PoE ports or cameras connected via the local network: Set up the bridge, the NVR, and the cameras on the same local network.
flowchart
graph TD
    A["Internet"] --> B["Router"]
    B --> C["Turing Bridge"]
    C --> D["TURING"]
    D --> E["Smart NVR"]
    E --> F["120V OUTLET"]
    G["Optional"] --> H["TVR"]
    H --> I["Power"]
    I --> E
    J["POE"] --> E
    K["USB"] --> E
    L["HDMI"] --> E
    M["Power"] --> E
Prepare Your TPP Info
Write down your TPP number here before adding and activating the cameras. You will need it in the next step. By entering your TPP number, you can view your customer's contact information, update the device firmware, and monitor their device health remotely from the Partners Portal.
My TPP Number is
The TPP number is the unique identifier you receive when you join the Turing Partner Program.
Not a Turing Partner yet?
Join our Turing Partner Program today.

Partner
Co-Marketing

Product Training

Preferred Pricing

Priority Support

Partners Portal

sales@turingvideo.com

877.730.8222

turing.ai/tpp

Create an account for your customer
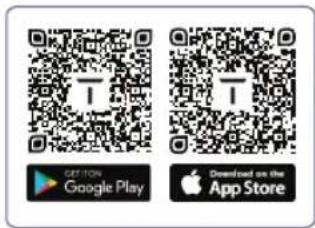
TURING Smart Series can be activated online using the web address below on a computer or by using a smartphone with the TURING app below.
1. To get started
Go to HTTPS://AI-VIDEO.TURINGVIDEO.COM
Scan the QR code to download the TURING Mobile app.
2. Sign in or sign up
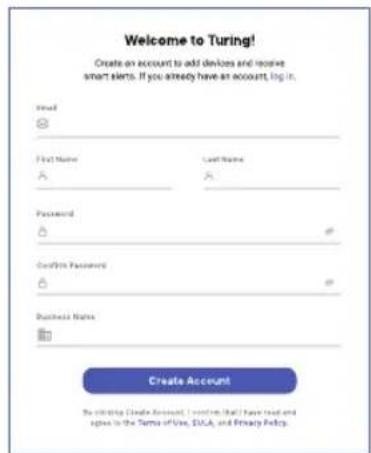
■ Create an account for your customer and enter their business information if they are new to our service.
- Log in to your customer's account if they already have one.
Create an account for your customer
3. To get started
For new user accounts:
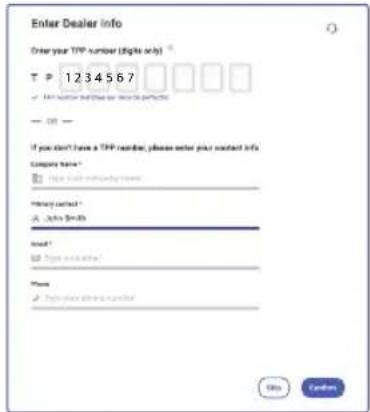
Enter your TPP info to view the customer's contact and device information on the Turing Partners Portal for adding and managing licenses.
When prompted, ask your customer for permission to monitor their system health and install updates.
By clicking "Allow," you can perform the following actions on behalf of your customer from the Partners Portal:
* Device health monitoring
* OTA system/firmware upgrades
* Remote device reboot
For existing accounts:
If your customer already has an account, under Settings, select "Your Dealer Info" and enter your TPP number.
Share information with Your Dealer
Your dealer may assist you with technical support. Thus, your contact information and device information may be shared with them.
Your dealer can also monitor system health and install updates for you. By clicking "Allow," you authorize the dealer to perform the following tasks on your behalf:
- Remote device health monitoring
• Over-the-air system/firmware upgrades - Remote device restart
You can decide later at [Settings] > [Profile] > "Yes, allow my dealer to monitor system health and install updates."
I'll decide Later
Allow
Activating the System
Click or tap "Add Cameras" and follow the instruction to add and activate your systems.
ON A COMPUTER ON A SMARTPHONE
![TUSING Devices No Devices [ ] Add Devices [ ] Add Devices [ ] Add Devices [ ] Add Devices [ ] Add Devices [ ] Add Devices [ ] Add Devices [ ] Add Devices [ ] Add Devices [ ] Add Devices [ ] Add Devices [ ] Add Devices [ ] Add Devices [ ] Add Devices [ ] Add Devices [ ] Add Devices [ ] Add Devices [ ] Add Devices [ ] Add Devices [ ] Add Devices [ ] + Add Devices [ ] + Add Devices [ ] + Add Devices [ ] + Add Devices [ ] + Add Devices [ ] + Add Devices [ ] + Add Devices [ ] + Add Devices [ ] + Add Devices [ ] + Add Devices [ ] + Add Devices [ ] + Add Devices [ ] + Add Devices [ ] + Add Devices [ ] + Add Devices [ ] + Add Devices [ ] + Add Devices [ ] + Add Devices [ ] + Add Devices [ ] + Add Devices [ ] + Add Devices [ ] + Add Devices [ ] + Add Devices [ ] + Add Devices [ ] + Add Devices [ ] + Add Devices [ ] + Add Devices [ ] + Add Devices [ ] + Add Devices [ ] + Add Devices [ ] + Add Devices [ ] + Add Devices [ ] + Add Devices [ ] + Add Diases [ ] + Add Diases [ ] + Add Diases [ ] + Add Diases [ ] + Add Diases [ ] + Add Diases [ ] + Add Diases [ ] + Add Diases [ ] + Add Diases [ ] + Add Diases [ ] + Add Diases [ ] + Add Diases [ ] + Add Diases [ ] + Add Diases [ ] + Add Diases (1) No Device (2) No Device (3) No Device (4) No Device (5) No Device (6) No Device (7) No Device (8) No Device (9) No Device (10) No Device (11) No Device (12) No Device (13) No Device (14) No Device (15) No Device (16) No Device (17) No Device (18) No Device (19) No Device (20) No Device (21) No Device (22) No Device (23) No Device (24) No Device (25) No Device (26) No Device (27) No Device (28) No Device (29) No Device (30) No Device (31) No Device (32) No Device (33) No Device (34) No Device (35) No Device (36) No Device (37) No Device (38) No Device (39) No Device (40) No Device (41) No Device (42) No Device (43) No Device (44) No Device (45) No Device (46) No Device (47) No Device (48) No Device (49) No Device (50) No Device (51) No Device (52) No Device (53) No Device (54) No Device (55) No Device (56) No Device (57) No Device (58) No Device (59) No Device (60) No Device (61) No Device (62) No Device (63) No Device (64) No Device (65) No Device (66) No Device (67) No Device (68) No Device (69) No Device (70) No Device (71) No Device (72) No Device (73) No Device (74) No Device (75) No Device (76) No Device (77) No Device (78) No Device (79) No Device (80) No Device (81) No Device (82) No Device (83) No Device (84) No Device (85) No Device (86) No Device (87) No Device (88) No Device (89) No Device (90) No Devices No Devices](/content/2026/05/940632/images/109f91360a9c561df81d59e2ae172706feb7228335eb795cdd9efc3ad4a07481.jpg)


Activating the System

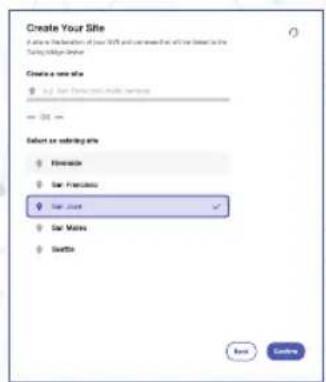
Sites are locations where your bridge, NVR, and cameras are grouped together.
Sites make it easy to view and search events and manage users' access and permissions.
Bridge connects your devices to Turing's cloud, so you can make the most of Turing AI. To add a bridge, enter its MAC address or scan its QR code. You can also select from the list of existing bridges.

Activating the System
The bridge will discover NVRs within the same network. Choose one to add. Use the on-screen instructions to enter or create a password for local access to the NVR. Upon activating the NVR for the first time, you will be asked to create a password. The NVR will reboot automatically after its password is created. This may take a few minutes.

DO THIS FIRST before adding the cameras to Turing Vision.
- Before adding cameras, check their connections.
- For NVRs with PoE ports: Connect the cameras to PoE ports on the NVR.
- For NVRs without PoE ports or cameras connected via the local network:
Add the cameras to the NVR using the NVR interface and ensure they are all online in the NVR before adding them to Turing Vision. - In the case of 3rd-party cameras, enter their username and password on the NVR Web or local interface to add the cameras, or follow the manufacturer's instructions on how to add the cameras via ONVIF.

Configuring AI Detection
For Turing cameras
Once the cameras are successfully added, continue to the camera settings to configure AI detections.
- Select the camera you want to configure.
- Select and enable INTRUSION DETECTION or ENTER AREA.
- Once enabled, click " + New Area".
- Draw four points to define the area of interest on the camera view;
- Configure the parameters as needed;
- Repeat steps 3-5 to add detection areas.
- Click "Save" to save the settings.

For third party cameras
Once the cameras are successfully added, please select the camera and follow the onscreen instructions.
Safety
The product must be installed and protected in a location that is not easily accessible, and is away from impacts or heavy vibration.
Do not install the product on an unstable mount or surface.
Do not disassemble the camera or perform maintenance task when power is connected.
The product should be used in compliance with local laws and regulations.
Before installation, the product should be stored in a dry and ventilated environment.
Use only accessories that comply with the technical specifications of the product.

This device complies with Part 15 of the FCC Rules. Operation is subject to the following two conditions: (1) this device may not cause harmful interference, and (2) this device must accept any interference received, including interference that may cause undesired operation.
Limited Warranty
1. Document Purpose and Scope
This document addresses return policies applicable to the products that are purchased by authorized distributors of Turing AI's products and that are returned to Turing AI for repair or return.
2. Turing AI's Responsibility
Turing Afs sole responsibility under the Turing warranty is limited to repairing or replacing the defective products returned by authorized distributors and direct purchasers. The warranty does not apply to any product where damage has been caused by accident, abuse, misuse, neglect, mishandling, misapplication, modification, improper operation, improper repair, any unauthorized disassembly or rework, or natural disaster. Turing AI reserves the right to examine the returned products. If the damage on the product is caused by improper action as described above, the direct purchaser or authorized distributor shall be liable for paying the related charge having occurred or paying the price of the replacements if the returned products are discarded. For details on the product warranty provided by Turing for the respective products, please refer to the following:
3. Product Warranty
Software Maintenance: Turing warrants the software within the active subscription period. Hardware Warranty:
+ 36 months repair warranty on IP cameras and NVRs. + Servers are warranted within the active subscription period.
4. General Return Requirements and Instructions
RMA Inquiry: Prior to returning product(s), please reach out to your direct point of purchase for return options. Turing only accepts returns from direct purchasers and/or authorized distributors. Direct purchasers or distributors must obtain an authorized RMA # from the Turing RMA Team via email rma@turingvideo.com.
To obtain authorization, direct purchasers or distributors can request via email at rma@turingvideo.com. Once the form is completely filled out and required documents are available i.e Proof of Purchase and Replacement Proof, please submit the form and documents to rma.usa@turingvideo.com for processing. Note that the RMA number approved must be clearly written in black or blue ink in large type on the outside of all returned packages. Turing will refuse the package(s) without an RMA number and return the product to the customer with freight due. Expiration: An RMA number is valid for thirty (30) calendar days after its issuance by Turing. The distributor must return the product described in the RMA, or else a new RMA number will be required. If Turing does not receive the product(s) within the allowed time frame, the RMA will be closed and returns may be refused, potentially delaying the process.
5. Return for Credit Policy
Turing has a 30-day return policy for both hardware and software. Warranty begins from the date the distributor ships the product to dealers/end-users. The dealer or end-user is required to send the product(s) back to the distributor for return processing. Distributors must submit a return authorization request with Turing via the RMA form. Returns outside the 30-day time period are not eligible for credit. Product(s) that have been painted tampered with, serial number removed, or any other modifications will void the credit warranty. These product(s) may be repaired but fees may apply. Please contact the RMA team: rma@turingvideo.com for the RMA number and return credit.
6. Advance Replacement
Turing has a one (1) year warranty policy for replacement/returns. Dealers/end-users must send the product(s) back to the distributors. Distributors may then offer an over-the-counter exchange option if the product is available at the branch.
Repair: The distributor must fill out and submit the RMA form with all the required information to assist the repair department with diagnosing and repairing the item. Out-of-warranty items require written authorization from the customer. If an item is deemed "unrepairable" the customer is contacted and has the option of (1) having the product returned, (2) having the product scrapped, or (3) purchasing a new unit as a replacement. Non-Turing product(s) received from an approved Turing Repair RMA, including Hard Drives not sold by Turing will not be repaired nor replaced. The product(s) will be shipped back as is to the sender.
Freight Charges: The direct purchaser or authorized distributor will pay inbound freight of the returned product and Turing will pay the ground outbound freight of the repaired product to the customer.
Packaging Requirements: All returned products must be packaged to afford individual mechanical protection so damage does not occur while the product is in transit to Turing. In addition, the packaging must provide proper electrostatic discharge (ESD) protection. All packaging should be comparable to the packaging in which Turing originally shipped the product. For multiple packages, each package must be labeled with the approved RMA number and properly sealed, and a copy of the RMA form must be enclosed with the shipment. The distributor or customer must enclose a packing list identifying the contents in each shipping carton. Turing is not responsible for packages or items received damaged in transit, the credit will be voided for Credit RMAs, and repair fees will apply for Repair RMAs.
Lost Package(s) in Transit Credit Request: Turing must be notified in 15 days from the expected delivery date of Purchase Orders not received / shipments possibly due to Lost in Transit. It will be investigated by both our warehouse and the carrier. The party that covered the freight charges will be responsible for filing the claim with the carrier for credit purposes. Turing credit is not guaranteed until the claim is determined. On that note, Turing will make the final conclusion according to the case and eligibility for credit.
Server Return: Once the software service is terminated the server will need to be returned to Turing, please contact the RMA team: rma@turingvideo.com for return details. If the server is not returned after the contract termination, a penalty will be applied. Please refer to the Master Service Agreement for the details.
Amending this Policy: Turing may choose to amend the Policy, in part or its entirety, at any time, without notice.
You can find the most updated and complete Turing RMA policy here: https://turing.ai/legal/rma-policy

natural_image
Abstract geometric pattern with interconnected triangles and nodes on a dark background (no text or symbols)Contact us at
Support:

866.816.7426
support@turingvideo.com
or visit

© Copyright 2022 Turing AI. All Rights Reserved.
TURING
https://turing.ai/

- What's in the box
- TURING BRIDGE TV-SERVER
- TURING SMART SERIES NVR
- Available Ports
- Installing Hard Drive
- NVR PART NUMBERS: TR-MRPO4(2T), TR-MRPO8(2T), TR-MRP16(4T)
- NVR PART NUMBERS: TR-MR32R, TR-MR64R
- Wiring and connections
- Prepare Your TPP Info
- My TPP Number is
- Create an account for your customer
- To get started
- Sign in or sign up
- To get started
- Share information with Your Dealer
- Activating the System
- Configuring AI Detection
- For Turing cameras
- For third party cameras
- Safety
- Limited Warranty
- Document Purpose and Scope
- Turing AI's Responsibility
- Product Warranty
- General Return Requirements and Instructions
- Return for Credit Policy
- Advance Replacement
Brand : Turing
Model : TRMRP164TB
Category : Security Camera