
DO65BL - Slow cooker Healthy Choice - Free user manual and instructions
Find the device manual for free DO65BL Healthy Choice in PDF.


| Product Type | Slow Cooker / Intelligent Electric Dutch Oven |
| Brand | Healthy Choice |
| Model | DO65BL |
| Functions | 8 presets: Slow Cook, Sear/Sauté, Soup/Broth, Bake, Braise, Stew, Roast, Stir Fry; plus Manual Mode and Keep Warm |
| Pot Material | Enamelled cast iron |
| Lid Material | Enamelled cast iron with self-basting dimples |
| Base Material | Stainless steel |
| Control Panel | Electronic touch buttons with dual LED display (time and temperature) |
| Timer Range | 1 minute to 12 hours (depending on function) |
| Temperature Range | 85°C to 210°C (depending on function) |
| Delay Start | 1 to 24 hours |
| Keep Warm | Automatic up to 12 hours after cooking |
| Safety Features | Boil-dry protection, overheat protection, automatic shut-off |
| Accessories Included | Power cord, heatproof mat, measuring cup, ladle, recipe booklet |
| Cleaning | Pot and lid are dishwasher safe |
| Power Supply | 220-240V ~50/60Hz (estimated) |
| Power Consumption | Not specified |
| Dimensions | Not specified |
| Weight | Not specified |
| Warranty | Refer to Lenoxx support |
| Country of Origin | Not specified |
Frequently Asked Questions - DO65BL Healthy Choice
User questions about DO65BL Healthy Choice
0 question about this device. Answer the ones you know or ask your own.
Ask a new question about this device
Download the instructions for your Slow cooker in PDF format for free! Find your manual DO65BL - Healthy Choice and take your electronic device back in hand. On this page are published all the documents necessary for the use of your device. DO65BL by Healthy Choice.
USER MANUAL DO65BL Healthy Choice
natural_image
Line drawing of a rice cooker with lid and control panel (no text or symbols)Model: DO65BL | Batch: PR4647
Carefully read all instructions before use and save for future reference.
IMPORTANT SAFEGUARDS:
- Use only the power cord supplied with this product.
- Do not use this product near walls, curtains and other heat or steam-sensitive materials. When using the Dutch Oven, provide adequate space above and on all sides for air circulation.
- When using the product, place it on a flat, stable surface, out of reach of children.
- Children should be supervised to ensure that they do not play with the appliance.
-
Be careful: the Dutch Oven and lid get very hot during cooking. Use care when touching hot surfaces and when removing food to avoid burns.
-
When the Dutch Oven is hot:
- do not place frozen or very cold foods inside it
-
do not place it in a freezer or cold water
-
Use only the supplied cast iron pot inside the Dutch Oven housing.
-
Do not place the Dutch Oven housing on an open fire, gas burner, oven or microwave oven.
-
This appliance is for household use only. Do not use this appliance for anything other than its intended use. It is not to be used outdoors or for commercial purposes.
-
To protect against electric shock, do not immerse the power cord, power plug or the base of the appliance in water or any other liquid.
-
To avoid electric shock, do not operate the appliance with wet hands.
-
Do not move the appliance during cooking.
-
Any maintenance other than cleaning should NOT be performed as this will void the warranty.
-
Before using the slow cooker for the first time, remove and safely discard any packaging material and promotional labels. To eliminate a choking hazard for young children, ensure children do not play with plastic bags or any packaging materials.
-
Always ensure the Dutch Oven is properly assembled before use. The removable cooking pot must be in place to use this appliance.
-
Do not use the appliance if the power cord, power plug or appliance becomes damaged in any way.
-
Use the included heatproof mat under the hot cooking pot instead of placing the pot directly on the counter surface.
-
Unplug from the outlet when not in use and before cleaning. Allow the appliance to cool down before cleaning.
- This appliance is not designed to be used by people (including children) with a physical, sensory or mental impairment, or people without knowledge or experience, unless they are supervised or given prior instructions concerning the use of the appliance by someone responsible for their safety.
- Do not let the power cord hang over the edge of a bench or table, touch hot surfaces or become knotted.
WHAT'S IN THE BOX
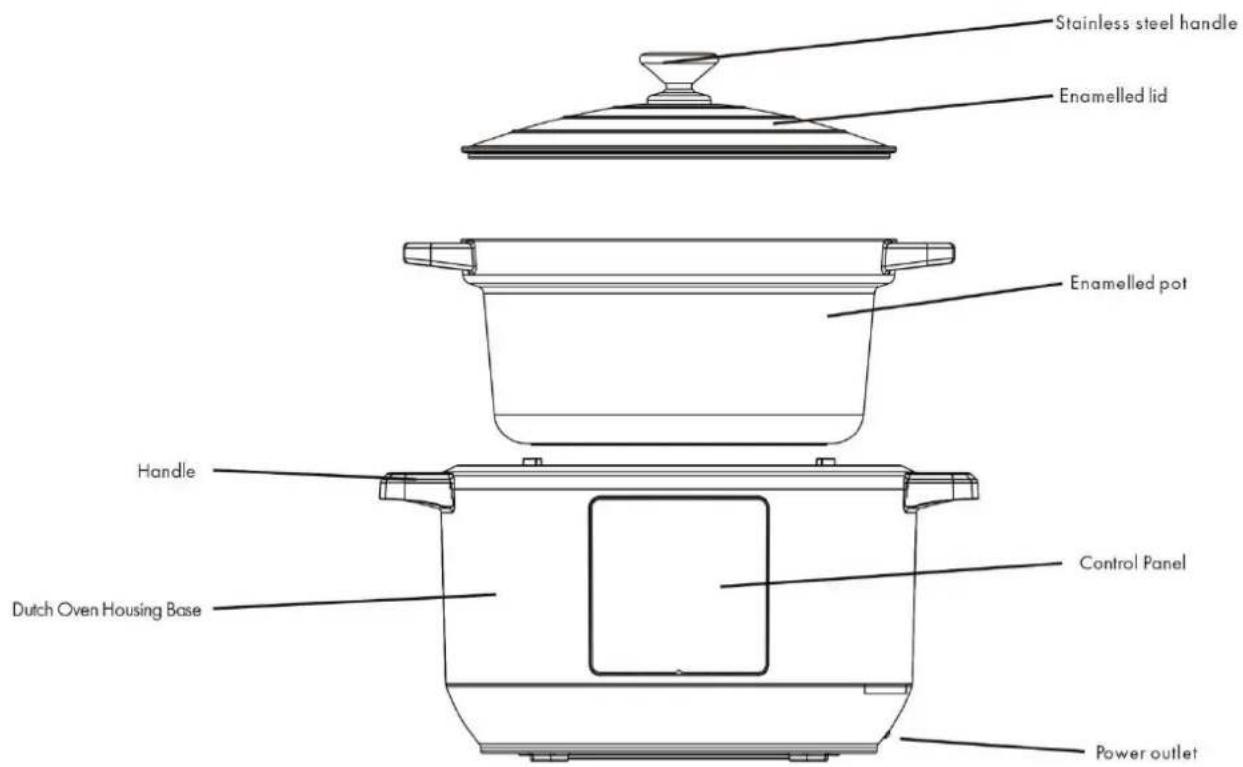
- Stainless steel Dutch Oven base
- Heavy-duty enamelled cast iron cooking pot & lid
- Power cord
- Heatproof mat
- Measuring cup
- Ladle
- Recipe booklet
- User manual
PRODUCT FEATURES
1. Heat retention & distribution
The enamelled cast iron pot has excellent heat retention and distribution properties making it ideal for slow cooking. It helps cook food evenly while retaining flavours and tenderness. The food will also stay warm for longer.
2. Self-basting lid
The specially designed heavy, self-basting lid prevents moisture from escaping and helps to evenly re-distribute it thanks to 26 little dimples on the underside. This ensures that your dishes will come out moist and tender.
3. Easy to clean
The enamelled finish creates a smooth surface inside & outside of the pot and lid. The food resists sticking and burning which makes cleaning up a breeze. The cast iron pot and lid are also dishwasher safe.
4. Precision & convenience
The Intelligent Dutch Oven makes cooking easier thanks to 8 pre-programmed intuitive cooking functions – slow cook, sear/sauté, soup/broth, bake, braise, stew, roast and stir fry. The manual mode lets you precisely control cooking time and temperature. The “keep warm” option helps to make sure the food is ready to serve when you need it.
USING YOUR INTELLIGENT ELECTRIC DUTCH OVEN
Control Panel
With LED display and indicator lights that illuminate when operating.
The Control Panel features 2 separate LED displays – one for time and the other for temperature. There are 8 pre-programmed function keys, 1 Manual Mode key as well as Delay Start, Temp/Timer and Keep Warm/Cancel - all with indicator lights.
Before first use
- Wash the cooking pot and lid with hot water and soap. Rinse and dry with a soft cloth. Alternatively, you can wash the cooking pot and lid in the dishwasher.
- Wipe the heating element inside the Dutch Oven base with a soft cloth.
-
Wash the accessories with hot water and dish soap. Rinse and dry with a soft cloth.
-
Before cooking, coat the bottom of the enamelled cast iron pot with a thin layer of oil and preheat it slowly.
- To avoid damage to the enamel coating, always use silicone or wooden utensils inside the enamelled cast iron pot.
Cooking Presets
The Control Panel displays 8 available food presets for easy selection. Pressing any of the 8 food presets will use the pre-programmed settings suggested for each type of food if not adjusted within 5 seconds of selecting the preset. The cooking time and temperature can be adjusted for most presets – please refer to the table below.
| Function | Default Time HH:MM | Time Range HH:MM | Default Temperature | Temperature Range |
| Slow Cook | 03:00 | 00:30-12:00 | 95°C | 85-95°C |
| Braise | 02:00 | 00:30-04:00 | 105°C | - |
| Sear/Sauté | 00:30 | 00:01-00:59 | 210°C | 180-210°C |
| Stew | 00:35 | 00:01-01:30 | 115°C | - |
| Soup/Broth | 00:50 | 00:10-02:00 | 110°C | - |
| Roast | 01:30 | 01:00- 03:00 | 150°C | 100-165°C |
| Stir Fry | 00:30 | 00:01-00:59 | 210°C | - |
| Bake | 01:00 | 00:01-02:00 | 160°C | 100-200°C |
Slow Cook
Press the Slow Cook button. The Slow Cook indicator light will illuminate and the LED displays will show the pre-programmed time and temperature. If the pre-programmed time and temperature are not adjusted within 5 seconds of selecting the Slow Cook function, the cooking will start.
To adjust the cooking time: press Slow Cook, the top LED display will start flashing, adjust the time by pressing + or - buttons. To adjust cooking temperature: while the top LED is flashing, press the Temp/Timer button, the lower LED display will start flashing, adjust the temperature by pressing + or - buttons. The Slow Cook function will start after 5 seconds.
When cooking ends, the Dutch Oven automatically enters Keep Warm mode for 12 hours.
Braise
Press the Braise button. The Braise indicator light will illuminate and the LED displays will show the pre-programmed time and temperature. If the pre-programmed time is not adjusted within 5 seconds of selecting the Braise function, the cooking will start.
To adjust the cooking time: press Braise, the top LED display will start flashing, adjust the time by pressing + or - buttons. The Braise function will start after 5 seconds.
When cooking ends, the Dutch Oven automatically enters Keep Warm mode for 12 hours.
Sear/Sauté
Press the Sear/Sauté button. The Sear/Sauté indicator light will illuminate and the LED displays will show the pre-programmed time and temperature. If the pre-
programmed time and temperature are not adjusted within 5 seconds of selecting the Sear/Sauté function, the cooking will start.
To adjust the cooking time: press Sear/Sauté, the top LED display will start flashing, adjust the time by pressing + or - buttons. To adjust cooking temperature: while the top LED is flashing, press the Temp/Timer button, the lower LED display will start flashing, adjust the temperature by pressing + or - buttons. The Sear/Sauté function will start after 5 seconds.
Stew
Press the Stew button. The Stew indicator light will illuminate and the LED displays will show the pre-programmed time and temperature. If the pre-programmed time is not adjusted within 5 seconds of selecting the Stew function, the cooking will start.
To adjust the cooking time: press Stew, the top LED display will start flashing, adjust the time by pressing + or - buttons. The Stew function will start after 5 seconds.
When cooking ends, the Dutch Oven automatically enters Keep Warm mode for 12 hours.
Soup/Broth
Press the Soup/Broth button. The Soup/Broth indicator light will illuminate and the LED displays will show the pre-programmed time and temperature. If the pre-programmed time is not adjusted within 5 seconds of selecting the Soup/Broth function, the cooking will start.
To adjust the cooking time: press Soup/Broth, the top LED display will start flashing, adjust the time by pressing + or - buttons. The Soup/Broth function will start after 5 seconds.
When cooking ends, the Dutch Oven automatically enters Keep Warm mode for 12 hours.
Roast
Press the Roast button. The Roast indicator light will illuminate and the LED displays will show the pre-programmed time and temperature. If the pre-programmed time and temperature are not adjusted within 5 seconds of selecting the Roast function, the cooking will start.
To adjust the cooking time: press Roast, the top LED display will start flashing, adjust the time by pressing + or – buttons. To adjust cooking temperature: while the top LED is flashing, press the Temp/Timer button, the lower LED display will start flashing, adjust the temperature by pressing + or – buttons. The Roast function will start after 5 seconds.
Stir Fry
Press the Stir Fry button. The Stir Fry indicator light will illuminate and the LED displays will show the pre-programmed time and temperature. If the pre-programmed time is not adjusted within 5 seconds of selecting the Stir Fry function, the cooking will start.
To adjust the cooking time: press Stir Fry, the top LED display will start flashing, adjust the time by pressing + or - buttons. The Stir Fry function will start after 5 seconds.
Bake
Press the Bake button. The Bake indicator light will illuminate and the LED displays will show the pre-programmed time and temperature. If the pre-programmed time and temperature are not adjusted within 5 seconds of selecting the Bake function, the cooking will start.
To adjust the cooking time: press Bake, the top LED display will start flashing, adjust the time by pressing + or - buttons. To adjust cooking temperature: while the top LED is flashing, press the Temp/Timer button, the lower LED display will start
flashing, adjust the temperature by pressing + or - buttons. The Bake function will start after 5 seconds.
Delay Start
Cooking start can be delayed by 1 – 24 hours for Slow Cook, Sear/Sauté, Roast and Bake functions. Select the cooking function and press Delay Start, the top LED display will flash, adjust the delay time by pressing + or – buttons.
Manual Mode
Manual Mode lets you choose your preferred cooking time and temperature. Press Manual Mode, using + or - buttons adjust the cooking time. Press Temp/Timer button, the lower LED display will start flashing, adjust the temperature by pressing + or - buttons.
CLEANING & MAINTENANCE
Clean after each use.
-
Switch off and unplug the Electric Dutch Oven and allow it to cool completely. Always unplug the unit before cleaning.
-
Wash detachable parts (removable cast iron pot and lid) in hot water with dishwashing liquid or in a dishwasher. Rinse and dry thoroughly.
Troubleshooting
| Problem | Possible cause | Solution |
| Appliance powers on but doesn't heat up | Boil-dry protection was activated | Fill the pot with cold water and let it cool before powering it up again |
| Product failure | Please contact professional after-sales service. | |
| No power | The appliance is not plugged in | Check if the power plug is inserted properly. |
| Product failure | Please contact professional after-sales service. | |
| Error Code E1 | Open circuit in the temperature sensor | Please contact professional after-sales service. |
| Error Code E2 | Short-circuit in the temperature sensor | The temperature sensor might be damaged, please contact professional after-sales service. |
| Error Code E3 | The temperature is too high | Disconnect the power and let the pot cool down before plugging it in and turning it on again. |
LENOXX
www.lenoxx.com.au

1300 666 848

LenoxxElectronics

LenoxxElectronics

@LenoxxAustralia
- IMPORTANT SAFEGUARDS:
- WHAT'S IN THE BOX
- PRODUCT FEATURES
- Heat retention & distribution
- Self-basting lid
- Easy to clean
- Precision & convenience
- USING YOUR INTELLIGENT ELECTRIC DUTCH OVEN
- Control Panel
- Before first use
- Cooking Presets
- Slow Cook
- Braise
- Sear/Sauté
- Stew
- Soup/Broth
- Roast
- Stir Fry
- Bake
- Delay Start
- Manual Mode
- CLEANING & MAINTENANCE
- Clean after each use.
- LENOXX
Brand : Healthy Choice
Model : DO65BL
Category : Slow cooker