
UT347A - Measurement Uni-T - Free user manual and instructions
Find the device manual for free UT347A Uni-T in PDF.


User questions about UT347A Uni-T
0 question about this device. Answer the ones you know or ask your own.
Ask a new question about this device
Download the instructions for your Measurement in PDF format for free! Find your manual UT347A - Uni-T and take your electronic device back in hand. On this page are published all the documents necessary for the use of your device. UT347A by Uni-T.
USER MANUAL UT347A Uni-T
natural_image
Abstract geometric pattern composed of gray squares forming a cross shape (no text or symbols)P/N:110401111116X
UNI-T®

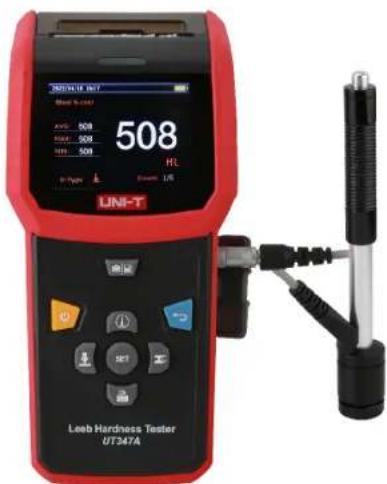
UT347A
Leeb Hardness Tester User Manual
PREFACE
Thank you for purchasing the new UT347A Leeb hardness tester. In order to use this product safely and correctly, please read this manual thoroughly, especially the Safety Instructions part.
After reading this manual, it is recommended to keep the manual at an easily accessible place, preferably close to the device, for future reference.
LIMITED WARRANTY AND LIABILITY
Uni-Trend guarantees that the product is free from any defect in material and workmanship within one year from the purchase date. This warranty does not apply to damages caused by accident, negligence, misuse, modification, contamination and improper handling. The dealer shall not be entitled to give any other warranty on behalf of Uni-Trend. If you need warranty service within the warranty period, please contact your seller directly.
This warranty is the only compensation you can obtain. Uni-Trend will not be responsible for any special, indirect, incidental or subsequent damage or loss caused by any reason or speculation. As some areas or countries do not allow limitations on implied warranties and incidental or subsequent damage, the above limitation of liability and stipulation may not apply to you.
TABLE OF CONTENTS
- Overview 4
- Accessories 5
- Specifications 5
- Product Introduction 7
- Operating Principle 8
- Preparation and Inspection 8
- Quick Operation 9
- Detailed Operation 10
- Printer Paper Installation 20
- Troubleshooting 21
- Maintenance 21
- Storage and Transport 21
Attached Table 1 22
Attached Table 2 23
Attached Table 3 24
Attached Table 4 25
1. Overview
UT347A is a tester designed to detect the metal material hardness based on the principle of the Leeb hardness test method.
Applications:
• Heavy and large workpieces;
- Bearings and other parts;
• Quality control of heat-treated parts;
• Machine guide rails and car chassis;
- Installed machinery or permanently assembled parts;
- Die cavity of molds and other workpieces with very narrow test space;
● Failure analysis of pressure vessel, steam generator and other equipment;
• Metal material identification.
Range of application:
- Refer to Attached Table 1 and Attached Table 2.
Functions:
- Test details can be recorded. The tester has the camera function and can store up to 900 records.
- The integrated thermal micro printer supports real-time printing and batch printing. The print definition is adjustable.
- The tester has a USB interface and a BLE Bluetooth module. With them, the tester can connect to computers or mobile phones and upgrade firmware;
- 2.8" TFT color screen with a resolution of 320x240;
- English/Chinese optional and easy-to-operate menu;
- Adjustable backlight brightness;
- The tester has the custom material function. Different materials have exclusive hardness conversion tables.
- The threshold alarm can be turned on/off. When it is on: higher than the upper threshold: yellow; lower than the lower threshold: red; normal: green.
• Built-in lithium battery, control circuit and USB Type-C interface for charging; - Calibration function.
2. Accessories
Unpack the box and carefully check whether the following accessories are missing or damaged:
- Leeb hardness tester---- 1 PCS
- Type-D impact device 1 PCS
- Standard Leeb hardness block 1 PCS
- Nylon brush 1 PCS
- Type C USB cable 1 PCS
- Type-C USB cable 1 PCS
- User manual 1 PCS
- User manual 1 PCS
- Download guideline 1 PCS
- Download guideline 1 PCS
- Printing paper 2 rolls
3. Specifications
- Units:
HL, HB, HRC, HRB, HV, HS - Range:
170-960 HLD
● Indicating value error and repeatability: (see Table 1 below)
| NO. | Impact device type | Hardness of standard Leeb hardness block | Indicating value error | Indicating value repeatability |
| 1 | D | 790±40HLD | ±6HLD | 6HLD |
| 530±40HLD | ±10HLD | 10HLD | ||
| 2 | DC | 790±40HLDC | ±6HLDC | 6HLDC |
| 530±40HLDC | ±10HLDC | 10HLDC | ||
| 3 | DL | 894±40HLDL | ±12HLDL | 12HLDL |
| 736±40HLDL | ||||
| 4 | D+15 | 795±40HLD+15 | ±12HLD+15 | 12HLD+15 |
| 544±40HLD+15 | ||||
| 5 | G | 590±40HLG | ±12HLG | 12HLG |
| 500±40HLG | ||||
| 6 | E | 755±40HLE | ±12HLE | 12HLE |
| 508±40HLE | ||||
| 7 | C | 851±40HLC | ±12HLC | 12HLC |
| 590±40HLC |
• Display:
2.8" TFT color screen with a resolution of 320x240
- Camera:
Effective pixel 640×480, focus free
- Flashlight:
White light, 0.5W LED
- Printing paper:
Thermal paper of 57mm width
- Data storage:
900 groups
- Alarm indicator light:
Higher than the threshold: yellow
Lower than the threshold: red
Normal: green
● Auto power off:
The meter will automatically shut down after a period of no operation. The auto power off time can be adjusted. The function can be turned off.
- Operating voltage:
Built-in lithium battery 3.7V
- Charging time:
About 2\~4h
- Charging source:
DC 5V 2A
- Operating time:
About 4\~8h (not print)
● Environmental requirements:
Operating: 0\~40°C ≤80%RH
Storage: 10\~50°C ≤75%RH
There is no strong vibration, strong magnetic field, corrosive medium and lots of dust in the surrounding environment.
4. Product Introduction
4.1 Structure
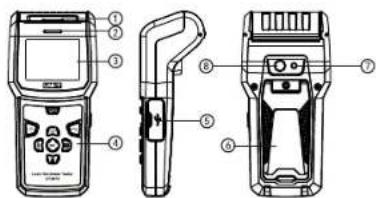
| NO. | Description | NO. | Description |
| 1 | Printing paper export | 5 | USB and impact device interface |
| 2 | Indicator light | 6 | Bracket |
| 3 | Display | 7 | Flashlight |
| 4 | Buttons | 8 | Camera |
4.2 Buttons
| Operation | Short press | Long press | ||
| Mode | In the main interface | Menu/other setting interfaces | In the main interface | Menu/Records interface |
| / | / | Power on/off | Power on/off | |
| Record the current data | Take photos | / | / | |
| / | Return | Delete the current value | / | |
| Switch the probe direction | Up | Turn on/off the flashlight | Scroll up | |
| Switch the hardness unit | Left | / | Delete data | |
| SET | Enter the menu interface | Confirm | / | Print data |
| Switch the material | Right | / | Jump to a data | |
| Print the current data | Down | Export the printing paper | Scroll down | |
7
5. Operating Principle
Under the action of elastic force, the impact body of specified mass impacts the sample surface at a certain speed, and the hardness value is calculated by the ratio of the rebound speed and impact speed of the punch at 1mm away from the sample surface. The calculation formula is as follows:
HL=1000*VB/VA
HL-Leeb hardness
VB-Rebound velocity
VA -Impact velocity
Output signal of impact device is
shown in schematic diagram:
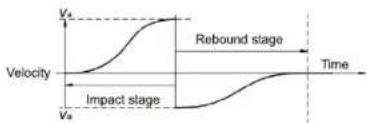
line
| Time Segment | Stage | Value | | ---------------- | ------------- | ----- | | Rebound stage | V_A | High | | Rebound stage | Impact stage | Low | | Impact stage | V_A | Low |6. Preparation and Inspection
- The sample surface should conform to the requirements in Attached Table 3.
- The sample should not be heated or frozen; otherwise its surface hardness will be affected. Please place it at room temperature for a period of time before measuring.
- The sample surface must be smooth and glossy without oil stains.
- Heavy samples do not need to be supported. A sample with overhang, thin-wall and a weight less than 5kg should be supported by an object to avoid the sample deformation, bending and movement caused by the impact force. Medium samples must be placed on a smooth and solid surface.
- Curved sample: The optimal test surface is a plane. If a sample whose surface curvature radius R is less than 30mm (D, DC, D+15, C, E, DL type impact device) or less than 50mm (type-G impact device) is being tested, a small supporting ring or special-shaped supporting ring should be used.
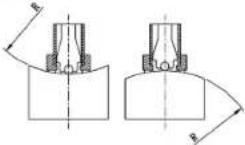
- The minimum thickness of the sample should conform to the requirements in Attached Table 3.
- For samples with a surface hardening layer, the depth of the hardening layer should conform to the requirements in Attached Table 3.
- Coupling: Light samples must be closely coupled with a solid support. The coupling surfaces must be smooth. The coupling agent dosage should not be too much. The test direction must be perpendicular to the coupling plane. When the sample is a large area of plate, long rod or bending parts, it may still cause sample deformation and instability even if the sample weight and thickness is large, so it should be strengthened or supported on the back of the test point.
UNI-T
UT347A Leeb Hardness Tester User Manual
UT347A Leeb Hardness Tester User Manual
UNI-T
• The magnetism of the sample should be less than 30Gs.
- Before measurement, the tester can be inspected with the standard Leeb hardness block and the indicating value error and repeatability should not be greater than those specified in Table 1.
Note: The standard Leeb hardness block is measured five times with a calibrated Leeb hardness tester, and the average is taken as its hardness value. If the hardness value obtained by measuring the hardness block with the Leeb hardness tester does not match this value, the tester should be calibrated first.
7. Quick Operation
Note: Turn off the tester before replacing the impact device.
7.1 Startup
- When the tester is not turned on, insert the impact device into the interface on the right side of the tester.
- Long press ⏻ to power on.
7.2 Loading
Push the loading tube down until the impact body is locked. For type-DC impact device, the loading tube can be sucked on the test surface, and the impact device is inserted into the loading tube until reaching the stop position, and then the loading is completed.
7.3 Localization
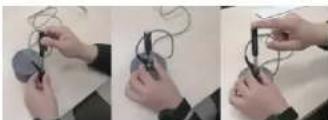
Press the support ring of the impact device firmly on the sample surface. The impact direction should be perpendicular to the test surface, as shown in the figure below.
natural_image
Three-panel photo showing hands manipulating a small object with wires, no visible text or symbols7.4 Measurement
- Press the release button on the impact device. The sample, impact device and operator should be stable and the action direction should pass the axis of the impact device.
- Each test part of the sample usually should take 5 measurements. The data dispersion should not exceed mean value ±15HL.
The distance between any two indentations or the distance between the indentation center and the sample edge should conform to the regulations in Table 2. - For specific materials, if the Leeb hardness values are to be accurately converted to other hardness values, comparative tests must be done to obtain the corresponding conversion relation. Use a certified Leeb hardness tester and a corresponding hardness tester to test on the same sample respectively. For each hardness value, five points of Leeb hardness should be measured uniformly around three or more hardness indentations to be converted. With the average Leeb hardness and the average corresponding hardness as comparison values respectively, make the hardness comparison curve. The comparison curve should include at least three groups of comparison data.
9
| Type of impact device | Distance between centers of two indentations | Distance between indentation center and sample edge |
| No less than (mm) | No less than (mm) | |
| D, DC | 3 | 5 |
| DL | 3 | 5 |
| D+15 | 3 | 5 |
| G | 4 | 8 |
| E | 3 | 5 |
| C | 2 | 4 |
(Table 2)
7.5 Read Measured Values
- Take the average hardness of several test points as the hardness value of the measured object.
- The measured values will show on the screen. The values measured by different types of impact devices are different, as shown in Table 1.
8. Detailed Operation
8.1 Power on/off
Long press Ⓑ to power on/off. The tester will automatically shut down after a period of time without operation
8.2 Main Interface
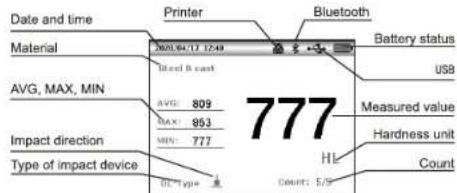
8.3 Take Measurements
Take a measurement in the main interface, and the measured value, AVG, MAX and MIN will show on the screen. The number of impact times will increase by one, and the buzzer will sound a short beep. If the measured value is out of the range, the buzzer will sound a long beep. After reaching the set number of impact, the buzzer will sound two short beeps.
8.4 Buttons (in the main interface)
- Short press to save the current group of data, which is valid only after reaching the set impact times, and can only be saved once. After saving, press this button again to print the data or take a photo.
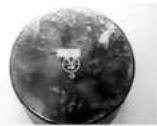
- In the camera interface, press 🔊/☐ to take a photo. An icon is automatically generated in the photo to indicate the current measurement average. Short press the direction (Up/Down/Left/Right) buttons to move the icon, and long press the direction buttons to quickly move it, as shown below:
- Long press to delete the last measured value.
- Short press ① to change the impact direction, and long press to turn on/off the flashlight.
- Short press ↓ to step through the hardness units
Note:
- For different materials, the optional hardness units are also different.
- After changing the material, the hardness unit will automatically change to HL.
- This operation is invalid for the strength measurement.
- Short press the SET button to enter the menu interface.
- Short press to select the material
Hardness: Steel & cast, Alloy steel, St. steel, Forged steel, Cast Al. alloy, Copper-zinc alloy, Copper tin alloy, Grey cast iron, Nodular iron, Pure copper
Copper-trm alloy, Grey cast iron, Nodular iron, Pure copper Strength: C steel, Cr steel, CrV steel, CrNi steel, CrMo steel, CrNiMo steel, CrMnSi steel, SS steel, S steel.
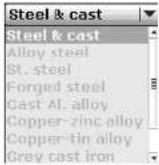
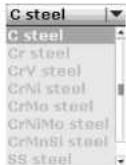
Press the Up/Down button to move the cursor. Press the SET button to confirm. Press ↩ to cancel.
Note: After changing the material, the current measured data will be cleared.
- Short press 📋 to print the current data, which is valid only after reaching the set impact times, and long press to control the export of printing paper.
8.5 Menu
In the main interface, short press the SET button to open the menu:
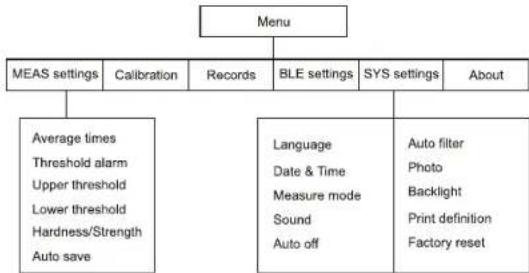
flowchart
graph TD
    A["Menu"] --> B["MEAS settings"]
    A --> C["Calibration"]
    A --> D["Records"]
    A --> E["BLE settings"]
    A --> F["SYS settings"]
    A --> G["About"]
    B --> H["Average times\nThreshold alarm\nUpper threshold\nLower threshold\nHardness/Strength\nAuto save"]
    C --> I["Language\nDate & Time\nMeasure mode\nSound\nAuto off"]
    E --> J["Auto filter\nPhoto\nBacklight\nPrint definition\nFactory reset"]
8.6 MEAS Settings
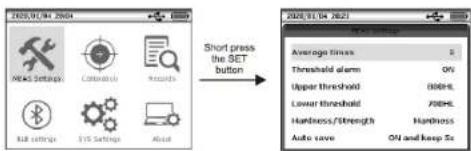
• Average times
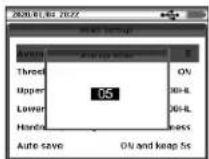
In the MEAS settings interface, press the Up/Down button to select "Average times", and then press the SET button to set the average times. Press the Right button to move the cursor to the units digit, and press the Up/Down button to add/subtract the value. Press the SET button to confirm. Press to cancel.
UNI-T
UT347A Leeb Hardness Tester User Manual
UT347A Leeb Hardness Tester User Manual
UNI-T
- Threshold alarm
The threshold alarm can be turned on/off. When it is on:
Higher than the upper threshold: yellow
Lower than the lower threshold: red
Normal: green
• Upper threshold
- Lower threshold
Press the Left/Right button to move the cursor, and press the Up/Down button to change the value. Press the SET button to confirm. Press → to cancel.
Note:
-
If the upper threshold is smaller than the lower threshold or the lower threshold is larger than the upper threshold, press the SET button and there will be no response. Reset the value or press to ↩ cancel.
-
After changing the hardness unit, the upper and lower thresholds will automatically restore to the default values.
- Hardness/Strength
Switch between the hardness and strength measurements.
Note: The strength measurement is available only when type D and DC impact devices are used.
• Auto save
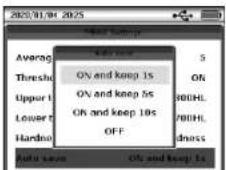
- In the MEAS settings interface, press the Down button to select "Auto save", and then press the SET button to set the function.
ON and keep 1s: After the measurement is completed, the tester will automatically save data and return to the main interface after 1 second;
ON and keep 5s: After the measurement is completed, the tester will automatically save data and return to the main interface after 5 seconds;
ON and keep 10s: After the measurement is completed, the tester will automatically save data and return to the main interface after 10 seconds;
OFF: Disable the auto save function.
Note: Users can choose whether to take photos or print data before the countdown ends
8.7 Calibration
The tester and impact device must be calibrated with the standard Leeb hardness block before using the instrument for the first time or before using the instrument again after a long period of time.
13
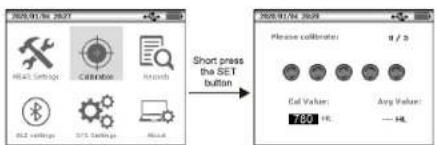
After taking 5 measurements, the average value will show on the screen. Input the calibration value according to the hardness marked by the standard Leeb hardness block, and then short press the SET button to confirm. Press → to re-measure and calibrate. The calibration range is ±15HL.
Note: After the impact device is replaced, the tester needs to be recalibrated before being used. The default probe is type-D. If users want to calibrate other types of probes, they need to refer to the hardness conversion table of different types of probes before inputting the calibration value.
8.8 Records
In the menu, press the Up/Down/Left/Right button to select "Records", and then press the SET button to enter its setting interface.
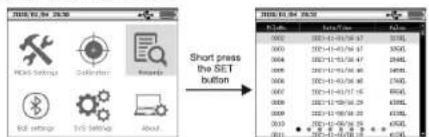
- Press the Up/Down button to move the cursor. Press and hold the Up/Down button to scroll up/down.
- Press the Left/Right button to turn the page. There are 100 pieces of data per page, up to 9 pages.
Dots at the bottom of the screen indicate the number of pages: ● ● ● ● ● ● ● ●
- Press the SET button to view the selected record.
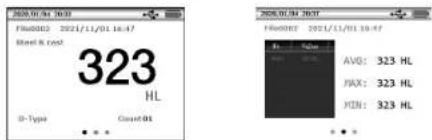
Press the Left/Right button to turn the page for detailed information.
- Long press ↓ to open the "Delete data" interface.
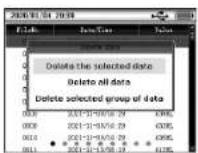
Press the Up/Down button to select an option, and press the SET button to delete. Press to cancel.
Select "Delete selected group of data" and press the SET button.
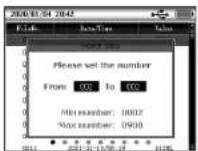
Press the Left/Right button to move the cursor. Press the Up/Down button to adjust the number. After setting the number in the first window, press the SET button to set the number of the next window. Press the SET button to delete data. Press → to cancel.
● Long press the SET button to open the "Print data" interface.
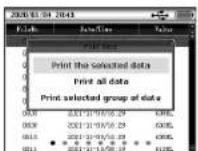
The operation of "Print data" is similar to "Delete data".
Note:
- Press to stop printing after the current group is printed.
- If the printer is short of paper or overheated, the printing will be automatically interrupted, and message prompts will pop up (press the SET button to exit). The icon ✗ (short of paper) or ⚠ (overheated) will flash. Please change the paper or wait for the printer to cool down until the above icon no longer flashes. If the "Print data" dialog box is not exited, the printing can continue from the break.
- Ordinary thermal paper has a short storage time. If users want to print data that needs to be stored for a long time, please choose long lasting thermal paper.
- Do not store the printing paper in a place of high temperature or direct sunlight. If it has been unsealed, store it in a place away from light.
● Long press 📄 to jump to a data.
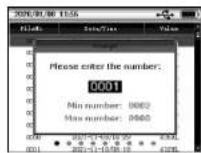
Press the Left/Right button to move the cursor. Press the Up/Down button to adjust the number. Press the SET button to jump to the data of the set number. Press → to cancel.
8.9 BLE Settings
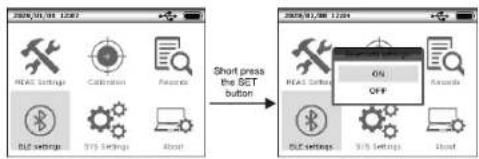
Press the Up/Down button to select ON/OFF, and press the SET button to confirm. Press ↩ to cancel.
8.10 Bluetooth App specification
- To connect Blutooth, you need to install the application (Smart Report- Hardness Tester).
- IOS device access it in App Store, Android device access it in Play Store or Please login www.uni-trend.com to download.
8.10 SYS Settings
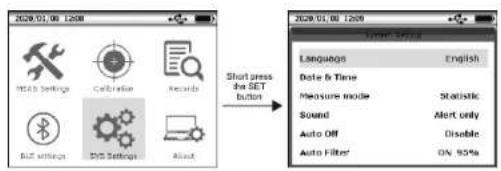
- Language
The optional languages are English and Chinese.
- Date & Time
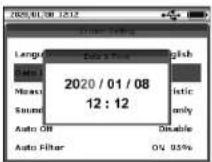
Press the Left/Right button to move the cursor. Press the Up/Down button to adjust the value. Press and hold the Up/Down button to quickly change the selected value. Press the SET button to confirm. Press ↩ to cancel.
- Measure mode
Press the Up/Down button to select Statistic/MultiMode/LinecMode/HistoMode.
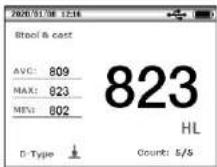
Statistic
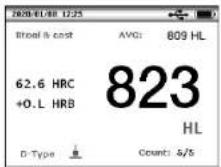
MultiMode
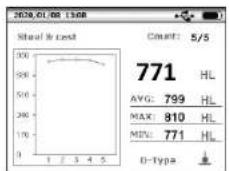
line
| Time | Value | | :--- | :--- | | 1 | 771 | | 2 | 799 | | 3 | 810 | | 4 | 771 | | 5 | HL |LinecMode
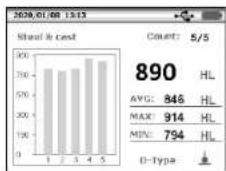
HistoMode
Sound
Press the Up/Down button to select Key & Alert/Alert only/Key only/Off.
- Auto off
Press the Up/Down button to select 1 minute/5 minutes/10 minutes/30 minutes/Disable.
- Auto filter
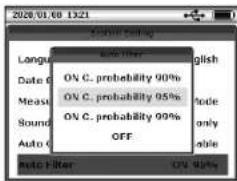
When the auto filter function is turned on, after the set average number of measurements is completed, the tester will automatically filter big errors according to Grubbs Criterion. If any data is filtered, supplementary measurements are required to reach the set number. There are three probabilities to choose from: 90%, 95% and 99%. The lower the probability, the easier it is to trigger auto filter.
Note: When the count is set to less than 3 times, the auto filter function is disabled by default.
UNI-T
UT347A Leeb Hardness Tester User Manual
UT347A Leeb Hardness Tester User Manual
UNI-T
- Photo
Enable/disable the camera function. - Backlight
The backlight brightness can be adjusted.
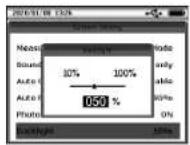
Press the Left/Right button to adjust, and press the SET button to confirm.
Press → to cancel.
Note: If the brightness is too high, the battery life will be affected.
- Print definition
The print definition can be adjusted according to the needs of different thermal paper.
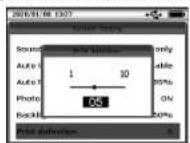
Press the Left/Right button to adjust, and press the SET button to confirm.
Press ↩ to cancel.
Note: Too high definition can lead to shorter print head life and overheating of the printer.
- Factory reset
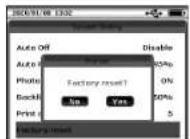
Press the SET button, and a dialog box "Factory reset?" will pop up. Press the Right button to select "Yes", and press the SET button to confirm.
Note: All saved data will be cleared after restoring factory settings.
19
8.11 About
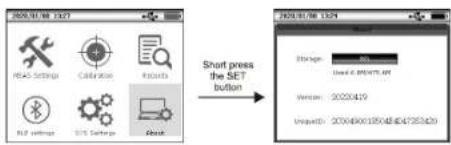
In this interface, users can view the storage information, version and unique ID.
● Storage: Remaining percentage, used memory, and total memory;
● The version changes with the firmware upgrade;
● The unique ID of each tester is different.
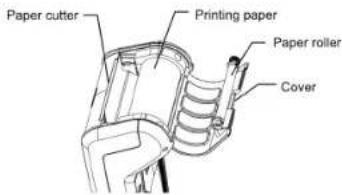
9. Printer Paper Installation
- Open the cover first.
- If the paper roller falls off, please reassemble it. Be careful not to damage its rubber part.
- Install the printing paper into the printer, pull out the paper and press it at the cutter. The length of the printing paper should exceed the cutter.
Note: The general thermal paper can only be printed on one side. If the paper is inverted, it will be impossible to print.
- Close the cover, and the printing paper is installed.
20
- Troubleshooting
| Phenomenon | Reason | Solution |
| The tester cannot be turned on or shuts down automatically after a while. | Low battery | Charge the tester |
| The battery life significantly decreases. | Battery failure | Return to the factory to replace battery |
| The tester cannot take measurements. | Impact probe cable malfunction | Change impact probe cable |
11. Maintenance
- After the tester has been used for 1000 to 2000 times, please use the nylon brush to clean the impact device. Unscrew the support ring first and then take out the impact body.
Spiral the nylon brush in counter-clockwise direction into the bottom of guide tube and take it out. Repeat above steps for 5 times, and install the impact body and support ring.
● Release the impact body after use. - Do not use lubricants in the impact device.
- When measuring the hardness of the standard Leeb hardness block, if all the errors are greater than 2HRC, please change the impact body.
- When the hardness tester has other abnormalities, please do not disassemble it.
- When the tester is not in use for a long time, it should be fully charged every 3 months.
12. Storage and Transport
- Keep the tester away from vibration, strong magnetic field, corrosive medium, dampness and dust, and store it at room temperature.
- With original packing, transport is allowed on tertiary highways.
Attached Table 1
| Material | Hardness unit | Impact device | |||||
| D/DC | D+15 | C | G | E | DL | ||
| Steel and cast steel | HRC | 17.9~68.5 | 19.3~67.9 | 20.0~69.5 | 22.4~70.7 | 20.6~68.2 | |
| HRB | 59.6~99.6 | 47.7~99.9 | 37.0~99.9 | ||||
| HRA | 59.1~85.8 | 61.7~88.0 | |||||
| HB | 127~651 | 80~638 | 80~683 | 90~646 | 83~663 | 81~646 | |
| HV | 83~976 | 80~937 | 80~996 | 84~1042 | 80~950 | ||
| HS | 32.2~99.5 | 33.3~99.3 | 31.8~102.1 | 35.8~102.6 | 30.6~96.8 | ||
| Forged steel | HB | 143~650 | |||||
| Alloy steel | HRC | 20.4~67.1 | 19.8~68.2 | 20.7~68.2 | 22.6~70.2 | ||
| HV | 80~898 | 80~935 | 100~941 | 82~1009 | |||
| Stainless steel | HRB | 46.5~101.7 | |||||
| HB | 85~655 | ||||||
| HV | 85~802 | ||||||
| Grey cast iron | HRC | ||||||
| HB | 93~334 | 92~326 | |||||
| HV | |||||||
| Nodular cast iron | HRC | ||||||
| HB | 131~387 | 127~364 | |||||
| HV | |||||||
| Cast aluminium alloy | HB | 19~164 | 23~210 | 32~168 | |||
| HRB | 23.8~84.6 | 22.7~85.0 | 23.8~85.5 | ||||
| Brass | HB | 40~173 | |||||
| HRB | 13.5~95.3 | ||||||
| Bronze | HB | 60~290 | |||||
| Pure copper | HB | 45~315 | |||||
Attached Table 2
| NO. | Material | HLD Leeb hardness HLD | (MPa) Strength cb (MPa) |
| 1 | Mild steel | 350~522 | 374~780 |
| 2 | C steel | 500~710 | 737~1670 |
| 3 | Cr steel | 500~730 | 707~1829 |
| 4 | CrV steel | 500~750 | 704~1980 |
| 5 | CrNi steel | 500~750 | 763~2007 |
| 6 | CrMo steel | 500~738 | 721~1875 |
| 7 | CrNiMo steel | 540~738 | 844~1933 |
| 8 | CrMnSi steel | 500~750 | 755~1993 |
| 9 | SS steel | 630~800 | 1180~2652 |
| 10 | S steel | 500~710 | 703~1676 |
Attached Table 3
| Type of impact device | DC/D/DL | D+15 | C | G | |
| Impact energy | 11mj | 11mj | 2.7mj | 90mj | |
| Impact body weight | 5.5/5.5/7.2g | 7.8g | 3.0 g | 20 g | |
| Impact body head hardness | 1600 HV | 1600 HV | 1600 HV | 1600 HV | |
| Impact body head diameter | 3 mm | 3 mm | 3 mm | 5 mm | |
| Impact body head material | Tungsten carbide | Tungsten carbide | Tungsten carbide | Tungsten carbide | |
| Impact device diameter | 20/20/6mm | 20mm | 20mm | 30mm | |
| Impact device length | 86/147/202mm | 162mm | 141mm | 254mm | |
| Impact device weight | 50/75/60g | 80g | 75g | 250g | |
| Maximum sample hardness | 940 HV | 940 HV | 1000 HV | 650 HB | |
| Average roughness of sample surface Ra | 1.6 μm | 1.6 μm | 0.4um | 6.3 um | |
| Minimum sample weight | >5kg | >5kg | >1.5kg | >15kg | |
| Need support firmly | 2~5kg | 2~5kg | 0.5~1.5kg | 5~15kg | |
| Need coupling tightly | 0.05~2kg | 0.05~2kg | 0.02~0.5kg | 0.05~5kg | |
| Minimum sample thickness | 5mm | 5mm | 1mm | 10mm | |
| Minimum depth of hardened layer | ≥0.8mm | ≥0.8mm | ≥0.2mm | ≥1.2mm | |
| Indentation size | |||||
| Hardness 300HV | Indentation diameter | 0.54mm | 0.54mm | 0.38mm | 1.03mm |
| Indentation depth | 24μm | 24μm | 12μm | 53μm | |
| Hardness 600HV | Indentation diameter | 0.54mm | 0.54mm | 0.32mm | 0.90mm |
| Indentation depth | 17μm | 17μm | 8μm | 41μm | |
| Hardness 800HV | Indentation diameter | 0.35mm | 0.35mm | 0.35mm | |
| Indentation depth | 10μm | 10μm | 7μm | ||
| Impact device application range | Type-DC: Hole or cylinder; Type-DL: Slender groove or hole; Type-D: Routine measurement | Type-D+15: groove or recessed surface | Type-C: Small parts and surface of hardened layer | Type-G: Large and rough-surface castings and forgings | |
Attached Table 4
| NO. | Model | Sketch of abnormal support ring | Remarks |
| 1 | Z10-15 | 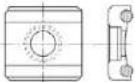 | Measure the outer cylinder R10-R1 5 |
| 2 | Z14.5-30 | Measure the outer cylinder R14.5-R30 | |
| 3 | Z25-50 | Measure the outer cylinder R25-R50 | |
| 4 | HZ11-13 | 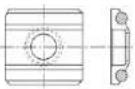 | Measure the inner cylinder R11-R13 |
| 5 | HZ12.5-17 | Measure the inner cylinder R12.5-R17 | |
| 6 | HZ16.5-30 | Measure the inner cylinder R16.5-R30 | |
| 7 | K10-15 | 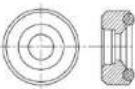 | Measure the spherical outside surface Sr10-SR15 |
| 8 | K14.5-30 | Measure the spherical outside surface SR14.5-SR30 | |
| 9 | HK11-13 | 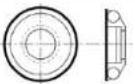 | Measure the spherical inside surface Sr11-SR13 |
| 10 | HK12.5-17 | Measure the spherical inside surface SR12.5-SR17 | |
| 11 | HK16.5-30 | Measure the spherical inside surface SR16.5-SR30 | |
| 12 | UN | 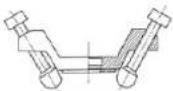 | Measure the outer cylinder, radius adjustable R10-∞ |
UNI-T®
UNI-TREND TECHNOLOGY (CHINA) CO., LTD.
No. 6, Gong Ye Bei 1st Road,
Songshan Lake National High-Tech Industrial
Development Zone, Dongguan City,
Guangdong Province, China
- PREFACE
- LIMITED WARRANTY AND LIABILITY
- TABLE OF CONTENTS
- Overview
- Applications:
- Range of application:
- Functions:
- Accessories
- Specifications
- Product Introduction
- Structure
- Buttons
- Operating Principle
- Preparation and Inspection
- UNI-T
- Quick Operation
- Startup
- Loading
- Localization
- Measurement
- Read Measured Values
- Detailed Operation
- Power on/off
- Main Interface
- Take Measurements
- Buttons (in the main interface)
- Note:
- Menu
- MEAS Settings
- Calibration
- Records
- Bluetooth App specification
- Printer Paper Installation
- Maintenance
- Storage and Transport
- UNI-T®
Brand : Uni-T
Model : UT347A
Category : Measurement