
JHD22 - Radio JENSEN - Free user manual and instructions
Find the device manual for free JHD22 JENSEN in PDF.


| Product Type | AM/FM/Weatherband Radio with Bluetooth |
| Brand | Jensen |
| Model | JHD22 |
| Dimensions (W x D x H) | 188 x 58 x 89 mm |
| Power Supply | 12V DC, negative ground |
| Maximum Output Power | 40W x 4 (RMS) |
| Speaker Impedance | 4-8 ohms per channel |
| Tuner Bands | AM, FM, Weatherband (7 channels) |
| Bluetooth Version | Supports A2DP and AVRCP |
| Display | 14-character alphanumeric segmented LCD |
| Audio Controls | Bass, Treble, Balance, Fader, Loudness |
| Preset Stations | 30 (12 AM, 18 FM) |
| Line Outputs | 2-channel pre-amp line level |
| Clock | 12/24 hour selectable with work timer |
| Low Voltage Alert | Visual and audible alarm at ~10.5V |
| USB Charging | Yes, via USB port (not specified current) |
| PA Microphone Input | 4-pin connector (compatible with JMICHFP) |
| Mounting | 1-DIN, front or rear mounting with support strap |
| Fuse Rating | Not specified, typically 10A |
| Key Features | Bluetooth streaming, weatherband, low voltage auto-off, dimmer |
| Care and Maintenance | Keep dry, avoid dust, use damp cloth, no harsh chemicals |
| Safety Instructions | Keep volume low while driving, use proper power supply, avoid water |
| FCC Compliance | Class B digital device, complies with FCC Part 15 |
Frequently Asked Questions - JHD22 JENSEN
User questions about JHD22 JENSEN
0 question about this device. Answer the ones you know or ask your own.
Ask a new question about this device
Download the instructions for your Radio in PDF format for free! Find your manual JHD22 - JENSEN and take your electronic device back in hand. On this page are published all the documents necessary for the use of your device. JHD22 by JENSEN.
USER MANUAL JHD22 JENSEN
Installation and Operation Manual

CONTENTS
Introduction 3
Safety Information 4
Installation....4
Wiring....6
Basic Operation....7
Tuner Operation....10
Bluetooth Operation....12
Care and Maintenance 14
Troubleshooting 15
Specifications....16
FCC Notes....17

INTRODUCTION
System Features
Features of Jensen JHD22 mobile audio system include:
• 14 Characters Alpha-Numeric Segmented LCD
• AM/FM (US/Europe /Japan/Russia) Tuner with 30 Presets (12AM, 18FM)
- Weatherband Tune
- Mute
- Bluetooth Streaming Audio (Supports A2DP and AVRCP)
- Loudness
• Electronic Bass, Treble, Balance, Fader Controls
• Maximum Output Power RMS 40W x 4
• Clock 12/24 Hour Selectable
- Work Clock Timer
- Low Battery Voltage Alert
- Illumination Dimming
- USB Charging
• 2-Channel Pre-amp Line Level Outputs
• 2- Wire Power with Non-Volatile Memory and Clock/Time support
Content List
• Jensen Heavy Duty Radio
- Hardware Kit
- Mounting Bracket
- Quick Reference Guide
Hardware Kit Contents
Commander
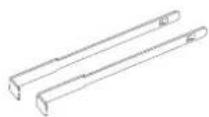
Din Sleeve
Removal Tool
flowchart
graph TD
    A["White"] --> B["Black"]
    C["Violet/Black"] --> D["Green/Black"]
    E["Gray"] --> F["Red/Blue/Black"]
    G["White/Black"] --> H["White/Black"]
    I["Red/Blue/Black"] --> J["Green/Black"]
    K["Green/Black"] --> L["Black"]
    M["White/Black"] --> N["White/Black"]
Harness Din Sleeve
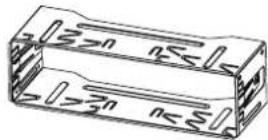

SAFETY INFORMATION
When Driving
Keep the volume level low enough to be aware of the road and traffic conditions.
When Washing Your Vehicle
Do not expose the product to water of excessive moisture.
Moisture can cause electrical shorts, re or other damage.
When Parked
Parking in direct sunlight can produce very high temperatures inside your vehicle. Give the interior a chance to cool down before starting playback.
Use the Proper Power Supply
This product is designed to operate with a 12 volt DC negative ground battery system.
WARNING:
• TO REDUCE THE RISK OF FIRE OR ELECTRIC SHOCK, DO NOT EXPOSE THIS EQUIPMENT TO RAIN OR MOISTURE.
- TO REDUCE THE RISK OF FIRE OR ELECTRIC SHOCK AND Consult with your nearest dealer if installation requires the ANNOYING INTERFERENCE, USE ONLY THE RECOMMENDRELLING of holes or other modifications to your vehicle.
NDConsult with your nearest dealer if installation requires the NDBEiling of holes or other modifications to your vehicle.
INSTALLATION
This unit is designed for installation in vehicle cabs with an existing 1-DIN radio opening. In many cases, a special installation kit will be required to mount the radio to the dashboard. See the dealer where the radio was purchased for kit availability. Always check the kit application before purchasing to make sure the kit works with your vehicle.
Before you Begin
- DisconnectBattery Before you begin, always disconnect the battery negative terminal.
- Remove Transport Screws
Important Notes
- Before final installation, test the wiring connections to make sure the unit is connected properly and the system works.
-
Use only the parts included with the unit to ensure proper O installation. The use of unauthorized parts can cause E. malfunctions.
-
Install the unit where it does not interfere with driving and cannot injure passengers during a sudden or emergency stop.
- If the installation angle exceeds 30^ from horizontal, the unit might not give optimum performance.
JENSEN HEAVY DUTY
- Avoid installing the unit where it will be subjected to high temperatures from direct sunlight, hot air, or from a heater, or subject to excessive dust, dirt or vibration.
DIN Front Mount
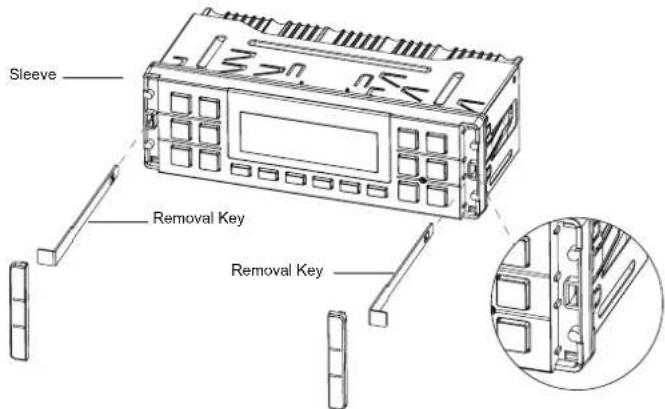
- Slide the mounting sleeve off of the chassis if it has not already been removed. If it is locked into position, use
the removal keys (supplied) to disengage it. The removal keys are depicted in "Removing the Unit" on page 6.
Dashboard
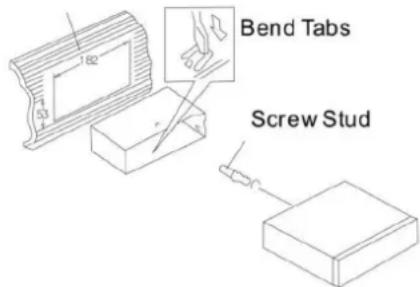
- Checkthe dashboard opening size by sliding the
mounting sleeve into it. If the opening is not large enough, carefully cut or files as necessary until the sleeve easily slides into the opening. Do not force the sleeve into the opening or cause it to bend or bow. Check that there will be sufficient space behind the dashboard for the radio chassis.
-
Locate the series of bend tabs along the top, bottom and sides of the mounting sleeve. With the sleeve fully inserted into the dashboard opening, bend as many of the tabs outward as necessary to firmly secure the sleeve to the dashboard.
-
Place the radio in front of the dashboard opening so the wiring can be brought through the mounting sleeve.
- Follow the wiring diagram carefully and make certain all connections are secure and insulated with crimp connectors or electrical tape to ensure proper operation.
- After completing the wiring connections, turn the unit on to confirm operation (vehicle accessory switch must be on). If the unit does not operate, recheck all wiring until the problem is corrected. Once proper operation is achieved, turn the accessory switch off and proceed with final mounting of the chassis.
- Carefully slide the radio into the mounting sleeve making sure it is right-side-up until it is fully seated and the spring clips lock it into place.
- Attach one end of the perforated support strap (supplied) to the screw stud on the rear of the chassis using the hex nut provided. Fasten the other end of the dashboard either above or below the radio using the screw and plain washer provided. Bend the strap, as necessary, to position it. Some vehicle installations provide cavity for rear support. In these applications, place the rubber bushing over the screw stud and insert.
CAUTION: The perforated rear support strap or rear rubber mounting bushing must be used in the installation of the radio. Installation without either may result in damage to the radio or the mounting surface and void the manufacturer's warranty.
- Test radio operation by referring to the operating instructions for the unit.

Removing the Unit
To remove the radio after installation, remove the plastic end caps, insert the removal keys straight back until they click, and then pull the radio out. If removal keys are inserted at an angle, they will not lock properly to release the unit.
Reconnect Battery
When wiring is complete, reconnect the battery negative terminal.
WIRING
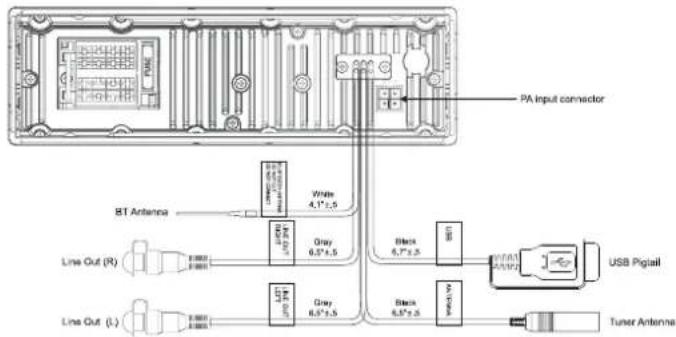
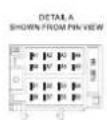
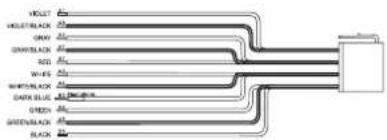
| PIN NO. | WIRE COLOR | DESCRIPTION |
| A1 | VIOLET | RIGHT REAR SPEAKER(+) |
| A2 | GRAY | RIGHT FRONT SPEAKER(+) |
| A3 | WHITE | LEFT FRONT SPEAKER(+) |
| A4 | GREEN | LEFT REAR SPEAKER(+) |
| A5 | GREEN/BLACK | LEFT REAR SPEAKER(-) |
| A6 | WHITE/BLACK | LEFT FRONT SPEAKER(-) |
| A7 | GRAY/BLACK | RIGHT FRONT SPEAKER(-) |
| A8 | VIOLET/BLACK | RIGHT REAR SPEAKER(-) |
| B1 | N/A | NO CONNECTION |
| B2 | N/A | NO CONNECTION |
| B3 | DARK BLUE | AMP REMOTE |
| B4 | N/A | NO CONNECTION |
| B5 | BLACK | GROUND |
| B6 | N/A | NO CONNECTION |
| B7 | RED | +12V ACC SWITCHED |
| B8 | N/A | NO CONNECTION |
WARNING!
Do not connect the +12VDC ACC switched wire to the battery. This wire MUST be connected to the Accessory/Ignition wire or a +12 volts switched power source.

BASIC OPERATION
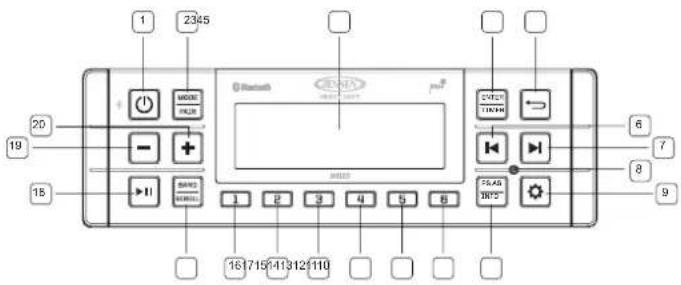
Power On/Off
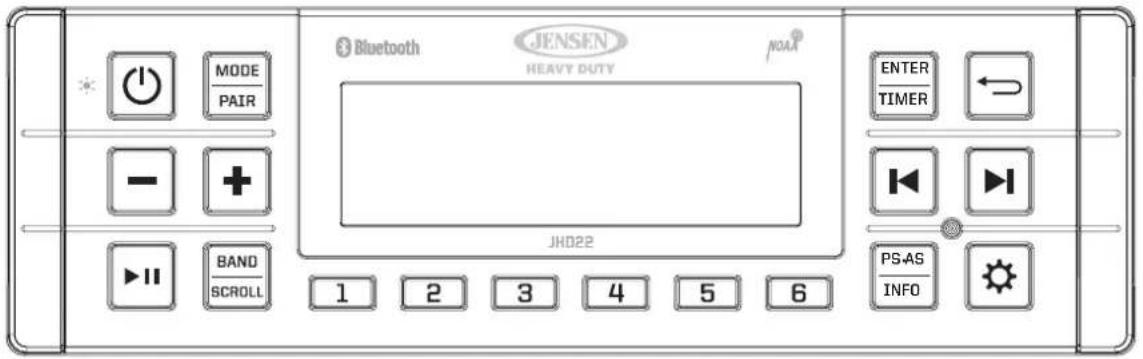
Press the POWER button (1) to turn the unit on. The unit will resume at the last mode (Tuner, BT, etc.) after turn on. Press and hold the POWER button (1) to enter standby mode.
Volume Control
To increase the volume, press the +button (20). To decrease the volume, press the _button(19).
Play/Pause/Mute
Press the ▶button (18) on the control panel to pause or mute the audio output. Press ▶button again to unmute or restore the audio output to the previous level.
Mode
Press the MODE button (2) to select a different mode of operation, as indicated on the display panel. Available modes include the following: FM > AM > Weather Band > BT Audio. FM is the default source mode on initial power up.
NOTE: Weatherband mode will be skipped when the Region menu option is set to "Europe/Russia/Japan".
Reset
The RESET button (8) should be activated for the following reasons:
- Initial installation of the unit when all wiring is completed.
• Function buttons do not operate. - Error symbol on the display.
Use a ball point pen or thin metal object to press the reset button. This may be necessary should the unit display an error code.
Audio Menu
Press the SETUP button (9) to access the audio menu. You can navigate through the audio menu items by pressing the SETUP button repeatedly or or buttons (6, 7). Once the desired menu item appears on the display, adjust that option by pressing the or buttons (20, 19) within 5 seconds. The unit will automatically exit the audio menu after five seconds of inactivity. The following menu items can be adjusted.
Loudness:
Press the +or buttons (20, 19) to toggle the loudness on/off. When listening to music at low volumes, this feature will boost the bass/treble range to compensate for the characteristics of human hearing.
Bass Level
Press the +or buttons to adjust the Bass level range from "-7" to "+7".
JENSEN HEAVY DUTY
Treble Level
Press the + or -buttons to adjust the Treble level range from "-7" to "+7".
Balance
Press the +or -buttons to adjust the Balance between the left and right speakers from "Left 7" to "Right 7".
Fade
Press the +or buttons to adjust the Fader between the rear and front speakers from "Rear 7" to "Front 7".
System Menu
- Press and hold the SETUP button (9) for more than 2 seconds to enter the system menu.
- Press the SETUP button repeatedly or ▶or ▶buttons (6, 7) to navigate the system menu.
- Pressthe of buttons (20, 19) to adjust the selected menu item. Press the ENTER/TIMER button (4) to select the desired item.
The unit will automatically exit the system menu after 5 seconds of inactivity.
The following items can be adjusted:
• LCD Dimmer (1-10): Adjust LCD backlight
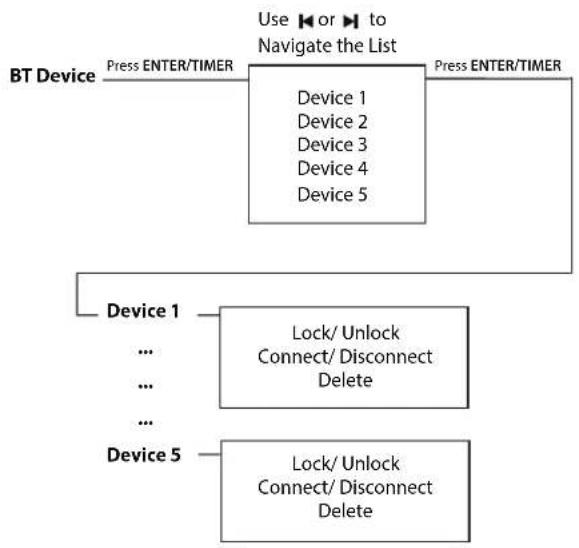
- Bluetooth Devices: Press to ENTER/TIMER button (4) to enter sub-menu. Press or buttons (6, 7) to navigate list. List loops. Press ENTER/TIMER button to select device. Press or to navigate selected device's menu
of available options (Lock/Unlock > Connect/ Disconnect > Delete and List loops). Press ENTER/TIMER button to select options.
- Lock/Unlock: Press ENTER/TIMER button to lock or unlock device. Lock icon displays next to device name in menu when device is locked.
- Connect/Disconnect:PressENTER/TIMER button to connect or disconnect previous paried device.
-
Delete: Option only available if selected device is unlocked. Press ENTER/TIMER button to delete.
-
Clock Set: Setting the clock (HH:MM) and hour format.
- Low Voltage Alarm (On/Off): Monitor voltage on ACC line and send alert when voltage is low.
- Low Voltage Auto Off (On/Off): Automatically turn off power to radio when battery voltage is low.
- Preset-Only Tuning (On/Off): If 'Preset-Only Tune' is set to 'On' in System Settings, only presets from all bands are recalled in sequence.
- Tuning Region (USA/EURO/RUSSIA/JAPAN): Set frequency spacing for various regions.
• USA Tuning Region (AM > FM > WX > Bluetooth)
• Europe, Japan & Russia Tuning Region (AM > FM > Bluetooth)
- Key Beep (On/Off): Turn the audible beep On/Off (heard when functions/ buttons are selected). Beep tone off will not affect Battery Alarm audible tone.
JENSEN HEAVY DUTY
- Reset System Defaults: Press the ENTER/TIMER button and Press For Buttons to select Confirm. Press the ENTER/TIMER to return the unit to factory default set up values.
• System Info: Display firmware version
NOTE: Bluetooth Device menu options are only available while the Bluetooth feature is ON and the radio is in Bluetooth Audio mode.
NOTE: A locked Bluetooth device will not be overwritten from the list.
Low Voltage Alarm Operation
If Low Voltage Alarm is set to "On", an alarm will sound (8 beeps every 30 sec) when the voltage drops to 10.5V (+/-0.3V). A visual warning (LOW VOLTAGE) will appear, Press any button to dismiss visual warning, (reappear every 10-minutes) in the LCD display.
NOTE: "Off" is the default setting for Low Voltage Alarm. If the audio is muted or the volume is set to 0, the audible beep will not be heard.
Liquid Crystal Display (LCD)
The liquid crystal display (LCD) panel (3) displays the frequency, time and activated functions. Press the POWER button (1) to turn the dimmer On (selected brightness level) and press again to turn dimmer Off (maximum brightness level).
NOTE: LCD panels may take longer to respond when subjected to cold temperatures for an extended period of time. In addition, the visibility of the characters on the LCD may decrease slightly. The LCD display will return to normal when the temperature increases to a normal range.
Setting the Clock
To set the clock to display the current time, turn the vehicle ignition on and turn the radio on. Enter the system menu and adjust the clock by selecting the "Set Clock" menu item.
- Press ENTER/TIMER button (4) to enter clock setting menu.
- press on to select hours, minutes, or 12/24 hour format.
- Press or to-adjust the setting field.
When no adjustment is made, the time will become set and normal operation will resume.
Setting Work Timer
To activate the work timer clock and running in the background,
- Press ENTER/TIMER button (4) to display work timer.
- Press ENTER/TIMER button again to start/stop work timer.
- Press & hold ENTER/TIMER button to reset work timer.
- Press RETURN button (5) to exit work timer display.
If timer is exited while running, "TIMER" flashed every 10 seconds for 2 seconds in place of clock in footer right on the display.
JENSEN
HEAVY DUTY
PA Operation
- Connect PA Microphone (JMICHFP) with a 4-PIN connector to the 4-PIN socket on the rear of the unit.
- The unit will automatically switch to PA mode when the mic switch is pushed "ON".
- The PA output level can be adjusted using the volume + or – buttons (20, 19).
- With radio power off, the radio will wake up when PA mic button is pressed to make an announcement. Please note that it will take a few seconds before the radio "wakes up" and PA is active. Radio will return to the off state when the PA mic is released.
TUNER OPERATION
Select a Band
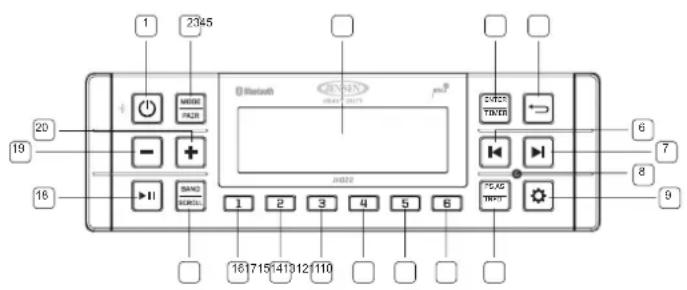
Press the BAND/SCROLL button (17) to change between FM1, FM2, FM3, AM1 and AM2.
Manual Tuning
Press & hold the kor buttons (6, 7) to seek stations up/down step by step.
Auto Seek Tuning
Press the or buttons (6, 7) to automatically seek the next or previous strong station.
NOTE: Seek tuning is not available for weather band channels. Use the up or down tuning buttons to manually select any of the seven available weather band channels.
Preset Stations
Six numbered preset buttons store and recall stations.
Store a Station
Select a station, then press and hold a preset button from 1 – 6 on the number buttons (11-16) for two seconds. The preset number will appear on the LCD.
Recall a Station
Press a preset button from 1 - 6 on the number buttons to select the corresponding stored station.
NOTE: Preset buttons are pre-assigned frequencies in weather band mode.

Automatically Store / Preset Scan (AS/PS)
Automatically Store
Select an AM or FM band. Press and hold the AS-PS button (10) for 2 seconds to automatically select 6 strong stations. "Storing Presets" appears on the screen and the new stations replace any stations already stored.
Preset Scan
Select a band. Press AS•PS (10) to scan stations stored in the current band. The unit will pause for 10 seconds at each preset station. Press AS•PS again to stop scanning when the desired station is reached.
Weather Band Operation
What is the NOAA Weather Radio/Weatheradio Canada?
NOAA (National Oceanic and Atmospheric Administration) is a nationwide system that broadcasts local weather emergency information 24 hours a day via the National Weather Service (NWS) network. The U.S. network has more than 530 stations covering the 50 states as well as the adjacent coastal waters, Puerto Rico, the U.S. Virgin Islands and the U.S. Pacific Territories. Each local area has its own transmitting station and there are a total of seven broadcasting frequencies used. A similar system is available in Canada under the Weatheradio Canada service administered by Environment Canada.
Tuning to Weatherband
Press the MODE button (2) repeatedly to reach the Weatherband. The indication "WB" will appear on the display panel, along with the current number and channel indication: "WB-1", WB-2", "WB-3", "WB-4", "WB-5", "WB-6" or "WB-7". The seven frequencies are shown in the following table:
WB Frequencies
| Frequency (MHz) Preset | |
| 162.400 2 | |
| 162.425 | 4 |
| 162.450 | 5 |
| 162.475 | 3 |
| 162.500 | 6 |
| 162.525 | - |
| 162.550 | 1 |
The above table also shows which preset button will access the frequency. Note that one frequency cannot be accessed using a preset button. The frequency can only be reached using the tuning controls.
Use the or buttons (6, 7) or the preset buttons to tune to each of the seven channels until you find the weatherband station broadcasting in your area.
How many stations can I expect to receive?
Since the broadcasts are local weather and information, the transmission power is usually very low (much less than standard AM or FM stations) so you will usually receive only one station unless you are on the edge of two or more broadcast signals. The most you will receive will be two or three, and that is rare.

Is it possible I won't receive any stations?
Depending on where you are located, there is a possibility you will receive only a very weak signal or none at all. Also, similar to AM and FM signals, weatherband signals are subject to surrounding conditions, weather, obstructions of the signal by hills or mountains, etc.
BLUETOOTH OPERATION
The JHD22 includes built-in Bluetooth technology that allows you to connect this head unit to Bluetooth devices for streaming audio playback.
About Bluetooth Technology
Bluetooth is a short-range wireless radio connectivity technology developed as a cable replacement for various electronic devices. Bluetooth operates in 2.4 GHz frequency range and transmits voice and data at speeds up to 2.1 Mbit/s over a range of up to 10 meters.
Bluetooth Menu Options
NOTE: Please note that some BT menu options are only available while the unit is in Bluetooth Audio mode.
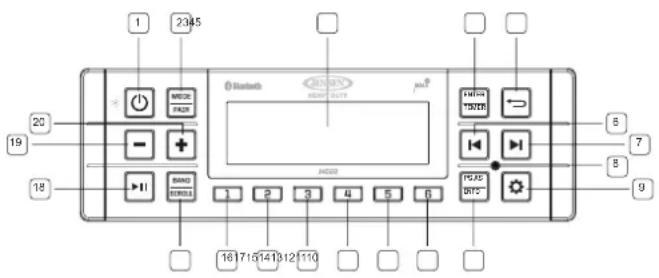
Press and hold the SETUP button (9) for more than 2 seconds to enter the system menu. Press the SETUP button repeatedly or/or buttons (6, 7) to view the Bluetooth Setup Menu options. Press ENTER/TIMER button (4) to enter BT Device List menu options.
BT Device List
Press the ENTER/TIMER buttons to view a list of previously paired mobile phone device models. Press the or buttons to navigate devices from the list. You cannot delete a device that is actively connected. Press the ENTER/TIMER button to select the device. Press the or buttons to choose Lock/Unlock, Disconnect or Delete for this device.
- LOCK/UNLOCK: The JHD22 can store up to 5 devices for Bluetooth connection. The devices are stored in FIFO (First in First Out) order. To prevent a device from being bumped from the list when more than 5 devices are used, you must lock the device. To lock/Unlock a device, press the ENTER/TIMER button to display/change the Locked or Unlocked icon.
- DISCONNECT: To disconnect a paired device, press the ENTER/TIMER button to temporarily remove the Bluetooth
JENSEN HEAVY DUTY
link. The link can be re-established through your phone menu by selecting the JHD22 for connection.
- DELETE: To delete a device from the list, press the ENTER/TIMER button.
NOTE: Device must be disconnected to be deleted.
flowchart
graph TD
    A["BT Device"] -->|Press ENTER/TIMER| B["Device 1"]
    A -->|Press ENTER/TIMER| C["Device 2"]
    A -->|Press ENTER/TIMER| D["Device 3"]
    A -->|Press ENTER/TIMER| E["Device 4"]
    A -->|Press ENTER/TIMER| F["Device 5"]
    B --> G["Device 1"]
    C --> H["..."]
    D --> I["..."]
    E --> J["..."]
    F --> K["..."]
    G --> L["Lock/ Unlock Connect/ Disconnect Delete"]
    H --> L
    I --> L
    J --> M["..."]
    K --> N["..."]
    L --> O["Device 5"]
    M --> P["..."]
    N --> Q["..."]
    O --> R["..."]
    P --> S["Lock/ Unlock Connect/ Disconnect Delete"]
    Q --> S
Pairing a Bluetooth Device
Before you begin, consult the owner's manual for the Bluetooth device you want to pair with the JHD22.
Bluetooth Quick Pair:
- On your personal Bluetooth device, enter the Bluetooth settings list. Make sure your device has Bluetooth turned on and is searching for new devices.
- Press and hold the MODE/PAIR button (2) for three seconds to make the JHD22 available on your Bluetooth device.
- On your Bluetooth device, select JHD22 once it becomes available to pair and connect your device. Enter the pairing password (0000), if requested.
After connecting successfully, you will be able to listen to music stored on your Bluetooth enabled device through the radio.
BT Audio (A2DP)
The A2DP music is available for Bluetooth enabled phones when the phone is connected. To access Bluetooth mode and play songs stored on your phone, press the MODE/PAIR button. While in Bluetooth mode, the Bluetooth Audio icon will appear on the LCD.
Selecting Tracks
During playback, press the or buttons (6, 7) buttons to play the previous or next track.
Pausing Playback
During playback, press the button (18) to pause the Bluetooth AUDIO player. "Pause" will appear on the LCD. Press again to resume playback. If you change to another mode, the mobile phone audio will pause. Press the MODE/TIMER
JENSEN HEAVY DUTY
button (2) to return to Bluetooth mode and resume mobile phone audio playback.
NOTE: If a Bluetooth device is disconnected due to the power being turned off or if the device is disconnected inadvertently, the unit will automatically search for the matching Bluetooth device when the power is restored.
CARE AND MAINTENANCE
- Keep the product dry. If it does get wet, wipe it dry immediately. Liquids might contain minerals that can corrode the electronic circuits.
- Keep the product away from dust and dirt, which can cause premature wear of parts.
- Handle the product gently and carefully. Dropping it can damage circuit boards and cases, and can cause the product to work improperly.
- Wipe the product with a dampened cloth occasionally to keep it looking new. Do not use harsh chemicals, cleaning solvents, or strong detergents to clean the product.
- Use and store the product only in normal temperature environments. High temperature can shorten the life of electronic devices, damage batteries, and distort or melt plastic parts.
Ignition
The most common source of noise in reception is the ignition system. This is a result of the radio being placed close to the ignition system (engine). This type of noise can be easily detected because it will vary in intensity of pitch with the speed of the engine.
Usually, the ignition noise can be suppressed considerably by using a radio suppression type high voltage ignition wire and suppressor resistor in the ignition system. (Most vehicles employ this wire and resistor but it may be necessary to check them for correct operation.) Another method of suppression is the use of additional noise suppressors. These can be obtained from most CB radio or electronic supply shops.
Interference
Radio reception in a moving environment is very different from reception in a stationary environment (home). It is very important to understand the difference.
AM reception will deteriorate when passing under a bridge or when passing under high voltage lines. Although AM is subject to environmental noise, it has the ability to be received at great distance. This is because broadcasting signals follow the curvature of the earth and are reflected back by the upper atmosphere.

TROUBLESHOOTING
| Symptom Cause Solution | ||
| No power | The vehicle's accessory switch is not on | If the power supply is properly connected to the vehicle's accessory terminal, switch the ignition key to "ACC". |
| Fuse is blown Replace the fuse. | ||
| No sound Volume too slow | Adjust volume to audible level. | |
| Wiring is not properly connected Check wiring connections. | ||
| The operation keys do not work | Control panel is not properly installed Reinstall control panel. | |
| Built-in microcomputer is not operating properly due to noise | Press the RESET button. | |
| Cannot tune to radio station, auto-seek does not work | Antenna cable is not connected Insert the antenna cable firmly. | |
| Signals are too weak | Select a station manually. | |
| ERROR-01 on LCD | Database or decoder error | Change to another mode. |

SPECIFICATIONS
FM Radio
Frequency Coverage (USA) 87.5 to 1
Frequency Coverage (Europe/ Russia/ Japan) 87.5 to 108
Sensitivity (S/N = 30dB) ....
Stereo Separation ....
AM/MW
Frequency Range (USAI) 530
Frequency Range (Europe/ Russia/ Japan).... 522-162
Sensitivity (S/N=20dB)
General
Frequency band(s) (for Bluetooth)....2.4\~2.48
Maximum radio-frequency power transmitted (for Bluetooth) 4 dF
Operating Voltage.
Grounding System
Ground Speaker Impedance 4-8 ohms per ch
Tone Controls:
Bass (at 100 Hz)
Treble (at 10 kHz) ....
Maximum Power Output ....
Idle/Standby Current ....
Fuse Rating ....
Max Dimensions 188 (W) x 58 (D) x 89

FCC NOTES
WARNING! Changes or modifications to this unit not expressly approved by the party responsible for compliance could void the user's authority to operate the equipment.
NOTE: This equipment has been tested and found to comply with the limits for a Class B digital device, pursuant to Part 15 of the FCC Rules. These limits are designed to provide reasonable protection against harmful interference in a residential installation.
This equipment generates, uses and can radiate radio frequency energy and, if not installed and used in accordance with the instructions, may cause harmful interference to radio communications.
However, there is no guarantee that interference will not occur in a particular installation. If this equipment does cause harmful interference to radio or television reception, which can be determined by turning the equipment off and on, the user is encouraged to try to correct the interference by one or more of the following measures:
• Reorient or relocate the receiving antenna.
- Increase the separation between the equipment and receiver.
- Connect the equipment into an outlet on a circuit different from that to which the receiver is connected.
- Consult the dealer or an experienced radio/TV technician for help.
This equipment complies with FCC radiation exposure limits set forth for an uncontrolled environment. This equipment should be installed and operated with minimum distance 20cm between the radiator & your body.
ASA ELECTRONICS™
ASA Electronics Corporation
www.asaelectronics.com
www.jensenheavyduty.com
©2022 ASA Electronics Corporation

HEAVY DUTY
JHD22
QUICK REFERENCE GUIDE
Basic Operation
MODE/PAIR: Press to cycle through source mode. Press and hold to begin Bluetooth pairing.
POWER: Press to turn ON. Press again to switch Dimmer (On/Off). Press and hold to turn off and enter standby mode.
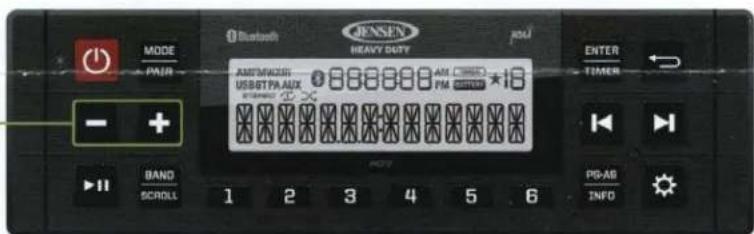
VOLUME: Press the VOLUME UP button to increase volume. Press the VOLUME DOWN button to decrease volume.
PLAY/PAUSE: Press to Mute/Pause audio, press again to resume audio volume.
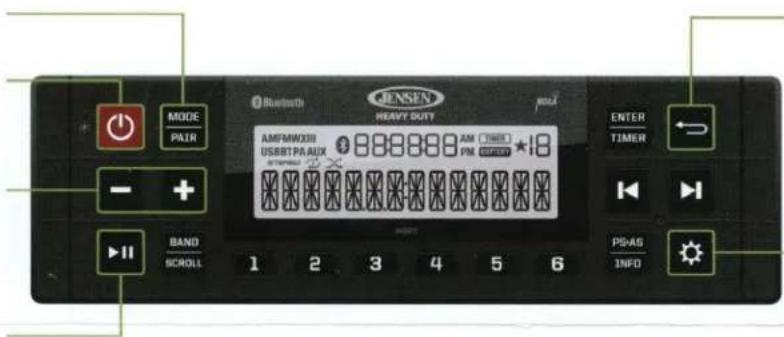
BACK: Press to EXIT any setting menu.
AUDIO/SETTINGS: Press to bring up AUDIO MENU options: LOUDNESS (On/Off). BASS, TREBLE & BALANCE (Left to Right). Press and hold to bring up SETTING MENU options: Dimmer, Bluetooth Devices, Clock Set, Low Voltage Alarm, Low Voltage Auto Off, Preset-Only Tuning, Tuning Region, Key Beep. System Reset & System Info. Press VOLUME "+" and "-" buttons to select each MENU option except for 'RESET'.
AM/FM Tuner Controls
VOLUME: Press the VOLUME UP button to increase volume. Press the VOLUME DOWN button to decrease volume.
MUTE: Press to MUTE volume. Press again to resume volume.
BAND/SCROLL: Press to Select preset group FM1, FM2, FM3, or AM1, or AM2 each with 6 channel memory location.
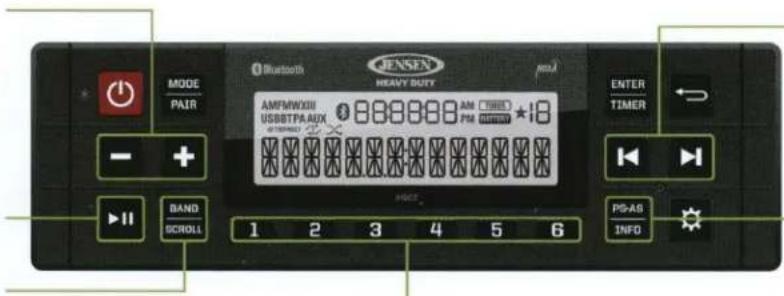
TUNE/SEEK: Press ▶ or ▶ buttons to seek to the next strongest station. Press and hold ▶ or ▶ to start manual tune mode, the frequency displayed will flash, press ▶ or ▶ to manually tune while in manual tune mode.
The manual tune mode will automatically end after 5 seconds of inactivity.
AS/PS: Press to SCAN through currently stored presets. Press & hold to STORE strongest broadcast stations in your area.
STATION STORE BUTTONS: Press to recall stored channel. Press & hold to store current station. Note: Up to 30 channels can be stored (6 channels per band FM1, FM2, FM3, AM1, AM2).
Weatherband Tuner Control
MODE: Press repeatedly until you reach Weatherband. Note: The Weatherband mode is only selectable when the tuner region is set to USA.
MUTE: Press to mute volume. Press again to resume volume.
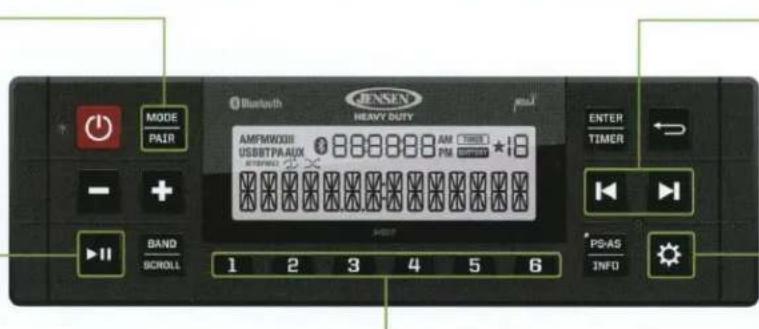
TUNE/SEEK: Press ◀ or ▶ buttons to toggle through the seven preset frequency bands.
TUNER REGION SETTING: Press & hold to access SETTING MENU. Press ▶ or ▶ to navigate to TUNER REGION Setup Menu option. Press VOLUME "+" and "-" buttons to select region option.
STATION STORE BUTTONS: Press to select Preset Weatherband channels 162.550MHz (CH1), 162.400MHz (CH2), 162.475MHz(CH3), 162.425MHz (CH4), 162.450MHz (CH5), 162.500MHz (CH6), hold ▶ button to manually tune to 162.525MHz (CH7).
PAIR DEVICE VIA BLUETOOTH:
Make sure the device you intend to pair with is on and Bluetooth is enabled.
Press & hold to start the pairing process. The display as "Pairing" and be able to be paired with for 2 minutes. With your device in Bluetooth settings, "JHD22" should appear as an available device. Tap "JHD22" to connect.
RECEIVING A PHONE CALL WHILE STEAMING MUSIC TO STEREO:
When a call is answered, BT AUDIO will pause automatically. After hanging up, BT AUDIO will continue playback on most phones. If it does not, press▶ button to resume.
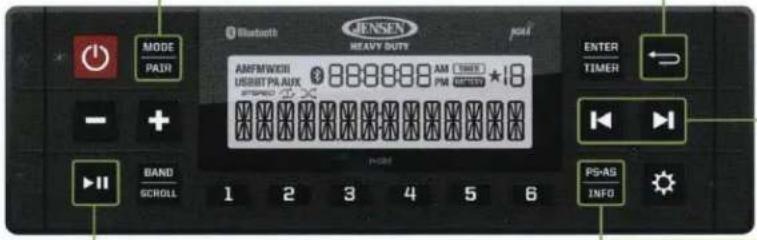
PLAY/PAUSE: Press to suspend playback.
Press again to resume current track.
BACK: Press to EXIT pairing process.
TUNE/TRACK: Press ▶ button to advance to next track. Press ◀ button to advance to previous track.
INFO: Press to toggle between ID3 tag info and track number 0000/0000 and elapsed time. Press & hold to display current connecting Bluetooth device name.
CLOCK/WORK TIMER:
Clock always appears at top, unless displaying Timer.
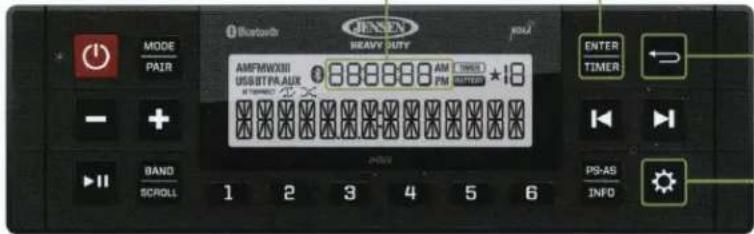
TIMER: Press to display work timer. When work timer is displayed, press again to start/stop work timer or hold to reset work timer.
BACK: Press to EXIT work timer display.
CLOCK SETTING MENU:
Press & hold to enter menu. Press ◀ or ▶ to navigate to CLOCK SET. Press ENTER to select. Press ◀ or ▶ again to navigate the HOUR or MINUTE or 12/24 HOURS FORMAT. Press + or - buttons to adjust setting.
VOLUME: When PTT mic is engaged, press VOLUME = or + to decrease or increase PA volume respectively.
Jensen Heavy Duty JHD22 is compatible with JMICHND hand held microphone (sold separately).
When PUSH-TO-TALK, PTT microphone is engaged, source unit automatically mutes or pauses current source mode and switches to PA audio from mic and "PA Active" displays.
When PTT mic is disengaged, source unit automatically returns to current source mode and previous master volume level.
For owner's manual, please visit:
https://www.asaelectronics.com/support or scan this QR code.

Part Number: JHD22
IMPORTANT OWNER'S MANUAL INFORMATION
Owner's Manuals are made available at the following website:
https://www.asaelectronics.com/support/
https://www.asaelectronics.com/support/
IMPORTANT MANUEL D'INFORMATION
https://www.asaelectronics.com/support/

ELECTRONICS.
2602 Marina Drive · Elkhart, IN 46514
www.asaelectronics.com
- Installation and Operation Manual
- CONTENTS
- INTRODUCTION
- System Features
- Content List
- SAFETY INFORMATION
- When Driving
- When Washing Your Vehicle
- When Parked
- Use the Proper Power Supply
- WARNING:
- INSTALLATION
- Before you Begin
- Important Notes
- JENSEN HEAVY DUTY
- DIN Front Mount
- Removing the Unit
- Reconnect Battery
- WARNING!
- BASIC OPERATION
- Power On/Off
- Volume Control
- Play/Pause/Mute
- Mode
- Reset
- Audio Menu
- Loudness:
- Bass Level
- Treble Level
- Balance
- Fade
- System Menu
- Low Voltage Alarm Operation
- Liquid Crystal Display (LCD)
- Setting the Clock
- Setting Work Timer
- JENSEN
- HEAVY DUTY
- PA Operation
- Select a Band
- Manual Tuning
- Auto Seek Tuning
- Preset Stations
- Store a Station
- Recall a Station
- Automatically Store / Preset Scan (AS/PS)
- Automatically Store
- Preset Scan
- Weather Band Operation
- What is the NOAA Weather Radio/Weatheradio Canada?
- Tuning to Weatherband
- How many stations can I expect to receive?
- Is it possible I won't receive any stations?
- BLUETOOTH OPERATION
- About Bluetooth Technology
- Bluetooth Menu Options
- BT Device List
- Pairing a Bluetooth Device
- Bluetooth Quick Pair:
- BT Audio (A2DP)
- Selecting Tracks
- Pausing Playback
- CARE AND MAINTENANCE
- Ignition
- Interference
- SPECIFICATIONS
- FM Radio
- AM/MW
- General
- Tone Controls:
- FCC NOTES
- ASA ELECTRONICS™
- JHD22
- QUICK REFERENCE GUIDE
- AM/FM Tuner Controls
- Weatherband Tuner Control
- PAIR DEVICE VIA BLUETOOTH:
- RECEIVING A PHONE CALL WHILE STEAMING MUSIC TO STEREO:
- CLOCK/WORK TIMER:
- CLOCK SETTING MENU:
- IMPORTANT OWNER'S MANUAL INFORMATION
- IMPORTANT MANUEL D'INFORMATION
Brand : JENSEN
Model : JHD22
Category : Radio