
R500 - Radio Lenoxx - Free user manual and instructions
Find the device manual for free R500 Lenoxx in PDF.


| Product Type | AM/FM Radio Receiver |
| Brand | Lenoxx |
| Model | R500 |
| Frequency Range | FM 87.5-108 MHz, AM 530-1710 kHz |
| Power Supply | AC 220V ±10% 50Hz or 4×AA batteries (not included) |
| Speaker Output | 3W RMS |
| Dimensions (W×H×D) | 200 × 120 × 80 mm |
| Weight | 0.5 kg |
| Antenna Type | FM telescopic antenna, AM built-in ferrite bar |
| Controls | Tuning knob, volume knob, on/off/band selector switch |
| Headphone Jack | 3.5 mm stereo |
| Battery Indicator | Red LED when battery low |
| Box Contents | Radio, user manual, warranty card |
| Warranty | 1 year limited |
| Cleaning Instructions | Wipe with a soft dry cloth; do not use liquid or aerosol cleaners |
| Safety Warnings | Do not expose to rain or moisture; unplug during storms |
| Recycling | Dispose in accordance with local regulations for electronic waste |
| Spare Parts | Contact Lenoxx customer service for replacement knobs, antenna, etc. |
Frequently Asked Questions - R500 Lenoxx
User questions about R500 Lenoxx
0 question about this device. Answer the ones you know or ask your own.
Ask a new question about this device
Download the instructions for your Radio in PDF format for free! Find your manual R500 - Lenoxx and take your electronic device back in hand. On this page are published all the documents necessary for the use of your device. R500 by Lenoxx.
USER MANUAL R500 Lenoxx
FM /AM Band Radio with USB/SD Player
BATCH NUMBER: PR4371
PLEASE READ AND RETAIN THESE INSTRUCTIONS FOR FUTURE REFERENCE
Know these Symbols
 | CAUTION: TO REDUCE THE RISK OF ELECTRIC SHOCK, DO NOT REMOVE COVER (OR BACK). NO USER-SERVICEABLE PARTS SIDE. REFER SERVICING TO QUALIFIED SERVICE PERSONNEL |
 | This bolt of lightning----Indicates uninsulated material within your unit which may cause an electrical shock.For the safety of everyone in your household, please do not remove product covering. |
 | The exclamation point ----calls attention to features for which you should read the enclosed literature closely to prevent operating and maintenance problems. |
 | Dripping warning: The product shall not be exposed to dripping or splashing and that no objects filled with liquids, such as vases, shall be placed on the product. This unit must not be exposed to moisture or rain. |
WARNINGS
This unit operates on 110/220V \~ 60/50Hz. If the unit is not used for an extended period of time, remove the plug from the AC mains.
Ensure all connections are properly made before operating the unit.
This unit should be positioned so that it is properly ventilated. Avoid placing it, for example, close to curtains, on the carpet or in a built-in installation such as a bookcase.
Do not expose this unit to direct sunlight or heat radiating sources.
PREPARATION FOR USE
Unpacking and Setup
* Carefully remove the unit from the display carton and remove all packing material from the unit itself.
* Remove any descriptive labels that may be found on either the front or top cabinet of the unit. Do not remove any labels located on either the back or button cabinet of the unit.
POWER SURRLY
Using AC Power
- Check if the power voltage, as shown on the type plate located on the bottom of the set, corresponds to your local AC power supply. If it does not, consult your dealer or service center.
- Connect the power cord to the AC socket inlet and the wall outlet. the power supply is now connected and ready for use.
- To switch off completely, unplug the power cord from the wall outlet.
- Unplug the power cord from the wall outlet to protect your set during heavy thunderstorms.
Using DC Power—inserting Batteries (not included)
- Open the battery compartment. This unit takes 4 x D size batteries.
- Insert batteries into the battery compartment, making sure that the batteries are installed in the designated numerical order and that the Proper Polarities (+ and -) are maintained, to Prevent possible damage to the unit:
(preferably Alkaline) with the correct polarity as indicated by the + and - symbols inside the compartment
Batteries contain chemical substances, so they should be disposed of properly.
*Incorrect use of batteries can cause electronic leakage and will corrode the compartment or cause the batteries to burst. Therefore:
*Do not mix battery types: e.g. alkaline with carbon Zinc. Only use batteries of the same type for the set.
*When inserting new batteries, do not mix old batteries with new ones.
*Remove the batteries if the set will not be used for a long time.
BATTERY LIFE
IF THE SOUND BECAOMES LOW OR DISTORTED, REPLACE ALL THE BATTERIES WITH NEW ONES.
CONTROL LOCATIONS
FM/AM RADIO WITH USB/ SD PLAYER
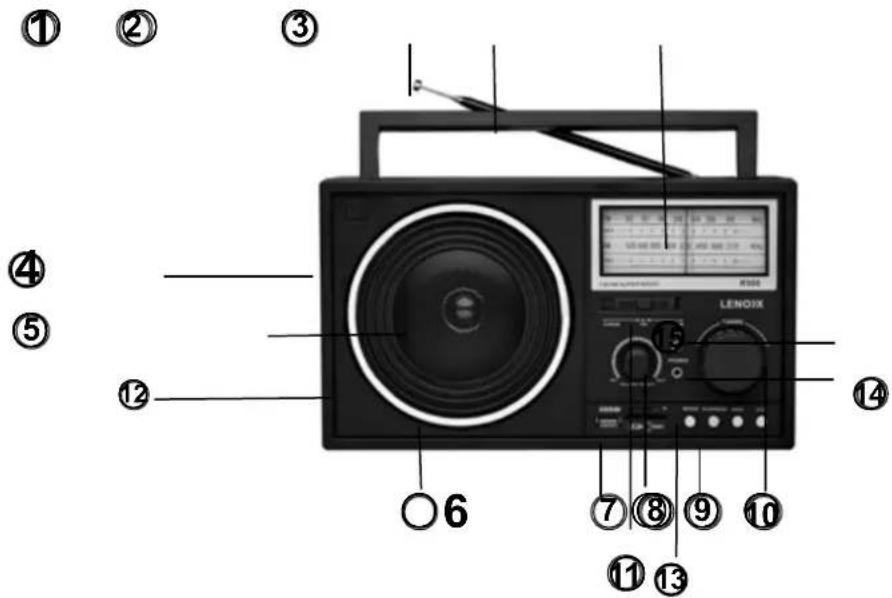
LOCATION OF CONTROLS
- ANTENNA
- HANDLE
- TUNING FREQUENCY DISPLAY WINDOW
- AC SOCKET (AT REAR OF THE UNIT)
- SPEAKER
- BATTERY COMPARTMENT (AT REAR OF THE UNIT)
- USB/SD/TF CARD SOCKET
- VOLUME CONTROL
- USB/SD RADIO FUNCTION BUTTONS
- TUNNING KNOB
- USB/FM/AM FUNCTION SWITCH
- EXTRAL HIGH SENSITIVITY ROUND ANTENNA
- THE FUNCTION INDIRECTOR
- EARPHONE JACK
- AUX IN JACK
POWER SUPPLY
This unit operates from a main supply of 240V \~ 50Hz. Connect the AC power cord to the AC household main outlet. Ensure that the voltage is as indicated on the rating plate on the rear of the unit.
- Rotate the volume knob clockwise to turn on the radio and adjust to desired sound level.
- Select the preferred wave range by sliding the band selector.
- Adjust the VOLUME knob to a comfortable listening level.
- Adjust the antenna (see Antennas).
- To turn off the radio, Rotate the Volume Knob anti-clockwise till a" click" sound is heard.
ANTENNA
THE UNIT HAS TWO ANTENNAS. ONE IS A TELESCOPIC ANTENNA, THE OTHER IS ANEXTRAL HIGH SENSITIVITY ROUND ANTENNA.
FM: Pull the Telescopic Antenna and adjust its length and angle for optimum reception.
AM: The sensitive ferrite care antenna inside the set will provide excellent AM reception in most areas. For optimum reception, turn the set in the direction which gives the best results since the ferrite care antenna is directional.
USING THE EXTERNAL HIGH SENSITIVITY ANTENNA:
- Assembled the AM antenna bracket and base together.
- Unwind the wire.
- Connect the AM antenna wires with the AM connection jacks on the backside of unit.
The red and black clips on the rear of the radio are spring loaded.
Press the clip down, then poke the wire in the hole, and then release your finger. The wire will be held in the port. Repeat for the other wire.
The AM antenna can be placed on top of the radio or in a high location (e.g.: bookshelf, high cabinet) to increase reception.
REMARK:
If the FM/AM reception is still weak, connect an extra High Sensitivity Round Antenna Directly, the set will then provide excellent radio program reception.

Max capability of USB player/SD/TF card is 32GB
Brief introduction of each component,
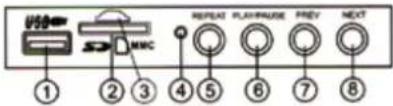
- USB Port: Playing MP3/WMA format music files from a USB stick.
- SD card port: Playing MP3/WMA format music files from a SD card.
-
TF card port: Playing MP3/WMA format music files from a TF card.
-
PROCESSING INDICATOR LIGHT: The indicator light begins to flash when the unit is reading MP3/WMA music files.
-
REPEAT function: When the unit is playing MP3/WMA music files from your USB stick, press the repeat button to repeatedly play a music track.
When a track is being played, press the REPEAT button once, the processing indicator light will blink at a quicker pace. Press the REPEAT button again to stop playing the track repeatedly. The processing indicator light will blink at a slower pace.
-
PLAY/PAUSE: When the unit is playing MP3 music files, press the pause button to pause a music track, press again to resume playback.
-
PREV button: When the unit is playing MP3 music files, press the prev button to play the previous track.
-
NEXT button: When the unit is playing MP3 music files, press the next button to play the next track.
AUX IN OPERATION
A device with an earphone socket can be connected to the Aux in jack on the radio.
Use an Aux in lead (not included).
Connect the Aux in lead to the Aux in jack on the radio.
Connect the other end of the Aux in lead to the earphone socket of your device.
Begin music playback from your device.
Sound from the device will play through the radio.
Remark: In order to ensure the normal operation of playing music from AUX mode, ensure the USB/Radio band switch is in the position of USB/SD. The USB slot or SD/TF card slot must be empty before an AUX in lead (not included) is connected to the radio and your aux in device.
For better usage and maintenance, please follow below instructions:
a) In order to ensure the normal operation of playing music from either USB/SD/TF mode, ensure the USB/Radio band switch is in the position of USB/SD/TF and the memory USB stick or SD/TF cad has been inserted before the unit is turned on.
b) During the operating process, please do not insert or pull out the USB stick or SD/TF card without switching of the volume knob to avoid unexpected damage.
c) Do not use or store the unit in a dusty or dirty environment to avoid damage.
d) Do not use or store the unit in a high-temperature environment, in this environment, high-temperatures will shorten the life of the device, damage the batteries and make the plastic parts deformed or melt.
e) Does not use or store the unit in a low-temperature environment, in this environment, the internal components will likely absorb the moisture in the air. After the radio is moved to room temperature, the moisture will damage the circuit board.
f) Do not throw, drop or shake the radio, any abuse may damage the motherboard or accessories.
g) Do not use harsh chemicals, cleaning solvents or strong detergents to clean the device, use a soft damp cloth to clean the unit.
h) If the Radio is wet, it should be turned off and dried in a dry place and left for 24 hours. Ensure the radio is dried before use.
AC POWER
For your own safety read following instructions carefully before attempting to connect this clock radio to the mains.
This unit is designed to operate on a 240V\~ 50Hz supply only. Connecting it to other power sources may damage it.
Ensure that supply corresponds to the information on the rating label on the bottom of the unit.
SPECIFICATIONS
FM Band: 88 to 108 MHz
AM brand: 520 to 1710 KHz
Power Supply: AC: 240V AC, 50 Hz
DC: 6V, USE 4 x "D" SIZE Batteries
Power Consumption: 4.5W
Power output: 1500mW
Max capability of USB player/SD/TF card is 32GB
LENOXX
www.lenoxx.com.au
1300 666 848
LenoxxElectronics
LenoxxElectronics
@LenoxxAustralia


- WARNINGS
- PREPARATION FOR USE
- UNPACKING AND SETUP
- POWER SURRLY
- USING AC POWER
- USING DC POWER—INSERTING BATTERIES (NOT INCLUDED)
- BATTERIES CONTAIN CHEMICAL SUBSTANCES, SO THEY SHOULD BE DISPOSED OF PROPERLY
- BATTERY LIFE
- CONTROL LOCATIONS
- LOCATION OF CONTROLS
- POWER SUPPLY
- ANTENNA
- USING THE EXTERNAL HIGH SENSITIVITY ANTENNA
- REMARK
- AUX IN OPERATION
- AC POWER
- SPECIFICATIONS
- LENOXX
Brand : Lenoxx
Model : R500
Category : Radio