
90313 - Toy Lenoxx - Free user manual and instructions
Find the device manual for free 90313 Lenoxx in PDF.


| Product Type | Ride-on Motor Tricycle (Toy) |
| Brand | Lenoxx |
| Model | 90313 |
| Age Range | 3 - 7 years |
| Maximum Speed | 3 km/h |
| Dimensions (L x W x H) | 80 cm x 36 cm x 52 cm |
| Battery Type | Sealed lead-acid, 6V 4.5Ah |
| Charging Time | 8 - 12 hours |
| Run Time per Charge | Up to 1 hour |
| Loading Capacity | 20 kg |
| Fuse Rating | 5 A |
| Power Input | AC 220V (or 110V) ±10% |
| Drive Modes | Forward and Reverse |
| Additional Functions | Siren sound, music, headlight, taillight |
| Safety Features | Overload protection, charging protection |
| Assembly Required | Yes (tools included, screwdriver not included) |
| Wheel Type | Plastic wheels with caps |
| Recommended Surface | Flat, dry surfaces (not on slopes >10°) |
| Battery Maintenance | Charge monthly if not in use; fully charge before first use |
| Cleaning Instructions | Wipe with soft dry cloth; no wax or sprays |
| Storage | Avoid high temperature, humidity, flames; keep covered if raining/snowing |
| Warranty/Contact | 1300 666 848 (Lenoxx Australia) |
Frequently Asked Questions - 90313 Lenoxx
User questions about 90313 Lenoxx
0 question about this device. Answer the ones you know or ask your own.
Ask a new question about this device
Download the instructions for your Toy in PDF format for free! Find your manual 90313 - Lenoxx and take your electronic device back in hand. On this page are published all the documents necessary for the use of your device. 90313 by Lenoxx.
USER MANUAL 90313 Lenoxx
natural_image
Line drawing of a toy motorcycle with visible engine, wheels, and spray bottle (no text or symbols)Read this manual in detail before use and retain this instruction manual for future reference.
The illustrations used in the manual are to illustrate the operation method and structure of the product. Where there is a small difference between the physical item and the illustrations, please take the physical as the standard.
SPECIFICATIONS OF THE MOTOR TRICYCLE:
Age range: 3 – 7, dependent on weight and height of the child
Max speed: 3km/h
Measurements: 80cm x 36cm x 52cm
Battery: Sealed and dry, 6V 4.5AH
Charging time: 8 - 12 hours
Run time after a full charge: up to 1 hour
Loading capacity: 20kg
Fuse: 5 amp
WARNING:
Keep small parts and packaging out of reach of children.
Adult supervision is required. Do not drive anywhere dangerous including slopes with more than 10 degrees, streets, next to bodies of water and away from other obstacles. The driver must sit on the seat to drive. Read the instruction manual and acknowledge it before use.
- Adult supervision required
- Read the instruction manual and instruct the child user
- The weight limit is 20kg
- Only one rider to use at the one time
- Please wear a bike helmet when riding
- Sit straight on the seat when riding
- Ride only on flat surfaces
- Ride away from other vehicles and bodies of water
- Recharge the batteries out of reach of children
- Do not charge the battery for more than 12 hours
- Wear shoes when riding
- Only use a power adaptor and battery by the manufacturers advice
1. SAFETY:
PREVENT INJURIES AND DEATHS: NEVER LEAVE CHILD UNATTENDED. DIRECT ADULT SUPERVISION IS REQUIRED.
Please instruct the child on the correct way to drive the motor tricycle.
Make sure your child knows how to steer, how to start and stop the vehicle and knows the rules for safe driving.
Please keep in mind the condition of the area they are riding in and the child's driving ability.
Designed for use by children between the ages of 3 – 7 years, weighing less the 20kg. This is advisable to avoid damage to the motor, gears and to prohibit overloading.
Do not let children ride in the street, anywhere dangerous including slopes with more than 10 degrees, streets, next to bodies of water and away from other obstacles. Use during day light hours or in an illuminated area is advised to avoid accidents in the dark.
When the motor tricycle is running, do not place anything on the moving parts such as the motor, gear box, wheels or steering wheel.
Do not drive on long or wet grass, mud, soft ground, gravel or sand.
Do not drive neat anything flammable or explosive. Keep any hazardous chemicals out of the drivers reach.
The vehicle can be driven at a maximum of 3km/h.
Always keep child in view when child is using the ride-on.
This toy should be used with caution since skill is required to avoid falls or collisions causing injury to the user or third parties.
Protective equipment should be worn.
Never use in roadways, near cars, on or near steep inclines or steps, swimming pools or other bodies of water.
Always wear shoes.
Always sit on the seat.
Not to be used in traffic.
This ride-on has no brake.
2. CONNECTING THE BATTERY:
The battery is located under the seat.

natural_image
Close-up of a white robotic device with black and red markings, showing control buttons and a central touchscreen (no readable text or symbols)To access, remove the screw using a screwdriver (not included) holding the heat down and then take the seat off the body.
If the battery is not connected and you charge the motor tricycle, the battery will not be charging.

natural_image
Interior view of a white appliance with visible wiring and a black electrical component (no text or symbols)Plug the red connector onto the red terminal of the battery. Plug the black connector onto the black terminal of the battery.
If the battery is not connected and you charge the motor tricycle, the battery will not be charging.
The forward/reverse switch must not be on either mode when charging. Charging time is 8 – 12 hours. The first hour of charging can get back 60% of the battery's energy back. You may leave it to charge overnight, but NEVER continuously over 20 Hours. Otherwise, you will shorten the batteries life.
It is normal for the battery to be warm when charging.
The motor tricycle must be charged prior to its first use.
Working AC voltage is 220V (or 110V) (+/-10%).
3. CHARGING THE BATTERY:


Insert the plug of the charger into the charging socket which is on the main body of the bike below the siren and music buttons.
Connect the charger to the motor tricycle first, and then connect the plug to power. Please note, the motor tricycle cannot be driven when charging.
Do not insert any metal pieces into the charging hole as to avoid short circuiting and any damage to the electro circuit.
This vehicle has a function of charging protection and while it is being charged, other functions cannot be used.
The charger needs to be removed from the charging socket before it is used.
Once the charger is removed, put the motor tricycle into either forwards or reverse mode, then press on the foot pedal.
This vehicle also has a function of overload protection. If the vehicle is overloaded or operated incorrectly, the overload preventer will cut off automatically. It will connect automatically in 20 minutes.
4. OPERATION:

- Step on the pedal to start, lift foot off the pedal to stop.
- Press go ahead to go forward, press back to reverse.
When the forward/backward switch is not on either mode, the bike will not drive.
- When in go forward, the head light will be on.
- When in backward, the taillight will be on.
- Press the alarm button to hear the siren, press the music button to hear the music.
5. ASSEMBLY:
Warning: Children could be injured by sharp edges, sharp angles, small components or electrical components. Take care when assembling or disassembling the motor tricycle. Keep the components and battery out of reach of children.
Screw and washer pack:
Total fittings:
2 x nuts to attach the front wheel
4 x washers to attach the front wheel
3 x screws needed to attach light cluster to the front handlebars
3 x screws needed to attach plastic windshield to the front handlebars
2 x screws needed to attach the siren light to the tool box
2 x screws needed to attach the tool box to the bike
1 x washer spare
2 x screws spare
2 x plastic socket/spanner for tightening the nuts
Screwdriver (not included) required for assembly.
Assembling the front wheel:

- The method from one side to the other when completed will be: Nut, washer, pass through the hole of the fork, washer, wheel cap, wheel, wheel cap, washer, pass through the hole of the fork, washer, nut.
- Put on the wheel caps onto the front wheel on both sides.
- Insert the front axel onto the holes of the fork.
- Put a washer on each side of the wheel.
- Fasten the nut on each side with a spanner.

Add the front wheel cover by clipping it onto the fork above the front wheel.

natural_image
Technical line drawing of a children's tricycle with attached mechanical components and a close-up inset showing internal wiring (no text or symbols)Fix the windshield onto the head cover with three self-tapping screws.
Fix the head cover onto the bracket on the handlebar using 3 self-tapping screws.
Ensure the headlight lead is passed through the back of the handlebars for connection later on.
Attach the plastic gauge piece to the front bars as below.
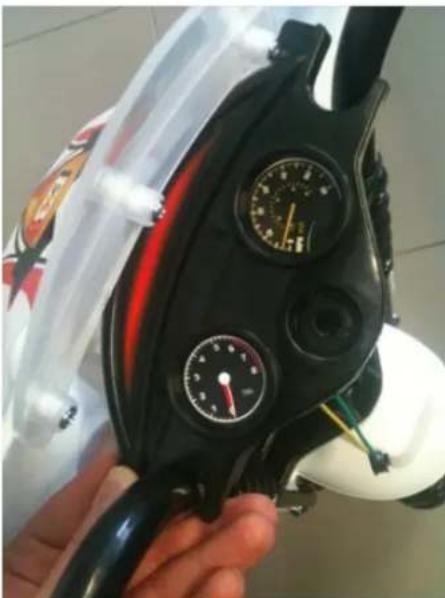
natural_image
Close-up of a hand holding a black pressure gauge with dials and a cable, no visible text or symbols.
Add the toolbox to the main body of the bike.
Insert the wires of the siren light through the holes of the toolbox.
Fix the alarm light using 2 self tapping screws.
Connect the two parts of the two the toolbox (as shown in the above diagram).
Connect the wires of the siren light to the to those of the main body of the bike.
Fix the toolbox to the body of the bike using 2 "3x12" washers and 2 self-tapping screws.

Join the main body of the motor tricycle to the front end with the front wheel using the bolt and washer and nut included.
Use the included plastic spanner to screw the bolt clockwise.

natural_image
Close-up of a metallic bolt and a small hole on a plain surface (no text or symbols visible)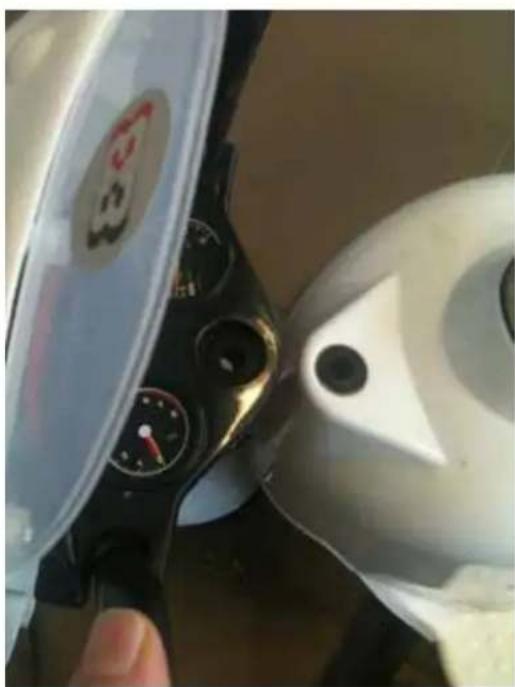
natural_image
Close-up of a motorcycle's front wheel and dashboard with a hand adjusting the dial (no visible text or symbols)
natural_image
Close-up of a black motorcycle dashboard with gauges and a small white connector (no visible text or symbols)Use the nut to screw onto the bolt to hold the pieces tightly together.
Use the included plastic spanner to screw the bolt clockwise.
Headlight connection:
Once the main body and the front end of the motor tricycle are joined, you can then connect the wires from the main body to the wires on the front end. This is optional if you would like the motor tricycle to have a headlight come on when the pedal is pressed down and the motor tricycle is driving.

natural_image
Close-up of hands installing or adjusting a red car body component with black connectors (no visible text or symbols)6. MAINTENCE AND TROUBLE SHOOTING:
Factors which may influence the motor tricycles performance and life span:
- How flat the driving surface is
- The weight of the driver
- Whether the battery has been fully charged
- Whether the motor tricycle is regularly used
- Whether water or any other liquid has eroded the electrical components
Cleaning:
Clean the motor tricycle with a soft dry cloth. Do not use any wax or spray liquids for cleaning. It could erode the power switch.
Storage:
Do not store the motor tricycle in an area of high temperature, humidity or near flames. When raining or snowing, keep the motor tricycle under cover and out of the weather.
Do not change the batteries setting, as it can cause fire and damage the electrical circuit system. Do not change the motor tricycles electrical circuit system. Any repairs done to this unit must be carried out by authorised and qualified service personnel.
Do not allow children to charge the motor tricycle, play with the battery or motor.
If the motor tricycle will not be used for a long period of time (3 months or longer), it is advised that you fully charge the battery and disconnect it from the connections.
A long period of non-use will damage the battery. It is advised that the battery should be charged once a month, even if the motor tricycle is not being used.
A new battery must be fully charged before its first use.
Please take care with the battery as it contains acid electrolyte. Handling of the battery by adults only.
If the battery has leaked, do not touch the acid. Place the battery into a polybag and dispose of it.
If the electrolyte splashes on your skin or into your eyes, immediately wash with water for at least 15 minutes and consult your doctor.
Do not contact the batteries two terminals with any other metal objects. It will cause short circuiting, damage or fire.
Adjust the f/r switch to on and press the siren button to check for power. If you hear no music, check that the battery has been joined up correctly. Correct if required.
Never push or pull the motor tricycle backward when it is running.
Do not plug the charger into any non-working or faulty wall socket. This could cause short circuiting or fire.
In the circumstance of unstable voltage, we suggest that you equip a regulator.
LENOXX
www.lenoxx.com.au

1300 666 848

LenoxxElectronics

LenoxxElectronics

@LenoxxAustralia
- SPECIFICATIONS OF THE MOTOR TRICYCLE:
- WARNING:
- SAFETY:
- PREVENT INJURIES AND DEATHS: NEVER LEAVE CHILD UNATTENDED. DIRECT ADULT SUPERVISION IS REQUIRED.
- CONNECTING THE BATTERY:
- CHARGING THE BATTERY:
- OPERATION:
- ASSEMBLY:
- Total fittings:
- Headlight connection:
- MAINTENCE AND TROUBLE SHOOTING:
- Cleaning:
- Storage:
- LENOXX
Brand : Lenoxx
Model : 90313
Category : Toy