
S352BU313R - External hard drive StarTech.com - Free user manual and instructions
Find the device manual for free S352BU313R StarTech.com in PDF.


| Product Type | External hard drive enclosure |
| Model | S352BU313R |
| Brand | StarTech.com |
| Supported Drive Size | 3.5-inch SATA I/II/III |
| Maximum Drive Capacity | Up to 8 TB |
| Interface | USB 3.0 (5 Gbps) and eSATA (3 Gbps) |
| Dimensions (L x W x H) | 200 x 125 x 35 mm |
| Weight | 500 g |
| Power Supply | External AC adapter (12V DC, 2A) |
| Data Transfer Rate (USB 3.0) | Up to 5 Gbps |
| Data Transfer Rate (eSATA) | Up to 3 Gbps |
| Supported File Systems | NTFS, FAT32, exFAT, HFS+ (read-only) |
| Operating System Compatibility | Windows, macOS, Linux |
| Enclosure Material | Aluminum and plastic |
| Cooling | Passive (ventilation slots) |
| LED Indicator | Power and activity |
| Maintenance | Wipe with dry cloth; avoid liquids |
| Safety | Use only provided power adapter; avoid electrostatic discharge |
| Spare Parts and Repairability | No user-serviceable parts; contact support for issues |
Frequently Asked Questions - S352BU313R StarTech.com
User questions about S352BU313R StarTech.com
0 question about this device. Answer the ones you know or ask your own.
Ask a new question about this device
Download the instructions for your External hard drive in PDF format for free! Find your manual S352BU313R - StarTech.com and take your electronic device back in hand. On this page are published all the documents necessary for the use of your device. S352BU313R by StarTech.com.
USER MANUAL S352BU313R StarTech.com
USB 3.1 Dual 3.5 in. SATA (6Gbps) HDD Enclosure with RAID
S352BU313R
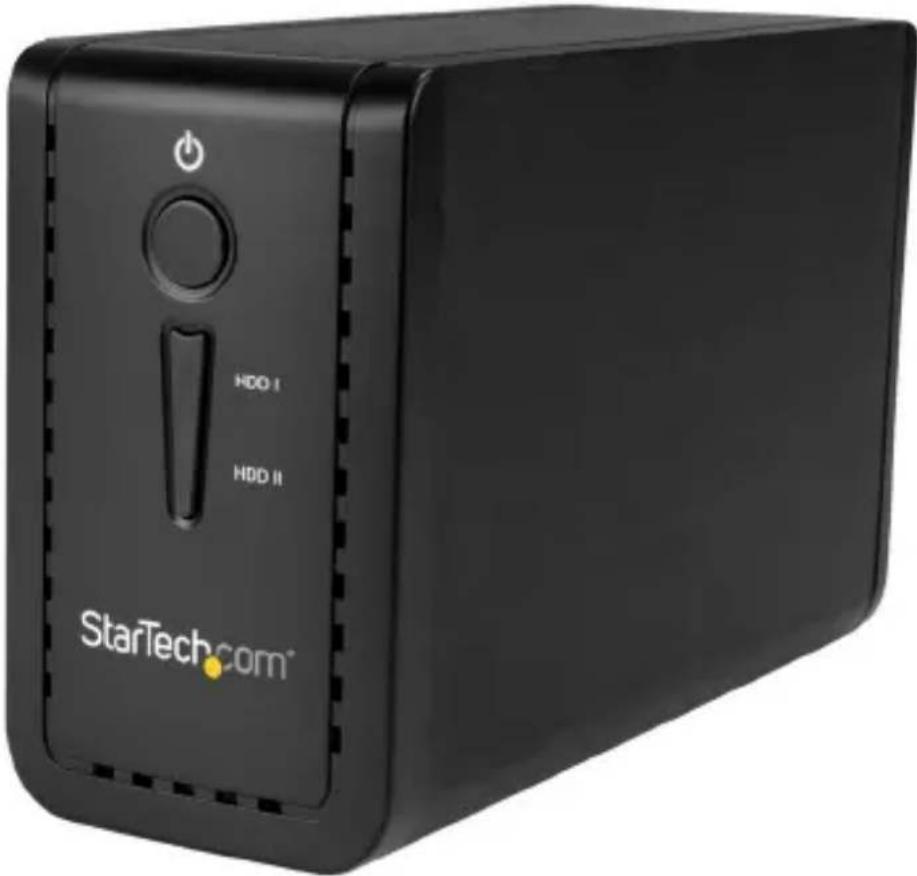
*actual product may vary from photos
For the latest information, technical specifications, and support for this product, please visit www.StarTech.com/S352BU313R.
FCC Compliance Statement
This equipment has been tested and found to comply with the limits for a Class B digital device, pursuant to part 15 of the FCC Rules. These limits are designed to provide reasonable protection against harmful interference in a residential installation. This equipment generates, uses and can radiate radio frequency energy and, if not installed and used in accordance with the instructions, may cause harmful interference to radio communications. However, there is no guarantee that interference will not occur in a particular installation. If this equipment does cause harmful interference to radio or television reception, which can be determined by turning the equipment off and on, the user is encouraged to try to correct the interference by one or more of the following measures:
• Reorient or relocate the receiving antenna.
- Increase the separation between the equipment and receiver.
- Connect the equipment into an outlet on a circuit different from that to which the receiver is connected.
- Consult the dealer or an experienced radio/TV technician for help
This device complies with part 15 of the FCC Rules. Operation is subject to the following two conditions: (1) This device may not cause harmful interference, and (2) this device must accept any interference received, including interference that may cause undesired operation.
Changes or modifications not expressly approved by StarTech.com could void the user's authority to operate the equipment.
Industry Canada Statement
This Class B digital apparatus complies with Canadian ICES-003.
Use of Trademarks, Registered Trademarks, and other Protected Names and Symbols
This manual may make reference to trademarks, registered trademarks, and other protected names and/or symbols of third-party companies not related in any way to StarTech.com. Where they occur these references are for illustrative purposes only and do not represent an endorsement of a product or service by StarTech.com, or an endorsement of the product(s) to which this manual applies by the third-party company in question. Regardless of any direct acknowledgement elsewhere in the body of this document, StarTech.com hereby acknowledges that all trademarks, registered trademarks, service marks, and other protected names and/or symbols contained in this manual and related documents are the property of their respective holders.
Table of Contents
Introduction....1
Product diagram....1
Package contents....3
Requirements 3
About USB 3.1 Gen 2....3
Install a drive....4
Set a RAID mode....5
RAID modes....5
About LED indicators....6
Technical support....7
Warranty information....7
Introduction
You can use the S352BU313R to create an external RAID storage setup, using two 3.5 in. SSDs or HDDS, with fast performance and USB 3.1 support. The S352BU313R includes a solid and compact housing and offers good drive protection, making it an ideal storage solution for your desktop computer or laptop.
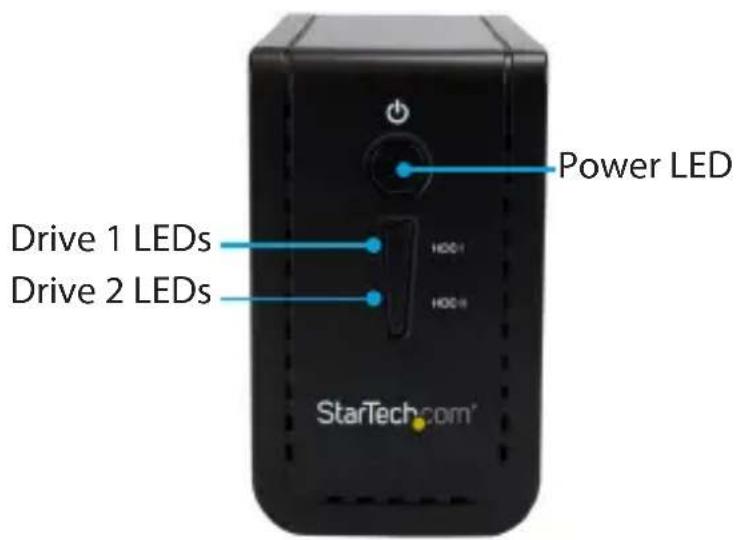
Product diagram
Front
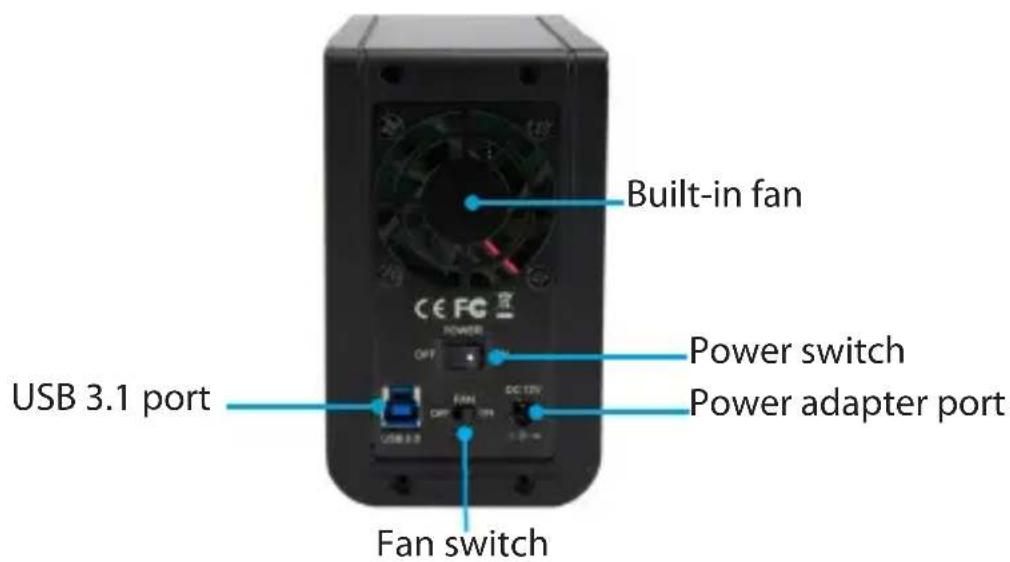
Back
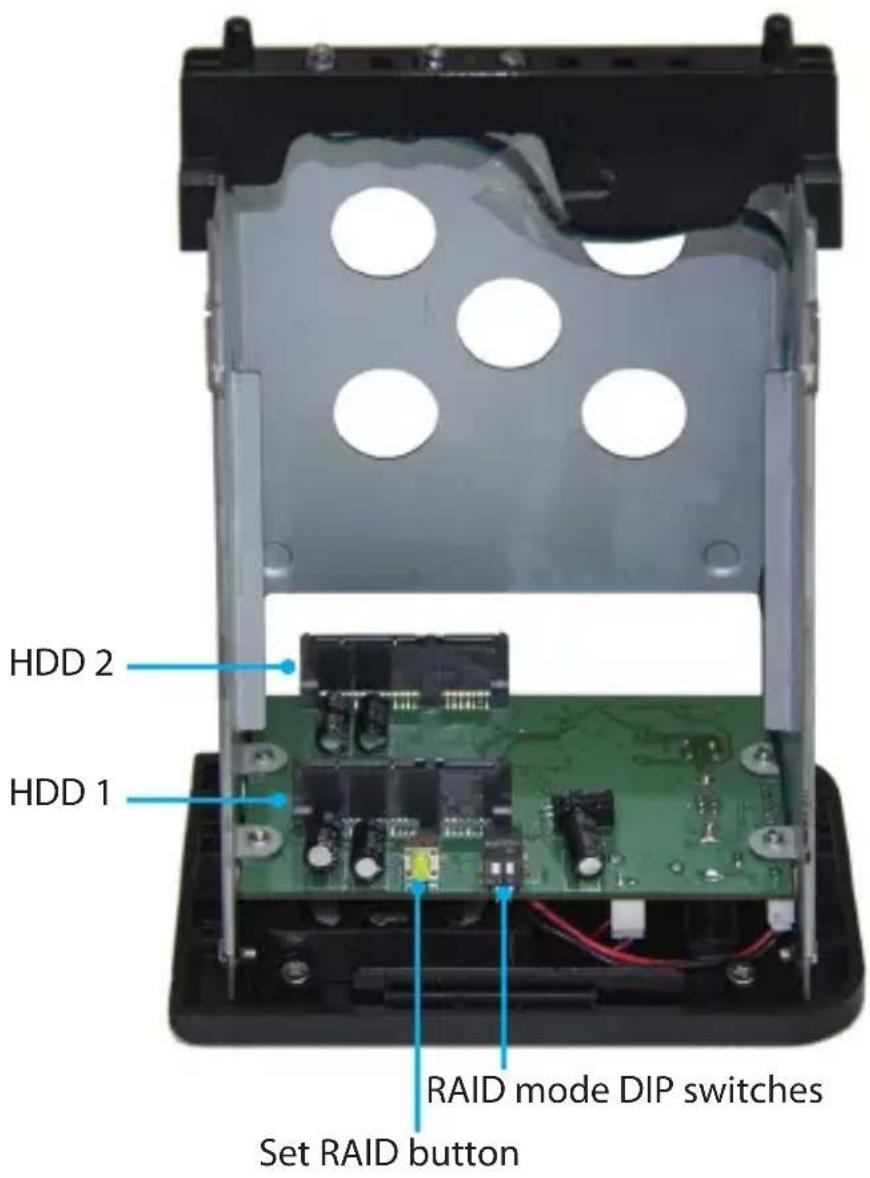
Drive tray
Package contents
- 1 x dual-bay enclosure
• 1 x universal power adapter (NA/JP, UK, EU, AU) - 1 x USB-A to USB-B cable
- 1 x USB-C to USB-B cable
- 1 x enclosure stand
- 8 x drive screws
- 1 x quick-start guide
Requirements
• Computer system with USB port
• One or two 3.5 in. HDDs, SSDs, or SSHDs
• Phillips screwdriver
This dual-bay enclosure is OS independent and doesn't require any additional drivers or software.
To obtain the maximum USB throughout, you must use a system with a USB 3.1 Gen 2 (10Gbps) port.
System requirements are subject to change. For the latest requirements, please visit www.StarTech.com/S352BU313R.
About USB 3.1 Gen 2
USB 3.1 Gen 2 connectivity standard offers speeds up to 10Gbps. The S352BU313R is backwards compatible and supports USB 2.0 and USB 3.1 Gen 1 (5Gbps).
Install a drive
Warning! Drives should be handled carefully, especially when they're transported. If you're not careful with your drives, you may lose data as a result. Always handle storage devices with caution. Make sure that you're properly grounded by wearing an anti-static strap when you install any computer component. If an anti-static strap isn't available, touch a large, grounded metal surface for several seconds to discharge any built-up static electricity.
- Use a Phillips screwdriver to remove the four screws in the back panel of the dual-bay enclosure.
Note: If you're using the dual-bay enclosure for the first time, you don't need to remove any screws because the dual-bay enclosure ships without the screws installed.
- Slide the back panel away from the dual-bay enclosure to reveal the drive tray.
- Place the drive tray on its side with the green Set RAID button facing upwards.
- Gently slide a 3.5 in. HDD, SSD, or SSHD into one of the drive trays so that the SATA connector on the drive lines up with the corresponding connector on the drive tray. The connector on your drive is keyed so that it only fits in the drive tray one way.
- To secure the drive in place, use a Phillips screwdriver to insert two of the provided screws into each side of the drive tray the drive is in, and tighten the screws in place.
- To install a second drive, repeat steps 4 and 5.
- Set a RAID mode. For more information about how to do this, see the "Set a RAID mode" section.
- Slide the drive tray back into the dual-bay enclosure.
- Use a Phillips screwdriver to insert the four screws into the back panel, and tighten the screws in place.
- Connect the universal power adapter to the Power adapter port on the dual-bay enclosure and a power outlet.
- Connect one of the provided USB cables to the USB 3.1 port on the dual-bay enclosure and a USB port on your computer.
- Move the Power switch on the dual-bay enclosure to the ON position.
- Use the Fan switch on the dual-bay enclosure to turn on the fan.
Set a RAID mode
To configure a RAID mode, you need to use the RAID mode DIP switches and the green set RAID button located on the inside of the dual-bay enclosure.
Warning! Setting or changing your RAID configuration will erase the data or metadata on your existing drives. Save or back up any important data before you proceed.
- Move the Power Switch on the dual-bay enclosure to the OFF position.
- Use a Philips screwdriver to remove the four screws in the back panel.
- Remove the drive tray from the dual-bay enclosure.
- Move the RAID mode DIP Switches to the correct position for the RAID mode that you want to set. For more information about the switch positions, see image at the end of this article.
- Connect the Universal Power Adapter to the Power Adapter Port on the dual-bay enclosure and a power outlet.
- Connect the USB Cable to the rear of the enclosure, and the computer.
- Open a disk management utility (Disk Management on Windows, Disk Utility on macOS).
- Move the Power Switch on the dual-bay enclosure to the ON position.
- Let the dual-bay enclosure power on, the drives will begin to spin up.
Note: This may take up to 30s depending on the capacity of the drives.
-
Once the drives (or drive if a RAID mode is already configured) show up in the disk management utility, press and hold the green Set RAID Button for 10 seconds until the drive LEDs begin to blink.
-
Once they blink, set the Power Switch on the dual-bay enclosure to the OFF position, and disconnect the Universal Power Adapter from the Power Adapter Port.
-
Slide the drive tray back into the dual-bay enclosure.
-
Use a Philips screwdriver to insert the four screws into the back panel, and tighten the screws in place.
-
Reconnect the Universal Power Adapter to the Power Adapter Port and move the Power Switch to the ON position.
-
Wait for the disks to spin up fully, and show up in the disk management utility.
-
Initialize and format the drive(s) before use.
RAID Modes
RAID mode Description Switch 1 Switch 2
| JBOD/PM Just a Bunch of Disks | Off Off |
| Allows access to both drives independently | |
| RAID 0 Stripe Set | On Off |
| Splits data evenly across two or more drives | |
| RAID 1 Mirror | Off On |
| Creates a redundant drive on the second drive for security | |
| SPAN Spanning | On On |
| Creates a large single drive volume that consists of both drives | |
Initialize A Disk
When setting up a new RAID Array, the drives are place in an uninitialized state. The RAID Array or Drive will require initialization and formatting prior to use. For instructions on how to initialize and format a disk, please visit the documentation for the Disk Utility Software you are using.
About the LED indicators
The dual-bay enclosure features three LED indicators: two drive activity LED indicators (both blue), and one power LED indicator (green).
| Situation LED status | |||
| Drive 1 activity Drive 2 activity Power | |||
| Unit is in standby (disconnected from PC or PC is turned off or in standby mode) | Off Off Blinking three times a second | ||
| Enclosure is online and ready | Off Off On | ||
| Accessing drive 1 Blinking three times a second | Off On | ||
| Accessing drive 2 Off Blinking three times a second | On | ||
| Drive 1 crash (RAID 0/1/SPAN) | LED is illuminated and not blinking | Off On | |
| Drive 2 crash (RAID 0/1/SPAN) | Off LED is illuminated and not blinking | On | |
| RAID 1 drive 1 rebuilding | On Cycle of gradually getting brighter and then darkening | On | |
| RAID 1 drive 2 rebuilding | Cycle of gradually getting brighter and then darkening | On On | |
| RAID rebuild complete Off Off On | |||
| RAID mode changed | Quickly flashes three times | Quickly flashes three times | On |
Technical support
StarTech.com's lifetime technical support is an integral part of our commitment to provide industry-leading solutions. If you ever need help with your product, visit www.startech.com/support and access our comprehensive selection of online tools, documentation, and downloads.
For the latest drivers/software, please visit www.startech.com/downloads
Warranty information
This product is backed by a two-year warranty.
StarTech.com warrants its products against defects in materials and workmanship for the periods noted, following the initial date of purchase. During this period, the products may be returned for repair, or replacement with equivalent products at our discretion. The warranty covers parts and labor costs only. StarTech.com does not warrant its products from defects or damages arising from misuse, abuse, alteration, or normal wear and tear.
Limitation of Liability
In no event shall the liability of StarTech.com Ltd. and StarTech.com USA LLP (or their officers, directors, employees or agents) for any damages (whether direct or indirect, special, punitive, incidental, consequential, or otherwise), loss of profits, loss of business, or any pecuniary loss, arising out of or related to the use of the product exceed the actual price paid for the product. Some states do not allow the exclusion or limitation of incidental or consequential damages. If such laws apply, the limitations or exclusions contained in this statement may not apply to you.
Hard-to-find made easy. At StarTech.com, that isn't a slogan. It's a promise.
StarTech.com is your one-stop source for every connectivity part you need. From the latest technology to legacy products — and all the parts that bridge the old and new — we can help you find the parts that connect your solutions.
We make it easy to locate the parts, and we quickly deliver them wherever they need to go. Just talk to one of our tech advisors or visit our website. You'll be connected to the products you need in no time.
Visit www.startech.com for complete information on all StarTech.com products and to access exclusive resources and time-saving tools.
StarTech.com is an ISO 9001 Registered manufacturer of connectivity and technology parts. StarTech.com was founded in 1985 and has operations in the United States, Canada, the United Kingdom and Taiwan servicing a worldwide market.
- USB 3.1 Dual 3.5 in. SATA (6Gbps) HDD Enclosure with RAID
- FCC Compliance Statement
- Industry Canada Statement
- Use of Trademarks, Registered Trademarks, and other Protected Names and Symbols
- Table of Contents
- Introduction....1
- Install a drive....4
- Set a RAID mode....5
- About LED indicators....6
- Technical support....7
- Warranty information....7
- Introduction
- Product diagram
- Drive tray
- Package contents
- Requirements
- About USB 3.1 Gen 2
- Install a drive
- Set a RAID mode
- RAID Modes
- Initialize A Disk
- About the LED indicators
- Technical support
- Warranty information
- Limitation of Liability
Brand : StarTech.com
Model : S352BU313R
Category : External hard drive